 Install a Smart Oil Tank Gauge
Easy steps to install a Wi-Fi oil tank level gauge

- POST a QUESTION or COMMENT about oil tank gauges
Here we describe the installation of a Smart Oil Gauge™ - a Wi-Fi enabled oil level indicator gauge that communicates with a smartphone app to allow remote monitoring of the amount of oil in an oil tank.
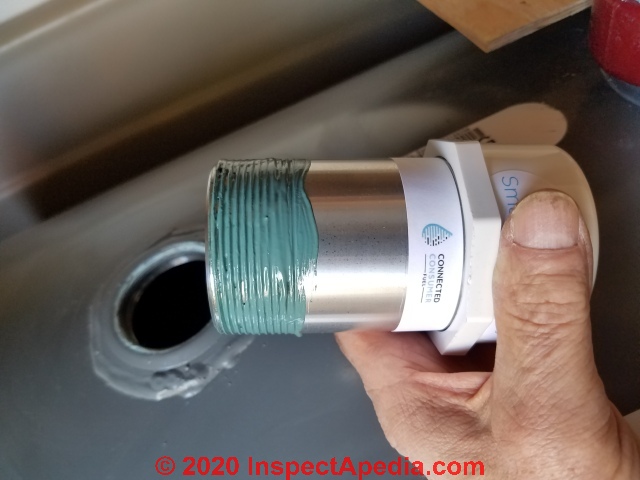
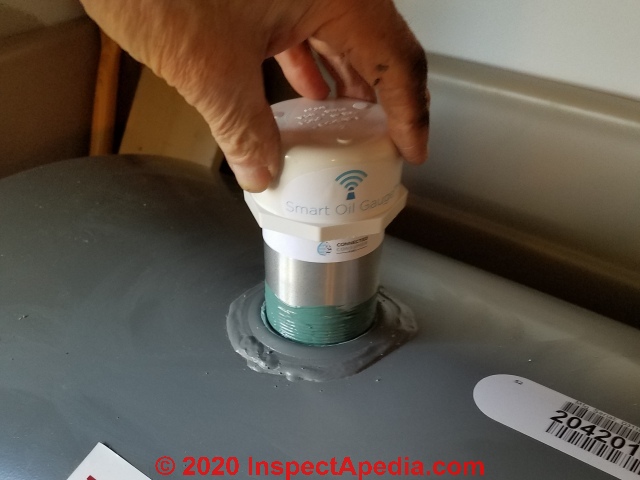
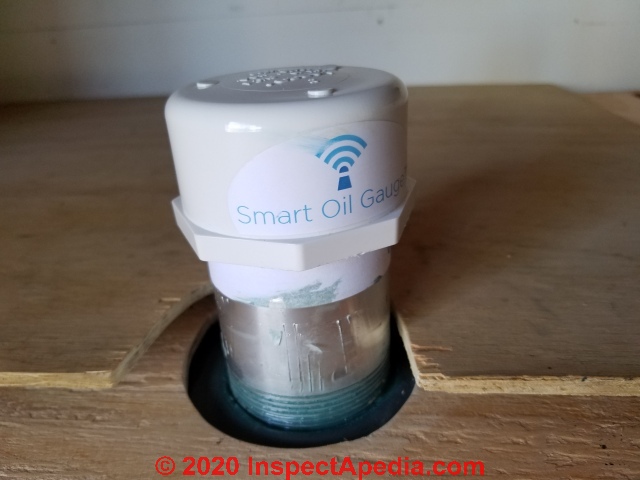
Page top photo: Smart Oil Gauge™ during installation into the top of an oil storage tank. We're wiping off excess pipe thread sealant.
This article series discusses the installation, reading, and repair of oil storage tank gauges.
InspectAPedia tolerates no conflicts of interest. We have no relationship with advertisers, products, or services discussed at this website.
- Daniel Friedman, Publisher/Editor/Author - See WHO ARE WE?
How to Install a "smart" oil storage tank gauge
 How do you find & install an oil tank gauge that you can read from anywhere using your cellphone?
A standard above ground oil tank gauge is read at the tank. Several remote-read-out oil tank gauges are already available to permit reading the oil level from elsewhere in the building.
But here we describe an oil tank gauge that allows monitoring of oil level in the tank from any other location as long as you have cellphone service.
[Click to enlarge any image]
Step 1: Read the instructions
All of the Smart Oil Gauge™ installation and app download and configuring instructions are packaged with your tank gauge and are also given in this article.
At oil burner school our teacher, Mike, kidded that most oil heat service techs use the instructions for whatever they're installing as a kneeling surface to avoid getting oil soaked through their pants.
But really, it'll pay big dividends for most products if you take a couple of minutes to see how the manufacturer want you to proceed. After all, besides you they're the people who have the most at stake in your oil tank gauge installation success.
Here we'll comment on what was easy and what was ... well slightly more difficult, in following the instructions for the Smart Oil Gauge™ produced by Connected Consumer Fuel and sold by various sources including online vendors.
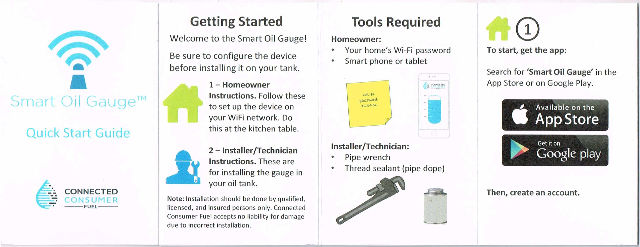
The information about this wifi-enabled oil tank level gauge is printed on a small bit of heavy paper in two sets:
Quick Start Guide: On the "getting started" side of these instructions - shown above - there is a little photo of a pipe wrench and some thread sealant followed by steps (1), (2), (3) and (4) about downloading the proper app onto your smart phone.
Two final steps (5) and (6) tell you to configure the gauge and optionally, connect it to Alexa (which I did not do).
The company figures you're going to configure the gauge before you install it on your oil tank.
I preferred to install the gauge onto the oil tank first, get it in position, turn it on, and connect it to the cellphone app.
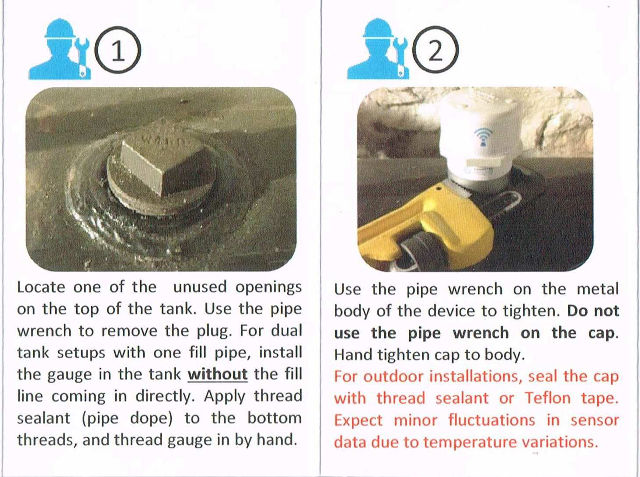
Flip the cardboard strip over, skip steps 5 and 6 of configuring your gauge, and you will see another pair of steps (1) and (2) and you'll see advice on removing the 2-inch pipe plug and screwing in the Smart Oil Gauge.
Troubleshooting guide: what to do if you can't get your Smart Oil Gauge™ to connect to a WiFi system or what to do if you can't get the app working on your cellphone.
Once I had the gauge installed and turned on, the Quick Start Guide was perfectly clear and the oil gauge worked and talked to the cellphone app with no problems.
Step 2. Install the Oil Gauge into the Top of the Oil Tank
These are my step numbers - they will not correspond to the printed instructions as those do not include the detail I am illustrating here.
To install this device you need to have one un-used 2-inch opening in the top of your oil tank. Or the company sells (or you can get at a plumbing supplier) an adapter if your oil tank only sports a smaller 1 1/2" opening.
Remove the 2" plug from the top of the oil tank. This is where you're going to install the Smart Gauge.
Really? Well it may not be easy, especially on an older oil tank into which the pipe plug may be rusty and seized.
Also you may need either a bigger pipe wrench or a "cheater" - a length of open pipe (I use 2" ID pipe) that you slip over the end of your wrench to get more turning power.
Watch out: if your oil tank is nearly empty or has loose tippy legs you may find that trying to remove the pipe plug starts to move the tank around. Don't do that. Moving the oil tank risks causing a leak in the oil fill or vent piping or in the oil lines to the burner.
Work carefully to minimize the amount of loose crud that you might otherwise drop into the oil tank as you remove the 2" plug.
Step 3. Prepare the oil tank opening and threads on the Smart Tank Gauge
Using a clean rag and if you like, mineral spirits (odorless paint thinner) dampening the rag, clean the threads of the opening in the top of the oil tank.
Now prepare the threads of both the oil tank top opening and the threads of the Smart Oil Gauge by coating them with pipe sealant. Notice that I'm working on a clean flat surface and not where I might drop something into that opening in the top of the oil tank.

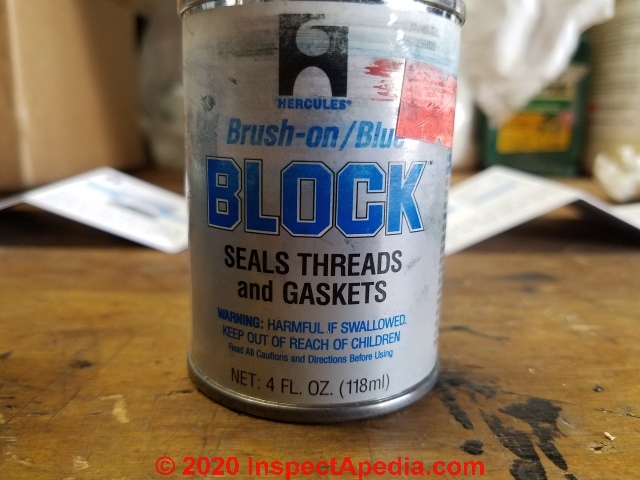
Watch out: be sure to use a pipe joint compound that is specifically rated for use on oil and gas piping. Other sealants may fail. Particularly on oil tank fittings the threads are sometimes coarse or even rusty; you need a good seal.
Step 4. Install the Smart Tank Gauge into the Oil Tank Tapped Opening
When the threads are coated liberally with sealant worked well into the thread-cuts but without dropping blobs of pipe sealant nor the applicator brush into the oil tank, we're ready to begin to hand-tighten the gauge into the tank top tapping.
Watch out: take care not to cross-thread the gauge into the tank top opening. Be sure that it's held at right angles to the tank tapping and turn it carefully until you are darn sure that it's threaded properly. If you foul up the threads in the tank top or on the gauge base you won't be able to secure the gauge in place and when you try to start over, even if you get the gauge in place you may have trouble with leaks later-on.
When the gauge is properly started in the opening you will be able to turn it by hand for one or two full rotations. Then you'll need to use a pipe wrench as I show below.
Watch out: do not try to tighten the gauge by putting your wrench on the white plastic. You will damage or ruin the gauge. Put the pipe wrench only on the shiny steel base of the gauge, just above the threads.
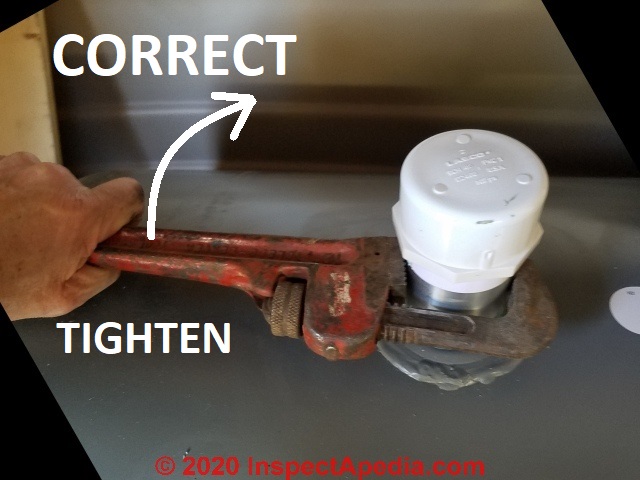
Which way does the pipe wrench go onto the gauge base? Above we show the correct use of a pipe wrench to tighten a pipe into an opening.
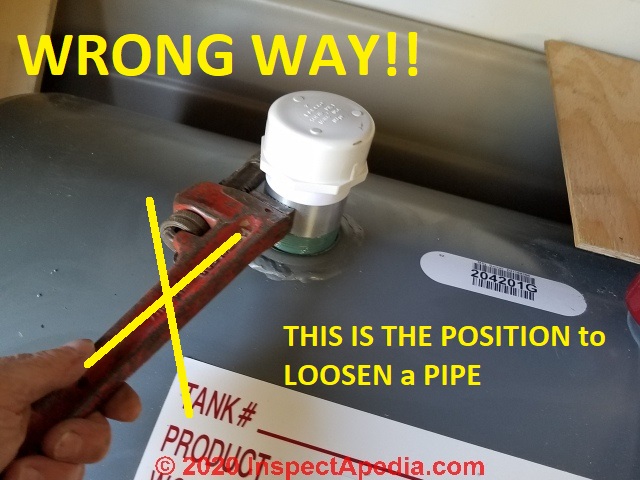
Below is the wrong way to try to use your pipe wrench to tighten a pipe. This is the "loosen" position.
How Far to Tighten the Gauge?
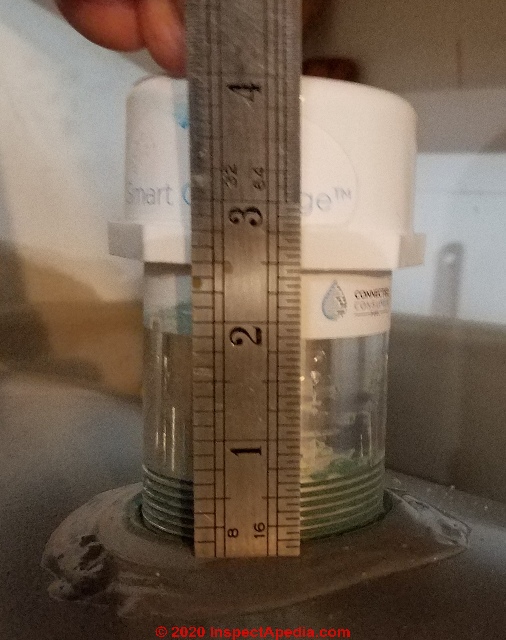
If you're using a small pipe wrench as I am in these photos you can tighten the oil gauge into the opening until you're forced to give up. The company warns that if you get a "tank full" indication when the tank isn't full the gauge may not be sufficiently screwed down into the tank.
In the photo above you can see that we stopped while there was still about 5/8" of thread showing above the tank.
Not to worry, the gauge worked perfectly in this position.
Step 5: Set up the Smart Oil Gauge on your Cellphone
OK so now we're back following the manufacturer's Quick-Start Guide, which tell us
- From the Google Play store or the Apple App Store find the "Smart Oil Gauge" app, install it on your phone.
- Connect your phone to the same Wi-Fi network that you want your Smart Oil Gauge to connect-to.
Watch out: be if you have both a 5 GHz network and a 2.4 GHz network be sure to connect to the slower 2.4GHz network. The device won't work on the higher speed net. - With the app installed on your phone but before fooling with it it's time for our step 6.
Step 6: Turn on the Smart Oil Gauge
This is Step (3) in the manufacturer's directions. So you can see I figure there was some stuff they could have told you but it wouldn't have fit on that cute little folding "Quick Start Guide" for the Smart Oil Gauge™.
Find the On/Off switch and slide it from "off" (how it's shipped) to "on". You won't see or hear a thing but your SmartTankGauge will wake up.
Watch out: I had some trouble with this step because the photo in the instructions was not quite clear enough.
There are TWO switches inside the Smart Oil Gauge, found by un-screwing the plastic cap from the device - as I show above. Don't confuse the "configuration switch" which is a push-down rod sticking up, with the "on-off" switch which is a slide switch.

Above: this is the "on-off" switch or the "power button" - it's a slider switch that is integral with the small black plastic "box".
It wasn't immediately obvious where this switch was, as the whole assembly was pushed-down inside the pipe body of the device. You might need to pull up the black plastic box slightly to see and access the switch. Maybe in a future release they'll give this switch a color so you can find it.
Step 7: Log into the Smart Oil Gauge App and Configure the Device
You'll need to follow the Smart Oil Gauge app's instructions to set up an account and password. Write down that password immediately or put it into your password vault or you'll be sorry.
In the App on an Apple device or iPhone there'll be a Plus sign; On a Google Android Device (like my antique Samsung Galaxy S7 phone) the app will show not a damn thing ...
It's ok: just touch the little vertical three-dot bar at the top right of your screen to drop down a menu where you will see "Sensor Setup" - select that.
Now follow the app's easy instructions to complete setup.
- You will need the password to tell the gauge, through your app, the password for the WiFi network to which the gauge will communicate. Remember to connect to the slower 2.5GHz speed version of your net.
- You will need to specify the oil tank size (either 275g or 330g) and you may need, under instructions from the app, to push down the "configuration" button.
Below is the "configuration button" that you might need to press down to configure the device.

The instructions warn that it may take 4-5 hours for the Smart Tank Gauge to upload its initial readings of the oil tank level. In fact mine uploaded oil tank data in just minutes.
Step 8: Close up the Smart Oil Tank Gauge Cap
This is trivial: just screw the plastic cap back onto the gauge body - hand tight is fine.
Above is our wi-fi-connected oil tank sensor unit installed and working.
The oil tank onto which this gauge was installed was a new one described
at OIL TANK REPLACEMENT PROCEDURE.
There we explain why we covered the top of this tank with plywood - something you probably don't need to do.
Step 9: Smart Oil Gauge™ Reading Compared with Mechanical Gauge

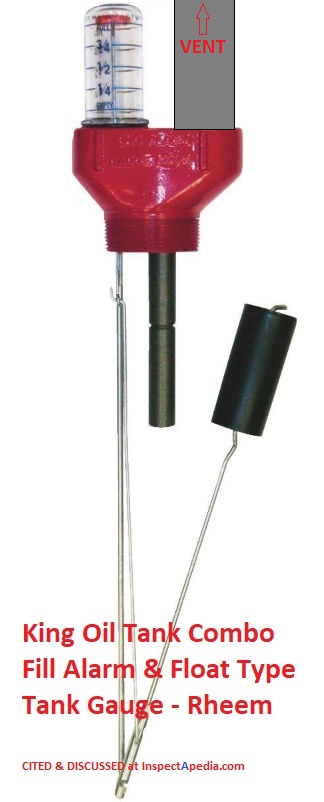
Below we're comparing the Smart Oil Gauge™ reading (showing just over half a tan of oil) with a traditional float-type Scully oil tank gauge on the same oil tank.
The two are in agreement about being just over "half full", but I'm a little curious about the quantitative translation of "half" in the Smart Oil Gauge app where the actual volume is expressed as 147.5 gallons.
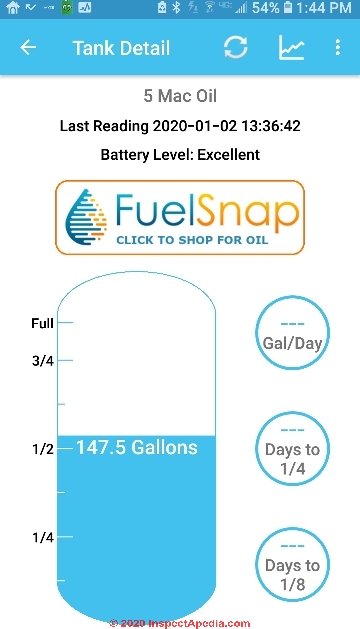
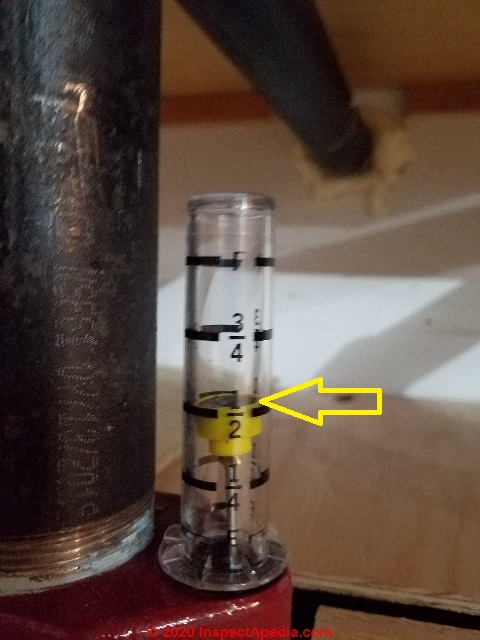
Really? We took care to tell the app that this is a 275 gallon oil tank - shown below).
According to the manufacturer this 275 gallon tank has a working capacity of 247 gallons - in part because the tank is not supposed to ever be filled to its very top.

But doubling 140 gallons (per the Smart Oil Gauge) would give us about 280 gallons.
That's 5 gallons more than the physical tank interior space and 33 gallons more than the actual working capacity of the oil tank.
Is this a catastrophe? Certainly not.
The central purpose of the Smart Oil Gauge is to let us monitor tank levels from a remote location in order to be sure that the oil company makes an oil delivery before we run out of fuel.
We will continue to monitor the performance of both gauges and add updates here.
Maybe the Smart Oil Gauge™, easily and nicely installed, will also get smarter over time. Or maybe we will.
Smart Oil Gauges Sources / Resources
- Smart Oil Gauge, Connected Consumer Fuel,1 Prindle Ln. Danbury, CT 06811 USA Tel: 1-203-456-1499 Website: www.smartoilgauge.com/support Customer Service Email: contact@connectedconsumerfuel.com Sales: sales@connectedconsumerfuel.com
Below: the mechanical float-type gauge used on the same oil tank is a Scully unit.
- Scully, SCULLY TANK & UNIFILL® Catalog [PDF] (2017) World Headquarters
Scully Signal Company
70 Industrial Way
Wilmington, MA 01887
USA
Phone: 617-692-8601
or 1-800-272-8559 Fax: 617-692-8620
Sales@scully.com
Applications@scully.com - this catalog illustrates several types of oil tank fill / vent alarms and oil tank gauges.
Scully UK Meridian House Unit 33 37 Road One Winsford Industrial Estate Winsford, Cheshire CW7 3QG Phone: +44 (0)1606 553805 Fax: +44 (0)1606 553824 Sales@scullyuk.com
Scully Europe Maanstraat 25 2800 Mechelen Belgium Phone: +32(0)15560070 Fax: +32(0)15550070 Sales@scully.be
retrieved 2019/10/25 original source: http://www.scully.com/wp-content/uploads/2015/04/Scully-Oil-Delivery-Catalog_TankUNIFIL_2017.pdf?d2ec2a&d2ec2a
...
Continue reading at OIL TANK GAUGE ACCURACY or select a topic from the closely-related articles below, or see the complete ARTICLE INDEX.
Or see these
Recommended Articles
- HEATING OIL USAGE RATE compare oil tank gauge readings with oil consumption rates.
- OIL TANK LEAKS & SMELLS - home
- OIL TANK GAUGES - home
- OIL TANK REPLACEMENT PROCEDURE
Suggested citation for this web page
OIL TANK GAUGE SMART WIFI INSTALLATION at InspectApedia.com - online encyclopedia of building & environmental inspection, testing, diagnosis, repair, & problem prevention advice.
Or see this
INDEX to RELATED ARTICLES: ARTICLE INDEX to HEATING OIL, OIL BURNERS, OIL FIRED HEATERS, OIL TANKS
Or use the SEARCH BOX found below to Ask a Question or Search InspectApedia
Ask a Question or Search InspectApedia
Share this article:Try the search box just below, or if you prefer, post a question or comment in the Comments box below and we will respond promptly.
Search the InspectApedia website
Note: appearance of your Comment below may be delayed: if your comment contains an image, photograph, web link, or text that looks to the software as if it might be a web link, your posting will appear after it has been approved by a moderator. Apologies for the delay.
Only one image can be added per comment but you can post as many comments, and therefore images, as you like.
You will not receive a notification when a response to your question has been posted.
Please bookmark this page to make it easy for you to check back for our response.
IF above you see "Comment Form is loading comments..." then COMMENT BOX - countable.ca / bawkbox.com IS NOT WORKING.
In any case you are welcome to send an email directly to us at InspectApedia.com at editor@inspectApedia.com
We'll reply to you directly. Please help us help you by noting, in your email, the URL of the InspectApedia page where you wanted to comment.
Citations & References
In addition to any citations in the article above, a full list is available on request.
- [7] "The Interim Prohibition Guidance for Design and Installation of Underground Oil Storage Tanks", U.S. EPA, EPA/530-SW-85203, Office of Underground Storage Tanks, Washington D.C.
- [11] National Association of Oil Heat Service Managers, PO Box 380, Elmwood Park, NJ 07407
- [12] "Homeowners Guide to Fuel Storage," Agway Energy Products, Verbank, NY, November 1990
- Our recommended books about building & mechanical systems design, inspection, problem diagnosis, and repair, and about indoor environment and IAQ testing, diagnosis, and cleanup are at the InspectAPedia Bookstore. Also see our Book Reviews - InspectAPedia.
- In addition to citations & references found in this article, see the research citations given at the end of the related articles found at our suggested
CONTINUE READING or RECOMMENDED ARTICLES.
- Carson, Dunlop & Associates Ltd., 120 Carlton Street Suite 407, Toronto ON M5A 4K2. Tel: (416) 964-9415 1-800-268-7070 Email: info@carsondunlop.com. Alan Carson is a past president of ASHI, the American Society of Home Inspectors.
Thanks to Alan Carson and Bob Dunlop, for permission for InspectAPedia to use text excerpts from The HOME REFERENCE BOOK - the Encyclopedia of Homes and to use illustrations from The ILLUSTRATED HOME .
Carson Dunlop Associates provides extensive home inspection education and report writing material. In gratitude we provide links to tsome Carson Dunlop Associates products and services.
 |
HOME | ABOUT | ASK a QUESTION | CONTACT | CONTENT USE POLICY | DESCRIPTION | POLICIES | PRIVACY | |
| © 2026 - 1985 Publisher InspectApedia.com - Daniel Friedman | |||||||||