 Bulk Sampling / Test Cuts in Building Surfaces

- POST a QUESTION or COMMENT about bulk sample collection for asbestos testing, mold testing, chemical hazard tests, and to find hidden mold contamination in buildings
Types of Test Cuts into Building Ceilings, Floors, Walls or for Bulk Sample Collection for Laboratory Analysis:
This article describes approaches to making test cuts into building surfaces to inspect for hidden contaminants, to collect bulk samples for asbestos or mold testing, and for diagnosis of building leaks, odors, environmental hazards, or other problems that may require invasive inspection methods or bulk sample collection for laboratory analysis.
The fact that asbestos, mold or other hazardous building contaminants are "hidden" in buildings does not mean one cannot find it. We look by context: where do we see leak stains, or where do we see building practices most likely to have produced a hidden leak or moisture problem? Ice dam leaks in walls, hidden plumbing leaks, roof spillage by the foundation, are all common clues that often track to a wet building wall or ceiling cavity and from there to a hidden mold problem which may need to be addressed.
InspectAPedia tolerates no conflicts of interest. We have no relationship with advertisers, products, or services discussed at this website.
- Daniel Friedman, Publisher/Editor/Author - See WHO ARE WE?
Test Cuts & Bulk Sampling in Buildings for Asbestos, Mold, Other Contaminants
 How to Use a round hole saw to make test openings in building ceilings, walls or floors to look for hidden mold or to collect core samples for analysis of layers of material
Ceiling or wall cavity test cuts for bulk sampling, materials testing, or for hidden mold
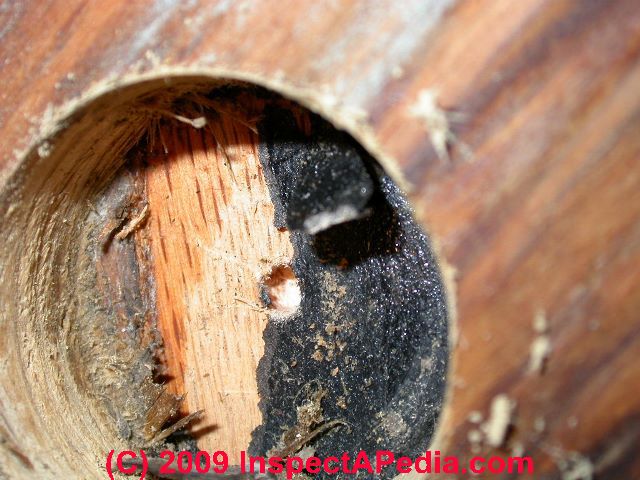
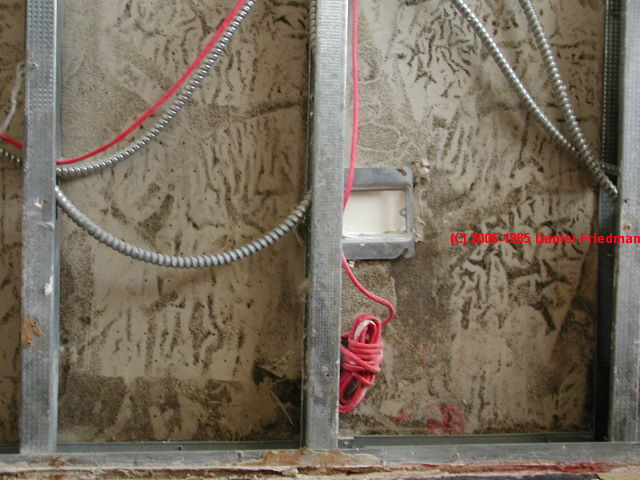
The photo shows us cutting a round hole in a wall to expose the wall cavity. We cut high enough above the floor to avoid the sill plate and to give access to the wall cavity itself. We cut close to but not on top of a wall stud, so that when examining the wall cavity we can examine:
- The cavity side of drywall plug which was removed, checking it for visible mold
- The condition of insulation in the wall cavity - if any. It may be necessary to vacuum-test wall insulation to test for mold since fiberglass insulation can be moldy but look quite clean.
See MOLD in FIBERGLASS INSULATION for details of the occurrence of mold contamination in building insulation, and - See VACUUMING BUILDING CAVITIES as a screen for building mold
- See also VACUUM TEST INSULATION CONTAMINANTS for finding mold-contaminated fiberglass.
- The condition of nearby upper surface of horizontal sill plates to check for mold growth or evidence of leaks
- The condition of nearby vertical surface of a wall stud to check for visual evidence of mold growth or leaks
- The condition of the wall cavity-side of the opposing drywall or exterior wall sheathing.
Do not fail to check all of these surfaces. It is common to find more severe mold growth on the drywall of one side of a wall cavity than on the other. This happens when water has run down one surface but not on another. The wall cavity side of our drywall test plug shows black and red mold and yeast contamination that was thick over the drywall surface even though the room-side of this drywall looked perfectly clean.
Watch out: if you suspect the presence of hazardous materials such as asbestos, lead, or chemical contaminants, use dust-control methods such as wetting and HEPA vacuuming as well as appropriate personal protective gear, and choose the sampling method that will produce the least amount of airborne dust and debris.
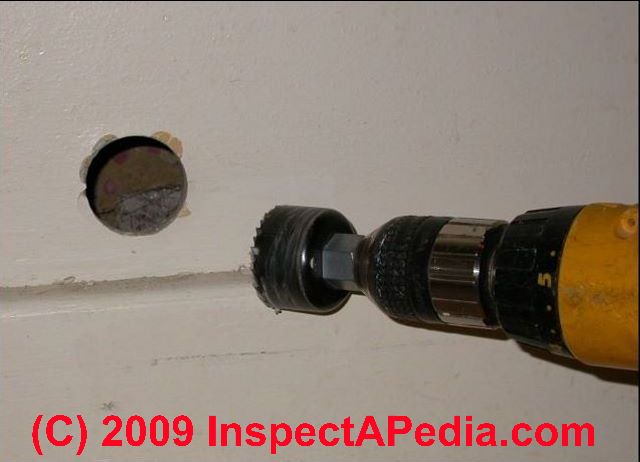
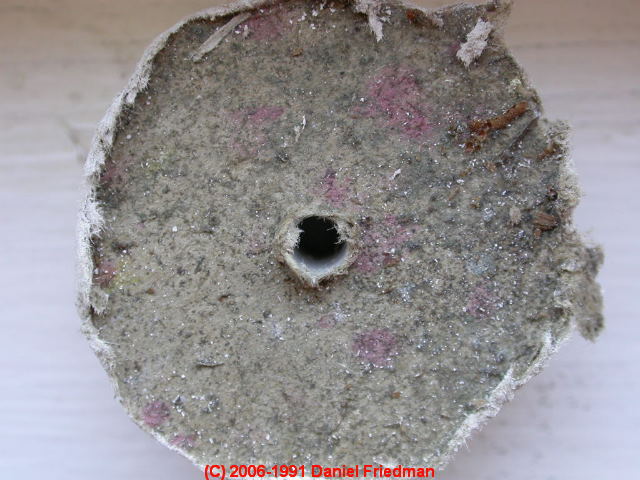
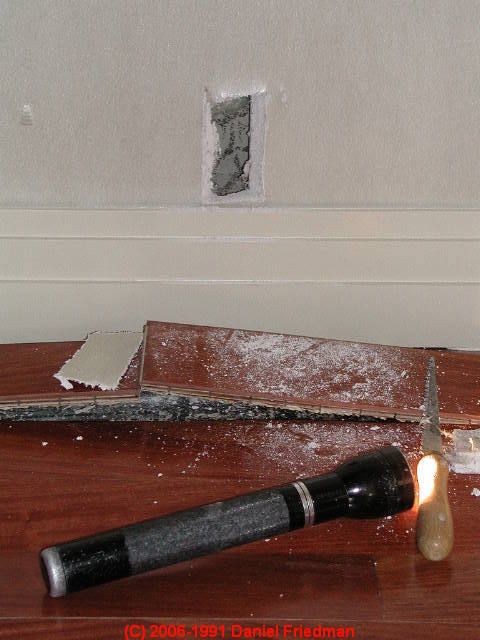
When cutting a test opening to explore a wood floor installed on sleepers over a concrete slab, we use two diameters of hole saws (see photos in the next section.)
First we cut a larger-diameter round hole (say 2.5") through the finish flooring using our hole saw's larger cutting blade. We remove and save the wooden plug created by this step.
Second we cut a smaller-diameter round hole (say 2") through the subflooring to expose the cavity below.
We examine the exposed and inner or hidden surfaces of each plug which is cut, as well as any rosin paper or other material that may be installed between layers of flooring.
Finally, using a flashlight and often a borescope as well, we explore the floor cavity itself for evidence of visible mold, organic mold-friendly debris, insect activity, or evidence of leaks or flooding.
Question: What is the best way to take a sample of a 3 layer plaster ceiling to check for asbestos or other harmful particles?
 2016/09/04 JohnMoore
What is the best way to take a sample of a 3 layer plaster ceiling? i've come across these hole cutter like core sampling things at wondermakers . com that seem neat but would just chiseling create less dust?
This question was posted originally
Reply: core sampler vs. hole saw: minimize dust in any case.
John
At TEST CUTS for MOLD in BUILDING CAVITIES you'll see a photo of making use of a simple hole saw that cuts a very nice plug that can be used to examine layers of material or to prepare a lab sample for an analysis. Choose a plug depth adequate to get all of the thickness you need and a hole diameter that is no larger than necessary so as to minimize the repair work.
I agree that using any power saw makes more airborne dust than cutting by hand, but I do not recommend attacking the ceiling with a chisel. You risk breaking plaster ears through the lath and causing more wide-spread damage or worse, causing whole sections of plaster to fall off of the ceiling.
You can control the dust from the hole saw during sample plug cutting by keeping a shop vac or HEPA vac hose next to the cut area. And of course wear appropriate eye and respiratory protection.
It's a good question; I'll post our conversation over at the discussion of use of the hole saw.
The company that you promote with your question, WonderMakers Environmental, sells asbestos bulk sampling equipment including a handle and plunger for cutting core samples of material. You're going to spend perhaps $140. to ten times that amount for asbestos bulk sampling materials - a cost that may not be appropriate for sampling plaster but that may indeed be appropriate for professional environmental inspectors. An advantage of the company's core sampler system, particularly for people whose work requires frequent bulk material sampling is that the owner claims (in company rep. Michael's instructional video) that personal protection equipment is not required.
Use of the core sampler is also preceded by pre-wetting of the asbestos pipe insulation and succeeded by injecting a replacement insulation into the core sampled opening.
Both methods include sealing the sample area with a suitable adhesive tape such as duct tape or foil tape.
Watch out: the WonderMaker's core sampler is demonstrated on asbestos pipe insulation - a rather soft material traditionally sampled by wetting the material and cutting a sample with a "box knife" or drywall knife aka "razor knife" and that can also be sampled by the core sampler.
It is notable that in the WonderMaker's demonstration video of the traditional knife-cutting asbestos sampling procedure no protective gear was used though the demonstrator comments that this procedure is "pretty dusty". Whether or not this core sampler cuts hard plaster surfaces with the same ease as what is basically soft-asbestos corrugated paper-like material has not been discussed.
Really? Is bulk testing always needed? As we document at ASBESTOS PIPE-INSULATION and also at ASBESTOS PHOTO GUIDE to MATERIALS there are some well-known asbestos-containing materials including pipe insulation that are easily and reliably identified by visual inspection alone, as there was no alternative material that was used in that application and that looks the same as the asbestos-based material. In that case, except for very special circumstances such as perhaps litigation or scientific research on percentages and mixtures of asbestos-containing materials, the requirement for costly asbestos-testing of the material might itself be questioned.
Also see MOLD / ENVIRONMENTAL EXPERT, HIRE ? for help in deciding when a (costly) expert is needed.
Watch out: If you suspect that you're dealing with an asbestos-containing material you do not want to make a dusty mess; wetting the area, working with hand tools, or using dust control measures including a HEPA vac would make sense. In that case and IF I were confident that I could cut away or break away a plaster sample without causing more damage to the ceiling or causing ceiling sections to collapse, I might indeed try some cutting with a sharp thin-bladed chisel. I'd still use dust control measures.
Daniel.
- ASBESTOS FLOORING HAZARD REDUCTION
- ASBESTOS REMOVAL, WETTING GUIDE
- Wonder Makers Environmental
P.O. Box 50209
Kalamazoo, MI 49005
Phone: 888.382.4154 Website: http://www.wondermakers.com/
Core Sampler video: https://www.youtube.com/watch?v=0D1m8bhaiSQ
How to Make Small Test Cuts to Check for Hidden Mold in Building Walls & Ceilings - Using a Drywall Knife
Small homeowner test cuts in walls: Make small test cuts in drywall in areas most-likely to have been wet. Don't make a big dusty (or moldy-dusty) mess. Keep it small and clean. You may want to re-seal test openings after using them, pending cleanup or further action.
Pull off floor trim at the floor/wall juncture in basements on walls suspected of harboring leakage - look on the back of the trim and on the newly exposed drywall for hidden mold growth.
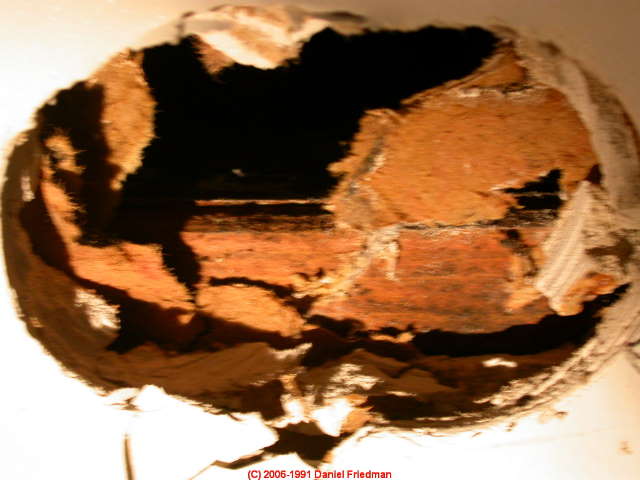
Our photograph just above shows a small test cut made into a wall cavity above a most-suspect area where we saw buckled flooring. We believed that leaks below the floor had wet the building floor but also its wall cavities, risking hidden mold contamination. The small test cut above led to the demolition shown with the drywall removal shown below. Click to enlarge these images and you can see extensive dark mold contamination throughout the wall cavities.
Our lab testing found that a dominant mold in this New York City apartment was Memnoniella echinata, a highly irritating and harmful mold closely related to the infamously media-popularized "toxic black mold" Stachybotrys chartarum.
Details of this wall cavity contamination investigation procedure are at HIDDEN MOLD in CEILINGS / WALLS.
When to Make Larger Wall Test Cuts to Check for Hidden Mold in Buildings
Larger wall cut openings: We may make a larger cut if external evidence such as staining or rot are strong suggestions of a wet, damaged, or moldy wall cavity.
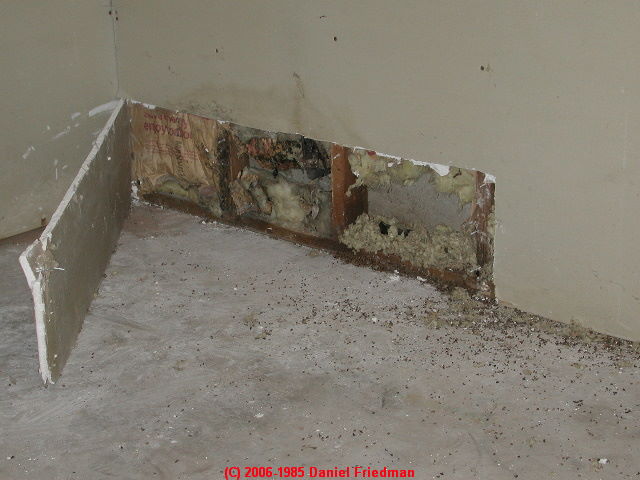
In the moldy drywall exploration test cut example shown you can see a water stain just above the upper horizontal line of this test cut in a basement corner. We cut the drywall because of a combination of factors that elevated the risk of hidden mold in this area:
- Downspout spillage outside the wall in this area
- Inside stains on the drywall
- Nearby mold odors
- Occupant complaints of respiratory difficulties in this area
In the wall we found evidence of a history of plumbing leaks from a drain that the homeowner did not know was even in this wall (center of the cut out area); we found evidence of a severe rodent infestation (right stud bay of the cutout area); and we found visibly wet, moldy insulation in the test cut area (left stud bay in the cutout area).
If there is a large mold reservoir discovered in an otherwise "clean looking" building, you'll want to close up the test cut made above, taping the seams with masking tape, to avoid exposing building occupants to problematic mold while waiting for further investigation and cleaning by a professional.
How to Make (or not make) Random Test Cuts to Check for Mold in Building Cavities
Random wall test openings: We have little confidence in and are reluctant to simply make random test cuts in buildings. Since water can take peculiar paths through hidden openings, such as wall plate holes drilled for pipes or electrical wiring or between single pairs of studs or ceiling or floor joists, cutting a hole that does not reveal a problem is no assurance at all that no hidden mold problems exist.
When to Make Strip Cuts to Look for Hidden Mold in Building Ceilings or Walls
When there is an ongoing building complaint that makes us suspect hidden leaks or mold, if we strongly suspect a hidden mold problem but have not found its precise location, on occasion it is justified to make a "strip cut" across multiple wall studs or ceiling joists, exposing multiple wall cavities.
How, Where, & Why to Peel Back Wallpaper to Check for Hidden Mold in Buildings

Carefully peel back wallpaper under windows where there has been leakage, or in bathrooms over and near showers. Mold often grows on paper wallpaper backing or on wallpaper glue in areas that have been wet.
See this WARNING about peeling back large areas of wall paper -
found in HIDDEN MOLD, HOW TO FIND
Watch out: just a light touch is needed. Don't try to investigate a building by dashing about with an axe cutting holes willy-nilly. That is an unnecessarily and inappropriately destructive approach to studying a property. But when building history, occupant complaints, or direct site observation of site and building conditions raise the level of probability of an important hidden leak or other damage, directed exploration, often with very modest means, can be very productive.
...
Reader Comments, Questions & Answers About The Article Above
Below you will find questions and answers previously posted on this page at its page bottom reader comment box.
Reader Q&A - also see RECOMMENDED ARTICLES & FAQs
Need help interpreting mold levels when I don't see the mold indoors
I am buying a Condo and Elevated mold levels (14000 aspergillus Pennicilum vs outdoors 600) have been detected by inspectors in two air tests. 2 Inspectors found No signs of visual mold, or any water in walls (thermal imaging), nothing under sinks, etc. There was a leak in to the bath ceiling 5 years ago and it was "caught and repaired immediately". AC is new -- only 1 year old but has some mold growing in 3 places. Seller wants to clean the AC system and ducts, do 2 days of air scrubbing and then do an immediate air test to see if the problem is fixed.
I am having the Bath ceiling inspected by having holes drilled and scoped and if needed cutting 6"x6" area.
Question -- without major construction -- just AC and duct remediation and air scrubbing, do we need 24 hours after the air scrubbing -- or can the air test be done immediately? Will and immediate test pick up another source of mold (not AC) if it exists -- or do we need to ewait 24 hours after air scrub? (June 1, 2014) John
Reply:
John,
Not much of this sounds sensible to me.
If a severe mold problem was found and repaired five years ago you would not be detecting high levels of indoor Penicillium sp. spores today.
I suspect the problem was never found, OR there have been other leaks and there are other mold reservoirs that need to be found and removed. This case illustrates why mold "tests" alone, without a competent inspection are not so helpful. We just have to visit the investigation de novo, this time, finding where the problem resides.
Please see (and continue the discussion at )
inspectapedia.com/mold/Find-Hidden-Mold.php
on how to find hidden mold
or at
inspectapedia.com/mold/Hidden-Mold-in-Ceiling-Wall.php
on making test cuts for mold. Scoping may not be adequate.
...
Continue reading at HIDDEN MOLD in FLOOR / SUB-FLOORING - test cuts into flooring layers from below avoids cosmetic damage, or select a topic from the closely-related articles below, or see the complete ARTICLE INDEX.
Or see these
Recommended Articles
- DUST SAMPLING PROCEDURE using adhesive tape
- HIDDEN MOLD, HOW TO FIND - other methods
- HIDDEN MOLD in CEILING / WALL CAVITY
- HIDDEN MOLD in FRAMING / SHEATHING
- MOLD / ENVIRONMENTAL EXPERT, HIRE ? - do you really need to hire an expensive consultant? Sometimes.
- TAPE & BULK SAMPLING & TESTS for MOLD
Suggested citation for this web page
TEST CUTS for SAMPLING BUILDING MATERIALS at InspectApedia.com - online encyclopedia of building & environmental inspection, testing, diagnosis, repair, & problem prevention advice.
Or see this
INDEX to RELATED ARTICLES: ARTICLE INDEX to MOLD CONTAMINATION & REMEDIATION
Or use the SEARCH BOX found below to Ask a Question or Search InspectApedia
Ask a Question or Search InspectApedia
Share this article:Try the search box just below, or if you prefer, post a question or comment in the Comments box below and we will respond promptly.
Search the InspectApedia website
Note: appearance of your Comment below may be delayed: if your comment contains an image, photograph, web link, or text that looks to the software as if it might be a web link, your posting will appear after it has been approved by a moderator. Apologies for the delay.
Only one image can be added per comment but you can post as many comments, and therefore images, as you like.
You will not receive a notification when a response to your question has been posted.
Please bookmark this page to make it easy for you to check back for our response.
IF above you see "Comment Form is loading comments..." then COMMENT BOX - countable.ca / bawkbox.com IS NOT WORKING.
In any case you are welcome to send an email directly to us at InspectApedia.com at editor@inspectApedia.com
We'll reply to you directly. Please help us help you by noting, in your email, the URL of the InspectApedia page where you wanted to comment.
Citations & References
In addition to any citations in the article above, a full list is available on request.
- "IgG Food Allergy Testing by ELISA/EIA, What do they really tell us?" Sheryl B. Miller, MT (ASCP), PhD, Clinical Laboratory Director, Bastyr University Natural Health Clinic - ELISA testing accuracy: Here is an example of Miller's critique of ELISA - www.betterhealthusa.com/public/282.cfm - Townsend Letter for Doctors and Patients
The critique included in that article raises compelling questions about IgG testing assays, which prompts our interest in actually screening for the presence of high levels of particles that could carry allergens - dog dander or cat dander in the case at hand.
- www.tldp.com/issue/174/IgG%20Food%20Allergy.html - contains similar criticism in another venue but interestingly by the same author, Sheryl Miller. Sheryl Miller, MT (ASCP), PhD, is an Immunologist and Associate Professor of Basic and Medical Sciences at Bastyr University in Bothell, Washington. She is also the Laboratory Director of the Bastyr Natural Health Clinic Laboratory. - Allergens: Testing for the level of exposure to animal allergens is discussed at http://www.animalhealthchannel.com/animalallergy/diagnosis.shtml (lab animal exposure study is interesting because it involves a higher exposure level in some cases
- Allergens: WebMD discusses allergy tests for humans at webmd.com/allergies/allergy-tests
- Rodent control issues, including dander, fecal, and urine contamination of Buildings and Building insulation are discussed at our
- Atlas of Clinical Fungi, 2nd Ed., GS deHoog, J Guarro, J Gene, & MJ Figueras, Centraalbureau voor Schimmelcultures, Universitat Rovira I Virgili, 2000, ISBN 90-70351-43-9
- Fifth Kingdom, Bryce Kendrick, ISBN13: 9781585100224, - we recommend the CD-ROM version of this book. This 3rd/edition is a compact but comprehensive encyclopedia of all things mycological. Every aspect of the fungi, from aflatoxin to zppspores, with an accessible blend of verve and wit. The 24 chapters are filled with up-to-date information of classification, yeast, lichens, spore dispersal, allergies, ecology, genetics, plant pathology, predatory fungi, biological control, mutualistic symbioses with animals and plants, fungi as food, food spoilage and mycotoxins.
- In addition to citations & references found in this article, see the research citations given at the end of the related articles found at our suggested
CONTINUE READING or RECOMMENDED ARTICLES.
- Carson, Dunlop & Associates Ltd., 120 Carlton Street Suite 407, Toronto ON M5A 4K2. Tel: (416) 964-9415 1-800-268-7070 Email: info@carsondunlop.com. Alan Carson is a past president of ASHI, the American Society of Home Inspectors.
Thanks to Alan Carson and Bob Dunlop, for permission for InspectAPedia to use text excerpts from The HOME REFERENCE BOOK - the Encyclopedia of Homes and to use illustrations from The ILLUSTRATED HOME .
Carson Dunlop Associates provides extensive home inspection education and report writing material. In gratitude we provide links to tsome Carson Dunlop Associates products and services.
 |
HOME | ABOUT | ASK a QUESTION | CONTACT | CONTENT USE POLICY | DESCRIPTION | POLICIES | PRIVACY | |
| © 2026 - 1985 Publisher InspectApedia.com - Daniel Friedman | |||||||||