 How to Install Ceramic Tile on a Concrete Wall
Use sealer + tile to stop efflorescence & wall leaks by installing a beautiful tile wall
- POST a QUESTION or COMMENT about choosing & installing ceramic tile floors in kitchens & bathrooms
Ceramic tile installation on a wall:
This article describes how to install ceramic tiles on a masonry wall to stop leaks, efflorescence, and to construct an attractive, durable wall covering. We discuss installation of ceramic wall tiles on masonry surfaces, on a leaky concrete wall, on cement backerboard, and on various interior wall surfaces.
This article series discusses ceramic floor tile choices & properties, and ceramic tile installation details for kitchens and bathrooms.
InspectAPedia tolerates no conflicts of interest. We have no relationship with advertisers, products, or services discussed at this website.
- Daniel Friedman, Publisher/Editor/Author - See WHO ARE WE?
Ceramic Tile Installation Advice for Walls
This article describes and illustrates the installation of ceramic tile on an exterior concrete wall that was leaking and suffering from efflorescence thanks to a neighbor who was not attentive to leaks in their adjoining wall of abutting homes in San Miguel de Allende, Guanajuato, Mexico.
[Click to enlarge any image]
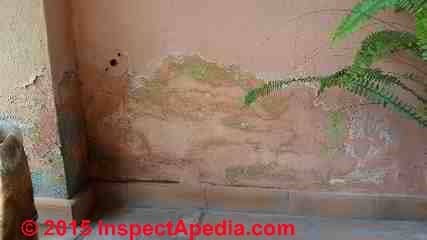
Above we show paint damage and chronic efflorescence (the white deposits) along with algae growth (green deposits) on a masonry wall that had suffered from water leaks originating at an abutting neighbor's property in Colonia de San Antonio, in San Miguel de Allende.
Efflorescence, the formation of mineral salts left behind when water leaks through and then evaporates from a masonry wall is quite powerful and has no trouble pushing paint off of a finished surface. The correct repair for damage such as shown on the wall above is to find and fix the source of water leakage, then clean and re-seal and paint the wall. See EFFLORESCENCE SALTS & WHITE DEPOSITS for more about this problem, its causes and cures.
But what happens when the water source is from leaks originating at a neighbor's property and when the neighbor refuses to make the repairs needed on their side to fix your wall?
At FLOOR TILE INSTALL on CONCRETE Steve Bliss suggests:
On tiled walls, protect the wood framing from water intrusion, using either 6-mil poly or 15-pound asphalt-impregnated felt lapped to shed water. The barrier should go between the tile substrate and the framing. On outside walls, this material can also served as the air and vapor barrier if the joints are sealed with tape or a compatible sealant.
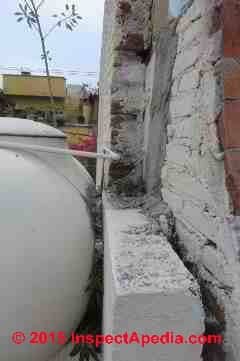
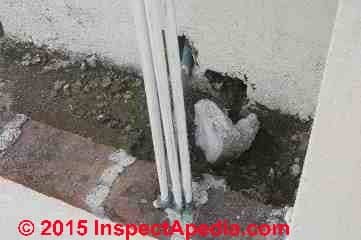
 We were faced with a different situation: As you can see in the two photos above, the neighbor's abutting water tank overflows constantly from a bad fill control valve, and that water combined with occasional rain collects on the neighbor's wall where it leaks through into the abutting property shown in earlier photo of the damaged painted masonry wall.
A long-standing feud between the leak-source property and the previous owner of the leaked-into property did not promise much success in making the proper repair at the leak source.
We decided to try a Little Dutch Boy at the Dike repair that we would not normally recommend: the construction of a water-resistant and efflorescence tile covering on the exposed or finished-side of the wall suffering leak and efflorescence damage.
The Little Dutch Boy illustration at left is discussed further
Some of those methods including installing a waterproof geotextile system on the outside of our leaky wall would have worked well if we'd had cooperation and permission of the neighbor (and if those products had been available). They weren't and they weren't.
Summary of the Ceramic Tile Installation Procedure for a Problem Wall
The ceramic tile installation procedure, illustrated in the photographs that follow, involved the following steps:
- Clean the wall surface thoroughly, removing all loose and granular materials to give a sound surface.
- Let the cleaned wall dry.
- Seal the wall surface with a tile-mastic-compatible polyurethane sealant and let that cure for a few days.
- Install ceramic tile using a tile cement that includes a latex additive to improve both its adhesion and its moisture resistance.
Doing a Decent Tile Job with Minimal Tools & Equipment
Because this was a small tile job and because we were working quite far from our New York test lab, the tile work was performed with a minimum of tools needed to assure an attractive result. We needed:
- A string or chalk line or straight-edge plus pencil
- A spirit level
- A small mason's trowel (a notched trowel would have been used by a professional and would have sped up the job. But hey, we were working in Mexico where hurry-up is not the approved start to or finish of tile work.
- A bucket to mix our tile cement and later to mix our tile grout
- Ceramic tile, tile cement, tile grout
The same ceramic tile wall installation techniques will work well on both interior and exterior masonry walls suffering minor leakage and efflorescence staining. If you are installing tile on a wood framed interior wall such as in a kitchen or bath,
see CEMENT BACKERBOARD INSTALLATION. We do not recommend installing ceramic tile on conventional drywall.
Lay Out the Tile Job, Course Lines, Vertical Guides, & Accent Tile Positions
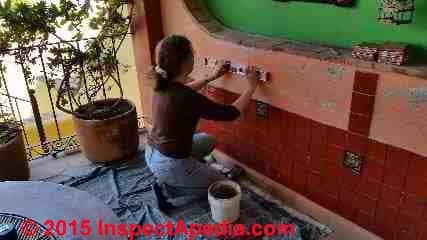
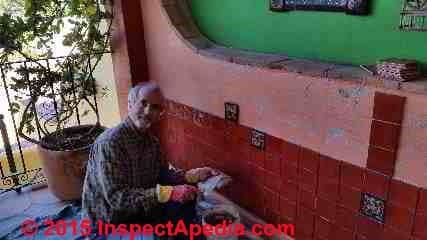
Above we show the ceramic tile instillation job when about half of the tiles had been installed. The job supervisor is marking a horizontal pencil line that we follow to keep our tiles straight.
[Click to enlarge any image]
Notice that vertical stack of tiles in the right portion of the photo. We measured the total wall width, laid out and spaced our tiles to fit that distance, and then installed two key courses of ceramic tiles: a vertical course in the center of the wall that would serve as a home base from which to extend horizontal lines to guide the other tile courses, and a bottom or first course that followed the first or lowest level line.
Because the actual wall bottom trim and floor below were not dead level, it was critical to install this first level tile course and to keep successive tile courses level. Otherwise by the time we got our tiles higher on the wall, entropy would have taken over and our tile courses would be askew - and ugly.
Step by Step Application of Ceramic Tiles to a Wall
Ok so with age and experience I'm going to show you how with just a few tools we can get the tile on the wall in nice even rows that look good.
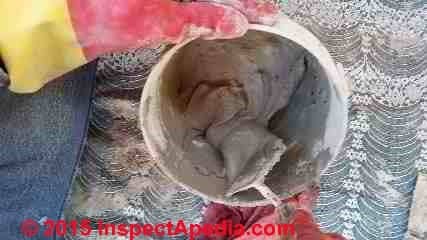
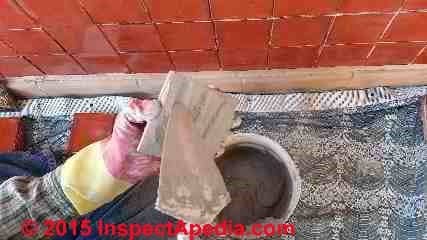
We used a tile setting cement that included a latex additive that improved its adhesive properties as well as its water resistance. Mix the tile cement until it is firm but not dry, as you can see in the bucket above. Let the tile cement slake or "cure" for 15 minutes or more before beginning to use it and it will perform better on the wall.
Watch out: don't mix more tile setting cement than you'll be able to use in your planned work session or you'll have to find some place to dispose of it; and if you mix more tile cement than you can use in an hour or 90 minutes you may find it's beginning to set up too hard to use - more waste to avoid.
Watch out: don't make your tile setting cement too liquid or you will have a hell of a time getting your tiles to stay in place on the wall. And the cement will also be weaker than you'd like even after it's set.
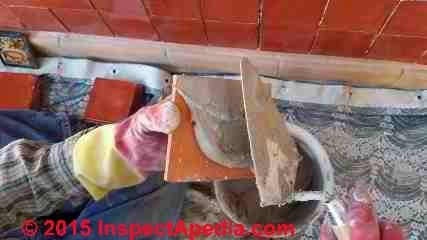
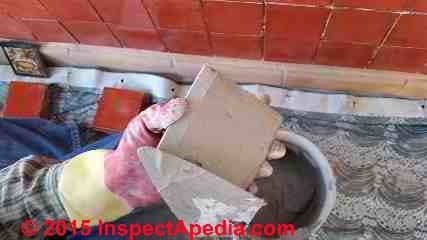
On the clean dry back side of your tile, apply a blob of tile setting cement. It may take a few tries to find the right amount, but it's no problem to just scrape excess tile cement back into your cement bucket. I probably put too much cement on some of these tiles, but when smoothing it off (below) I wanted to see about 1/8" to 3/16" thickness of tile cement.
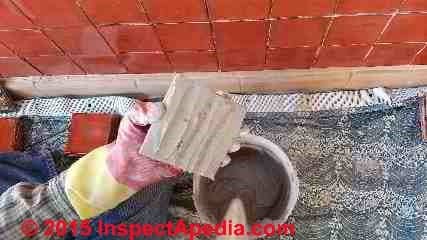
Below I'm using the point of my trowel to make three or four gouges in the tile cement. The tip of the trowel scrapes all the way down to the tile back surface, leaving a few ridges of tile cement on the tile back. If you were using a notched trowel with 1/8" deep notches this step would be easier.
Why are we making these notches? First because otherwise there'd be too much cement on the back of the tile - I don't want great blobs of tile cement to push up between my tiles through the grout joint (more on that later).
But more important, the horizontal ridges of tile cement rather than solid cement allow you to both push the tile onto the wall and to position it perfectly - adjustment is almost impossible if there is too much cement on the tile back. And too much cement on the tile back will leave some tiles protruding out from the wall in an ugly tile job.
Above is my tile cemented and ready to be applied to the wall.
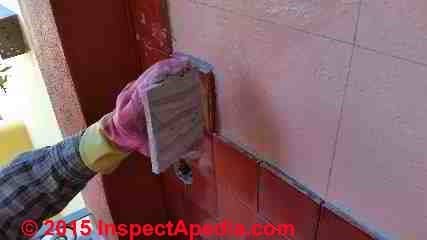
Notice that I apply the tile to the wall with the grooves of removed tile cement horizontal (parallel to the ground). Vertical ridges of tile cement work too but there seems to be less resistance to the tile oozing down the wall below where you want it.
Note: A tile professional would more likely use a notched trowel and would apply the tile cement to the wall rather than to the tile back.
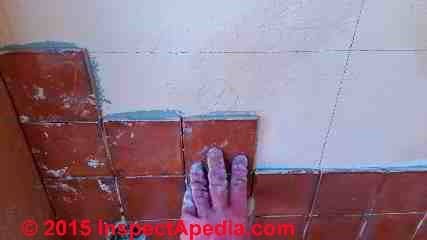
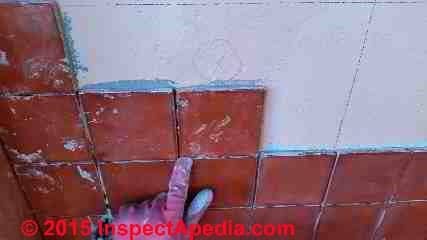
Above I'm positioning the tile a bit high. This is not an accident. I apply the tile about 3/16" higher on the wall than I want it to end-up. This allows me to slide the tile down into the right position, holding it there for a moment to let it set.
By pushing the tile onto the wall, then sliding it slightly down into position it will stay where I want.
Notice that circle with an X in it above the tile I'm setting? That's where the tile job supervisor had indicated that we were to use an accent tile - you'll see those in our photos of the finished tile wall at page top and at the end of this article.
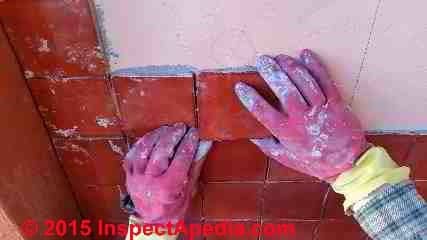
Here I've slid the tile down so that its top edge is exactly level with the tile to its left. You'll notice that since we're amateur tile setters (actually I've done this before), we marked tile course guidelines at frequent intervals up the wall to keep both vertical and horizontal tile course lines true and neat.
I've let go of the tile and I've observed that it has not moved further down the wall into a too-low position. If the tile slid down just a teensy bit I might try pushing it back up and holding it in place for a time. If when I let go again the tile slides down lower than I want, I remove the tile, clean its back, clean the wall, and start over, this time applying it a bit higher on the wall and then sliding it down into position.
If your tiles keep oozing down the wall then you've mixed your tile setting cement too wet. Many tile setters use little rubber crosses or spacers between their tiles to keep their grout joints spaced properly and to allow themselves to be more careless about the consistency of their tile setting compound. Those tile jobs will go faster. We didn't have tile spacers and didn't want to drive 120 kilometers round trip to go get them.
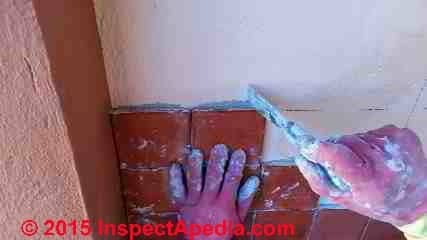
Take a look at all sides of the tile that you've just placed to be sure that the grout joint lines are parallel and are of the proper width before moving on to the next tile.
To avoid the bad-builder syndrome I will describe below, once the tile is in position, if I see so much tile setting cement oozing out from behind the tile that it is filling the grout joints, I remove that excess.
That makes filling the grout joints easy later. And when I prepare the next tile I'll use a bit less tile cement on the tile back so that I don't see excessive cement ooze-out.
Above our tiles are all installed and ready for grouting. To make the tile grouting step easy we took care to remove any remaining excessive tile setting cement from the grout joints before the cement had hardened, but after the tiles were sufficiently set that we would not disturb them. Moving a tile that has been set on the wall before the tile cement has cured risks loosening the tile.
Don't do that. You'll have to dig out all of the tile cement, clean the back of the tile, and set it all over again.
Grouting the Ceramic Tile Wall
Tile grouting is pretty easy:
- Mix the tile grout in a clean bucket. Add water slowly so that you don't over-thin the grout. It should mix to resemble firm whipped cream.
- Apply the grout to the tiled wall; Using a grouting sponge or a rubber tile grouting tool (which we did not have) smear the tile grout into the tile joints on a diagonal with respect to the horizontal or vertical grout lines, working the grout into the joints.
- Squeegee off the excess tile grout with your sponge or rubber tile grout tool but don't push too hard.
- Let the grout set until it is firm. Then wipe the wall with a damp cloth.
- Let the tile grout set again until the remaining grout that you smeared across your tiles has dried to a haze, then
- Wipe off the grout from the tile surfaces, taking care not to wipe grout out of the tile joints. It's better to take your time, go through extra tile grout set and haze wipe-off steps, than to rush the job and remove too much grout from the joints, or rush the job and leave grout to dry to a hard haze on the tiles.
Watch out: don't do what our nightmare builder did in Minnesota: First, while installing ceramic tile on a concrete slab floor he used too much tile setting cement such that cement oozed up from between the tiles, filling the future grout joints. Then he charged us hundreds of dollars for the time his wife spent with a router gouging out the hard tile cement so that the tile grout could be installed.
The builder, who was a fabulous carpenter but a horrible and expensive tile setter, also failed to wipe off the excess grout from our floor tiles. The result was an ugly haze on the tiles that was very hard to remove later. More about this bully builder's foul-ups arising from working out of his area of skill on that same ceramic tile floor can be read
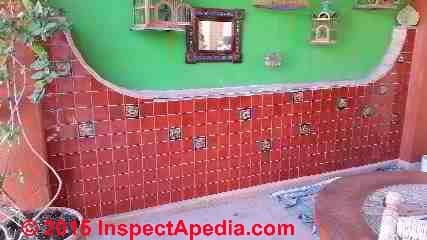
Above is our completed ceramic tile wall. How well has this wall withstood the leaks from the neighboring building? Inspecting the wall a year after original installation showed no signs of efflorescence, no loose tiles, and no cracks. So far the tile job on this leak-stained wall has been durable as well as more attractive than the paint jobs that the owners had tried previously.
For a discussion of cleaning up moldy bathroom tile grout or for preventing moldy grout, see BATHROOM MOLD REMOVAL / PREVENTION and also BATHROOM MOLD.
For a discussion of sealers other than the coating used on the concrete wall illustrated in this article, see FLOOR TILE SEALERS, CERAMIC, STONE.
This article series discusses current best design practices for kitchens and bathrooms, including layout, clearances, work space, and accessible kitchen and bathroom layout, clearances, turning space, grab bars, controls, etc.
...
Continue reading at FLOOR TILE, CERAMIC for K & B or select a topic from the closely-related articles below, or see the complete ARTICLE INDEX.
Or see these
Recommended Articles
- BATHROOM MOLD REMOVAL / PREVENTION
- CEMENT BACKERBOARD INSTALLATION
- CERAMIC TILE, ASBESTOS / LEAD?
- CERAMIC TILE DAMAGE REPAIR
- FLOOR DAMAGE DIAGNOSIS
- FLOOR DESIGNS: KITCHEN & BATH
- FLOOR FRAMING & SUBFLOOR for TILE
- FLOOR, RESILIENT VINYL or CORK
- FLOOR, STONE, GRANITE, MARBLE, AGGLOMERATE
- FLOOR TILE, CERAMIC for K & B
- FLOOR TILE HISTORY & INGREDIENTS
- FLOOR TILE INSTALL on CONCRETE
- FLOOR TILE SEALERS, CERAMIC, STONE
- TILED WALKING SURFACE SLIP HAZARDS
- FLOOR TILE SETTING COMPOUNDS
- FLOOR TYPES & DEFECTS
- GROUT INSTALLATION, TILE
- SEAL CRACKS in CONCRETE, HOW TO
- WALL, CERAMIC TILE INSTALLATION
Suggested citation for this web page
WALL, CERAMIC TILE INSTALLATION at InspectApedia.com - online encyclopedia of building & environmental inspection, testing, diagnosis, repair, & problem prevention advice.
Or see this
INDEX to RELATED ARTICLES: ARTICLE INDEX to BUILDING INTERIORS
Or use the SEARCH BOX found below to Ask a Question or Search InspectApedia
Ask a Question or Search InspectApedia
Questions & answers or comments about choosing & installing ceramic tile floors in kitchens & bathrooms
Try the search box just below, or if you prefer, post a question or comment in the Comments box below and we will respond promptly.
Search the InspectApedia website
Note: appearance of your Comment below may be delayed: if your comment contains an image, photograph, web link, or text that looks to the software as if it might be a web link, your posting will appear after it has been approved by a moderator. Apologies for the delay.
Only one image can be added per comment but you can post as many comments, and therefore images, as you like.
You will not receive a notification when a response to your question has been posted.
Please bookmark this page to make it easy for you to check back for our response.
IF above you see "Comment Form is loading comments..." then COMMENT BOX - countable.ca / bawkbox.com IS NOT WORKING.
In any case you are welcome to send an email directly to us at InspectApedia.com at editor@inspectApedia.com
We'll reply to you directly. Please help us help you by noting, in your email, the URL of the InspectApedia page where you wanted to comment.
Citations & References
In addition to any citations in the article above, a full list is available on request.
- Best Practices Guide to Residential Construction, by Steven Bliss. John Wiley & Sons, 2006. ISBN-10: 0471648361, ISBN-13: 978-0471648369, Hardcover: 320 pages, available from Amazon.com and also Wiley.com. See our book review of this publication.
- Our recommended books about building & mechanical systems design, inspection, problem diagnosis, and repair, and about indoor environment and IAQ testing, diagnosis, and cleanup are at the InspectAPedia Bookstore. Also see our Book Reviews - InspectAPedia.
- In addition to citations & references found in this article, see the research citations given at the end of the related articles found at our suggested
CONTINUE READING or RECOMMENDED ARTICLES.
- Carson, Dunlop & Associates Ltd., 120 Carlton Street Suite 407, Toronto ON M5A 4K2. Tel: (416) 964-9415 1-800-268-7070 Email: info@carsondunlop.com. Alan Carson is a past president of ASHI, the American Society of Home Inspectors.
Thanks to Alan Carson and Bob Dunlop, for permission for InspectAPedia to use text excerpts from The HOME REFERENCE BOOK - the Encyclopedia of Homes and to use illustrations from The ILLUSTRATED HOME .
Carson Dunlop Associates provides extensive home inspection education and report writing material. In gratitude we provide links to tsome Carson Dunlop Associates products and services.


