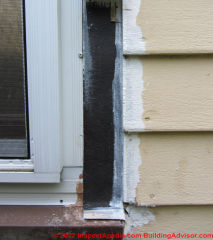
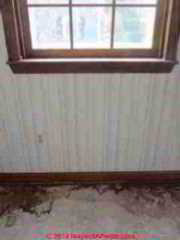
 Building Wall / Window Leak RepairHow to find & fix building wall leaks
- POST a QUESTION or COMMENT about the diagnosis & cure of leaks through exterior walls, windows, siding, flashing
Building siding, window or wall leak detection, diagnosis & repair procedures.
This article describes the discovery of both active and prior leaks through a building's walls or windows and the steps that were taken to evaluate the impact of the leaks on the structure, to track down the leak sources, and to fix the problem both as a stop-gap mode (due to weather and time constraints) and as final repairs were made to stop future leaks.
InspectAPedia tolerates no conflicts of interest. We have no relationship with advertisers, products, or services discussed at this website.
- Daniel Friedman, Publisher/Editor/Author - See WHO ARE WE?
Building Wall Leak Mystery, Diagnosis & Repair
 Procedures for tracking down uncertain sources of leaks through a building's exterior siding, trim, walls or windows
Here the authors describe tracking down the cause of wall leaks, finding related rot and damage, and making some stop-gap repairs to wall leaks around building openings like windows and doors.
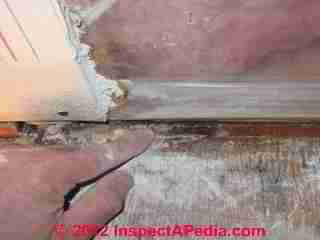
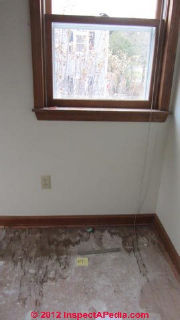
Photo: pointing to leak stains found on subfloor below a window after carpeting was pulled-up.
[Click to enlarge any image]
Article Contents
- WALL / WINDOW LEAK DIAGNOSIS
- SIGNS OF WINDOW OR WALL LEAKS
- INSPECTING THE BUILDING EXTERIOR FOR CANDIDATES TO EXPLAIN THE LEAKS
- THREE COMMON WINDOW LEAK POINTS
- GABLE END WINDOW WEATHER EXPOSURE INCREASES RISK OF ROT & LEAKS
- INVASIVE INSPECTION: TEST CUTS AT THE BUILDING INTERIOR TO INVESTIGATE WALL LEAKS
- WINDOW OR WALL LEAK CHANNELS INSIDE WALLS, BETWEEN DOUBLED STUDS OR JACK STUDS
- PROBING & INSPECTION OF THE BUILDING EXTERIOR WINDOW TRIM & WALL SIDING TO DIAGNOSE WINDOW OR WALL LEAKS
- TEMPORARY vs LASTING WALL OR WINDOW LEAK REPAIR OPTIONS
Telltale Signs of Window or Wall Leaks

Steven Bliss & Daniel Friedman
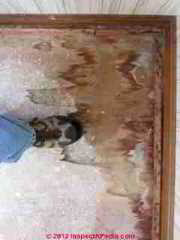
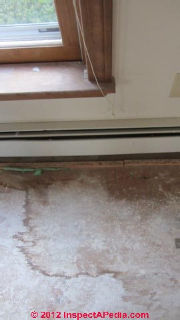
Our photographs illustrate the discovery of leak stains on the carpeting, tack strips, and subflooring that were discovered when first floor wall-to-wall carpeting was removed during building renovations.
Rather than pretend to be smarter than we are, we report here the actual site observations and our discussion about them, more or less in the order that they occurred among "new owner" and the authors.
The result is a look into the thinking process of a couple of experienced building investigators and builders during the track-down of wall leaks.
Remarks from New Owner are in italics.
Authors' replies and comments are in normal font, not italicized.
We ripped up the carpets at our new house today and found signs of extensive water leakage on the plywood subfloor. The house is a cape, built in 1986 with 2x6 walls, fiberglass insulation, and a poly vapor barrier.
The back (east) side of the roof is a shed dormer for most of the length of the house. Roof is roughly 12/12 pitch with kneewall height of about 40 in. on the front (west) side.
The leaks tend to be located under or near windows, skylights, and along the transition to an attached garage where there is step flashing. The underside of the carpet is also stained in these locations – see photos.
My first thought was a flashing leak at windows, but the window appear to be properly flashed with a cap flashing. The house appears to be wrapped with Tyvek and I don’t know if the cap flashing is cut into the tyvek, sealed with flashing tape, etc. I plan to remove a piece of siding above a window to see how it is detailed. Don’t yet know if the cap flashing is aluminum or vinyl.
Staining is prominent along the front of the house, despite a generous roof overhang. So I’m not sure the window flashing is at fault.
With 2x6 R-19 walls, I would not expect condensation on the vapor barrier unless they maintained tropical conditions indoors all winter.
An elderly couple lived there and told us they kept the house very warm during the winter (although they were away in Florida for a couple of months each winter).
 One of the large skylights (Velux roof window) on the east side of the roof (over the bed in master bedroom) is nailed shut to prevent rain from coming in if the skylight were left open.
The husband had mild dementia. Someone suggested that maybe he left all the windows open during a big rainstorm.
Windows are good quality, wood double hung with double glazing – Andersen I think. I do not see deterioration of the sash from condensation on the glass.
So at the moment I am stumped.
I have someone coming over Thursday with a moisture meter to tell me if the plywood is still soggy vs. leakage from long ago. Also plan to remove a clapboard or two above windows to see what I can see.
Other possible clues: An architect who visited the house for about an hour had an uncontrollable sneezing fit – allergic reaction to mold???
The basement, which appears dry, but requires dehumidification in summer, has a strong, sweet odor that I cannot place. My wife finds it very unpleasant and thinks it is probably some type of mold.
Any theories, suggestions, diagnostic approaches to pursue?
An immediate sign of a history of leaks was discovered when carpeting was removed as preparation for building renovations for a new owner. - New [owner]
Initial Comments on floor leak stain report
When investigating building window or wall leaks or leak stains on building floors along the exterior wall/floor juncture, before tearing the building apart we inspect the building exterior for likely water entry point candidates, and we inspect the interior for evidence of the extent and history of water leaks as well as to assess the risk of water-related rot or insect damage that might require further repairs.
 Inside there was not evidence of significant damage to the carpet nor to the subfloor, but we suspected there had been more than one leak event.
A report of a prior owner leaving windows open was considered but comparing the location and extent of leak stains on the floor with that story, we doubted that all of the home's windows had been left open repeatedly.
Here was our
Initial reply to New Owner:
The stain pattern seems to rule out a floor flooded from a skylight left open as the stains stop close to the wall perimeter.
Pull off baseboard trim in a very-stained area, check for mold on back of trim as well as signs of more than one event - stain pattern or rot;
Make your test cut into the wall cavity in the same area, from subfloor up about 4" so we can see the side of the sill plate as well as into the wall cavity.
I especially want to know if (and where) you find water stains down the interior side of exterior sheathing; I posit that there were not leaks at the windows or window sills that bled to the interior wall surface or that wallpaper wouldn't look so good.
Another note about basement smell: perhaps if it's not a mold smell it's a cleaner or deodorant left to cover up a mold odor?
I can't relate all of the stain photos to the particular house orientation or walls and general layout. Nor can I tell if there could have been windows left open in a rainstorm, though I tend to think not as you mentioned that outside siding staining.
Inspecting the Building Exterior for Candidates to Explain the Leaks
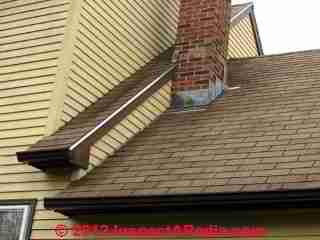
Inspecting the home exterior for a few common snafus and leak points were considered in the initial inspection.
While it was natural to suspect that water leakage had passed through the building walls or perhaps around windows, we wanted to rule in or out probable causes of those indoor leak stains on the floor that might be tracked to ice dam leaks that can send water into building walls, and we also wanted to rule in or out leaks at the sidewall flashing of lower roof to building upper walls alongside the dormer.
We even considered that leaks around skylights could have sent water down the roof cavity and into the building walls where it emerged to make those floor and carpet stains shown above.
Follow-up remarks from New Owner
I suspect that the basement smell is some sort of deodorant – a thick, pungent, sickly sweet odor reminiscent of a heavily smoked-in hotel room after deodorizing.
 I don’t really think that all the windows were left open in the rain, but I am trying to entertain all theories at this point as the correct explanation is not obvious. As doctors say about diagnosis, look for the horse, not the zebra – but occasionally it’s the zebra.
Also, the siding is not water-stained – the finish is a solid-based or semi-solid stain (watered-down paint, according to paint guru Bill Feist and US FPL), but that’s what I got to deal with.
I spent most of the afternoon photographing and documenting the water intrusion problem. All leaks are under windows or along garage-to-house step flashing (although these may be old and resolved when new roof was installed).
Of the 10 windows with exposed subflooring below, 7 had signs of leakage – all sides of house, with and without protection of overhanging eaves. I opened up one of the worst areas – a window on the gable end (south) wall of the house.
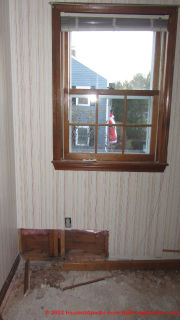
I cut open two stud bays, which you can see in the photos.
The bottom plate and subflooring by the plate was wet. The tackless strip (to hold carpeting) was wet and moldy. The plaster ground along the bottom of the wall was wet and moldy (why a plaster ground with drywall – who knows?).
The windows are the original wood double-hung windows. They appear to be in good condition.
I haven’t yet identified the manufacturer. Some of the windows were “repaired” at some point with aluminum coil stock wrapped around the sill due to “dry rot” according to the previous owner.
On the interior, the coil stock terminates halfway up the sill. You can see the edge of the coil stock where I stuck a key underneath.
The guy who did this work also, apparently replaced/fixed some of the screens and maybe storms. This is now third-hand info, so I need to learn more about what was done when and why.
However, many of the leaking windows do not have the coil stock, so I don’t think this is responsible for the leakage. The windows have aluminum cap flashing over the brick-mold. I believe these are older style windows installed via brick-mold rather than flanges.
In general, these installations work well. As far as I can tell, the builder used Tyvek, not asphalt-felt paper. Don’t know how the cap flashing is detailed – over vs. under the house wrap.
Question: Have you ever seen double-hung windows that leak due to a design flaw or installation error? I plan to get a tech rep from the local window wholesaler up there to see if he has any thoughts. We are scheduled to put down new hardwood floors and carpeting in a couple of weeks, but obviously need to resolve this before proceeding.
The odd thing is that this problem apparently went on for years undetected since the mold never made it through the carpeting. And despite the ugly photos I took, there was no significant rot. I suspect that these have been slow, intermittent leaks that had a chance to dry out between episodes so it never caused significant mold or rot. Your thoughts, doctor?
Three Common Window Leak Points
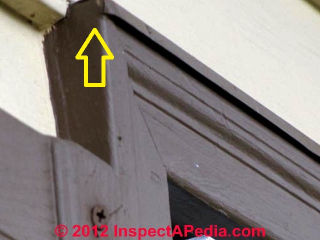
Here is a closeup of the window top or head flashing.
- Window head flashing leaks:
we noticed that the window head flashing stops short of the vertical brick mold side trim - a common cause of window leaks because at some installations water may enter the window or wall at the top corners when wind-blown rain striking the siding runs down the wall to the window top but is not directed off of the window top but rather into its top corners. - Water entry points along vertical window trim:
a second possible leak point is formed by the horizontal abutment of the wood shutter screwed to the wall, slowing water running down the side of the window. If there is any defect at the window side flashing or seal between the window frame and the building siding, this becomes a leak. - Window sill leaks:
a third possible window leak point is formed where the vertical window side trim abuts the window sill - also a very common location for trim rot, window sill rot, and leaks into the wall cavity. We also find window leaks entering below some window sills;
by capillary action water may run around and back up under the exterior projection of a window sill, entering the building wall at a poorly-sealed joint between the underside of the sill and the top of the siding in that location.
A drip groove cut into the under-side of window sills, if present, is intended to interrupt this capillary action that can actually move water up underneath the sloping sill.
Next Reply to New:

New: I agree about the deodorant, but in turn that hints at either cat pee or mold and leaks or moisture.
About Question: Have you ever seen double-hung windows that leak due to a design flaw or installation error? I plan to get a tech rep from the local window wholesaler up there to see if he has any thoughts. We are scheduled to put down new hardwood floors and carpeting in a couple of weeks, but obviously need to resolve this before proceeding.
On an entire development in Poughkeepsie, I [DF] found window leaks and rot traced to the same worker making the same detailed head flashing error on every window. Leakage varied by weather exposure.
That's why I asked about the exterior siding type and flashing. In my case it was vinyl or AL siding, J channel head flashing, improperly cut and trimmed so that when water ran down building walls and hit the head flashing, at either end of the flashing it ran inside the siding along the window brick mold instead of outside along the vertical flashing (also J-channel).
Your photo of the window head flashing looks a little worrisome - though I'm not quite sure from the image. Is that head flashing cut a bit short of the width of the window top brick mold?
And is there a shutter screwed to the siding along the window, forming a horizontal dam that might interrupt water running off the ends of the head flashing - encouraging it there or at the very window top to enter the walls?
Your photo of the sill plate with wall open suggests water leaking along the top of the sill plate at the bottom of the stud, maybe from the other side, since I don't see water stains down the sheathing nor down the stud itself.
I'm guessing that that sawdust and dark corner in another photo shows that the wall cavity was wet at the time of the image though the sawdust looks like construction debris - big wood chips, yet I see little black dots that sometimes are carpenter ant parts.
Your photos of the jack studs and gap between them show a significant leak entry point, and I'm guessing some of these are jack studs at one side of a window. Adding argument in support of a window top or side or bottom water entry point.
Your photo showing the relationship between the window, jack studs, and wet areas and leak stains is the most helpful, showing the jack studs at the window. It really looks as if water is entering around the window and running down between very specific studs onto the sill and out onto the floor.
In a house where I [DF] was allowed to do any demo I wanted (for an insurance company), there had been ice dam leaks down walls - in locations such as that in the Invasive Inspection Photos [shown below]. I tore off drywall around the entire window to pinpoint the entry spots for water.
I've got an article on it
at MOISTURE METER STUDY if you want to see the result. I used it to prove why moisture meters miss leaks.
Water ran down the inside surface of exterior sheathing along one specific stud. - DF
Gable End Window Weather Exposure Increases Risk of Rot & Leaks
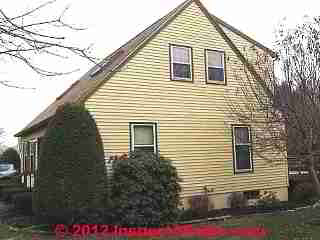
An inspection of the building exterior homed in on windows found on the gable-end of the home.
Home inspectors know that if one were to choose which windows to check first for weather damage, wear, or leakage, the gable end windows are a top candidate because they lack the weather protection offered by overhanging roof eaves.
But on this home, an expanded Cape Cod design, there is almost no roof overhang at all.
While we now had some good candidates for possible explanation of the leak stains found inside, it was time for some more invasive inspecting both to assess the extent of leaks and to be sure we understood the leak source(s).
Invasive Inspection: test cuts at the building interior to investigate wall leaks
With winter already present and owners needing to make the home dry and habitable as soon as possible, we needed to decide just how much exterior demolition was really necessary to diagnose and cure the leak problem.
On the one hand we didn't want to renovate the home interior without being sure that the building shell was adequately weatherproof, lest we risk new water damage to the planned renovations (a hardwood floor, other indoor improvements).
On the other hand, we didn't want to tear apart the building exterior in cold, probably wet weather, expanding and extending outdoor work and delaying the date at which the home could be occupied.
An advantage of starting invasive inspecting on the building interior is that while removal of an occasional wood clapboard (or exterior siding) and poking into building sheathing might be possible, in general it's easier to fix a hole cut into building interior drywall, exploring the same leaky wall cavity from that side.
In the first pass at invasive interior inspection steps (photo at above left) drywall was removed along the floor in the areas of staining.
In the photo below you can see that water was certainly entering the floor from the bottom of the wall sill plate; you will also notice that a plastic vapor barrier had been installed behind the drywall - a step that permits water to run inside the wall cavity all the way to the floor without making an earlier appearance through the wall surface or in wallpaper stains.
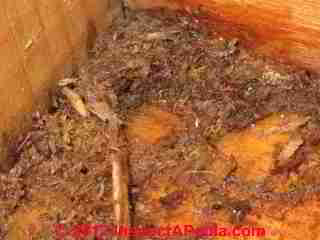
In the next photo below you can see the discovery of wet sawdust in the wall - the hope that the leaks were old, and had somehow all been corrected became a fantasy.
There was at least some ongoing or active water leakage.
We noticed some small shiny black fragments mixed in with the sawdust - a carpenter ant alert sign. But the rough texture of the sawdust doesn't look like carpenter ant frass (it was explained as debris from nearby drilling through wood sheathing or studs).
Window or Wall Leak Channels Inside Walls, Between Doubled Studs or Jack Studs
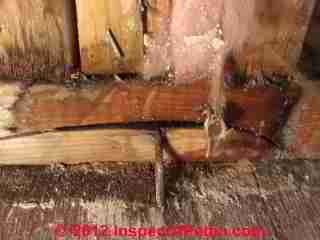
The pair of photos above begin to point to a leak at a window side or sill. At left just above that protruding nail you can see a wet sill plate immediately below an insulated gap between a set of wall stud and jack studs found along side and below typical window framing.
The second photo shows that same location with the insulation and debris removed.
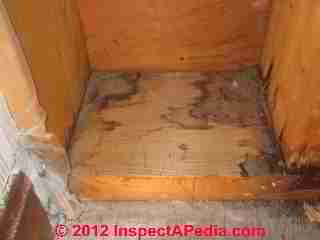
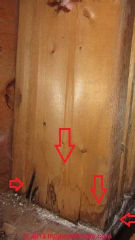
Looking along the other sides of wall studs we see from the stains that water was clearly passing under the stud bottom and out onto the top of the sill plate - arguing for water passing down the wall cavity, not entering from some snafu at the very bottom of the building exterior siding or wall.
The presence of disconnected water stains at the stud bottoms argues for more than one water entry point. As the left side of the photo shows an abutting wall (see that baseboard trim) we wondered if there was additional leakage at the building corner trim outside.
Incidentally, when we see leak stains on subflooring, it's appropriate to remove all of the nearby baseboard trim to check for hidden rot, mold, or other leak stains.
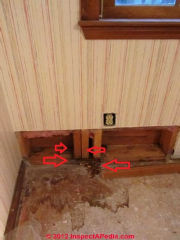
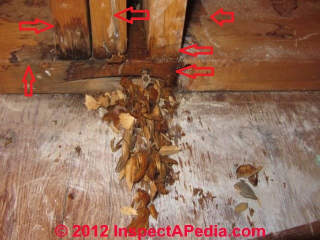
This photo shows the arrangement of wall corner stud (photo left), and the jack studs along the left side of the window being investigated.
While further investigation is needed to be sure of the water entry point (along the window top, side, or sill), the images seen to this point form a strong argument for leaks at the windows.
Further inspection outside confirmed that the brick-mold trim around these windows was quite rotted.
We discussed a stop-gap measure of injecting cold-weather caulk into the most-suspect areas and perhaps some live tests with a garden hose to see if we could make the wall weather tight for the winter, deferring more extensive window repairs or replacements.
We also discussed a strategy of window repairs versus window replacement, but agreed that until we know the exact leak points and extent of window damage, that decision would wait.
Next Reply from New:

In answer to your questions/comments:
The head flashing on some or maybe all windows stops a little short of the ends of the top brick-mold. So that is a potential entry point – although I’ve seen this condition often with no leaks.
In the best of all possible worlds, the cap flashing should be cut a little long and the ears bent down over the ends. I think/hope that the cap flashing is aluminum, not vinyl. I check out the location of shutters as a contributing factor.
If the sides of the windows were flashed properly, with vertical strips of felt paper properly wrapped, I don’t think slightly short cap flashing would be a problem.
However, as I mentioned earlier, I believe this house was wrapped in Tyvek (based on shredded Tyvek dangling from the wall in the attic space above the garage).
Tyvek makes good envelopes, but is a lousy material for wrapping houses. Over time it gets brittle – if wet, it deteriorates rapidly.
So I suspect that the Tyvek around the windows is not in good shape. Also, a widely promoted detail by DuPont was the cut an X in the Tyvek and wrap it into the rough opening – making a perfect pathway for water.
Now builders seal the flanges in modern windows to the Tyvek or other housewrap with “flashing tape”, which also deteriorates and un sticks over time according to builders I know. If I built a new house today, I would use asphalt impregnated felt, aka tarpaper.
There was plenty of water stains, mold, and some water along the bottom plate of the wall below the window corner. Most of the wetness and damage was at the bottom of the king stud and adjacent jack studs at the left corner of the window.
There was no staining on the back of the sheathing or visible sides of the studs, but it seems very likely that the water ran down some surface of these studs. Points to leakage points along side of window – or along top or sill and down side.
There is also a black spot at the bottom of the stud to the left of the window where a partition abuts the outside wall. Not sure why.
The Marvin rep poked around on the window exterior and found some rot along the bottom of the side jamb, just above the sill on one window. Also found some punky wood (paint over air) on one of the clapboards where it abuts the side brick-mold.
The siding is very tight to the brick-mold making it difficult to caulk. One school says not to caulk this joint, but rather to detail everything perfectly so water runs down the side of the window and is managed by the flashing.
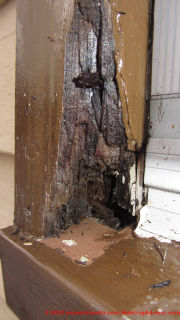 Today I plan to explore the exterior a little more, looking in particular for decayed wood.
Some of the sills have been wrapped in alum. coil stock and, according to the previous owner (who denies any knowledge of leaks) some of the brick-mold was replaced when they added triple-track storm windows about 6 years ago – making, effectively, triple glazing.
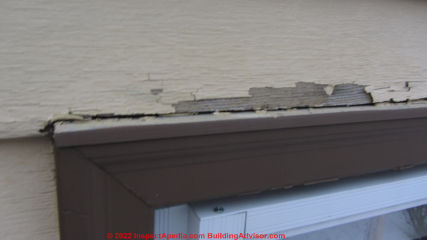
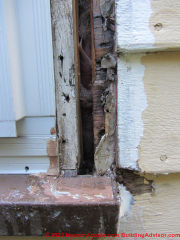
Photo: extensive window trim rot was revealed by gentle probing of the thickly-painted wooden trim.
I will also extend my interior excavation up the left side of the window for one stud bay to see what I can see. Then I have to get back to real work as I have several subs lined up between now and mid January.
Given the weather (cold and getting colder) and our moving schedule, I may just do a hack caulking job to try to minimize/eliminate leakage, test the one open window with a hose – and if all looks OK for now, deal with this in the spring.
I’m torn between using a high quality urethane caulk, which will be difficult to remove vs. a cheap acrylic caulk which will be falling out by spring when I will have the time, weather, and temperament to deal with this problem more effectively.
FYI: The local Marvin rep suggests replacing all the windows (big surprise). He said that the frames were probably too far gone to use replacement inserts.
I’ll keep you posted – thanks for your insights
Reply:
Interesting about that aluminum sill wrap; it was done most likely as a repair attempt that was both cosmetic and functional, as I see it was shoved partly up under the vertical window brick-mold trim; but it doesn't look as if the worker actually sealed anything so no surprise that leaks continued. If weather permits, slobber some cold weather caulk around as you intend and it may help;
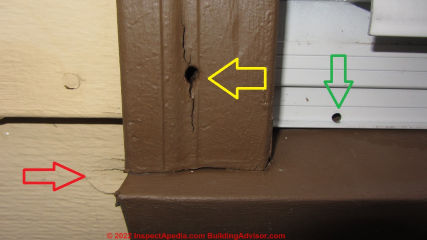
Watch out: even small, almost subtle signs of rot such as that vertical crack on the thickly-painted wood window trim (yellow arrow pointing to the crack in brown-painted "brick mold" in vernacular, and that small dent in the wood clapboard (red arrow) can indicate significant water entry and rot damage. If you can push your finger into the wooden siding it's pretty rotted.
The green arrow in this photo points to an add-on drain opening drilled into the bottom of an aluminum storm window.
Storm windows that don't drain properly can trap water atop the window sill, leaking into the building and adding to building water entry and rot damage.
See details at STORM WINDOW WEEP HOLES
I've also seen some dramatic sill leaks from inside the storms, worse where the sill wrap didn't extend far enough up inside the sill - one needs to prevent water from entering the storm and passing beneath the aluminum wrap therein; In my retrofit/repair spec - one that seemed to work very well over time, we took the aluminum inside under the storm and all the way up to the abutting edge of the window sill or stool.
With the sash down, water never blew inside enough to get under the aluminum; At corners we'd have sealed to the siding where yours was left open (and rotted).
We still don't rule out higher entry points but your probe certainly points to plenty of work in store for you next spring.
Probing & inspection of the building exterior window trim & wall siding to diagnose window or wall leaks
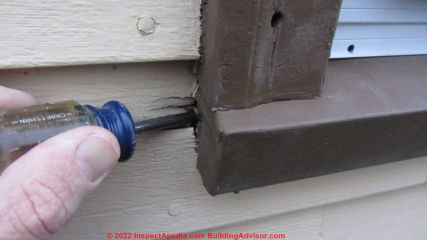
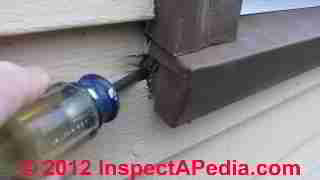
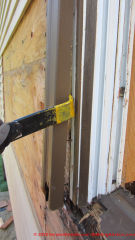
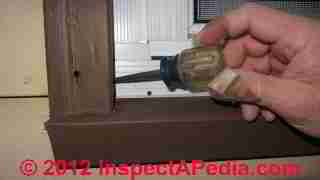
These photographs illustrate probing for leak and rot damage at the suspect windows by easy insertion of tool into trim.
 ...
... 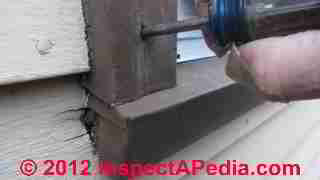
We observed soft rotted vertical brick-mold window trim (photos above).
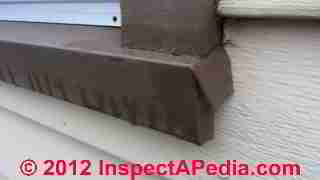
We also noted that some window sills had been wrapped in brown aluminum coil stock (photo below).
While the aluminum trim wrap had been pushed up under the (probably already soft, rotted) vertical window trim, this covering of the previously leaky, rot-damaged window sills had not been sealed against further water entry beneath the aluminum.
When covering damaged window sills using aluminum coil stock and where storm windows are installed, for a successful seal against further leaks at the window, the aluminum needs to extend all the way up inside the window sill to abut the interior window sill or stool edge, and all sides of the aluminum must be sealed against further leaks.
Otherwise water may simply pass beneath the aluminum where it can continue to leak into the building wall.
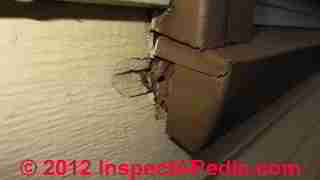
In the photos below you can see that the aluminum window sill wrap was not sealed to the building and that someone has already probed in this location; further probing confirmed that the sill and siding were soft and rotted here, and we pose that perhaps the window king stud will also be found to be leak stained and perhaps even rotted as well.
...
Back inside the building and examining the sides of the king stud at the window opening we can see what appear to be several water tracking or leak stains down the side of the stud (red arrows).
Comment from New:
Inside the storm windows the aluminum sill wrap terminates about ½ to 2/3 of the way to the inside trim – so water blowing past the storms could get in under the wrap. Will need to test the storm windows with a hose next time it’s above freezing.
Still, given the amount of water intrusion, I’d put my money on leakage through the exterior portion of the window sills and surrounding materials.
I’m only moderately bummed out about the situation and figure I can solve it in the springtime without spending $15K on new windows.
Temporary & Lasting Wall or Window Leak Repair Options
Watch out: the repair described here is not one that I would not necessarily recommend to others.
The “right” way would have been to remove all the brick mold from all the affected windows, remove siding as needed, re flash all the windows, and replace any brickmold and siding that didn’t make the cut.
Since it was the middle of winter when the owner discovered this problem, he decided to take a few shortcuts and monitor the problem. If it persisted, he would take further action as needed.
BTW, the owner did have the local Marvin dealer (these were Marvin double-hungs) who mumbled something about some problems with wood moldings from the 1980s (house built in mid-1980s).
Marvin Window Company recommended replacing all the windows for around $30k and oh, by the way, we can’t guarantee they won’t leak since this is a retrofit.
Damage was well hidden by cheap caulking and a thick layer of paint, and remained hidden from the home inspector and the owner until the owner removed the carpeting and saw the water stains under the windows.
The owner reported:
I usually do my own inspections, but hired someone in this case.
The new owner took the following steps to stop the wall leaks
- Inspected all the windows. The ones on the south (gable end, no overhang) were the worst and appeared to be actively leaking.
- On a couple of the windows the cedar bevel siding and brickmold were held together by “1/4-inch paint” (old carpentry joke). You could insert an awl right through the brickmold straight into the interior of the wall.
- Same for the siding where it butted to the brickmold. Water was entering directly through some of these holes into the wall cavity.
- On one of the south windows, removed the drywall and baseboard under the window and found wet insulation, wet wood, mold, and some wood decay on bottom plate.
- Replaced siding and brickmold as needed (with Azek) and reflashed the windows on the south side.
- Replaced rotten sills on the worst windows – rot hidden under the aluminum coil stock used to wrap the sills at some point by a tinman remodeler at some point.
- Caulked all the windows with a high-performance sealant that can be used at very low temperatures. Product is Dap Sidewinder.
Dap Sidewinder™ Product description: Advanced polymer formula siding and window sealant delivers excellent performance on vinyl, fiber cement, aluminum, wood siding and windows.
Permanently flexible. Wet weather and low temperature application. No shrink and virtually no VOC's (less than 1 percent). Low odor, paintable formula for interior/exterior use. Meets ASTM Specification C 920.
- Replaced the missing drywall with a removable panel so to permit future periodic inspections of the wall.
The wall did not leak when checked over the ensuing six years.
- Repairs of these wall leaks were completed in 2013; Theowner sold house in 2019.
Other details and photos of these leaks are shown at Steve Bliss' Building Advisor - at
- ALL BUILDING EXTERIORS LEAK at the Building Advisor [Sister Website]
- WINDOW FLASHING DETAILS at the Building Advisor [Sister Website]
...
Continue reading at a href="../BestPractices/Window_Flashing.php">FLASHING WINDOW DETAILS or select a topic from the closely-related articles below, or see the complete ARTICLE INDEX.
WALL / WINDOW LEAK DIAGNOSTIC FAQs - questions & answers posted originally on this page.
Or see these
Recommended Articles
- FLASHING WINDOW DETAILS
- SLIDING GLIDING WINDOW DEFECTS
- MOISTURE METER STUDY
- WATER ENTRY in BUILDINGS - home
- WATER LEAK DETECTION & SHUTOFF DEVICES
- WINDOW LEAKS INTO BASEMENT
- WINDOW SASH REPAIR - more examples of finding leaks and rot in and around windows
Suggested citation for this web page
WALL / WINDOW LEAK DIAGNOSIS at InspectApedia.com - online encyclopedia of building & environmental inspection, testing, diagnosis, repair, & problem prevention advice.
Or see this
INDEX to RELATED ARTICLES: ARTICLE INDEX to BUILDING LEAKS & WATER ENTRY
Or use the SEARCH BOX found below to Ask a Question or Search InspectApedia
Ask a Question or Search InspectApedia
Questions & answers or comments about procedures for finding & fixing leaks around building windows or through building exterior walls, siding & trim.
Try the search box just below, or if you prefer, post a question or comment in the Comments box below and we will respond promptly.
Search the InspectApedia website
Note: appearance of your Comment below may be delayed: if your comment contains an image, photograph, web link, or text that looks to the software as if it might be a web link, your posting will appear after it has been approved by a moderator. Apologies for the delay.
Only one image can be added per comment but you can post as many comments, and therefore images, as you like.
You will not receive a notification when a response to your question has been posted.
Please bookmark this page to make it easy for you to check back for our response.
IF above you see "Comment Form is loading comments..." then COMMENT BOX - countable.ca / bawkbox.com IS NOT WORKING.
In any case you are welcome to send an email directly to us at InspectApedia.com at editor@inspectApedia.com
We'll reply to you directly. Please help us help you by noting, in your email, the URL of the InspectApedia page where you wanted to comment.
Citations & References
In addition to any citations in the article above, a full list is available on request.
- Steve Bliss's Building Advisor at buildingadvisor.com helps homeowners & contractors plan & complete successful building & remodeling projects: buying land, site work, building design, cost estimating, materials & components, & project management through complete construction. Email: info@buildingadvisor.com
Steven Bliss served as editorial director and co-publisher of The Journal of Light Construction for 16 years and previously as building technology editor for Progressive Builder and Solar Age magazines. He worked in the building trades as a carpenter and design/build contractor for more than ten years and holds a masters degree from the Harvard Graduate School of Education. Excerpts from his recent book, Best Practices Guide to Residential Construction, Wiley (November 18, 2005) ISBN-10: 0471648361, ISBN-13: 978-0471648369, appear throughout this website, with permission and courtesy of Wiley & Sons. Best Practices Guide is available from the publisher, J. Wiley & Sons, and also at Amazon.com - Our recommended books about building & mechanical systems design, inspection, problem diagnosis, and repair, and about indoor environment and IAQ testing, diagnosis, and cleanup are at the InspectAPedia Bookstore. Also see our Book Reviews - InspectAPedia.
- In addition to citations & references found in this article, see the research citations given at the end of the related articles found at our suggested
CONTINUE READING or RECOMMENDED ARTICLES.
- Carson, Dunlop & Associates Ltd., 120 Carlton Street Suite 407, Toronto ON M5A 4K2. Tel: (416) 964-9415 1-800-268-7070 Email: info@carsondunlop.com. Alan Carson is a past president of ASHI, the American Society of Home Inspectors.
Thanks to Alan Carson and Bob Dunlop, for permission for InspectAPedia to use text excerpts from The HOME REFERENCE BOOK - the Encyclopedia of Homes and to use illustrations from The ILLUSTRATED HOME .
Carson Dunlop Associates provides extensive home inspection education and report writing material. In gratitude we provide links to tsome Carson Dunlop Associates products and services.


