 Window Sash & Hardware Repair & Window Air Leaks
How to repair a window sash, rope or pulley system & seal sash weight area air leaks
- POST a QUESTION or COMMENT about how to identify types and ages of window latches, weights, pulleys, and other controls.
Window sash repairs:
This article gives simple steps illustrating how to replace a broken window-sash rope or as an alternative we describe how to install a replacement track to keep a window sash in place and operating properly without air leaks or drafts.
Where to buy windows or window parts: a list of window and window hardware manufacturers is included at the end of this article.
InspectAPedia tolerates no conflicts of interest. We have no relationship with advertisers, products, or services discussed at this website.
- Daniel Friedman, Publisher/Editor/Author - See WHO ARE WE?
Window Rope Repair / Replacement, Window Ropes, Chains, Pulleys, Tracks, Sliders, Controls & Sash Latches
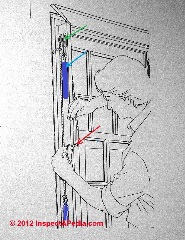 Window ropes (or chains) combined with window sash weights hidden in a cavity along either side of the window frame, were used to offset the weight of the window sash and to ease window opening and closing.
The window rope is secured to the top (red arrow in our sketch, below left) or occasionally to the bottom of the window sash at each side.
[Click to enlarge any image]
The rope (or flat metal chain) runs up the side of the window sash in a groove (our photo at far left), passes over a pulley (green arrow in sketch at below left) at the top of the window frame (photo at close left).
The window rope then extends down into a cavity to its connection at a (usually cast iron) window weight (blue in our sketch).
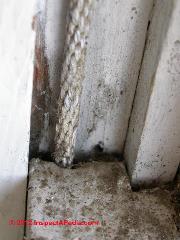
Below in our photo you can see the window sash cord or rope extending up and over the pulley.
You can't see the sash weight as that component (blue in our sketch above) moves up and down in a cavity behind the sash frame.
Repair of a broken window rope is not technically difficult, but it requires careful removal of the interior vertical window trim from one (or both sides) to expose the window sash weight and its cavity.
A new window sash rope is tied to the weight, passed up over the pulley and out into the window frame where it is secured (usually by a knot pushed into a hole at the window sash bottom corner).
If you need to replace the sash rope on the upper window sash you will need to remove in this order:
- The vertical window trim at one or both sides of the window.
- The lower window sash (the unit being repaired in our sketch at above left)
- The parting strip that separates the upper and lower sashes: red arrow in our photo (above center). The parting strip is typically tapped into or maybe nailed into a groove in the window jamb sides.
If you are lucky you can pry it out for re-use but in our experience [DJF] more often we have to destroy the parting strip to get the thing out.
Don't despair. It's trivial to cut or plan a new parting strip out of common pine stock by ripping a slightly over-thick length out of a 1x clear pine board. Then plane or sand the parting strip to fit snugly into the groove in the window jamb. Cut it to length and, after your window rope replacement, tap it into place. Don't glue it - you 'll be cursed by the next fellow. - The upper sash - to expose its rope and rope connection.
Window Sash Control Without Window Rope Replacement
A step up in energy efficiency from just replacing a broken window rope is the combination of insulating the window sash weight cavity and installing an air-tight window sash track. This method re-uses the original window sashes. (For the maximum window energy efficiency gain you'd replace the entire window assembly with replacement, insulated glass sashes - an easy but more expensive step.)
Several manufacturers offer a snap-in window track that uses a spring-loaded or even a simple aluminum center "parting strip" between the two sashes. To make this repair the window pulleys are removed and discarded - typically there are screws at the top and bottom of the pulley that permit it to be removed without any disassembly of the window trim.
But to get the replacement window tracks in place you may need to remove window trim to permit removal of the upper and lower window sashes.
The window ropes are removed from both sashes and discarded. The window weights and some of the window rope or chain are left in the cavity on either side of the window - just push the cut end of your chain or rope through the pulley opening and into the cavity where it will lie fallow.
The replacement window track left and right sides are held in place along with the upper and lower sashes as an entire "assembly" that is then set into the window jamb. Tacking a new outer wood strip molding in place holds the entire assembly in place.
The replacement window track kit usually includes foam or instructions to seal with caulk the surface behind the track - between the back side of the track and the window jamb surface. This step will eliminate drafts around your window sashes even though you're re-using the original window sashes.
The down side of this approach is that you have left the old un insulated cavity on either side of the window - an imperfection in the insulation of the building exterior wall.
To insulate that cavity, before we set the assembled sashes and new track in place we drill openings that permit filling the old window weight side cavity with spray foam.
See WINDOWS & DOORS our home page for window and door information, and
also see WINDOW TYPES - Photo Guide for a photographic guide to window and door types and architectural styles. Our links listed at the ARTICLE INDEX the bottom of this article provide in-depth articles on window and door selection, inspection, installation, problem diagnosis, and repair.
Check Window Condition for Leaks & Rot Damage Before Fooling With Sash Rope Repairs
Before buying materials or beginning a window sash replacement or repair, take a careful look at the entire window assembly both from indoors and again from outside.
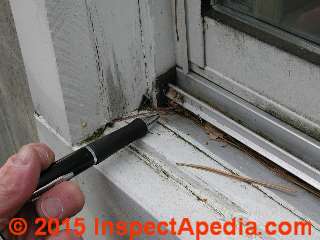
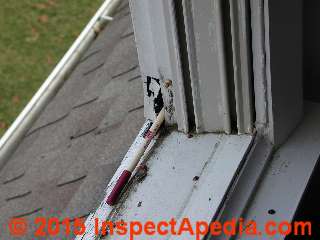
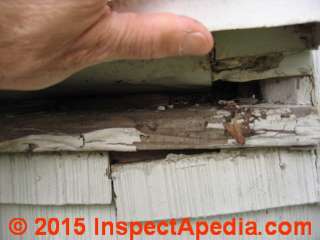
If the window frame and sill are rotted such as my pen is pointing out in the photos above and below (these are two different buildings), the window needs more extensive repair work or possibly complete replacement.
Watch out: when checking on the condition of your windows, be alert for leaks into the building wall cavity around and below windows: a common location of hidden rot, insect damage or mold contamination.
Watch out: when inspecting windows from the building exterior, don't be fooled by nice-looking aluminum-wrapped trim on older homes.
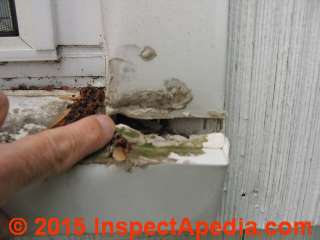
Look closely for signs that the trim was not properly installed, not properly sealed, or for leaks into the window and wall structure. Aluminum trim wrap itself is quite durable but improperly-installed its beauty is only skin deep, as my photos below illustrate.
This sill is totally rotted; I would consider checking the wall cavity for further damage.
See WALL / WINDOW LEAK DIAGNOSIS if you need more help figuring out where leaks around a window are originating.
Manufacturers of Windows & Window Parts or Replacement Windows
- Andersen Windows and Doors www.andersenwindows.com Vinyl-clad windows and patio doors, including storm resistant models. Also see Anderson A-Series Casement Windows & Window Parts, web search 01/15/2010, original source: http://www.andersenwindows.com/homeowner/pdfs/A-Series_Casement.pdf
- Atrium Companies Inc. www.atriumcompanies.com Vinyl and aluminum windows and patio doors
- Certainteed Corp. www.certainteed.com Vinyl windows and patio doors
- Crestline Windows and Doors www.crestlinewindows.com Wood, vinyl, and aluminum-clad windows and patio doors
- Eagle Windows and Doors www.eaglewindow.com Extruded-aluminum-clad windows and sliders with LVL frames and steel entry doors
- Fibertec Windows and Door Manufacturing www.fibertec.com Pultruded fiberglass windows and doors
- Hurd Windows and Doors www.hurd.com Wood, vinyl, and aluminum clad windows and patio doors
- Jeld-Wen Windows and Doors www.jeld-wen.com Wood, vinyl, aluminum-clad, and aluminum windows and patio doors
- Kolbe Windows and Doors www.kolbe-kolbe.com Wood, vinyl, and aluminum-clad windows and patio doors
- Marvin Window and Doors www.marvin.com Wood and extruded-aluminum-clad windows and patio doors, including true divided lites and storm-resistant models
- Milgard Windows and Doors www.milgard.com Wood, aluminum, vinyl, and fiberglass-clad windows and patio doors
- MW Windows www.mwwindows.com Wood, vinyl, and vinyl-clad windows and patio doors
- Peachtree Doors and Windows www.peach99.com Vinyl-clad and aluminum-clad windows with optional hardwood interior; aluminum-clad, steel, and fiberglass patio doors with optional hardwood interior
- Pella Windows and Doors www.pella.com Wood and aluminum-clad windows and patio doors with optional between-the-glass shades and blinds, including storm-resistant models
- Thermotech Windows Ltd. www.thermotechwindows.com Complete line of fiberglass pultruded windows
- Weather Shield Windows and Doors www.weathershield.com Wood, vinyl, vinyl-clad, and aluminum-clad windows and patio doors, including historic replacement windows and storm-resistant models
- WindsorWindows and Doors www.windsorwindows.com Wood and vinyl windows and patio doors, including a line of wood windows with a cellular-PVC exterior
Industry Associations for Windows & Doors
- American Architectural Manufacturers Association (AAMA) www.aamanet.org
- Efficient Windows Collaborative www.efficientwindows.org
- National Fenestration Rating Council (NFRC) www.nfrc.org Sustainable by Design www.susdesign.com
- Shareware calculators for sun angles, solar heat gain, and shading
- Window and Door Manufacturers Association (WDMA) www.wdma.com
- WPSC Window Preservation Standards Collaborative,
Website: http://windowstandards.org/ Thanks to preservationist John Leeke for this suggestion. This website is marketing a book of suggestions for the preservation of historic windows. Website excerpt:
Older and historic windows can be saved with ordinary maintenance, repairs and energy saving upgrades.
-- Window manufacturer list adapted and paraphrased, edited, and supplemented, with permission from Best Practices Guide to Residential Construction (Steve Bliss, J Wiley & Sons) .
...
Reader Comments, Questions & Answers About The Article Above
Below you will find questions and answers previously posted on this page at its page bottom reader comment box.
Reader Q&A - also see RECOMMENDED ARTICLES & FAQs
Question: antique sash weights & window pulley behind cabinets: what type of plasterboard is exposed?
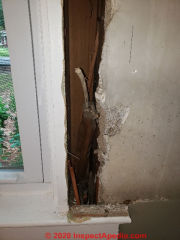
Above: sash weights in their vertical channel alongside a window of a South Carolina home. [Click to enlarge any image]
As I removed kitchen cabinets that had been built in right up to the old windows (which were replaced about 8 years ago), I discovered the old sash weights had been left in the wall cavity.
I believe the house was built in 1945. I think the walls are gyp rock lath but perhaps you can confirm? - 2020/11/03 Stephanie F. Nichols, Greenville SC
Moderator reply:
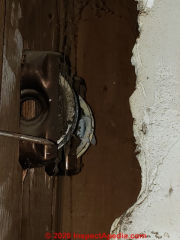
Above: 1940s window sash weight pulley in a South Carolina home.
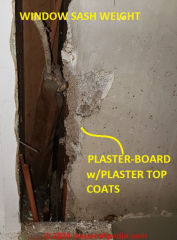
In the photos the wall covering looks like true plaster base, or possibly true plaster-board with a paper backing (our edge view was very limited);
if that's what's there it's not a gypsum board in that the bulk of the material is coarse and sandy rather than more homogeneous white like gypsum.
See details of types of plaster and plaster board
at PLASTER TYPE IDENTIFICATION
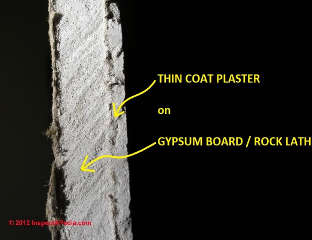
In comparison with your plaster system, below is a photo of the edge of a gypsum "rock lath" board.
If you have another view of the edge or of the back of the material or of the presence or absence of wood or metal lath that'll be useful.
About the window sash weight space, when renovating or replacing windows it's useful to fill that area with insulation as otherwise that's a notorious spot for air leaks and thus heat loss, or perhaps in SC, un-wanted loss of cooler indoor air during the cooling season.
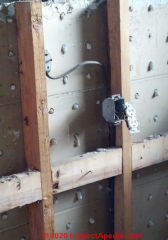
Below is a follow-up photo from Stephanie, showing the use of perforated gypsum board as a plaster base.
Details about this type of plaster base are
at GYPSUM BOARD ROCK LATH SYSTEMS
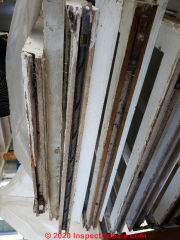
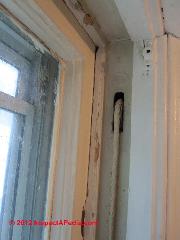
Reader follow-up: window sash springs from 1934 South Carolina house
As a side note, my grandmother owned a house down the street that was built in 1934 according to county records. The windows there had some kind of spring loaded sash? I attached pictures of those too.
On 2019-07-06 by (mod)
Thanks you so much John, it's nice to see you're still kicking around. I have added your suggested window preservation resource.
On 2019-07-05 by John leeke
Hi Dan, you may want to include the Window Preservation Standards Collaborative in you list of associations . www.WindowStandards.org --John
On 2017-01-07 by (mod)
Nuno:
If the window sashes are still sufficiently in the frame that there are no air leaks you should be OK but if there are actually gaps or air leaks then the window or its installation are not correct.
On 2017-01-07 by (mod)
RE-Posting
AUTHOR:Nuno (no email)
COMMENT:I just had slider windows installed. After I lock the window I move the window in a closing motion and the whole window unit moves in that direction. when I put my hand on the other side/window and push in that closing direction the window unit then moves in that same direction.
Moves probably 1/4 to 1/2 inch or so. I can not see the space due to the encasement. Is this normal? My old 1970's windows did not do this.
...
Continue reading at WINDOW FLASHING & SEALING Guide or select a topic from the closely-related articles below, or see the complete ARTICLE INDEX.
Or see these
Recommended Articles
- TRIM, INTERIOR INSTALLATION
- WINDOW HARDWARE AGE
- WINDOW FLASHING & SEALING Guide
- WINDOW INSTALLATION, Flange-Type
- WINDOW INSTALLATION, Integral Brickmold
- WINDOW INSULATION OPTIONS
- WINDOW SASH REPAIR
Suggested citation for this web page
WINDOW SASH REPAIR at InspectApedia.com - online encyclopedia of building & environmental inspection, testing, diagnosis, repair, & problem prevention advice.
Or see this
INDEX to RELATED ARTICLES: ARTICLE INDEX to BUILDING INTERIORS
Or use the SEARCH BOX found below to Ask a Question or Search InspectApedia
Or see
INDEX to RELATED ARTICLES: ARTICLE INDEX to BUILDING LEAKS & WATER ENTRY
Or use the SEARCH BOX found below to Ask a Question or Search InspectApedia
Ask a Question or Search InspectApedia
Try the search box just below, or if you prefer, post a question or comment in the Comments box below and we will respond promptly.
Search the InspectApedia website
Note: appearance of your Comment below may be delayed: if your comment contains an image, photograph, web link, or text that looks to the software as if it might be a web link, your posting will appear after it has been approved by a moderator. Apologies for the delay.
Only one image can be added per comment but you can post as many comments, and therefore images, as you like.
You will not receive a notification when a response to your question has been posted.
Please bookmark this page to make it easy for you to check back for our response.
IF above you see "Comment Form is loading comments..." then COMMENT BOX - countable.ca / bawkbox.com IS NOT WORKING.
In any case you are welcome to send an email directly to us at InspectApedia.com at editor@inspectApedia.com
We'll reply to you directly. Please help us help you by noting, in your email, the URL of the InspectApedia page where you wanted to comment.
Citations & References
In addition to any citations in the article above, a full list is available on request.
- Anderson A-Series Casement Windows & Window Parts, web search 01/15/2010, original source: http://www.andersenwindows.com/homeowner/pdfs/A-Series_Casement.pdf
- Thanks to reader Ed. - Hong Kong for providing a photo of the window operator for a casement window located in Hong Kong. January 2011.
- Our recommended books about building & mechanical systems design, inspection, problem diagnosis, and repair, and about indoor environment and IAQ testing, diagnosis, and cleanup are at the InspectAPedia Bookstore. Also see our Book Reviews - InspectAPedia.
- Best Practices Guide to Residential Construction, by Steven Bliss. John Wiley & Sons, 2006. ISBN-10: 0471648361, ISBN-13: 978-0471648369, Hardcover: 320 pages, available from Amazon.com and also Wiley.com. See our book review of this publication.
- Decks and Porches, the JLC Guide to, Best Practices for Outdoor Spaces, Steve Bliss (Editor), The Journal of Light Construction, Williston VT, 2010 ISBN 10: 1-928580-42-4, ISBN 13: 978-1-928580-42-3, available from Amazon.com
- The Journal of Light Construction has generously given reprint permission to InspectAPedia.com for adaptations, quotations, or reproductions used at this website. All rights and contents of the JLC material are ©Journal of Light Construction and may not be reproduced in any form.
- In addition to citations & references found in this article, see the research citations given at the end of the related articles found at our suggested
CONTINUE READING or RECOMMENDED ARTICLES.
- Carson, Dunlop & Associates Ltd., 120 Carlton Street Suite 407, Toronto ON M5A 4K2. Tel: (416) 964-9415 1-800-268-7070 Email: info@carsondunlop.com. Alan Carson is a past president of ASHI, the American Society of Home Inspectors.
Thanks to Alan Carson and Bob Dunlop, for permission for InspectAPedia to use text excerpts from The HOME REFERENCE BOOK - the Encyclopedia of Homes and to use illustrations from The ILLUSTRATED HOME .
Carson Dunlop Associates provides extensive home inspection education and report writing material. In gratitude we provide links to tsome Carson Dunlop Associates products and services.


