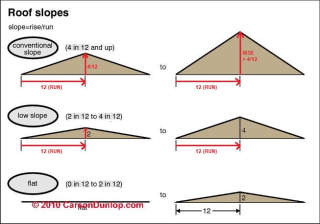
 Roof Measurements, Slope, Rise, Run, Area
How to measure or estimate roof rise, run, area or slope? Slope specifications by roofing type. How to use a framing square for rafter cuts.
- POST a QUESTION or COMMENT about types of roofing materials, installation, inspection, diagnosis, repair, maintenance, & warranties
Roof measurement methods:
Here we describe various methods for measuring all roof data: roof slope or pitch, rise, run, area, and other features.
We include on-roof measurements, roof measurements or estimates that can be made from ground level, and several neat tricks using a folding ruler to measure roof angle or slope.
This article shows how simple measurements can give the roof area without having to walk on the roof surface. This article series gives clear examples just about every possible way to figure out any or all roof dimensions and measurements expressing the roof area, width, length, slope, rise, run, and unit rise in inches per foot.
InspectAPedia tolerates no conflicts of interest. We have no relationship with advertisers, products, or services discussed at this website.
- Daniel Friedman, Publisher/Editor/Author - See WHO ARE WE?
How to Measure Roof Slope or Angle or Rise & Run & Roof Area
Measuring the roof slope, pitch, or rise and run is easy if you've got a tape measure and more accurate still if you've also got a level on hand.
[Click to enlarge any image]
Here are examples of every method we can think of for measuring the pitch or slope of a roof from various positions on the roof, near the roof, and from ground level.
There are several neat tricks that allow you to just a carpenter's rule to get a close approximation of the roof slope or pitch. We describe all of them here. All of these examples work best for a simple gable end roof. Additional measures may be needed for hip roofs, mansards, and intersecting gables.
How to Measure Roof Slope from On the Roof
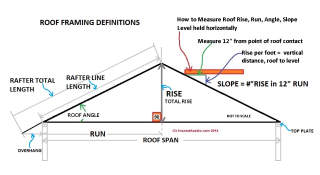
To use the direct roof slope measurement procedure shown just above, in addition to safe access to a roof that won't be damaged by touching or walking on it, you need: a tape measure and a carpenter's level. This procedure to measure roof slope can be performed on the roof or from a ladder at roof edge. [Click to enlarge the image].
- Hold the carpenter's level in a horizontal position with one end touching the roof surface.
- Measure out 12" along the level bottom edge - the green line in our sketch. Mark this point on the level.
- Measure straight down to the roof surface from the mark you just made - the blue line in our sketch.
- Read that distance in inches. The result is inches of rise per foot of run.
How to Measure Roof Slope from Inside the Attic or Inside of a Cathedral Ceiling Structure
You need: a tape measure and a carpenter's level. The procedure is like the on-roof example above, but flipped upside down.
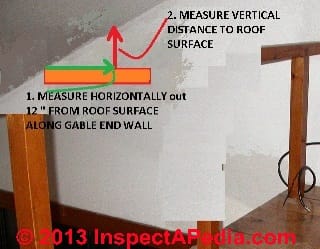
As with measuring roof slope on the roof, inside the attic all we need is a simple carpenter's level and a tape measure. We use the level to measure out from the roof surface horizontally for a distance of 12".
Then from that point on our level we measure the distance straight up to point of contact with the roof surface.
That distance in inches will be the inches of rise per foot of horizontal run for this (horrible leaky) roof.
Watch out: if you do not keep the level at right angles to the roof (parallel to the gable end wall of the building) your vertical measurement will be inaccurate. Hold your level with its side tightly against the side of a rafter to keep the level at right angles to the roof surface.
Or you can make this measurement inside the attic or even inside the building if a cathedral ceiling is installed (photo at left) by holding the level right against the gable end wall as we show at left.
For an outdoor version of this same approach see our example of MEASURING ROOF SLOPE OUTSIDE at the gable end of a building.
How to Measure Roof Slope Outdoors at the Gable End of a Building
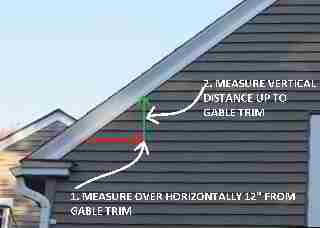
You need: a tape measure and, if there is no horizontal siding installed, you will need a carpenter's level. [Click to enlarge the image]
From a ladder or other accessible area giving safe access to the sloping gable end trim or roof edges,
1. Measure out horizontally 12" (one foot) from the gable end sloping trim to a point along horizontal siding, or use your level to make a mark that is level, horizontally measured out 12" from the sloped gable trim or roof edge.
2. From the point you just marked, measure vertically straight up to the edge of the same sloping gable end trim or roof edge. This distance (green arrow in our photo) is the roof rise in inches per foot of run.
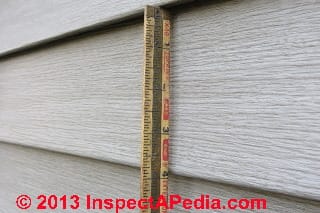
How to Measure Roof Slope & All Other Dimensions From the Ground - counting siding courses
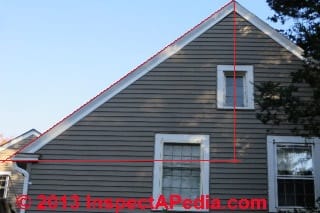
All of the roof data: rise, run, and slope can be calculated from the ground if the building sports horizontal siding such as that shown in our photograph below.
Roof rise (b): first we will obtain the total roof rise by counting siding courses. We measure siding width & then we count courses at the building gable end. If we start counting siding at a horizontal line even with the lower roof edge or eaves and count up to the ridge, we've got a close guess at the total roof rise.
The number of siding courses from the roof triangle base to the roof peak x siding course width = total roof rise = (b)
Roof length (c): Measure or step off building gable end width.
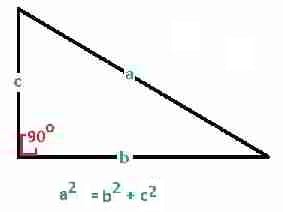
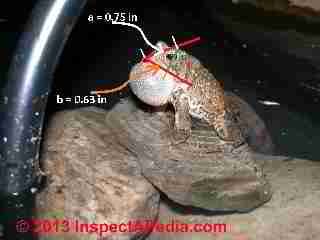
Roof width (a): This data allows us to calculate the roof triangle as we know two sides (b) and (c) of the three sides of a right triangle (the red lines in our photo at above left). Let (b) = the vertical rise in the roof and (c) = the roof length (building length + gable overhangs). The third side of the triangle, its hypotenuse or the sloping surface of the roof, or side is (a) which is calculated as follows:
a2 = b2 + c2 - the square of the length of the hypotenuse (a) equals the squares of the lengths of the opposite sides of a right triangle (b) and (c).
Given a2 we use our calculator to take the square root and bingo, we have the length of the sloping side of the roof.
Given that we now know all of the lengths of our triangle we can easily obtain roof slope too if we need it.
Now finally to get the roof area, we just need one more figure, the length of the roof along the building eaves or ridge. From the ground we measure or step off building length (L).
The roof area (RA) is calculated easily: we multiply the Roof Length (c) (which is the sum of building length plus the gable end overhangs of the roof) by the Roof Width of slope (a) that we just figured out above when we computed the hypotenuse of the roof triangle (that's why we needed the roof rise number).
RA = (a) x (c)
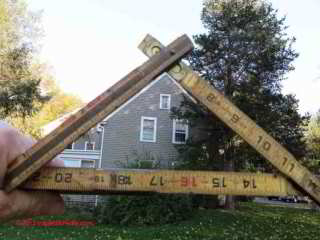
Measure Roof Slope From the Ground Using a Folding Carpenter's Rule
As you've see from out other roof measurement examples beginning
at ROOF MEASUREMENTS, knowing the roof slope is really handy as something we can measure up close but also from a distance, obtaining a number that plugs into simple formulas for roof area too.
What if the roof is inaccessible from outdoors, and there is no access to the building interior (i.e. its attic) so we cannot make direct roof slope measurements, but we still need to know its slope?
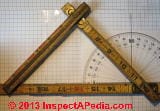
You need a simple folding carpenter's rule. It helps to have a steady hand and to read the instructions on exactly where to read the inches on the bottom scale in the folding rule triangle that we show at left.
Details of how to use a folding carpenter's rule to obtain roof slope, area, and other measurements along with a table that translates inches along the bottom scale of the folded rule into roof slopes are
at ROOF MEASURE by FOLDING RULE
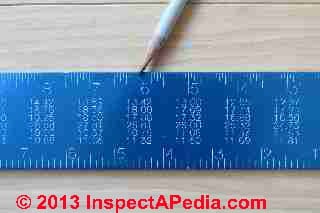
Obtain Roof Pitch or Slope by Using the Rafter Tables on a Framing Square
A long-standing use of the framing square that is missed by many new carpenters is the rafter table imprinted right on the framing square itself.
This data will tell us the required rafter length for a roof of a given pitch or slope.
The rafter table on a typical framing square gives rafter length for roof slopes with a rise anywhere between 2" to 18" per foot of run.
[Click to see an enlarged image]
Details of how we use the tables on a framing square to quickly figure out roof slope, rafter lengths, cuts etc. are
at FRAMING SQUARE USER'S GUIDE
How to Obtain the Roof or Ceiling Slope, Rise & Run Using an Angle-Finder Level & the Tangent Function
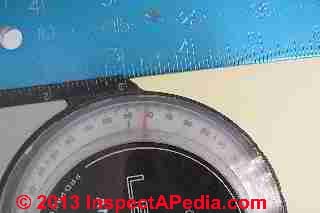
It's trivial to obtain the slope of a roof or ceiling if you happen to have picked up an angle finder such as the one shown here and sold by Pro Products Co., Rockford IL.
We can simply place either of the Level + Angle Finder straight sides against a sloping surface and read the surface slope expressed in degrees right off of the tool's scale.
A weight inside the Angle Finder level moves the pointer to the proper position.
For more accurate angle or slope measurements, for example on a rough shingle surface outdoors, use a straight edge between the angle finder level and the roof surface to give a longer footprint for the sensor. If your framing square is steel (not aluminum), the angle finder level will clamp neatly right onto the framing square.
That's how I used the angle finder shown until someone ran over my steel framing square, forcing me to buy a new (aluminum model). The angle finder level still works but I have to hold it in place (leaving too scratches on my ceiling as I fumbled around for these photos).
You can see that the angle finder immediately gives the answer to the roof slope: 81 degrees. [Click to enlarge any image]
Now what? We can use the TAN or tangent feature of a calculator or a TANGENTS TABLE as a trivial way to convert degrees of slope (or grade if we're building a sidewalk or road) into units of run per unit of rise. The Tangent of any angle expressed in degrees is nothing more than a ratio:
Tangent = Rise / Run
Let's calculate rise per foot of run for this roof using the number from an angle level
I'll show that even if we screw up we can still come out ok finding the angle and then the rise and run of a roof using the angle finding level.
I read 81 deg. on my angle level. Now let's figure run for 12" of rise for an 81 degree slope - HOLD ON! something's crazy here. This is a low slope roof, how can it be sloping 81 degrees? Egad! that's nearly straight up! This is a good lesson in thinking for yourself - or performing a sanity check on calculations.
The answer is I was holding my angle level on the wrong scale. I could have made my photos over again holding the angle level the right way, but there's an easier trick:
81 degrees is just 9 degrees off of dead vertical (90 - 81 = 9). So really I could go just 9 degrees off of flat. As "flat" is 0 degrees of slope, flat+ 9 = 9. My roof actually slopes 9 degrees. Whew!
The Tan value for my 9 degree slope roof = Tan ( 9) = 0.1583
Find Tan 9 deg using a handy dandy calculator, or table such as the one I give
at ROOF MEASURE by FOLDING RULE.
The inches of rise for 12-inches of run on a 9 deg low-slope roof is calculated as follows:
Tangent is defined as a ratio: Rise / Run so all we need is a little algebra (don't faint, it's easy):
0.1583 = Rise / Run
Set run to 12-inches because we're going to calculate the rise per foot of run.
0.1583 = 12 / Run
Use simple algebra:
0.1583 x Run = 12" of rise
Run = 12" / 0.1583
Run = 75.8"
That makes sense: we travel about 75 inches horizontally for every 12 inches of vertical rise on this low slope 9 degree roof.
Calculate Unit Rise for the Roof Rise
To calculate total rise if I knew the total run (say we had made an on-roof measurement) we take the following steps:
Total Rise = (Total Run in Feet) x (Rise per Foot)
The Tan value for my 9 degree slope roof = Tan ( 9) = 0.1583
0.1583 = Rise / Run
Using a little high school algebra we can re-write the equation as
0.1583 x Run = Rise
If I want to know the rise per foot of run I calculate
0.1583 x 12 = 1.89 " of rise per foot of run.
Calculate Total Rise for the Roof
I measured the total horizontal run - my building width is 20 ft. + a total of 2 ft. of overhang at the eaves.
0.1583 x 22 = 3.5 ft.
My roof increases in height 3.5 ft. from the eaves to the high end (this is a shed roof).
I can check this result against the rise per foot we got above.
(22 ft. x 1.89" rise per foot) / 12 = 3.5 ft. (thank goodness)
For the Tangential Enthusiast - Using Inverse Tangent Function Tan-1
The inverse Tan-1 function can convert a Tan value back into degrees of roof slope.
Tan-1 (1.43) = 55 deg. and wonderfully, Tan-1 (1.00) = 45 deg.
Since Tan is a simple ratio of unit Rise / unit Run, we note that we can quickly convert a roof slope in degrees into the number of inches of rise per 12" of run as follows, using a 55 deg. slope as
example:
Tan (55) = 1.43
Since 1.43 = rise / run we can use simple algebra to write:
1.43 x 12" run = 17.16" of rise per 12" of run
How Various Roof Measurements are Calculated
Details for calculating roof area are at ROOF AREA CALCULATIONS
RA = Roof Area = RW x RL
If you have safe access to the roof surface you can quickly make the needed area measurements: just measure from the ridge to the lower edge or eaves, keeping your tape straight. With a decent 3/4" or 1" wide 30 ft. tape measure you can extend the tape out to catch the roof eaves without having to walk dangerously close to the roof edge. Also measure the roof edge or length.
- RW = Roof Width - dimension a in my sketch at left. Remember to include in (a) the amount by which the roof extends out over the building walls - its eaves.
- RL = Roof Length = dimension of the roof from one gable end of the building to the other. RL is simply the building width plus the amount of overhang at the two gable ends of the building.
Details for calculating the slope, pitch or grade of a roof or any other surface are
Or if you want to know more about the frog at left,
see FROGS HEAD SLOPE MEASUREMENT
Slope is simply the relationship between increase in height and horizontal distance traveled. In my sketch above if we travel up my triangle along (a) from left to right, we will cross a horizontal distance (b) and we will ascend in height an amount (c).
Slope or pitch or grade has several means of expression: Rise/Run, Angle in degrees, Tangent, Pitch, or Percent Grade - all compared in our little table below.
Tangent = Rise / Run
E.g. Tan (45 deg) = 1.00 - that is, we will travel 12" up for 12" of run
Tan -1 is the inverse of a Tangent which will convert any rise/run ratio back to degrees.
E.g. Tan -1 (1.73) = 60 deg.
Put another way, a roof with a slope of about 27 in 12 has a Rise/Run of 27/12 = 1.73 (approximately)
So Tangent in its simple use here is just the ratio of increase in unit height for travel in unit run. "Units" can be inches, feet, meters, furlongs, or hammer handle lengths. A table of tangent values for common roof slopes is given
at FOLDING RULER to SLOPE DATA TABLE.
Below is a tiny summary that shows the range of these values.
Notes to the table above
A complete table of these values is given
at FOLDING RULER to SLOPE DATA TABLE
A complete table of roof slopes expressed as rise / run, slope, and grade as well as roof walk-ability according to steepness is given
at ROOF SLOPE TABLE, TYPES, WALKABILITY
How to Use Horizontal or "Flat" Roof Projections as Rough Estimates of Roof Area for Inaccessible Roofs
Another simplistic approach used by some estimators is to ignore complex roof structure, just measuring the building's footprint and the roof slope - an approach that gets you into the right "ballpark" but will very seriously underestimate the roof area for steep slope roofs.
Frankly, as we illustrate beginning at ROOF MEASUREMENTS, there are some easy and accurate alternatives that can give a good estimate of roof area while making measurements only from the ground. But to understand how some people use a flat or horizontal projection of a roof to guess at roof area, here is the procedure.
BF: Measure the building footprint or BF
EO: Measure or estimate the increase in footprint size given by the roof eaves overhang. (Tip: look at the drip line under the roof eaves and measure the distance from the outer edge of the drip line to the building exterior wall. This is EF.
GO: Measure or estimate the increase in footprint size given by the gable end overhangs. This is GO.
RF: If the eaves overhang and gable end overhang are the same on both front and back and left and right building ends we just add these up to obtain Roof Footprint or RF.
RF = BF + (2 x EO) + (2 x GO)
RA: Obtain the approximate roof slope to convert Roof Footprint to Roof Area - RA using the ROOF SLOPE MULTIPLIER TABLE given below.
RA = RF x Roof Slope Multiplier
How to convert the building footprint or roof "footprint" (building footprint + roof overhangs) to roof area
To convert the rectangular footprint of the building roof to roof area we need to increase the footprint area to account for the greater area covered by the sloping roof. Using any of the roof slope estimating or measuring methods described above, just this simple roof slope multiplication chart:
Roof Slope Multipliers: convert a "flat" or "projected horizontal" building footprint
|
|||||||
|---|---|---|---|---|---|---|---|
Roof Slope
or |
Multiplier to convert a flat horizontal
footprint to roof area |
Triangle side (a) Hypotenuse or Roof Length |
Triangle side (b) |
Triangle side (c) Hypotenuse or Roof Width SQRT (a2 = b2 + c2) |
Convert (c) to Inch Scale (convert fraction to 16ths of an inch) |
(c) x 2 (two roof slopes) |
|
| 12 3/16" | 24 3/8" | ||||||
| 12 3/8" | 24 3/4" | ||||||
| 12 5/8" | 25 1/4" | ||||||
| 13 " | 26" | ||||||
| 13 3/8" | 26 3/4" | ||||||
| 13 7/8" | 27 3/4" | ||||||
| 14 3/8" | 28 3/4" | ||||||
| 15" | 30" | ||||||
| 15 5/8" | 31 1/4" | ||||||
| 16 5/16" | 32 5/8" | ||||||
| 16 7/8" | 33 3/4" | ||||||
Notes to the table above
Notes: for fractional slopes, when estimating roof area use the next higher slope multiplier.
Roof Pitch = rise / run = Roof Slope = Tangent Function. Tangent calculations are illustrated
Roof slope or pitch can also be expressed in degrees or angular degrees, as we illustrate
The numbers in the table above can be calculated as follows: (and as illustrated below)
For a 12-inch unit-length roof we calculate the hypotenuse dimension to obtain the roof true width for each roof slope. In the table above the roof slope or rise (e.g. 6 in 12) gives us the vertical dimension of a right triangle. The horizontal dimension is fixed at 12 inches.
A complete table of roof slopes expressed as rise / run, slope, and grade is given
at ROOF SLOPE TABLE, TYPES, WALKABILITY
Roof Area Estimating Using Online Satellite Services
On 2022-05-05 by aerial - Instead of measuring a roof by hand, get a roof report from us
Nice Blog !
Aerial Estimation provides a free trial of satellite roof measurements to check accuracy and turnaround time. For roofers and insurance adjusters in the United States and Canada, aerial Estimation provides accurate 3D satellite roof and wall measurements, aerial roof measurements, and roofing reports.
Instead of measuring a roof by hand, get a roof report now at. https://www.aerialestimation.com/
On 2022-05-05 by Inspectapedia Com Moderator (mod) - review & results using an aerial roof estimating service: Oops, wrong house!
@aerial,
Thanks aerial - for the good suggestion.
Actually your name is actually aerial, to fix your typo in the message you posted.
The following is excerpted from the Aerial Roof Estimation website cited by the person posting the suggestion above - we guess that it's a company rep.
Aerial Roof Measurement Services
... Get A Roof Report Using Accurate Satellite Roof Measurements at Aerial Estimation. We’re dedicated to saving your time, reducing your cost of business, ... with automated Aerial Roof Measurements. Our reports are unique because They are just as accurate as on-site measurements, ...
Our roof reports start at $12 and have no set-up or membership fees.
Comparing Roof Size Estimates & Job Cost Proposals
For Other Readers: how easy is it to use aerialestimation's service, and how well does it work?
The idea sounds like a good one. And some roofers tell us that they make regular use of the service, describing it as quick and easy.
We tested the aerialestimation dot com service with an actual roof that needs roof repair or replacement. In the screen shot(s), in our description of this service, and its result, we will redact the homeowner's private information.
1. First we walked the roof ourselves
and made actual measurements using a measuring tape, accurate to about 1/4" or better.
The roof is a flat EPDM comprised of four separate sections of varying size and condition.
We’ll report the actual physical measurement results in a follow-up post after we’ve seen the aerial survey report result.
2. Roofer A
came to the job site, walked the roof, and tried using his cellphone to measure the roof but didn't have success.
Roofer A left intending to use an aerial estimation service to obtain roof area and to mail us a roof repair estimate.
The roof proposal, received a week later, described the nature of the work to be performed: install 0.60 EPDM, fully adhered, over a new layer of roof boards atop the existing roof (no tear-off of old roofing excepting small areas of obvious, severe damage, described as "replacing rotten wood" to an unspecified extent), and metal perimeter flashing, 10 year warranty.
The roofer's proposal cost was $17.50 / sq.ft. based on our roof measurements and the proposal's total. The proposal included a 10-year roof warranty on labor.
3. Roofer B
walked and inspected the roof in more detail, then made actual roof measurements using a roller-type measuring wheel.
Roofer B provided a written estimate of the job, the roof area, and the work to be done. The roofer's proposal, received in 48 hours, described the work to be performed: complete tear off of the old roof covering. Repairs of any damaged decking or framing at an additional $2.70/sq ft.
This roofer's proposal cost was $16.80 / sq.ft. The proposal included a 20-year warranty on labor and material.
4. Aerial estimate
(roof area measurement) service: we signed up, noticed a few more typographical errors at the company's website and email correspondence but nothing serious, then we ordered an estimate for the same roof as described above, using the actual property address.
We will report the result of that service in a follow-up post when we have the results.
We encountered a few rough spots in arranging the aerial roof area estimate:
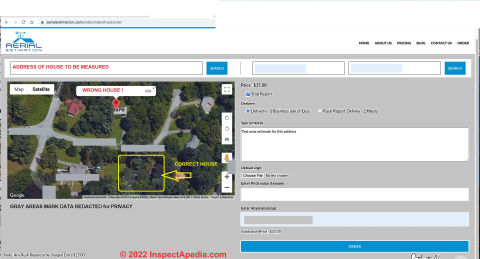
Problem #1: Wrong house for aerial roof measurement
The Google Map that opened to identify the building that we wanted to measure was pointing not to the property of interest, but to one nearby, across the street, at what's actually a different address. (Illustration above)
We tried dragging the Google Maps locator pointer to the proper building and then proceeded with our roof estimate order. (Illustration below)
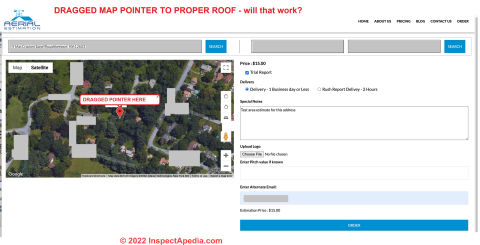
But it was never clear which building was going to be analyzed by the Aerial Estimation service. So we’re unsure what we’ve ordered and paid for.
Other than injuring someone or setting a house afire during a roof repair job, it's about as big a mistake as you can make, though I admit that I've made this mistake without help from aerialestimation dot com.
I, (moderator), once went to the wrong property and was walking and measuring the wrong roof when the homeowner gently asked me what I was doing on his roof. He was pretty nice about it.
Problem #2: Payment confusion for aerial roof report
To pay the quite reasonable $15. fee for our aerial estimate of the test building, we entered our credit card number. And indeed going to our credit card company's website (a VISA card) we saw the charge there.
Incidentally, the charge was $15. for a 1-day turnaround report, not quite $12. as the rep or reader pointed out. If you want a report in two hours, the charge will be $30.
More confusing: the email acknowledgement we received from aerialestimate said that our PayPal account was being charged $15.
 ...
... 
Concerned about stumbling into paying twice for one estimate, we logged in to PayPal but the charge did not appear there.
Whew!
Still the billing information was confusing.
Results for Aerial Estimates Roof Area Report
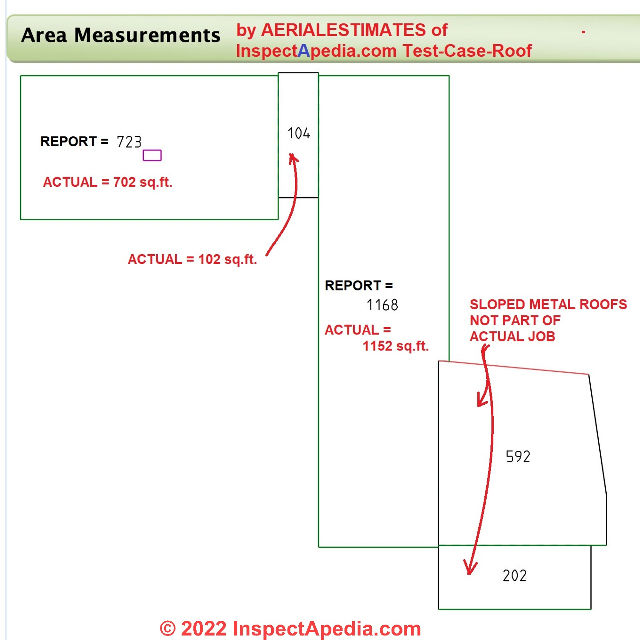
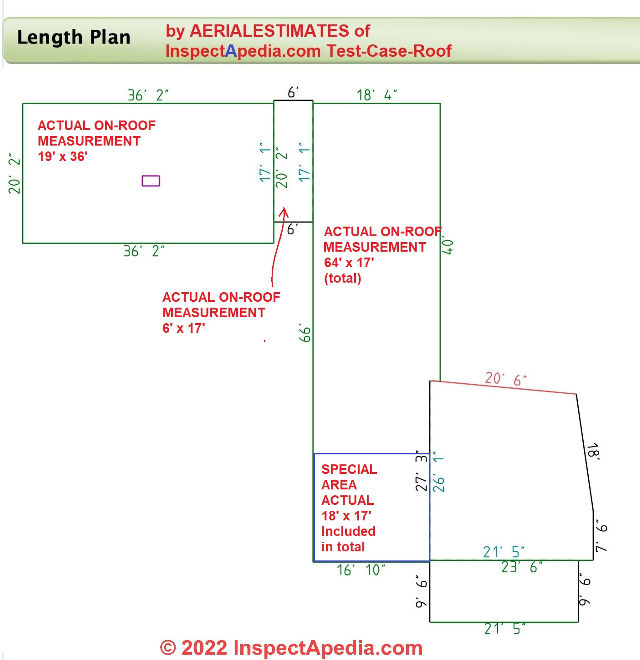
The roof areas, lengths, dimensions, pitch and other information provided by the company were reasonable though not precisely-accurate, as we'll illustrate below.
Overall areialestimates provided a timely, credible, usable roofing estimate for a case that was perhaps a bit difficult, with trees obscuring parts of the roof sections in question and very low slope roofs whose pitch would be more-difficult to measure.
AERIALESTIMATES ROOF AREA REPORT [PDF] was received on-time on the morning after we placed our roof estimate order described above.
Below, excerpting just two pages from the roof report we compare the company's estimates of roof dimensions and area with our on-roof actual physical measurements.
Roof Dimensions - Actual vs. AerialEstimates Estimate
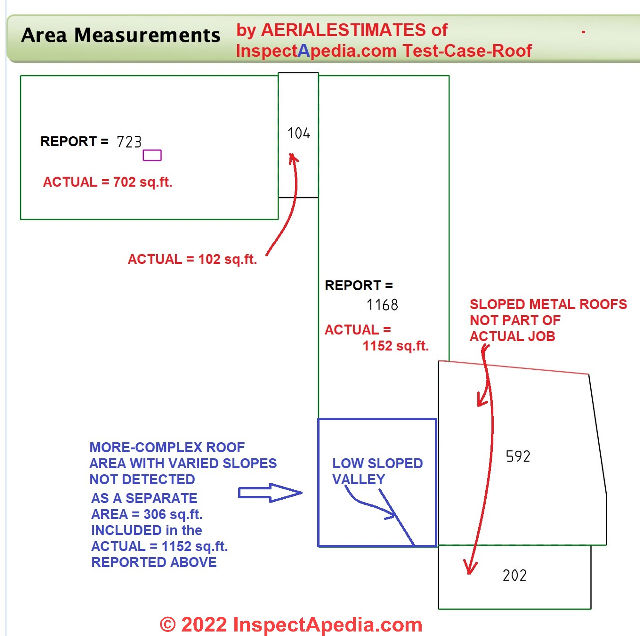
Roof Areas - - Actual vs. AerialEstimates Estimate
Smaller Complex Roof Area Treated as Part of Larger Roof
The roof area outlined in blue in the sketch above actually is separate and more-complex and is at a slightly higher elevation than the remainder of the larger rectangle.
These details will add a bit of work to the actual low-slope roofing job but but make no significant difference in the total roof area that we describe above.
OPINION: It's useful to have an idea of the total area of roofing work to be performed, and certainly the roofing companies need to know that information both to estimate the job cost and to purchase materials for the roof repair.
Watch out: it's useful to compare bids from multiple contractors but take care to obtain as much detail as you can about the work to be performed.
Different contractors will have different ideas about exactly what is needed - they may not all be performing identical work. So comparing a roof job based on cost alone is likely to be a mistake.
...
Reader Comments, Questions & Answers About The Article Above
Below you will find questions and answers previously posted on this page at its page bottom reader comment box.
Reader Q&A - also see RECOMMENDED ARTICLES & FAQs
On 2017-03-21 by roofgenius - want info for 8/12 Roof Pitch 33¾ Degrees
roofgenius.com said:
8/12 Roof Pitch 33¾ Degrees İnfo
On 2017-03-21 by danjoefriedman (mod)
also see ROOF SLOPE CALCULATIONS at https://inspectapedia.com/roof/Roof_Slope_Calculation.php
andROOF SLOPE TABLE, TYPES, WALKABILITY at https://inspectapedia.com/roof/Roof_Slope_Table.php for a nice table that shows the walk-ability of roofs of various slopes as well as giving the roof slope conversions between pitch expressed as n/12 into degrees of slope.
...
Continue reading at ROOF MEASURE by FOLDING RULE or select a topic from the closely-related articles below, or see the complete ARTICLE INDEX.
Or see these
Recommended Articles
- CALCULATE RISE & RUN from SLOPE
- LOW SLOPE ROOFING
- ROOF AREA CALCULATIONS
- ROOF MEASUREMENTS
- ROOF MEASURE ON ROOF
- ROOF MEASURE INDOORS
- ROOF MEASURE at GABLE END
- FRAMING SQUARE USER'S GUIDE
- ROOF MEASURE FROM GROUND
- ROOF MEASURE by FOLDING RULE
- ROOF SLOPE by ANGLE FINDER LEVEL
- ROOF CALCULATIONS SUMMARY
- ROOF ESTIMATES by FLAT PROJECTION
- ROOF AREA ESTIMATE by ONLINE AERIAL SATELLITE SERVICE
- FROGS HEAD SLOPE MEASUREMENT
- ROOF SLOPE TABLE, TYPES, WALKABILITY
- ROOF SLOPE CALCULATIONS
- ROOF SLOPE TABLE, TYPES, WALKABILITY
- TANGENT & SLOPE CALCULATIONS
Suggested citation for this web page
ROOF MEASUREMENTS at InspectApedia.com - online encyclopedia of building & environmental inspection, testing, diagnosis, repair, & problem prevention advice.
Or see this
INDEX to RELATED ARTICLES: ARTICLE INDEX to BUILDING ROOFING
Or use the SEARCH BOX found below to Ask a Question or Search InspectApedia
Ask a Question or Search InspectApedia
Try the search box just below, or if you prefer, post a question or comment in the Comments box below and we will respond promptly.
Search the InspectApedia website
Note: appearance of your Comment below may be delayed: if your comment contains an image, photograph, web link, or text that looks to the software as if it might be a web link, your posting will appear after it has been approved by a moderator. Apologies for the delay.
Only one image can be added per comment but you can post as many comments, and therefore images, as you like.
You will not receive a notification when a response to your question has been posted.
Please bookmark this page to make it easy for you to check back for our response.
IF above you see "Comment Form is loading comments..." then COMMENT BOX - countable.ca / bawkbox.com IS NOT WORKING.
In any case you are welcome to send an email directly to us at InspectApedia.com at editor@inspectApedia.com
We'll reply to you directly. Please help us help you by noting, in your email, the URL of the InspectApedia page where you wanted to comment.
Citations & References
In addition to any citations in the article above, a full list is available on request.
- NRCA - National Roofing Contractors Association - Website: www.nrca.net 10255 W. Higgins Road, Suite 600, Rosemont, IL 60018-5607, Tel: (847) 299-9070 Fax: (847) 299-1183
- Asphalt Roofing Residential Manual from ARMA the Asphalt Roofing Manufacturers Association Website https://www.asphaltroofing.org/product/residential-asphalt-roofing-manual/ ,
- In addition to citations & references found in this article, see the research citations given at the end of the related articles found at our suggested
CONTINUE READING or RECOMMENDED ARTICLES.
- Carson, Dunlop & Associates Ltd., 120 Carlton Street Suite 407, Toronto ON M5A 4K2. Tel: (416) 964-9415 1-800-268-7070 Email: info@carsondunlop.com. Alan Carson is a past president of ASHI, the American Society of Home Inspectors.
Thanks to Alan Carson and Bob Dunlop, for permission for InspectAPedia to use text excerpts from The HOME REFERENCE BOOK - the Encyclopedia of Homes and to use illustrations from The ILLUSTRATED HOME .
Carson Dunlop Associates provides extensive home inspection education and report writing material. In gratitude we provide links to tsome Carson Dunlop Associates products and services.


