
InspectAPedia® FREE Encyclopedia of Building & Environmental Construction, Diagnosis, Maintenance & Repair |
Question? Just ask us! InspectAPedia
|
 Toilet Installation Procedures & Details:
Best Practices, rough-in dimensions, tips & tricks

- POST a QUESTION or COMMENT about the best way to install a toilet
Toilet installation: best practices guide:
This article discusses the installation procedure for toilets, detailing best practices that avoid future leaks or toilet problems.
We include the rough-in dimensions that show where to locate the toilet and its waste pipe, and we provide warnings about some SNAFUs you can avoid during toilet layout & installation.
InspectAPedia tolerates no conflicts of interest. We have no relationship with advertisers, products, or services discussed at this website.
- Daniel Friedman, Publisher/Editor/Author - See WHO ARE WE?
Installation Procedures & Details for Toilets
This article series discusses current best design practices for kitchens and bathrooms, including layout, clearances, work space, and accessible kitchen and bathroom layout, clearances, turning space, grab bars, controls, etc.
We include advice on choosing and installing kitchen countertops, cabinets, and kitchen or bathroom flooring, sinks, and other plumbing fixtures and fixture controls such as faucets. A list of kitchen and bath product manufacturers and sources is included.
As detailed in Chapter 6 of Best Practices Guide to Residential Construction :
- Before installing a toilet,
examine it for manufacturing defects that can cause leaks or prevent it from sealing fully to the closet flange.
Occasionally the inlet where the tank connects to the bowl, or the outlet (horn) at the bottom of the bowl that seals to the closet flange, is deformed enough to cause problems.
Note that one of our readers used the term "water closet pan" to refer to the toilet bowl.
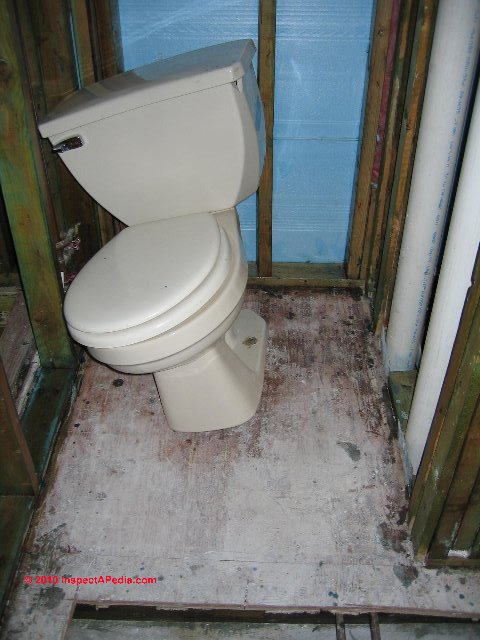
Watch out: check the toilet measurements and installation instructions before cutting the hole in the floor through which the toilet waste line will be installed. - Make
sure the base (foot) of the toilet is flat
or it will have a tendency to rock and break the seal, leading to odors and leakage.
Above: the rough-in location for a toilet drain will also determine the toilet's position relative to walls and other fixtures.
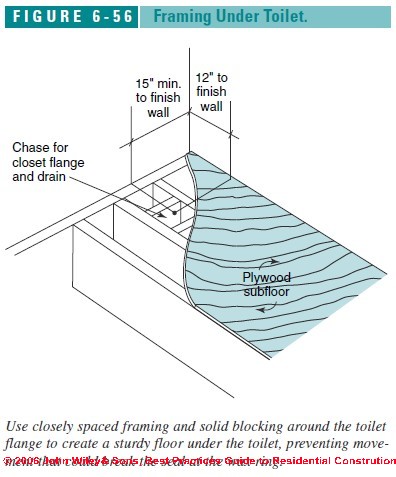
- Make sure the floor framing where the toilet will be mounted is adequate.
Ideally the toilet should sit between two joists set no more than 12 inches on-center, with blocking nailed on either side of the drain to reinforce the area around the closet flange - illustrated above in Figure 6-56.
This will limit any movement in the fixture that could break the seal at the wax ring.
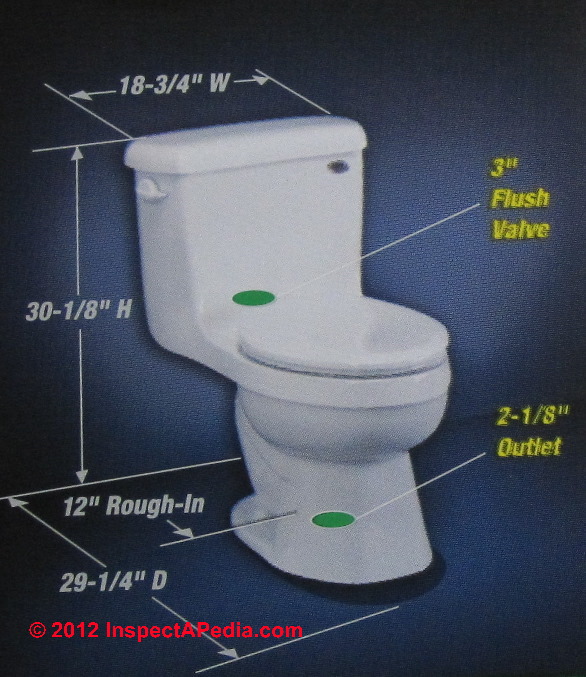
- Toilet rough-in dimensions
locate the toilet waste pipe and flange assembly in the building rough and finished floor so that the toilet will be spaced a proper distance from the wall.
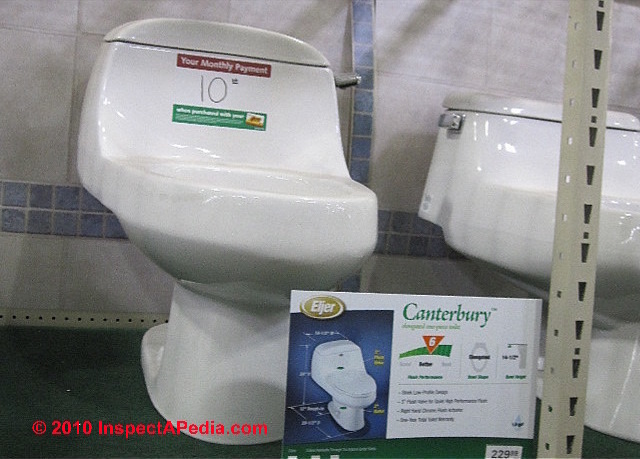
The toilet rough-in dimension illustration (above & below ) shows the standard distances to the waste line center from the finished wall and side wall and are illustrated by this adaptation from a Titan toilet package from Eljer.
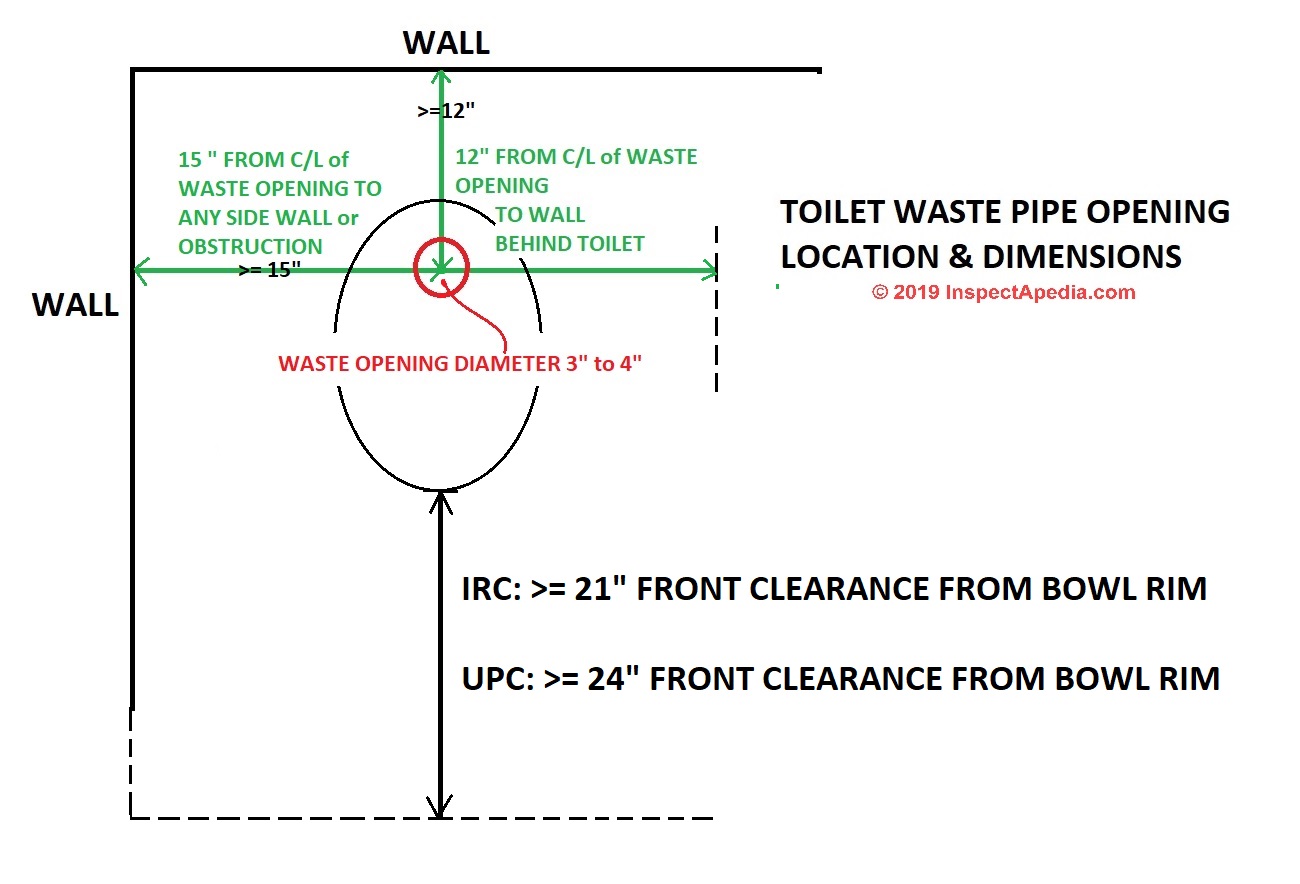
Toilet clearance distances from other fixtures or building walls, etc. are given in detail
at TOILET CLEARANCE DISTANCES - here are some key excerpts:
- 12" from finished wall behind toilet to center of waste line - may vary by toilet model.
- 15" from center of toilet to nearest side wall
- 21" or 24" clear space in front of the toilet
OPINION: Watch out: using ANY non-standard rough opening or R.O. to install a toilet today is likely to lead to some vehement language some day in the future when the odd-sized toilet must be replaced.
[Click to enlarge any of the toilet installation and measurement or clearance sketches shown here]
A toilet waste connection that is too close o the wall behind the toilet (or a wall to one side) as that can make it impossible to install a replacement toilet without moving the waste pipe - an onerous job.
If the toilet waste connection is a few inches more than 12-14" away from the wall (behind the toilet) installing a replacement or new toilet can still be accomplished: the installer might add a spacer behind the toilet cistern or tank to help stabilize the unit.
- The hole in the
subfloor cut to fit the toilet waste line should be just a bit larger than the drain.
Also, it is best if the toilet sits on top of the finished flooring rather than having a dirt-trapping joint where the finished floor abuts the fixture.
Watch out as well for proper sizing of the toilet waste pipe connection opening. The diameter of the waste line hole will typically be between 3" and 4".
The diameter of the cutout opening for the waste pipe must be small enough that the mounting flange for the toilet can bolt securely to the waste pipe AND can be secured to the subfloor.
- Next, install the closet flange and secure it to the
subfloor
with brass or stainless-steel screws.
With vinyl flooring, the flange can sit directly on the subfloor. With tile, use a plywood spacer to raise the flange to the height of the tile.
To insure longevity, use brass closet bolts, nuts, and washers rather than the plated steel that is often packaged with the toilet.
Watch out: the waste flange must extend out over and be secured to the flooring. The waste flange can NOT be recessed inside of the floor nor can it be below the floor. Why? Because the toilet mount will be insecure, the toilet weight may cause sewer line leaks, and because the toilet can not be well sealed to the waste pipe.
Our illustration just below shows that the plastic waste flange is atop the flooring and the installer (Steve, not me) is pushing the wax ring down onto the flange.

- Then place the toilet sealing wax ring
in the closet flange (photo at left) and set the bowl in place.
Toilet Setting Tips [DF]:
Watch out: did you remember to get the toilet mounting bolts ready before setting the toilet onto the toilet flange?
Install the (usually two) toilet mounting bolts by sliding their heads into the slot of the toilet mounting flange and position the toilet mounting bolts properly opposite one another in a line parallel to the wall behind the toilet's location.
Setting the wax ring now, onto the flange will help hold the two toilet mounting bolts upright but I [DF] usually proceed as follows:
I prefer to push the wax ring securely to the clean bottom of the toilet, around the toilet's waste opening.
Then I stand straddling the toilet bowl, holding it over the waste pipe, and (with help from a spotter if necessary) I lower the bowl or toilet base down atop the waste opening.
Some plumbers use two wax rings. IF using two wax rings first is pushed onto the bottom of the toilet bowl around its drain opening, pushing the wax ring thoroughly into recesses and making sure that the stick wax seals thoroughly to the bowl bottom and that it does not protrude into (and thus block) the bowl drain opening.
A second, thin wax ring is then placed onto and gently pushed against the toilet flange ring on the floor. Alternatively you can buy an "extra thick" toilet base wax ring seal.
Details about the types of toilet seals, closet seals, and wax rings or wax ring alternatives are
at LEAKY TOILET SEALS, ODORS and also
at LOOSE TOILET REPAIRS.
Now as the toilet is set and pushed down onto the toilet flange, rotate the toilet left and right slightly an inch or two to seal the two wax rings together or to seal the single wax ring between the toilet bottom or underside and the upper surface of the toilet mounting flange and waste pipe.
This approach can provide a more thorough seal and plenty of wax to minimize the risk of future leaks around the toilet base.
The two toilet bolts should be protruding up through the mounting holes in the toilet base.
- Gradually tighten the nuts
on the closet bolts,
alternating from one side to the other until it is snug without over tightening. - Finally, apply a
bead of silicone caulk
around the sides and front of the toilet foot, leaving the back unsealed.
This will allow leaks to be spotted before serious damage develops.
Toilet Leaks and Toilet-Caused Flood Catastrophes You Can Avoid
At our toilet home page,
TOILET TYPES, CONTROLS, PARTS we discuss the full range of types of toilets available.
If you are interested in choosing an environmentally friendly toilet tissue,
Also see ALTERNATIVE & WATERLESS TOILETS where we list alternative toilet designs to basic water-operated flush toilets.
Repairing problem toilets are discussed
at TOILET REPAIR GUIDE and
at TOILET OVERFLOW EMERGENCY. I
Hidden Toilet Leaks, Sewer Gases, Rot
Watch out: a loose toilet will leak into the floor structure and if present, the ceiling below, risking costly rot, insect damage, or mold contamination, or odors and sewer gas leaks
(see LEAKY TOILET SEALS & ODORS and also
and SEWER GAS ODORS).
But don't over-tighten the toilet base mounting bolts or you risk breaking the toilet.
Toilet Leak Catastrophes - cracked toilet tank floods home
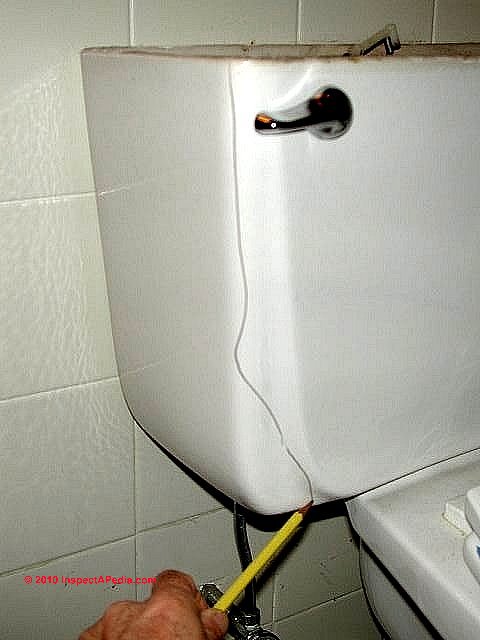
Watch out: be careful not to over-tighten the toilet tank mounting bolts. Doing so may break a porcelain toilet tank immediately, or, as we have observed, an over-tightened toilet tank may suddenly crack years later, flooding the building and leading to costly water damage.
Our photo at left illustrates just this case: the toilet tank cracked suddenly (no one was at home), several years after the tank had been mounted.
Details are at TOILET LEAK CATASTROPHES
See FLOODS IN buildings-priorities for an explanation of how to prevent mold contamination after building flooding.
Since two-piece toilet tank mounting hardware will include some thick rubber mounting washers you'll see that you can wiggle the reservoir tank slightly at its mounting point to the toilet bowl after the toilet tank has been secured.
- - Adapted with permission from Best Practices Guide to Residential Construction (Steve Bliss, J Wiley & Sons) .
...
Reader Comments, Questions & Answers About The Article Above
Below you will find questions and answers previously posted on this page at its page bottom reader comment box.
Reader Q&A - also see RECOMMENDED ARTICLES & FAQs
How is a water closet pan installed?
Explain the installation of water closet pan.
Note: include material type, quantity,size and description - On 2023-03-16 by Patrick S -
Reply by InspectApedia Editor (mod) - definition of a water closet pan - good luck on your quiz
@Patrick S,
What is a water closet pan?
The "bowl" or "pan" of a toilet is the receptacle that receives bodily waste. A toilet bowl is most often made of a ceramic, but can sometimes be made of stainless steel or composite plastics.
so include here "water closet pan" as a synonym for "toilet base" or "toilet bowl"
It sure sounds as if you're posting a test question. We hope you're not cribbing on your test. (That's a nice word for "cheating")
Need Rough-In details for a 1939 Gerber Jefferson Wall Hung Toilet
 Does anyone know if the Gerber Jefferson 1939 wall hung toilet have a 12" rough in or 14" - On 2019-11-17 by John -
Reply by (mod) - How to measure the rough-in location of the drain for a toilet
Great question. It's very easy to measure the rough-in location for a toilet.
Just measure the toilet itself and the spacing from the floor or wall, depending on where the toilet will be mounted.
But you'll see from our example sketch (from Gerber) that there is some latitude depending on how high you want the finished toilet seat to be above the finished floor. Gerberit says the top of the drain opening is 12-16" above the floor.
For a Gerber wall hung toilet, see the example measurements in this Gerberit Model No. 111.335.00.5 Toilet Installation Manual [PDF] - Copy on file as Gerberit-Concealed-Tank-Wall-Hung-Toilet-Manual.pdf
The floor drain location for a non-standard toilet given below can also be adapted for wall hung johns.
General Procedure for Measuring the Rough-In Drain Floor Location for an Unfamiliar or Non-Standard Toilet
- Set the toilet upright on clean paper set in turn on a dry, flat clean surface.
- Use a 4' level, held vertical, against the back of the toilet tank, with the lid on, to make a mark on the paper that corresponds to the wall against which the toilet could be placed.
This corresponds to the finished surface of the wall against which the toilet back and tank will be located.
Call this location W. for Wall.- Before moving the toilet, make a second mark on the paper along the rear of the toilet base -
This is location B for the rear outer edge of the toilet base- Note the distance between W and B
Call this C1 - for Clearance part 1- Now turn the toilet over and measure the distance from the toilet base rear outer edge to the inner edge of the toilet bottom drain flange closest to the toilet rear
This is location F for Flange - Mark that distance on your paper sheet as well- Measure the distance between C1 and F on the paper.
Call this C2 for Clearance part 2- Now the rough-in location for the drain onto which the toilet will mount is the distance from the building finished wall (don't forget "finished" so include the thickness of drywall or paneling if the bathroom is just rough-framed) will be
Rough-In RI = C1 + C2 + 1/2" (working space) - we've added the distance from the wall to the back of the toilet base to the distance from the back of the toilet base to the closest edge of the drain flange on the bottom of the toilet.
RI, The rough in location of the toilet drain will place the drain's edge that is closest to the wall (behind the toilet) out from the wall by distance RI;Details of rough-in toilet drain location and toilet installation are
at TOILET INSTALLATION PROCEDURE
You might also search to see if you can find some patent disclosures or similar documents that might have the dimensions.
This Q&A were posted originally
On 2019-08-06 by Anonymous toilet flush does not complete
Toilet starts to flush then stops
On 2019-08-20 by danjoefriedman (mod) -
Check in the cistern or toilet tank to see if the flapper valve is falling down too soon - if so shorten its pull chain.
What's the best way to install a toilet?
best way fo instaling a toilet - On 2017-09-15 y paul
Reply by (mod) - what is the best way to install a toilet
Please see the toilet installation details given above on this page.
Don't hesitate to ask any further questions that you may have.
...
Continue reading at TOILET REPLACEMENT PROCEDURE - details of how to remove an old toilet & install a new toilet, or select a topic from the closely-related articles below, or see the complete ARTICLE INDEX.
Or see these
Recommended Articles
- TOILETS, INSPECT, INSTALL, REPAIR - home
- FLUSHOMETER VALVES for TOILETS URINALS
- LEAKY TOILET SEALS, ODORS
- LOOSE TOILET REPAIRS
- LOW WATER USAGE / POWER FLUSH TOILETS
- TOILET DESIGN CHOICES
- TOILET CLEARANCE DISTANCES
- TOILET CLOG REPAIR, UN-BLOCK
- TOILETS, DON'T FLUSH LIST - home
- TOILET DRAIN CLOGGED
- TOILET FLUSH OPERATION
- TOILET INSTALLATION PROCEDURE
- TOILET CLOG REPAIR, UN-BLOCK
- TOILETS, DON'T FLUSH LIST
- TOILET FLUSHES POORLY
- TOILET LEAK CATASTROPHES
- TOILET OVERFLOW EMERGENCY
- TOILET PLUGS, SEWER BACKUP
- TOILET REPLACEMENT PROCEDURE
- TOILET RUNS CONTINUOUSLY
- TOILET SEAT / SEAT-LID REPLACEMENT & BOLT SPREADS
- TOILET TANK / CISTERN LID REPLACEMENTS
- TOILET TANK SWEATS
- TOILET WON'T FLUSH
- TOILET TYPES, CONTROLS, PARTS - home
Suggested citation for this web page
TOILET INSTALLATION PROCEDURE at InspectApedia.com - online encyclopedia of building & environmental inspection, testing, diagnosis, repair, & problem prevention advice.
Or see this
INDEX to RELATED ARTICLES: ARTICLE INDEX to TOILET INFORMATION
Or use the SEARCH BOX found below to Ask a Question or Search InspectApedia
Ask a Question or Search InspectApedia
Try the search box just below, or if you prefer, post a question or comment in the Comments box below and we will respond promptly.
Search the InspectApedia website
Note: appearance of your Comment below may be delayed: if your comment contains an image, photograph, web link, or text that looks to the software as if it might be a web link, your posting will appear after it has been approved by a moderator. Apologies for the delay.
Only one image can be added per comment but you can post as many comments, and therefore images, as you like.
You will not receive a notification when a response to your question has been posted.
Please bookmark this page to make it easy for you to check back for our response.
IF above you see "Comment Form is loading comments..." then COMMENT BOX - countable.ca / bawkbox.com IS NOT WORKING.
In any case you are welcome to send an email directly to us at InspectApedia.com at editor@inspectApedia.com
We'll reply to you directly. Please help us help you by noting, in your email, the URL of the InspectApedia page where you wanted to comment.
Citations & References
In addition to any citations in the article above, a full list is available on request.
- Best Practices Guide to Residential Construction, by Steven Bliss. John Wiley & Sons, 2006. ISBN-10: 0471648361, ISBN-13: 978-0471648369, Hardcover: 320 pages, available from Amazon.com and also Wiley.com. See our book review of this publication.
- Steve Bliss's Building Advisor at buildingadvisor.com helps homeowners & contractors plan & complete successful building & remodeling projects: buying land, site work, building design, cost estimating, materials & components, & project management through complete construction. Email: info@buildingadvisor.com
Steven Bliss served as editorial director and co-publisher of The Journal of Light Construction for 16 years and previously as building technology editor for Progressive Builder and Solar Age magazines. He worked in the building trades as a carpenter and design/build contractor for more than ten years and holds a masters degree from the Harvard Graduate School of Education. - In addition to citations & references found in this article, see the research citations given at the end of the related articles found at our suggested
CONTINUE READING or RECOMMENDED ARTICLES.
- Carson, Dunlop & Associates Ltd., 120 Carlton Street Suite 407, Toronto ON M5A 4K2. Tel: (416) 964-9415 1-800-268-7070 Email: info@carsondunlop.com. Alan Carson is a past president of ASHI, the American Society of Home Inspectors.
Thanks to Alan Carson and Bob Dunlop, for permission for InspectAPedia to use text excerpts from The HOME REFERENCE BOOK - the Encyclopedia of Homes and to use illustrations from The ILLUSTRATED HOME .
Carson Dunlop Associates provides extensive home inspection education and report writing material. In gratitude we provide links to tsome Carson Dunlop Associates products and services.
 | HOME | ABOUT | ASK a QUESTION | CONTACT | CONTENT USE POLICY | DESCRIPTION | POLICIES | PRIVACY | |
| © 2025 - 1985 Publisher InspectApedia.com - Daniel Friedman | |||||||||