
InspectAPedia® FREE Encyclopedia of Building & Environmental Construction, Diagnosis, Maintenance & Repair |
Question? Just ask us! InspectAPedia
|
 Best Practices Guide to Drywall Installation
How to hang & tape drywall, horizontal vs vertical drywall hanging

- POST a QUESTION or COMMENT about the best methods used to install or hang drywall
How to hang & finish drywall:
This article describes tips and tricks that help follow the best practices when installing drywall in buildings. We describe the types of drywall and where each type should be used.
We discuss different approaches to hanging drywall, including the necessary framing and adhesion or fastening specifications.
We describe the types & uses of drywall tape, and we review the types and uses of different types of drywall joint compound or mud, including general purpose mud, lightweight mud, setting compounds, and special products such as spray-on texture mud compounds.
This article also discusses how to avoid cracks in drywall finishes, including installation of floating corners, control joints, corner beads, and drywall curves or arches. We explain the interior temperature and humidity recommendations for drywall installation and finishing, and we provide product and manufacturer information sources for drywall work.
InspectAPedia tolerates no conflicts of interest. We have no relationship with advertisers, products, or services discussed at this website.
- Daniel Friedman, Publisher/Editor/Author - See WHO ARE WE?
Drywall Types & Installation, Hanging & Taping Procedures
 This article series discusses and provides a best construction practices guide to the selection and installation of building interior surface materials, carpeting, doors, drywall, trim, flooring, lighting, plaster, materials, finishes, and sound control materials.
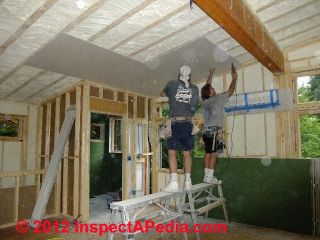
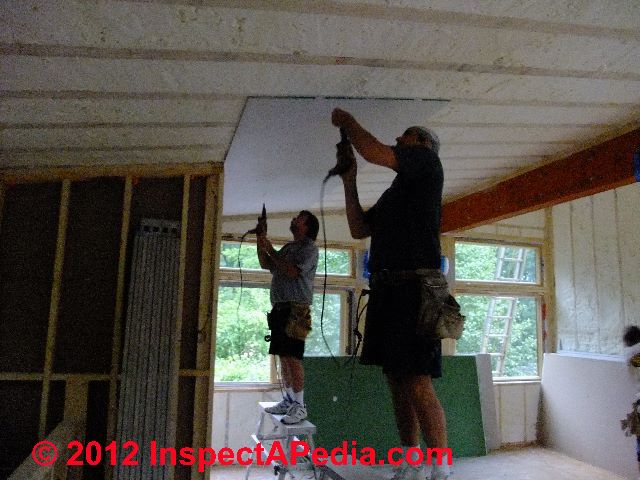
Photos at page top and left are provided courtesy of Eric Galow, Galow Homes. These pictures illustrate drywall installation by professionals. For speed, efficiency and profit, drywall installation is specialized, often using different crews to hang the rock from those who tape, finish, and paint the surface (shown below).
Separately at DRYWALL FINISH LEVELS we cite industry standards for the level of gypsum board finish work required for different building conditions and area uses.
This article is focused on drywall finish levels 4 and 5 for occupied, exposed areas where finish work quality is important. As described in the book, Best Practices Guide to Residential Construction (Steve Bliss, J Wiley & Sons) Chapter 5, Interior Finish:
Interior finishes are the most visible and, on a square-foot basis, often the most expensive components in a house. However, since many of these products and materials are marketed directly to consumers, they are often not well understood by builders and designers.
Making good decisions on such finish materials as flooring, carpeting, and lighting fixtures can make a critical difference to homeowner satisfaction. The builder or designer can play a key role in helping the homeowner choose finishes that are well-suited to the intended use, as well as providing the structural support and prep work the materials require for good performance.
Single-layer, 1/2-inch drywall is the default wall and ceiling treatment in most residential construction. Done well, it goes largely unnoticed.
Nail pops (DRYWALL NAIL POPS & DENTS) and cracks (DRYWALL CRACKS), however, are very conspicuous and remain the leading cause of builder callbacks. With wet or poor-quality framing, there are bound to be problems in the drywall finish. With dry lumber and proper detailing, however, drywall problems can be kept to a minimum.
Types of Drywall Available: applications & uses
Drywall consists of a gypsum core covered by two layers of treated paper. The long sides are tapered for easy finishing with joint compound. The short or “butt” ends are not tapered
Standard Drywall Properties

Drywall material comes in four thicknesses: 1/4-inch, 3/8-inch, 1/2-inch, and 5/8-inch. A single layer of 1/2-inch drywall covers most residential walls and ceilings.
Photo at left courtesy of Eric Galow, Galow Homes.
For a stiffer wall and better sound deadening, use 5/8-inch drywall or a double layer of 1/2-inch drywall, with all joints staggered between layers and the second layer glued to the first for best performance.
The 3/8-inch panels are useful for covering existing walls and ceilings in remodeling. One quarter- inch board, installed in layers, is useful for curves. Special 1/4-inch bending-type drywall has the smallest bending radius.
Fire-Resistant Drywall Specifications & Requirements for Fire Rated Drywall Between Occupied Space & Garage
Fire-code drywall has special additives, including glass fibers, to increase its fire resistance. Residential building codes typically require Type X 5/8-inch fire-code drywall with a one-hour rating for party walls, ceilings over furnaces, and common walls between living space and garages.
Watch out: for fire safety and inb compliance with model and local building codes, the ceiling of an attached garage and walls common with the occupied structure (private home, apartment, etc) need to be covered with fire-rated drywall.
See DEFECTS LIST - GARAGES - for details.
Moisture-Resistant Drywall
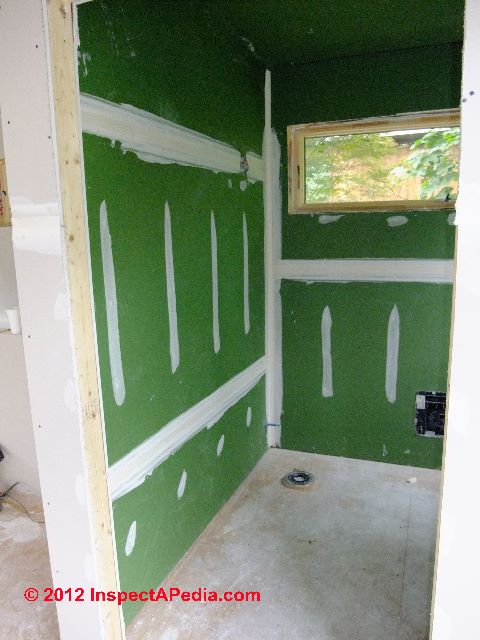
Moisture-resistant (MR) board, sometimes called “green board” because of its green paper facing, has limited water resistance from asphalt additives, and is recommended for high-humidity areas such as bathrooms and laundries.
The material is denser and less rigid than regular drywall, so it is prone to sag on ceilings unless the framing is 12 inches on-center or less. Also it will fall apart, like regular drywall, if it gets soaked.
For that reason it should not be used as a tile substrate in any application where it might get wet.
Photo courtesy of Eric Galow, Galow Homes.
Mold-Resistant Drywall
This is a relatively new product that uses an inorganic fiberglass matt instead of paper facing, since the paper facing readily supports mold growth. Panels are available with the fiberglass matt on one side or two.
Glass fibers in the gypsum core add strength as well.
Details about mold resistant drywall and an OPINION about its effectiveness are found
Installation Procedures for Drywall: Best Practices Guide
To prevent problems in the finished drywall installation, use good quality framing lumber and follow these recommendations:
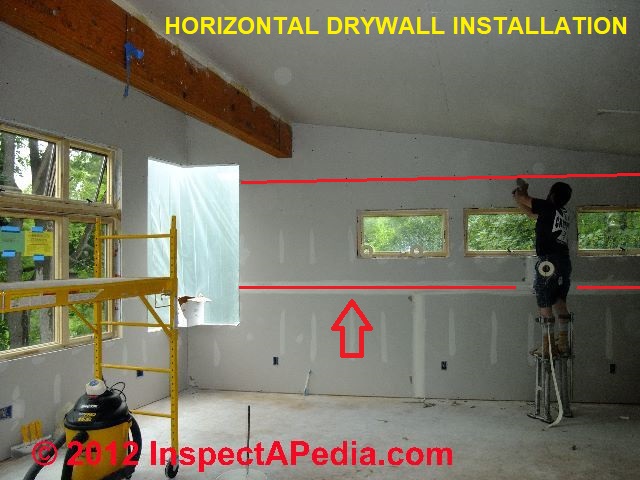
- For walls 8 feet high or less, run drywall sheets
perpendicular to the studs [or horizontally, with the long side of the drywall sheets parallel to the floor. The installer in the job shown at left used 12-foot drywall lengths for even fewer joints. - Ed.]. This is stronger, bridges
framing irregularities, and results in fewer joints.
Our photo above illustrates horizontal drywall application - as you can see by noticing the long horizontal tape joint up 4 ft. from the floor (red arrow).
Photo courtesy of Eric Galow, Galow Homes.
Also see DRYWALL INSTALLATION HORIZONTAL vs VERTICAL - which method is better, easier, safer, stronger? - Make sure the drywall is tight against the framing before fastening.
- Install with screws, which have better holding power than nails and are less likely to tear or weaken the drywall facing.
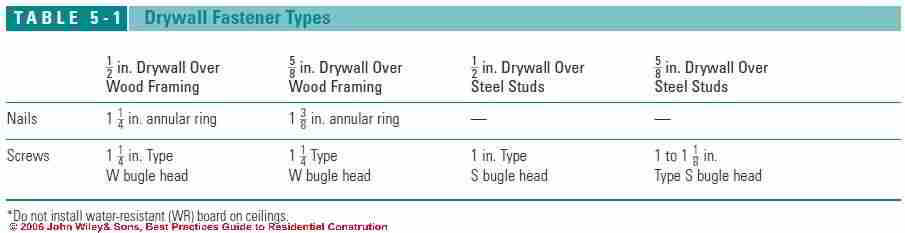
- Use the correct length fastener. Either longer or shorter than recommended can lead to nail pops (see Table 5-1 shown below).
- Maintain the temperature at 55°F to 70°F during and after applying the joint compound.
- If using fiberglass mesh rather than paper tape (the top two products in our photo), use setting-type joint compound to embed the mesh, since it is not as strong as paper tape.
- Install drywall on ceilings before walls and use floating corners to allow for some movement.
- Keep butted joints (short ends) to a minimum, and butt the sheets together loosely. Because they are un tapered they are more visible.
Framing Specifications for Successful Drywall Installation
Drywall should be installed over straight and level framing. If the framing is excessively wet, it will crack the drywall and cause nail pops as it shrinks. If the framing is twisted, bowed, or out of alignment, it will cause weak points in the surface and possible cracking.
[Click to enlarge any table or image]
Moderately bowed studs can be fixed by cutting a kerf at mid height, straightening the stud, and scabbing a section of 1x4 or plywood on either side. Repair or replace problem studs before installing the drywall.
On ceilings, it is common practice in some parts of the country to install 1x3 furring strips at 16 inches on-center perpendicular to the ceiling joists before installing the drywall.
The furring is shimmed to even out irregularities in the ceiling joists and creates a more stable substrate for the drywall with less chance of cracking. Also, the furring provides a wider nailing surface for hanging drywall.
Also see DRYWALL CRACKS for a catalogof the causes & dures of drywall cracking.
Framing Spans Recommended for Ceiling & Wall Drywall Installation
On walls and ceilings, it is best to install drywall perpendicular to the framing. This ties together more framing members and provides greater racking strength.
On walls, 1/2-inch or 5/8-inch drywall can span up to 24 inches whether it is installed parallel or perpendicular to the framing.
On ceilings, 1/2-inch or 5/8-inch drywall can span 24 inches only if it is installed perpendicular to the joists and supports less than 1.3 pounds per square foot (psf ) of insulation. Otherwise, 16-inch on-center spacing is recommended. With latex spray textures or airless spraying of latex paints, perpendicular installation over 16-inch on center framing is recommended to prevent sagging.
Guide to the Adhesive Installation Method for Drywall
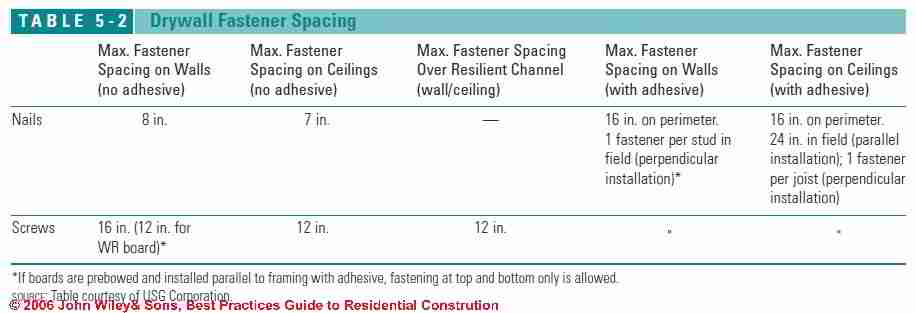
Another way to minimize nail and screw pops is to minimize the number of fasteners. Gluing the drywall to the studs with construction adhesive allows the installer to eliminate 75% of the fasteners (Table 5-2).
Using adhesives also helps to even out minor irregularities in the framing and results in a much stronger and stiffer wall.
Use a construction or drywall adhesive that meets ASTM C557.
Apply a 3/8-inch bead down the center of each stud or joist, stopping about 6 inches from each end. Where two drywall panels meet, apply two 3/8-inch beads so each panel gets full contact with adhesive.
No adhesive is needed at inside corners, top and bottom plates, or at bridging, diagonal bracing, or other miscellaneous framing. Also do not use adhesive over polyethylene sheeting or insulation batts with paper flanges stapled over the stud faces.
To ensure a good bond, drywall manufacturers recommend pre bowing the drywall by stacking several sheets face up with a 2x4 under each end. Left overnight, this will leave a permanent bow, forcing the center of the sheet tight against the adhesive (except in very humid weather, when the boards may remain flexible).
Push drywall panels into the adhesive with hand pressure along joists or studs. Do not apply more adhesive than can be covered in 15 minutes, or it may skin over. Allow the panels to dry at least 48 hours before adding joint compound or skim coating.
How to Install Floating Corners to Avoid Drywall Cracks
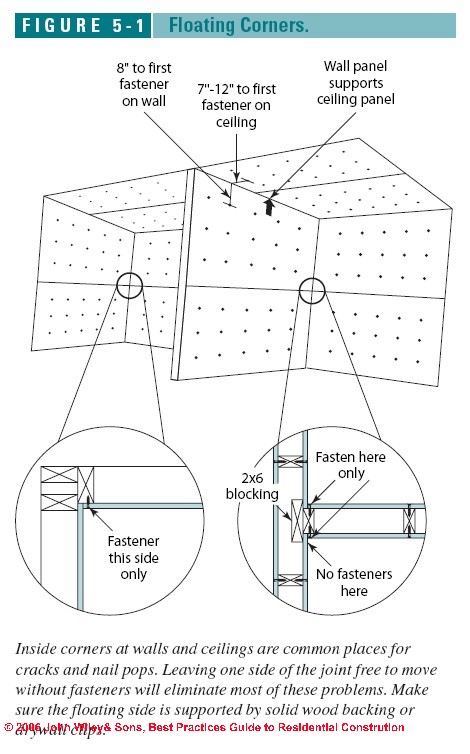
Inside corners at walls and between walls and ceilings are stress points for drywall and common places for cracks or nail pops. Leaving one side of the joint free to move without fasteners will eliminate most of these problems.
On ceilings, place the first screws 7 to 12 inches in from the corner and support the ceiling drywall with the wall panels.
Also, do not fasten the top 8 inches of the wall panels.
No screws should go into the top plate, where shrinkage may occur. Similarly, leave one side unfastened at wall-to-wall corners, but make sure it rests against solid wood backing or drywall clips (see Figure 5-1).
Also see DRYWALL CRACKS.
Guide to use of Control Joints to Avoid Drywall Cracks
While control joints in drywall are not commonly used in residential construction, they are a good idea in surfaces over 30 feet long or at changes in floor level, such as stairway walls. On a stairway wall, locate the control joint at the top of the first-floor wall where the top plate meets the ceiling joists.
The 1/4-inch joint can be painted with the wall and left as a reveal. Another option is to omit the metal control joint and simply leave a small gap between the upper and lower drywall, and cover the joint with wood trim.
Details about drywall control joints (plasterboard control joints or gypsum board control joints) including installation specifications & product sources are
Installing Drywall Corner Bead
Outside corners fashioned with metal corner bead are also prone to cracking and nail pops. To avoid problems, do not nail into the top plate, and leave a gap at the bottom of the wall to accommodate any settling. Nail with drywall nails at 9 inches on-center on both sides of the corner, with nails opposing each other.
Newer “mud-on” or “tape-on” corner beads are less prone to edge cracking than traditional metal corner beads and, with no nails, eliminate nail popping. The corners are metal or plastic and are held in place by paper or vinyl flanges embedded in joint compound.
Some of the vinyl corner beads can also be installed with spray-on contact cement. In general, tape-on corner beads require fewer coats and less joint compound than traditional metal corner beads, speeding up the finishing process.
Method for Installing Drywall Curves on Radiused Walls
For radiused walls, the easiest approach is to use two layers of1/4-inch drywall, preferably the “high-flex” type, if available. If not available, it is possible to wet the side of the drywall that will be compressed (the inside of the curve) with a garden sprayer or short-nap roller.
Then stack the boards with wet face to wet face and cover with plastic sheeting. After an hour, install the panels with their long dimension across the studs. Minimum bending radii are shown in Table 5-3.

Procedures for Taping and Finishing Drywall: Best Practices
The building should be heated before finishing begins and maintained at 55°F to 70°F throughout taping and finishing.
Photo at left showing drywall expert Ron taping a cathedral ceiling is provided courtesy of Eric Galow, Galow Homes.
The cooler and more humid it is, the longer it will take ready-mixed joint compounds to dry. If necessary, use supplemental heaters and provide adequate ventilation to remove excess moisture.
[See Offermann, Francis (Bud) J., P.E., C.I.H., ASHRAE & Mark Nicas, Ph.D., MPH, C.I.H., USE WITH ADEQUATE VENTILATION ? [PDF], ASHRAE Journal, May 2018]
Too much moisture can soften and weaken the bond between the drywall and the paper facing.
Conversely, if the weather is too hot and dry, paper drywall tape may not bond well and joints may experience excess shrinkage and cracking.
Mesh vs. Paper Tape Choices for Drywall Seams
 ...
... 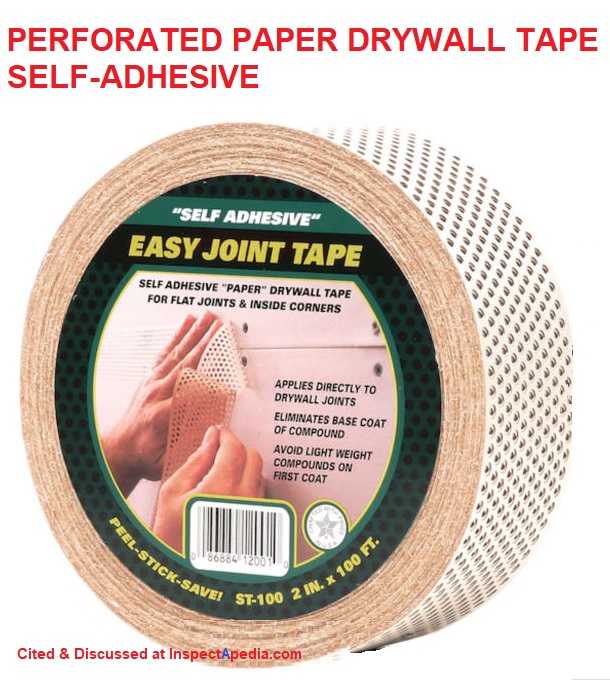
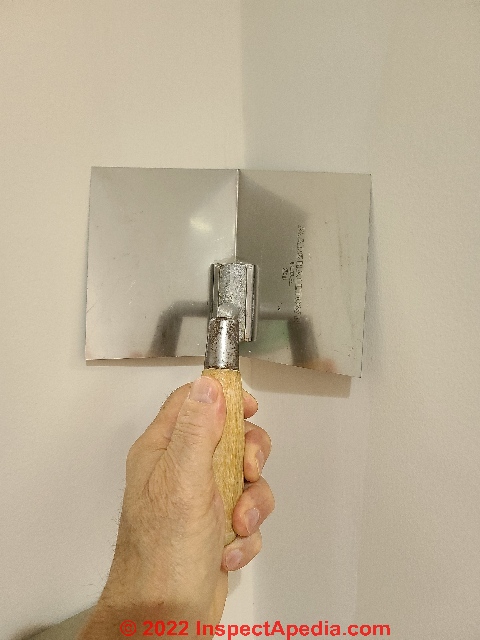
Mesh tape is easier to apply but not as strong as paper tape. It should never be used in inside corners, where it can tear or be cut by the trowel.
OR use a special drywall corner trowel like the one shown below -[DJF]. That tool works well to speed the application of mud into the corner or into a wall/ceiling joint and it doesn't tear the mesh tape.
However, if combined with setting-type compound, mesh tape is nearly as strong as paper tape and can produce a quality job.
Mesh tape is also very useful for repairing cracks in older plaster walls or ceilings.
Also see ASBESTOS in DRYWALL TAPE? (probably not).
Joint Compound (Mud) Types for Drywall Taping & Finishing
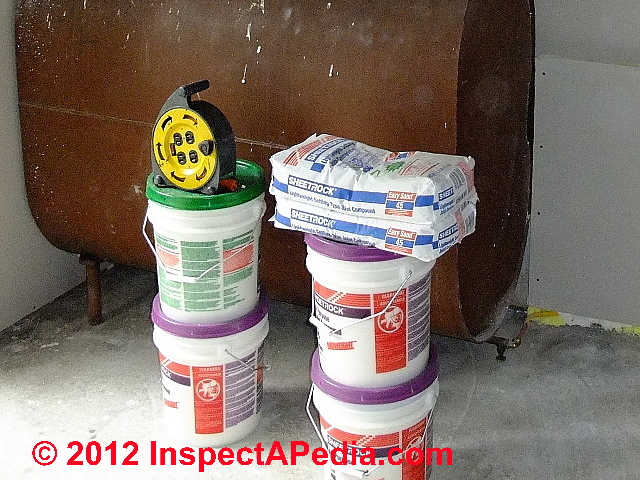
Color code guide to USG's joint compound mud bucket color tops
Watch out: the number and variety of joint compound and mud products for drywall finishing can be overwhelming to a beginner.
USG alone sells at least twenty-one different products including general purpose mud, quick set Durabond® type mud with various set times, lightweight general purpose mud, and Speed-Tex™ ready-mixed spay-on textured mud. [14]Happily most interior drywall taping and finishing can be accomplished using as few as one or more often just three products.
The three basic types of joint compound (mud) are shown in our photograph at left and are described below as the first three of our bulleted items:
- The Green-topped mud bucket in our photo at left is USG's high performance multi-task mud or "all purpose" joint compound.
- The Purple-topped mud bucket in our photo at left is USG's Mid weight all purpose joint compound. (or "Taping compound")
- The dry powder "mud" in paper bags in our photo at left is quick-set joint Durabond® compound.
- Blue-topped joint compound buckets (not shown) sold by USG contain lightweight all purpose joint compound.
- Chartreuse yellow-green topped USG mud (not shown) is an ultra-lightweight all purpose joint compound
Properties & applications of general purpose or "all purpose" joint compound
- Quick set joint compound, also referred to as "hot mud" because in fact it heats up during curing. In our photo at left hot mud is in those two paper bags at right. Hot mud is a powder (mixed with water) and is sold in a range of setting times from five minutes to 210 minutes.
We use hot mud for the first coat in plaster repairs and where thick filler is needed in preparing a wall or ceiling surface for finish work. Quick set joint compound is not recommended for amateur workers because it sets fast and because it is very difficult to sand - be sure that you leave the final hot mud surface smooth and slightly below the final desired finish surface level so that it can be top coated. - Topping joint compound: use this mud type for first and second joint compound layers or coats as it resists shrinkage precisely in the early taping phase where you are likely to be applying the mud in thicker layers. This compound is softer and easier to sand.
- All purpose joint compound: use this mud type for joint taping and for applying textured surfaces. For skim coating an entire wall you may find problems with shrinkage and more work in sanding.
Many residential jobs are taped with premixed all-purpose joint compound for all three coats.
While this is acceptable, according to U.S. Gypsum guidelines, installers can produce stronger joints less prone to cracking by using special setting-type compounds for the first coat to embed the tape and corner beads and patch any big holes.
For nail and screw indents, and the fill and topping coats on seams, most contractors use premixed all-purpose compound; although special topping compounds are available. Premixed compound should be stored, applied, and allowed to dry at between 55°F and 70°F, preferably over 60°F.
Properties & applications of setting compounds in drywall applications
Do not use setting-type compound on nail or screw indents.
Setting compounds are mixed on-site and set up by a chemical reaction, rather than evaporation of the water.
They dry rock-hard and do not shrink. Setting times range from 20 minutes to several hours, and the compound can be recoated as soon as it sets, rather than the next day as is typical for ready-mix compound.
Durabond® 90 is the most commonly used. A new type of setting-type compound from USG, called Easysand®, overcomes the chief liability of setting-type compounds—that they are nearly impossible to sand.
Interior Conditions & Temperatures Recommended for Drywall Installation & Finishing
U.S. Gypsum recommends in its Gypsum Construction Handbook that, in cold weather, buildings be heated to 55 to 70 degrees F. before applying joint compound.[6]
Most formulations of joint compound specify a minimum application temperature of 50 or 55 degrees, but do not specify a maximum temperature.
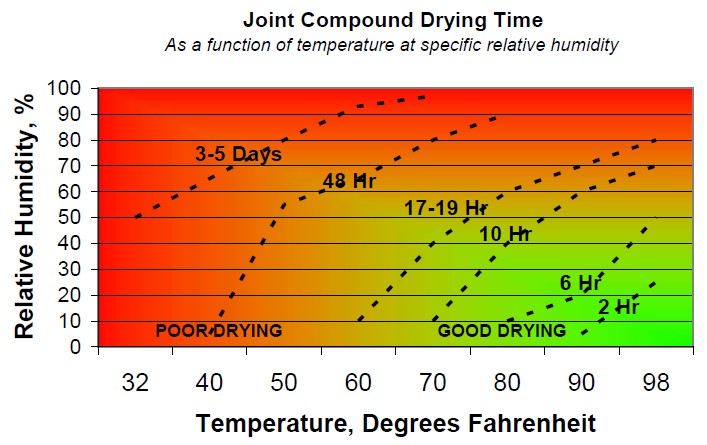
The Drywall Finishing Council [11]publishes a pamphlet called Joint Compound Drying Time (a free download at their website) which includes a graph showing drying time as a function of heat and relative humidity (see graph at left).
The graph shows that joint compound applied at 85 to 90 degrees will dry quickly and perform well as long as the relative humidity stays below about 60%.
If the relative humidity is above 70% at those temperatures, drying conditions are poor, leading to long drying times and possible “finishing problems.” Cold-climate builders often need to heat their buildings prior to finishing the drywall. Hot climate builders may need to cool and/or dehumidify their buildings to provide the right conditions for finishing drywall.
Drywall Joint Compound & Low Temperature Applications
If allowed to freeze, manufacturers claim that readymix compound can be reused if thawed and remixed thoroughly with an electric mixer, but it is probably wiser to just throw it away.
Note-DF: we have successfully used joint compound that had been exposed to low temperatures by thorough power mixing. But beware of the difference between salvaging and using compound that was cold and applying compound to building drywall in a cold environment. Temperatures below 55 degF during drywall taping and coating may be asking for trouble. [2]
U.S. gypsum specifically warns that some joint compounds such as their high-performance vinyl-type formulated Sheetrock® All Purpose Joint Compound-Select should be protected from freezing. [3]
The Drywall Finishing Council also publishes Jobsite Conditions for Applying Interior Finishing Materials (a free download at their website) [11] that describes the recommended jobsite conditions prior, during, and after application of interior finishing materials that includes the following advice:
The interior space shall be maintained at a minimum temperature of 50°F (10°C) for at least 48 hours prior to the application of interior finishing materials. The interior space shall be environmentally controlled at a minimum temperature of 50°F (10°C) during and after the application(s) of interior finishing materials, and ideally, jobsite controlled under occupancy environmental conditions throughout the finishing process until occupancy. [11]
Specialty Drywall Trims Used with Windows & Doors
Drywall window and door trim, acute and obtuse angles, bullnose corners, and arches have been greatly simplified by the introduction of specialty drywall trims and accessories (see Buy Interior Finish Product Resources).
Most profiles are available in metal and plastic in either nail-on or tape-on styles.
Installing Drywall at Off–90 Degree Angles
Standard nail-on or tape-on corner bead provides the strongest 90-degree corner. However, for acute or obtuse outside corners—for example, around skylight wells—you are better off with flexible tape-on corner trims reinforced with metal or plastic that can be set at any angle.
These help at inside corners as well, such as between intersecting roof planes, where standard paper tape tends to leave a wavy line.
How to Make Rounded Drywall Corners

A variety of trim products simplify creating rounded inside (cove) or outside (bullnose) corners.
These come in both tape-on and nail-on styles, but the tape-on type are less prone to cracking.
Some of the plastic profiles can also be applied with spray-on contact adhesive. In general, one finish coat of joint compound is applied to the flanges only (after the embedding coat dries), so these profiles are quicker to finish and dry than standard metal corner bead (Figure 5-2).
For miters and three-way corners, some suppliers provide special trim pieces. If these are not available, the trim will need to be miter-cut with a carbide or abrasive blade, depending on the trim material.
Drywall Details for Windows and Doors
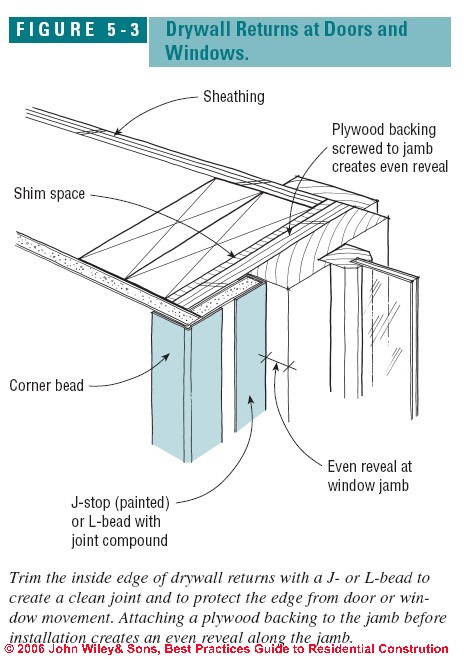
For a simple, contemporary detail, you can return the drywall directly to the window or door jamb and trim the edge of the drywall with a J-bead or L-bead, available in both plastic and galvanized steel.
J-bead must be slipped on the end of the drywall before it is installed.
It creates a separation from the wood frame, which is useful where movement in the door or window might otherwise crack the finished joint.
The reveal type of J-bead, called J-stop, is not mudded, as it serves as finish trim.
Shimming around the rough opening to get an even reveal around door or window jambs can be tricky.
Enlarging the rough opening and attaching a plywood or pine backing to the jamb simplifies the task (Figure 5-3).
How to Construct Drywall Arches
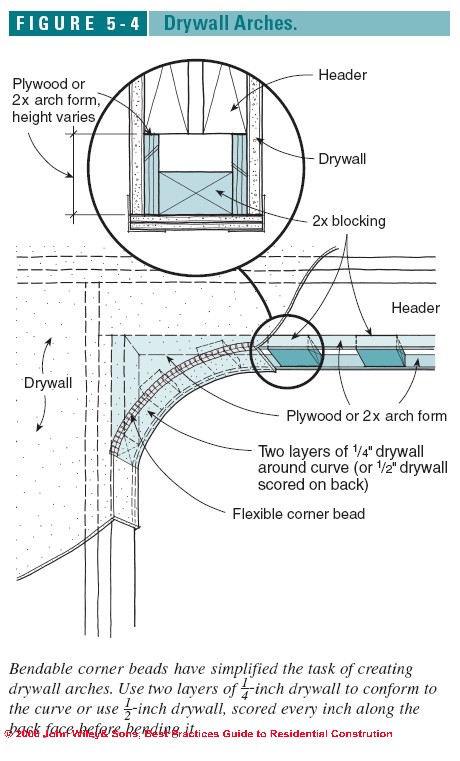
Before the introduction of specialty beads designed for curves, building drywall arches meant snipping metal corner bead every inch and bending it as well as possible to conform to the contour of the arch.
A variety of bendable corner beads have simplified the task.
Two of the more popular are Archway L Bead (Trim-Tex Inc.), a vinyl installed with a spray-on adhesive, and Arch-Flex (Con-Form International), a vinyl tape-on bead (see Buy Interior Finish Product Resources).
Use 2x stock, or plywood with 2x blocking in between, to frame the curve of the arch.
To form a smooth curve, use two layers of flexible1/4-inch drywall around the curve.
If this is not available, score the back face of
a strip of 1/2-inch drywall every inch and form it to the curve
(Figure 5-4).
Drywall Installation Guides, Trims, Accessories, Research
- CERTAINTEED DRYWALL INSTALLATION INSTRUCTIONS [PDF] (2007) CertainTeed Corporation P.O. Box 860 Valley Forge, PA 19482 Professional: 800-233-8990 Consumer: 800-782-8777 www.certainteed.com http://blog.certainteed.com
- CERTAINTEED DRYWALL FINISHING GUIDE [PDF] Op. Cit.
- Clinch-On Products, A Deitrich Metal Framing Company www.dietrichindustries.com Nail-on and clinch-on galvanized metal corner beads
- Con-Form International/Strait Flex www.straitflex.com Strait-Flex fiber-composite mud-on corner bead for inside and outside off-90 degree angles
- Drywall Finishing Council www.dwfc.org,
- DRYWALL INSTALLATION HORIZONTAL vs VERTICAL
- Drywall Systems International www.no-coat.com No-Coat prefinished drywall tapes for inside and outside corners, off angles and bullnose trims
- Flex-Ability Concepts www.flexc.com Curved metal top and bottom plates for curved wood or metal stud walls
- Grabber Construction Products www.grabberman.com Drywall screws, corner clips, and fiberglass mesh tapes
- Insta Arch Corp. www.instaarch.com Galvanized steel preformed and custom arches for drywall
- National Gypsum Co. www.nationalgypsum.com ProForm tapes and finishing compounds
- Pan, Christopher S., and Sharon S. Chiou. "Analysis of biomechanical stresses during drywall lifting." International Journal of Industrial Ergonomics 23, no. 5-6 (1999): 505-511.
- Pla-Cor www.pla-cor.com ABS corner trims, bullnose, 3-way corner caps, and flexible arches
- Phillips Manufacturing Co. www.phillipsmfg.com Metal and vinyl corner beads, bullnose trim, and flexible bullnose and angled arch trim
- Spence, William P. Installing and Finishing Drywall. Sterling Publishing Company, Inc., 2008.
- Tasligedik, Ali Sahin, Stefano Pampanin, and Alessandro Palermo. "Low damage seismic solutions for non-structural drywall partitions." Bulletin of Earthquake Engineering 13, no. 4 (2015): 1029-1050.
- Trim-Tex www.trim-tex.com Vinyl drywall beads, flexible arch beads, and finishing accessories
- U.S. Gypsum Beadex and Sheetrock-brand tape-on metal corner beads and trims. Complete line of drywall finishing compounds
- USG SHEETROCK™ INSTALLATION MANUAL [PDF] U.S. Gypsum Corp. (2015) Website: https://www.usg.com/
- Vinyl Corp., A Deitrich Metal Framing Company www.vinylcorp.com Full line of vinyl beads and trim
- - Adapted with permission from Best Practices Guide to Residential Construction (Steve Bliss, J Wiley & Sons) .
Installation Procedures for Drywall: Best Practices Guide to hanging drywall. Framing Specifications, Adhesive Installation Method for Drywall. Floating Corners & Control Joints to Avoid Drywall Cracks. Drywall Corner Bead or Drywall Curves on Radiused Walls; Drywall arch construction.
Procedures for Taping and Finishing Drywall: Best Practices. Mesh vs. Paper Tape Choices for Drywall Seams. Joint Compound (Mud) Types for Drywall Taping & Finishing. Interior Conditions & Temperatures Recommended for Drywall Installation & Finishing. Special window & door trim used with drywall; Where to buy drywall products.
...
Reader Comments, Questions & Answers About The Article Above
Below you will find questions and answers previously posted on this page at its page bottom reader comment box.
Reader Q&A - also see RECOMMENDED ARTICLES & FAQs
On 2021-04-21 by Rob
Right on, thank you for the reply and for the valuable information. I will be sure to do this, you're absolutely right that the more accurate content is available the more of a benefit it is to us all. Cheers
On 2021-04-20 - by (mod) -
@Rob,
Thanks for the nice comment;
Your link won't post but if you provide even the smallest technical content contribution to InspectApedia.com such as suggested corrections to an article or new content or photos or suggestions, that does give a legitimate opportunity for us to include your website link and contact information.
Contributing content, criticism, corrections, photo images are great ways to receive a referral link from InspectAPedia.com at no cost, and we all benefit from the increased accuracy and content. Content contributors to InspectApedia.com can also provide their link information using the form at InspectAPedia.com - Directory Listing & Link Exchange Instructions found at https://inspectapedia.com/Link_Exchange.htm
On 2021-04-20 by Rob
Wow this article is great you really put a ton of information into this that is awesome! I especially enjoyed where you mentioned the application of trimming the edge of the drywall near doors and windows with a J-bead. We've done this with galvanized steel to create some space, and we have noticed that it does in fact lessen the chances quite significantly of cracks appearing in the future.
I've worked with some drywall contractors who haven't done this and the overall quality of their work reflects the shortcuts they take. Thank you for writing all this. Our site has some great information as well, any platform to generate awareness to drywall and it's processes is always a great idea.
On 2019-11-09 - by (mod) -
Lakewood drywall said:
It's always nice to get a perspective on how other pros get the job done. We just started our drywall business in lakewood Colorado Thank you so much for sharing your knowledge on the topic!
On 2017-05-18 by Iggy - too many drywall screws weakens connection
An okay and fairly complete article. Although, if we're talking Best Practices, as you state several times, there a few changes I would recommend.
Best Practices is "here's the right way" and you don't deviate. Putting in more screws than Best Practice can weaken drywall just as putting in less screws can result in a weaker attachment of drywall.
First off, I MUST totally poo-poo the Horizontal Installation of drywall. There's ABSOLUTELY no benefit to this very stupid method passed down from idiot to moron. This is the sole reason that we constantly and consistently see homes burn entirely to the ground in less than 30-minutes, when drywall does and very easily can contain a fire to just its originating room for AT LEAST 30-minutes. I'll provide my 12-point factual list of Horizontal's Defects later.
Secondly, is the 24" Framing Spans. Unless you want guaranteed sagging and very easy accidental hole making, I'd lose the 1/2" from both of those bullet points. Again, Best Practices and not works for a little while.
Thirdly, Adhesive Method. I'm just not a believer and would never suggest such silliness when I've witnessed, countless times, Liquid Nails and whatever other Construction Adhesive Manufacturer's promises drying out and completely losing their grip in as little as 10-years.
Fourthly, Corner Beads. I suggest clarifying that square corners to be beaded must have the corners overlapped in drywall. The corner should exist before the corner bead, but I always see corners pulled back like everyone's bull-nosing the corners and they leave a mostly hollow non-corner behind the corner bead. "Looks" good ain't good.
Fifthly, Mesh vs. Paper Tape. Again, for Best Practices I'd have to go with Mesh. Whether it's stuck to naked drywall or bedded, it still embeds. Paper is simply stuck and way too many times have I seen Paper Tape completely separate from the wall with the high humidity of a bathroom. It usually starts with a hairline crack at the top and bottom of the tape until the moisture gets deep enough to start popping it off.
Sixthly, I'd like to see something about screws spaced every 6 to 7-inches and therefore the Best and Proper Practice of installing 2x4 back-blocking for walls and 2x6's for ceilings (as is required) for ANY unsupported edges or ends. Meaning, no Floating Seams and the use of ridiculous things like Rock-splicer or thin plywood, etcetera.
...
Continue reading at DRYWALL INSTALLATION HORIZONTAL vs VERTICAL or select a topic from the closely-related articles below, or see the complete ARTICLE INDEX.
Or see DRYWALL INSTALLATION FAQs - questions & answers posted originally here
Or see these
Drywall / Gypsum Board Articles
- DRYWALL, FIBERBOARD, PLASTER INTERIORS - home
- ASBESTOS CEMENT CEILING & WALL PANELS
- ASBESTOS in DRYWALL
- ASBESTOS in DRYWALL MUD - TEST LOCATIONS
- ASBESTOS in DRYWALL TAPE?
- CHINESE DRYWALL HAZARDS
- COATING TYPE CEILING & WALL SURFACES: CATALOG OF
- DRYWALL & GYPSUM BOARD COMPOSITION & HISTORY
- DRYWALL CONTROL JOINTS
- DRYWALL CRACK CAUSES & CURES
- DRYWALL FINISH LEVELS
- DRYWALL TYPE IDENTIFICATION STAMPS
- DRYWALL INSTALLATION Best Practices
- DRYWALL INSTALLATION HORIZONTAL vs VERTICAL
- DRYWALL GREEN LOW TOXICITY MAGNESIUM OXIDE MgO
- DRYWALL MOLD RESISTANT
- DRYWALL MOLD TESTING
- DRYWALL NAIL POPS & DENTS
- GYPSUM BOARD GYP ROCK SHEATHING
- GYPSUM BOARD PLASTER LATH SYSTEMS
- PICTURE HANGING NAILS
- SHEATHING, GYPSUM BOARD
- TRUSS UPLIFT, ROOF
- WALL FINISHES INTERIOR
Suggested citation for this web page
DRYWALL INSTALLATION Best Practices at InspectApedia.com - online encyclopedia of building & environmental inspection, testing, diagnosis, repair, & problem prevention advice.
Or see this
INDEX to RELATED ARTICLES: ARTICLE INDEX to BUILDING INTERIORS
Or use the SEARCH BOX found below to Ask a Question or Search InspectApedia
Ask a Question or Search InspectApedia
Questions & answers or comments about the best methods used to install or hang drywall
Try the search box just below, or if you prefer, post a question or comment in the Comments box below and we will respond promptly.
Search the InspectApedia website
Note: appearance of your Comment below may be delayed: if your comment contains an image, photograph, web link, or text that looks to the software as if it might be a web link, your posting will appear after it has been approved by a moderator. Apologies for the delay.
Only one image can be added per comment but you can post as many comments, and therefore images, as you like.
You will not receive a notification when a response to your question has been posted.
Please bookmark this page to make it easy for you to check back for our response.
IF above you see "Comment Form is loading comments..." then COMMENT BOX - countable.ca / bawkbox.com IS NOT WORKING.
In any case you are welcome to send an email directly to us at InspectApedia.com at editor@inspectApedia.com
We'll reply to you directly. Please help us help you by noting, in your email, the URL of the InspectApedia page where you wanted to comment.
Citations & References
In addition to any citations in the article above, a full list is available on request.
- Steve Bliss's Building Advisor at buildingadvisor.com helps homeowners & contractors plan & complete successful building & remodeling projects: buying land, site work, building design, cost estimating, materials & components, & project management through complete construction. Email: info@buildingadvisor.com
Steven Bliss served as editorial director and co-publisher of The Journal of Light Construction for 16 years and previously as building technology editor for Progressive Builder and Solar Age magazines. He worked in the building trades as a carpenter and design/build contractor for more than ten years and holds a masters degree from the Harvard Graduate School of Education. Excerpts from his recent book, Best Practices Guide to Residential Construction, Wiley (November 18, 2005) ISBN-10: 0471648361, ISBN-13: 978-0471648369, appear throughout this website, with permission and courtesy of Wiley & Sons. Best Practices Guide is available from the publisher, J. Wiley & Sons, and also at Amazon.com - Best Practices Guide to Residential Construction, by Steven Bliss. John Wiley & Sons, 2006. ISBN-10: 0471648361, ISBN-13: 978-0471648369, Hardcover: 320 pages, available from Amazon.com and also Wiley.com. See our book review of this publication.
- [1] Eric Galow, Galow Homes, Lagrangeville, NY. Mr. Galow can be reached by email: ericgalow@gmail.com or by telephone: 914-474-6613. Mr. Galow specializes in residential construction including both new homes and repairs, renovations, and additions.
- [2] "Finishing Drywall Systems", U.S. Gypsum (USG) Corporation [copy on file as USG_Finishing_Drywall_Systems_Ch5.pdf] 2009
- [3] "Sheetrock® All Purpose Joint Compound - Select for professional drywall finishing", Submittal Sheet 09250
- [4] "Quality Drywall Finishing in All Kinds of Weather", USG Folder J-75 (out of print), U.S. Gypsum corporation
- [5] Gypsum Construction Guide, National Gypsum Corporation
- [6] Gypsum Construction Handbook [purchase at Amazon.com] H17, Technical Folder SA920 and PM2, PM3 and PM4, United States Gypsum Company, 125 South Franklin ST., PO Box 806278, Chicago, IL 60680-4124,
- [7] Lath & Plaster Systems [copy on file as /interiors/LathPlaster_Nat_Gypsum.pdf ] - , 092300/NGC, National Gypsum Lath and Plaster Systems, National Gypsum Corporation, 800-628-4662 describing National Gypsum's Kal-Kore brand plaster base
- [8] Metal Lath Specifications, Specification for metal lath and accessories, Lath and Plaster [copy on file as/interiors/Amico_lath-inside.pdf ] - from Amico, a lath and plaster accessory producer.
- [9] Plastering, PM 5, Product & Systems Technology, US Gypsum, May 1998, web search 10.5.2010, original source: http://www.usg.com/rc/technical-articles/plaster/
[copy on file as/interiors/Plastering_USG.pdf ] -
plastering-technical-guide-veneer-plaster-joint-reinforcement-systems-en-PM5.pdf
United States Gypsum Company, 125 South Franklin ST., PO Box 806278, Chicago, IL 60680-4124,
Paraphrasing from this document: USG uses the term shadowing in this document in describing the visual effect over gypsum board joints caused by the lower moisture absorption rate (take-up) and lower capacity than gypsum base face paper. Shadowing at joints occurs where veneer plaster is applied over tape joints, requiring a second coat to completely hide the tape, providing a visually uniform surface. USG Advises: "This [second] cover coat must be allowed to harden and dry before plaster application is started. - [10] Plastering Skills, F. Van Den Branden, Thomas L. Hartsell, Amer Technical Pub (July 1, 1985), ISBN-10: 0826906575, ISBN-13: 978-0826906571 [purchase at Amazon.com]
- [11]
Drywall Finishing Council www.dwfc.org, Members: CertainTeed Gypsum • Freeman Products • Georgia Pacific Gypsum LLC • LaFarge North America • Magnum Products •
National Gypsum Company • Panel Rey SA • Rapid Set Cement • Saint-Gobain, Inc • Sherwin-Williams Company • Solid
Products, Inc. • Southern Wall Products • Trim-Tex, Inc. • United States Gypsum Company • Westpac Materials
- "Joint Compound Drying Time, the Impact of Environmental Conditions", Drywall Finishing Council, Retrieved 8/16/12, original source: http://www.dwfc.org/wp-content/files/2010_03_16_Joint_Compound_Drying.pdf [copy on file as Joint_Compound_Dry_Tmie_DWC.pdf]
- "Jobsite Conditions for Applying Interior Finishing Materials", Drywall Finishing Council, Retrieved 8/16/12, original source: http://www.dwfc.org/wp-content/files/2011_09_16_Interior_Job_Condition_Specifications.pdf [copy on file as Drywall_Finish_Conditions_DWC.pdf ]
- DWFC. Interior Job Condition Specifications For The Application of Drywall Joint Compounds,
Drywall Textures, and Paint/Coatings". Drywall Finishing Council, Incorporated. www.dwfc.org - DWFC. Recommended Specification for Preparations of Gypsum Board Surfaces Prior To Texture
Application, Drywall Finishing Council, Incorporated. www.dwfc.org - GA. GA-214, Recommended Levels of Gypsum Board Finish. Gypsum Association, 6525 Belcrest
Road - Suite 480. Hyattsville, MD 20782 www.gypsum.org - National Gypsum Company. ProForm Brand Drywall Finishing Products Construction Guide,
National Gypsum Company, 2001 Rexford Road, Charlotte, NC, 28211, www.nationalgypsum.com
- [12] The Gypsum Association
www.gypsum.org
- Gypsum Construction Handbook H-17 [purchase at Amazon.com] . USG Corporation, 550 West Adams Street,
Chicago, IL, 60661, www.usg.com
- Gypsum Construction Handbook H-17 [purchase at Amazon.com] . USG Corporation, 550 West Adams Street,
- [13] Painting and Decorating Contractors of America www.pdca.org Smartwood/Rainforest Alliance www.smartwood.org
- [14] "Joint Compounds", United States Gypsum Company, 125 South Franklin ST., PO Box 806278, Chicago, IL 60680-4124, retrieved 8/16/12, original source: http://www.usg.com/interiors/joint-compounds.html [copy on file as Mud_Types_USG.pdf]
- Gypsum Construction Guide, National Gypsum Corporation
- Gypsum Construction Handbook [purchase at Amazon.com] H17, Technical Folder SA920 and PM2, PM3 and PM4, United States Gypsum Company, 125 South Franklin ST., PO Box 806278, Chicago, IL 60680-4124,
- Lath & Plaster Systems, 092300/NGC, National Gypsum Lath and Plaster Systems, National Gypsum Corporation, 800-628-4662 describing National Gypsum's Kal-Kore brand plaster base
- Metal Lath Specifications, Specification for metal lath and accessories, Lath and Plaster from Amico, a lath and plaster accessory producer.
- Plastering Skills, F. Van Den Branden, Thomas L. Hartsell, Amer Technical Pub (July 1, 1985), ISBN-10: 0826906575, ISBN-13: 978-0826906571 [purchase at Amazon.com]
- Plastering, PM 5, Product & Systems Technology, US Gypsum, May 1998, web search 10.5.2010, original source: http://www.usg.com/rc/technical-articles/plaster/
plastering-technical-guide-veneer-plaster-joint-reinforcement-systems-en-PM5.pdf
United States Gypsum Company, 125 South Franklin ST., PO Box 806278, Chicago, IL 60680-4124,
Paraphrasing from this document: USG uses the term shadowing in this document in describing the visual effect over gypsum board joints caused by the lower moisture absorption rate (take-up) and lower capacity than gypsum base face paper. Shadowing at joints occurs where veneer plaster is applied over tape joints, requiring a second coat to completely hide the tape, providing a visually uniform surface. USG Advises: "This [second] cover coat must be allowed to harden and dry before plaster application is started. - What Style Is It?: A Guide to American Architecture, Rev., John C. Poppeliers, S. Allen Chambers, Wiley; Rev Sub edition (October 6, 2003), ISBN-10: 0471250368, ISBN-13: 978-0471250364
- American Plywood Association, APA, "Portland Manufacturing Company, No. 1, a series of monographs on the history of plywood manufacturing",Plywood Pioneers Association, 31 March, 1967, www.apawood.org
- In addition to citations & references found in this article, see the research citations given at the end of the related articles found at our suggested
CONTINUE READING or RECOMMENDED ARTICLES.
- Carson, Dunlop & Associates Ltd., 120 Carlton Street Suite 407, Toronto ON M5A 4K2. Tel: (416) 964-9415 1-800-268-7070 Email: info@carsondunlop.com. Alan Carson is a past president of ASHI, the American Society of Home Inspectors.
Thanks to Alan Carson and Bob Dunlop, for permission for InspectAPedia to use text excerpts from The HOME REFERENCE BOOK - the Encyclopedia of Homes and to use illustrations from The ILLUSTRATED HOME .
Carson Dunlop Associates provides extensive home inspection education and report writing material. In gratitude we provide links to tsome Carson Dunlop Associates products and services.
 | HOME | ABOUT | ASK a QUESTION | CONTACT | CONTENT USE POLICY | DESCRIPTION | POLICIES | PRIVACY | |
| © 2025 - 1985 Publisher InspectApedia.com - Daniel Friedman | |||||||||