 Weep Holes, Drainage & Moisture Ventilation in Brick Veneer Walls
Masonry veneer wall drainage details & specifications, defects & inspections
- POST a QUESTION or COMMENT about brick wall weep inserts & where to buy masonry wall weep opening inserts & products for shell drains.
Weep holes in brick walls:
Here we give construction specifications & details for proper location, flashing, & protection of weep holes or drain openings & vents in brick or other masonry veneer walls. We explain how these weep or vent openings in brick walls work, where and how they should be installed, and what special products such as opening screens & flashings are available.
This article series explains the purpose of drainage openings & rain screens in solid brick walls and in some brick veneer walls: brick wall weep holes and recommends their use in new construction and in some brick wall repairs or retrofits
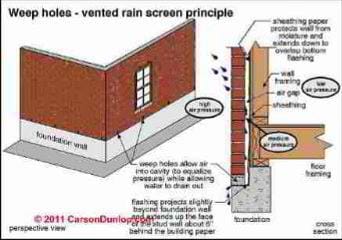
. Weep holes in building exterior masonry walls (brick or stone) are a drainage system that is used in cavity wall or rain-screen wall construction methods to get rid of water that has penetrated the outer wall skin or surface.
InspectAPedia tolerates no conflicts of interest. We have no relationship with advertisers, products, or services discussed at this website.
- Daniel Friedman, Publisher/Editor/Author - See WHO ARE WE?
Weep Holes in Brick Veneer & other Masonry Veneer Walls
 Brick veneer construction [and some other masonry veneer construction such as thin stone over wood framed walls] incorporates a drainage
cavity to deter water penetration into the building.
This air space creates a physical separation between the brick wythe and the inner steel stud wall.
When the wind-driven rain penetrates the veneer wythe, the cavity allows the water to drain down the back face of the brick. This water is then collected at the base of the wall by flashing and channeled out to the exterior through weep holes. (Arumala 2007)
Watch out: Both structural brick walls and veneer brick (or stone) walls may be designed either as a barrier wall or a cavity/rain-screen wall. Before you can evaluate the condition of a wall you need to understand how it was built and whether or not the as-built matches the as-designed conception of the wall.
Our page top sketch, courtesy of Carson Dunlop Associates, a Toronto home inspection & education firm, shows both the reasons for and the typical design details used in weep openings on brick walls.
[Click to enlarge any image].
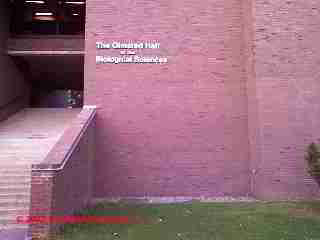
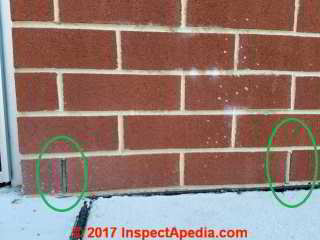
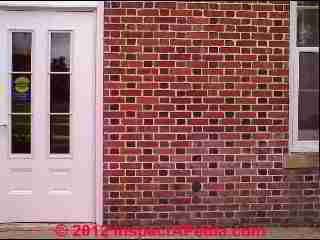
The beautiful Flemish-bond structural brick wall (left) on the Vassar College Campus was constructed with very subtle drain or weep openings at the wall bottom. It has survived intact even though the building is located in a seasonally wet and freezing climate.
Article Series Contents
- BRICK WALL DRAINAGE WEEP HOLES
- DEFINITION of WEEP HOLES in BRICK WALLS
- BRICK VENEER WEEP HOLE & VENT SPECIFICATIONS
- BRICK VENEER WALL WEEP HOLE LOCATION
- BRICK VENEER WEEPS BLOCKED or MISSING
- BRICK VENEER WALL THROUGH-VENTILATION
- BRICK VENEER WALL LEAKS in FLOOD PRONE AREAS
- BRICK VENEER WALL REPAIRS in FLOOD PRONE AREAS
- BRICK WALL DRAIN, FLASHING, VENT SOURCES
Watch out: In February 2016 in the U.K. The Telegraph reported that the Cavity Wall Insulation Victims Alliance (CWIVA) was lobbying both industry and government to obtain relief from insulation companies who were selling this bad approach to building energy savings by representing that their insulation was "government-backed" - it was not and it is not.
Some of these news reports "mould in wall cavities is caused by insulation" describe a real problem but do not necessarily offer a correct explanation of the cause of the mould contamination. Insulation does not itself cause mould growth. Mould spores are present everywhere, all the time, in air. But when conditions are right, particularly trapped moisture and perhaps temperature, mould growth will be encouraged in and on buildings.
Since the mid 1980's building scientists have known stressed that air leaks into and out of wall cavities at penetrations (openings for receptacles, switches, wires, pipes) is a particular source of moisture problems.
If we combine leaks or moisture with improper placement of insulation, such as pumping or blowing styrofoam bead or other insulation into the air space between a brick veneer wall and the building's structural (usually wood-framed) wall, then yes, that's a recipe for trouble. Brick veneer walls are not waterproof and must be designed to permit water to drain out of the wall rather than into the wall interior.
This article provides details about the importance of providing proper drainage for brick veneer walls.
Definition & Images of Veneer Wall or Masonry Wall Weep Openings
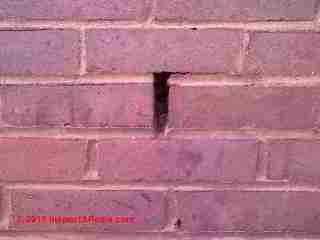
Weep openings are drainage holes left in the face of a brick veneer wall [and possibly some other constructions] in order to allow water that has penetrated the wall to escape downwards through the wall cavity and out to the exterior of the wall surface through the weep openings.
As will be explained later, I think the weep openings in the veneer wall shown above, though properly located, are probably not working.
This escape passage and wall design are a method for reducing water intrusion into the structure interior. According to the Masonry Design Manual, weep holes are
Openings placed in mortar joints of facing materials at the level of flashing, to permit the escape of moisture, or openings in retaining walls to permit water to escape.
Above we illustrate the most basic brick wall weep opening.
To diagnose a building water entry or moisture problem originating at its exterior walls we must first understand the construction concepts that were used to build that wall: two very different concepts apply, though they often appear mixed or even confused in buildings: barrier wall construction methods (the wall exterior skin keeps out water) and cavity or rain-screen wall construction (the wall is designed to handle and get rid of water that penetrates the outer skin).
See WALL CONSTRUCTION BARRIER vs CAVITY for definitions and explanations of barrier wall construction compared with cavity / rain screen exterior wall construction methods, objectives, and damage vulnerabilities.
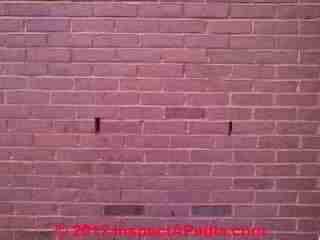
Below we show a brick wall (a veneer in this case) with weep openings at regular intervals at two heights above ground level.
Below is a close up of one of the drainage openings.
Veneer wall weep or drain openings are placed at least at the very bottom of a brick veneer wall cavity and sometimes as vents openings are placed higher in the wall in some designs.
For the wall shown in the photos just above, we suspect that an air space behind the veneer does not extend lower than the weep holes in our photos. Why? The lower wall is solid masonry construction with no air space rather than frame construction.
The lower brick courses were laid tight, with no cavity at all, against a solid concrete or masonry block foundation wall, thus forming a solid composite masonry wall.
Typical Construction Specification for Brick Veneer Wall Containing Weep or Drain Openings & Wall Cavity Vents
Here are three examples of wall cavity vent and weep opening specifications adapted from the Brick Industry Association (BIA), our industry expert source, and from two example construction specifications for brick veneer walls that offer more details.
Note: the specifications for any particular building project should be made by a qualified design professional such as a licensed professional engineer or licensed architect.
Weep Hole Wall Vent Construction Specification Example #1 - BIA
The Brick Industry Association recommends veneer wall weep opening specifications as follows:
Weeps:
- Open head joint weeps spaced at no more than 24 in. (610 mm) o.c. recommended
- Most building codes permit weeps no less than 3 /16 in. (4.8 mm) diameter and spaced no more than 33 in. (838 mm) o.c.
- Wick and tube weep spacing recommended at no more than 16 in. (406 mm) o.c. - BIA 28B cited below.
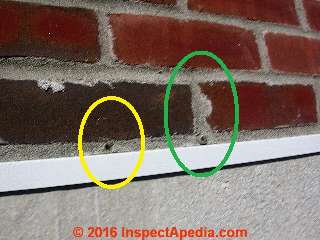
Above, these weep openings are properly located: above the upper surface of the wall bottom flashing, and they might meet the BIA's 3/16" (4.8mm) diameter, but in my opinion they are inadequate.
At BRICK VENEER WEEPS BLOCKED or MISSING we show that these tiny tubes inserted as veneer wall drains were mostly blocked by mud placed by mud-dauber wasps. Little wall-bottom tubes are also very easily blocked by falling mortar and debris in the wall cavity. Good location, weak weeps.
At BRICK WALL DRAINAGE, FLASHING, VENTILATION PRODUCTS we illustrate a taller, blockage-resistant PVC product that provides better veneer wall drainage opening protection, letting water out while preventing insect intrusion.
Weep Hole Wall Vent Construction Specification Example #2
- Wall shall use pre-formed control joints using rubber material. Provide with corner and tee accessories and fused joints.
- Weep openings: use molded PVC grilles that are insect resistant, located above-grade and not blocked
- Install weeps in veneer walls at 16" (400 mm) on center horizontally above through-wall flashing, above shelf angles and lintels and at bottom of walls
- Install cavity vents in veneer walls at 16" (400 mm) on center horizontally below shelf angles and lintels and at top of walls.
- Install cavity mortar diverter at base of cavity as recommended by manufacturer to prevent mortar droppings from blocking weep/cavity vents.
- Do not permit mortar to drop or accumulate into cavity air space or to plug weep/cavity vents.
- Wall cavity mortar control: Semi-rigid polyethylene or polyester mesh panels, sized to thickness of wall cavity, and designed to prevent mortar droppings from clogging weep openings and cavity vents and designed to allow proper cavity drainage
Venting a Veneer Wall Supported on a Foundation
[Click to enlarge any image]
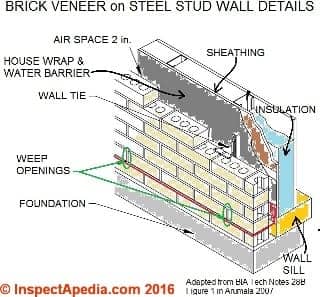
Above: Brick veneer wall construction details showing weep openings immediately above flashing that is in turn atop bottom brick course of a brick veneer wall constructed over a steel stud cavity wall. These details are for a brick veneer wall that rests atop a masonry foundation.
This illustration is adapted from BIA Technical Notes 28B, Figure 1 as used in Arumala 2007 cited below. Critical wall bottom flashing is shown in red, brick veneer weep opening locations above the horizontal portion of that flashing are shown in green, and house-wrap / water barrier fabric(s) are shown in dark gray.
Watch out: Less evident in our sketch but important: the water barrier affixed to the wall sheathing should extend over the top of the wall bottom flashing, not behind it.
Otherwise water in the wall cavity may pass behind the bottom flashing and thus will fail to drain from the wall cavity.
Venting A Veneer Wall Supported by Steel Lintel
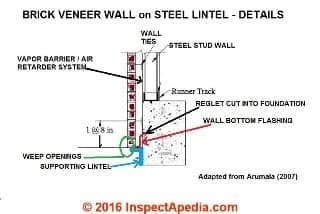
Below: Brick veneer wall construction details showing the location of weep openings immediately above wall bottom flashing that is in turn immediately above the upper surface of the supporting steel lintel in a lintel-supported brick veneer wall design.
[Click to enlarge any image]
Notice that when the brick veneer is supported by a steel lintel, the weep openings are immediately over the wall bottom flashing that is in turn immediately over the upper surface of the supporting steel lintel.
This illustration is adapted from Figure 3, "A Typical Section of a Brick Veneer Wall with Steel Stud Backup Wall" - Arumala (2007)
Weep openings & vents in upper levels of brick veneer walls
As our photograph above illustrates, in tall brick veneer walls additional weep openings and air vent openings may be specified by the architect/engineer for placement higher in the wall.
Air, Cavity & Weep Hole Wall Vent Specification Example #3
- Air Vents: Flexible ultra violet resistant polypropylene co-polymer DA1006 Cell
Vent by Dur-O-Wal Inc., 7777 Washington Village Dr., Ste. 130, Dayton, OH
45459, (888) 977.9600, www.dur-o-wal.com.- Size: Height 2-1/2 inch maximum except as indicated otherwise, by full width of brick.
- Color: To match mortar color.
- Weep Vents: Flexible ultra violet stable recycled polyester mesh, rectangular
shape by Mortar Net USA Ltd, 541 S. Lake St., Gary, IN 46403, (800) 664-6638,
www.mortarnet.com, CavClear Weep Vents by Archovations, Inc., PO Box 241, Hudson, WI 54016, (888) 436-2620, www.cavclear.com.- Size: Height 2-1/2 inch maximum except as indicated otherwise, by full width of Brick.
- Color: To match mortar color.
- Cavity Wall Mortar Net: Lightweight polyethylene, 90 percent open woven mesh
by Mortar Net USA Ltd, 541 South Lake Street, Gary, IN 46403, (800) -664-6638,
www.mortarnet.com. or CavClear Masonry Mat by Archovations, Inc., PO Box 241, Hudson, WI 54016, (888) 436-2620, www.cavclear.com.- Size: Height 10 inches, thickness as required to fill cavity.
- Size: Full height of wall, thickness as required to fill cavity
- Weep Holes:
- Form weep holes in mortar joints of exterior wythe of cavity walls at bottom of cavity over foundations, bond beams, through wall flashings, and other water stops in wall.
- Form weep holes by leaving head joint free and clean of mortar, and raking out bed joint at weep hole.
- Space weep holes approximately 24 inches oc. Keep weep holes free of mortar droppings and other obstructions.
- Pointing & Cleaning at End of Wall Construction
- At completion of masonry Work, fill holes in joints (except weep holes) and tool.
Building Code Requirements for Brick, Stone or other Veneer Wall Drains & Vents
U.S. IRC, (2012) International Residential Code, Foundations, R703 Exterior Covering
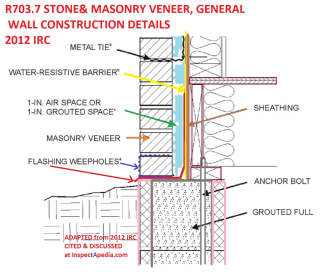
Sketch: brick or other masonry veneer wall construction details showing air space, flashing, weep openings, adapted from 2012 IRC cited below.
[Click to enlarge any image]
R703.1.1 Water Resistance
The exterior wall envelope shall be designed and constructed in a manner that prevents the accumulation of water within the wall assembly by providing a water-resistant barrier behind the exterior veneer as required by Section R703.2 and a means of draining to the exterior water that enters the assembly.
Protection against condensation in the exterior wall assembly shall be provided in accordance with Section R702.7 of this code.
Exceptions:
1. A weather-resistant exterior wall envelope shall not be required over concrete or masonry walls designed in accordance with Chapter 6 and flashed according to Section R703.7 or R703.8.
2. Compliance with the requirements for a means of drainage, and the requirements of Sections R703.2 and R703.8, shall not be required for an exterior wall envelope that has been demonstrated to resist wind-driven rain through testing of the exterior wall envelope, including joints, penetrations and intersections with dissimilar materials, in accordance with ASTM E 331 under the following conditions:
2.1. Exterior wall envelope test assemblies shall include at least one opening, one control joint, one wall/eave interface and one wall sill. All tested openings and penetrations shall be representative of the intended end-use configuration.
2.2. Exterior wall envelope test assemblies shall be at least 4 feet by 8 feet (1219 mm by 2438 mm) in size.
2.3. Exterior wall assemblies shall be tested at a minimum differential pressure of 6.24 pounds per square foot (299 Pa).
2.4. Exterior wall envelope assemblies shall be subjected to the minimum test exposure for a minimum of 2 hours.
The exterior wall envelope design shall be considered to resist wind-driven rain where the results of testing indicate that water did not penetrate control joints in the exterior wall envelope, joints at the perimeter of openings penetration or intersections of terminations with dissimilar materials.-
R703.7 Stone and Masonry Veneer, General
Stone and masonry veneer shall be installed in accordance with this chapter, Table R703.4 and Figure R703.7.
These veneers installed over a backing of wood or cold-formed steel shall be limited to the first story above-grade plane and shall not exceed 5 inches (127 mm) in thickness.
See Section R602.10 for wall bracing requirements for masonry veneer for wood-framed construction and Section R603.9.5 for wall bracing requirements for masonry veneer for cold-formed steel construction.
Exceptions:
For all buildings in Seismic Design Categories A, B and C, exterior stone or masonry veneer, as specified in Table R703.7(1), with a backing of wood or steel framing shall be permitted to the height specified in Table R703.7(1) above a noncombustible foundation.
For detached one- or two-family dwellings in Seismic Design Categories D0, D1 and D2, exterior stone or masonry veneer, as specified in Table R703.7(2), with a backing of wood framing shall be permitted to the height specified in Table R703.7(2) above a noncombustible foundation.
Brick Veneer Wall & Curtain Wall Venting & Research
- Arumala, Joseph O. "Brick Veneer Steel Stud Wall Systems: State-of-the-Art." The Masonry Society Journal (2007): 9-19. Illustrations used in the article above include adaptations from BIA Technical Notes 28B Figure 1 as used in this article. ©IAP 2016
- Arumala, J. O. and Brown, R. H., “Performance Evaluation of Brick Veneer with Steel Stud Backup”, Department of Civil Engineering, Clemson University, Clemson, South Carolina, April 1982.
- Brick Industry Association, "Technical Notes on Brick Construction", Brick Industry Association, 1850 Centennial Park Drive
Suite 301
Reston, Virginia 20191
703-620-0010
brickinfo@bia.org, Website: www.gobrick.com, retrieved 2016/06/21,original source: http://www.gobrick.com/Technical-Notes
- Brick Industry Association, [BIA], "Brick Veneer / Steel Stud Walls, 28B", [PDF] Brick Industry Association, op.cit. (December 2005), retrieved 2016/06/21, original source: http://gobrick.com/Portals/25/docs/Technical%20Notes/TN28B.pdf Excerpt included in the article above
- BIA, "Brick Veneer Construction: Basics of Resisting Water Penetration in Residential Construction", [PDF] Brick Industry Association, op.cit. (Issue 1), retrieved 2016/06/21, original source: http://www.gobrick.com/Portals/25/docs/Publications/Builder%20Notes/Builder_Notes_1.pdf
Excerpt:
Through-wall flashing is an impermeable membrane placed in the wall that extends from the sheathing, across the air space, and all the way to the exterior of the brickwork (see Figure 1). One should place flashing at all points where the air space is closed off.
Model building codes require flashing at the foundation, above window and door heads, at window sills, and where the roof of a one-story wing meets a two-story brick veneer wall.
...
Flashing should extend from the outside face of the veneer, through the thickness of the brick veneer, across the air space to the backing, and then up at least 8 inches. The flashing should either extend up behind the water-resistant barrier or should be attached to its surface with a termination bar. Flashing held back from the outside of the brick veneer— even just 1/2 inch—could allow water to re-enter the wall. - BIA, "Lo Esencial sobre la Construcción de Revestimiento de Ladrillos y Lista de Control de Trabajo", retrieved 2016/06/21 original source http://www.gobrick.com/Portals/25/docs/Publications/Builder%20Notes/Builder_Notes_Spanish_Issue2.pdf
- BIA, “Brick Masonry Cavity Walls: Introduction,” Technical Notes on Brick Construction No. 21, Rev., Brick Industry association, Reston, VA., 1998.
- BIA, “Brick Veneer/Stud Panel Walls,” Technical Notes on Brick Construction No. 28B, Rev. II, Brick Industry association, Reston, VA., 1999.
- Choi, Edmund CC, and Zhihong Wang. "Study on pressure-equalization of curtain wall systems." Journal of Wind Engineering and Industrial Aerodynamics 73, no. 3 (1998): 251-266.
Abstract:
In recent years, aluminium-curtain-wall systems are often used in southeast Asia. Many of these curtain-wall systems can be classified as a two-barrier system with a front-panel (the rainscreen) and the back-panel (the air barrier). The back-panels of such systems are usually thin and flexible.
Compared with the brick or brick-veneer rainscreen walls, where the back-panels are very rigid, the pressure-equalization characteristics are expected to be quite different. To improve on the understanding of the behaviour of such systems and to evaluate design parameters, full-scale measurements were carried out.
A numerical model which takes into account the flexibility of the back-panel has been developed for the prediction of cavity pressure in curtain walls. The results based on this model show good agreement with those obtained from full-scale experiments. - Drysdale, R.G. and Kluge, A., “A Summary of Performance of Brick Veneer/Steel Stud Wall Systems Subject to Temperature, Air Pressure and Vapor Pressure Differential,” Seminar on Brick Veneer Wall Systems, Toronto, Ontario, Canada, June 1989.
- ICBO 1997, Uniform Building Code, International Conference of Building Officials, Whittier, CA, 1997.
- IRC, (2012) International Residential Code, Foundations, Chapter 7, Wall Covering [PDF] [ OFFLINE but available ]
- Keeton, B., “Prevent Water Intrusion and Minimize Exposure to Claims by Building with Mold in Mind” Construction Executive, vol. 13, No. 7, pg 46-48, Association of Builders and Contractors, 4250 North Fairfax Drive, 9th Floor, Arlington, Virginia 22203, June 2004.
- Masonry Standards Joint Committee (MSJC), “Building Code Requirements for Masonry Structures”, (ACI 530- 05/ASCE 5-05/TMS 402-05), American Concrete Institute; Structural Engineering Institute of the American Society of Civil Engineers; The Masonry Society, Boulder CO, 2005.
- McGinley, Mark W., “An Alternative Design for Brick Veneer Steel Stud Walls”, The Masonry Society Journal, The Masonry Society, Vol. 18, Number 2 pp. 9-22, December 2000.
- Piper, Richard S., and Russell J. Kenney. "Brick Veneer Walls-Proposed Details to Address Common Air and Water Penetration Problems." [PDF] In Masonry: Design and Construction, Problems and Repair. ASTM International, 1993., retrieved 2016/06/21, original source: http://www.masonrysociety.org/TMSJournal/Vol.%2025.%20No.%201/P009%202004-10.pdf
- Reneckis, Dziugas, James M. LaFave, and Wade M. Clarke. "Out-of-plane performance of brick veneer walls on wood frame construction." Engineering structures 26, no. 8 (2004): 1027-1042.
Abstract:
Full-scale brick veneer wall panel specimens, representing typical residential construction practice, were investigated under static and dynamic out-of-plane lateral loading on a shake table. The tests captured the overall performance of the wall system, including interaction and load-sharing between the brick masonry veneer, corrugated sheet metal ties, and wood frame backup.
The tests evaluated the effects of two different tie installation methods, as well as a veneer-to-backup connection repair using post-installed mechanical anchors. The progression of system damage was noted up until partial collapse of the veneer walls; tie stiffness and strength were found to significantly affect wall performance at all stages of behavior.
Analytical models for veneer wall systems are being developed based on these experiments to further study the vulnerability of this type of construction. - Straube, J. F., and E. F. P. Burnett. "Rain control and screened wall systems." In Proc. 7th Conf. on Building Science and Technology. Durability of Buildings. Design, Maintenance, Codes and Practices. Toronto, pp. 20-21. 1997.
- Treshsel, H. R., editor, “Moisture Control in Buildings”, ASTM manual series MNL 18, 1994 American Society for Testing and Materials (ASTM), pp. 224-225, 1994.
- Van Straaten, Randy. "Measurement of ventilation and drying of vinyl siding and brick clad wall assemblies." (2004).
Abstract:
Control of moisture and heat flow through building enclosure assemblies is a critical component of overall building performance. This thesis shows that significant drying of moisture in wall assemblies is possible and that ventilation of cladding significantly increases the rate of drying in some assemblies without having detrimental impact on the enclosures thermal performance.
A review found that thermal and moisture buoyancy, wind pressure gradients and mechanical equipment drive ventilation airflow. This ventilation flow can theoretically increase the effective water vapour permeance and thermal conductivity. Ventilation has the potential to increase outward drying through relatively impermeable claddings at the low flows expected to occur in service.
The impact on thermal conductance is much less. A methodology for assessing the complicated airflow resistance characteristics of lap sidings was developed and applied to a representative vinyl siding. Field drying studies showed that the sample tested is well ventilated. Field brick veneer clad wall samples were also tested for system airflow resistance over a range of driving pressures.
Theoretical predictions under-estimated the measured flow rate for given steady driving air pressures. Measurements of naturally driven cavity air speeds and smoke pencil testing showed that flow rates were commonly occurring that would in theory significantly affect the hygrothermal performance of the walls. This was confirmed with field drying studies. A field drying study of east-facing test wall with vinyl siding and brick veneer cladding was conducted in Waterloo, Ontario, Canada.
Significant amounts of drying and inward moisture redistribution were measured. Wall sheathing dried quickly in hot summer conditions but in some cases significant inward driven moisture flow occurred. In cool and cold weather the wall dried more slowly and much less moisture moved inward. Increased cladding ventilation significantly increased drying rates and reduced internal wall assembly moisture levels.
It was concluded that cladding ventilation acts to increase the effective vapour permeance of cladding and to reduce solar driven inward vapour drives. The use of spun bonded polyolefin sheathing membrane in lieu of #15 asphalt impregnated felt was found to improved hygrothermal performance in the test walls.
The difference observed was concluded to be due to the higher vapour permeance of the spun bonded polyolefin and may not hold for wall assemblies with lower permeance sheathings (e. g. oriented strand board and foam plastic). Walls clad with vinyl siding dried faster than those clad with brick veneer. It was concluded that the vinyl siding is a well ventilated cladding system. - Williams, Mark F., and Barbara Lamp Williams. "Water Intrusion in Barrier and Cavity/Rain Screen Walls." In Water in Exterior Building Walls: Problems and Solutions. ASTM International, 1991.
- Also seeReferences or Citations for this article
Where do the Brick Wall Drainage Openings (Weep holes) Belong?
Where do the brick wall weep holes go? This topic has moved to a separate article now found at BRICK VENEER WALL WEEP HOLE LOCATION
 Damaged Brick Veneer Walls - Blocked or Missing Brick Veneer Weep Openings
Details of this topic are now at BRICK VENEER WEEPS BLOCKED or MISSING.
Not All Brick Veneers Lacking Drainage are Damaged - Some of these are Barrier Walls not Cavity / Rain Screen Walls
Brick Veneer Wall Through-Ventilation - Airflow Removes Moisture?
This discussion has moved to BRICK VENEER WALL THROUGH-VENTILATION
Brick Veneer Wall Leakage Problems in Buildings Exposed to Flooding
Please see the new article at BRICK VENEER WALL LEAKS in FLOOD PRONE AREAS
Guide to Brick Wall Drainage Opening, Flashing & Ventilation Products
Please see BRICK WALL DRAIN, FLASHING, VENT SOURCES
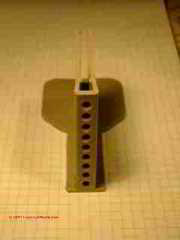
Shown above: A Tamlyn Building Products brick vent screen discussed in the article linked-to just above.
...
Reader Comments, Questions & Answers About The Article Above
Below you will find questions and answers previously posted on this page at its page bottom reader comment box.
Reader Q&A - also see RECOMMENDED ARTICLES & FAQs
On 2021-03-27 by Steven - missing flashing at brick veneer wall top = leak damage
 thank you. This is exactly what I feared. Will have to make sure it gets taken care of
On 2021-03-26 - by (mod) -
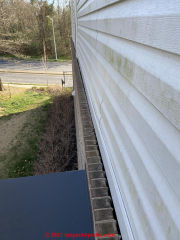
@Steven, it's really is a very poor design and is going to direct a good part of the water that runs down that wall in wet weather in behind the brick veneer which I turn is likely to damage the building, risking mold contamination, inviting insect pests and Rod, and possibly contributing to an indoor mold contamination problem. On the way you would have Z flashing or a continuous angled flashing behind the siding and out over the top of the veneer wall
On 2021-03-26 by Steven
Our house has a brick facade around the ground floor, with vinyl siding on the second floor. Where the siding meets the brick, the brick is completely open at the top, with all the water that runs down the siding able to run right behind the brick facade, as you can see in the attached picture.
Seems to me there should be flashing or some sealant to prevent water from running straight behind the facade. You can look in the gap and see the Tyvek. I have already sent images of this to the engineering firm that the condo association hired to inspect the property before the handover from the builder.
On 2018-10-17 - by (mod) - how water is getting into the block wall
Martin
It's an important and interesting question about where water is leaking into your building. Apologies but I don't have a clear picture of the construction; perhaps you can attach a drawing or photos using the Add Image button.
On 2018-10-17 by Marlin
Wondering how water is getting into the block wall run siting on the I beam which supports the second story brick veneer up to the roof? The builder ha to remove and re flash the entire second story veneer. After this there was a rain where , in the garage attic , water could again be seen bleeding through lower block runs on the I beam as before.
There is a window above this area. No visible penetration of water into the upstairs bedroom where the window is located. There was a blue skin barrier installed and typar is applied to the sheathing. I do not know if the blocks top row filled with mortar. The top of the blocks were not water barriered for the first run of veneer The space between the sheathing and veneer appears to be in code.
The redo eliminated a fair amount of water penetration through the block and into the garage. The builder had left adequate weep holes above the structural flashing. The builder unfortunately after news of additional penetration chose to add additional roof flashing , over the structural flashing and in so doing reduced the vertical weeping holes to less than 1/4 inches.
The builder states that the holes will weep under the flashing and the water will drain out over the roof. The weeping holes look properly located over the front window lentils. 3inch wedge size wafers.
I suspect either the window is leaking into the wall space down and into the top row of blocks since the first run of veneer is not thick enough to cover the open block holes. Water goes in and bleeds out between the mortar joints. Reading you waring about ensuring the vapor barrier directs water to the bottom row of weeping holes may be suspect as well.
I am concerned about the reduction in the size of the lowest row of weeping holes on top of the structural flashing. We have pictures available. Thanks for any forensic insight into this structural issue. Marlin Sorry for the grammar errors.
On 2017-09-17 - by (mod) -
Liz,
The problem you describe, leaks into a brick veneer wall of a home during flooding, and how much demolition is later appropriate is a particularly difficult one given the very high costs involved. There is simply no inexpensive way to cut out and remove moldy wall sheathing on the exterior wall behind the brick veneer.
What steps I would take vary depending on conditions at the specific home - you are welcome to use the page bottom CONTACT link to send me photos and details and I'll be glad to offer suggestions tailored to your situation.
How Much Drywall to Remove After Flooding
Remove all drywall and insulation that was physically wet by floodwaters as well as drywall above that that was damp from flood water absorption, as well as any visibly moldy drywall above that, until you see at least a 12" clear distance of no water signs and no visible mold above the bottom of the remaining drywall on a wall - looking at the wall cavity side, not just the room side.
If a home has suffered flooding well above the lowest interior floor we are at the very least going to remove drywall and insulation and trim to a height at least a foot above the highest wet drywall point. That will be ABOVE the flood line, since water wicks up in the drywall.
When I make the first test cuts into the drywall during demolition I remove insulation from the wall cavity from floor level to a foot or more above the bottom edge of the remaining drywall.
Use a light and mirror to inspect the cavity side of the drywall.
Keep in mind that if a home sits flooded for many days, especially in warm humid climates, mold problems can develop in other walls and ceilings above the actual level of flood waters.
I make small exploratory test cuts into most-suspect areas to look for mold or water damage in order to decide how much more demolition is needed.
Keep in mind that the cost difference between cutting away the bottom three feet of a wall drywall and the bottom four feet is about zero since the new drywall will be purchased in four foot widths. I cut in 12" or 24" widths at each pass along a wall or ceiling.
On 2017-09-14 by Liz
Harvey flooding minor but Our home is 1977 weep holes are low almost at ground level.. we had water intrusion through weep holes.
the brick backer board has paper backing on both sides and show signs of mold. What about removing backer board.. that would require removal of brick veneer of entire house is this recommended and should my flood ins. Cover it... I have asthma and cannot have mold in my house.
On 2017-09-17- by (mod) -
Jay,
TEMPORARY plugging of brick veneer weep holes to reduce water entry and damage from low-level flooding is something I'd try myself.
I would not leave such openings plugged as trapping water in the wall - as some water may seep in through other voids in the veneer - invites rot, insect damage, and mold growth.
I would go to the most-suspect area of an interior wall and there cut a 2" x 4" inspection opening above the floor trim to inspect the wall cavity for water entry, mold, damage. If you don't find any indicators of trouble you might stop there.
I sometimes pull off the baseboard trim at the floor to make the same investigation lower on the wall as that simplifies the cosmetic repair of the test cut area. In that case the test cut starts 1 1/2 " above the floor level to be sure I can see above the wall sill plate.
On 2017-09-02 by Jay chuah
Hello, I plugged my weep holes in around 4 days ago due to hurricane harvey. Water did not enter my house but I read online that i did the wrong thing because the weepholes actually prevent mold by airing the house. I was wondering how fast mold is going to grow and if it will be a serious problem after 4 days.
On 2017-08-27- by (mod) -
Unfortunately there may be a problem that the flashing that directs water out of weep openings is at the bottom of most brick walls. So closing bottom openings and making higher ones invites a reservoir of water that enters and stays in the wall, making matters worse.
There is no meaningful air circulation through weep hole systems. That's not the point. Rather it's to let water drain out.
If I were unable to raise the home and had a problem of water entering weep holes at wall bottom during flooding I'd consult with a local engineer who has expert in retrofit for that situation. She might want to modify the wall to make it solid high-portland cement for a height well above high water.
In Venice people live with this flooding by also putting temporary barriers across the bottom of entry doors - and by moving living space higher in the building, and by using all masonry on the lowest level so as to reduce the amount of mold-friendly material to get soaked.
On 2017-08-26 by Andy
Can you plug weep holes and move up one brick to prevent water from entering during rain events do to improper drainage which can not be fixed. Will higher weep hole still allow circulation of air. I could always remove mortar if I ternal issue with water
...
Continue reading at BRICK VENEER WALL WEEP HOLE LOCATION or select a topic from the closely-related articles below, or see the complete ARTICLE INDEX.
Or see these
Recommended Articles
- BRICK WALL DRAINAGE WEEP HOLES
- DEFINITION of WEEP HOLES in BRICK WALLS
- BRICK VENEER WEEP HOLE & VENT SPECIFICATIONS
- BRICK VENEER WALL WEEP HOLE LOCATION
- BRICK VENEER WEEPS BLOCKED or MISSING
- BRICK VENEER WALL THROUGH-VENTILATION
- BRICK VENEER WALL LEAKS in FLOOD PRONE AREAS
- BRICK VENEER WALL REPAIRS in FLOOD PRONE AREAS
- BRICK WALL DRAIN, FLASHING, VENT SOURCES
- BRICK WALL THERMAL EXPANSION CRACKS
- STUCCO WALL WEEP SCREED DRAINAGE
Suggested citation for this web page
BRICK WALL DRAINAGE WEEP HOLES at InspectApedia.com - online encyclopedia of building & environmental inspection, testing, diagnosis, repair, & problem prevention advice.
Or see this
INDEX to RELATED ARTICLES: ARTICLE INDEX to BUILDING STRUCTURES
Or use the SEARCH BOX found below to Ask a Question or Search InspectApedia
Ask a Question or Search InspectApedia
Try the search box just below, or if you prefer, post a question or comment in the Comments box below and we will respond promptly.
Search the InspectApedia website
Note: appearance of your Comment below may be delayed: if your comment contains an image, photograph, web link, or text that looks to the software as if it might be a web link, your posting will appear after it has been approved by a moderator. Apologies for the delay.
Only one image can be added per comment but you can post as many comments, and therefore images, as you like.
You will not receive a notification when a response to your question has been posted.
Please bookmark this page to make it easy for you to check back for our response.
IF above you see "Comment Form is loading comments..." then COMMENT BOX - countable.ca / bawkbox.com IS NOT WORKING.
In any case you are welcome to send an email directly to us at InspectApedia.com at editor@inspectApedia.com
We'll reply to you directly. Please help us help you by noting, in your email, the URL of the InspectApedia page where you wanted to comment.
Citations & References
In addition to any citations in the article above, a full list is available on request.
- Howell, Jeff, "Could the cavity-wall insulation scandal rival PPI?", The Telegraph, 16 February 2015, original source: Could the cavity-wall insulation scandal rival PPI?
Excerpts: Many victims’ cases were described by the MPs, and all had features in common. One was the way in which the idea of CWI had been presented to them by door-stepping and cold-calling salesmen, describing cavity insulation as being “Government-backed” or “Government-funded”. This is not the case. ... Another factor that the victims’ cases have in common is the role of the Cavity Insulation Guarantee Agency (CIGA), which issues 25-year guarantees. Salesmen often describe these as “Government guarantees”, which they are not. - Arumala, Joseph O. "Brick Veneer Steel Stud Wall Systems: State-of-the-Art." The Masonry Society Journal (2007): 9-19.
Illustrations used in the article above include adaptations from BIA Technical Notes 28B Figure 1 as used in this article. ©IAP 2016 - [1] Williams, M.F., Williams B.L., "Water Intrusion in Barrier and Cavity / Rain Screen Walls", Water in Exterior Building Walls: Problems and Solutions, ASTM STP 1107, Thomas A. Schwartz, Eds., American Society for Testing and Materials, ASHRAE, Philadelphia, 1991, retrieved 8/10/12, Abstract:
Exterior walls are designed and constructed using barrier or cavity / rain screen wall principles. Exterior Insulation and Finish Systems (EIFS) are typically constructed as barrier walls; masonry is often constructed as a cavity wall. These wall systems are discussed along with common deficiencies that allow water intrusion to occur.
[Mark F. Williams and Barbara Lamp Williams are president and vice president respectively of Kenny/Williams/Williams, Inc., a building diagnostics firm at 945 Tennis Ave., Maple Glen PA 19002.] - Airolite BVC Brick Vents (extruded aluminum), The Airolite Company, LLC, PO Box 410, Schofield WI 54476, Tel: 715-841-8757 Web: http://www.airolite.com/
- Brick Development Association, The Building Centre, 26 Store Street, London, WC1E 7BT, England, U.K., Tel: 020 7323 7030, Email: brick@brick.org.uk Web: http://www.brick.org.uk
- Brick Industry Association, 1850 Centennial Park Drive, Suite 301, Reston, VA 20191 Phone: 703.620.0010 Fax: 703.620.3928 Web: http://www.gobrick.com/
- Brickvent™, Masonry Innovations, Masonry Innovations, 36 Woodview Drive, Pittsboro, IN 46167, Tel: 317.341.0882 or 317.695.0509, Email: info@masonryinnovations.com Web: http://masonryinnovations.com/ - the company provides this BrickVent™ MOISTURE CONTROL SYSTEM INSTRUCTIONS [PDF] . Web Search 02/16/2011, original source: http://masonryinnovations.com/Instruction_Sheet.pdf
- Canada Masonry Centre, 360 Superior Blvd., Mississauga ON Canada L5T 2N7. Tel: (905) 564-6622 Web: http://www.canadamasonrycentre.com/ - CMC Offers the CMCA Textbook of Canadian Masonry.
- Masonry Design Manual, James E. Amrhein & Walter L. Dickey, Civil & Structural Engineers, Masonry Industry Advancement Committee, Masonry Institute of America, ASIN B0006XMFZE
- Tamlyn Building Products, Tom Tamlyn, President, 13623 Pike Rd., Stafford TX 77477, Tel: 800-334-1676 Web: http://www.tamlyn.com
- "Concrete Slab Finishes and the Use of the F-number System", Matthew Stuart, P.E., S.E., F.ASCE, online course at www.pdhonline.org/courses/s130/s130.htm
- Sal Alfano - Editor, Journal of Light Construction*
- Thanks to Alan Carson, Carson Dunlop, Associates, Toronto, for technical critique and some of the foundation inspection photographs cited in these articles
- Terry Carson - ASHI
- Mark Cramer - ASHI
- JD Grewell, ASHI
- Duncan Hannay - ASHI, P.E. *
- Bob Klewitz, M.S.C.E., P.E. - ASHI
- Ken Kruger, P.E., AIA - ASHI
- Aaron Kuertz aaronk@appliedtechnologies.com, with Applied Technologies regarding polyurethane foam sealant as other foundation crack repair product - 05/30/2007
- Bob Peterson, Magnum Piering - 800-771-7437 - FL*
- Arlene Puentes, ASHI, October Home Inspections - (845) 216-7833 - Kingston NY
- Greg Robi, Magnum Piering - 800-822-7437 - National*
- Dave Rathbun, P.E. - Geotech Engineering - 904-622-2424 FL*
- Ed Seaquist, P.E., SIE Assoc. - 301-269-1450 - National
- Dave Wickersheimer, P.E. R.A. - IL, professor, school of structures division, UIUC - University of Illinois at Urbana-Champaign School of Architecture. Professor Wickersheimer specializes in structural failure investigation and repair for wood and masonry construction. * Mr. Wickersheimer's engineering consulting service can be contacted at HDC Wickersheimer Engineering Services. (3/2010)
- *These reviewers have not returned comment 6/95
- Masonry structures: The Masonry House, Home Inspection of a Masonry Building & Systems, Stephen Showalter (director, actor), DVD
- Masonry Design for Engineers and Architects, M. Hatzinikolas, Y. Korany, Canadian Masonry (2005), ISBN-10: 0978006100, ISBN-13: 978-0978006105
- Masonry Structures: Behavior and Design, Robert G. Drysdale, Ahmid A. Hamid, Lawrie R. Baker, The Masonry Society; 2nd edition (1999), ISBN-10: 1929081014, ISBN-13: 978-1929081011
- Masonry, Engineered: Using the Canadian Code, J. I. Gainville, Cantext publications (1983), ASIN: B0007C37PG
- Masonry, Non-reinforced masonry design tables, Hans J. Schultz, National Concrete Producers Association and the Canadian Masonry Contractors Association (1976), ASIN: B0007C2LQM
- MOISTURE CONTROL in BUILDINGS [PDF] U.S. Department of Energy
- MOISTURE CONTROL in WALLS [PDF] U.S. Department of Energy
- VAPOR BARRIERS or VAPOR DIFFUSION RETARDERS [PDF] U.S. DOE - how vapor barriers work, types of vapor diffusion barriers, installing vapor barrier
- VENTILATION for ENERGY-EFFICIENT BUILDINGS [PDF] Purpose of ventilation, ventilateion strategies, etc.
- Building Failures, Diagnosis & Avoidance, 2d Ed., W.H. Ransom, E.& F. Spon, New York, 1987 ISBN 0-419-14270-3
- Building Pathology, Deterioration, Diagnostics, and Intervention, Samuel Y. Harris, P.E., AIA, Esq., ISBN 0-471-33172-4, John Wiley & Sons, 2001 [General building science-DF] ISBN-10: 0471331724 ISBN-13: 978-0471331728
- Historic Preservation Technology: A Primer, Robert A. Young, Wiley (March 21, 2008) ISBN-10: 0471788368 ISBN-13: 978-0471788362
- In addition to citations & references found in this article, see the research citations given at the end of the related articles found at our suggested
CONTINUE READING or RECOMMENDED ARTICLES.
- Carson, Dunlop & Associates Ltd., 120 Carlton Street Suite 407, Toronto ON M5A 4K2. Tel: (416) 964-9415 1-800-268-7070 Email: info@carsondunlop.com. Alan Carson is a past president of ASHI, the American Society of Home Inspectors.
Thanks to Alan Carson and Bob Dunlop, for permission for InspectAPedia to use text excerpts from The HOME REFERENCE BOOK - the Encyclopedia of Homes and to use illustrations from The ILLUSTRATED HOME .
Carson Dunlop Associates provides extensive home inspection education and report writing material. In gratitude we provide links to tsome Carson Dunlop Associates products and services.


