 Water Pressure Tank & Pump Winterizing Guide
Freeze-Protect Water Pumps Tanks when Heat will be left OFF
- POST a QUESTION or COMMENT about winterizing a building with heat off and drained pipes
Winterizing a building: how to drain & freeze proof the well tank and pump when heat is going to be left off in a building.
This article series explains with a step by step guide just how to winterize or freeze proof a building when the building's heating system is going to be turned off completely.
InspectAPedia tolerates no conflicts of interest. We have no relationship with advertisers, products, or services discussed at this website.
- Daniel Friedman, Publisher/Editor/Author - See WHO ARE WE?
How to Drain & Winterize a Well Tank or Water Pressure Tank & Pump
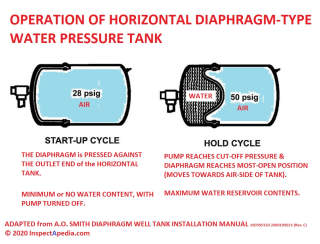
An Optimistic Hypothesis Explains How a Horizontal Diaphragm Type Water Tank Drains for Winterizing:
The company's illustrations, using a vertical tank as an example, show that at "start-up" the tank is empty of water and the diaphragm is pressed against the bottom of the air chamber.
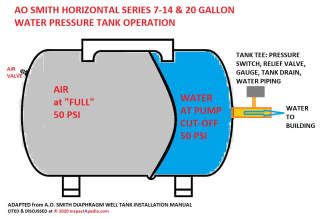
In a horizontal tank the diaphragm moves horizontally, from the end of the tank that has an air valve (Schrader valve for adjusting the tank's air pre-charge) towards the water inlet/outlet end of the tank.
Provided that we have adequate air charge in the tank, if you turn off the pump and open a drain valve the diaphragm is intended to push all (probably "almost" all) of the water out of the water-end of the tank or bladder end and out of the tank's water connection.
What little moisture is left in the bladder will not be enough to damage the water tank; any slight expansion of the bladder if those water droplets freeze would simply move the bladder slightly inside the tank.
Here is my illustration, based on the company's literature and illustrations, adapted for horizontal tank models:
[Click to enlarge any image]
Should You Adjust the Water Tank Air Pressure for Winterizing-Draining?
Probably not, and it should be un-necessary. But you could perform this experiment:
- Turn off the pump & drain the water.
With the tank air pre-charge set to its normal level (2 psi below the pressure control switch CUT-IN pressure, or 28 psi for a 30/50 pump control system), turn off the pump and open the tank drain and allow all water to drain out of the tank. - Temporarily increrase the tank's air charge to a higher but safe level
When no more water is draining from the pressure tank, increase the air pressure at the other end of the tank to 40 psi. This should be a safe level as it is well below the tank's normal maximum operating pressure. - Watch for additional water being pushed out of the tank drain.
If no more water is extracted by this step then we have confirmed that at its normal 28 psi air precharge (pump off, no pressure on the water system, the horizontal tank will drain completely. - Watch out: don't forget to release the excess air from the tank.
Return the tank to its proper air pre-charge pressure (28 psi in this example).
If you leave air pressure in the water tank set to a pressure above the pump pressure control switch CUT-IN pressure then on restoring the system to service the pump will never turn on and you'll have no water.
For more help
See WATER TANK AIR ADD AT AIR VALVE
and see WATER TANK AIR HOW MUCH TO ADD
Beyond this speculation and experimentation on winterizing a horizontal water tank to be sure it's drained sufficiently to be safe from freeze-damage, what's left is to contact the company to ask for confirmation that even a horizontal diaphragm tank will drain sufficiently as to not be concerned about freeze damage, and to ask where we find those "additional instructions" to which they refer in the installation manual that's readily available and provided herewith.
- Contact: A. O. Smith, 500 Tennessee Waltz Parkway Ashland City, TN 37015Phone: 1-800-527-1953www.hotwater.com
Drain & Freeze-Protect the Water Pump
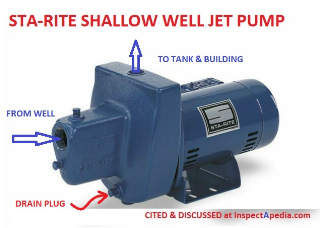
Shown here: a 1-line Jet Pump showing the drain plug at the bottom of the pump impeller assembly.
[Click to enlarge any image]
- What kind of water pump is installed? If your well pump is an above-ground pump it's probably a 1-line or 2-line jet pump.
If the jet pump is left exposed to freezing conditions it could be damaged or destroyed.
All above-ground jet pumps need to be drained if the pump is exposed to freezing conditions.
If your well pump is a submersible unit, that is, the pump is actually in the well, at most buildings the pump is well below the frost line and no additional steps are needed to protect the pump itself from freezing or frost damage.
If you don't know how to identify your various water system components, types, controls,
See IDENTIFY WELL PUMP TANK COMPONENTS
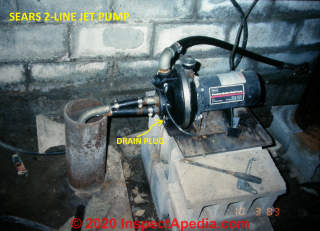
Above: a 1980s vintage Sears 2-line Jet Pump showing the drain plug. This pump provides an impeller assembly drain that can simply be opened to drain the pump.
Watch out: this 2-line jet pump and well installation is not sanitary: the well casing top is open, and the pump is hardly secure: it's just set atop a stack of concrete blocks. This isn't a reliable water source, but I'll admit it had been in use in this precarious state for over a decade when I met it.
- Find & Open or Remove the Pump Drain Plug: on the lower portion of the impeller assembly, most above-ground jet pumps include a small threaded pump that can be removed to drain water from the pump.
Remove that plug to allow water out of the impeller assembly and nearby water piping.
Really? Well not always. Some jet pumps like the Sears unit shown above are provided with a finger-operated drain cock that opens by turning the "T" shaped valve handle - it is not necessary to remove this fitting to drain the pump.
Usually rotating the valve counter-clockwise will open it. But don't force the valve if it won't turn: breaking it off will mean you have to buy a replacement or screw in a small-diameter pipe plug to return the pump to service.
Watch out: I prefer to return the plug to its proper position after the pump has drained completely. If you leave the plug out and it is lost you'll have to replace it before you can return the well pump to service.
Watch out: you won't be able to restore a jet pump to operation without re-priming it. When you are ready to do that, see
WELL PUMP PRIMING PROCEDURE.
...
Reader Comments, Questions & Answers About The Article Above
Below you will find questions and answers previously posted on this page at its page bottom reader comment box.
Reader Q&A - also see RECOMMENDED ARTICLES & FAQs
Question: how do I get all of the water out of my horizontal bladder-type well tank?
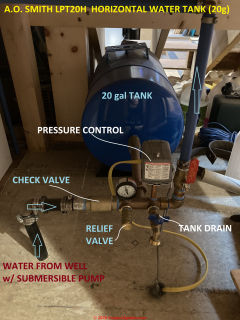 I have a new 20 gallon horizontal pressure tank that is connected to my drilled well. I need to drain it prior to winter, as I will be closing up camp here in Maine. How do I drain the tank to be sure to get all of the water out of the bladder?
It is an A.O. Smith Model #LPT20H that I bought at Lowes. See picture of my install.
The water inlet/outlet is connected into one end of this horizontal well tank, in the center of the tank so I'm concerned that water may remain in the tank when it is drained through the sillcock.
Make sense? - Anonymous by private email 2020/10/19
Moderator reply:
The air pressure in the tank ought to push all the water out of the tank - provided the tank was one designed for horizontal installation. This article, above and below our conversation, provides the details.
I have looked at all of the generations of AO Smith's pump tank installation manuals I could find at a section that has this minimal advice:
Draining for servicing or for Winter
The system should be drained before it is disconnected for servicing, or if it is inoperative for an extended period of time, or if it is in danger of freezing.
To Drain:
• Follow the instructions in your pump installation manual to drain the pump.
• Open tank drain cock to drain tank.
• Drain all piping to a point 3 feet below ground level
 I will attach one of these manuals (just below) in case you don't have it.
Is or was there an additional instruction manual that came with your tank that has additional information?
Watch out: in your photo [shown above] the tank and tank tee ought to be drained successfully from the drain valve your installation provides, but unless your well also includes a drainback system such as a snifter valve water may remain in that check valve (at least on the well side) and in the plastic well piping.
Plastic well pipes can tolerate some freezing without damage but I'm not 100% sure of that check valve. If you agree that that's a concern you might disconnect the check valve on the well piping side (removing the stainless steel hose clamps).
I find that disconnecting and re-connecting plastic well pipes to metal components or unions or couplings requires heating the pipe and in my OPINION repeated heating deforms the pipe and can lead to leaky connections.
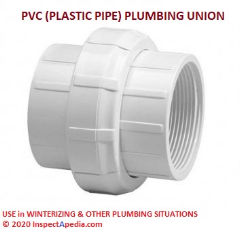
So a better longer-term solution might be to install a metal or PVC pipe union with suitable adapters to make future opening at that side easier.
I use plumbing unions everywhere that I might need to later disassemble or disconnect plumbing connections; it adds a small cost and bit of labor but IMO pays off when future work or draining are needed.
Well Tank & Water Pump Instructions including Winterizing Procedures for Freeze Protection
- AO SMITH DIAPHRAGM WELL TANK INSTALLATION MANUAL [PDF] (2018) 100305320 2000199921 (Rev. C) A. O. Smith, 500 Tennessee Waltz Parkway, Ashland City, TN 37015Phone: 1-800-527-1953www.hotwater.com retrieved 2020/10/20 original source: A.O. Smith at https://www.hotwater.com/Resources/Product-Literature/Instruction-Manuals/Tanks/
- Sears CRAFTSMAN HYDROGLASS CONVERTIBLE DEEP WELL JET PUMP MANUAL [PDF] (1998) Models 390.251182, 390.251982, 390.252282
- Water Systems, DIAPHRAGM WELL TANK INSTALLATION MANUAL - AWH [PDF] (2012) Water systems, 4302 Raleigh St, Charlotte, NC 28213
- WATER TANK & PUMP MANUALS - complete list for all brands
What about Just Leaving Some Heat ON?
An alternative to turning heat off in the building entirely is to continue your practice of leaving heat on at a low setting (4 C or about 40 F) but take measures to protect the building from damage (possibly allowing a slightly lower heat setting) and to reduce heating cost by finding and fixing drafts, air leaks, or by improving building insulation.
In some buildings it may be convenient to turn off water and drain fixtures in most of the building but to leave heat on or to provide a small electric or hydronic heat source in areas of the building that cannot be reliably drained and winterized.
See WINTERIZE - HEAT ON PROCEDURE
...
Continue reading at WINTERIZE - HEAT OFF PROCEDURE or select a topic from the closely-related articles below, or see the complete ARTICLE INDEX.
Or see these
Building Freeze Protection Articles
- ARTESIAN WELL FREEZE PROTECTION
- CHEMICAL TOILET FREEZE PROTECTION
- DE-WINTERIZE a BUILDING
- DRAIN FREEZE PROTECTION
- FAUCETS, OUTDOOR HOSE BIBBS
- FREEZING FORCE of ICE
- FROST HEAVES, FOUNDATION, SLAB
- FROZEN AEROBIC SEPTIC or WATER SUPPLY SYSTEM
- FROZEN PIPE THAW-OUT
- GREYWATER FREEZE PROTECTION
- PIPE FREEZE PROTECTION - home
- SEPTIC TANK & DRAINFIELD FREEZE PROTECTION
- SPA / HOT TUB DRAIN / WINTERIZING PROCEDURE
- WATER SOFTENER / TREATMENT TURN OFF
- WATER TANK & PUMP DRAIN & WINTERIZE
- WINTERIZE A BUILDING - home
Suggested citation for this web page
WATER TANK & PUMP DRAIN & WINTERIZE at InspectApedia.com - online encyclopedia of building & environmental inspection, testing, diagnosis, repair, & problem prevention advice.
Or see this
INDEX to RELATED ARTICLES: ARTICLE INDEX to BUILDING FREEZE PROTECTION
Or use the SEARCH BOX found below to Ask a Question or Search InspectApedia
Ask a Question or Search InspectApedia
Try the search box just below, or if you prefer, post a question or comment in the Comments box below and we will respond promptly.
Search the InspectApedia website
Note: appearance of your Comment below may be delayed: if your comment contains an image, photograph, web link, or text that looks to the software as if it might be a web link, your posting will appear after it has been approved by a moderator. Apologies for the delay.
Only one image can be added per comment but you can post as many comments, and therefore images, as you like.
You will not receive a notification when a response to your question has been posted.
Please bookmark this page to make it easy for you to check back for our response.
IF above you see "Comment Form is loading comments..." then COMMENT BOX - countable.ca / bawkbox.com IS NOT WORKING.
In any case you are welcome to send an email directly to us at InspectApedia.com at editor@inspectApedia.com
We'll reply to you directly. Please help us help you by noting, in your email, the URL of the InspectApedia page where you wanted to comment.
Citations & References
In addition to any citations in the article above, a full list is available on request.
- "Freezeproof Your House," Mike McClintock, Rodale's New Shelter, p. 30, October 1985 (approximate date)
- "How to Winterize Your Pipes," Mike McClintock, Homeowners How-To Magazine, p. 59-62, Nov-Dec 1979.
- In addition to citations & references found in this article, see the research citations given at the end of the related articles found at our suggested
CONTINUE READING or RECOMMENDED ARTICLES.
- Carson, Dunlop & Associates Ltd., 120 Carlton Street Suite 407, Toronto ON M5A 4K2. Tel: (416) 964-9415 1-800-268-7070 Email: info@carsondunlop.com. Alan Carson is a past president of ASHI, the American Society of Home Inspectors.
Thanks to Alan Carson and Bob Dunlop, for permission for InspectAPedia to use text excerpts from The HOME REFERENCE BOOK - the Encyclopedia of Homes and to use illustrations from The ILLUSTRATED HOME .
Carson Dunlop Associates provides extensive home inspection education and report writing material. In gratitude we provide links to tsome Carson Dunlop Associates products and services.


