
InspectAPedia® FREE Encyclopedia of Building & Environmental Construction, Diagnosis, Maintenance & Repair |
Question? Just ask us! InspectAPedia
|
 Water Softener Injector / Eductor Repair
How to clean or replace the injector or eductor in a water softener
Eductor/Injector details for AO Smith, Culligan, Fleck, Triasoft, Water Right & Other Softeners
- POST a QUESTION or COMMENT about water softener injectors or eductors & water softener brine level problems
The water softener injector or eductor is a venturi device that creates the suction to draw brine from the water softener brine tank and to inject that brine into the water softener's resin tank.
Hence the part's name varies in water softener service manuals, where you'll find it described as the water softener eductor (Culligan) or as the water softener injecctor (most brands).
This article series describes procedures for diagnosing and repairing water softener or water conditioner problems including water conditioner control settings and adjustment or repair, brine tank and brine tank float cleaning and repair, and the proper amount of water softening or conditioning that is needed. To identify the main components of a water softener click to enlarge the page top image.
InspectAPedia tolerates no conflicts of interest. We have no relationship with advertisers, products, or services discussed at this website.
- Daniel Friedman, Publisher/Editor/Author - See WHO ARE WE?
Brine Tank Eductor Valve / Water softener Injector Location, Cleaning, Repair
Here we provide details about how to locate, remove, clean, or replace the injector in most water softeners.
We start with several photos and sketches to show the injector location on some common water softener brands and models, followed by detailed instructions for specific water softener examples.
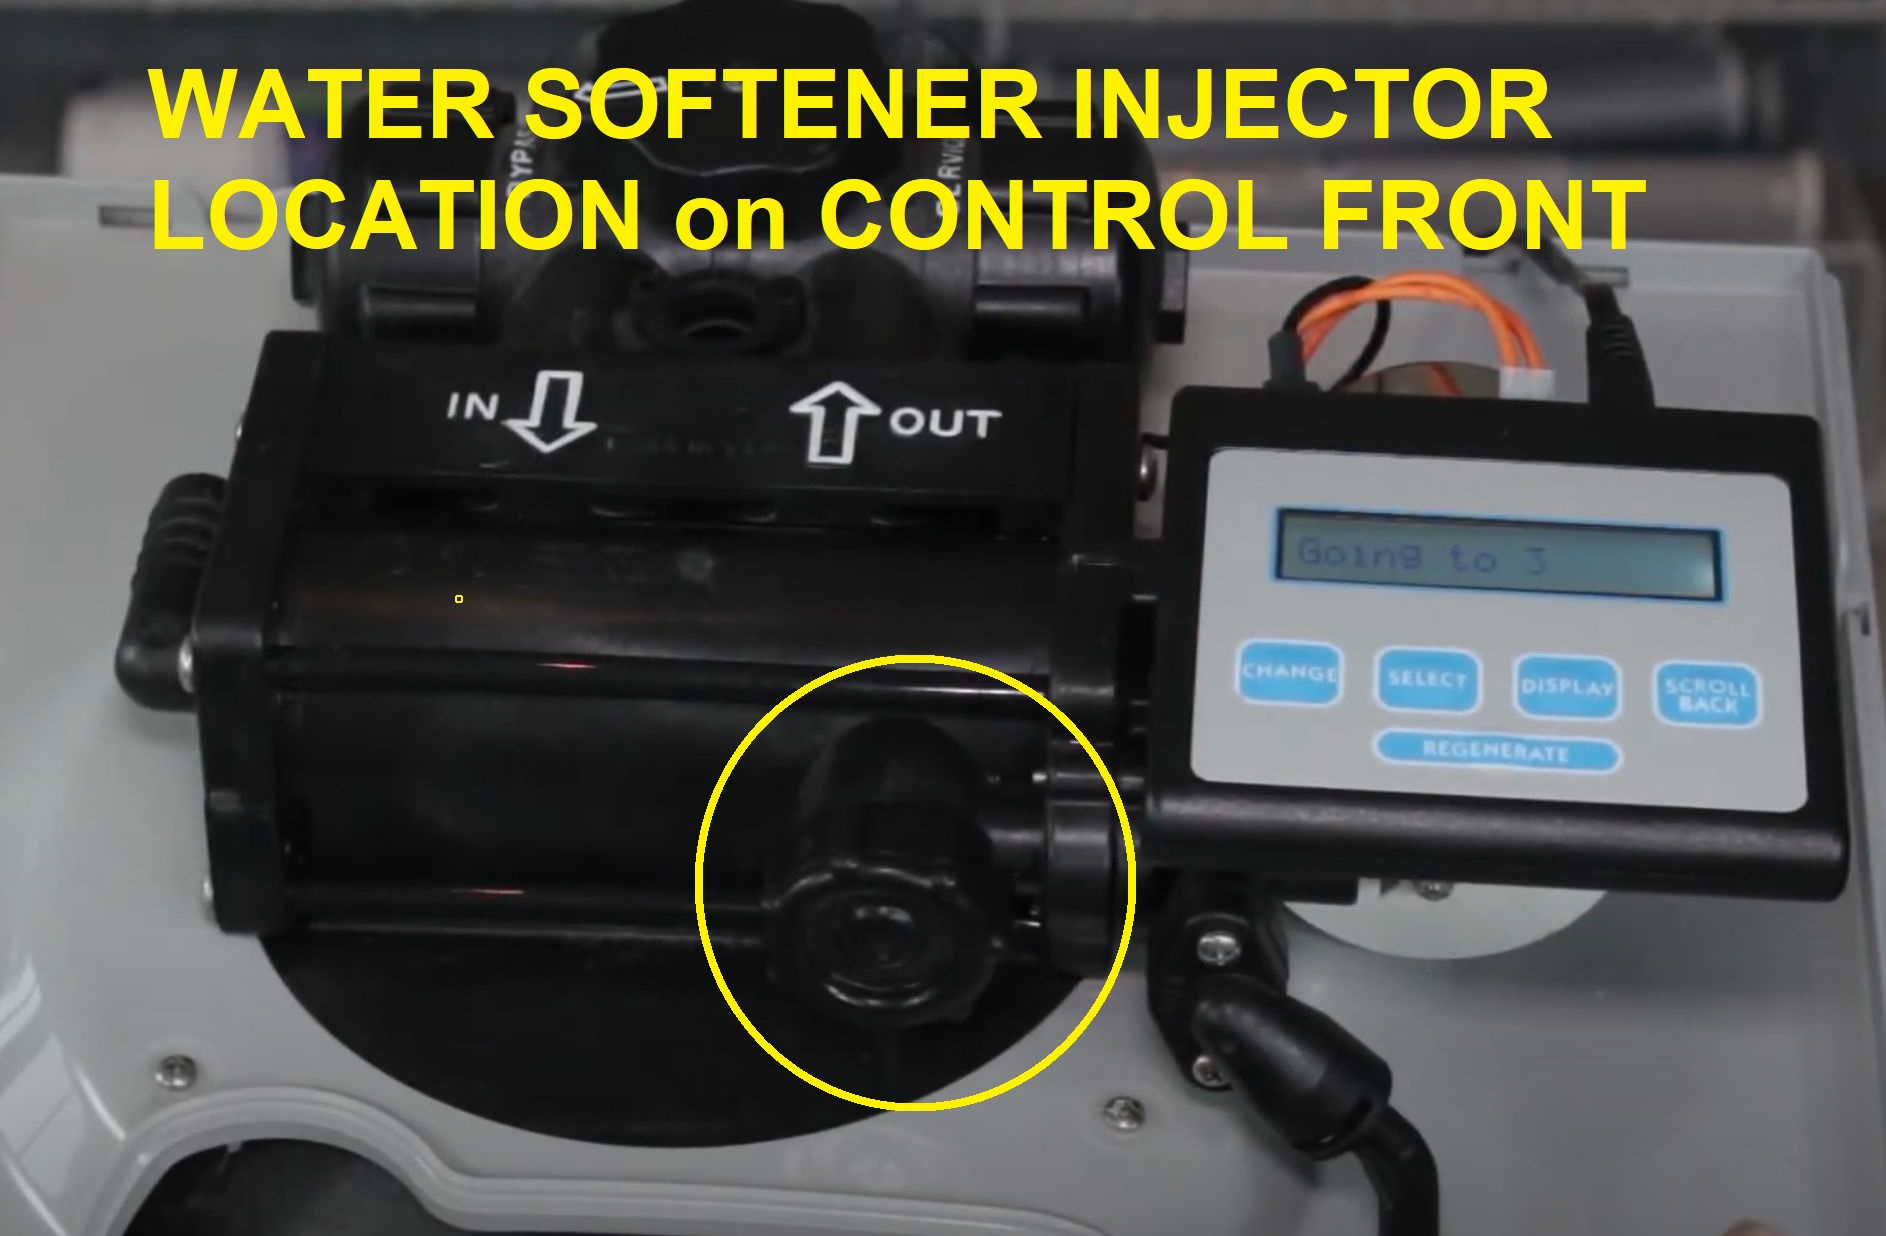
Water Softener Injector Located on the Front of the Control Head
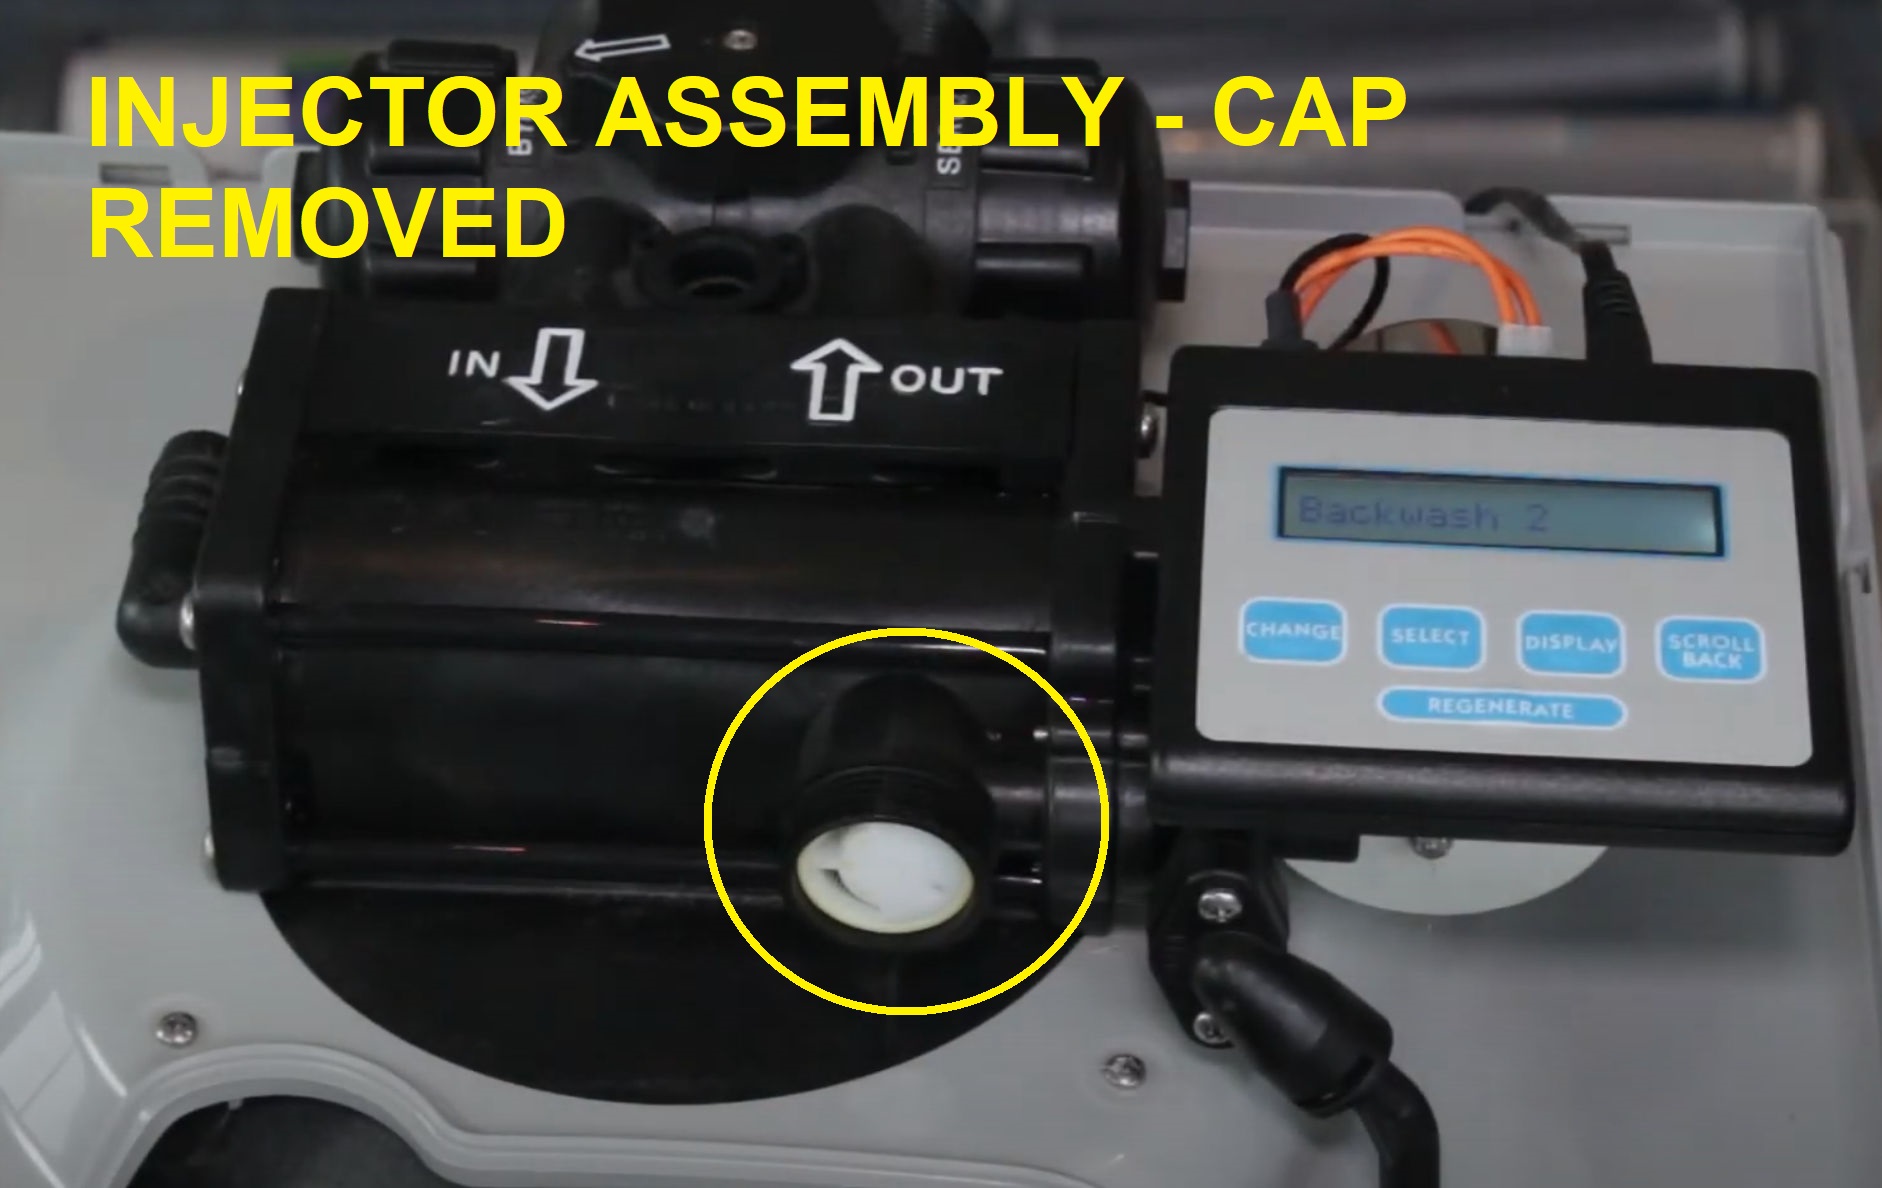
Above we see the water softener injector located below a screw cap on the front of the control head.
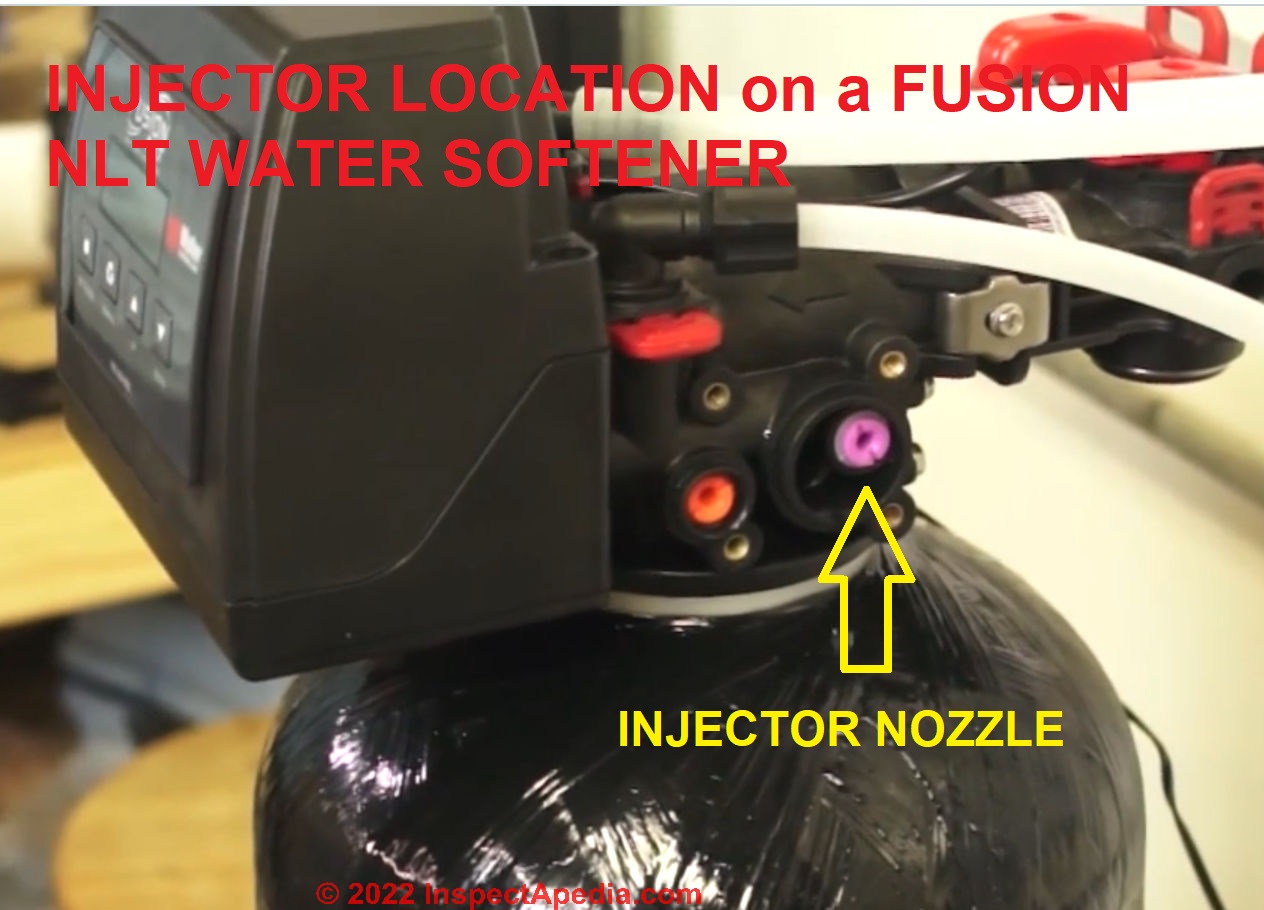
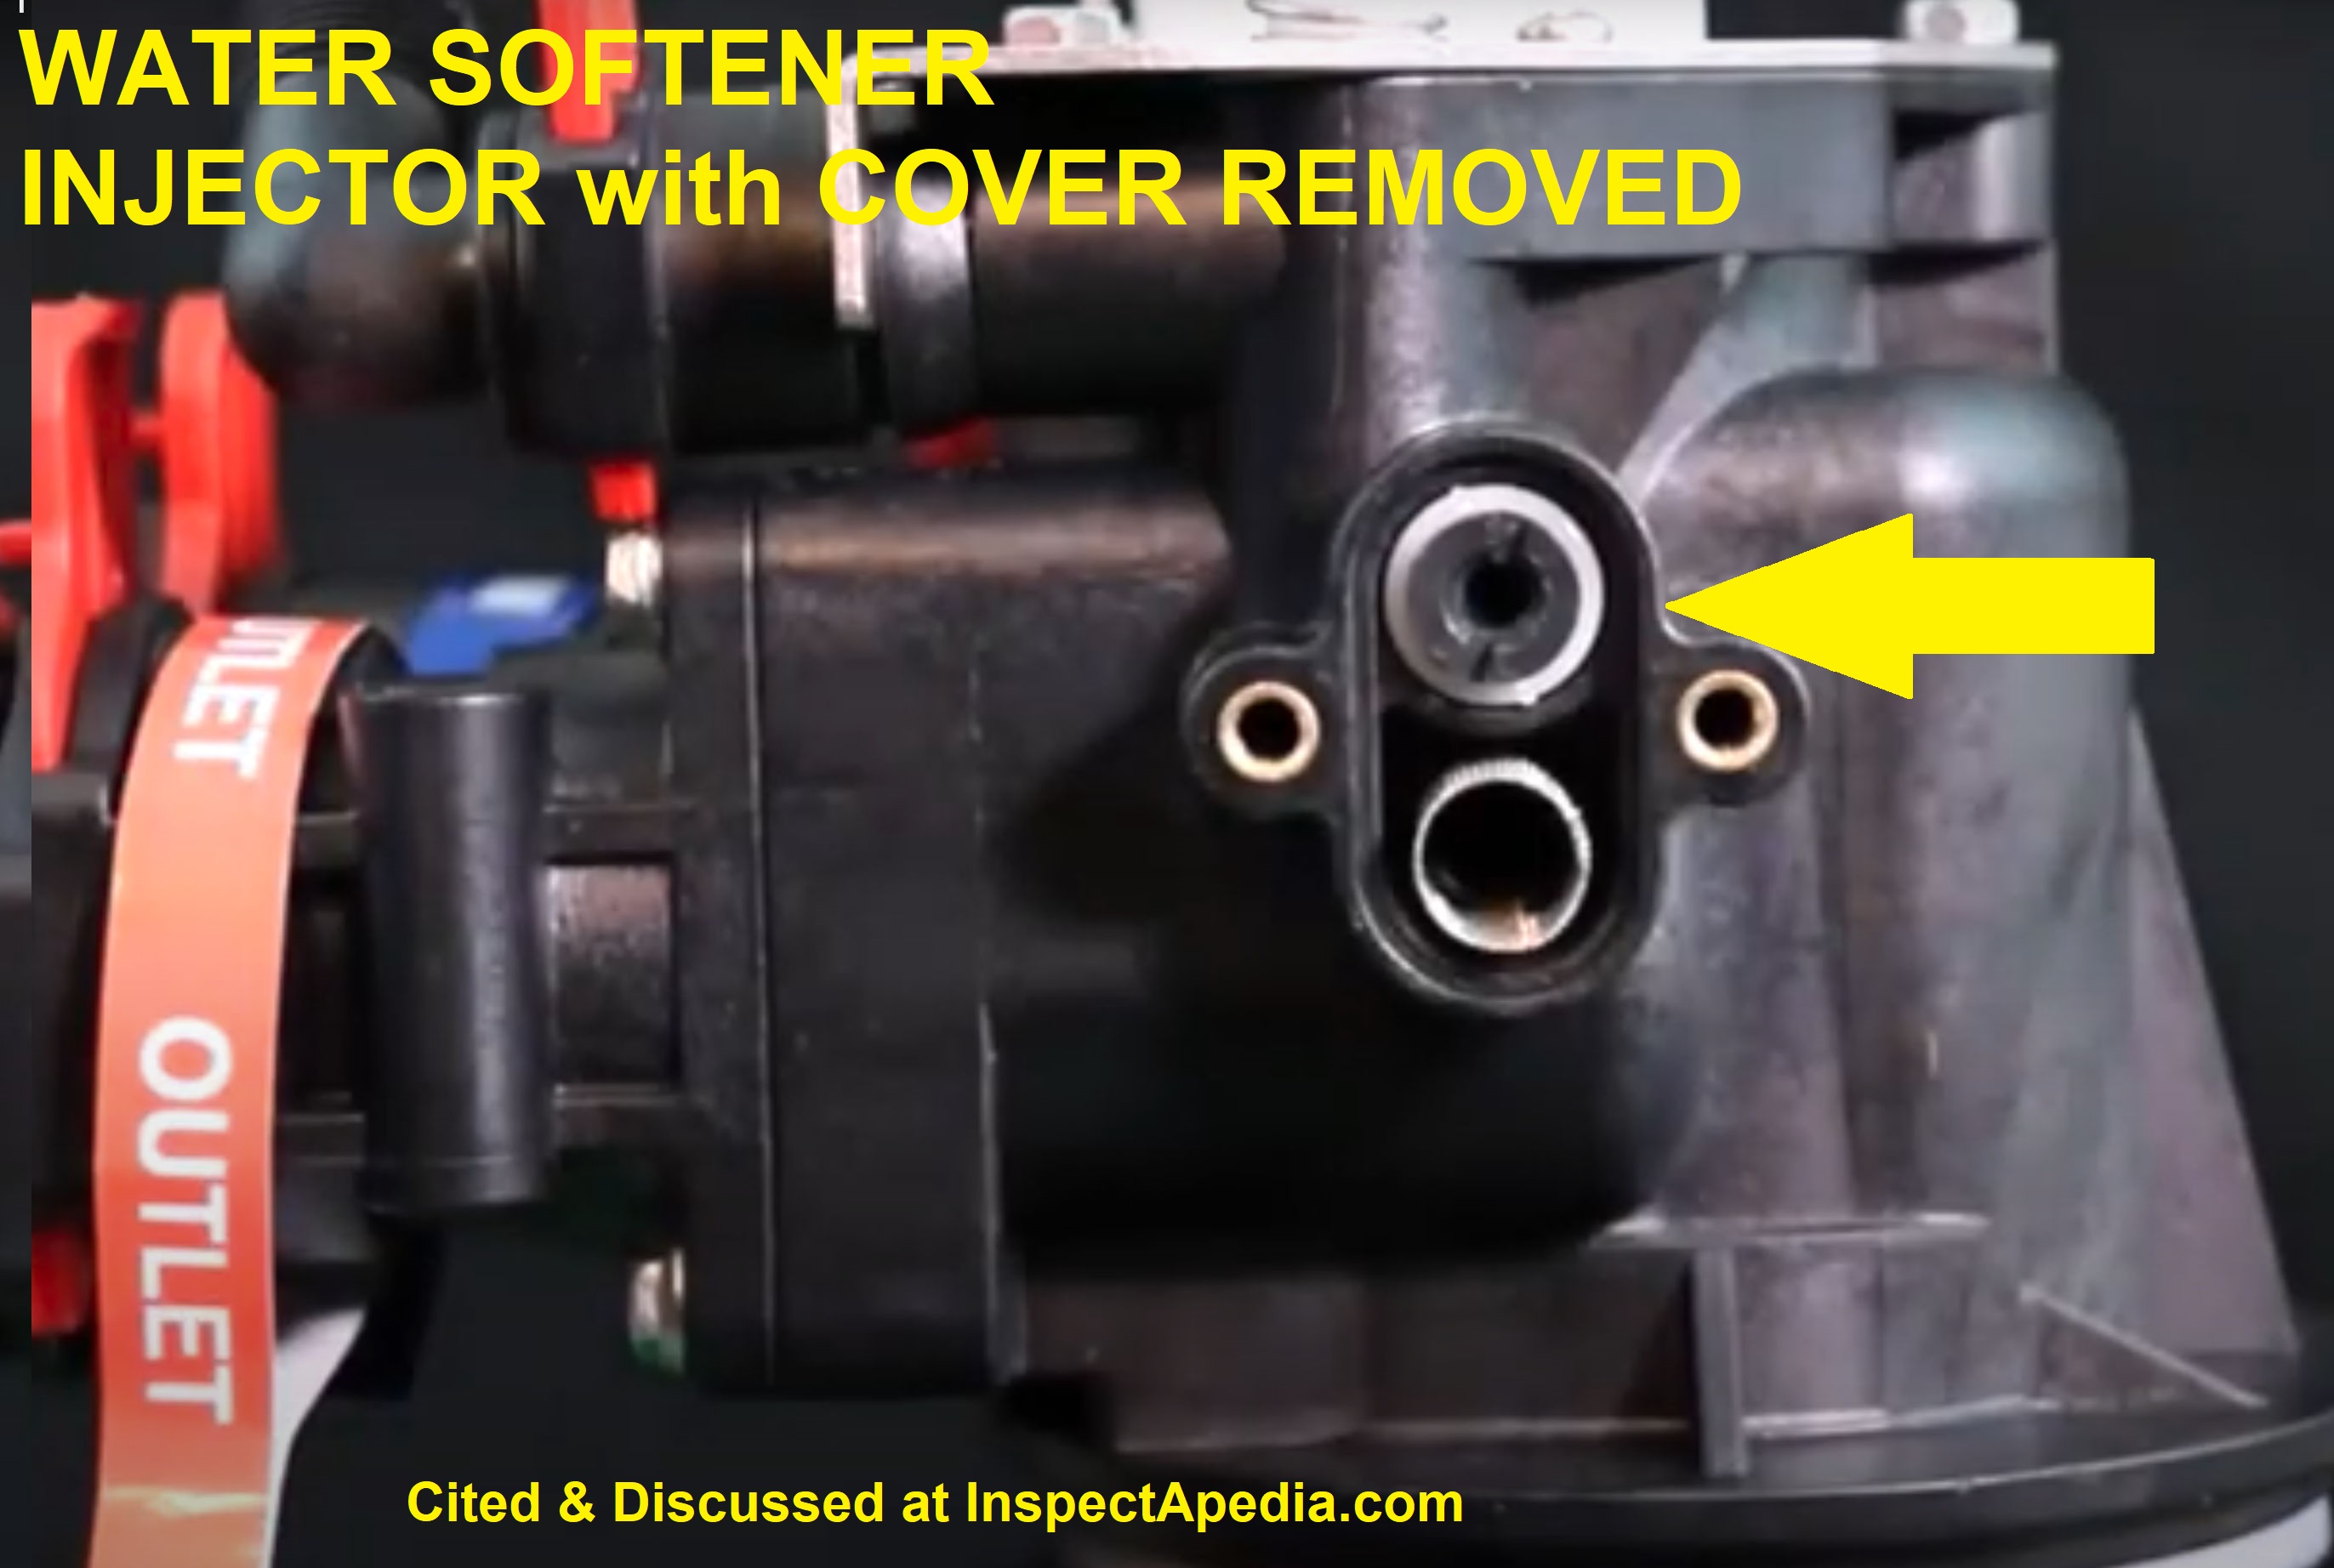
Water Softener Injector/Eductor Located on the Side of the Control Head
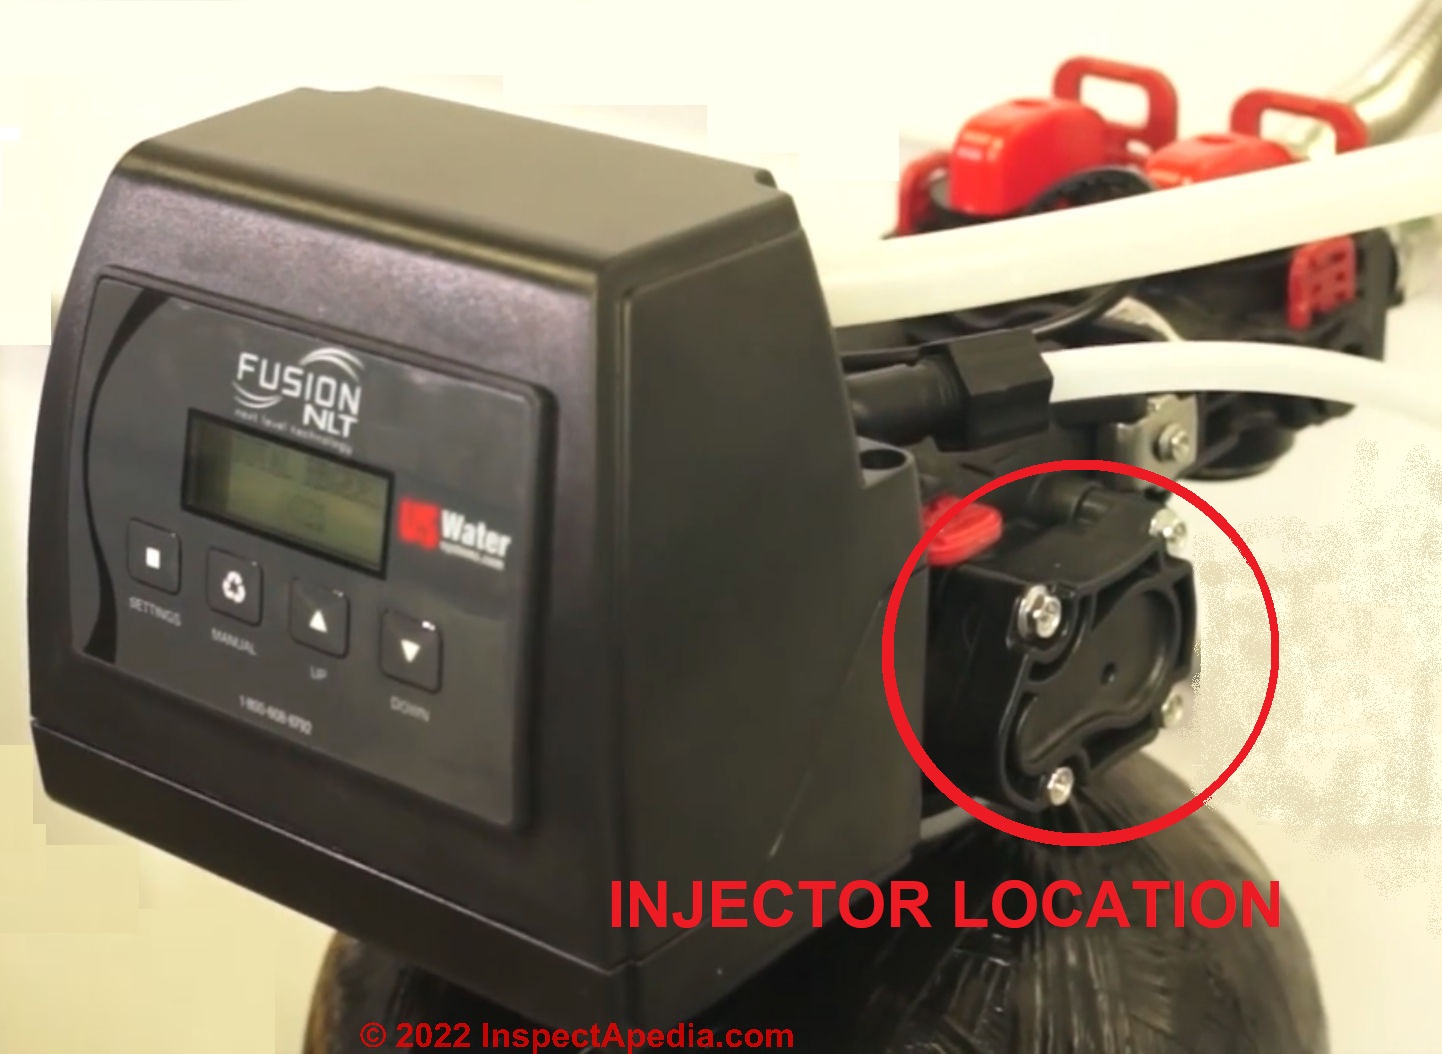
Above4 and below we show a typical water softener injector located on the side of the control head, using a Fusion water softener as an example.
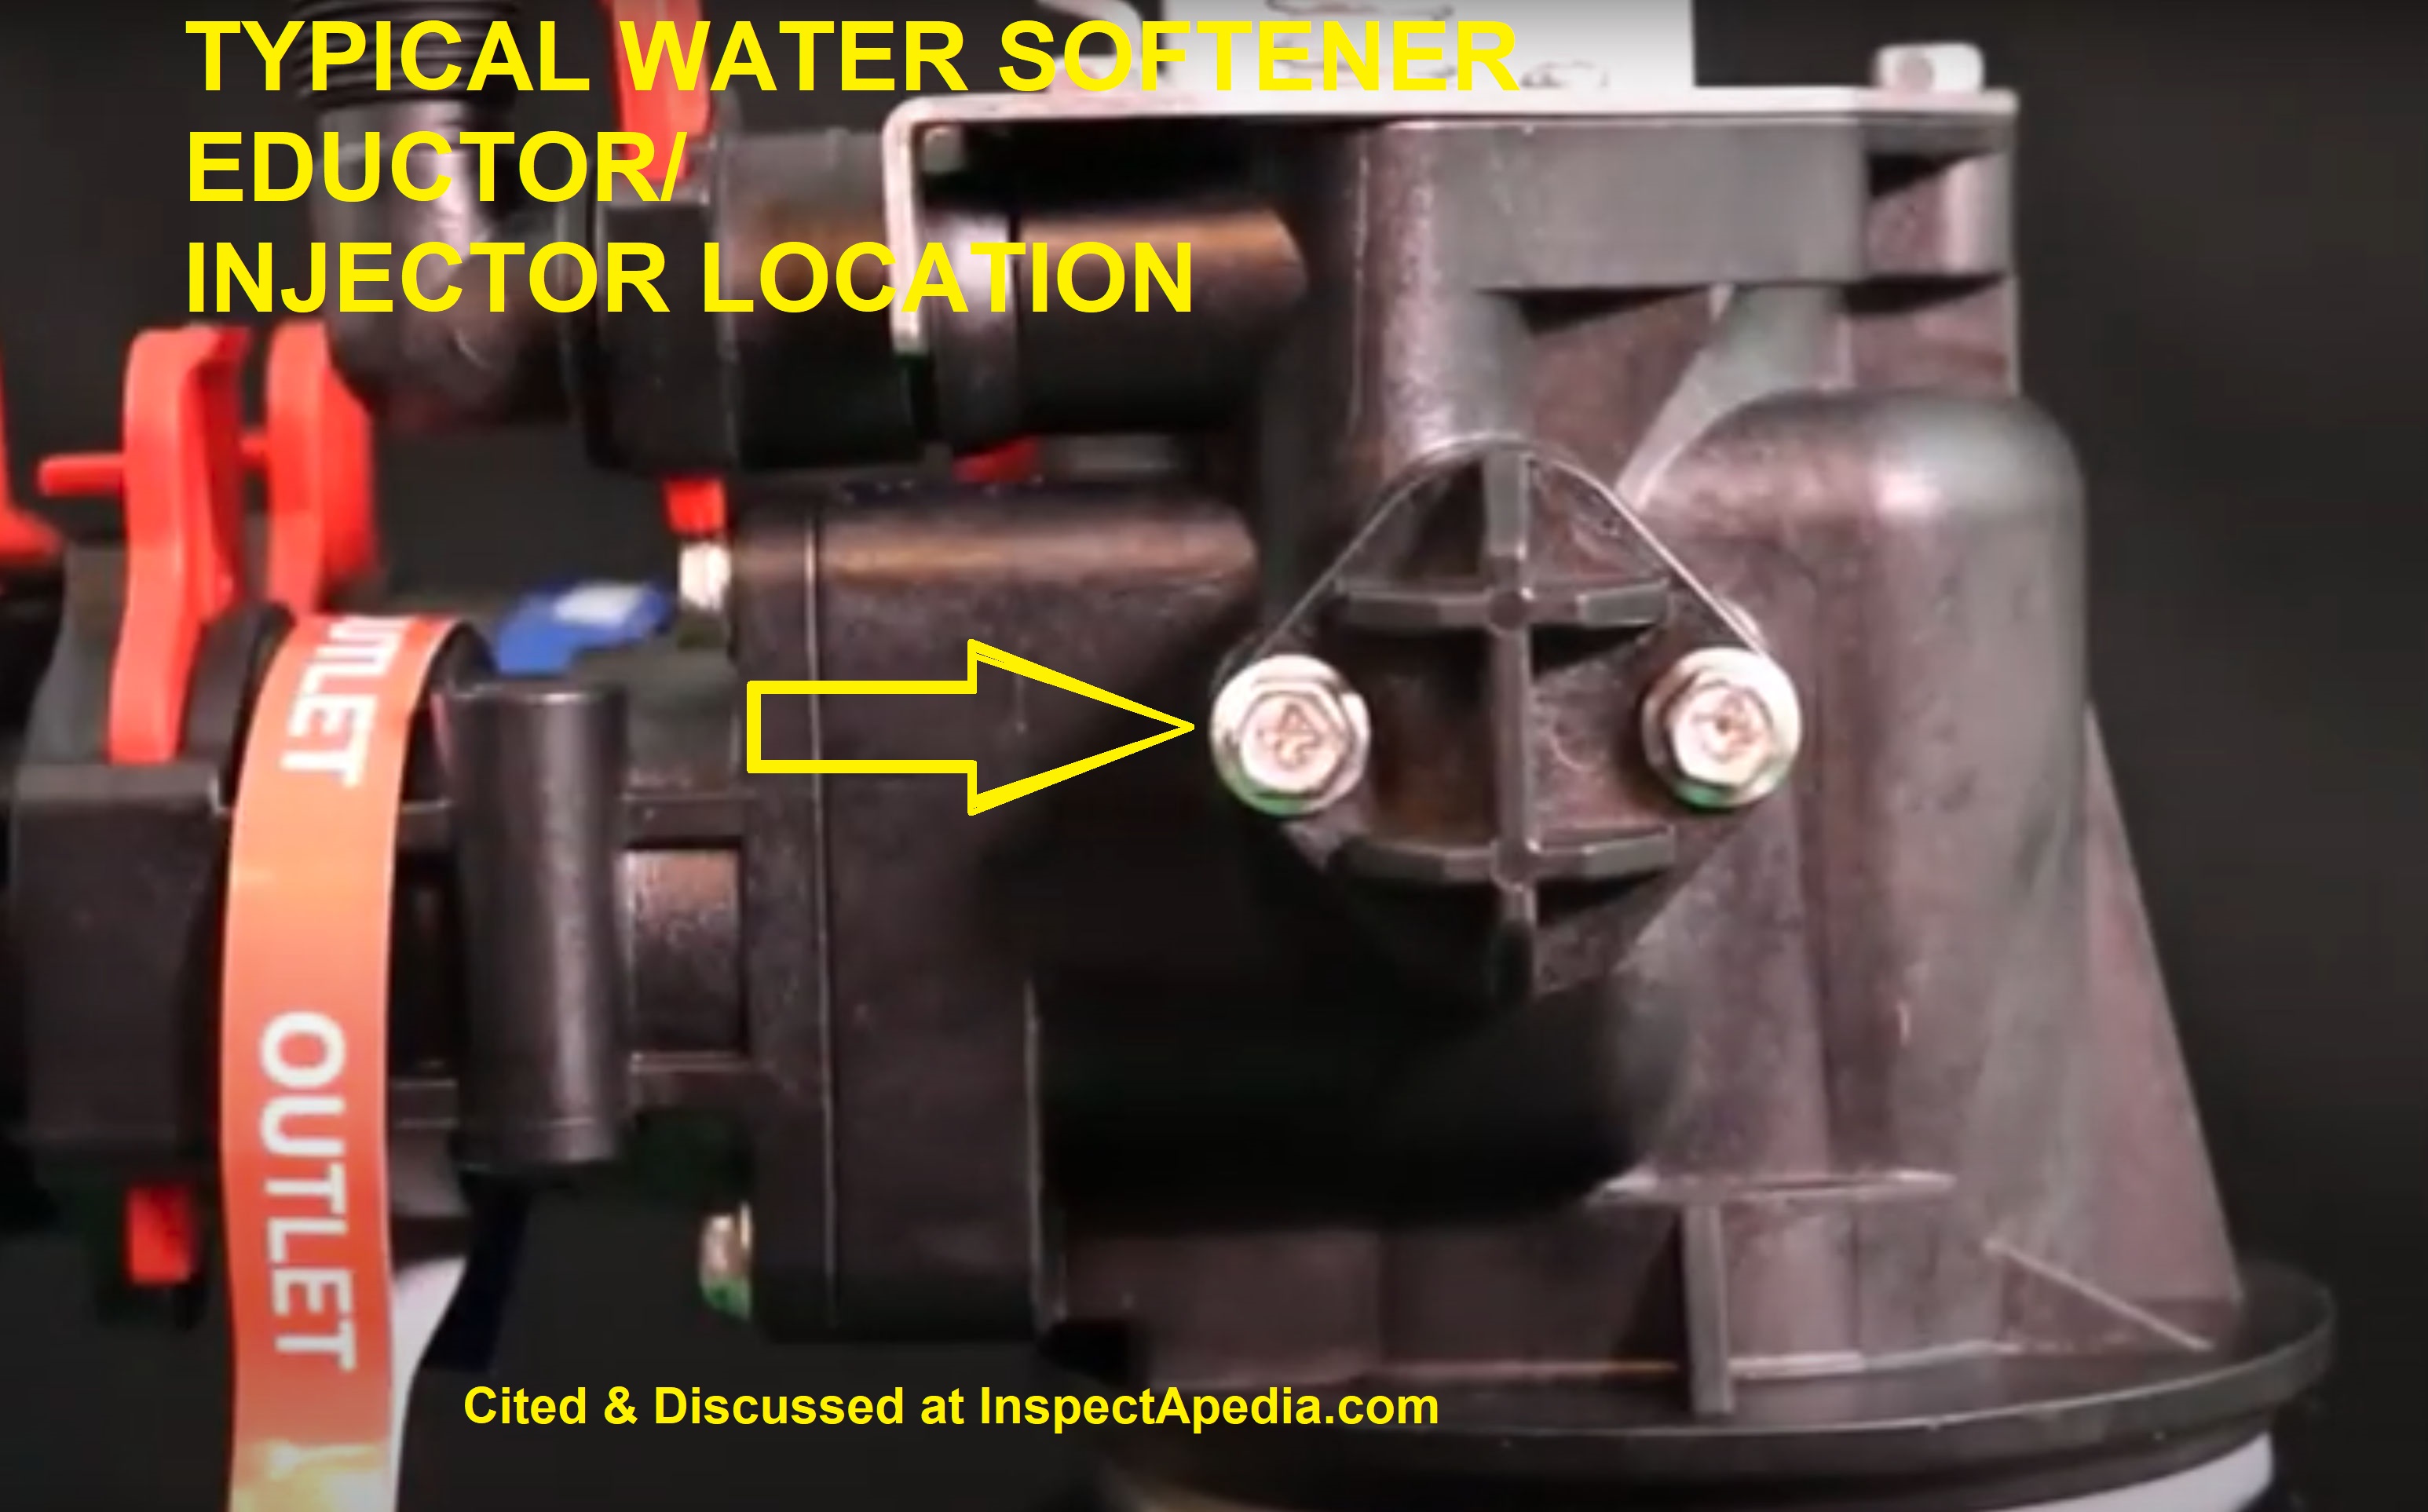
AO Smith & Water Right Injector Assembly Locations
Below: location of the injector/eductor on an AO Smith 400T Water softener.
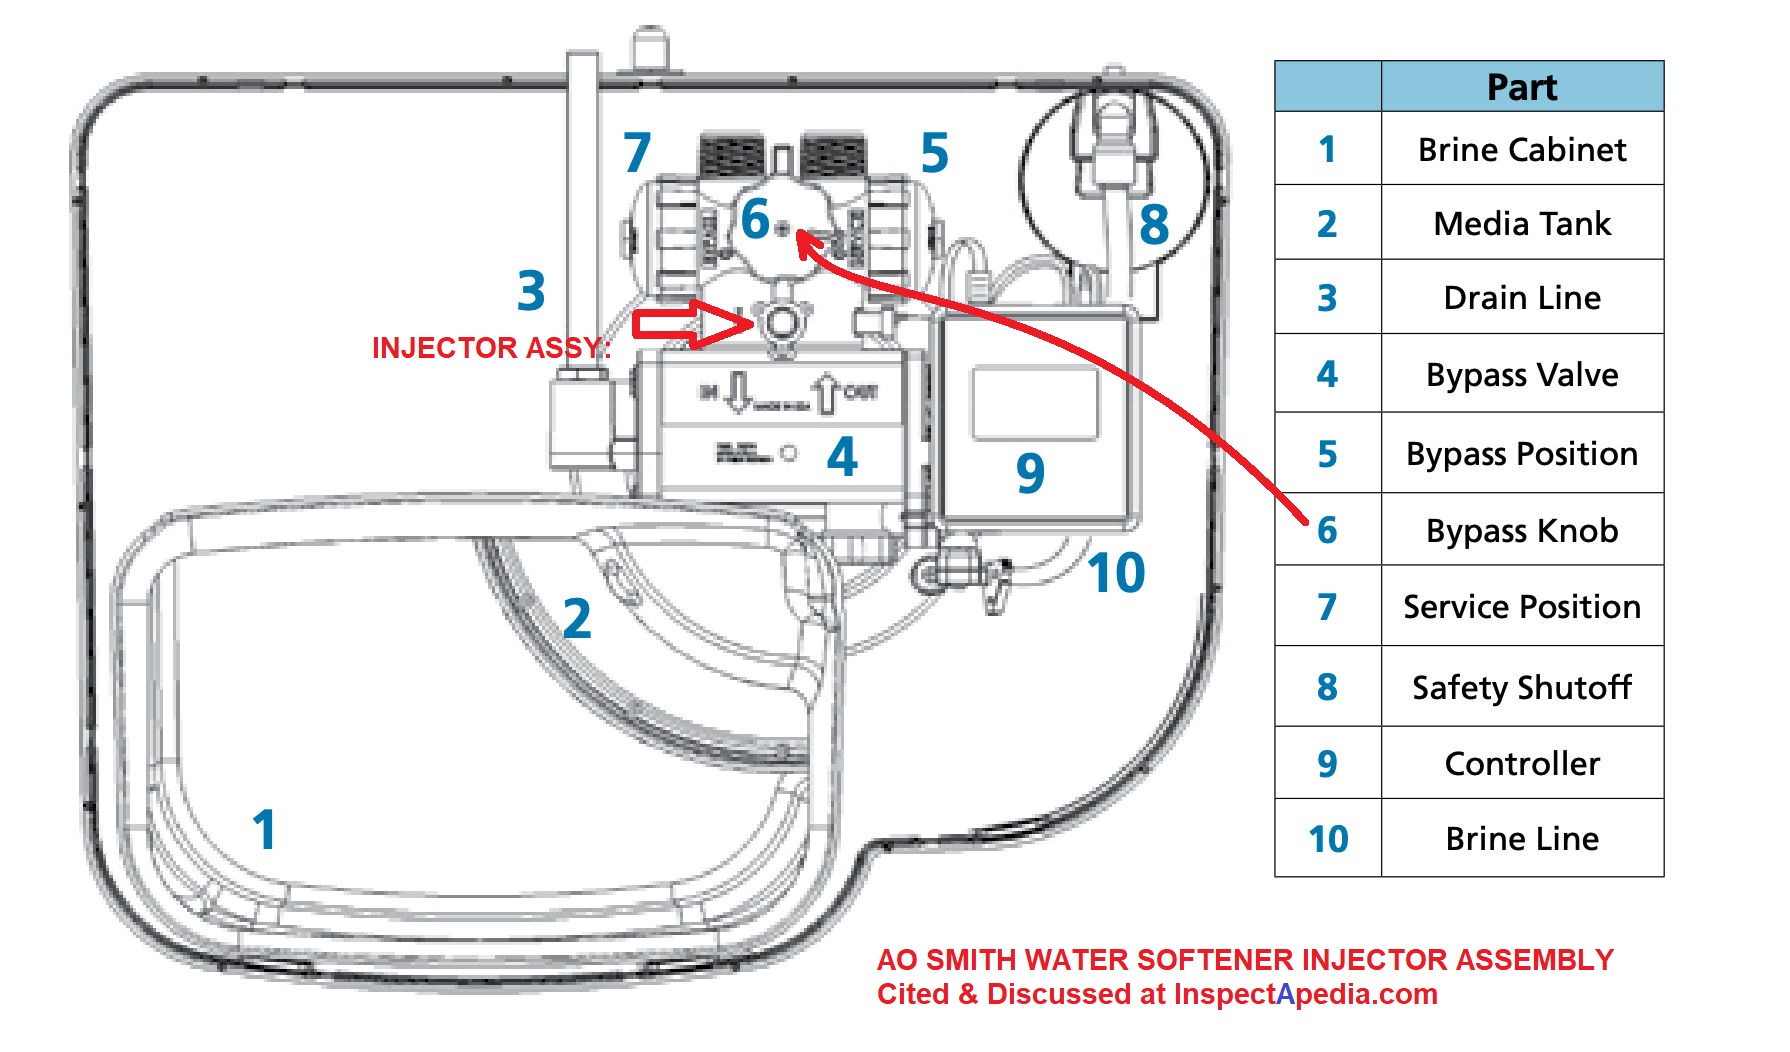
The injector above is discussed in detail at AO-Smith WATER SOFTENER INJECTOR CLEANING
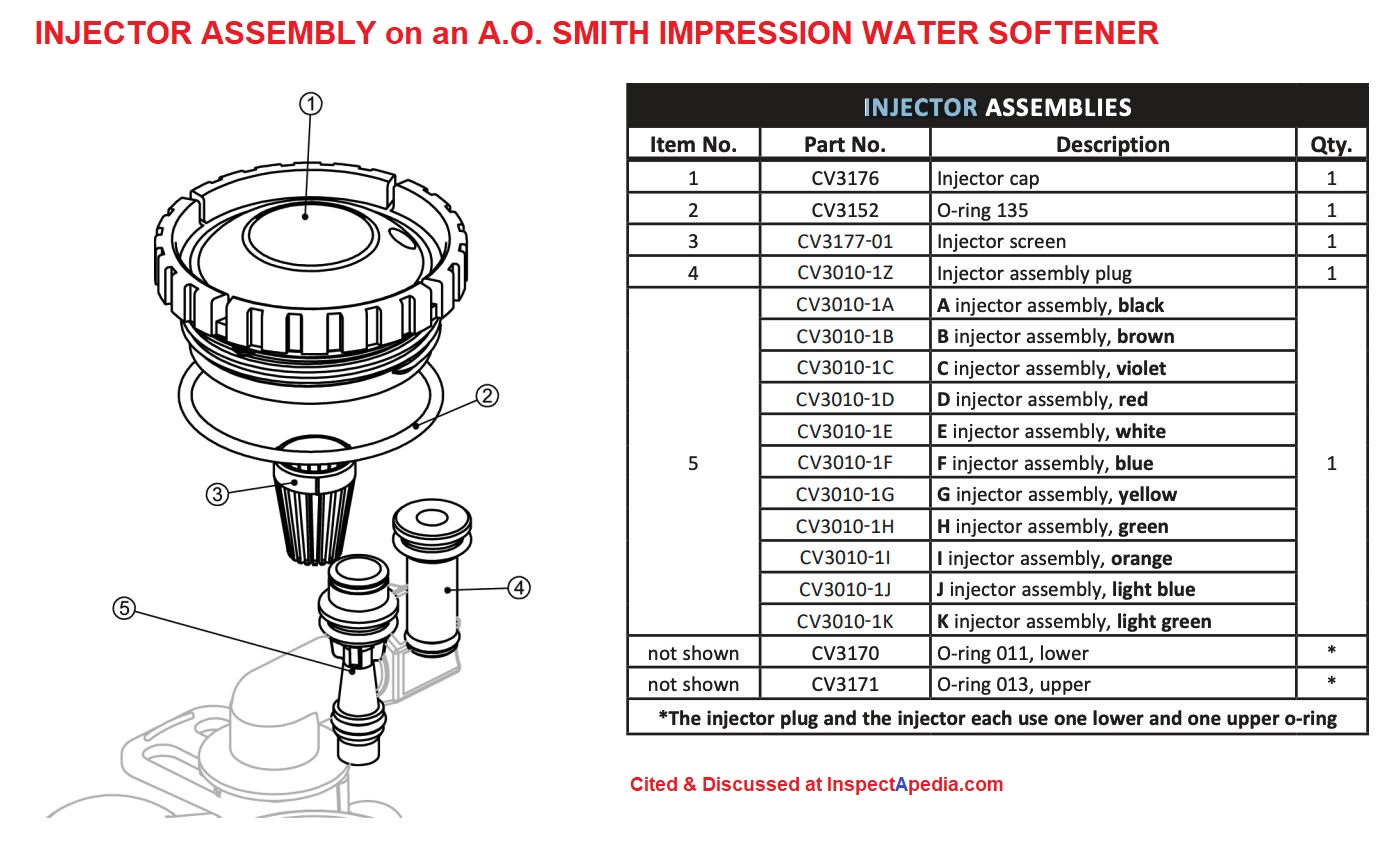
Below: Parts explosion for the injector assembly on a Water Right Impression Series water filter/treatment tank/softener, listed by A.O. Smith several middle-eastern countries including Egypt and saudi Arabia, Jordan, Juwait, UAE, Oman, Bahrain and Quatar.
This model provide a screw-off cap over the softener's injector screen and plug.
Below: on the AO Smith Triasoft Midi water softener the injector is found in the plastic valve at the top of the brine tank well.

Steps in Water Softener Injector / Eductor Removal, Cleaning, Replacement
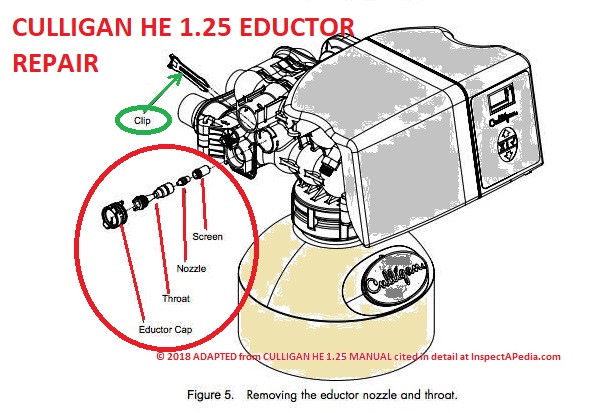
Below, using as an example excerpts from the Culligan HE 1.25 water softener manual, we show the location of the Water Softener Eductor Valve parts (on a Culligan High Efficiency Softener) that may need to be cleaned or replaced.
Watch out: when replacing an eductor, the parts need to be matched to the specific model of water softener - the backwash flow control, eductor nozzle, and eductor throat sizes must be matched to the tank size.
The following steps in locating, inspecting, and replacing a water softener eductor are excerpted/adapted from the Culligan High Efficiency HE 1.25 water softener guide cited in detail below.
[Click to enlarge any image]
Eductor Nozzle and Throat Replacement
Refer to Figure 5 above and the instructions below when changing the eductor nozzle and throat.
1. Remove the eductor cap clip - circled in green in our illustration
2. Remove the eductor cap - outermost component of the assembly in the red circle in our illustration
3. Remove the eductor assembly.
In our illustration in the red circle [click to enlarge] in order under the Eductor cap from outer-most to inner-most component in the eductor assembly are the eductor throat, nozzle, and screen.
4. Remove the eductor screen from the assembly. Check the eductor screen for tears or debris clogging.
Clean or replace the screen. A clogged eductor screen is a likely explanation for failure to draw brine from the softener brine tan k.
5. Remove the blue nozzle and replace it with the correct nozzle. See Table 2 below, also given on pp. 13-14 in
the INSTRUCTIONS for the CULLIGAN HE-1.25 [PDF] for a guide to selecting the proper-sized backwash flow control (aka DLFC), eductor nozzle, eductor throat for various water softener sizes and brine refill flow-rates.
Watch out: It may be possible to clean a clogged water softener injector nozzle using a soft probe like a wooden toothpick, but take care not to enlarge, gouge, or damage the injector's orifice or it will not work properly.
6. Make sure to put the O-ring on the nozzle.
Watch out: take care not to gouge or damage an o-ring seal or the unit will leak.
7. Replace the eductor throat (injector throat) if required.
8. Reverse the procedure to reassemble.
Fleck Brine Injector Nozzles
Shown below are Fleck Style Brine White Injector Nozzle 10913 and White Throat 10914 used on Fleck water treatment controls found on 8" / 9" / 10" diameter tanks.
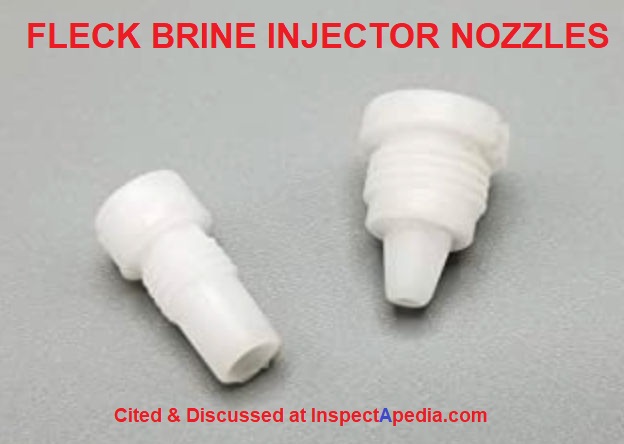
Fleck Style White Brine Injector Nozzle 10913 & Fleck Style White Brine Throat 10914 found on 8" / 9" / 10" Water Softeners Tanks such as the Fleck 1500, 2510, 2750, 2850, 2900, 5600, 9000, 9500 Series water softener control heads.
Fleck water softener manuals can be found at the WATER CONDITIONER/SOFTENER MANUALS link in the Recommended Articles list at the end of this page.
Water Group Water Softener Injector Assembly Cleaning
The following is exceprted from the Water Group WG7000 MI water softener manual cited below.
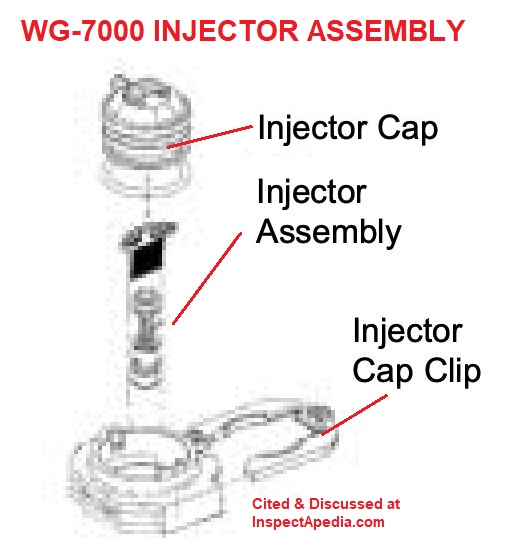
Cleaning the Injector Assembly
Sediment, salt and silt will restrict or clog the injector. A clean water supply and pure salt will prevent this from happening.
The injector assembly is located on the top of the control valve. This assembly is easy to clean.
Shut off the water supply to your softener and reduce the pressure by opening a cold soft water faucet. Remove the injector cap clip. Next remove the injector cap. Carefully remove the assembly and disassemble as shown in Figure above.
The injector assembly is removed from the valve body by carefully using the injector cap clip. Note: Do not rotate the injector when removing. Carefully flush all parts. Use a mild acid such as vinegar or Pro-Rust Out to clean the small holes in the orifice and throat.
Reassemble using the reverse procedure
References for Softener Eductor / Injector Valve Cleaning or Replacement
Also see WATER SOFTENER PLUMBING PROBLEMS where we warn about crimped tubing or leaky tubing between the brine tank and the water softener control head or resin tank, causing weak brine flow due to crimps, blockages, or air leaks.
- A.O. Smith WATER SOFTENER OWNER'S MANUAL WH-SOFT 350-400 [PDF] AO Smith Models AO-WH-SOFT-PRO-350 / AO-WH-SOFT-400T, installation and repair manual
- CULLIGAN HIGH EFFICIENCY HE 1.25 WATER SOFTENER OWNERS GUIDE [PDF] Culligan International Company, Culligan International Company, 9399 West Higgins Road, Suite 1100, Rosemont, Illinois 60018 USA, Tel: 1-847-430-2800 offices in California, France, Italy, Canada, Spain, and the United Arab Emirates.
Website: https://www.culligan.com/dealer-locator/contact-us (page to find a local Culligan water equipment dealer or repair service, retrieved 2018/07/08, original source https://www.culligan.com/CulliganCom/media/products/HE_1_25_Inch_Water_Softener_Owners_Guide.pdf
This manual includes a table giving the proper Eductor nozzle - throat sizes and parts identification for each water softener model and size. - Culliagan, CULLIGAN GOLD MEDAL TOTAL HOME WATER SOFTENER GUIDE [PDF], Op. Cit., retrieved 2018/07/08
- American Aqua HELLENBRAND H-100 Series WATER SOFTENER MANUAL [PDF]
Pages 10-11 in this manual includes a detailed table explaining all of the water softener's error codes and conditions. - Water Right / AO Smith (Middle East), AO SMITH / WATER RIGHT IMPRESSION / IMPRESSION-PLUS SERIES WATER FILTERS [PDF] AO Smith, Middle East, Web: https://aosmithme.com/contact/, retrieved 2022/05/06 original source: https://aosmithme.com/wp-content/uploads/2020/08/Impression-Impression-Plus-manual.pdf
- Water Group [PDF] HIGH FLOW 7000 SERIES WATER SOFTENERS MANUAL (2007)
- WATER CONDITIONER / SOFTENER MANUALS - find the manual for your water softener
...
...
Continue reading at WATER SOFTENER BRINE TANK WATER TOO HIGH or select a topic from the closely-related articles below, or see the complete ARTICLE INDEX.
Or see these
Recommended Articles
- WATER CONDITIONER / SOFTENER MANUALS
- WATER SOFTENERS & CONDITIONERS - home
- WATER SOFTENER ADJUSTMENT & CONTROLS
- WATER SOFTENER BRINE TANK DIAGNOSIS & REPAIR - home
- WATER SOFTENER EDUCTOR / INJECTOR REPAIR
- WATER SOFTENER BRINE TANK AIR CHECK VALVE
- WATER SOFTENER BRINE TANK BRIDGING or CRUSTING
- WATER SOFTENER BRINE TANK DRAW REPAIR
- WATER SOFTENER BRINE TANK FLOAT VALVE ADJUST
- WATER SOFTENER BRINE TANK WATER TOO HIGH
- WATER SOFTENER BRINE TANK WATER TOO LOW
- WATER SOFTENER CLEANING & SANITIZING
- WATER SOFTENER SALT CHOICES
- WATER SOFTENER SALT DOSE SETTING
- WATER CONDITIONER / SOFTENER MANUALS - download the manual for your softener
- WATER SOFTENER OPERATING CYCLES
- WATER SOFTENER RUNS TOO LONG
Suggested citation for this web page
WATER SOFTENER EDUCTOR / INJECTOR REPAIR at InspectApedia.com - online encyclopedia of building & environmental inspection, testing, diagnosis, repair, & problem prevention advice.
Or see this
INDEX to RELATED ARTICLES: ARTICLE INDEX to WATER TREATMENT SYSTEMS
Or use the SEARCH BOX found below to Ask a Question or Search InspectApedia
Ask a Question or Search InspectApedia
Try the search box just below, or if you prefer, post a question or comment in the Comments box below and we will respond promptly.
Search the InspectApedia website
Note: appearance of your Comment below may be delayed: if your comment contains an image, photograph, web link, or text that looks to the software as if it might be a web link, your posting will appear after it has been approved by a moderator. Apologies for the delay.
Only one image can be added per comment but you can post as many comments, and therefore images, as you like.
You will not receive a notification when a response to your question has been posted.
Please bookmark this page to make it easy for you to check back for our response.
IF above you see "Comment Form is loading comments..." then COMMENT BOX - countable.ca / bawkbox.com IS NOT WORKING.
In any case you are welcome to send an email directly to us at InspectApedia.com at editor@inspectApedia.com
We'll reply to you directly. Please help us help you by noting, in your email, the URL of the InspectApedia page where you wanted to comment.
Citations & References
In addition to any citations in the article above, a full list is available on request.
- [2] Culligan Mark 10 Water Softener 1994-1998 Installation and Operating Instructions (covering models manufactured after 1995) (1-96) 01881948.pdf available from www.culligan.com
- [3] Water Softeners, CMHC, Canadian Mortgage and Housing Corporation, cmhc-schl.gc.ca/en/co/maho/wawa/wawa_005.cfm - October 2008. Canada Mortgage and Housing Corporation acknowledges the contribution of Health Canada to the development of this document. For further questions regarding water treatment and water quality, contact Health Canada at watereau@hc-sc.gc.ca or call 613-957-2991 or 1-866-225-0709.
- [4] "Commercial Water Softener Installation and Operating Instructions", IBC Filtration & Water Treatment Products (Australia) for commercial, industrial and residential application www.ibcwater.com.au (07) 3219 2233
- [9] Water Right, 1900 Prospect Court Appleton, Wisconsin 54914, Tel: 920-739-9401, Website: http://www.water-right.com/ and their water softener manuals are available online at http://www.water-right.com/library/literature/literature_manuals.html
- [10] General Electric Corporation, Operation Manual, 740/760 [Water Conditioner or Water Softener] Control, 255 and Performa Series Valves, (268, 268 FA), General Electric Corp. 2007
- [11] Ecodyne Industrial, 1270 Frontenac Road, Naperville, IL 60563 Tel: 1 800-228-9326 (USA Only) Tel: +1 630-961-5043 Fax: 1 800-671-8846, Customer Service: 1 800-228-9326, Email: customers@ecodyneind.com, Website: http://www.ecodyneind.com/
- In addition to citations & references found in this article, see the research citations given at the end of the related articles found at our suggested
CONTINUE READING or RECOMMENDED ARTICLES.
- Carson, Dunlop & Associates Ltd., 120 Carlton Street Suite 407, Toronto ON M5A 4K2. Tel: (416) 964-9415 1-800-268-7070 Email: info@carsondunlop.com. Alan Carson is a past president of ASHI, the American Society of Home Inspectors.
Thanks to Alan Carson and Bob Dunlop, for permission for InspectAPedia to use text excerpts from The HOME REFERENCE BOOK - the Encyclopedia of Homes and to use illustrations from The ILLUSTRATED HOME .
Carson Dunlop Associates provides extensive home inspection education and report writing material. In gratitude we provide links to tsome Carson Dunlop Associates products and services.
 | HOME | ABOUT | ASK a QUESTION | CONTACT | CONTENT USE POLICY | DESCRIPTION | POLICIES | PRIVACY | |
| © 2025 - 1985 Publisher InspectApedia.com - Daniel Friedman | |||||||||