 How to Assemble a Pipe Heating Cable
Making a Heating cable for pipe freeze protection
- POST a QUESTION or COMMENT about how to protect buildings from freeze damage: prevent frozen pipes, frost heaves, cracking due to freezing, and prevent water and mold damage that follows frozen, burst pipes.
How to put together a pipe freeze protection heating cable:
This article explains and illustrates the steps in assembling any needed length of automatic heating cable used to protect water pipes against freezing.
The articles at this website will answer most questions about freeze protection for piping and other building plumbing and heating system components: how to winterize a building to avoid frozen pipes, and how to thaw frozen water supply & drain piping, wells, & water tanks. We discuss various methods to give each spot in danger of freezing its own heat source.
InspectAPedia tolerates no conflicts of interest. We have no relationship with advertisers, products, or services discussed at this website.
- Daniel Friedman, Publisher/Editor/Author - See WHO ARE WE?
How to Assemble a Custom-Length Pipe Heating Cable
[Click to enlarge any image]
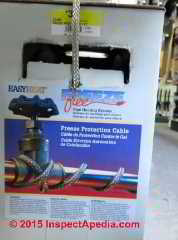
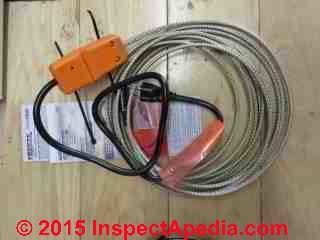
The braided-metal-covered indoor-use pipe heating cable show above described here can be purchased in variable lengths from your local plumbing or hardware supplier.
The kit includes two cable terminations: a fused, temperature-sensing plug-connector and a vinyl seal for the other end of the cable. In some pipe heat tape cable versions the temperature sensor may be located at the plug-end, in others a sensor is located at the end of the cable.
We bought this top-end do-it-yourself freeze protection cable at Davies Hardware on Main Street in Poughkeepsie, New York but this EasyHeat® brand freeze-free protection cable is widely available from plumbing and building suppliers.
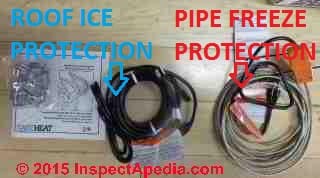
Watch out: be sure to buy the correct kind of heating tape or cable.
Don't try to use a cable designed for protecting pipes from freezing up on a roof as an ice dam measure. And similarly, don't use a roof heating cable designed to roof ice dam leaks on a building plumbing pipe. The cable we discuss here is a pipe freeze protection cable, shown in the right of the photo just above.
Watch out: the Freeze-Free pipe freeze protection cable shown here is intended for use
- Only in dry locations
- Only on metal water pipes
- Above-ground
- The pipe heating cable is not intended for buried use, not for below ground use, not where it will get wet, not on plastic piping, and not on piping carrying anything but water.
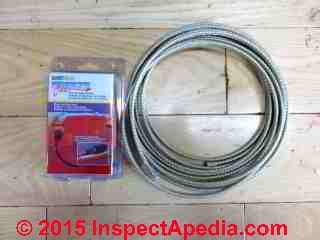
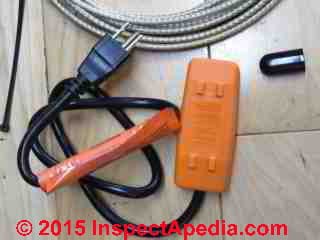
Above you see the two things you need: a sufficient length of pipe freeze protecting cable and the termination kit that will be attached to the two ends of the cable. This approach permits freeze protection cables to be assembled for the specific length of pipe you need to protect.
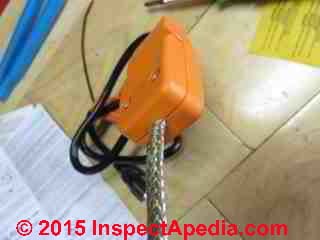
The cable terminations include a fused wall plug and a black vinyl terminating cap or end-seal for the other end of the cable. The fused wall plug includes a power light indicating that the heating cable has electrical power. The kit also includes an insulating grease used in the black cable plug and end seal, or end-cap as you'll see later.
Pipe Freeze Protection Cable Length & Amps Requirements
The length you require depends on the length of pipe you need to protect plus extra cable length to get from the wall receptacle to the protected pipe, and allowing some extra length if a heating cable is to be wrapped around the pipe.
Generally I don't want to buy a cable longer than is needed for the application, both for economy and for safety.
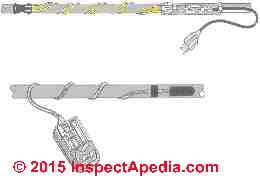
Note that some heating cables cannot be wrapped around the pipe in such a way that the cable crosses itself or a melt, failure, or dangerous electrical sort or even a fire can ensue. The braided steel jacketed cable shown here is illustrated by the vendor as crossing over itself - see the photo at the top of this page.
Watch out: this cable and its connectors are designed for use in dry locations. Do not install this type of freeze protection cable where it can be wet. The manufacturer recommends that the cable be installed only on GFCI-protected electrical circuits.
When installing a pipe heating cable be sure you have reviewed both the manufacturer's instructions
and HEAT TAPE SAFETY WARNINGS
See also GFCIs & AFCIs for HEAT TAPE SAFETY.
Steps in Assembling the Pipe Freeze Protection Heating Cable
Watch out: to avoid an untimely death, never work on assembling a heating cable assembly, repair or modification while the power cord is connected to electrical power.
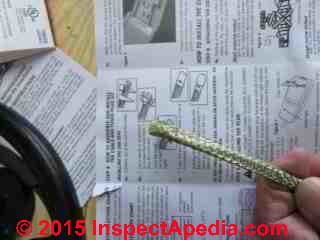
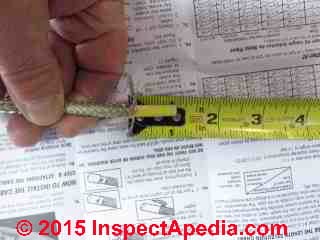
Clean about an inch of braid off of the cut end of the heating cable. Above left - the cut-end of the heating cable. Above right, cable insulating braid pushed back to prepare the wire end for insertion into the fused plug-connector.
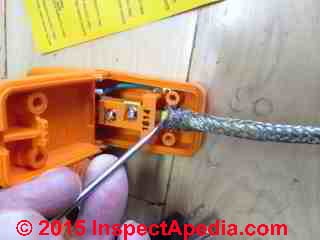
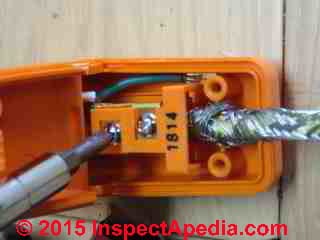
Loosen the cover screws of the connector so that you can open it in order to insert and clamp the wire.
If they are not already in the open position you may need also to loosen the two connector-clamp screws of the actual wire connector - see my screwdriver in one of these in the illustration just below.
Push the cleaned cable about 3/4 " into the connector as shown. The manufacturer says "let the braid slide back along the cable" as you push it into place. But I viewed this advice with some caution: as the company warns more attention is needed.
Watch out: if you allow a stray strand of the braided wire cable cover to enter the connector so that it joins in an electrical connection you may find that the cable shorts out, doesn't work, or is otherwise unsafe. In the photo at below-left I'm making sure that none of the braided protective heating cable cover strands are inside of the electrical connector - I don't want a short circuit or a surprise.
When the orange plastic plug cover is pressed shut tightly it will press against the braided shield and hold the cable securely in the plug assembly.
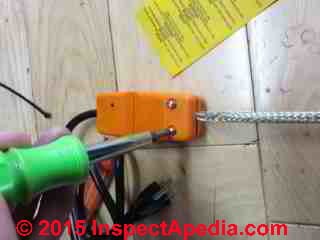
Above left, tighten the screws that pinch the clamp against the wire to make the proper electrical connections inside the plug assembly. The manufacturer says you need about 5 inch-pounds of torque. For me that's using about half my hand-held screwdriver strength pushing down on a workbench.
Basically the screws tightening the clamp into the stripped-back, pushed-in pipe heating cable are turned down until they're fully flush with the surface of the clamp into which they screw and then are turned "snug" without excessive force.
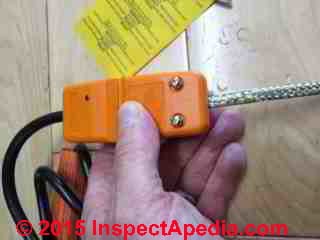
Above: the wall plug assembly is almost complete - the two cover screws need to be tightened.
When you then close the cover you should see that the ground strip connector in the plug is indeed in good contact with the braided steel mesh. If you fail to do this the system will be unsafe as the braided mesh won't be grounded.
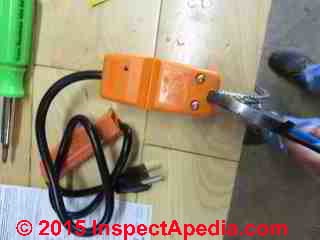
Above the two photos show that just relying on the screws to pull the plug connector cover down snug may cause stripping of the plastic as it requires force to pinch the cable inside the connector. I used slip-joint pliers to provide some gentle assisting force (above left) then screw the cover tightly shut.
Watch out: don't squeeze too hard on the plastic cover with your slip-joint pliers or you may break it. Just apply enough force to allow you to turn the cover-closing screws down snugly and to see that the edges of the connector cover top and bottom meet nicely and uniformly. (See photos below).
Above: the wall plug connector for the pipe freeze cable is assembled and almost ready for use.
Watch out: do not plug this device in if you haven't also already installed the cover on the other end of the cable. Else someone could be shocked or killed.
Now if you didn't already do so you will need to install the end plug or cap on the other end of the pipe freeze preventing cable.
Install the Pipe Heating Cable End-Seal
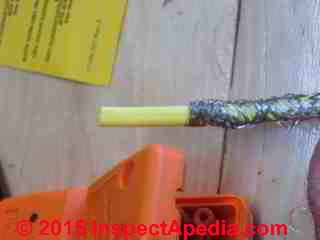
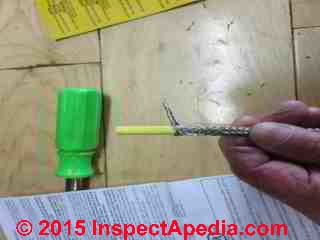
Make a clean cut through the heating cable at its end and push the protective steel braid back one inch (photo above).
The steel braid is separated from an inch of the cable and twisted into a pigtail. [Note: some pigs object to this use of their appendage but go ahead and do it anyway. The pig won't be hurt.]
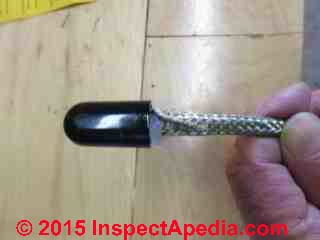
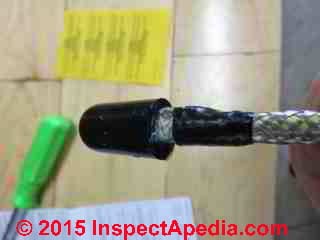
Push the end of the wire at least 3/4" into the vinyl cap (shown above). If some of the silicone gel sealant oozes out leave it alone - it'll help seal the wire end. The manufacturer warns:
Watch out: do not twist or rotate the black plastic cable end-seal after you've pushed it onto the cable end. Doing so may damage required electrical connections or wires making the cable inoperative or unsafe.
The plastic cap is pushed over the wire end and the twisted steel braid is folded down along the wire side and taped in place. We are making sure that the steel braid wire cover does not short out with live electrical wire ends inside the connecting and sealing cap.
The cap is filled with a silicone sealant grease. We tape the twisted braid against the side of the cable to keep it out of the way.
Below is the completed pipe heating cable ready for installation.
Buy a Pre-Assembled Pipe Heating Tape?
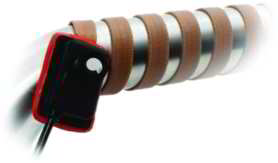
You certainly don't have to make a custom-length pipe heating cable to protect your pipes from freezing. Products such as illustrated in the photo below can be purchased in pre-assembled, ready-to-use lengths of heating tape or cable for pipe freeze protection.
Watch out: However as we warned earlier in this article, some of these products will melt or short-out and may be un-safe if crossed over themselves. Be sure to read and follow the installation and use instructions for your pipe heating cable both to avoid frozen pipes and to avoid a house fire.
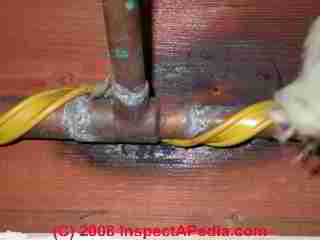
Oh and no, the charring in the photo at above left was created by a plumber who didn't protect a floor joist from his soldering torch - it's not an example of pipe cable overheating. Above in our second photo you see the temperature sensing bulb of a pipe heating cable.
Sources:
- BriskHeat, 4800 Hilton Corporate Drive Columbus, OH 43232 1-888-412-0122 (Worldwide) Email: bhtsales1@briskheat.com Web: https://www.briskheat.com/
- Easy Heat Freeze Free pipe heating system, Item # 10802, 120VAC from Easy Heat, available from building suppliers, plumbing suppliers and online vendors.
- Frost King heating tapes, Thermwell Products Co Inc Corporate Headquarters 420 Route 17 South Mahwah, NJ 07430 (201) 684-4400
- O.E.M. Heaters,739 Kasota Avenue SE, Minneapolis, MN 55414 USA, Phone: (866) 685-4443 Fax: (612) 767-1046 sales@oemheaters.com
- OMEGA Engineering, INC. 800 Connecticut Ave. Suite 5N01 Norwalk, CT 06854 1-888-826-6342 or (203)-359-1660 - flexible silicone rubber heating tapes with built-in thermostats.
...
Continue reading at HEAT TAPES to AVOID FROZEN PIPES or select a topic from the closely-related articles below, or see the complete ARTICLE INDEX.
Or see these
Recommended Articles
- ANTIFREEZE for BOILERS
- DRAIN FREEZE PROTECTION
- DRAIN a WATER HEATER TANK
- FAUCETS, OUTDOOR HOSE BIBBS
- FREEZING FORCE of ICE
- FROZEN PIPE THAW-OUT
- GREYWATER FREEZE PROTECTION
- PIPE FREEZE PROTECTION - home
- DRAIN FREEZE PROTECTION
- HEAT SOURCES to AVOID FROZEN PIPES
- INSULATION to AVOID FROZEN PIPES
- PIPE FREEZE-BURST PATTERNS
- PIPE FREEZE-UP POINTS
- PIPE INSULATION CHOICES, MATERIALS, TYPES
- WELL SNIFTER & DRAIN BACK VALVES
- WINTERIZE A BUILDING - home
Suggested citation for this web page
PIPE FREEZE PROTECTION CABLE ASSEMBLY at InspectApedia.com - online encyclopedia of building & environmental inspection, testing, diagnosis, repair, & problem prevention advice.
Or see this
INDEX to RELATED ARTICLES: ARTICLE INDEX to BUILDING FREEZE PROTECTION
Or use the SEARCH BOX found below to Ask a Question or Search InspectApedia
Ask a Question or Search InspectApedia
Try the search box just below, or if you prefer, post a question or comment in the Comments box below and we will respond promptly.
Search the InspectApedia website
Note: appearance of your Comment below may be delayed: if your comment contains an image, photograph, web link, or text that looks to the software as if it might be a web link, your posting will appear after it has been approved by a moderator. Apologies for the delay.
Only one image can be added per comment but you can post as many comments, and therefore images, as you like.
You will not receive a notification when a response to your question has been posted.
Please bookmark this page to make it easy for you to check back for our response.
IF above you see "Comment Form is loading comments..." then COMMENT BOX - countable.ca / bawkbox.com IS NOT WORKING.
In any case you are welcome to send an email directly to us at InspectApedia.com at editor@inspectApedia.com
We'll reply to you directly. Please help us help you by noting, in your email, the URL of the InspectApedia page where you wanted to comment.
Citations & References
In addition to any citations in the article above, a full list is available on request.
- [1] "New Electric Heat Tapes Help Prevent Fires," US Consumer Product Safety Commission (CPSC) #00936
- [5] "Freezeproof Your House," Mike McClintock, Rodale's New Shelter, p. 30, October 1985 (approximate date)
- [6] "How to Winterize Your Pipes," Mike McClintock, Homeowners How-To Magazine, p. 59-62, Nov-Dec 1979.
- [7] "HUD Regulation for Manufactured Homes; Requirement that Heat-Tape not include a GFCI [ copy on file as /plumbing/GFCI_Heat_Tapes_HUD_CPSC_Letter1994.pdf ] - ", Meeting Log, US CPSC, HUD, Dennis McCoskrie, ESEE, 2/14/1994
- [8] Thanks to reader Ryan T. Duffy for discussing the suggestion for GFCI's on heat tape circuits to reduce fire risk, October 2010.
- [9] Easy Heat heating cables, "Easy Heat AHB-013 Cold Weather Valve and Pipe Heating Cable",
http://www.emersonindustrial.com/, retrieved 3/2/2013,
Product Description: Temperature-controlled cable runs straight along pipe and valves, held in place by application tape and plugs into grounded electrical outlet. Keeps water flowing down to -380. For odd lengths of pipe over 3/4 inches in diameter, we recommend two separate cables on opposite sides of the pipe with up to 3 feet of overrun at center of pipe run. Metal pipe requires 1/2-inch fiberglass insulation around cable. For plastic pipe, its recommended wrapping pipe with aluminum foil before cable installation. The traditional resistance cable produces a fixed amount of heat based on the electrical line feed. It comes with a built-in thermostat that switches the flow of electricity on and off based on temperature. Cable installs fast and easy. Each package contains grounded plug, built in thermostat and instructions. Cable has weather resistant PVC outer jacket and inner insulation. Keeps water flowing down to 40 F. - [10] Easy Heat, "Easy Heat® Freeze Free® Preset Thermostat (EH-38)" , EGS Electrical Group, 9377 W. Higgins Rd.
Rosemont, IL 60018, USA or EGS Electrical Group, 99 Union Street
Elmira, ON N3B 3L7, Canada. Tel: 800.621.1506,
Product specifications: 15 amps, 120 volts 1800 watts Thermostat for use with Freeze Free Self-Regulating pipe heating cable, For dry location only, UL listed, CSA certified - [11] RayChem "Self-Regulating Pipe Heating and Roof/Gutter De-Icing Cable", Rachem Corporation, 300 Constitution Drive, Menlo Park, California 94025-1164, U.S.A., Website: http://raychem.te.com/, retrieved 3/2/2013, Product Description:
Self Regulating Heating Cable, Mounting Location Dry, Cable Length 50 ft., Max. Circuit Length 200 ft., Voltage 120, 6 Watts per Foot @ 40F, 0.050 Amps per Foot @ 40FFeatures Self Regulating, Automatically Adjust Heat Output, For Use With Lighter Plastic or Metal Pipes Up to 8 In. Dia., Standards UL Listed and CSA Certified, Includes Cable Only; Characteristics : Tough Metal Braided Self Regulating Heating Cables, Can be Overlapped and Insulated without Overheating or Burning Out, Automatically Adjust Heat Output at Each Point Along its Length without Using Thermostats, Standards : UL Listed and CSA Certified, Includes : Cable Only - In addition to citations & references found in this article, see the research citations given at the end of the related articles found at our suggested
CONTINUE READING or RECOMMENDED ARTICLES.
- Carson, Dunlop & Associates Ltd., 120 Carlton Street Suite 407, Toronto ON M5A 4K2. Tel: (416) 964-9415 1-800-268-7070 Email: info@carsondunlop.com. Alan Carson is a past president of ASHI, the American Society of Home Inspectors.
Thanks to Alan Carson and Bob Dunlop, for permission for InspectAPedia to use text excerpts from The HOME REFERENCE BOOK - the Encyclopedia of Homes and to use illustrations from The ILLUSTRATED HOME .
Carson Dunlop Associates provides extensive home inspection education and report writing material. In gratitude we provide links to tsome Carson Dunlop Associates products and services.


