 Electric Hot Water Heater Replacement
Steps in replacing an electric water heater
- POST a QUESTION or COMMENT about how to replace or repair electric hot water heaters
Electric water heater replacement procedures: how to install a new electric water heater.
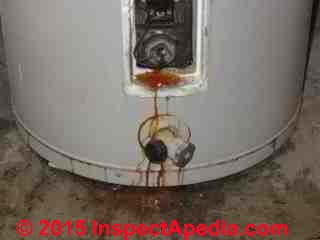
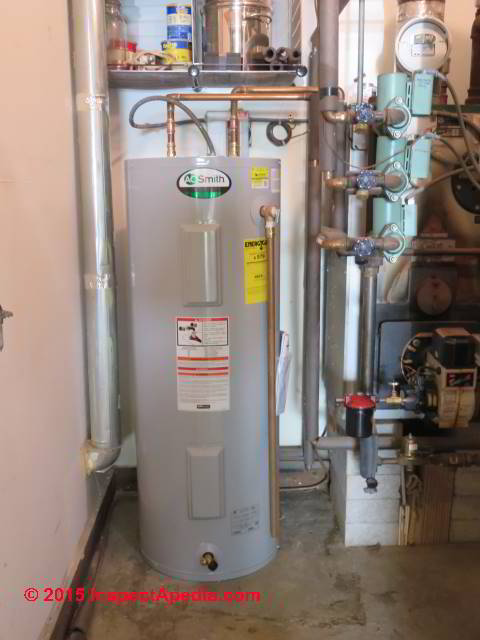
This article describes and illustrates the steps in removing a leaky electric water heater that needs to be replaced, bringing in the new water heater, and connecting the new electric water heater to plumbing pipes and electrical wiring. Our page top photo shows a leaky electric water heater.
This article illustrates plumbing and electrical wiring connections for installing an electric water heater or hot water cylinder and includes photo details of using the Viega ProPress pipe joining system.
This series of articles describes how to inspect, operate, diagnose, and repair electric hot water heaters. The articles at this website will answer most questions about electrical water heaters as well as many other building plumbing system inspection or defect topics.
InspectAPedia tolerates no conflicts of interest. We have no relationship with advertisers, products, or services discussed at this website.
- Daniel Friedman, Publisher/Editor/Author - See WHO ARE WE?
How to Replace an Electric Water Heater
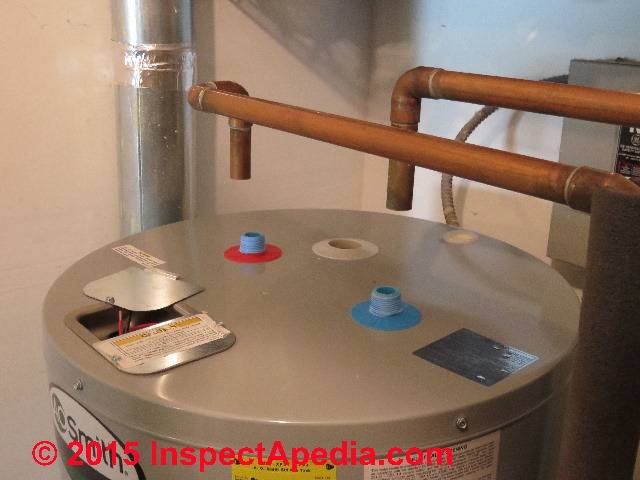
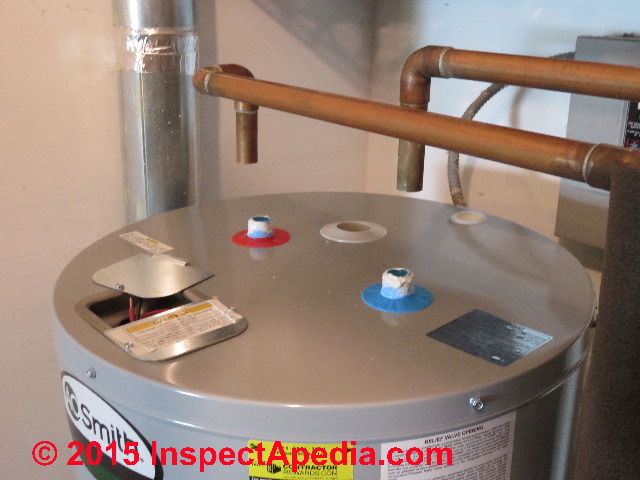
 Our page top photo and the photographs included in this article show a leaky electric water heater.
How to Decide a New Water Heater is Needed: check the water heater for the source of leaks
Noting the location of the leak was near the tank bottom, it was probably the case that this heater needed to be replaced, but some added checks were important first to rule out a repairable leak in plumbing connections higher on the water heater itself.
Watch out: before replacing a leaky or otherwise bad-behaving water heater you may want to be sure that replacement rather than repair is what's needed. In some jurisdictions water heater replacement must be performed by a licensed plumber, and where electrical work is involved, a permit and electrical inspections may also be required.
If your electric water heater has stopped working entirely, or if it produces less hot water quantity than normal, or the electric water heater produces warm but not hot water, provided the problem is not due to a perforated or leaky hot water tank, the diagnosis of the water heater problem is pretty easy, and sometimes the repair is easy and inexpensive as well.
See ELECTRIC WATER HEATER REPAIR GUIDE
If the water heater tank itself is leaking, you almost certainly need a new heater. On the other hand if the leak is at a plumbing connection or fitting it is usually possible to repair the connection rather than replace the whole water heater.
So an accurate diagnosis of water heater leaks is important.
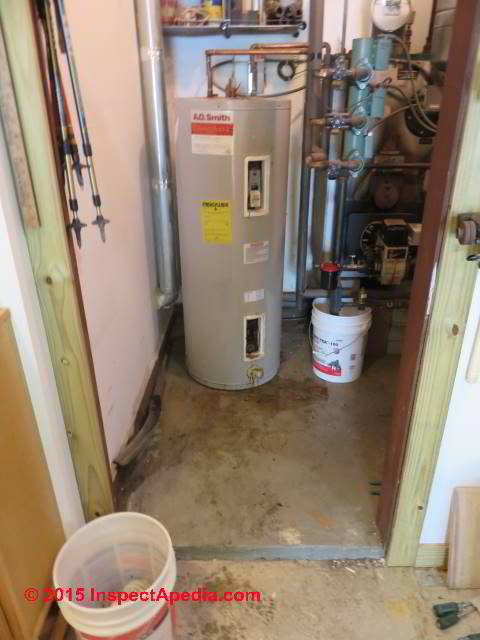
At above right we see rust stains that tell us that this heater has been leaking for some time, perhaps days or weeks. Most likely the heater tank is leaking - which means it's time for a new water heater.
But because a leak at the top of the water heater or at it the side-mounted temperature & pressure relief valve on some models can send water inside the water heater jacket where it appears on the floor or at the bottom of the heater, it is important to check for those leaks before calling for a whole new water heater.
A check at the bottom of the water heater's TP valve discharge tube found that the tube interior was dry and water had not been dripping from that source. The problem was not a TPR valve leak. A check at the TPR valve mounting position on the water heater found no signs of leaking there either.
A check of the plumbing connections - cold water in and hot water out - at the top of the water did not find any signs of leaks at those fittings. This was an important step since a leak here can show up as water at the water heater tank bottom or on the floor around the heater.
We also inspected for leaks around the electric water heater element mounting openings. Those were dry and clean.
And a check at the water heater drain valve (below) showed that the leak was originating well above the drain valve itself so we could not blame the heater drain.
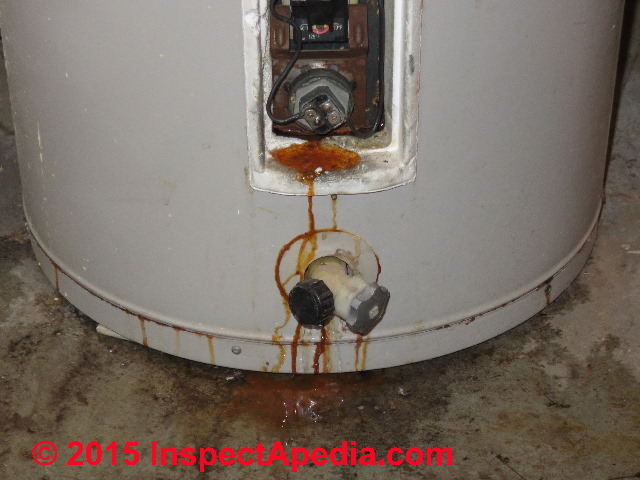
Above you can see that this water heater had been leaking for days or perhaps a few weeks.
Steps in Replacing the Leaky Water Heater
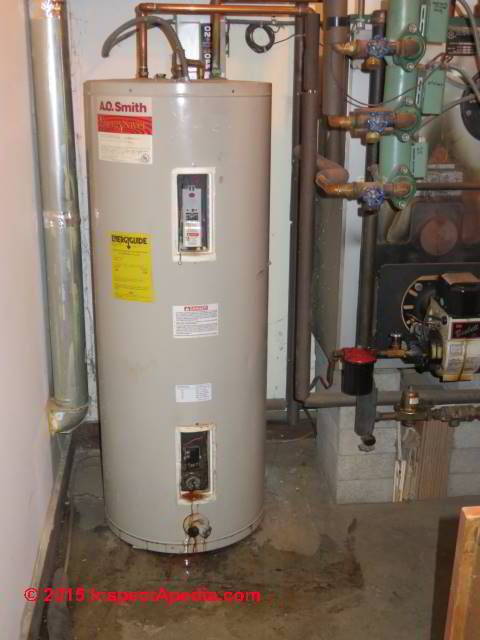
 This leaky electric water heater was located in a private home in Poughkeepsie, New York. And as luck would have it, the leak was discovered just before the owners were leaving.
The heater water supply could simply have been left shut down, but not if the home were to be occupied by others during the owners' absence.
Your first task in replacing a leaky water heater is to find a competent plumber who actually shows up.
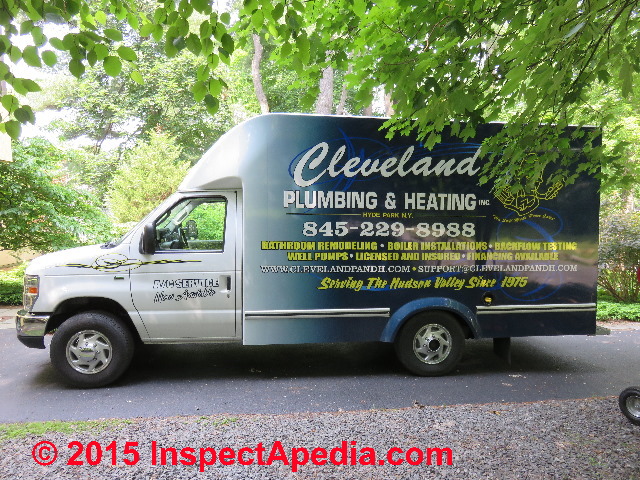
We called Scott Cleveland, at Cleveland Plumbing, a Hyde Park New York plumbing firm. Cleveland is not the "cheapest" plumber in the area but then, we've found that "cheapest" can ultimately end out to be "most expensive" before the job is completed successfully.
Cleveland was able to obtain a replacement water heater, necessary permits, and to schedule, then complete the water heater replacement within 24-hours of notice.
Note: we owe particular thanks to Cleveland Plumbing for patience with our interfering in their water heater replacement job to take photos and ask questions.
Hudson Valley New York residents can find Cleveland Plumbing in Hyde Park NY at Tel: 845-229-8988. More contact information for Cleveland Plumbing is at the end of this article and in the articleReferences or Citations .
InspectAPedia is an independent publisher of building, environmental, and forensic inspection, diagnosis, and repair information provided free to the public - we have no business nor financial connection with any manufacturer or service provider discussed at our website.
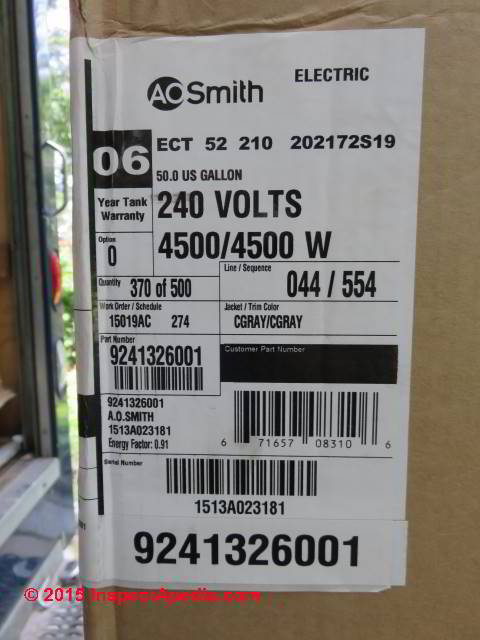
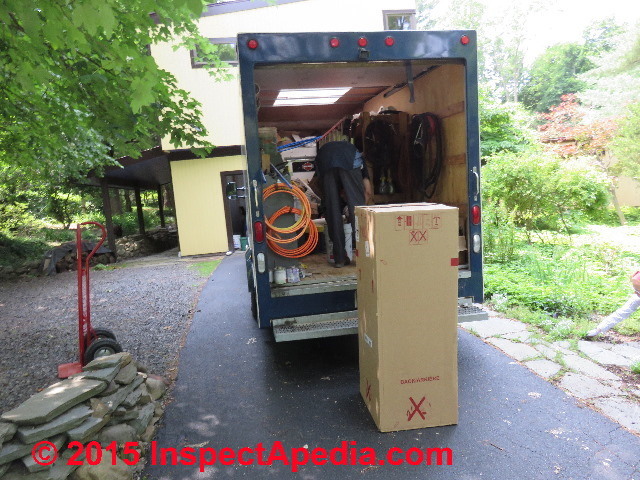
The plumber confirmed that the water heater was leaking, agreed that replacement was needed, unloaded and checked the specifications of the replacement water heater that he had brought to the job.
Obtain the Right Replacement Water Heater
Scott had noted the model and specifications of the leaky water heater, an AO Smith unit, and had located a new unit with specifications that would fit and line-up exactly in the old water heater's spot in a crowded utility room. This would make the water heater replacement job a bit faster and easier.
Prepare to Remove the Leaky Water Heater
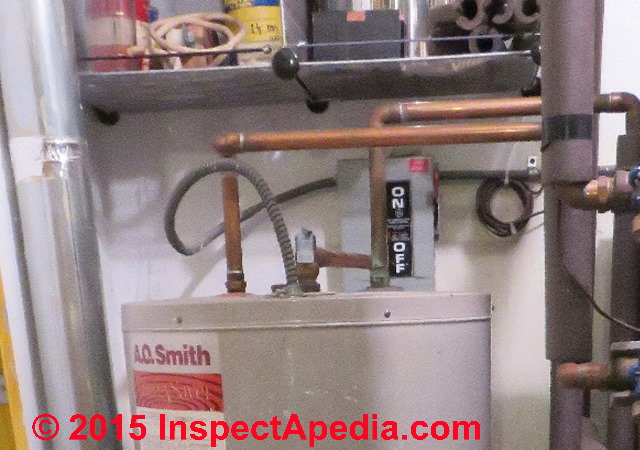
In the photo below you can see the ON (up position) and OFF (down position) of the level on the electrical fuse panel that powers this electric water heater. In our photo the handle is in the UP or ON position - power is still on to the water heater.
1. Electrical power must be shut off to the water heater as a first step.
Watch out: failing to remember to turn off electrical power to the water heater during repair or replacement risks electric shock, death by electrocution, and lesser snafus like burning up heating elements in the water heater.
See ELECTRIC WATER HEATER CONTROLS if you're not sure how to find the water heater power switch.
2. Turn off the hot and cold water supply valves serving the water heater
The water heater cold-in and hot-out water stop valves must be closed before beginning draining the water heater. If you forget this step you'll feel stupid when you try to drain the water heater tank and the drain process continues indefinitely, and dumber still if you try cutting into the water heater piping while it's still under pressure. Don't do that.
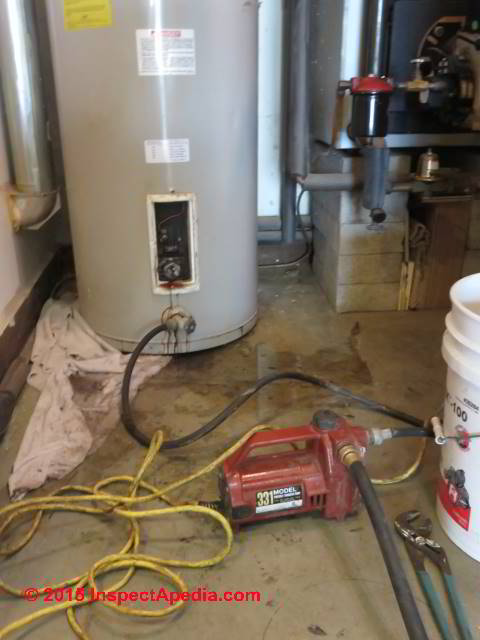
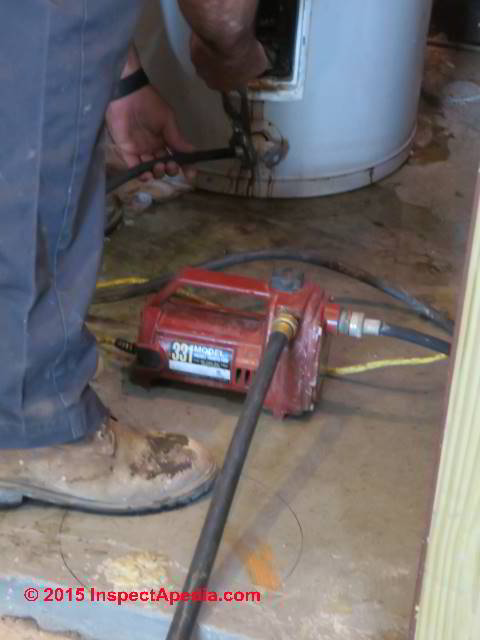
3. Drain water from the water heater
Then the plumber connected a pony pump to the water heater drain valve and ran the pump's outlet hose to a safe outdoor location to dispose of hot water to be drained from the tank. Before starting the pump we opened one or more hot water faucets inside the building to permit air to enter the hot water piping and water heater tank, making its draining possible. Other water heater drainage procedure advice is at DRAIN a WATER HEATER TANK
4. Cut or disconnect the old water heater from the cold and hot water pipes
Once the water heater was no longer under water pressure and had been at least partly drained the plumber could begin disconnecting its cold and hot water piping.
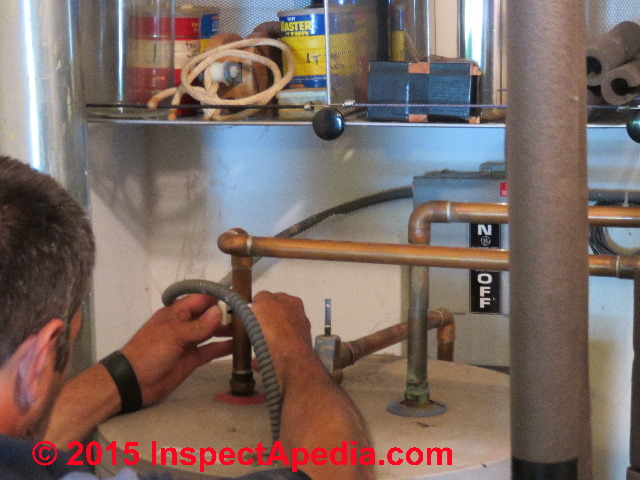
Some thought about just where to cut the water heater cold-in and hot-out piping can make re-connection of the new water heater easier. Here the plumber is cutting at about the middle of the vertical hot and cold risers from the water heater tank. Later you'll see how these cuts made installation of the new heater a snap.
5. Disconnect the water heater's electrical wiring

The plumber next disconnected the electrical wires at the top of the electric water heater. The sequence in which steps are performed as well as the quality of workmanship can tell us something about the experience and expertise of the plumber.
This electrical wiring disconnection step could have been performed before cutting the water pipes but he cut the water pipes first to speed the final drainage of all water from the water heater tank.
Watch out: as we warned earlier, failing to remember to turn off electrical power to the water heater during repair or replacement risks electric shock, death by electrocution.
6. Finish draining the water heater and remove it
Below: at left the plumber is removing the pump used to drain the water heater, and at below right the old water heater has been disconnected and drained. The pony pump used to speed tank draining has been disconnected.
The white plastic bucket is being used as a temporary support for the vertical rise of water pipes that remain to be connected to the new water heater.
7. Prepare the site for new water heater installation
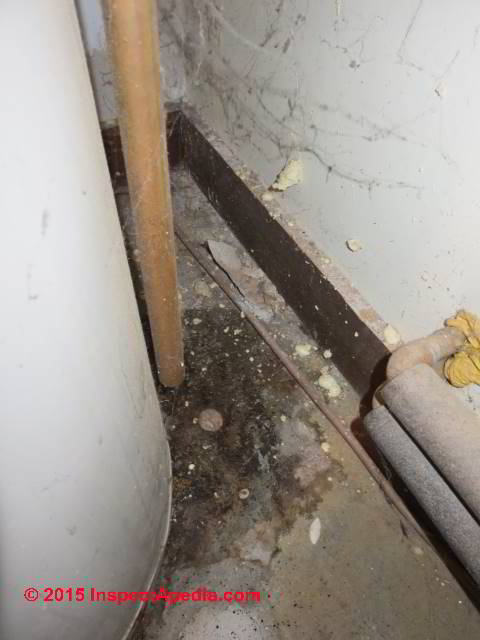
Once the old water heater has been removed (below left), clean the floor, mop up any spilled water, and if the floor is not level, have a few scraps of tile or siding or similar waterproof material on hand to use as shims.

While the plumber was un-boxing and preparing the replacement water heater we mopped up water from the leaky water heater, noted the position of old shims, and then picked them up and cleaned the floor.
This is a good time to inspect and clean otherwise inaccessible walls and floor conditions behind the water heater.
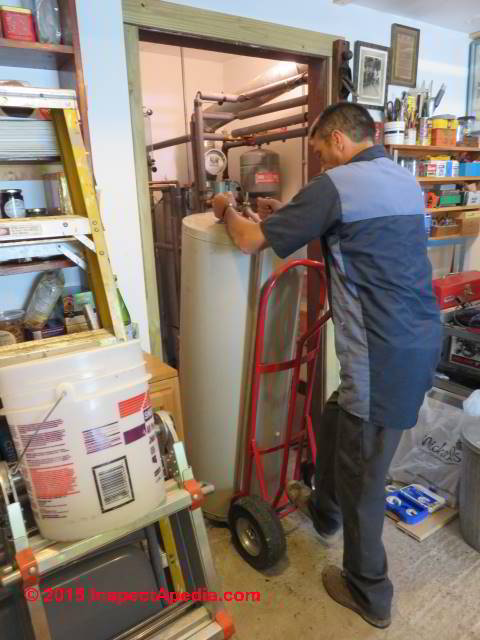
8. Bring in the new water heater and set it in place
The new water heater is set carefully in place so that its inlet and outlet piping connections are directly below the cut-off stubs of the existing water pipes.
Before connecting its piping check the level of the water heater, as it may need to be adjusted with shims if the floor is not flat and level.
If the heater is slightly out of level that's probably OK, but it should not be wobbly nor tilted. Hold your level along the flat side of the water heater at two locations that are about 90 degrees apart so that you check its level in all directions.
9. Connect hot and cold water piping to the new water heater and install the TPR valve & discharge tube
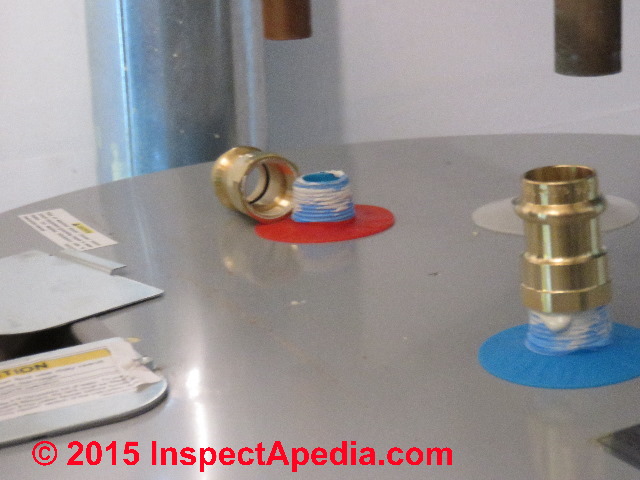
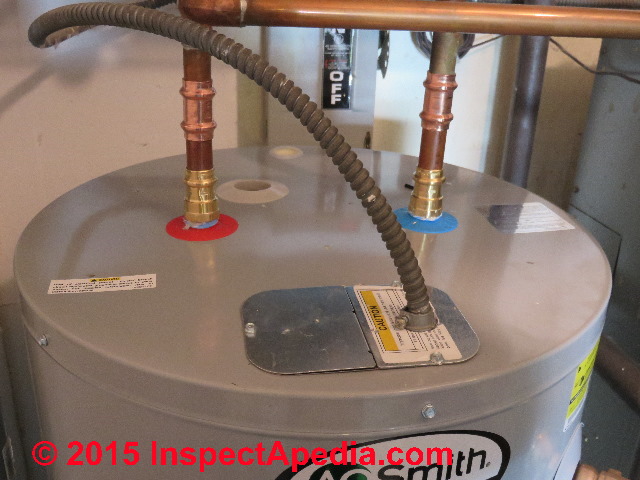
At below left the plumber has placed a white teflon pipe dope on the cold inlet (blue) and hot outlet (red) piping connectors on the water heater tank top.
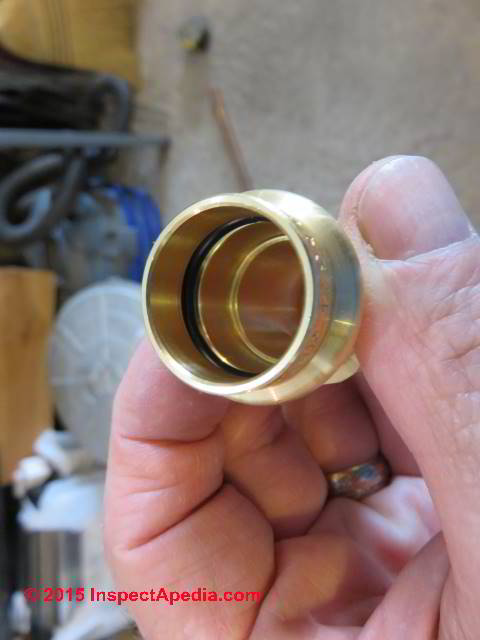
Cleveland Plumbing uses the Viega ProPress® pipe joining system connectors (shown at below left) for these water pipe connections.
The Viega ProPress® connectors are sold in a variety of sizes (1/2" to 4") and options and are crimp-connected to copper water piping using a special purpose Rigid™ tool designed for that purpose.
Advantages of this approach include that no soldering is needed and that connections can be made regardless of whether or not the piping is dry or wet.
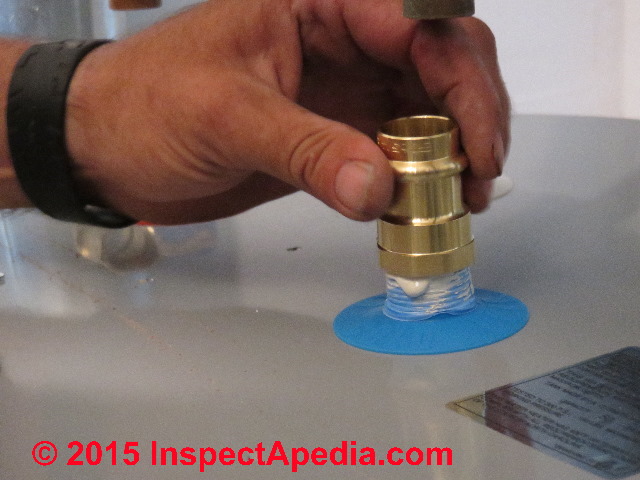
At above right the plumber is installing the ProPress fitting onto the cold water inlet for the water heater. You'll see that a total of four fittings are needed to reconnect the water heater to its piping.
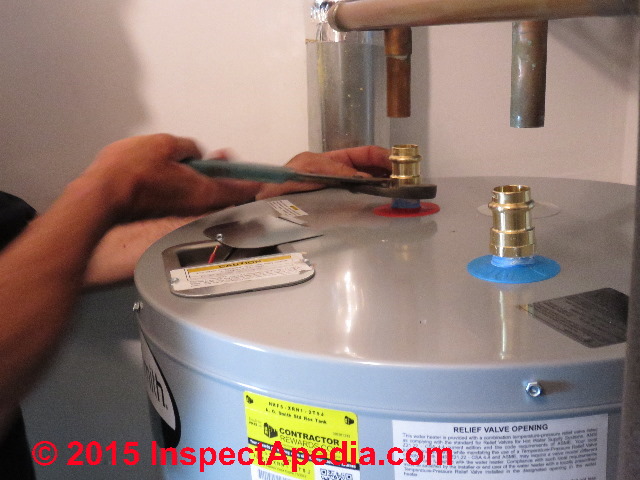
Why is the installer using gooseneck pliers to install these fittings at above right? Keep in mind that the water heater's tank top connectors are plastic. We don't want to risk over-tightening and breaking those fittings.
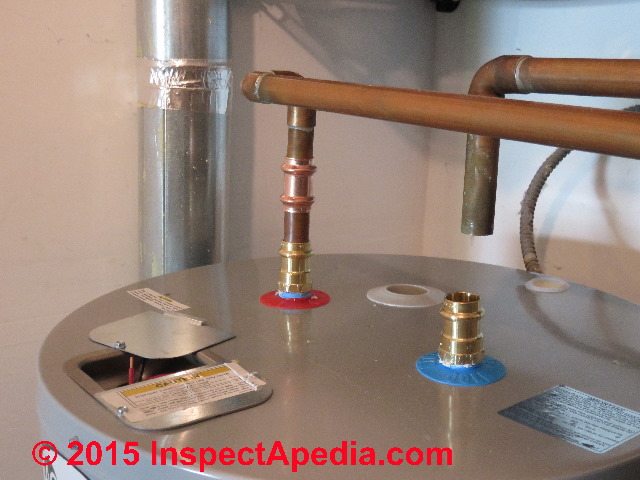
Below you can see the assembled fittings before the crimping operation. A short length of 3/4" copper piping was cut to fit between the coupling and the water heater top fitting and then assembled with the appropriate Viega ProPress fitting (below left). The same procedure is repeated on cold as on hot water piping.
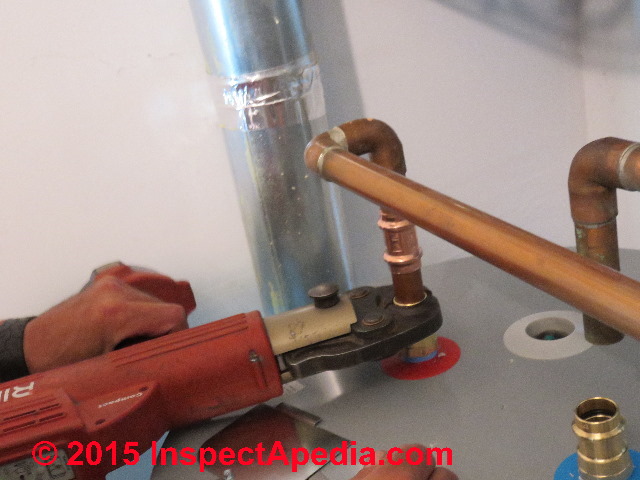
At above right the plumber is using the Rigid™ crimping tool to crimp the ProPress fitting onto the hot water supply line.
Watch out: installers should be sure to obtain proper training and to read the Viega ProPress installation manual. For example, failure to maintain the proper distance between Viega ProPress fittings can result in an unreliable fitting seal.
For 3/4" diameter copper tubing fittings can abut with zero distance but at larger sizes at 1 14" and above, clearance distances increase from 10mm up to 20mm. There are also clearance distances from abutting walls, ceilings or corners to permit the crimping tool to fit properly,.
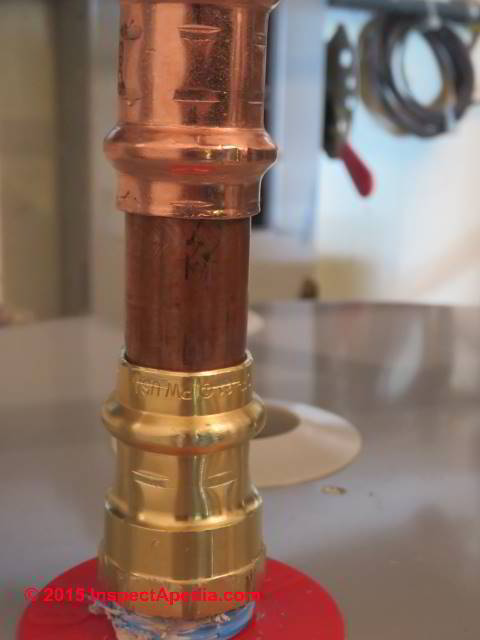
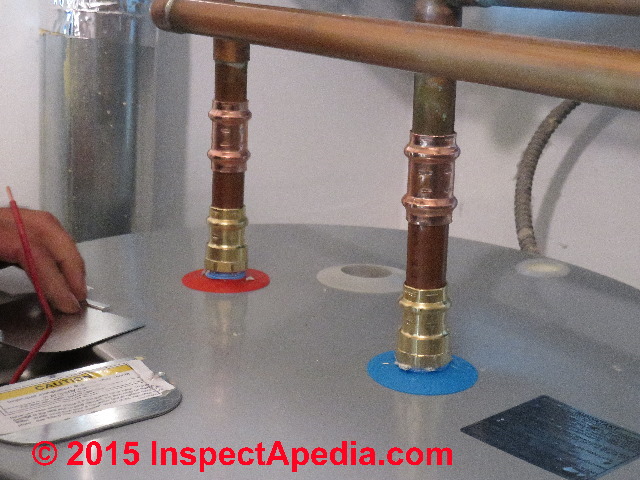
At above left you can see the crimping tool marks on the ProPress fittings. At above right are the completed plumbing connections for this water heater. In the left of that photo the installer is removing the access plate to begin making the water heater electrical connections.
10. Turn on water to the replacement water heater
Check for leaks at all fittings and joints around the water heater.
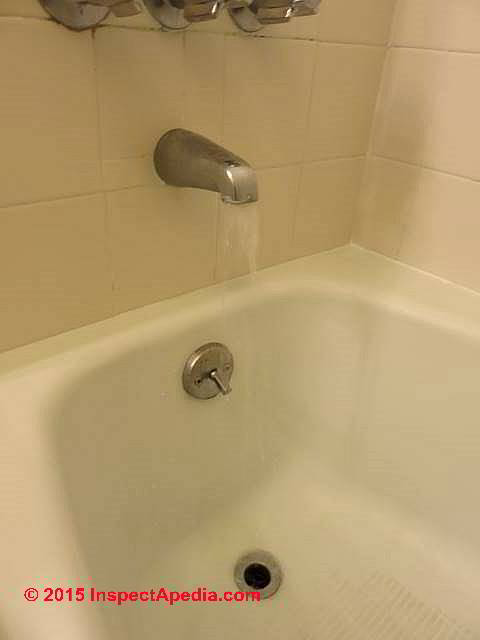
Open one or more indoor faucets ( a tub faucet is a good one) to enable the water entering the water heater to force air out of the heater tank and out of building piping.
Run hot water (it will still be cold in temperature at this point of course since we have not turned on the water heater) until all air has been purged from the system.
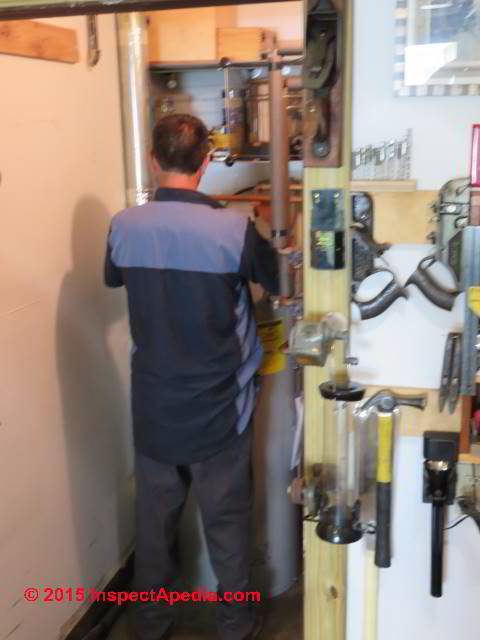
11. Connect the new water heater electrical wiring
While we're purging air from the water heater tank and building piping we can begin the water heater electrical wiring connections.
Watch out: be sure that electrical power to the water heater remains off at this point.
There is not only a risk of death by electrocution for workers touching a live electrical wire and perhaps a water pipe, but also if the water heater is turned on before it is completely filled with water you will destroy it by burning up the water heater elements.
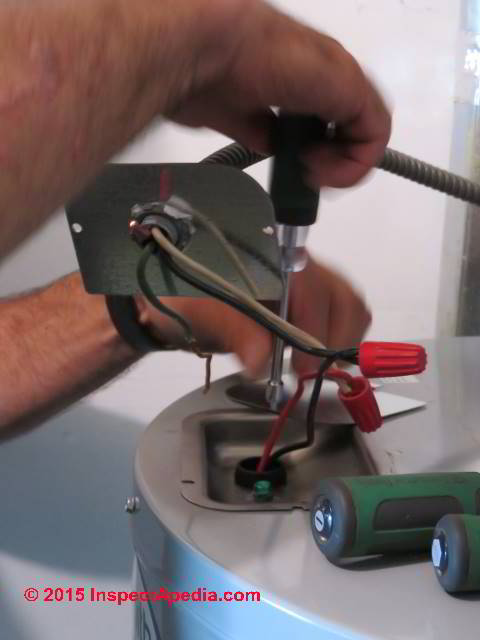
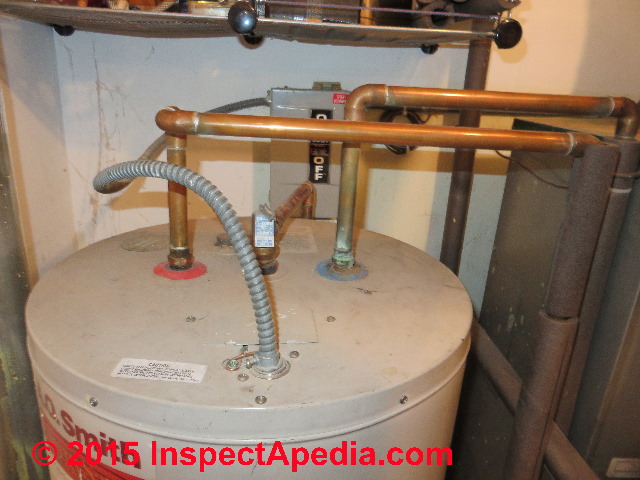
In the photo above the armored cable (BX) feed from the water heater's fuse panel has been left connected to a BX connector screwed to the top of the original metal plate that will mount to the water heater top. Since this matched the plate on the new water heater the installer is removing the new heater's plate using a nut driver.
He has used new twist-on connectors to connect the two hot leads (black and white in this installation) from the fuse panel to the red and black wires at the top of the water heater. This is a 240VAC electrical circuit. By convention we've connected black to black for one of the hot leads.
As the original installer used wire with a white (conventionally used for neutral) wire as the second hot lead from the fuse panel, that white wire is connected to the water heater's second hot lead - the red wire.
Be sure to check the wiring installations for your specific water heater model and brand. In some jurisdictions a permit and electrical inspection will be required for this water heater installation.
Remaining to be connected but visible in the photo, the ground wire on the incoming wiring must be connected to the green ground screw in the water heater's top electrical box and then the cover is secured in place.
12. Turn on the water heater electrical power and allow it to heat up
Watch out: do not turn on electrical power to the water heater until you are certain that the heater tank has been completely filled with water and that there is no air in the water heater tank.
Otherwise you'll melt the heating elements and destroy the new water heater. Oops. That's why at step 10 above we turned on water earlier and watched for a burst of air followed eventually by solid water flow.
Once air has been purged from the system you can turn on the water heater and give it time to heat up. Check that hot water is delivered and that air has been purged from the building plumbing lines.
At above left you can see the completed water heater installation.
13. Make a final check that no leaks have developed as the water heater has come up to temperature.
Check not only at all of the plumbing fittings and connections you've made but also check at the water heater temperature/pressure relief valve, at the water heater shut-off valves, and check on the floor around the heater for water from any hidden leaks. We suggest checking the water heater for leaks again when it has come up to full operating temperature and check it again 24-hours later.
- Cleveland Plumbing in Hyde Park NY at Tel: 845-229-8988 or via the company's website: http://www.clevelandpandh.com/ The company has been patient and generous with us in photographing other plumbing jobs.
See SEWER LINE REPLACEMENT - Viega ProPress Pipe Joining System, Viega LLC 100 N. Broadway, 6th Floor Wichita, KS 67202 insidesales@viega.us Telefon800-976-9819, Website: http://www.viega.us/catalog/en_US/1.1_ProPress/30924.html
...
Continue reading at ELECTRIC WATER HEATER ELEMENT TESTS or select a topic from the closely-related articles below, or see the complete ARTICLE INDEX.
Or see these
Electric Water Heater Repair Articles
- ELECTRIC WATER HEATER CHECKLIST
- ELECTRIC WATER HEATER CONTROLS
- ELECTRIC WATER HEATER REPAIR GUIDE
- HOT WATER T&P RELIEF VALVE
- WATER HEATER ANODE & DIP TUBE CHECK
Suggested citation for this web page
ELECTRIC WATER HEATER REPLACEMENT at InspectApedia.com - online encyclopedia of building & environmental inspection, testing, diagnosis, repair, & problem prevention advice.
Or see this
INDEX to RELATED ARTICLES: ARTICLE INDEX to WATER HEATERS
Or use the SEARCH BOX found below to Ask a Question or Search InspectApedia
Ask a Question or Search InspectApedia
Share this article:Try the search box just below, or if you prefer, post a question or comment in the Comments box below and we will respond promptly.
Search the InspectApedia website
Note: appearance of your Comment below may be delayed: if your comment contains an image, photograph, web link, or text that looks to the software as if it might be a web link, your posting will appear after it has been approved by a moderator. Apologies for the delay.
Only one image can be added per comment but you can post as many comments, and therefore images, as you like.
You will not receive a notification when a response to your question has been posted.
Please bookmark this page to make it easy for you to check back for our response.
IF above you see "Comment Form is loading comments..." then COMMENT BOX - countable.ca / bawkbox.com IS NOT WORKING.
In any case you are welcome to send an email directly to us at InspectApedia.com at editor@inspectApedia.com
We'll reply to you directly. Please help us help you by noting, in your email, the URL of the InspectApedia page where you wanted to comment.
Citations & References
In addition to any citations in the article above, a full list is available on request.
- A.O. Smith, "Residential Gas & Electric Water Heatern Service Handbook", A.O. Smith Water Heaters, Technical Training Department, Ashland, TN, Tel: 1-800-527-1953, Website: www.aosmithwaterheaters.com, Publication #320991-000, July 2006. Retrieved 3/4/2014, [Copy on file]
- Cleveland Plumbing in Hyde Park NY at Tel: 845-229-8988 or via the company's website: http://www.clevelandpandh.com/
- Viega LLC, "ProPress Systems Installation Manual" [PDF], Viega ProPress Pipe Joining System, Viega LLC 100 N. Broadway, 6th Floor Wichita, KS 67202 insidesales@viega.us Telefon800-976-9819, Website: http://www.viega.us/catalog/en_US/1.1_ProPress/30924.html
- [3] Thanks to reader Red Wood for clarification about the operation of electric water heater elements. Red Wood offers plumbing information at his website: http://411plumb.com
- Carbon Monoxide Gas Toxicity, exposure limits, poisoning symptoms, and inspecting buildings for CO hazards
- In addition to citations & references found in this article, see the research citations given at the end of the related articles found at our suggested
CONTINUE READING or RECOMMENDED ARTICLES.
- Carson, Dunlop & Associates Ltd., 120 Carlton Street Suite 407, Toronto ON M5A 4K2. Tel: (416) 964-9415 1-800-268-7070 Email: info@carsondunlop.com. Alan Carson is a past president of ASHI, the American Society of Home Inspectors.
Thanks to Alan Carson and Bob Dunlop, for permission for InspectAPedia to use text excerpts from The HOME REFERENCE BOOK - the Encyclopedia of Homes and to use illustrations from The ILLUSTRATED HOME .
Carson Dunlop Associates provides extensive home inspection education and report writing material. In gratitude we provide links to tsome Carson Dunlop Associates products and services.
 |
HOME | ABOUT | ASK a QUESTION | CONTACT | CONTENT USE POLICY | DESCRIPTION | POLICIES | PRIVACY | |
| © 2026 - 1985 Publisher InspectApedia.com - Daniel Friedman | |||||||||