
InspectAPedia®FREE Encyclopedia of Building & Environmental Construction, Diagnosis, Maintenance & Repair |
Question? Just ask us! InspectAPedia
|
 Steam Radiator Vent Cleaning & Testing
Steps in cleaning & testing: how to get the steam vent working or decide to replace it
- POST a QUESTION or COMMENT about steam radiator vent disassembly, repair, replacement, or operation
Steam radiator vent cleaning & testing procedures:
How to remove, clean, then test a steam vent to either get it working or decide that it needs to be replaced. This article describes step by step how to remove, clean, de-scale, then test a steam vent used on radiators or on steam main piping systems.
We include warnings that may help avoid trouble and we explain how to determine that the steam vent should simply be replaced.
InspectAPedia tolerates no conflicts of interest. We have no relationship with advertisers, products, or services discussed at this website.
- Daniel Friedman, Publisher/Editor/Author - See WHO ARE WE?
Steam Radiator Vent Cleaning
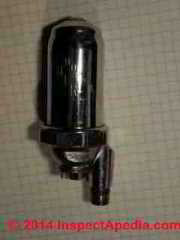
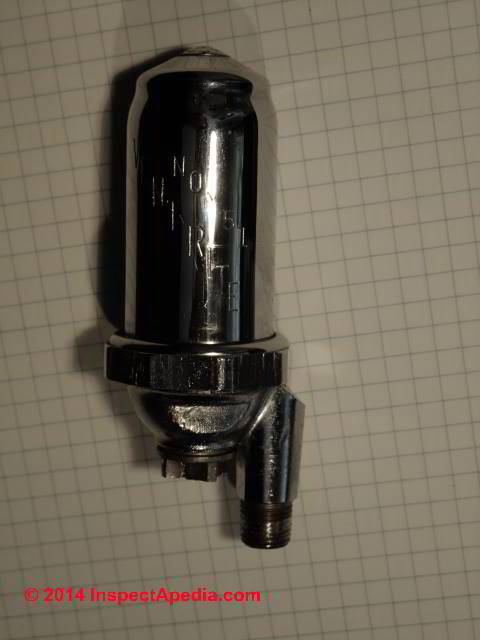
A steam vent is designed to allow air to escape from the steam piping or steam radiator during the heating phase (when steam is rising in the system), in order to allow steam to rise into the piping or into the radiator itself.
If the steam vent becomes debris clogged or otherwise is not working it cannot vent air properly. Results of a clogged steam radiator vent or mainline steam vent include loss of heat, diminished heat, cold steam radiators, or sometimes a steam vent that does not stop venting when it should, continuing to vent steam even after the radiator is hot.
Manufacturers such as Heat-Timer Inc. (producer of the Varivalve quick vent discussed at STEAM VENTS, 1-PIPE SYSTEMS) point out that
...
Over long working hours and years, these air vents clog with rust from the radiator and other heating system components. In many cases, it may be a matter of cleaning the air vent to bring the radiator back to its working condition. Cleaning the air vent is a very simple process that can be done by any homeowner. - retrieved 22 Jan 2015, original source: Steam Vent FAQs, : Heat-Timer Corporation, 20 New Dutch Lane Fairfield, NJ 07004 USA, Tel: 973 575 4004 and website: heat-timer.comThe following steps in cleaning a steam vent are adapted and expanded from the information we just cited:
- Turn off the heating system
and allow it to cool so that when you remove the steam vent you don't send potentially dangerous scalding steam venting into the occupied building spaces. - Remove the steam vent
from the radiator using a suitable wrench.
Watch out: don't use a larger wrench than necessary and still if you cannot remove the steam vent with just modest turning force (counter-clockwise) STOP lest you break off the vent and have to leave your heating system shut down while waiting for your heating service technician to bail you out. - Soak the steam vent in household vinegar
for 30 minutes or longer if necessary. If there is visible white mineral scale on the vent that disappears or that will disappear when you agitate the vent in the vinegar you've probably soaked it long enough.
Notice that for this procedure you are not actually disassembling the vent into its individual components though if that's necessary we show how to do so beginning
at STEAM RADIATOR VENT REPAIR. - Rinse the steam vent
thoroughly with cold water. - Test the steam vent
by blowing through it: (blow into the end that screws into the radiator body)- If the steam vent is clear:
if you can blow through the steam vent and air comes out of the vent's exit orifice freely then the vent is as clean as you'll get it without disassembly. - If the steam vent is not clear:
if you can't get air to move freely through the steam vent try shaking it and rinsing it again. If you still can't get air to move through the vent you can try soaking it longer and repeating the rinse and blow test above. - If you cannot clear the steam vent
your options are to risk ruining it by disassembly (shown above) or just buy a new replacement steam vent of the same type and capacity.
- If the steam vent is clear:
- Re-install the steam vent
(or install the new one you bought after cleaning didn't work). Wrap the threaded end of the vent with teflon tape, taking care that the tape doesn't block the steam entry port on its mounting end and screw it back into its tapped mounting opening on the steam radiator.
Watch out: be sure that you end up with the steam vent pointing "up" for proper steam vent operation - Turn the heating boiler back on and set the room thermostat
to above room temperature so that the boiler operates and sends steam rising in the system. - Watch the steam vent for proper operation:
as steam rises in the system the vent should release air in the piping or radiator. When the radiator (and the steam vent itself) become hot the steam vent should close. If the steam vent does not close - that is if it continues to vent steam, replace it.
Bottom line on steam radiator vent repair versus replacement
If you are a tinkerer or if you are desperate to try to get a recalcitrant steam vent working and don't have a replacement at hand (replacement is still our best advice), you might want to try disassembling the steam vent and then cleaning the valve seat or float pin in a steam radiator vent.
Details of how to do this steam vent disassembly are
at STEAM RADIATOR VENT REPAIR.
But really for most repair technicians or building occupants or owners you'd be better off just replacing the steam valve if simple cleaning didn't work: it's often not worth the time and trouble to actually disassemble the steam vent, especially since there's a good chance that if the valve no longer opens or closes when it should it's the float itself that's at fault.
Given the trouble of cleaning and reassembling and reinstalling the valve, then bringing up the heat to watch the valve to see if it works, the disappointment when it doesn't, and the muttering, to me it makes sense to just go ahead and replace the steam vent with a new unit.
...
Continue reading at STEAM RADIATOR VENT REPAIR for details about how to completely disassemble a steam vent, or select a topic from the closely-related articles below, or see the complete ARTICLE INDEX.
Or see these
Recommended Articles
- BOILER CONTROLS & SWITCHES
- STEAM HEAT RADIATOR REPAIR
- RADIATOR VALVES & HEAT CONTROLS
- STEAM TRAPS
- STEAM VENTS - home
Suggested citation for this web page
STEAM RADIATOR VENT CLEAN & TEST at InspectApedia.com - online encyclopedia of building & environmental inspection, testing, diagnosis, repair, & problem prevention advice.
Or see this
INDEX to RELATED ARTICLES: ARTICLE INDEX to HEATING RADIATORS
Or use the SEARCH BOX found below to Ask a Question or Search InspectApedia
Ask a Question or Search InspectApedia
Try the search box just below, or if you prefer, post a question or comment in the Comments box below and we will respond promptly.
Search the InspectApedia website
Note: appearance of your Comment below may be delayed: if your comment contains an image, photograph, web link, or text that looks to the software as if it might be a web link, your posting will appear after it has been approved by a moderator. Apologies for the delay.
Only one image can be added per comment but you can post as many comments, and therefore images, as you like.
You will not receive a notification when a response to your question has been posted.
Please bookmark this page to make it easy for you to check back for our response.
IF above you see "Comment Form is loading comments..." then COMMENT BOX - countable.ca / bawkbox.com IS NOT WORKING.
In any case you are welcome to send an email directly to us at InspectApedia.com at editor@inspectApedia.com
We'll reply to you directly. Please help us help you by noting, in your email, the URL of the InspectApedia page where you wanted to comment.
Citations & References
In addition to any citations in the article above, a full list is available on request.
- Honeywell Corporation, Tel: U.S. 1 (877) 841-2840, International 001 (480) 353-3020, Website: www.honeywell.com
- Vent-Rite Valve Corporation: 1875 Dewey Ave. Benton Harbor, MI 49022 TEL: (269) 925-8818 FAX: (269) 925-7888
- Emerson Swan, Inc. 300 Pond Street Randolph, MA 02368 Tel: (781) 986-2000 Fax: (781) 986-2028 info@emersonswan.com
- Barnes & Jones Corporation, 91 Pacella Park Drive Randolph, MA 02368, Tel: 781-963-8000calibrated steam traps and vents, Email: bnesbitt@barnesandjones.com. Vent-Rite steam vents for radiator control.
- Gorton Heating Corporation, 546 South Avenue East, Cranford, New Jersey 07016, Tel: 908-276-1323, email: info@gorton-valves.com, fast venting valves for steam heating systems.
- "Rv-4 One-Pipe Steam Radiator Valve", available from Armstrong International,
816 Maple Street, Three Rivers, MI 49093 USA, Tel: (269) 273-1415, Armstrong has offices in Beijing, China, Belgium, India and Mexico. Web search 12/27/2010, original source:
http://www.armstronginternational.com/thermostatic-valves-rv-4-one-pipe. - "Special Steam Vents", Hoffman Specialty heating products, web search 12/27/2010, original source:
http://www.hoffmanspecialty.com/pdf/hs900/HS900-3474.pdf - "Steam and Water Vents, Selection Guidelines - Steam Vents", Hoffman Specialty, web search 12/27/2010, original source:
http://www.hoffmanspecialty.com/pdf/hs900/HS900-stvents.pdf - Hoffman 1A adjustable steam vents, available from Hoffman Specialty, ITT, web search 12/27/2010, original source:
http://www.drillspot.com/products/51570/Hoffman_1A_Adjustable_Automatic_Air_Vent_For_Steam_Radiators - Hoffman Convector Steam Vents, available from Hoffman Specialty, ITT, web search 12/28/2010, original source:
http://www.hoffmanspecialty.com/pdf/hs900/HS900-conv109.pdf - Report 95-14, PB96-198163 Thermostatic Radiator Valve (TRV) Demonstration Project, contact NYSERDA. 17 Columbia Circle, Albany, NY 12203-6399 Toll-Free: 1-866-NYSERDA, Tel:(518)465-6252, Ext. 241. Web Search 12/27/2010, original source: http://www.homeenergy.org/archive/hem.dis.anl.gov/eehem/96/960509.html
- VariValve® Quick-Vent from Heat Timer, adjustable radiator and main line vent valves for one pipe steam systems, web search 12/27/2010, original source: http://www.heat-timer.com/enFiles/ProductDocument/literature/VariV056082C.pdf
- "Care & Feeding of Air Vents", Dan Holohan, Old House Journal Online, November 2004
- The Steam Book, 1984, Training and Education Department, Fluid Handling Division, ITT [probably out of print, possibly available from several home inspection supply companies] Fuel Oil and Oil Heat Magazine, October 1990, offers an update, (see next item in this list). ITT Fluid Technology,
1133 Westchester Avenue
White Plains, NY 10604, tel +1 914 304 1700 fax +1 914 696 2950 www.ittfluidbusiness.com - The Lost Art of Steam Heating, Dan Holohan, 516-579-3046 FAX
- Principles of Steam Heating, Dan Holohan, technical editor of Fuel Oil and Oil Heat magazine, 389 Passaic Ave., Fairfield, NJ 07004 ($12.+1.25 postage/handling).
- "Residential Steam Heating Systems", Instructional Technologies Institute, Inc., 145 "D" Grassy Plain St., Bethel, CT 06801 800/227-1663 [home inspection training material] 1987
- The Heat Efficiency of Steam Boilers, Bryan Donkin
- Steam Boiler Operation, Principles & Practice, James J. Jackson
- The Steam Book, 1984, Training and Education Department, Fluid Handling Division, ITT [probably out of print, possibly available from several home inspection supply companies] Fuel Oil and Oil Heat Magazine, October 1990, offers an update,
- The Lost Art of Steam Heating, Dan Holohan, 516-579-3046 FAX
- Principles of Steam Heating, Dan Holohan, technical editor of Fuel Oil and Oil Heat magazine, 389 Passaic Ave., Fairfield, NJ 07004 ($12.+1.25 postage/handling).
- "Residential Steam Heating Systems", Instructional Technologies Institute, Inc., 145 "D" Grassy Plain St., Bethel, CT 06801 800/227-1663 [home inspection training material] 1987
- Boilers, Boiler Conversions, James E. Brumbaugh, ISBN 0-672-23389-4 (v. 1) Volume II, Oil, Gas, and Coal Burners, Controls, Ducts, Piping, Valves, James E. Brumbaugh, ISBN 0-672-23390-7 (v. 2) Volume III, Radiant Heating, Water Heaters, Ventilation, Air Conditioning, Heat Pumps, Air Cleaners, James E. Brumbaugh, ISBN 0-672-23383-5 (v. 3) or ISBN 0-672-23380-0 (set) Special Sales Director, Macmillan Publishing Co., 866 Third Ave., New York, NY 10022. Macmillan Publishing Co., NY
- Our recommended books about building & mechanical systems design, inspection, problem diagnosis, and repair, and about indoor environment and IAQ testing, diagnosis, and cleanup are at the InspectAPedia Bookstore. Also see our Book Reviews - InspectAPedia.
- In addition to citations & references found in this article, see the research citations given at the end of the related articles found at our suggested
CONTINUE READING or RECOMMENDED ARTICLES.
- Carson, Dunlop & Associates Ltd., 120 Carlton Street Suite 407, Toronto ON M5A 4K2. Tel: (416) 964-9415 1-800-268-7070 Email: info@carsondunlop.com. Alan Carson is a past president of ASHI, the American Society of Home Inspectors.
Thanks to Alan Carson and Bob Dunlop, for permission for InspectAPedia to use text excerpts from The HOME REFERENCE BOOK - the Encyclopedia of Homes and to use illustrations from The ILLUSTRATED HOME .
Carson Dunlop Associates provides extensive home inspection education and report writing material. In gratitude we provide links to tsome Carson Dunlop Associates products and services.
 |
HOME | ABOUT | ASK a QUESTION | CONTACT | CONTENT USE POLICY | DESCRIPTION | POLICIES | PRIVACY | |
| © 2026 - 1985 Publisher InspectApedia.com - Daniel Friedman | |||||||||