 Heating Boiler Gauge Replacement Procedure
10 detailed steps
Two approaches:
Wet replacement w/ithout draining the boiler
Dry replacement with partial drain of the boiler
- POST a QUESTION or COMMENT about how to replace a bad pressure & temperature gauge on a heating boiler - hot water or steam
Heating boiler gauge replacement: this article describes the steps in replacing a pressure or temperature gauge on a hot water (hydronic) boiler or on a steam boiler.
We give two different approaches to boiler gauge replacement, a wet process that is done without draining the boiler and a dry gauge replacement process that requires draining water out of the heating equipment.
InspectAPedia tolerates no conflicts of interest. We have no relationship with advertisers, products, or services discussed at this website.
- Daniel Friedman, Publisher/Editor/Author - See WHO ARE WE?
How to Replace a Heating Boiler Pressure & Temperature Gauge
 Here we describe two approaches to safely drain and refill the water in a heating boiler to
permit replacement of a bad heating boiler pressure/temperature gauge.
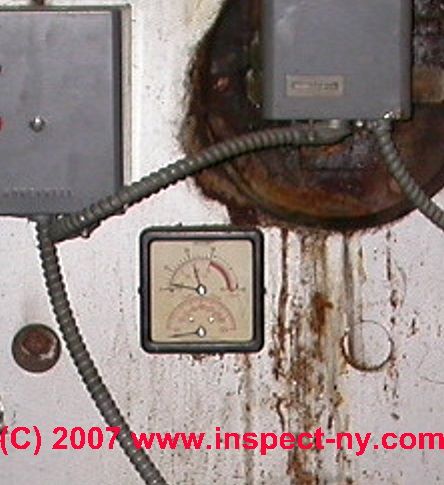
By the way, the boiler is only about 3 years old. It doesn't speak well for Mclain products. - J. Wojciechowski
Basic outline of how to replace a heating boiler pressure/temperature gauge
Just replacing the pressure/temperature gauge itself is usually mechanically simple - as long as you buy an OEM part you'll have exactly the same item as before.
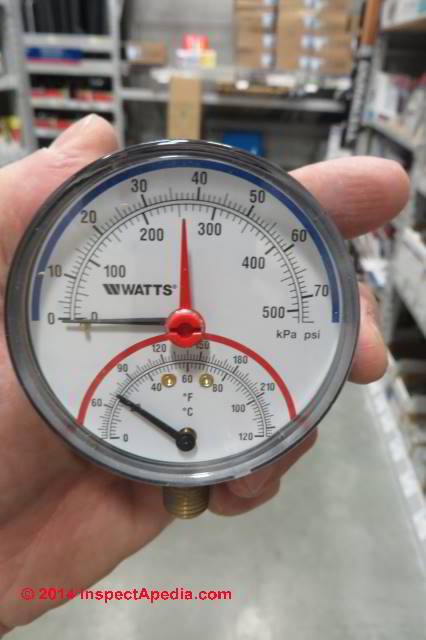
At left we illustrate a standard hydronic heating boiler replacement gauge that reads pressure and temperature. This replacement boiler gauge is produced by the Watts Regulator Company - in the U.S. see www.wattsreg.com or in Canada see www.wattsca.com for details.
Watch out: the actual gauge replacement itself is not usually technicall difficult as long as the gauge mounting port on the boiler has not become rust damaged.
But there are some serious pitfalls to watch out for - enough that for most people I'd recommend having the job done by a trained heating service tech, particularly because you might have difficulty purging all air out of the system after you get the gauge installed.
Basically to replace a heating pressure/temperature gauge one would:
- Purchase an OEM replacement part
so that we won't waste time trying to jury-rig something that does not fit on your boiler.
Or
Purchase a generic replacement boiler gauge:
Examine the original gauge carefully to note its operating range and importantly, the size of the pipe-treaded tapping into which the replacement guage will mount.
You should be able to find a generic standard or an OEM replacement gauge set from your local heating supplier or from the boiler manufacturer.
With the new gauge checked for a match, prepared with teflon tape or pipe dope as needed, the general procedure that an HVAC tech would follow would be as follows: - Turn off electrical power to the boiler
- just using the service switch at the boiler should be fine - Let the heating system completely cool down
to room temperature - If there are valves that isolate the various zones,
close them (that may save leaking air into the zones and leaving them airbound). - Close the water supply valve to the boiler
- usually the boiler water shutoff is just ahead of the automatic water feeder
See details at WATER FEEDER VALVES, HYDRONIC BOILER - Attach a drain hose to the boiler drain and run it outside or to a floor drain
- Open the boiler drain to drain water pressure off of the system.
- Choose the gauge replacement method you want to use:
GAUGE REPLACEMENT WET PROCEDURE (don't have to purge air later, but you'll probably splash some nasty boiler water around)
or the
GAUGE REPLACEMENT DRY DRAINDOWN PROCEDURE (clean and neat but more trouble purging air later)
After the gauge is replaced we will continue at Step 10
Step 9w. The "wet" process for changing a heating boiler gauge
(This process can avoid having to purge air from the heating system)
- When pressure is off, the boiler cooled-down
and with the new part ready to install, IF it is a direct screw-in part, some installers just allow things to get a bit wet (protecting electricals, burner etc from splashing), and with PRESSURE drained off of the boiler but the boiler not completely drained,
then - Remove the old boiler gauge gauge and
Use a fitted or adjustable wrench to turn the gauge by its solid metal base. "Leftie-Loosie" - unscrew by rotating the gauge base to the left or counter-clockwise.
Watch out: ever try to unscrew the gauge by twisting the gauge body itself: you're likely to break the gauge and create a mess.
Watch out: severe scalding burn hazard: never remove a boiler gauge (nor any other part that can release hot water) when the boiler is hot.
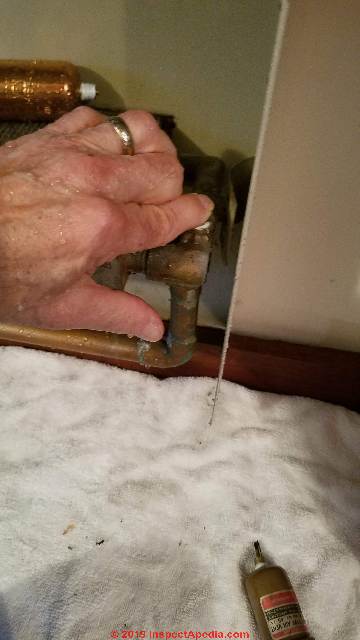
Be ready to install the new gauge - I hold a finger over the gauge mounting port with my left hand to stop water from squirting out (be sure the boiler was cold before trying this) ...
Photo below: I'm demonstrating the "hold a finger over the mounting port" detail where I was replacing not a boilere gauge, but an air eliminator/automatic air bleeeder on a heating convector in our article AIR ELIMINATOR / FLOAT VENT REPLACEMENT - you can see I prepared for the spill with a towel on the floor and you'll see that my hand got wet.
- Install the new boiler gauge
... working calmly but quickly to minimize the spillage
and with my right hand I pick up the new gauge and as I remove my left finger from the gauge port I quickly place the new gauge in place and begin to screw it in place.
If you prepared the new gauge base with some teflon tape or pipe dope and have it close at hand this step will go well.
Watch out: IF you're inexperienced with plumbing repairs or are working in a location where even a small spill of cool boiler water onto the floor is unacceptable THEN
I don't recommend this approach but for those who can take this approach it may save having to remove air from the boiler and piping later.
Step 9d. The "dry" drain-down process for changing out a heating boiler gauge
This procedure will require purging air from the heating system after the new gauge has been installed.
1. With pressure off, and the boiler cooled down drain enough water
from the boiler to get the water level just below the height of the gauge attachment point (you don't need to drain the whole system) - then
2. Remove the old pressure gauge;
clean the threaded fittings (I use an old toothbrush)
Watch out: severe scalding burn hazard: never remove a boiler gauge (nor any other part that can release hot water) when the boiler is hot.
Watch out: to screw the gauge in or out, always use your wrench to grasp old or new pressure gauges by the rectangular or hexagonal brass fitting at the base of the gauge - NEVER try to screw a gauge in or out by turning the gauge body itself. The gauge body is not strong enough to withstand that torque pressure and you'll probably break the gauge and cause a leak as well.
3. Install the new pressure/temperature boiler gauge
using the pipe sealant (pipe dope or teflon tape depending on the manufacturer's suggestion).
Watch out: do not screw the new boiler gauge into place by twisting on the gauge body itself - you will most likely destroy the part. Instead use a wrench that is connected to the faceted brass mounting base that in turn carries the gauge body.
A damaged boiler gauge is unsafe as it could burst and spray someone with scalding water.
You may need to open a service valve, remove (and then install a new)
AIR BLEEDER VALVES or even open the pressure/temperature relief valve to let air INTO the boiler (once pressure has been relieved therein) to speed water draining out of the boiler.
Watch out: messing with a relief valve can leave it leaky and lead to need for replacement.
See RELIEF VALVES - TP VALVES for details
Watch out: You may later have to purge air from the boiler, and even from the heating zones, depending on how much air enters the heating system during this procedure.
AIRBOUND HEAT SYSTEM REPAIR by WATER FEED VALVE
Step 10. Return the boiler to service after Boiler Gauge Replacement
With new boiler pressure/temperature gauge in place, you will need to:
- Check that the P/T relief valve or any other air inlet source you opened has been closed and is not leaky
- Make sure that the Boiler drain is now closed and drain hose removed
- Turn on water supply to the boiler
- Check and confirm no leaks at the gauge nor elsewhere
- Purge air from the heating system boiler and if needed from the zones.
If you drained the boiler or if you hear air in the heating pipes see our air purging methods beginning
at AIRBOUND HEAT SYSTEM REPAIR by WATER FEED VALVE - If you closed valves that isolated heating zones and circulators from the boiler remember to open them
- Turn power back on to the boiler and if necessary set the thermostat up to call for heat so that the boiler runs
- Let boiler run up to full operating temperature and check for leaks and for airbound conditions
- If any heating zones are not heating properly they may be airbound and may need additional venting
...
Continue reading at GAUGES, HYDRONIC BOILER or select a topic from the closely-related articles below, or see the complete ARTICLE INDEX.
Or see BOILER GAUGE REPLACEMENT FAQs - questions & answers about replacing a boiler pressure gauge, posted originally at this page
Or see these
Heating Boiler Pressure Gauge Articles
- BOILER CONTROLS & SWITCHES
- BOILER GAUGE REPLACEMENT
- BOILER PRESSURE & TEMPERATURE SETTINGS
- BOILER PRESSURE CONTROLS & SETTINGS
- GAUGES, HYDRONIC BOILER
- GAUGES, STEAM BOILER
- PRESSURE REDUCING VALVES
- RELIEF VALVES - TP VALVES
Suggested citation for this web page
BOILER GAUGE REPLACEMENT at InspectApedia.com - online encyclopedia of building & environmental inspection, testing, diagnosis, repair, & problem prevention advice.
INDEX to RELATED ARTICLES: ARTICLE INDEX to HEATING SYSTEMS
Or use the SEARCH BOX found below to Ask a Question or Search InspectApedia
Ask a Question or Search InspectApedia
Try the search box just below, or if you prefer, post a question or comment in the Comments box below and we will respond promptly.
Search the InspectApedia website
Note: appearance of your Comment below may be delayed: if your comment contains an image, photograph, web link, or text that looks to the software as if it might be a web link, your posting will appear after it has been approved by a moderator. Apologies for the delay.
Only one image can be added per comment but you can post as many comments, and therefore images, as you like.
You will not receive a notification when a response to your question has been posted.
Please bookmark this page to make it easy for you to check back for our response.
IF above you see "Comment Form is loading comments..." then COMMENT BOX - countable.ca / bawkbox.com IS NOT WORKING.
In any case you are welcome to send an email directly to us at InspectApedia.com at editor@inspectApedia.com
We'll reply to you directly. Please help us help you by noting, in your email, the URL of the InspectApedia page where you wanted to comment.
Citations & References
In addition to any citations in the article above, a full list is available on request.
- In addition to citations & references found in this article, see the research citations given at the end of the related articles found at our suggested
CONTINUE READING or RECOMMENDED ARTICLES.
- Carson, Dunlop & Associates Ltd., 120 Carlton Street Suite 407, Toronto ON M5A 4K2. Tel: (416) 964-9415 1-800-268-7070 Email: info@carsondunlop.com. Alan Carson is a past president of ASHI, the American Society of Home Inspectors.
Thanks to Alan Carson and Bob Dunlop, for permission for InspectAPedia to use text excerpts from The HOME REFERENCE BOOK - the Encyclopedia of Homes and to use illustrations from The ILLUSTRATED HOME .
Carson Dunlop Associates provides extensive home inspection education and report writing material. In gratitude we provide links to tsome Carson Dunlop Associates products and services.


