 Automatic Air Eliminator Replacement
Heating Convector or Radiator or Piping Float-Type Air Vents
Diagnose the trouble
Replace the Vent
Detailed step by step procedure
- POST a QUESTION or COMMENT about troubleshooting problems bleeding the air out of hot water heating system radiators, baseboards, convectors etc.
Step by step automatic air purging valve / float valve / air eliminator replacement procedure on a hot water heating system.
We explain how to diagnose and fix a cold heating convector or radiator caused by a clogged or stuck air vent or automatic float-type air eliminator.
We also show how to replace a heating system vent without draining the pipes or boiler - provided you've let the system cool down to a safe temperature.
This article series provides a detailed guide to using air bleed valves to get rid of unwanted air in hot water heating systems: fix cold or noisy hot water heating radiators or baseboards.
InspectAPedia tolerates no conflicts of interest. We have no relationship with advertisers, products, or services discussed at this website.
- Daniel Friedman, Publisher/Editor/Author - See WHO ARE WE?
Diagnose & Fix Loss of Heat due to Bad Automatic Air Eliminator Vent
On the first cold morning your heating boiler is going to turn on and warm up your home before you stumble out of bed to brush teeth, right?
Watch out: My mom used to warn Not so fast, buster! That meant trouble. In this case the house is suspiciously cold, but not everywhere.
So some of your radiators, baseboards, or as shown here, hot water (hydronic) heating convector units are nice and toasty warm but you go up one floor and the convectors are freezing cold. (So is the floor).
Since some of our heating convectors are hot and we hear the boiler running we know that the problem isn't the boiler itself nor a loss of heating fuel.
So we take a closer look starting with diagnosing the problem, then if it's a bad air vent we replace it.
A word on terminology: while an expert may point out technical differences, for purposes of replacing an air removal device on hot water heating sytems, all of the following vent types or names are covered here:
Air vent, float vent, auto-vent, air eliminator, air bleeder, automatic air bleeder, float type air vent.
Article Contents
- DIAGNOSE BAD AIR ELMINATOR / VENT - figure out what's wrong before tying to fix your heater
- REPLACE BAD AIR ELIMINATOR / VENT - simple easy and fast steps - be safe, cool down the boiler first
- LEAKY AIR VENT CLUES - these details right at the vent can tell you what's going on
- VENT REPLACEMENT SAFETY WARNINGS - don't get burned & don't flood your building
- HEATING BOILER VENT TYPES - how to identify the kind of air eliminator you have installed
These vents are available from your hardware store, plumbing supplier or building supply store. Manufacturers of air bleeders, both manual and automatic include at least Amtrol, Bell and Gossett (B&G), Bluefin, Caleffi, Durst, GoValve, Resideo (Honeywell), Hoffman, Hydro Master, Jacobus - Maid O Mist, Legend, Nibco, Sailong, Sparco, Taco, Valemo, Vent-Rite and Watts.
...
Steps to Diagnose a Bad Air Vent
Step 1. Is the thermostat calling for heat;
heck the thermostat for the heating zone that's cold. If thermostat is set well above room temperature then the thermostat is probably calling for heat.
Step 2. Does the heating boiler run?
Well we know the answer to this since some zones are already or hot. Phew!
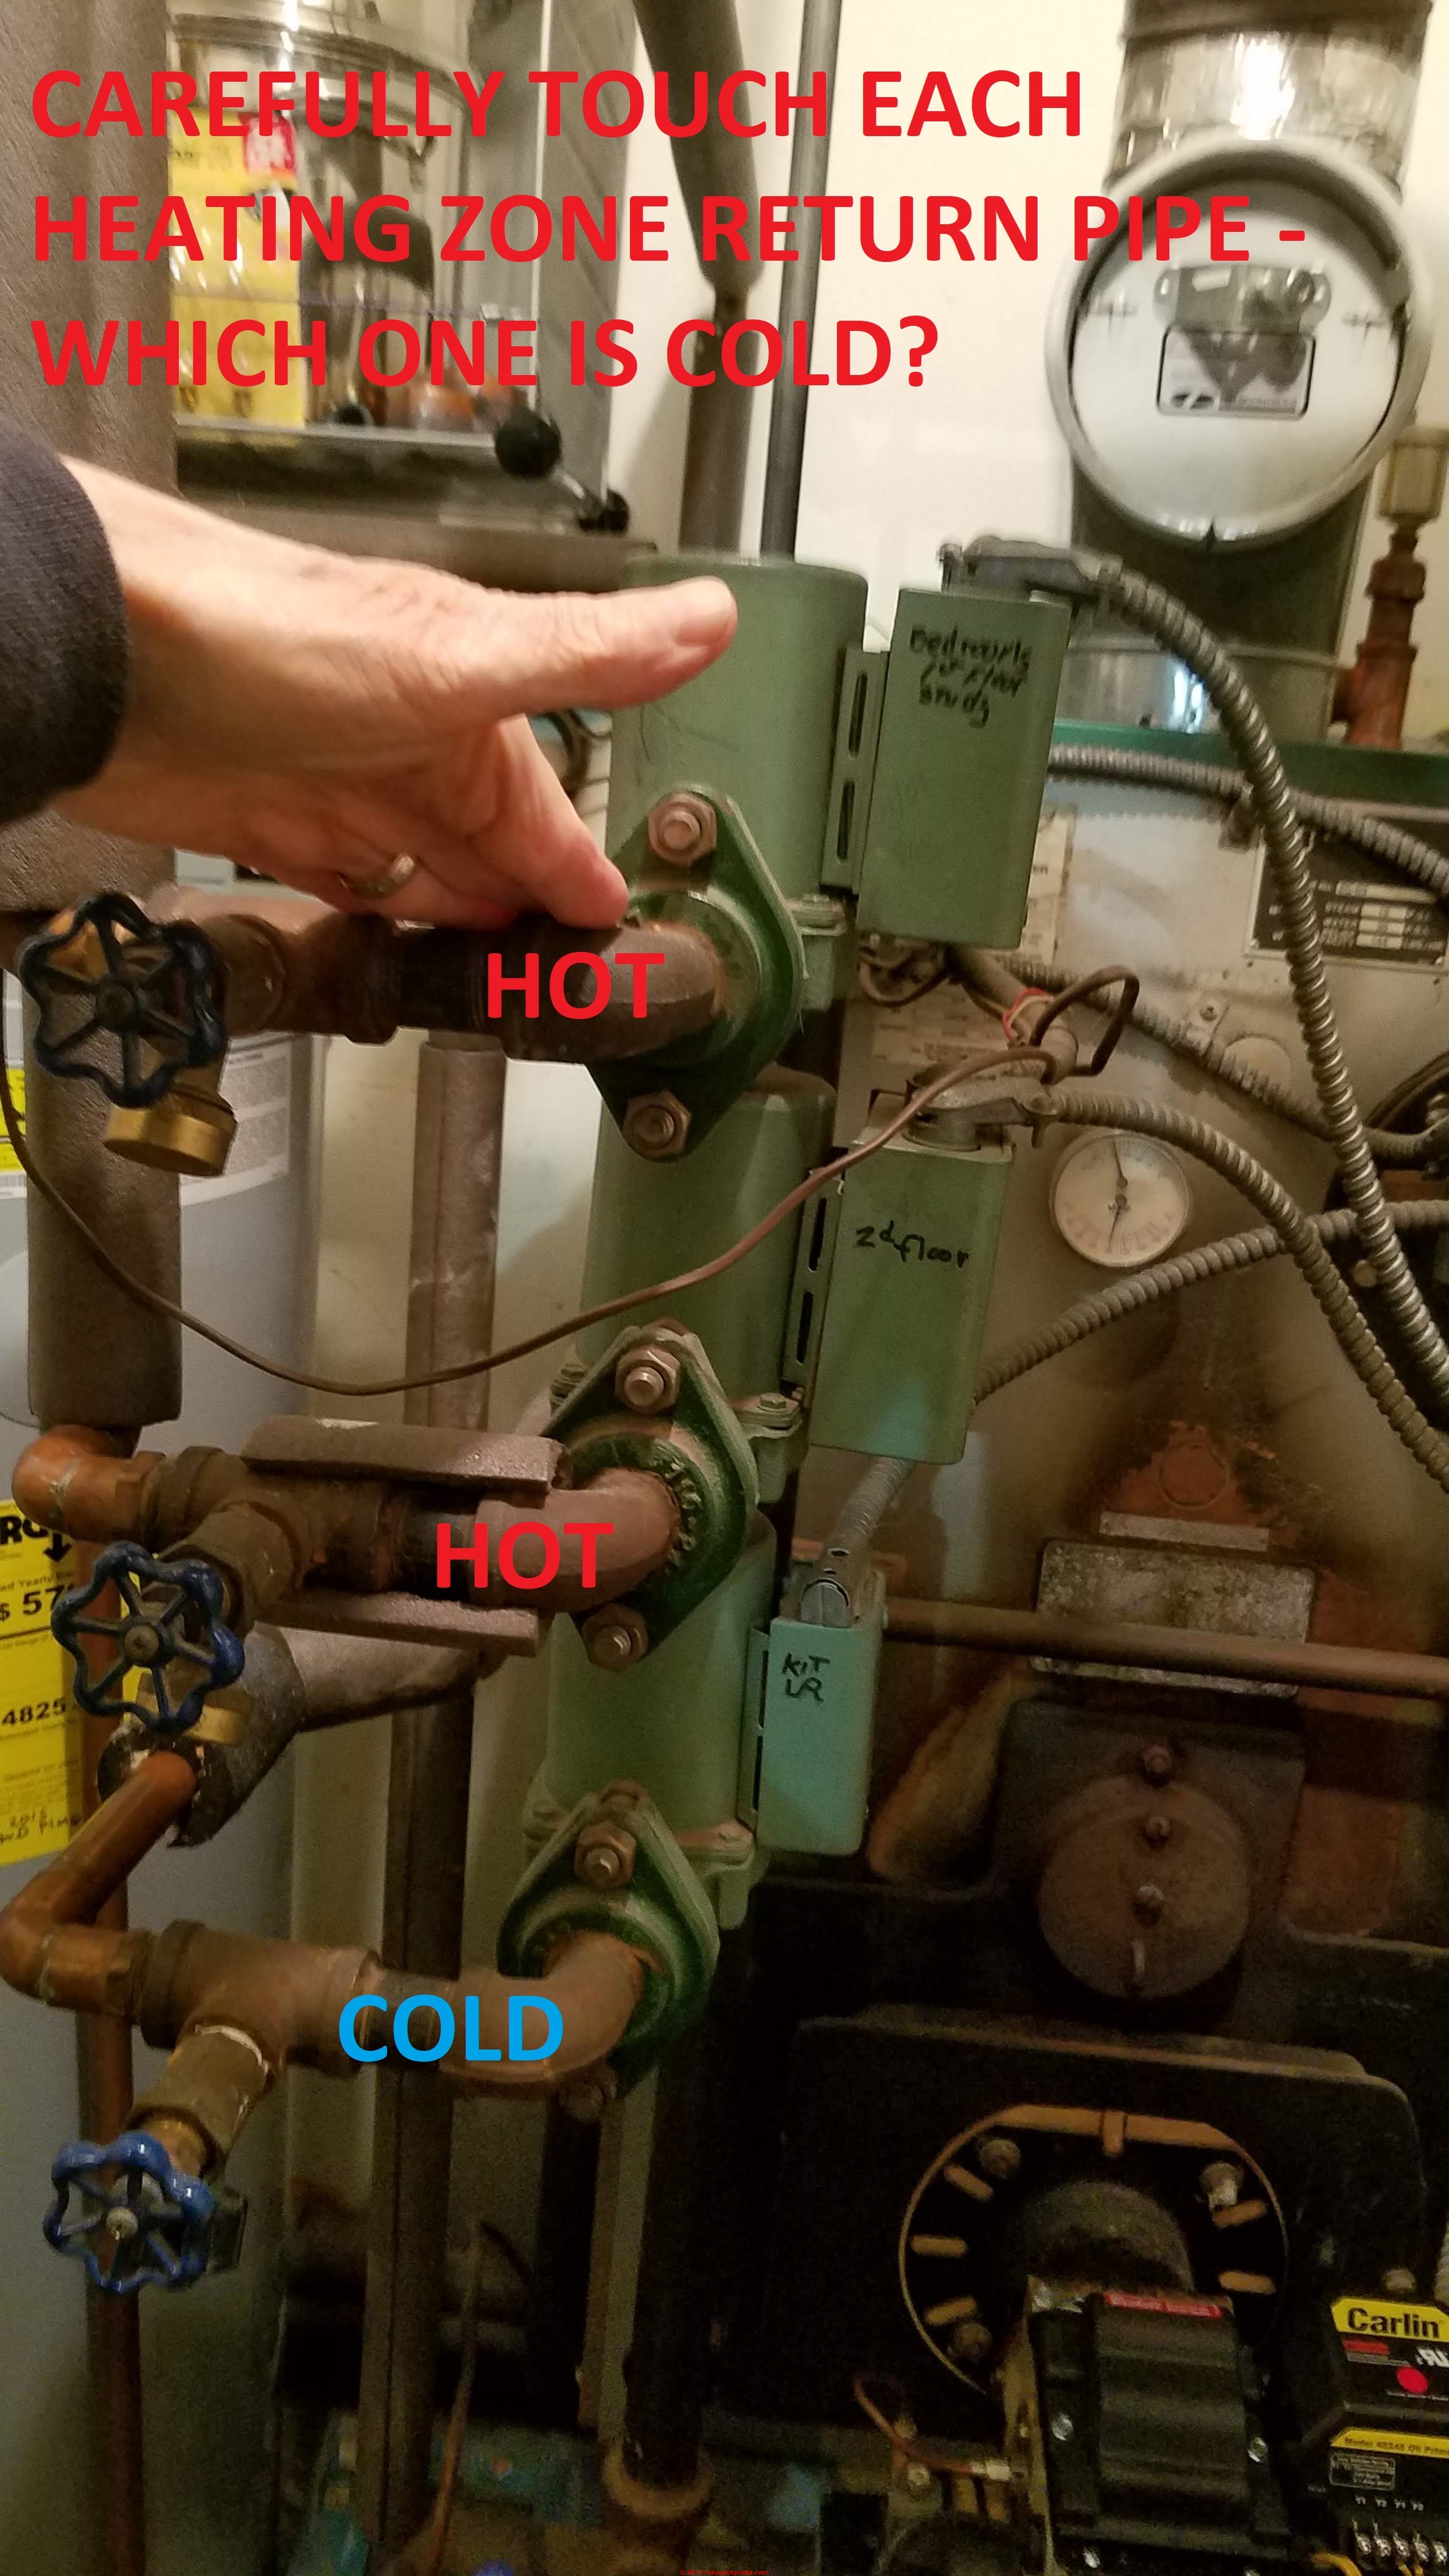
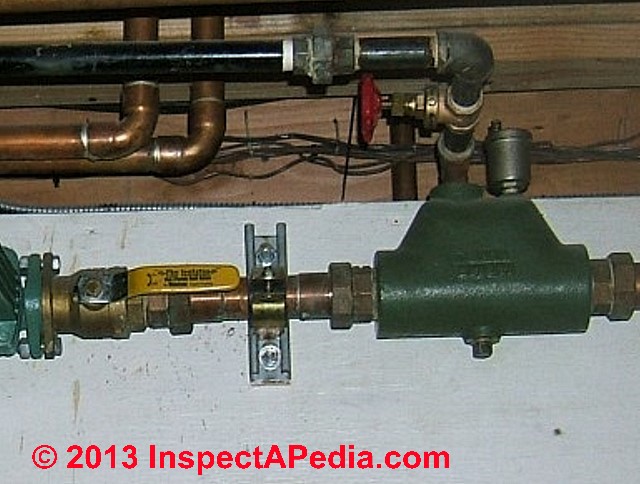
Step 3. Feel the heating pipes at the boiler.
This building has three heating zones. We feel each pipe to see if one of them is cold.
We could (and did) also fee the pipes at the heating convector itself - they were cold too, but that's more awkward to reach as you may have to lie down on a cold floor to feel up in that cold, dusty, spider-infested space - so I prefer to check right at the heating zone return line at the boiler itself.
Watch out: Touch carefully so as not to get burned.
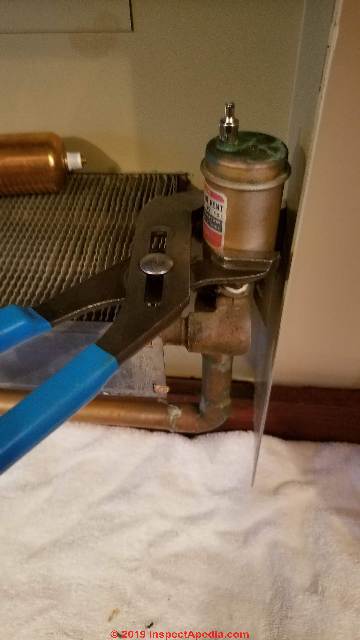
Take a look at our boiler photo shown here.
No surprise, the bottom pipe is cold AND a note someone inked on that circulator confirms that the cold pipe is named the same as the part of the building where the heating convector itself is cold.
Step 4. Is the circulator running?
Those little green Taco brand circulators are darn quiet but if you are very careful (or try a mechanic's stethoscope) you can hear the pump motor or feel its vibration.
It's running. If it's not then this isn't an airbound problem it's a control or circulator problem. But our circulator was running.
Step 5. Look for a clogged or stuck float valve or air eliminator.
We had just two cold convector units in the home so it was no problem to guess which one to examine.
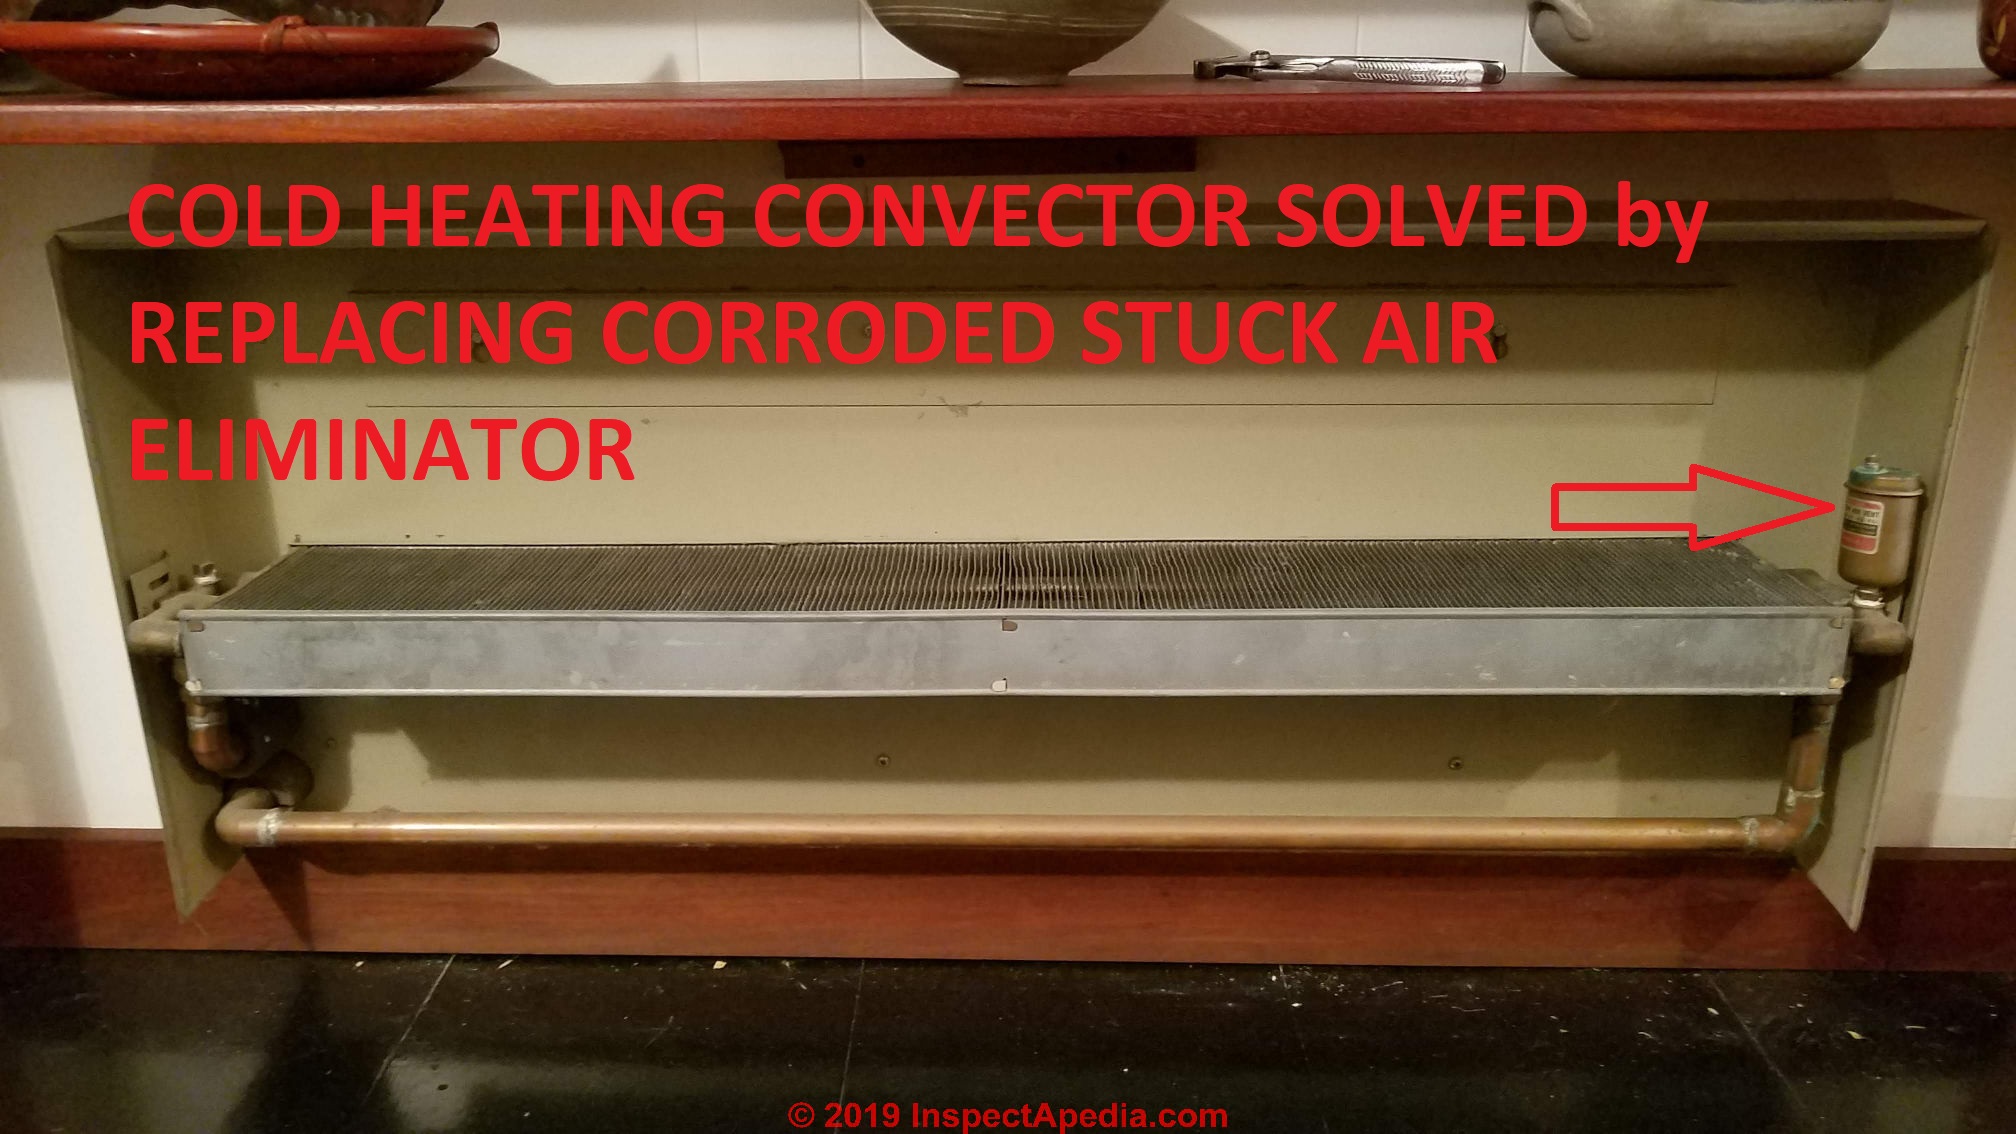
We pulled the cover off of the convector nearest the end of that heating loop or closest to the boiler to see if it had its own little air purger. If it didn't we'd have checked the next convector ahead of it.
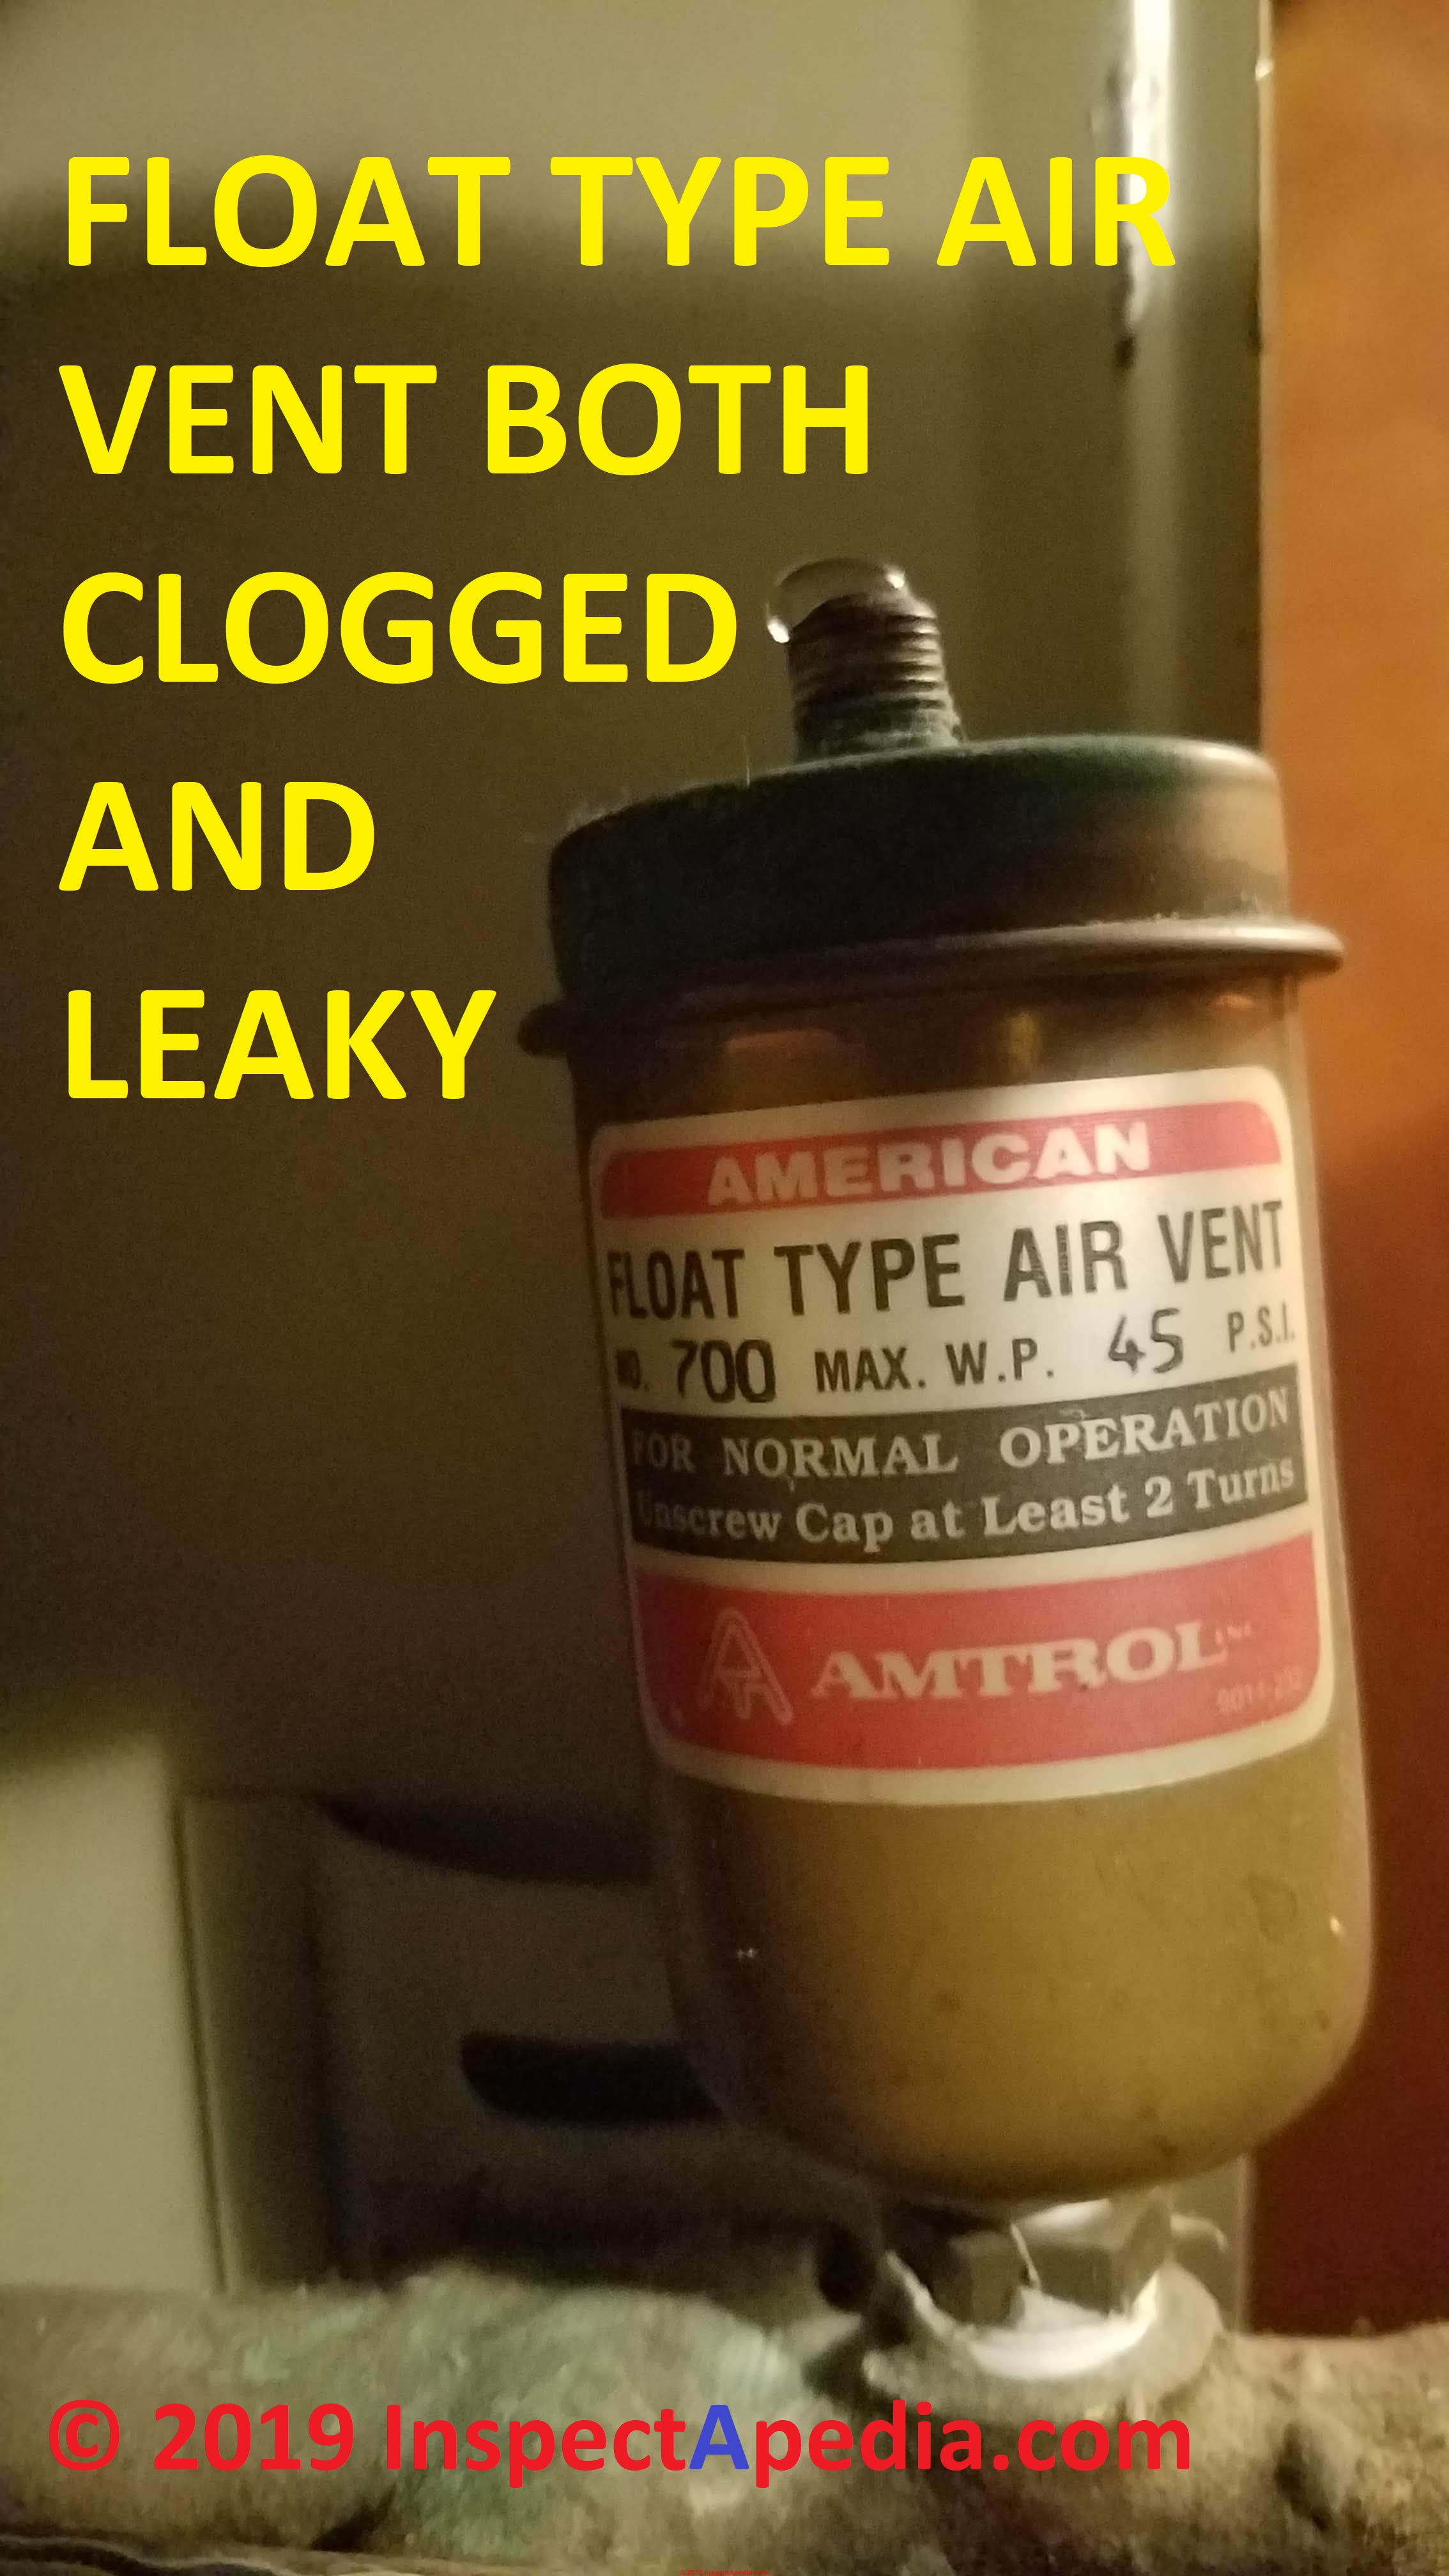
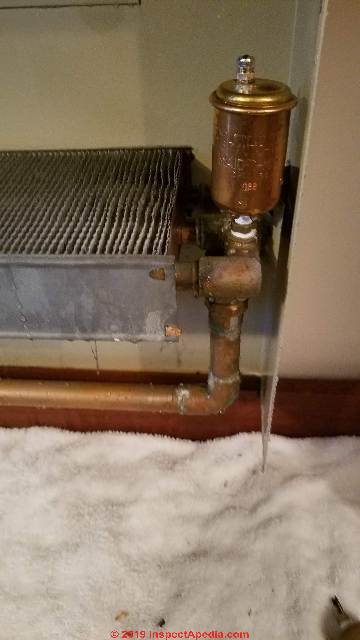
At the right end of the convector is our air vent or "air eliminator" or "float vent" - the cap was badly corroded and jammed in place - so we knew there was no way this vent could be working. It needed to be replaced.
Examine the air eliminator valve top:
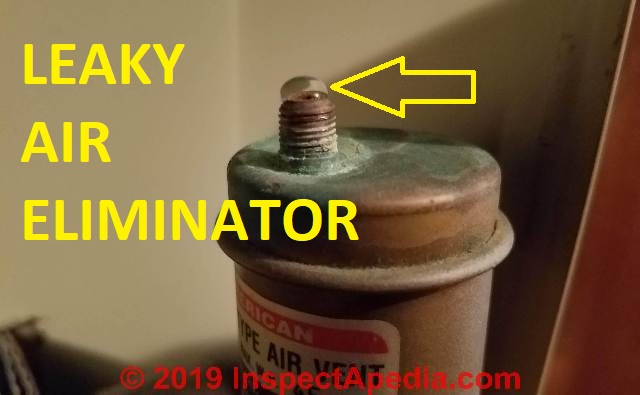
is there a valve cap or cover screwed onto the valve top? Yeah. And this one was full of corrosion. So we know this valve was leaking until it built up so much corrosion that it couldn't pass any more air - nor was it leaking any more water - at least not onto the floor below.
More detailed examples of clues telling us that an air vent has a history of leaking and may now be shot are
at LEAKY AIR VENT CLUES - details right at the vent tell you what's going on.
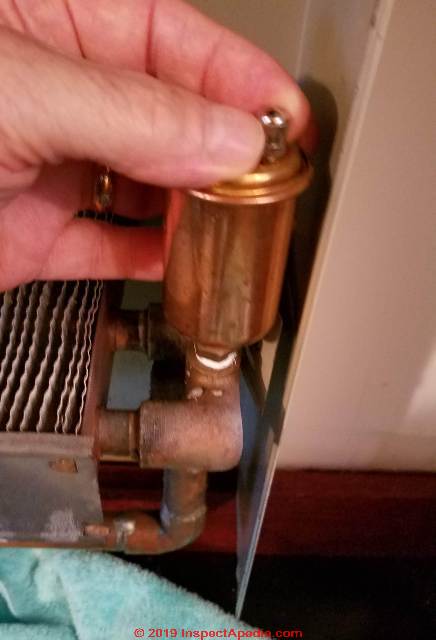
Loosen the valve cap on the air eliminator. Good luck Charlie. I had to use pliers to loosen the cap.
But we were in luck. There it was. The air eliminator is shown here after I tried loosening its corroded valve cap.
If we are lucky some air will hiss out and nothing else - no water, and we'd leave the valve cap loose and we'd have heat. But if there was a lot of crud and corrosion around the valve top then the chances of this happening are close to zero.
Instead the valve may drip - or worse, leak a spew of nasty hot water.
Watch out: do not even touch the valve cap before you have a spare valve cap at hand. Why?
Because once you loosen the little cap, if the valve leaks like mad you'll want to screw the cap back on to stop the leak while you take the later steps in this repair process. If you don't have a spare valve stem cap you can borrow one off your partner's car's tire. It's ok, you'll put it back later.
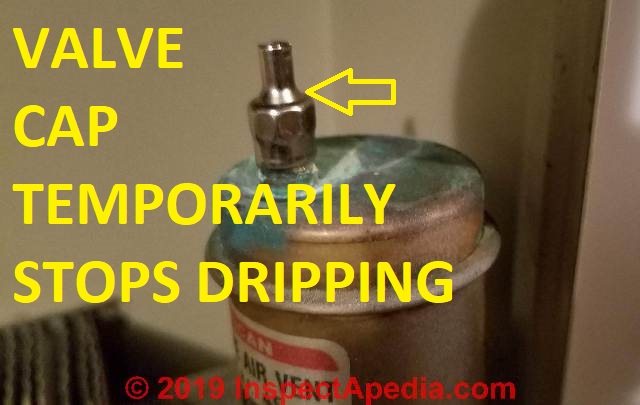
I had a spare valve cap - you can see it in place in the photo above.
So where are we?
The convector is still cold, probably still airbound. So I think that the air vent is clogged internally with crud and scale, preventing it from venting air in the convector unit and thus preventing hot water from circulating in this heating zone.
What Next?
So now you can either
Call your heating service technician - which I recommend if you're at your limit on plumbing repair,
Make your own repair if you're familiar with basic plumbing: you can read the following steps to see if you're confident you can follow them safely.
Watch out: don't try the repairs described in this article series if you are not familiar with basic plumbing repair procedures and don't try this repair without cooling down the boiler to avoid scalding burns. Call your plumber or heating service technician instead.
...
Steps in Replacing an Automatic Air Vent / Air Eliminator Valve
This procedure is for simple replacement of automatic air eliminators or auto-vents that may be found at a heating boiler, at zone valve piping, or at heating convectors or where these devices are sometimes found at one end of a heating baseboard.
Step 1. Buy a replacement air eliminator or float vent.
Get over to your local plumbing supplier or hardware store and pick up at least one new air eliminator or air float vent.
At the hardware store the first clerk I spoke with had no idea what I was talking about so I had to find someone older than nineteen.
The older employee knew perfectly well what an air vent or float vent or "Maid-o-Mist" vent was and went right to those little critters hidden under a dusty shelf.
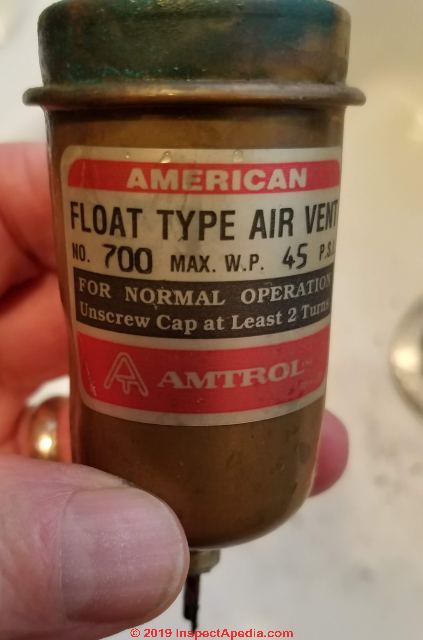
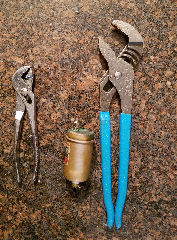
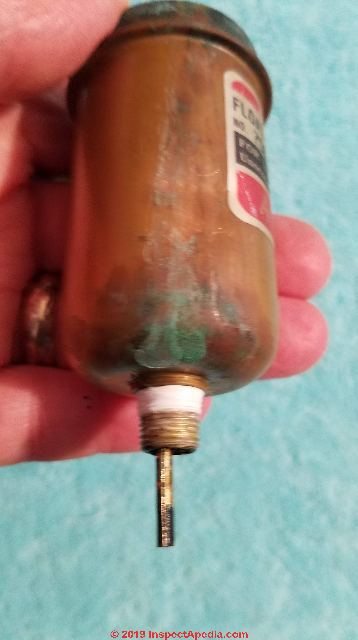
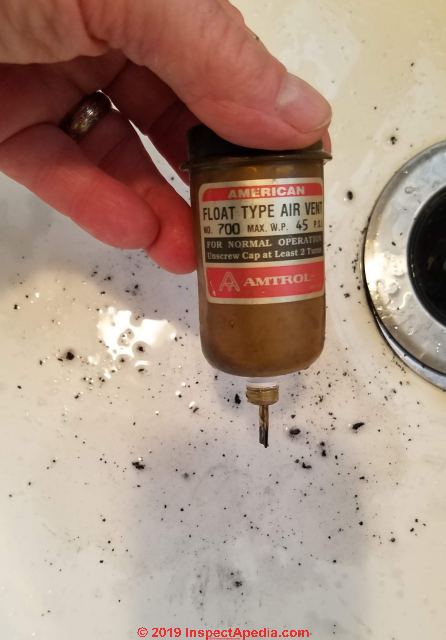
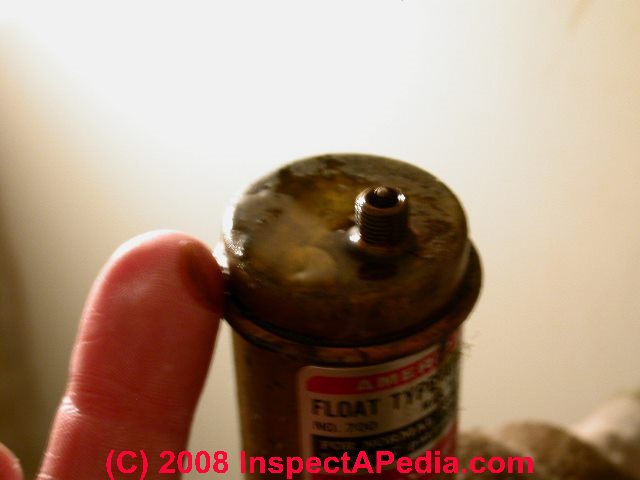
Just read the product label: our original vent was an American© Float Type Air Vent No. 700, produced by Amtrol.
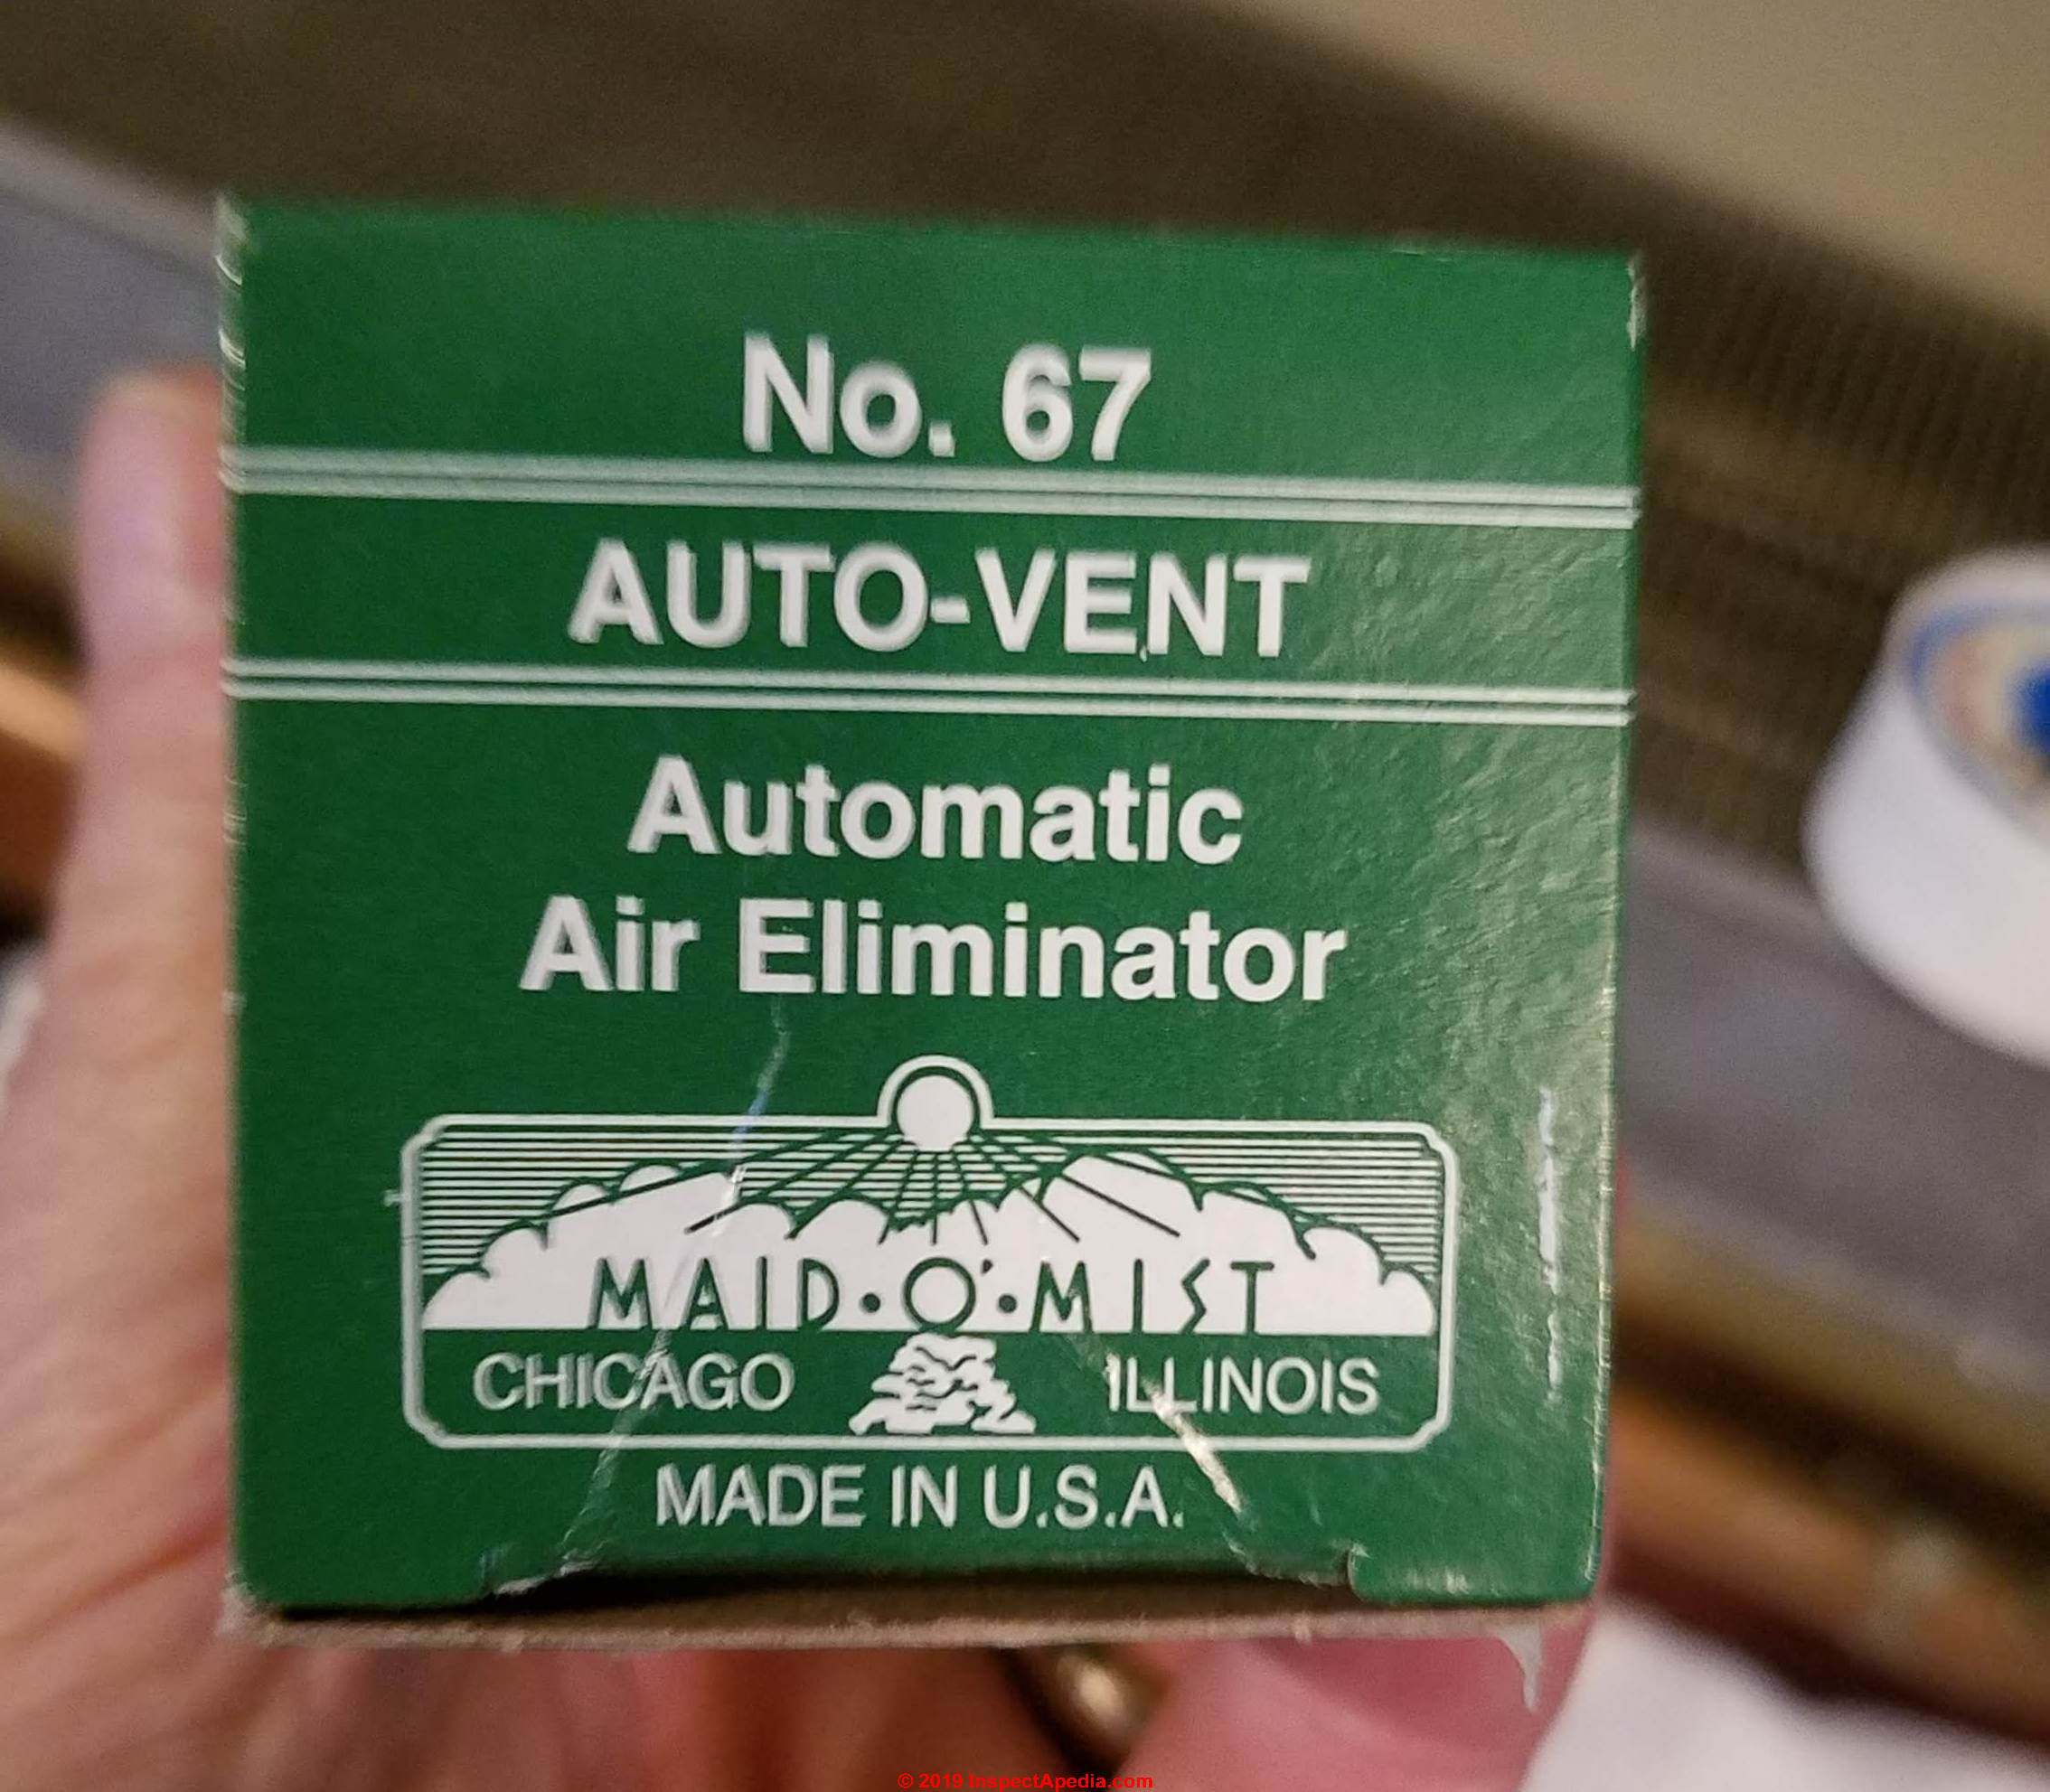
The hardware store stocks a different product that works perfectly well, the Maid-O-Mist No. 67 Auto-Vent automatic air eliminator. Both are shown below,.
Your new automatic air eliminator will sport its own little valve cap (that you'll leave loose if you read the instructions) so you'll soon be able to put that valve cap back on your partner's car's tire.
Step 2. Collect your tools & check for cool piping - for safety:
the original air vent should have been screwed in just hand tight but after 30 years of service it may be hard to turn so I used a pair of slip joint pliers to just slightly loosen the valve.
The smaller pliers were used to loosen the corroded valve cap on the original float vent back at Step 5 above - as it was stuck on.
Watch out: don't loosen anything yet.
I also had at hand teflon tape to seal the new air vent and a couple of towels, and I cleared away from the convector anything I didn't want to get wet.
Watch out: put down at least a couple of towels and drop cloth - and keep a clean towel for drying yourself off later as water's going to squirt soon, and DO NOT CONTINUE if the heating pipes nearby are Hot as you do not want to get shot in the face with 200 F smelly heating water.
Watch out: To avoid getting scalded or burned by hot boiler water you might want to turn off your boiler and cool it down before starting this repair.
Below in this article are more detailed steps on minimizing the water leakage and burn risk when changing out this little valve.
The alternative to "working live" on the system is to shut down your heat, cool it down, and drain pressure off of the system - a longer and more expensive process, if one that's less scary.
Step 3. Prepare the new float vent.
It's important to have the new air vent ready to install since soon you're only going to have one free hand.
This means read the instructions on the box - they're not too long. And follow them.
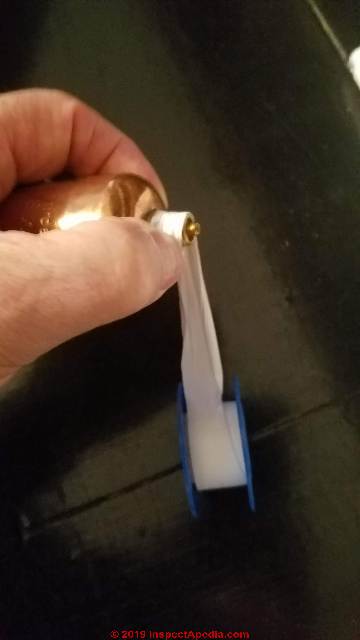
I wrapped the threaded fitting on the bottom of my new float vent using teflon tape.
I want three or four turns of tape on the fitting - enough that I'm sure it won't leak but not so much that I won't be able to thread it into its mounting opening.
If you are clever enough to wrap in the right direction (as shown) the tape will not tend to come off as you screw the new vent into the mounting opening on the convector unit.
Step 4. Slightly loosen the old float vent.
Watch out: just turn the vent with your pliers (counter clockwise - leftie loosie) until it begins to move.
Step 5. Remove the old air vent by unscrewing it
carefully so as not to strip any threads in the convectors cast-brass mounting fitting.
Watch out: Get ready. Water is about to spew like mad in a terrifying geyser.
DO NOT PANIC. You made sure the system was cool or cold, right? And not much water is really going to come out because
Step 6. Stop the water spout and catch your breath.
QUICKLY as soon as you've unscrewed the old air float vent you're going to drop the vent on the floor and immediately push a finger over the hole where it mounts to stop the spray.
The maximum pressure in a residential boiler is 30 psi. I'm really old - even an old guy in his seventies is strong enough to push a finger down to stop this water leak.

Watch out: you want to stop the flow of water quickly with a finger or thumb because if you let it run too long you might get hot water from the boiler coming all the way around to this point - you could get burned - unless you shut off heat a few hours ago and let the whole house get cold as all get-out.
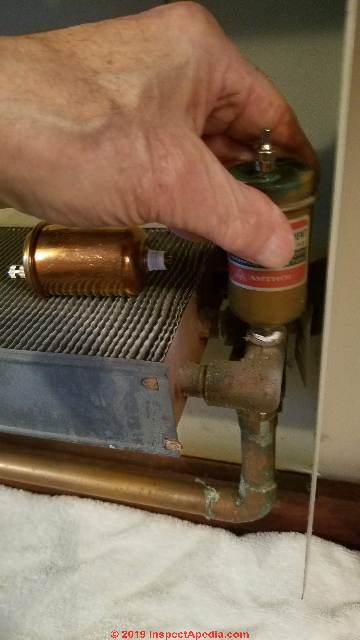
In my photo above the old vent is on the floor, the new vent is ready to install - just above my pinkie, and I'm using my left hand's forefinger to stop the water flow.
Don't get smug that so little water escaped - there's worse spray about to happen.
Step 7. Screw in the new air vent.
Assuming you're right-handed, pick up the new air vent in your right hand and hold it with the teflon-prepared screw-in stem down just over the hole and get ready.
Watch out: CALM YOURSELF because the second you remove that index finger water is going to spew into the air like mad. You want to screw in the new air vent quickly but calmly - as you do not want to cross-thread the vent's stem in the mounting hole.
Watch out: some heating systems are filled with an anti-freeze mix that may be toxic - wear appropriate protection and don't get this spray in your eyes nor mouth. Or shut down the system and relieve its pressure before starting this process. You can do that without fully draining the boiler.
Hold the vent upright and press it into the opening (this will be gratifying as it'll slow the water fountain. And thread it carefully and calmly into the opening without cross-threading it.
You'll be thrilled to see how quickly you stopped the water fountain.
Finish screwing in the new air eliminator by hand only - as per the instructions. If you had enough teflon tape on the fitting it won't leak.
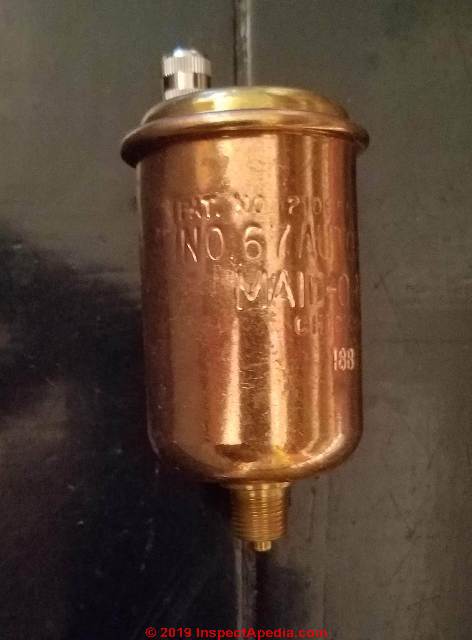
Our photo shows the new air eliminator (Maid-o-Mist float vent) in place.
I apologize for not having a photo of the geyser of water spewing out of the air eliminator fitting during this step but ... geez I just have two hands and I was kind-of busy. If you work with an assistant she can take photos of your geyser and perhaps you'll share that with our InspectApedia readers in a page bottom post.
Step 8. Dry up and dry off.
With the new air eliminator or float vent happily in place you can take a moment to dry yourself off and then dry up the floor around the work area.
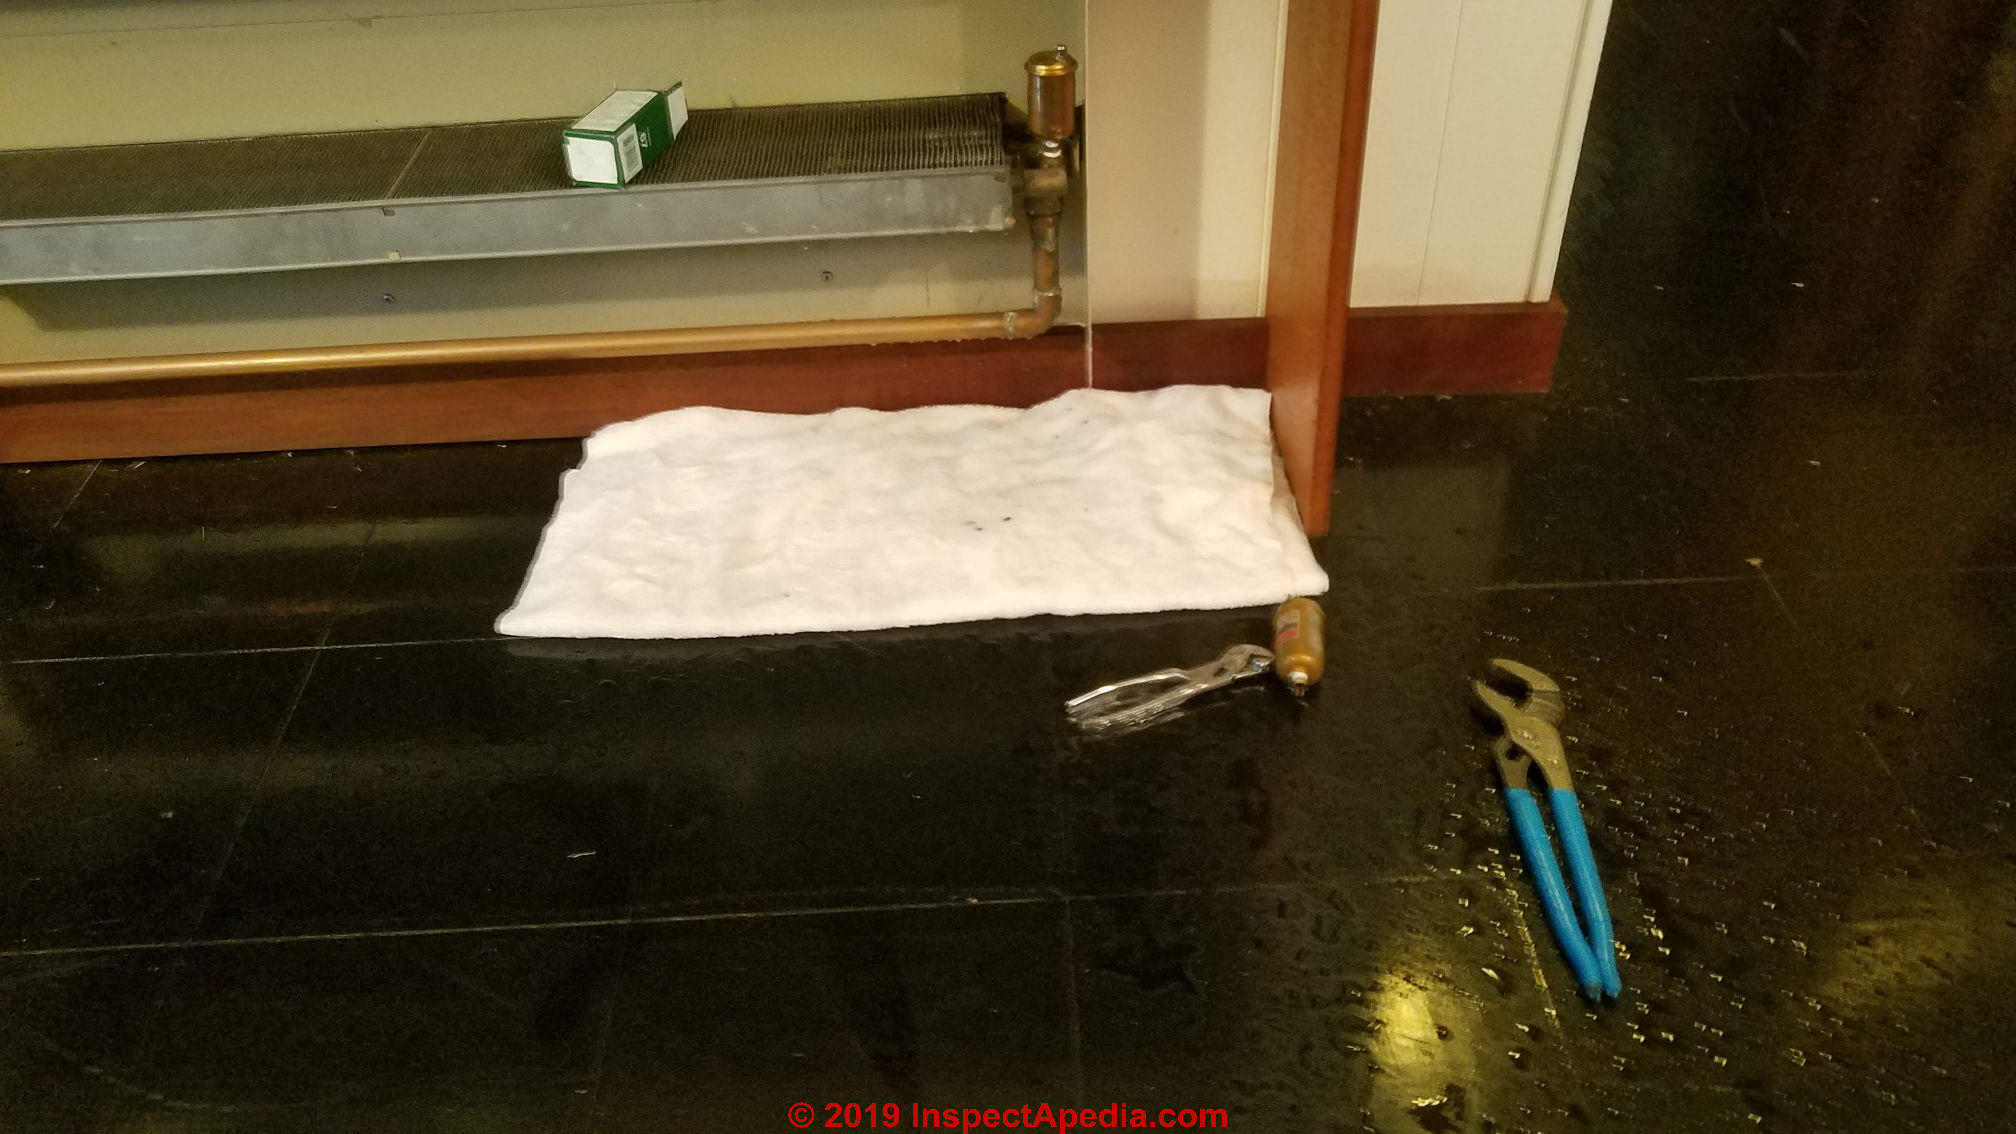
I took this photo so you can have an idea just how much water actually ended up on the floor - before I wiped-up. It's drops, not puddles nor oceans.
Work fast before the homeowner sees the mess you made. Dry your self first.
Step 9. Loosen the air eliminator or float vent cap screw.
Instructions may vary by product but typically they'll tell you to leave the valve cap two turns loose so that the float vent can actually vent air. You may hear a bit of air release but probably not since the air bound in the convector or near it has already spewed out along with that geyser of heating water.
Instead, if the problem was that this heater convector was air bound - as we thought - then it'll get hot quickly once the boiler is returned to service (if you ever switched it off).
If you were working on an air vent right at the heating boiler or one of its nearby zone pipes, you're finished.
If you were working at a covered heating convector or radiator then:
Step 10 If the Air Vent was at a covered heating convector
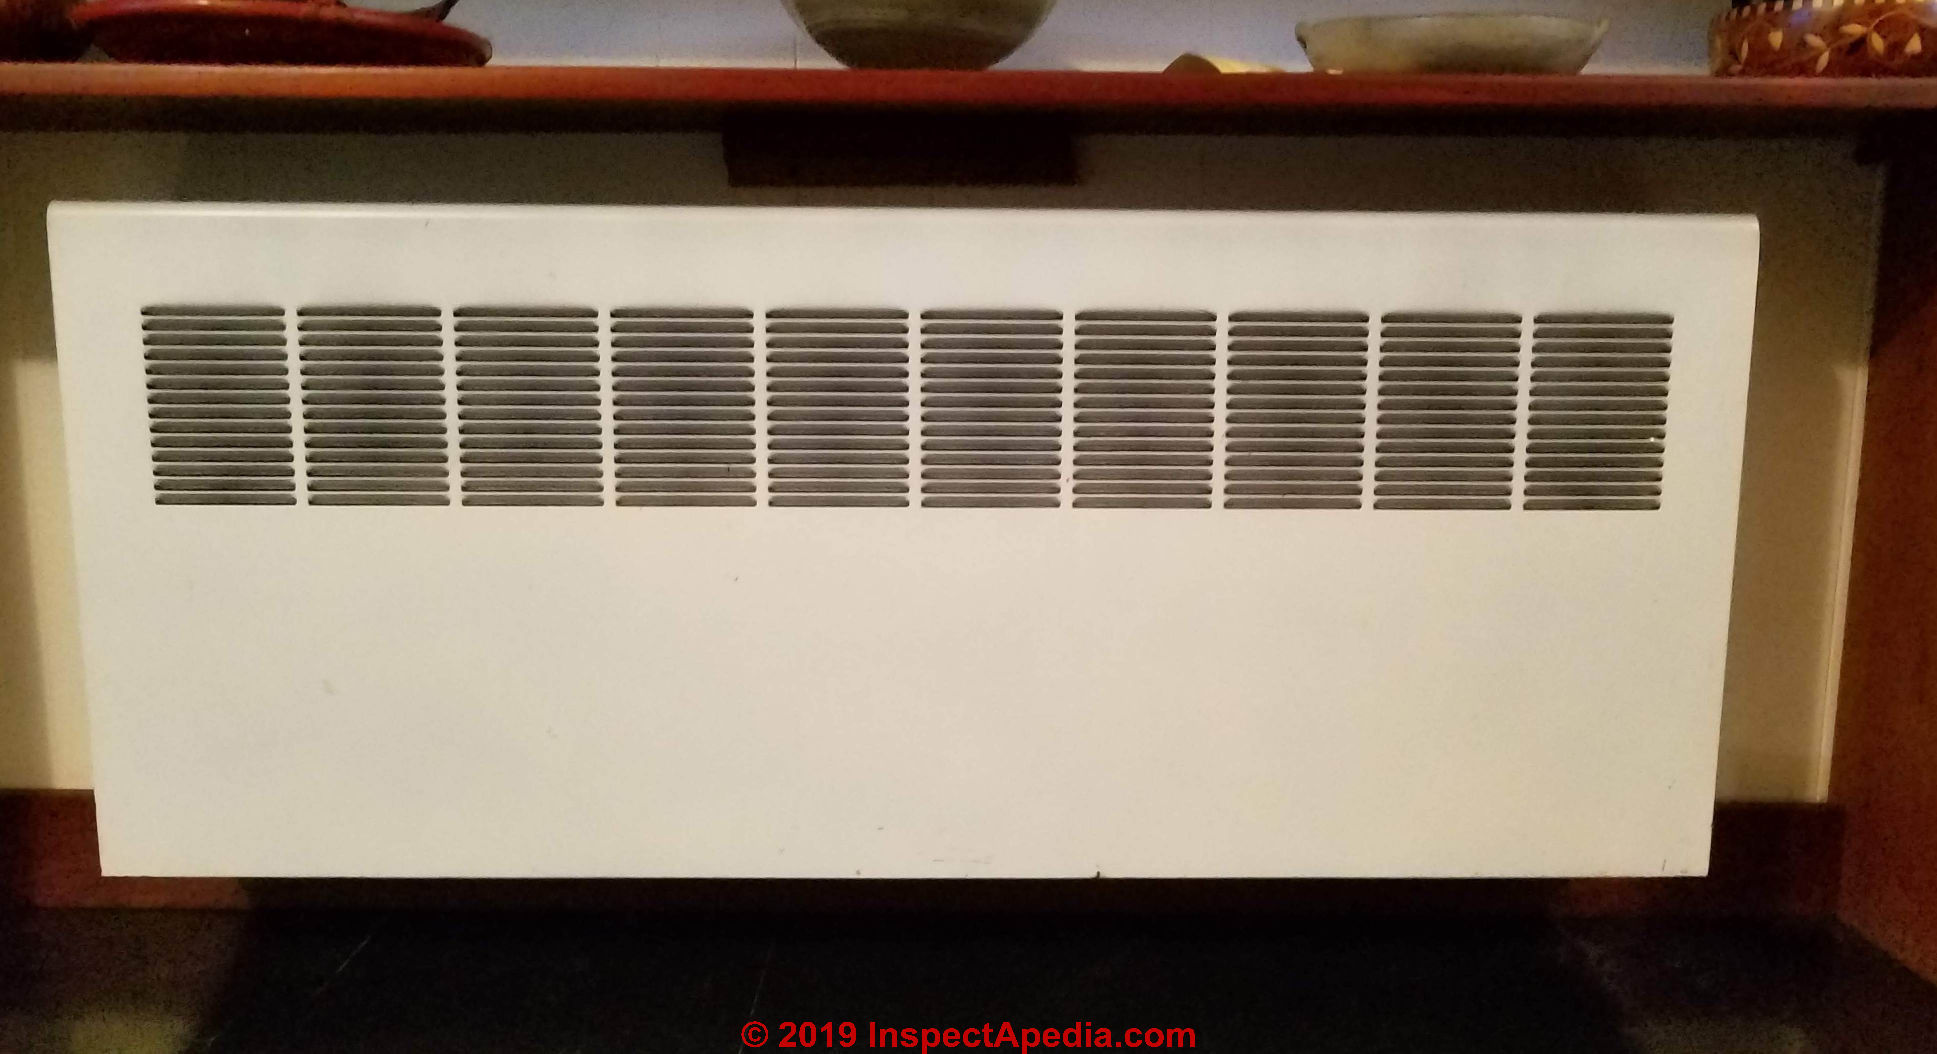
Replace the convector unit's cover and finish cleaning up.
Here is our convector heater, heating nicely and back in business.
...
Clues of a Leaky Air Eliminator
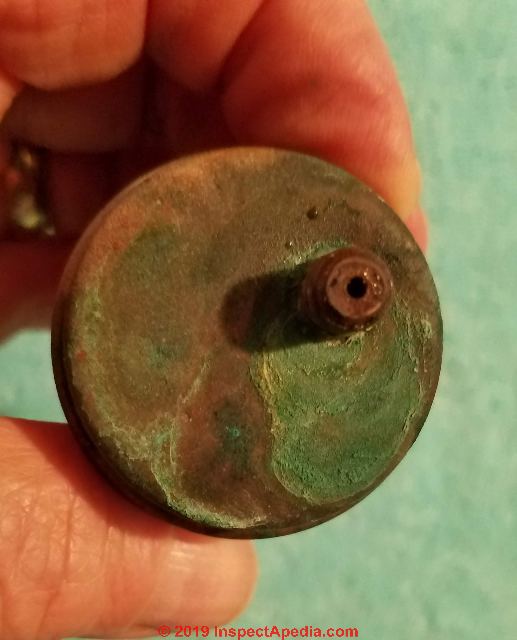
Besides guessing at an air-bound heating system and finding an air eliminator on a cold radiator, a look at the old air eliminator itself, after it has removed from the convector above provides evidence of its history of leaking.
The corroded valve cap is gone in the trash but notice the corrosion and leak stains on this device. It served faithfully for over 30 years before needing replacement.
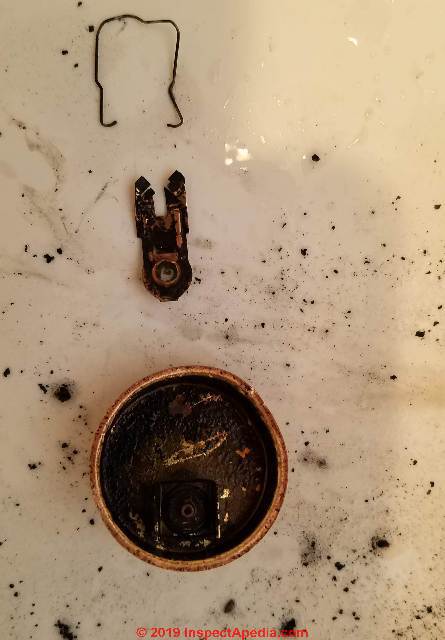
And shaking the device over a kitchen sink begins to dump bits of black debris: gasket material, scale, other goop, confirming that the internal mechanism of this float vent was clogged and completely jammed.
We disassembled the device to confirm that its internal float mechanism was indeed jammed with debris. Before you ask, no this is not a field-repairable device. If it's not working it gets replaced with a new unit.
...
Don't Get Burned nor Flooded: Tips for Replacing a Damaged or Leaky Air Bleeder or Vent
on Hot Water Heating Systems with a Minimum of Water Leakage, Spills, Mess or Panic
- If possible, wait (it's not usually an emergency)
until a service procedure requires that the heating system is to be shut down and drained.
A hot water heating system in that condition won't spill any water when you then replace radiator control valves or air bleeder vent controls. - But you don't have to wait.
If you have not drained the heating system (which we want to avoid so that we don't have to go through a more complete air bleed procedure after installing new bleeder vents), it is still possible to remove and replace an air bleeder vent valve with a minimum of spillage, mess and hassle. - The best time to remove the old and install a new air bleeder vent
on an active hot water heating systems is with the heat shut off and the system cooled down to avoid getting scalded by hot water and to minimize the water spillage. - Check that you have purchased the proper type and size of air bleeder valve controls
- compare the diameter of the threaded valve base to the threaded valve base already in place on the radiator or baseboard or piping.
Usually these air bleeders on residential heating systems are 1/8" or 1/4" diameter NPT (national pipe thread).
Most of them are 1/8" standard pipe threads. But double check before taking anything apart. - Obtain the new float vent valve(s) and prepare them
with teflon tape or pipe dope before attempting to remove the old valve. Having the new air vent completely ready to screw in place will minimize the chances of spilling water around the baseboard or radiator where work is to be performed. - An expert heating technician can assist by temporarily dropping heating system pressure
so that the old valve can be removed and the new one installed with minimum water spillage. - Remove the old valve and quickly screw the newly
prepared air vent in place by hand - this will stop water from squirting all over the place. Don't panic or drop the valve into some place where you can't retrieve it. - If you're worried about being clumsy,
have a couple of extra air bleeder valves or simple threaded pipe plugs of the proper size on hand so that you have something to screw into the radiator opening to stop leakage if you're having trouble with the old or new air bleeder valve itself. - Finish tightening the air bleed valve
by hand as per the instructions- don't over-tighten or you may break the part.
For air vents with a water/air directing spout, be sure that you finish turning the new part with the spout pointing down, or to an accessible location, or in a direction recommended by the air bleeder manufacturer.
...
What Kind of Air Vent is Installed?
There are two basic air vent types used on hot water heating systems: manual air bleeders that are opened by a small screw or handle, and automatic float-type air eliminators.
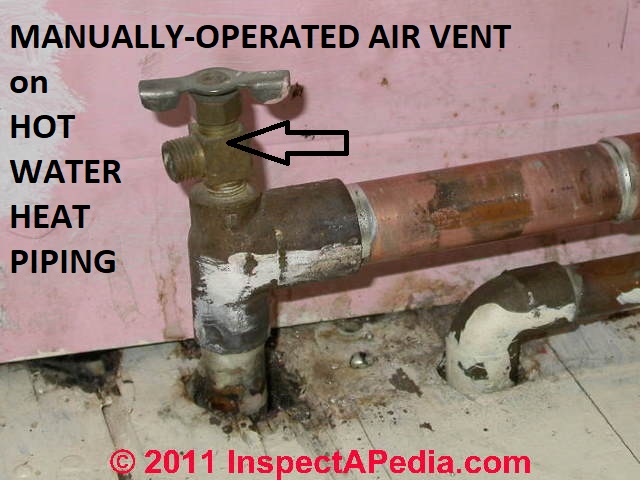 If your air vent looks like the little device shown just here it's a manually-operated air vent - and this page will tell you what you need to know.
Is there a little cap on top of the air bleeder?
Many automatic air bleeders (shown below) use an internal float and an air valve stem that is about the same as the valve stem of an automobile tire valve or bicycle tire valve.
The cap over these valves looks just like the cap on the valve stem on a tire (it is).
But on an air bleeder the valve cap is normally left loose so that when the valve has accumulated enough air to move the internal float the valve can open to expel the air.
If the valve cover is screwed down tightly, or if the valve cover has become clogged with mineral debris left by leaking water, air cannot be released. Loosen the valve cap.
If air escapes when you loosen the valve cap on the air bleed valve, that's good.
If the valve cap on your air bleeder is badly corroded (photo above left) the valve probably needs to be replaced.
If the automatic air purge valve has become corroded and/or leaky: the air bleeder valve is of the automatic float and canister type rather than manual type; among these.
If your air vent looks something like the device shown above, it is an automatic air eliminator or "float vent" that we discuss in more detail on this page.
Automatic air bleeders, also called float vents or air eliminators, in order to work, require that their little screw cap (it looks like and is a tire valve stem cap) be left loose so that the float inside the automatic air purger/bleeder can release air when needed. Typically the cap is left two turns loose from fully screwed in.
But on some of these devices the float eventually sticks or becomes waterlogged and the automatic air bleeder dribbles and leaks, as you can see in our photos above.
Usually automatic float type air bleeder valves are installed at easy-to-access spots such as at heating convectors (shown above on this page) or at the boilerwhere it's easy to see and replace leaky ones during boiler service.
I don't recommend using float type automatic air bleeders at heating baseboards inside the building at any location where they may be both hidden by baseboard covers and hard to get-to and where they can leak into and damage the building for some time before anyone notices.
...
Continue reading at AIR-BOUND HEATING SYSTEMS - topic home, or select a topic from the closely-related articles below, or see the complete ARTICLE INDEX.
Or see AIR BLEED VALVE INSTALLATION FAQs - questions & answers about air bleeder valves on hot water heating systems, posted originally at this page.
Or see these
Recommended Articles
- AIR BLEEDER VALVES - home
- AIR BLEEDER VALVE FUNCTIONS
- AIR BLEED VALVE INSTALLATION
- AIR ELIMINATOR / FLOAT VENT REPLACEMENT
- AIR BLEED VALVE LEAK REPAIR
- AIR BLEED VALVE SOURCES
- AIR-BOUND HEATING SYSTEMS - home
- AIR ELIMINATORS for POTABLE WATER SUPPLIES to remove air from water supply systems, piping, fixtures.
- AIR SCOOPS PURGERS SEPARATORS
- RADIATOR PLUG REMOVAL
- RADIATOR VALVES & HEAT CONTROLS
- WALL CONVECTORS HVAC
Suggested citation for this web page
AIR ELIMINATOR / FLOAT VENT REPLACEMENT InspectApedia.com - online encyclopedia of building & environmental inspection, testing, diagnosis, repair, & problem prevention advice.
Or see this
INDEX to RELATED ARTICLES: ARTICLE INDEX to HEATING RADIATORS
Or use the SEARCH BOX found below to Ask a Question or Search InspectApedia
Or see
INDEX to RELATED ARTICLES: ARTICLE INDEX to HEATING BOILERS
Or use the SEARCH BOX found below to Ask a Question or Search InspectApedia
Ask a Question or Search InspectApedia
Share this article:Try the search box just below, or if you prefer, post a question or comment in the Comments box below and we will respond promptly.
Search the InspectApedia website
Note: appearance of your Comment below may be delayed: if your comment contains an image, photograph, web link, or text that looks to the software as if it might be a web link, your posting will appear after it has been approved by a moderator. Apologies for the delay.
Only one image can be added per comment but you can post as many comments, and therefore images, as you like.
You will not receive a notification when a response to your question has been posted.
Please bookmark this page to make it easy for you to check back for our response.
IF above you see "Comment Form is loading comments..." then COMMENT BOX - countable.ca / bawkbox.com IS NOT WORKING.
In any case you are welcome to send an email directly to us at InspectApedia.com at editor@inspectApedia.com
We'll reply to you directly. Please help us help you by noting, in your email, the URL of the InspectApedia page where you wanted to comment.
Citations & References
In addition to any citations in the article above, a full list is available on request.
- "Residential Hydronic (circulating hot water) Heating Systems", Instructional Technologies Institute, Inc., 145 "D" Grassy Plain St., Bethel, CT 06801 800/227-1663 [home inspection training material] 1987
- Installation Guide #200 for Residential Hydronic Heating Systems, The Hydronics Institute, 35 Russo Place, Berkeley Heights, NJ 07922
- Our recommended books about building & mechanical systems design, inspection, problem diagnosis, and repair, and about indoor environment and IAQ testing, diagnosis, and cleanup are at the InspectAPedia Bookstore. Also see our Book Reviews - InspectAPedia.
- In addition to citations & references found in this article, see the research citations given at the end of the related articles found at our suggested
CONTINUE READING or RECOMMENDED ARTICLES.
- Carson, Dunlop & Associates Ltd., 120 Carlton Street Suite 407, Toronto ON M5A 4K2. Tel: (416) 964-9415 1-800-268-7070 Email: info@carsondunlop.com. Alan Carson is a past president of ASHI, the American Society of Home Inspectors.
Thanks to Alan Carson and Bob Dunlop, for permission for InspectAPedia to use text excerpts from The HOME REFERENCE BOOK - the Encyclopedia of Homes and to use illustrations from The ILLUSTRATED HOME .
Carson Dunlop Associates provides extensive home inspection education and report writing material. In gratitude we provide links to tsome Carson Dunlop Associates products and services.
 |
HOME | ABOUT | ASK a QUESTION | CONTACT | CONTENT USE POLICY | DESCRIPTION | POLICIES | PRIVACY | |
| © 2026 - 1985 Publisher InspectApedia.com - Daniel Friedman | |||||||||