
InspectAPedia®FREE Encyclopedia of Building & Environmental Construction, Diagnosis, Maintenance & Repair |
Question? Just ask us! InspectAPedia
|
 Deck Guardrail or Stair Railing Baluster Installation Procedure
Deck, Stair, Porch Design-Build Online Guide

- POST a QUESTION or COMMENT about deck construction
Guardrail baluster installation: how to buy or make and then install balusters to enclose a deck or stair guardrailing.
We describe baluster materials, choices, and how to space the balusters, giving three options for handling tricky baluster spacing problems.
The article continues with details and pros and cons for several methods for attaching balusters to the top and bottom rail or to the deck, ramp, porch or balcony structure itself.
We explain why some popular pre-cut bottom guardrail designs invite rot and are actually unsafe. This article series describes critical safe-construction details for decks and porches, including avoiding deck or porch collapse and unsafe deck stairs and railings.
InspectAPedia tolerates no conflicts of interest. We have no relationship with advertisers, products, or services discussed at this website.
- Daniel Friedman, Publisher/Editor/Author - See WHO ARE WE?
Deck Guardrail Baluster Installation Steps
Balusters are commonly made with 2x2 lumber and installed vertically. You can buy precut 2 x 2s or milled balusters in lengths that will fit standard railings.
If you want to save a few dollars, you can cut your own balusters from long 2 x 2s. If you have access to a table saw, you can also rip balusters from straight 2 x 4s or 2 X 6s.
Another choice for wood balusters is 1 X 4s or 1 x 6s. If you want to maximize privacy, use wide boards and space them closely together.
If you cut your own balusters, make sure they are all the identical length. The most efficient way to do this is to use a power miter saw and construct a simple stop block.
Lengths of baluster material are fed under the saw against the stop block, making rapid chopping of equal lengths easy and uniform.
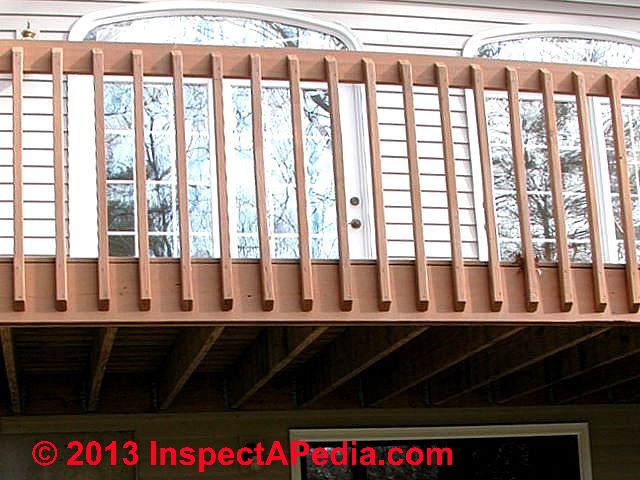
Balusters attached to the sides of rails and to the exterior of the rim joist (page top photo and photo at left) look much nicer (and shed water better) if the ends are beveled.
Keep the size and angle of the bevels consistent from baluster to baluster by making the end cuts using a power miter saw.
This installation method is rapid and easy because you don't face the difficulties of abutting and securing balusters to the under-side of the rail nor to the top of a horizontal guardrail bottom segment. You may need to pre-drill balusters to avoid splits.
If post bottoms will be visible on the deck, try to match the proportion of the bevels on the posts with those on the balusters.
How to Calculate the Deck Guardrail Baluster Spacing

Building codes usually allow a maximum gap of 4 inches between balusters.
The metal balusters shown here are unsafe and improper, with a gap of more than 5-inches of open space.
Chances are good that using that 4-inch gap will not result in evenly spaced balusters across the entire balcony, porch, or deck surface.
Common solutions to this little problem include:
- Baluster Spacing Method #1: Ignore it
- almost: space the balusters 4" on center across the entire run of guardrail making sure that the last opening is less than 4" - don't leave a large end gap.
This is a bit ugly because you can end up with a funny 1-inch gap at one end of the guardrailing.

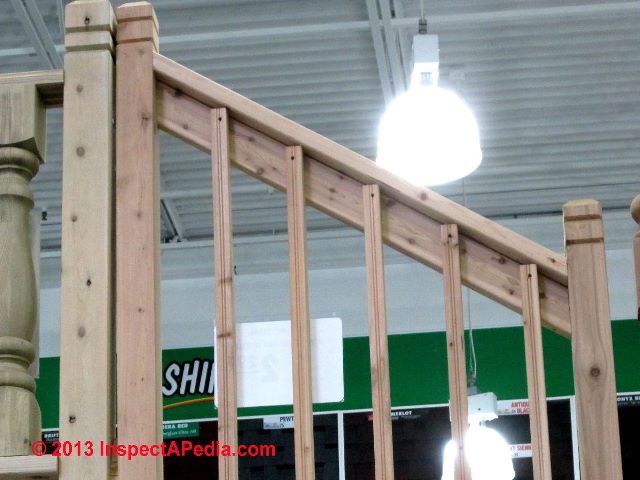
Photo above: example deck guardrail baluster spacing at a Menards store in Duluth, Minnesota. Notice that the builder used a uniform 4" spacing and split the odd space amount into two smaller gaps between baluster and post at the two ends of the guardrail section.
- Baluster Spacing Method #2: split the difference.
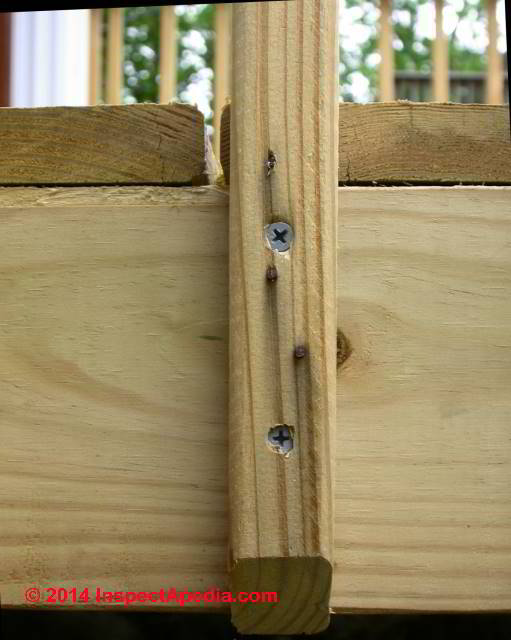
Measure the distance and split the odd space between the left and right ends of the guardrailing. Again make sure the end gaps are 4" or less. This is my preferred approach and is shown at left.
This method is shown at a guardrail and baluster demonstration at Menards in Duluth, MN (photo at left).
If the split-the-difference approach results in a too-small end space problem you can do what roofers do to adjust shingle courses near the ridge.
Starting several baluster gaps away from the ending newel posts at either run, adjust the baluster spacing in by a small amount, say 1/8? or 1/4", such that you end up with the desired end or last space.
A 1/4" adjustment will give you an extra 1-inch in the last space, and so on.
- Baluster Spacing Method #3: calculate an exact spacing.
Calculate a non-standard baluster spacing of something less than 4" so that all baluster space openings are uniform across the entire run.
In my opinion (DF) this is more trouble than it's worth, and you'll be sorry, but for those who care we outline the simple arithmetic below.
For consistent spacing, do the following math. Add the width of one baluster (I 1/2 inches for a nominal 2 x 2" baluster) to the maximum allowed spacing (typically, 4 inches). This total (the width of an individual baluster plus the 4-inch desired opening) becomes the unit width used in calculations that follow.
Divide this total (5 1/2 inches, in most cases) into the measured distance between two posts (68 1/2 inches for example). Finally, round up the result (12.45) to the next highest whole number (here, 13) to find the number of balusters you will need between the posts.
Now that you have the number of balusters, you can figure the exact baluster spacing.
Multiply the number of balusters (13) by the width of one (13 x 1 1/2 inches = 19 1/2 inches). Subtract that number from the distance between the posts (68 1/2 - 19 1/2 = 49) and divide the result by the total number of spaces, which is always one more than the number of balusters (thus, 49 divided by 14 = 3 1/2 inches).
The result is the ideal spacing between balusters. Make a spacer as close to that figure as you can (if necessary, convert the number to its fractional equivalent). Double-check your math by making sure your result is less than the maximum baluster spacing allowed by code.
Watch out: If the distance between posts varies by a very small amount, you should not have to calculate different spacings for the balusters. People are not likely to notice small differences in the spaces between balusters.
But you must keep all the gaps between balusters, or balusters and posts, at or below the maximum allowed by your code. But if the distance between post spacings is too large this whole scheme will have been a lot of trouble for nothing.
For these reasons, on a large deck with imperfect post spacings or other obstructions in the baluster and guardrail path, I recommend using option 1 or 2 above - much simpler and just about equal in cosmetic appearance.
Framing Tip: for Spacing Deck Railing Balusters Uniformly Use a Spacer Block
Attaching balusters will proceed much more quickly if you make a spacer.
Rip a piece of plywood or 1 X 4 or 1 X 6 lumber to match the desired space between rails. Make the spacer long enough to span from the top to the bottom rail. Press the baluster against the spacer and the neighboring baluster or post as you drive the fasteners.
How to Attach the Deck Guardrail or Stair Rail Balusters
How to Build Wooden Guardrails with Balusters Screwed to the Sides of Top & Bottom Rails
For strong, easy-to-assemble railings, it is hard to beat the system, install posts, add rails on edge, and finish with balusters. In some areas, building codes insist on this technique.
Our photo (above, also photographed at Duluth Menards) shows the top baluster connections along a stairway guardrail.
The square cut end of the baluster abuts the under side of the deck (or in this example stairway) guardrailing flat top cap and the baluster is fastened to the guardrail using construction screws.
Notice that the Menards installers building this example used Method #1, the "ignore-it" rule of baluster spacing - they started at the left with 4-inches of spacing and let the right end of the run come out however it might.
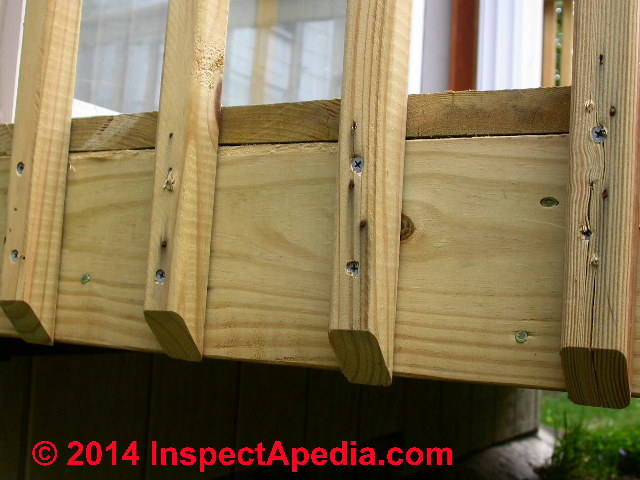
At its bottom the beveled end of the baluster faces down and out as shown at left.
Notice that the installer used at least two construction screws at the bottom of each balulster, connecting it to the deck rim joist.
Watch out: don't just nail balusters to the rim joist. Our field inspections often find that balusters have come loose and might easily fail if someone, such as a child, simply falls against the guardrail. That's an unsafe design.
If you are not installing a top cap along the deck guardrail then you will want to use cut beveled ends at both top and bottom of the balusters and to connect them as shown in our Baluster Spacing Method #2 above.
Begin the installation by grasping a baluster and the spacer in one hand. Hold the spacer tight against the post while driving two screws or nails into each end of the baluster.
Move the spacer to the other side of the baluster, pick up another baluster, and repeat the process. Having a helper hold each baluster in place while you work the drill for pilot and screw driving can speed the process.
Baluster Drilling Tips: If you mark and pre-drill pilot holes for the baluster screws ahead of time with all of your balusters laid flat on a work surface the job will go still faster.
Lining up the baluster screw location on a consistent horizontal plane is worth the effort as it will be quite noticeable if your screws are not at consistent locations across the deck.
Finally, don't pre-drill your balusters by placing them directly on the deck surface. It's tempting but you'll drill holes all over the deck.
You will see this mistake and will be sorry as soon as you pick up the balusters.
How to Cut the Correct Top & Bottom Rail Lengths of a Guardrail
The top and bottom rail length will need to be longer than the space between the supporting posts if you are going to mortise the rail ends into the posts. Increase the railing length by more than the exact measurement so that you can trim the rails for an exact fit during assembly.
How to Build Wooden Guardrails with Balusters Placed Between Top Rail & Bottom Rail
Assemble the Deck Railing a Section at a Time
If your code is less strict, and your taste differs, you may prefer the look of a railing with balusters installed between flat rails. This type of railing takes more time to build, and it works best when the posts are perfectly plumb and evenly spaced.
These railings are best assembled in full sections, which then are attached as units between posts.
Balusters should be cut to identical lengths. To keep them from spinning in place, you can cut a 1/2-inch-deep channel along the underside of the top rail just wide enough for the balusters to fit.
(Or plan on toe-nailing each baluster with galvanized finishing nails.
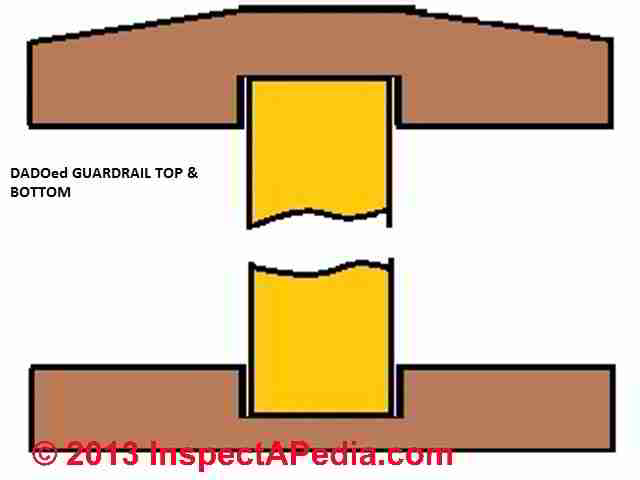
Some writers on deck building suggest that to strengthen the assembly, plan to set the rails into 1/2-inch- deep dadoes cut into the bottom guardrail as well.
In fact pre-dado-cut top and bottom railing assemblies are available at most lumber suppliers so don't use this project as an excuse just to buy a new router.

If you use this double-dado approach shown above, the dados are 1/2" deep so the the balusters should be cut 1 inch longer than the space between the horizontal railings.
The dadoes are easiest to cut with a router or table saw before the posts are installed.
Watch out: The dado 'ed guardrailing approach works very nicely for constructing the top railing of a guardrailing or stair railing, but for the bottom rail ... well that's another matter.
I do not recommend this approach (shown above) because the dado groove in the bottom rail, facing up, will collect water and speed rot, splits, and aggravation throughout the entire (and short) life of the railing.
Watch out: break-away balusters due to rot or poor connections are very dangerous and can permit someone to fall off of the deck, ramp, or stairway the balusters were intended to enclose.
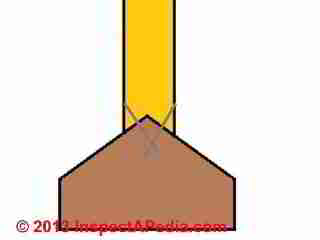
Your guardrail and its balusters along a deck or stairway will be more durable if the bottom ends of balusters abut on a flat, or better still, double-angled bottom rail that provides better drainage.

The flat abutment is easiest to assemble. Just drill and screw up through the bottom of the rail into the bottom of each baluster.
You'll need two galvanized finishing nails in the top end (and maybe bottom) of the balusters to prevent them from rotating in place (a problem the stupid dado-approach does solve, I admit).
If you use a flat bottom rail (shown at left), before setting the rail assembly in place between its supporting posts, use a block plane to chamfer the upper edges of the bottom rail.
For a well-drained, long-lasting bottom baluster rail assembly you don't need a slope as steep as I've shown in the sketch (left) though the steeper you make the slope the more resistant the baluster will be to rotation.
Use 4d galvanized finishing nails to secure the baluster bottoms in place.
You'll want to pre-drill the holes for your galvanized 4d or 6d finishing nails used to secure the baluster bottoms to avoid splits.
When all of the parts have been cut, assemble a railing section on the deck.
Position the balusters with a spacer.
Drill a pilot hole at each baluster location, and then attach the baluster with 3-inch deck screws driven through the top and bottom rails into the center of the baluster.
Once the balusters have been attached to the rails, lift the section into place, sliding the rail ends into the post dadoes if you took the dado approach. (Ick!).
Fasten the railing assembly to the posts with 3-inch deck screws driven at an angle through each rail into the post.
...
Reader Comments, Questions & Answers About The Article Above
Below you will find questions and answers previously posted on this page at its page bottom reader comment box.
Reader Q&A - also see RECOMMENDED ARTICLES & FAQs
Do I glue the balusters or pickets?
I’m using 6 fr love handrails the kind of boards that have top and bottom balusters r pickets. I saw they make a sleeve r cap for the rail. Where can I buy these caps for each end I’d railing my boards have holes in top and bottom the picket fits in holes.
Do I glue pickets in top and bottom holes with screws. Thanks. - On 2019-10-14 by Alaine -
Reply by (mod) -
Gluing the vertical ballusters in a typical guardrail is difficult - especially if you're using treated wood that's still wet - and worse, may be mechanically too weak and thus unsafe.
Use toe nails or better, construction screws; I prefer coated deck screws that are thus intended for treated wood and exterior use.
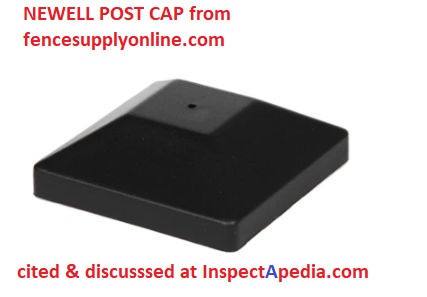
Caps for top and bottom posts or newells that fit a 4x4 are sold at lumber suppliers and online such as this post cap from fencesupplyonline.com
Easy ways to get uniform guardrail baluster spacing
If you get a heavy duty elastic roll and mark it every 3 inches, you can attach it between your posts, stretching enough so you have less than 5 inches or less between two marks.
Center the balusters on these marks. - On 2019-05-13 by Anonymous -
Reply by (mod) -
Interesting, thanks for the suggestion.
When I build a guardrail I often use a simple 5 inch spacer (or what local codes require for spacing) .Check that the starting post is plumb (vertical) in both directions. Then hold the space to give the desired gap as each baluster is marked or placed.
Check every few balusters to be sure you're keeping them vertical.
Balusters attached to outside surface of deck & railing: may not be safe
Your balusters (as shown) all are attached from the outside of the railing, deck etc. Over time, these balusters loosen.
When a child falls against the loosened baluster, the balusters will give and the child falls thru (to injury). Better to have the balusters fastened from inside of the railing or deck.On 2018-12-03 by Rttrack - -
Reply by (mod) - balusters on the inside surface of railings are safer
Good suggestion,I agree. Inside balusters, all else being equal, are stronger and safer. And a bit more work.
The attachment of the tops of balusters to the inner face of a guardrail is easy as pie but attaching the bottoms of balusters to the inner face of a deck perimeter joist would be rather troublesome and just tacking those baluster bottoms to the deck surface is not likely to be strong-enough.
In this deck baluster installation article I'm showing common practices that are also permitted, and common: easier to build, no bottom rail, less skill, so all the more reason to take extra care with the number, type, and location of the fasteners.
Watch out: Outside-attached balusters depend entirely on the fasteners, so we pay extra attention to that connection.
Use construction screws, never just finishing nails and never just a power nailer.
Be sure there are splits in the balusters lest the connection fail
Use 2 or more screws as space permits at the top and bottom of each baluster
Watch out: Inspect wiith care both after installation and periodically: I've often found loose or disconnected deck guardrail balusters.
What's the minimum depth for interior staircase balusters?
Is there a minimum depth for interior staircase baluster's? I would like to install 11/2 wide by 3/4 thick white pine, with 4 in. opening between. - on 2017-02-15 by drtomj@hotmail.com -
Reply by (mod) -
Dr tom
I'm not clear on what dimension you refer to by the term "depth" - but the 4" opening between space is within common guidelines.
Here's Simple math for baluster opening and even spacing
math does not lie, the simplest approach to even spacing works every time this way.
Take the total length of opening, divide by 5 to allow for code open free spacing(less than 4"), divide by 5,
you will get the quantity of balusters,now add the thickness of 1 baluster to the total measurement, divide that new total number by your number of balusters,
these are centers for layout, when you start you first baluster, deduct half the thickness of one baluster for the first layout,
the rest will be on layout from that first baluster you just layed out deducting half the thickness, you should have equal spacing at each end and all balusters in between - On 2016-12-08 by pete diminico -
Reply by (mod) - suggestions for baluster layout
Thanks for the comment, Pete.
What are the Code-compliant methods of attaching a wood railing to meet strength requirements
I have been on the hunt for code-compliant methods of attaching a wood railing section similar to the one shown in the example to wood posts.
It seems that we the new codes mandating the use of special hardware to withstand 500lb at the posts, logic would say that railing attachments to the posts would need to support similar force.
So my question is,
if the method shown and what for so long seems to have been used in residential deck construction (toe screwing the railing to the post) in actuality does support the 500lb requirement ?
And if so, what type of screws? #10? Larger? Special Simpson construction screws?
I hope some one has a positive answer as I have spent considerable time searching and looking at the new codes but can't seem to find a good answer.
I see a lot of the new composit railing systems using L-brackets of various types.
I assume since they are allowed to be sold in my area (RI) they must be compliant with code. Not overly pleasing and very expensive. So I was hoping to confirm the toe nail approach or find some better suggestions.
Regards, G. - On 2015-09-02 by G-RI -
Reply by (mod) - code-compliant methods of attaching a wood railing
G
I think the strength question needs an engineering analysis.Guardrail designs vary: some use through-bolted corner posts that, combined with a top rail and bottom rail, will certainly meet the 500lb load at any point along the rail.
Balusters, especially if attached to the inside of the guard's horizontal rails, ought to be able to meet that load as well, and without having to individually each have a 500lb connector at each baluster top and bottom.
As for devices for making the connection, construction screws, toe nailing, and also specialty brackets are all used successfully - take a look at what's found at your hardware or building supplier.
Certainly for stairs that I've built and repaired, dating from the mid 1970's in my case, we have seen hundreds of toe-nailed balusters in older homes that lasted and functioned for many decades.
In sum it's not the choice of fastener (among the choices I named) as much as the strength of the connection that's key.
...
Continue reading at HANDRAILS & HANDRAILINGS or select a topic from the closely-related articles below, or see the complete ARTICLE INDEX.
Or see these
Recommended Articles
- BALUSTER INSTALLATION
- BALUSTER INSTALLATION METAL
- HANDRAILS & HANDRAILINGS - home
- FALL HAZARDS DUE TO UN-GRASPABLE HANDRAILS
- GRASPABILITY of HANDRAILINGS
- HANDRAIL CODES & OSHA HAND RAIL SPECS
- HANDRAIL CODES - GRASPABILITY
- HANDRAIL CONTINUITY
- HANDRAIL EXTENSION REQUIREMENTS
- HANDRAIL GRASPABILITY DEFECT PHOTOS
- HANDRAILING STRENGTH
- HANDRAILS for WIDE STAIRWAYS
- SNAG HAZARDS on STAIRWAYS
- RAILING CODES & STANDARDS - home
- STAIR CODES & STANDARDS - home
- STAIR CODE DETAILS
Suggested citation for this web page
BALUSTER INSTALLATION at InspectApedia.com - online encyclopedia of building & environmental inspection, testing, diagnosis, repair, & problem prevention advice.
Or see this
INDEX to RELATED ARTICLES: ARTICLE INDEX to STAIRS RAILINGS LANDINGS RAMPS
Or use the SEARCH BOX found below to Ask a Question or Search InspectApedia
Ask a Question or Search InspectApedia
Try the search box just below, or if you prefer, post a question or comment in the Comments box below and we will respond promptly.
Search the InspectApedia website
Note: appearance of your Comment below may be delayed: if your comment contains an image, photograph, web link, or text that looks to the software as if it might be a web link, your posting will appear after it has been approved by a moderator. Apologies for the delay.
Only one image can be added per comment but you can post as many comments, and therefore images, as you like.
You will not receive a notification when a response to your question has been posted.
Please bookmark this page to make it easy for you to check back for our response.
IF above you see "Comment Form is loading comments..." then COMMENT BOX - countable.ca / bawkbox.com IS NOT WORKING.
In any case you are welcome to send an email directly to us at InspectApedia.com at editor@inspectApedia.com
We'll reply to you directly. Please help us help you by noting, in your email, the URL of the InspectApedia page where you wanted to comment.
Citations & References
In addition to any citations in the article above, a full list is available on request.
- [1] Steve Bliss's Building Advisor at buildingadvisor.com helps homeowners & contractors plan & complete successful building & remodeling projects: buying land, site work, building design, cost estimating, materials & components, & project management through complete construction. Email: info@buildingadvisor.com
Steven Bliss served as editorial director and co-publisher of The Journal of Light Construction for 16 years and previously as building technology editor for Progressive Builder and Solar Age magazines. He worked in the building trades as a carpenter and design/build contractor for more than ten years and holds a masters degree from the Harvard Graduate School of Education. Excerpts from his recent book, Best Practices Guide to Residential Construction, Wiley (November 18, 2005) ISBN-10: 0471648361, ISBN-13: 978-0471648369, appear throughout this website, with permission and courtesy of Wiley & Sons. Best Practices Guide is available from the publisher, J. Wiley & Sons, and also at Amazon.com - [2] Decks and Porches, the JLC Guide to, Best Practices for Outdoor Spaces, Steve Bliss (Editor), The Journal of Light Construction, Williston VT, 2010 ISBN 10: 1-928580-42-4, ISBN 13: 978-1-928580-42-3, available from Amazon.com
- [3] Prescriptive Residential Wood Deck Construction Guide, based on the 2009 International Residential Code, American Forest & Paper Association, Inc., provided by reader Mark Morsching from Everflashing.
- [4] Mark Morsching, Everflashing, Tel: 800-550-1667, Email: everflashing@gmail.com. The Everflashing product comes in G-185 and Stainless Steel and is intended for use with treated lumber with copper in it. Everflashing produces a variety of specialty flashing products including flashings for use with decks at deck ledgers and deck perimeters.
- [2] Manual for the Inspection of Residential Wood Decks and Balconies, by Cheryl Anderson, Frank Woeste (Forest Products Society), & Joseph Loferski, October 2003, ISBN-13: 978-1892529343,
- [5] Claudia Hudson, Asheville NC, Tel: 828-252-0644 Email: claudiahudson@charter.net . Ms. Hudson is an SEO copyrighter / content writer. She has provided background research and text for InspectApedia's articles on deck and porch construction methods & procedures. April 2013.
- Our recommended books about building & mechanical systems design, inspection, problem diagnosis, and repair, and about indoor environment and IAQ testing, diagnosis, and cleanup are at the InspectAPedia Bookstore. Also see our Book Reviews - InspectAPedia.
- In addition to citations & references found in this article, see the research citations given at the end of the related articles found at our suggested
CONTINUE READING or RECOMMENDED ARTICLES.
- Carson, Dunlop & Associates Ltd., 120 Carlton Street Suite 407, Toronto ON M5A 4K2. Tel: (416) 964-9415 1-800-268-7070 Email: info@carsondunlop.com. Alan Carson is a past president of ASHI, the American Society of Home Inspectors.
Thanks to Alan Carson and Bob Dunlop, for permission for InspectAPedia to use text excerpts from The HOME REFERENCE BOOK - the Encyclopedia of Homes and to use illustrations from The ILLUSTRATED HOME .
Carson Dunlop Associates provides extensive home inspection education and report writing material. In gratitude we provide links to tsome Carson Dunlop Associates products and services.
 |
HOME | ABOUT | ASK a QUESTION | CONTACT | CONTENT USE POLICY | DESCRIPTION | POLICIES | PRIVACY | |
| © 2026 - 1985 Publisher InspectApedia.com - Daniel Friedman | |||||||||