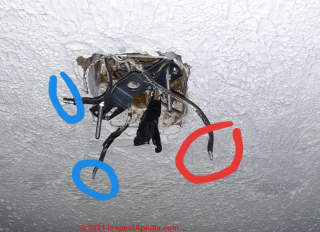
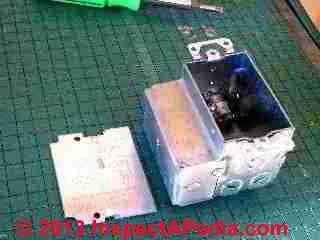
 Field Experience using the AlumiConn™ Connector for Aluminum Wiring Repair using Pigtailing
- POST a QUESTION or COMMENT about solving space problems that arise in electrical boxes when repairing aluminum wiring
AlumiConn™ field installation experience: making it fit.
Aluminum wiring repair procedures using the AlumiConn™ terminal block are described in this article where field experience and some installer / opinions / suggestions are made for fitting the copper-to-aluminum pigtailed splice wires back into the electrical box.
InspectAPedia tolerates no conflicts of interest. We have no relationship with advertisers, products, or services discussed at this website.
- Daniel Friedman, Publisher/Editor/Author - See WHO ARE WE?
Field Experience Using the AlumiConn™ and Copper Pigtailing on Aluminum Wire for Aluminum Wire Repairs
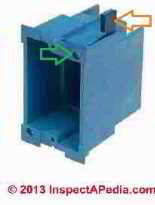 Space to fit the pigtailed copper wires and recommended splice connectors is a critical concern during aluminum electrical wire repairs.
Our photo (left) shows an old-work plastic electrical box that can give more wiring space by added box depth in the original wall opening.
[Click to enlarge any image]
at ALUMINUM WIRE REPAIR SPLICE SPACE we discuss the wiring space problem and solutions in detail.
Using the King Innovations AlumiConn Connectors for Aluminum Wiring Pigtail Repairs
In order to understand the practicalities associated with installing AlumiConn™ connectors I have added the connectors to a small number of boxes. From this experience I have gained some experience in the installation process, and also drawn some conclusions for the remaining work ahead. - reader contributed comments from - C.J. 9/6/2013 [Ed]
I have purchased 3-port AlumiConn™ connectors at Home Depot (the only type I found on their shelves). I noticed sometime in the past week that King Innovations is now selling 2-port connectors and 3-port connectors.
I think the 2-port connectors is a new product. I will be asking my local Home Depot to please stock them. I would also like to see a 4-port connector but so far I don't see such a product.
In the typical suburban tract house (like mine) there are somewhere between 50 and 100 electrical boxes that need to be converted. All of the boxes are metal, and they were installed when the house was built. The majority of the wall boxes are 3" x 2". None of the boxes were designed to be extended.
The walls and ceilings are covered with 1/2" drywall and the electrical boxes protrude through the drywall. The drywall has a textured finish which was applied when the house was built. Any wall or ceiling damage is very hard to fix due to the need to patch, then re-texture and then paint the damaged area. It is very difficult to match the existing wall texture.
Furthermore, a small supply of matching paint for each color in the house may not be available - thus requiring the purchase of new paint matched with a photo spectrometer. It can also be expected to require painting the entire wall to avoid the appearance of an obvious patch.
A 12" long piece of 3/8" wood dowell works well to push electrical wires and connectors around in an electrical box.
There are a number of common electrical configurations in the boxes. These configurations, along with some comments are as follows:
Aluminum Wire Repair using the AlumiConn™ for Duplex Outlet Wiring Connections
- The Hot Wire In & out
- Neutral wire in & out
- Ground wire in & out
1 duplex receptacle requires 3 triple port AlumiConn connectors.
Grounding of the electrical box can be done in either of 2 ways:
(1) Copper pigtailing : Two copper pigtails can be attached to the ground screw of the receptacle. One pigtail is connected to an AlumiConn™ connector to which the ground line for the IN and OUT lines is connected. The other pigtail is attached to the box. In either case, the 3 triple port connectors can be pushed into the electrical box without too much trouble.
Watch out: be sure to follow the manufacturer's recommended torque settings to assure a successful aluminum wire repair. Details are
(2) Receptacle metal strap: The outlet receptacle contains a grounding screw that attaches to a metal band. The band holds the receptacle together and also provides the tabs by which the reciprocal is attached to the box. Screwing the receptacle to a metal box will result in grounding the box to the receptacle.
Watch out: method (1) described by CJ is not recommended and is not an approved electrical grounding method. There is risk that for various electrical receptacle installation conditions the receptacle screws mounting the metal trap tabs (of the receptacle) to the electrical box itself may become loose or may become loosened through use of the receptacle. The result is an unreliable ground. Don't use this method - Ed.
Aluminum Wire Repair using the AlumiConn™ for Single light switch (single pole, single through):Wiring Connections
- hot in,
- hot out,
- switched-hot
- + neutral
Requires 4 triple port connectors and 1 double port connector (for a total of 5 connectors).
In my experience so far I was able to get 4, but not 5 AlumiConn connectors pushed into the box.
This leaves me with the following (lousy) choices. I have not yet decided which I will use.
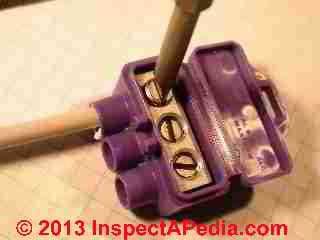 #1 - Connect the ground lines of hot in, hot out and switched-hot wires in an AlumiConn connector and leave the metal box ungrounded (not desirable).
#2 - Replace the metal box with a plastic box. This will eliminate the need to ground the box. I have not yet tried to remove the old box, but I think I can do this without damaging the wall. I will need to first slightly loosen the box from the stud so that a hack saw blade will fit between the box and the stud.
The loosening will require a properly designed crowbar (such as a leaf from an automobile leaf spring). This may cause some damage to the drywall on the other side of the box opening.
Hand hacksaw the nail at the top and bottom of the box that hold the box to the stud.
Attach a piece of string to the end of each of the wires entering the box. Loosen the screw that secures the wire to the box and push the wire into the wall, keeping the other end of the string outside of the wall.
Remove the box from the wall by first pushing the box into the wall, then rotate it 90 degrees about a horizontal axis (push the top in, pull the bottom out), then pulling the box through the drywall opening. Install a new plastic box using retro-fit attachment bars (sometimes called "Madison bars").
#3 - Attach a copper pigtail to the electrical box and twist all of the ground lines (3 aluminum + 1 copper) together with a "long" twist.
Apply NoAlox to the end and bind with a wire nut. I think this is probably a reasonable practical solution, but it does not meet CPSC recommendations. [And is not a recommended repair approach for aluminum wiring - Ed.]
Aluminum Wire Repair using the AlumiConn™ for 3-way light switch (single pole, double through) wiring connections
hot in, hot out, 3-conductor switched-hot + neutral
Requires 4 triple port connectors and 2 double port connectors (for a total of 6 connectors
I know that I will not be able to make this number of connectors fit in a box.
Replacing the box with plastic (as described above) will reduce the connector count from 6 to 5.
If the replacement box is a deep box, then the 5 connectors should fit.
Other common configurations
- 2-receptacle box (switch + outlet)
- 2-receptacle box (2 duplex outlets)
- 2-receptacle box (2 switches)
- n-receptacle box (usually n switches), some may be 3-way
Thanks, - C.J. 9/6/2013
Time Required to Repair Aluminum Wiring by Pigtailing with the AlumiConn™ connector
My experience so far is that conversion of an outlet box that contains no surprises (just hot in + hot out) takes about 20 minutes to convert. This is the time from unscrewing the cover plate to getting the cover plate back on after the conversion.
A box containing an on/off switch takes longer.
I have also found that planning the exact placement in repacking the wires and AlumiConn™ connectors back into the box is essential. The lack of forethought can result in re-packing multiple times - very undesirable due to "excess" re-bending of wires (I am always fearful of a break, especially of the aluminum wire) and lost time. - C.J.
Typical Pigtail Wire Lengths for Repairing Aluminum Wiring by Pigtailing with the AlumiConn™ connector
I have also experimented with the length of the copper pigtail. I tried 3", 4" and 5".
While there are exceptions, I think the 3" length is a little too short - it provides insufficient length to easily tighten the set screws on the AlumiConn™ connectors, and make attachment to an outlet or switch, and bend the wire around when repacking. 4" is a good length. 5" works fine, but adds more wire than necessary. - C.J.
...
Reader Comments, Questions & Answers About The Article Above
Below you will find questions and answers previously posted on this page at its page bottom reader comment box.
Reader Q&A - also see RECOMMENDED ARTICLES & FAQs
On 2021-06-04 by inspectapedia.com.moderator (mod) - there should be no case where a solid conductor aluminum branch circuit wire is not pigtailed to Copper
@Chris,
That's right. In other words there should be no case where a solid conductor aluminum branch circuit wire is not pigtailed to Copper before it is taken to its ultimate connector such as a receptacle, light switch, a light fixture, or circuit breaker.
One of the things I worry about is an aluminum wired building at which the repair work was not complete.
The concern is that the ocvupants think that the aluminum wiring hazard has been completely repaired, so might as a result ignore warning signs such as flickering lights.
I don't think you would do that but then you won't be the only person who ever lives in the building.
Thank you for the questions and the discussion. It will be helpful to other readers as well.
On 2021-06-04 by Chris
@inspectapedia.com.moderator, Thank You for your reply. You provided me with info that sheds light to what happens if I don't add one on low current light switches Risk of "micro fretting and oxidation at a connection leads to overheating even when the current load is low."
I have now placed an order for 50 pack of 2 ports alumiConn and will go back and retrofit those ones. One last question... should all aluminum wires connected at the breakers in the main electrical panel also be retrofitted?
On 2021-06-04 by inspectapedia.com.moderator (mod) - tighten the connections and skip the copper pigtailing ?
@Chris,
Thank you that's an interesting question of the relationship between current load and aluminum wire connector failures.
I can't give an authoritative answer.
But intuitively what you say sounds reasonable in terms of setting priorities for repair.
The subtle question is the extent to which micro fretting and oxidation at a connection leads to overheating even when the current load is low.
Obviously the concept is sound, that is less current means less Heat.
I can't recommend that you never address the other connectors but I do agree with the priority that you state.
On 2021-06-04 by Chris
Hi, I have a house built in 71 with 10 gauge aluminum wire. I bought a 100 pack of 3 port AlumiConn and a torque screw driver and have have been slowly retro fitting every electrical outlet, fixture, switch, or electrical junction that is daisy chained carrying a load to another. In the interest of saving money and time, I have purposefully been skipping any signal aluminum wire to goes directly and only to a light fixture.
My entire house is LED and feel like it won't carry much of a load.
I make sure that the aluminum connections is secure to the light switch, but skip adding AlumiConn just for those specific connections... "for now".
How risky is this? I feel like the biggest risk is connections carrying a load to another and have been focusing on those type of connections.
On 2021-04-15 - by (mod) - how to sort out aluminum wires at a light switch
@Eric,Confirm what the wires doing and use as many connectors as you need and expand the electrical box if you need more space. I think I made more detailed versions of that suggestion before
On 2021-04-15 by Eric
So what's the best course of action?
On 2021-04-14 - by (mod) - General Cable 3-wire aluminum conductors 12/3 for lighting circuit
@Eric,We ought to be able to sort out 3 wires.
A switch interrupts the hot wire to your light.
Power goes to the switch and then comes back from it.
When the switch is OFF the "return to the light" should show no voltabe.
What I can't say is if power is brought first to the switch and thence to the light,
or as is more common
power comes into the junction box for the light - Hot In - , goes out from there to the switch - Hot to Switch - , then returns from the switch - On or Off fro Switch-
You electrical wire photo below shows a General Cable solid conductor alumnum wire using #12 conductors - suitable for a 15-Amp lighting circuit provided you use the proper aluminum-to-copper pigtail method and connector.
Watch out: the electrical box in your photo looks shallow - small enough that you may not have room to safely push back all of those AlumiConn splices into the box and re-connect the light fixture.
You may be able to simply add a box extender that in turn gives enough cubic inches and that will be covered by the light fixture canopy. If not you'll need to install a larger electrical box.
The "code" permits you to skip counting these special aluminum wiring splice connectors when calculating the code-required electrical box size, but nevertheess, if the box is way too small you may find that you damage a wire or break a connection trying to shove five pounds of wire into a two pound box.
On 2021-04-14 by Eric
Ok I traced the wire. It runs to the switch that turns the fixture I'm working on on and off.
There's wire running from there to another fixture in the same room, from there to a dual switch the powers said second fixture as well as basement and outdoor lights. Attached is a picture of the wiring for the fixture I'm currently replacing. Red comes from the breaker and blue goes to the switch.
All are hots. I'll also comment a picture of the wire with what remains of the labeling (the house was built in 73) that runs to the switch.
Here is a pic of the wire running to the switch.
On 2021-04-13 by (mod) - why are there TWO hot wires in the electrical box for my light or switch?
@Eric,
Usually a second "hot" wire in a box is there to power another device, OR someone ran 240V into the electrical box for some prior 240VAC application, of which you're using just one 120VAC leg to power a light.
An example is wiring to provide two separate 120VAC receptacles on two different circuits at a single location so that two high-current using devices can be plugged-in there without tripping a breaker; the electrician might run a 14/3 15-Amp circuit around the walls, with two separate "hot" wires and a shared neutral (which has its own trouble - described at MULTI-WIRE CIRCUITS https://inspectapedia.com/electric/Multi-Wire-Electrical-Circuits.php )
That permits providing separately-powered receptacles at the same location.
I can't know from just your text if your two hot leads are from separate panel buses (and thus are capable of delivering 240V between them) or if they're two wires from the same panel bus providing simply two 120V leads for two separate circuits - you'd need to trace the wires back to the panel and/or perhaps check voltage between the two separate hot leads and between each and ground.
But if we are talking about electric wires to and from a light switch, there is always at least one live or "hot" wire going TO the switch,
and when the switch is "ON" there will be a second hot wire in that box, coming FROM the switch and going to the switched fixture.
Now if we're looking at wire ends in an electrical box from which a light is supported, dependign on how the electrician routed wires, she may have brought the hot, neutral, and ground wires first to the light fixture electrical box, and from there wires head down to the light switch (and return from it).
In that case, when the switch is ON, checking for live voltage in the box there will be two "hot" wires - one coming into the box and heading out to the switch and a second coming back from the switch that will be "hot" if the switch is "ON".
Watch out: if you're not familiar with proper and safe electrical wiring practices and testing procedures you could be shocked or killed.
On 2021-04-13 by Eric
Thanks for your quick response. I will post a picture later on to clarify what I'm talking about, but basically there is an extra hot wire and I'm not sure what to do with it. The extra does not come from the breaker end so I'm not sure how to get power to it.
On 2021-04-13 - by (mod) -
Clarify what are your two "positive" fixtures (AC wiring isn't positive or negative, but its circuits do include "hot" and "neutral" wires)
If in your original, and correctly and safely-wired light fixture, two or even three wires were joined with a single twist-on connector, then you could put two or three into a 3 port AlumiConn connector as well.
So going from aluminum to copper, you need at least two ports - aluminum-in and copper -out (you can use the smaller 2-port AlumiConn if that helps) - to make that single copper "pigtail" leaving you only one more possible wire connected to a 3-port device.
So you may have to daisy-chain a couple of AlumiConn's to get all of your wires connected.
And you'll need to be sure you can fit all of those devices back into the original electrical box - if not you'll need to enlarge the box with an extension or replace it with a larger box.
On 2021-04-13 by Eric - how to replace a light fixture that is wired with aluminum wire
I am replacing a light fixture going from aluminum to copper. The wire from the box connects to another wire that powers other fixtures, but from that end there are 2 positive wires.
Can I splice those together and run them in to 1 port on the Alumiconn 3 port connector? The other 2 ports would be the positive from the box and the positive from the fixture.
On 2020-04-24 by (mod) - when were Madison Bars first used in home electrical wiring?
Hi OHG, and thanks for a helpful question.
If your old work box supports are actually a Madison product then they're probably from after 1967, Details are in the article I cite below.
An early but more-complex flat steel box support is described in
Seckinger, George D. "Outlet box hanger." U.S. Patent 2,032,636, issued March 3, 1936.
The earliest simplified flat steel electrical box mounting clip or "F" clip patents I've found (so far - there may be earlier versions) in the U.S. are from the 1950s, such as Shepard's "Wall Outlet Box Mounting" cited at the link I'll give below.
Please find your question repreated along with our reply at
OLD WORK ELECTRICAL BOXES for RETROFIT - near the bottom of that article where we give what history we've found on old work box installation devices.
/electric/Old-Work-Electrical-Boxes.php
On 2020-04-24 by Ken The Old House Guy
Hi. My electrician found Madison Bars in my house. Do you know when they began being used in homes?
On 2019-10-11 - by (mod) -
Steven you'll notice in the article above and in the repair repair procedure link article that you'll read that the alumiconn connector accepts up to three wires. Or less.On 2019-10-11 by Stephen Teel
If you have four, all aluminum wires, properly twisted in a wire nut. Can you attach ONLY one of those to the Alumiconn connector for the pigtail. So in my scenario it is only aluminum on aluminum. or is that still an issue?
On 2019-05-14 - by (mod) -
No Ric - that is to say ONE WIRE per connector opening in the AlumiConn.But there are three-port AlumiConn connectors that can thus accept three conductors: two aluminum and one copper or one aluminum and two copper.
On 2019-05-14 by ricmermar
Are Alumiconn ports approved for more than one conductor ?
...
Continue reading at ALUMINUM WIRE REPAIR SPLICE SPACE or select a topic from the closely-related articles below, or see the complete ARTICLE INDEX.
Or see these
Recommended Articles
- ALUMINUM WIRING HAZARDS & REPAIRS - home
- ALUMINUM WIRING REPAIR METHODS
- ALUMINUM WIRING REPAIR ELECTRICIANS
- ALUMINUM WIRING REPAIR METHODS - CPSC Meeting 9/28/95
- ALUMINUM WIRING REPAIRS NOT-RECOMMENDED
- FAQs on author/website credibility
- REDUCE THE AL WIRE RISK: DETAILS
Suggested citation for this web page
ALUMINUM WIRING REPAIR FIELD NOTES at InspectApedia.com - online encyclopedia of building & environmental inspection, testing, diagnosis, repair, & problem prevention advice.
Or see this
INDEX to RELATED ARTICLES: ARTICLE INDEX to ELECTRICAL INSPECTION & TESTING
Or use the SEARCH BOX found below to Ask a Question or Search InspectApedia
Ask a Question or Search InspectApedia
Try the search box just below, or if you prefer, post a question or comment in the Comments box below and we will respond promptly.
Search the InspectApedia website
Note: appearance of your Comment below may be delayed: if your comment contains an image, photograph, web link, or text that looks to the software as if it might be a web link, your posting will appear after it has been approved by a moderator. Apologies for the delay.
Only one image can be added per comment but you can post as many comments, and therefore images, as you like.
You will not receive a notification when a response to your question has been posted.
Please bookmark this page to make it easy for you to check back for our response.
IF above you see "Comment Form is loading comments..." then COMMENT BOX - countable.ca / bawkbox.com IS NOT WORKING.
In any case you are welcome to send an email directly to us at InspectApedia.com at editor@inspectApedia.com
We'll reply to you directly. Please help us help you by noting, in your email, the URL of the InspectApedia page where you wanted to comment.
Citations & References
In addition to any citations in the article above, a full list is available on request.
- Dr. Jess Aronstein, protune@aol.com is a research consultant and an electrical engineer in Schenectady, NY. Dr. Aronstein provides forensic engineering services and independent laboratory testing for various agencies. Dr. Aronstein has published widely on and has designed and conducted tests on aluminum wiring failures, Federal Pacific Stab-Lok electrical equipment, and numerous electrical products and hazards. See ALUMINUM WIRING BIBLIOGRAPHY and see FPE HAZARD ARTICLES, STUDIES for examples.
- "The Influence of Corrosion Inhibitor and Surface Abrasion on the Failure of Aluminum-Wired Twist-on Connections", Aronstein, J.; Campbell, W., Components, Hybrids, and Manufacturing Technology, IEEE Transactions on Volume 7, Issue 1, Mar 1984 Page(s): 20 - 24
- [1]AlumiConn [Website: AlCopStore.com ] ™ AlCopStore.com 223 Salt Lick Road, #279, St. Peters, MO 63376
Tel: 866-826-2256, Fax: 636-754-0500, Email Sales: pking@AlCopStore.com, Email General Inquiry: info@AlCopStore.com - [2] "Repairing Aluminum Wiring," [As updated 2011] U.S. Consumer Product Safety Commission Publication available online
- [3] "Record of Commission Action, Commissioners Voting by Ballot", CPSC Publication No. 516, Repairing Aluminum Wiring (original version op.cit.), (Briefing package dated March 15, 2011), Quoting:
The Commission voted unanimously (5-0)·to approve republication of CPSC Publication No. 516, Repairing Aluminum Wiring, with the explicit recognition that the COPALUM and AlumiConn connectors currently are the only products that meet the agency's standards to prevent aluminum wire fire hazards
Copy on file as /aluminum/Pub516_Alumi_Conn.pdf - [4] Dr. Jess Aronstein, protune@aol.com is a research consultant and an electrical engineer in Schenectady, NY. Dr. Aronstein provides forensic engineering services and independent laboratory testing for various agencies. Dr. Aronstein has published widely on and has designed and conducted tests on aluminum wiring failures, Federal Pacific Stab-Lok electrical equipment, and numerous electrical products and hazards. See ALUMINUM WIRING BIBLIOGRAPHY and see FPE HAZARD ARTICLES, STUDIES for examples.
- [5] "The Influence of Corrosion Inhibitor and Surface Abrasion on the Failure of Aluminum-Wired Twist-on Connections", Aronstein, J.; Campbell, W., Components, Hybrids, and Manufacturing Technology, IEEE Transactions on Volume 7, Issue 1, Mar 1984 Page(s): 20 - 24
- In addition to citations & references found in this article, see the research citations given at the end of the related articles found at our suggested
CONTINUE READING or RECOMMENDED ARTICLES.
- Carson, Dunlop & Associates Ltd., 120 Carlton Street Suite 407, Toronto ON M5A 4K2. Tel: (416) 964-9415 1-800-268-7070 Email: info@carsondunlop.com. Alan Carson is a past president of ASHI, the American Society of Home Inspectors.
Thanks to Alan Carson and Bob Dunlop, for permission for InspectAPedia to use text excerpts from The HOME REFERENCE BOOK - the Encyclopedia of Homes and to use illustrations from The ILLUSTRATED HOME .
Carson Dunlop Associates provides extensive home inspection education and report writing material. In gratitude we provide links to tsome Carson Dunlop Associates products and services.


