 Stair Construction on Sloped Surfaces
Stairs landing at uneven top or bottom surfaces
- POST a QUESTION or COMMENT about measuring and calculating to build stairways & low slope or low angle stairways, treads, risers, stairway run, stairway landings & platforms
Stair layout & construction over sloped or uneven surfaces:
Here we illustrate how to lay out and measure stair rise and run distances when the surface over which the stair will be built is uneven or gets in the way of a straight-line measurement.
We include stair layout calculations where the stair passage is over uneven ground or surfaces such as a bulged hill (page top) or a depression in the surface. If you don't adopt a way around these obstructions, your stair measurements and stair build plan will be wrong and the stairs won't fit the site.
This article includes example stair building calculations and warns that inconsistent step rise or tread size anywhere in the stairway may be a trip/fall hazard. We also explain how to include landings and platforms in stair design calculations.
InspectAPedia tolerates no conflicts of interest. We have no relationship with advertisers, products, or services discussed at this website.
- Daniel Friedman, Publisher/Editor/Author - See WHO ARE WE?
How to Measure & Layout a Stair Rise & Run over Uneven Ground
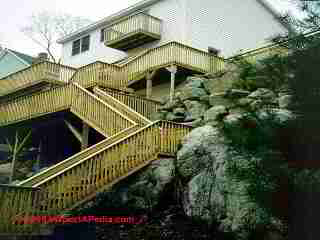 However some terrain shapes are irregular enough or are humped so that you cannot just take off measurements directly.
It's better to make an accurate and direct measurement of the stairway run and rise so that your calculated tread depths and riser heights will be proper and uniform.
Many builders use a transit to make accurate angle and distance measurements.
Certainly designing and building stairs with uniform tread depth and riser height over rough ground like that in our photo (left) can be a serious challenge.
Here we provide an alternative crude but effective approach to stair rise and run measurement using string, plumb line, and level, along with a stick or board (or two of them) of sufficient length.
Basically we project a horizontal line out from the upper elevation over the landing spot for the stairway, using that line to measure both stair run and stair rise accurately.
[Click to enlarge any image]
If the horizontal run distance is small, you can get by with straight lumber tacked in place temporarily to permit measurement of horizontal run projection and vertical rise.
Typically we use our stringer 2x lumber (before it has been cut to length) for this purpose since by definition the diagonal stringer will be longer than the horizontal stair run.
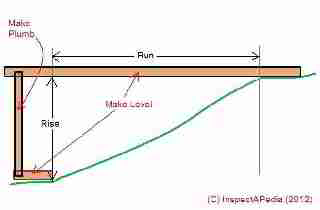 This approach works to measure and design a stairway over any irregular surface.
Make certain that the horizontal boards are straight and that they are held level and that your vertical board, useful for holding up the outer end of that upper horizontal member is also vertical.
Take off the rise and run measurements as we show in the sketch.
For longer distances than the length of boards you have on hand, you will do fine with string to set out the horizontal distance, a vertical pole, and a plumb line and measuring tape.
Below, for completeness, we include how to obtain stair rise and run lengths using sine and cosine tables - not a process we are seriously recommending.
Stairs built over both an uneven hillside & uneven bottom or top landing
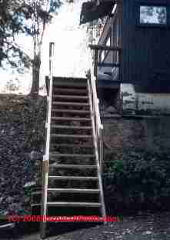
Our photo shows a stairway during construction by the author & an associate (Arthur Cady).
We faced a double difficulty of constructing a (replacement) exterior stairway over a rough hillside and stairs that had to land on a sloping surface.
By supporting the stringer above the hillside we bypassed the irregularities of the slope itself,but as you can see from the photo, because we had to land on a sloping surface the two stringers could not be identical, yet they had to line up properly for the treads to be level.
Using the longer (downhill) stringer as the main pattern, we measured and laid out the tread positions along the stringer surface, then aligned the two stringer tops and mapped the master layout onto the inner side of the uphill, shorter stringer.
The treads were placed between the stringers, supported by both cleats and end-nailing through the stringers from outside.
Best design would have insisted on a level landing platform at the stair bottom but in the real world we can't always meet that criteria. In this case, the stairs had to land on a narrow driveway.
Had we installed a level landing platform the drive would have become unusable by the client's vehicles. The result is a first step with uneven riser height depending on where you enter the stairway.
Where it is impossible to avoid a step with riser height that varies from others in a stairway or where a stair ends on an uneven surface,
- Provide secure hand railings
- Provide a color cue that is unique for the irregular step or riser
- Provide a warning sign (at least at public stairways)
Example building code citation for irregular risers ending at a sloping surface
Normally a stairway walking surface for treads and landings is expected to be close to level.
 R311.5.3 excerpt from Treads & Risers:
The walking surface of treads and landings of a stairway shall be sloped no steeper than one unit vertical in 48 units horizontal (2% slope).
But in unavoidable circumstances of sloped surfaces or irregular riser heights exceptions are permitted provided measure are taken to reduce falls.
IBC 1009.3.2 Dimensional uniformity.
Stair treads and risers shall be of uniform size and shape. The tolerance between the largest and smallest riser height or between the largest and smallest tread depth shall not exceed 0.375 inch (9.5 mm) in any flight of stairs.
The greatest winder tread depth at the 12-inch (305 mm) walk line within any flight of stairs shall not exceed the smallest by more than 0.375 inch (9.5 mm) measured at a right angle to the tread’s leading edge.
Exceptions:
1. Nonuniform riser dimensions of aisle stairs complying with Section 1025.11.2.
2. Consistently shaped winders, complying with Section 1009.3, differing from rectangular treads in the same stairway flight.
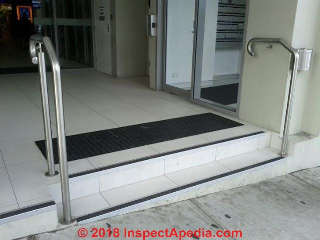
Where the bottom or top riser adjoins a sloping public way, walkway or driveway having an established grade and serving as a landing, the bottom or top riser is permitted to be reduced along the slope to less than 4 inches (102 mm) in height, with the variation in height of the bottom or top riser not to exceed one unit vertical in 12 units horizontal (8-percent slope) of stairway width.
The nosings or leading edges or treads at such nonuniform height risers shall have a distinctive marking stripe, different from any other nosing marking provided on the stair flight.
The distinctive marking strip shall be visible in descent of the stair and shall have a slip-resistant surface. Marking stripes shall have a width of at least 1 inch (25 mm) but not more than 2 inches (51 mm).
[Underline emphasis added - Ed.]
The steps shown above are not in compliance in that the same black no-slip stripe is used on both treads rather than just the un-even bottom riser/tread in this hotel stairway.
Regulation on Measuring Riser Height at Sloped Landing Surfaces
OK, so where do we measure the riser height when the landing surface is sloped?
The British Stair Recommendations give this reasonable advice:
2.6 Where the landing of a stair is formed by the ground and slopes across the width of the flight, then the rise of the step shall be measured at the middle of the tread's width.
That means that if you set the mid-width height at a desired riser height - say 7" - then towards one end the riser height will be less than desired and towards the other end of the step the riser height will be more than desired.
That's why special colour cues are required for these steps.
Here is a similar U.S. stair code for handling stair construction and marking at uneven landing surfaces
2007 NYS Stair Code: 1009.3 Stair treads - exception to step riser height is permitted at joining a sloping surface
Where the bottom or top riser adjoins a sloping public way, walkway or driveway having an established grade and serving as a landing, the bottom or top riser is permitted to be reduced along the slope to less than 4 inches (102 mm) in height with the variation in height of the bottom or top riser not to exceed one unit vertical in 12 units horizontal (8-percent slope) of stairway width.
The nosings or leading edges of treads at such nonuniform height risers shall have a distinctive marking stripe, different from any other nosing marking provided on the stair flight.
The distinctive marking stripe shall be visible in descent of the stair and shall have a slip-resistant surface. Marking stripes shall have a width of at least 1 inch (25 mm) but not more than 2 inches (51 mm).
The Mathematical Approach to Building Stairs Spanning Uneven Ground
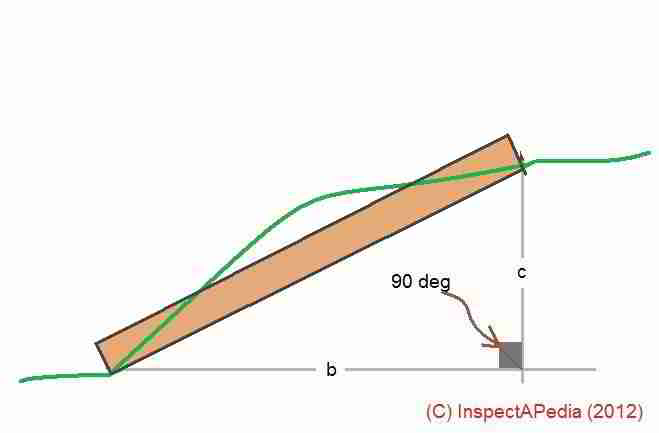
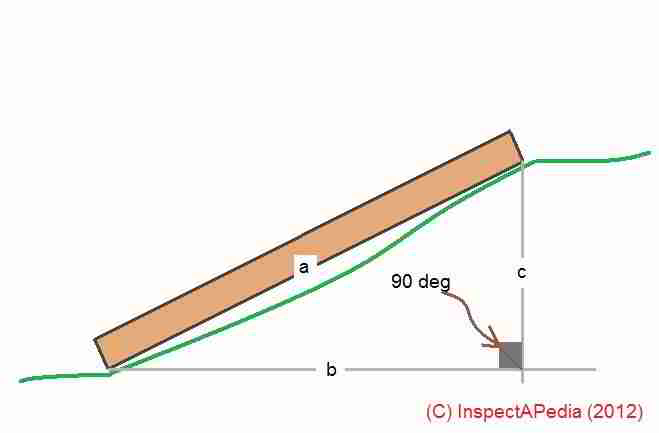 The geometry approach to calculating stair rise and run over rough terrain when you have only two measurements works correctly provided you know enough triangular geometry to convert between your sloped-line measurement (the hypotenuse of the triangle) and the triangle's other sides that form the rise & run dimensions.
Using a calculator and it's square root function, and the most basic knowledge of geometry is not enough - we also need a table of sine and cosine values, functions readily found these days online. [45]
a2 = b2 +c2 - the square of the length of the hypotenuse (a) equals the squares of the lengths of the opposite sides of a right triangle (b) and (c).
In a geometry or trigonometry text, you'll see that when we refer to the angle ab, we mean the angle formed at the intersection of lines a and b, or in this case the lower left angle in our sketch.
And so the three angles formed by the triangle's sides are ab, bc, and ac.
Knowing that the triangle abc will always include a 90 degree right angle ( i.e. this is always a "right triangle"- angle bc in our sketch) allows use of sine and cosine tables to obtain the lengths of the two unknown sides b and c in the sketch.
Geometry teaches that if we know three pieces of data about a right triangle (one side length and two angles, or two side lengths and one angle) we can obtain all of the other data about a triangle - all of its angles, and the actual lengths of all of its sides.
 sin of angle ab = (length of the opposite side c / the triangle's hypotenuse a) = a / c
cos of angle ab = (length of the adjacent side b / the triangle's hypotenuse a) = b / a
But the rub is that we need to know at least two of the angles on this triangle. We know bc is always 90 degrees.
On the ground, we'd have to measure either angle ab or angle ac. You can do this using a transit, a protractor or other angle measuring tool either by placing your angular measuring tool on the sloped surface of the stringer side a, or by actually measuring the angle formed between side a and a horizontal or level surface.
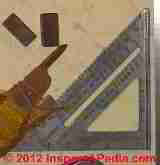
Our carpenter's square at left is one such tool, though there are some neat level tools that, placed on a slope, will simply give you the angle directly as a readout.
Example: if our stairs are to run from the two extreme ends of the 2x stringer we illustrate above,
and if that length (after cutting to "fit" the hill and desired stair run) measured 100 inches exactly,
using just that known length of the hypotenuse of the triangle we would obtain the key measurements of
stair rise c and
stairway run b
by first converting all measurements to inches and then using a table of sine and cosine values.
Suppose we measure angle ab (sketch above) at 30 degrees.
sin of angle ab = (length of the opposite side c / the triangle's hypotenuse a) = a / c = 100 / c
cos of angle ab = (length of the adjacent side b / the triangle's hypotenuse a) = b / a = b / 100
Reading from sine and cosine tables, we'll find that side c (rise) = 50" and that side b (run) = 86.6"
If you don't think this whole sine-cosine process is absolutely horrible for field use in building a set of stairs, then we're not on the same planet.
...
Continue reading at STAIR RISER SPECIFICATIONS or select a topic from the closely-related articles below, or see the complete ARTICLE INDEX.
Or see these
Recommended Articles
- SLIP TRIP & FALL HAZARD LIST, STAIRS, FLOORS, WALKS
- STAIR CODES & STANDARDS - home - you are on this page
- STAIR CONSTRUCTION IDEAL DIMENSIONS
- STAIR CONSTRUCTION, LOW ANGLE SLOPE
- STAIR CONSTRUCTION, SPECIFIC ANGLE or SLOPE
- STAIR CONSTRUCTION, SPECIFIC TOTAL RISE & RUN
- STAIR DESIGNS for UNEVEN / SLOPED SURFACES
- STAIR DIMENSIONS, WIDTH, HEIGHT - home
- STAIR TREAD COLOR CUES REDUCE FALLS for more color cues to reduce falls at steps
Suggested citation for this web page
STAIR DESIGNS for UNEVEN / SLOPED SURFACES at InspectApedia.com - online encyclopedia of building & environmental inspection, testing, diagnosis, repair, & problem prevention advice.
Or see this
INDEX to RELATED ARTICLES: ARTICLE INDEX to STAIRS RAILINGS LANDINGS RAMPS
Or use the SEARCH BOX found below to Ask a Question or Search InspectApedia
Ask a Question or Search InspectApedia
Try the search box just below, or if you prefer, post a question or comment in the Comments box below and we will respond promptly.
Search the InspectApedia website
Note: appearance of your Comment below may be delayed: if your comment contains an image, photograph, web link, or text that looks to the software as if it might be a web link, your posting will appear after it has been approved by a moderator. Apologies for the delay.
Only one image can be added per comment but you can post as many comments, and therefore images, as you like.
You will not receive a notification when a response to your question has been posted.
Please bookmark this page to make it easy for you to check back for our response.
IF above you see "Comment Form is loading comments..." then COMMENT BOX - countable.ca / bawkbox.com IS NOT WORKING.
In any case you are welcome to send an email directly to us at InspectApedia.com at editor@inspectApedia.com
We'll reply to you directly. Please help us help you by noting, in your email, the URL of the InspectApedia page where you wanted to comment.
Citations & References
In addition to any citations in the article above, a full list is available on request.
- Best Practices Guide to Residential Construction, by Steven Bliss. John Wiley & Sons, 2006. ISBN-10: 0471648361, ISBN-13: 978-0471648369, Hardcover: 320 pages, available from Amazon.com and also Wiley.com. See our book review of this publication.
- ASTM F 1637, Standard Practice for Safe Walking Surfaces, (Similar to the above standard
"Falls in the home and public places are the second leading cause of unintentional injury deaths in the United States, but are overlooked in most literature. This book is unique in that it is entirely devoted to falls. Of use to primary care physicians, nurses, insurance adjusters, architects, writers of building codes, attorneys, or anyone who cares for the elderly, this book will tell you how, why, and when people will likely fall, what most likely will be injured, and how such injuries come about. "
- "A Parametric Study of Wall Moisture Contents Using a Revised Variable Indoor Relative Humidity Version of the "Moist" Transient Heat and Moisture Transfer Model [copy on file as/interiors/MOIST_Model_NIST_b95074.pdf ] - ", George Tsongas, Doug Burch, Carolyn Roos, Malcom Cunningham; this paper describes software and the prediction of wall moisture contents. - PDF Document from NIS
- ANSI A1264.2
- ANSI B101
- ASTM D-21, and ASTM D2047
- UL-410 (similar to ASTM D-21)
- NSFI 101-B (National Floor Safety Institute)
- NSFI Walkway Auditing Guideline (WAG) Ref. 101-A& 101-B (may appear as ANSI B101.0) sets rules for measuring walkway slip resist
- OSHA - (Dept of Labor CFR 1910.22 does not specify COF and pertains to workplaces) but recognizes the need for a "qualified person" to evaluate walkway slipperiness
- ADA (relies on the ANSI and ASTM standards)
OSHA estimates that there are 24,882 injuries and as many as 36 fatalities per year due to falls from stairways and ladders used in construction. Nearly half of these injuries are serious enough to require time off the job--11,570 lost workday injuries and 13,312 non-lost workday injuries occur annually due to falls from stairways and ladders used in construction. These data demonstrate that work on and around ladders and stairways is hazardous. More importantly, they show that compliance with OSHA's requirements for the safe use of ladders and stairways could have prevented many of these injuries. - osha.gov/doc/outreachtraining/htmlfiles/stairlad.html
CONTINUE READING or RECOMMENDED ARTICLES.
- Carson, Dunlop & Associates Ltd., 120 Carlton Street Suite 407, Toronto ON M5A 4K2. Tel: (416) 964-9415 1-800-268-7070 Email: info@carsondunlop.com. Alan Carson is a past president of ASHI, the American Society of Home Inspectors.
Thanks to Alan Carson and Bob Dunlop, for permission for InspectAPedia to use text excerpts from The HOME REFERENCE BOOK - the Encyclopedia of Homes and to use illustrations from The ILLUSTRATED HOME .
Carson Dunlop Associates provides extensive home inspection education and report writing material. In gratitude we provide links to tsome Carson Dunlop Associates products and services.

