
 Insulation Installation
Chapter 12 of How to Build Your Dream Home © 2020 InspectApedia.com

- POST a QUESTION or COMMENT about how to identify the architectural style of buildings and building components
How to choose & install building insulation for an owner-built home.
This article series provides an updated version of Hubbard Cobb's Your Dream Home, illustrated by Sigman-Ward, first published by Wm. H. Wise & Co. New York, 1950.
InspectAPedia tolerates no conflicts of interest. We have no relationship with advertisers, products, or services discussed at this website.
- Daniel Friedman, Publisher/Editor/Author - See WHO ARE WE?
How to Install Insulation
This is Chapter 12 of BUILD YOUR DREAM HOME at InspectApedia.com - online encyclopedia of building & environmental inspection, testing, diagnosis, repair, & problem prevention advice.
This web page is also available as INSULATING YOUR SELF-BUILT HOME [eBook], or as a PDF image at INSULATE YOUR SELF-BUILT-HOME [PDF] original page images.
As soon as the shell of the house is complete and tight against the weather, the job of insulating the walls and roof can get underway.
The purpose of insulation is to reduce the passage of heat through the walls and roof. Heat always flows from hot to cold and, therefore, in winter the insulation tends to keep the heat in the house while in summer it protects the interior of the house by keeping out the heat of the sun.
The value of insulation is so well established that it is taken for granted in all high-quality house construction. In the first place, a complete and property applied insulation job will save as much as 35 per cent on heating costs per year.
Considering the fact that the cost of the materials for insulating the basic house is only about $95. (1950 dollars, or about $1000. in 2019 dollars), it is easy to see that the saving on fuel costs in just a few years will pay this entire sum. And after that, the yearly saving goes into the pocket of the home-owner.
But insulation does more than just cut down on fuel bills. It makes the walls proof against annoying and unhealthy drafts and it also helps to make the house more resistant against the sudden spread of fire.
One of the basic flaws in our modern wall construction is the fact that there is an open space between the inner and outer wall surfaces. This space acts as a chimney for any fire originating in the basement or at the base of a wall. When this space between wall surfaces is filled with a fire-resistant insulation, the wall does not provide such a fire with a convenient chimney.
Another advantage of insulation is that it has certain soundproofing characteristics. While in most cases only the outside walls are insulated, as this is where a great deal of heat loss occurs, it is well worth the added time and cost to insulate some of the inner walls such as the bathroom or any other room where you wish to reduce the transmission of noise.
There are two types of thermal insulation. The first kind works on the principle that motionless air is a poor conductor of heat. This sort of insulation is made of vegetable or animal fibers or minerals. Between each particle of insulation is a minute air cell. The air in these pockets is held motionless by the matter that surrounds it.
It is obvious that the greater the thickness of the insulation, the greater will be its insulating abilities. Once a certain point is reached, however, the fact that the thickness of the insulation is doubled does not mean that its insulating value is also doubled.
The other type of insulation is made out of thin sheets of shiny metal or metal foil attached to a paper backing. This insulation reflects the heat back toward its source. In winter, it reflects heat back into the house—in summer back toward the sun.
Many authorities feel that the most efficient insulation of all is a combination of the air-cell and the reflective types.
What to Look For in Choosing Insulation
The most important single item to look for in any type or brand of insulation is a low thermal conductivity. But this should not be the only consideration. A good insulation should also resist fire. Materials such as vegetable or wood fibers can be treated during the manufacturing process so that they will be fire-resistant. Mineral insulation does not require this treatment.
Insulation should also be treated so that insects or rodents will not use it for a nesting place. A good insulation should not readily absorb and hold moisture because once insulation becomes damp, it loses its insulating qualities. Do not make the mistake of trying to save a few dollars by using such things as sawdust, hay or straw for insulation. While they will do the job to a certain extent, they are all highly inflammable and will attract all sorts of wild life.
Importance of a Vapor Barrier
With the exception of reflective insulation, all types must be provided with some sort of vapor barrier. The reason for this is that the air inside a house during the winter months will contain a certain amount of moisture in the form of a gas or vapor. This moisture vapor passes through the interior wall, then through the insulation and finally strikes the cold, outside-wall sheathing, where it condenses into a liquid or, if the wall is cold enough, into frost, which in time will turn back into water.
Moisture at this point may rot out the sheathing or be absorbed by the insulation, thus reducing its effectiveness. The solution to this problem is to apply a vapor barrier of treated paper over the inside or warm side of the insulation. This will prevent the water vapor from penetrating into the insulation.
Many brands of insulation come with this paper barrier already in place. In other cases, after the insulation is in place, it is covered with a vapor barrier. Be certain that the paper used for this job is actually vapor proof; ordinary building paper is not satisfactory.
Types of Insulation

Fig. 1. Blanket or roll type of insulation without any vapor barrier of paper. Insulation of this type should be covered over with vapor-proof paper after it has been installed.
There are a great many types as well as brands of insulation on the market.
One kind is flexible, and called roll or blanket insulation. It comes in rolls up to 100 feet in length. See Fig. 1. The width is made to fit between studding and varies from 16" to 24". The thickness of flexible insulation will run all the way from to a little over 3".
The insulating material may be either vegetable fibers or minerals. In either case they are encased in a heavy paper covering. On the edges of this covering is a small paper flange, which is used to attach the insulation to the studding or joists. Flexible insulation is very easy to apply, and the work goes very fast.
How to Install Flexible Insulation
The most important point to keep in mind when insulating is that no sort of insulation will give satisfactory results unless it is installed according to exact specifications and the job is done in a workmanlike manner. When working with flexible insulation the first rule is to use as long runs of insulation as possible. Use the short lengths for patching and for small spaces, but avoid cutting and patching as much as you possibly can.
Flexible insulation is placed so that it fits snugly between the studding. It should not, however, be forced up against the outside wall sheathing. The reason for this is that a small dead air space between the sheathing and the insulation will act as additional insulation.
Also, in the event that some water vapor does penetrate through the insulation and condenses on the sheathing, this air space tends to protect both insulation and sheathing from damage. If this air space is to be effective in aiding the insulation, the air in it must not move—it must be dead. That is why it is important that the insulation is tightly attached to the studding and that the joint between the studding and the flange on the insulation is covered over in some fashion.
Flexible insulation comes with two types of flanges. In one case the flange is tacked to the side of the studding. If this type of insulation is used, it is wise to tack strips of lath over the flange so that you get a good tight joint. See Fig. 2.
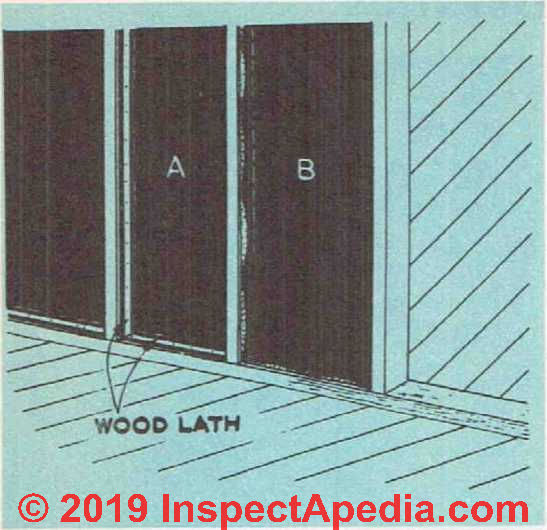
Fig. 2. When insulation is nailed along the face of wall studding, the seam should be covered over with strips of wood lath to produce a tight joint.
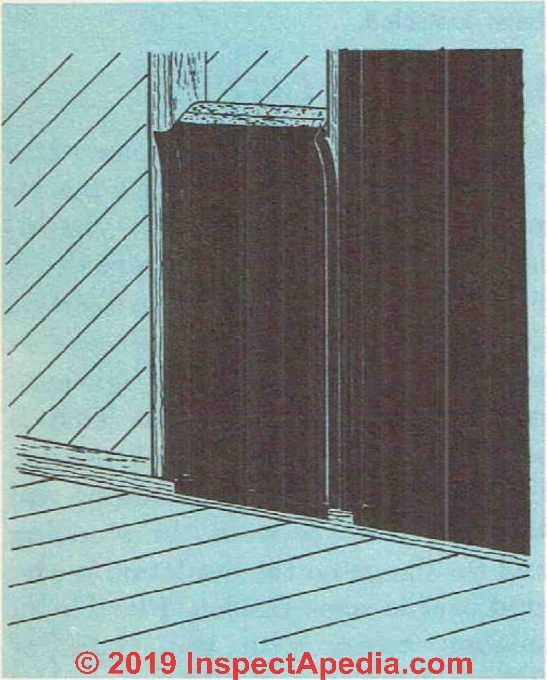
Fig. 3. Blanket or roll type of insulation with an extra wide nailing flange that allows it to be nailed to the outside edge of the studding, thus eliminating the need for laths along the seams.
The other type of flange you may encounter is a little wider than the first one and has a right-angle bend. This bend allows the flange to be brought over to the face of the studding and nailed. See Fig. 3. No lath is required to seal over the joint between flange and studding. The interior wall material will do the job by itself. The insulation should not extend out so far that it will come into direct contact with the interior wall surface.
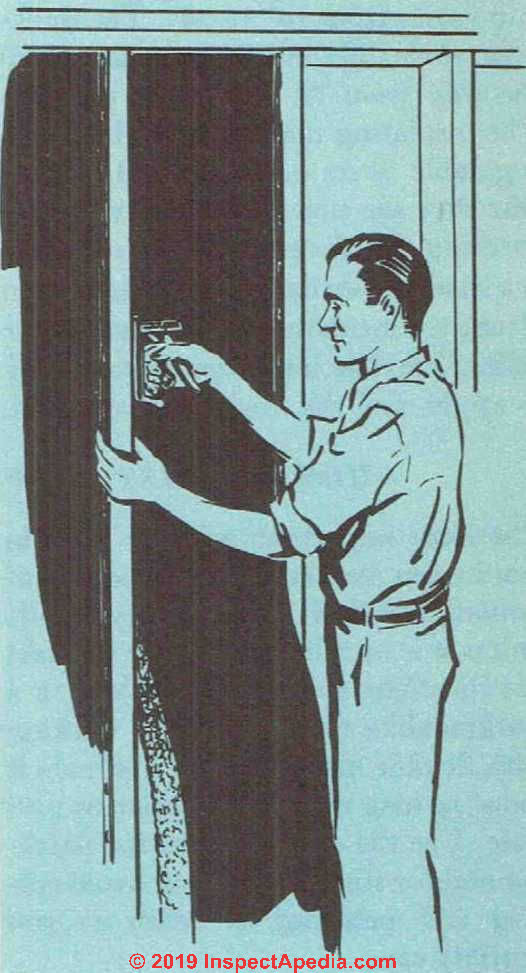
Fig. 4. Applying insulation with a special stapling machine is a great time saver.
A small air space here will help, just as the one between insulation and sheathing does.
Flexible insulation can be nailed to the studding with large-head roofing nails, but you will find that a stapling machine built especially for this sort of work will finish the job much quicker.
See Fig. 4. It will also allow you to have one hand free and this is advantageous in centering the insulation and getting the flanges to line up along the studding. Stapling machines can be rented or borrowed from your local insulation dealer.
After all the long runs between studding have been filled, take the left-over pieces of insulation and fill in all small spaces. Do not leave any surfaces, no matter how small, uninsulated. You may find it necessary to cut up the material into very small pieces in order to fit it around the window and door framing.
Article Contents
BATT INSULATION

Fig. 5. Batt insulation with nailing flange of heavy paper.
This insulation is made from about the same materials as flexible insulation. It comes in short lengths measuring up to 48" and the width varies so the bats will fit snugly between studding spaced on center from 16" to 24". The thickness of this type of insulation runs from 2" to 3".
Batts are usually encased, or at least backed on one side, with paper. If bats without paper are used or if the paper is not vapor-proof, be sure to install a vapor barrier over the insulation after it is in place. See Fig. 5.
Installing Batt Insulation
There are several ways to install bats depending on the job and the kind of bat used.
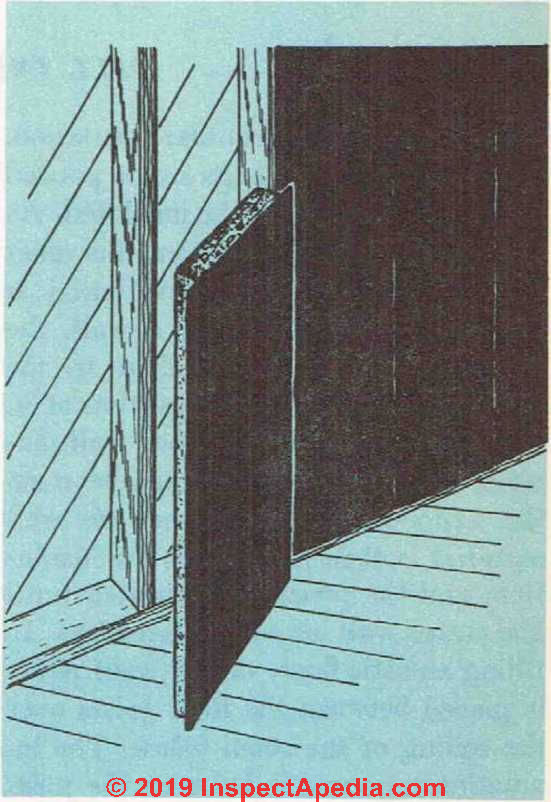
Fig. 6. Bat type of insulation.

Fig. 7. Insulating bats without a nailing flange can be held in place under the roof by means of wire.
If there is no nailing surface provided on the bat, it can be wedged between the studding, joists or rafters. See Fig. 6. It is important to make sure that the bats are butted close together so there will be no air leaking through joints.
When it comes to installing the bats on roof rafters, some device must be employed to hold them in place. A simple method of anchoring them in position is to drive some nails into the sides of the rafters on each side and then lace thin wire between these nails. See Fig. 7. Wood laths can also be used to hold the bats in place. When the bats are encased in paper and have a nailing flange, they are installed in the same manner as flexible insulation.
Loose Fill Insulation
This is also called granular insulation. It is loose, comes in bags and is poured into the area that is to be insulated. As it provides no vapor barrier, this must be installed before the insulation is poured in. In the case of a wall, the vapor-proof paper is tacked to the studding, or at least to a portion of it, and then some of the interior wall material is nailed up.
The area between the vapor-proof paper and the wall material is then filled with the insulation, and the process is repeated until the entire wall area has been filled. In filling an attic floor, vapor-proof paper is placed between the floor joists over the ceiling of the room below.
The insulation is poured in between the joists and leveled off. See Fig. 8. Fill insulation is used most often on old work the wall spaces by means of a hose and because it can be effectively blown into air pressure.
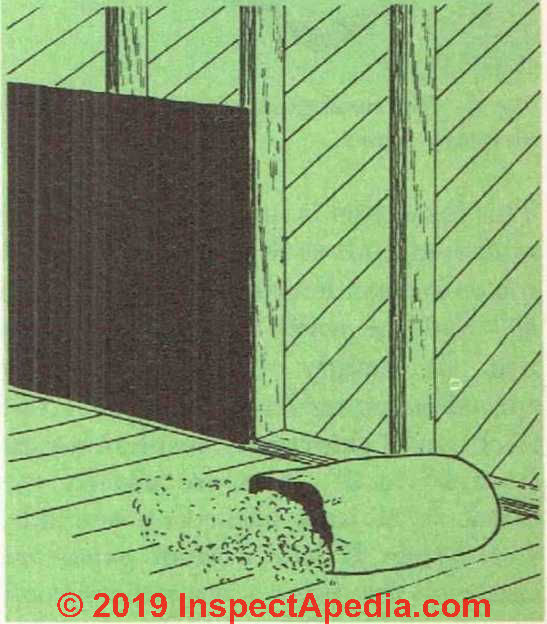
Fig. 8. Loose fill insulation can be poured into the wall space after
See CELLULOSE LOOSE FILL INSULATION
See VERMICULITE INSULATION - home
Rigid Insulation Foam Board
This insulation is made out of wood or vegetable fibers that are compressed into sheets under heavy pressure. See Fig. 9. There are two basic types, one used on the outside of the wall and one used for interior work. The exterior type is called structural fiberboard insulating sheathing and is used in place of wood sheathing. The interior type is called insulating board and serves as an interior wall as well as providing insulation.
Some of these insulating boards are extremely thin and do not offer the full amount of insulating value that may be required. For this reason, when you plan to use an insulating board for the interior wrall material it is wise to use some additional type of insulation between the wall studding.
Reflective Insulation
This insulation, as stated previously, differs from all others in that it prevents the transmission of heat through a surface by reflecting the heat back toward its source. It is made out of thin sheets of aluminum or heavy paper coated with aluminum. See Fig. 10. It is applied between the studding in about the same manner as flexible insulation. One of the most important things to remember when installing this type of insulation is that the surface must be bright and shiny.
If the surface becomes dirty or coated with dust, it will no longer reflect heat and the thin film of metal will be of little use as far as insulation goes. The second point that you must keep in mind is that there must be a space of at least 1 inch between the insulation and the inner and outer wall surfaces.
If the insulation is placed tightly against the outside sheathing, it will have no insulation value at all.
The best procedure when you install reflective insulation is to place it so that it comes right down the middle of the total space between inner and outer wall surfaces. If you install flexible insulation with one side coated with aluminum foil, put it up just as you would ordinary flexible insulation, keeping the side with the aluminum 1 inch away from the wall surface.
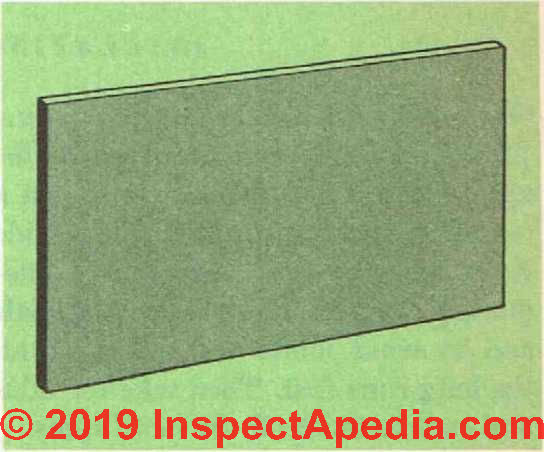
Fig. 9. Sheet of rigid insulating board.
The application of structural fiber-board insulating sheathing has been discussed in the section on sheathing. The application of the interior insulating board is covered in the chapter dealing with interior wall materials.
See details at FOAM BOARD INSULATION TYPES
Insulating the House
Once the builder understands the purpose of insulation and how it works, the application is not difficult. It is just a matter of making sure that all outside walls and the roof surface are adequately covered. To conserve materials and to avoid joints and seams, do all the long runs first. Then take the odds and ends to finish off the small spots.
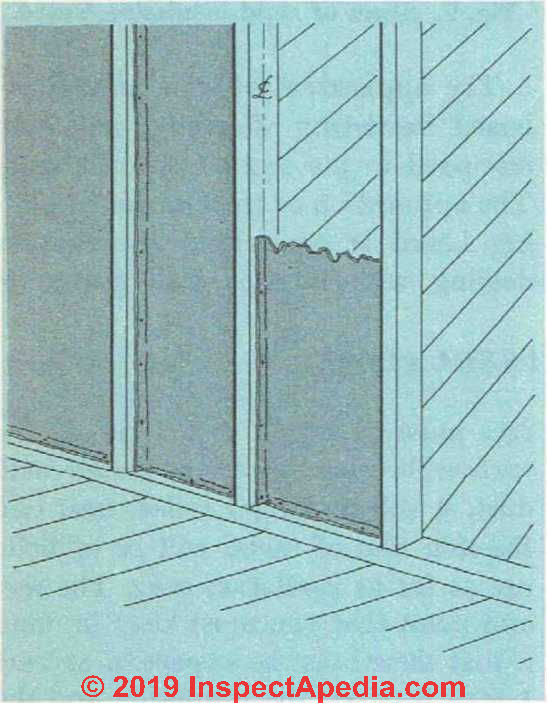
Fig. 10. The reflective type of insulation should be installed as near to the center of the wall cavity as possible. It should never be placed up light against the wall sheathing.
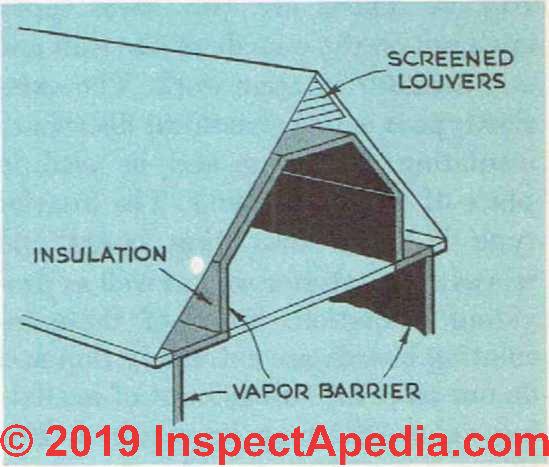
Fig. 11. When the attic of the house is to be used for living purposes, the side walls and the roof should be insulated as shown above.
Insulating the walls should offer no great problems. But when it comes to the roof many persons run into difficulties. The first question is just where the insulation should go. Should it be placed under the roof between rafters or should it go under the attic floor between joists?
The answer depends entirely upon what purpose the attic is to serve. If you plan to use the attic for living purposes—even as a den or study—then insulate along the roof rafters. See Fig. 11. If the attic is to serve only as a storage area, the insulation should go on the floor.
When the attic is not to be heated during the winter, there is a definite advantage in insulating the floor rather than the roof. If the roof is insulated, the entire attic has to be considered as part of the total house area to be heated.
But if the floor is insulated and the attic door kept closed, you have removed a good many cubic feet of space from the overall amount that must be heated and this will help to further reduce your fuel bills. See Fig. 12.
Insulating the attic floor is not very difficult but the job must be done before the sub-floor goes on. If flexible or bat insulation is used, it can be tacked between the floor joists even if there is no ceiling on the room below.
If the fill type of insulation is used, you will have to have a ceiling below to support it. Put down the vapor-proof paper first and then pour the insulation on over this.
After the insulation is down, a subfloor is not necessarv, but you should put down a few wide boards to serve as a surface on which to walk.
Insulating the roof is much the same as insulating the walls. The insulation is placed between the rafters and care should be taken not to let it come directly against the roof sheathing. The insulation should not be brought up along the rafters all the way to the roof-peak, however.
There must be an air space between the insulation and the peak of the roof if the attic is going to be comfortable. The best procedure to follow is to bring the insulation up along the rafters until you come to the collar beams that tie the rafters together.
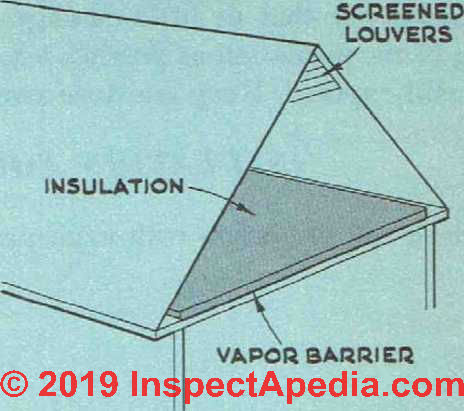
Fig. 12. If the attic is not to be used for living purposes, insulating the attic floor will eliminate heat loss and make the house more comfortable during the hot weather.
Bring the insulation across between these collar beams and then down between the rafters on the opposite side. When you do this work with flexible insulation, you will be able to use long runs that will go from the base of the rafters on one side to the base of those on the other without a single seam or joint. With the insulation placed between the collar beams there will be an air space of several feet between the top of the insulation and the peak of the roof.
This air space should be vented by means of louvres placed at each gable end of the house as near to the peak as possible. Because the collar beams are nailed to the side of the rafters it will be necessary to tack some 2" wood strips to their sides so that the distance between these beams will be the same as that between the rafters.
Best practice: instead of gable end vents, continuous intake venting along the soffits or eaves and continuous exit venting along the ridge provide optimum attic ventilation that will reduce house cooling costs and avoid attic moisture and mold problems.
Once the house has been properly insulated, see that as little damage is done to the insulation as possible while it is still exposed. Keep moisture away from it, and if holes must be cut into it for lighting or plumbing lines, make them as small as possible and do not disturb the insulation.
INSULATION FOR THE BASIC HOUSE
1600 sq. ft
3" thick roll insulation with vaporproof paper or foil facing
...
Continue reading at PLUMBING SYSTEM INSTALLATION - next chapter in this book, or go to book contents at BUILD YOUR DREAM HOME, or select a topic from the closely-related articles below, or see the complete ARTICLE INDEX.
Or see these
Recommended Articles
- BASEMENT CEILING VAPOR BARRIER
- BUILD YOUR DREAM HOME
- CELLULOSE LOOSE FILL INSULATION
- ENERGY SAVINGS in BUILDINGS - home
- FOAM BOARD INSULATION TYPES
- FRAMING DETAILS for BETTER INSULATION
- HEAT LOSS in BUILDINGS - home
- HOUSEWRAP AIR & VAPOR BARRIERS
- INSULATION LOCATION - WHERE TO PUT IT - home
- INSULATION R-VALUES & PROPERTIES
- REFLECTIVE INSULATION
- VAPOR BARRIERS & CONDENSATION in BUILDINGS - home
- WINDOW / DOOR AIR LEAK SEALING HOW TO
Suggested citation for this web page
INSULATING YOUR SELF-BUILT HOME at InspectApedia.com - online encyclopedia of building & environmental inspection, testing, diagnosis, repair, & problem prevention advice.
Or see this
INDEX to RELATED ARTICLES: ARTICLE INDEX to BUILDING ARCHITECTURE
Or use the SEARCH BOX found below to Ask a Question or Search InspectApedia
Or see
INDEX to RELATED ARTICLES: ARTICLE INDEX to BUILDING DAMAGE, DISASTER, REPAIRS
Or use the SEARCH BOX found below to Ask a Question or Search InspectApedia
Ask a Question or Search InspectApedia
Share this article:Questions & answers or comments about how to identify the architectural style of buildings and building components
Try the search box just below, or if you prefer, post a question or comment in the Comments box below and we will respond promptly.
Search the InspectApedia website
Note: appearance of your Comment below may be delayed: if your comment contains an image, photograph, web link, or text that looks to the software as if it might be a web link, your posting will appear after it has been approved by a moderator. Apologies for the delay.
Only one image can be added per comment but you can post as many comments, and therefore images, as you like.
You will not receive a notification when a response to your question has been posted.
Please bookmark this page to make it easy for you to check back for our response.
IF above you see "Comment Form is loading comments..." then COMMENT BOX - countable.ca / bawkbox.com IS NOT WORKING.
In any case you are welcome to send an email directly to us at InspectApedia.com at editor@inspectApedia.com
We'll reply to you directly. Please help us help you by noting, in your email, the URL of the InspectApedia page where you wanted to comment.
Citations & References
In addition to any citations in the article above, a full list is available on request.
- In addition to citations & references found in this article, see the research citations given at the end of the related articles found at our suggested
CONTINUE READING or RECOMMENDED ARTICLES.
- Carson, Dunlop & Associates Ltd., 120 Carlton Street Suite 407, Toronto ON M5A 4K2. Tel: (416) 964-9415 1-800-268-7070 Email: info@carsondunlop.com. Alan Carson is a past president of ASHI, the American Society of Home Inspectors.
Thanks to Alan Carson and Bob Dunlop, for permission for InspectAPedia to use text excerpts from The HOME REFERENCE BOOK - the Encyclopedia of Homes and to use illustrations from The ILLUSTRATED HOME .
Carson Dunlop Associates provides extensive home inspection education and report writing material. In gratitude we provide links to tsome Carson Dunlop Associates products and services.
 |
HOME | ABOUT | ASK a QUESTION | CONTACT | CONTENT USE POLICY | DESCRIPTION | POLICIES | PRIVACY | |
| © 2026 - 1985 Publisher InspectApedia.com - Daniel Friedman | |||||||||