
 Window & Door Installation
Chapter 10 of How to Build Your Dream Home © 2020 InspectApedia.com

- POST a QUESTION or COMMENT about how to identify the architectural style of buildings and building components
How to install windows & doors in an owner-built home.
This article series provides an updated version of Hubbard Cobb's Your Dream Home, illustrated by Sigman-Ward, first published by Wm. H. Wise & Co. New York, 1950.
From site selection and obtaining financing through each step in construction of a single family home the simple procedures and drawings in this book are still useful for anyone building or repairing a home or other small structure.
InspectAPedia tolerates no conflicts of interest. We have no relationship with advertisers, products, or services discussed at this website.
- Daniel Friedman, Publisher/Editor/Author - See WHO ARE WE?
Window & Door Installation
 This is Chapter 10 of BUILD YOUR DREAM HOME at InspectApedia.com - online encyclopedia of building & environmental inspection, testing, diagnosis, repair, & problem prevention advice.
This web page is also available as WINDOW & DOOR FRAMES, INSIDE PARTITIONS, FLASHING INSTALLATION [eBook] ,
or as a PDF image at WINDOW & DOOR FRAMES, INSIDE PARTITIONS, FLASHING INSTALLATION - [PDF] original page image
[Click to enlarge any image]
Types of Window Frame
There are three types of window frame that you can use. One is the knocked-down type, which you can get at any lumber yard. All the pieces are cut and fitted, you have only to assemble them. You can get a sheet of directions on just how this is done from your lumber yard, and you should have no trouble.
In fact, even without directions the job is simple enough. If you want to pay just a little more, you can get frames that are already assembled from a local lumber concern. You can also make the frames yourself, but this is not recommended because of the time and skill required to make a really good frame by hand.
Knocked-down frames and those that are already assembled are made by machine and are more precise than those that are made by hand.
Setting in Window Frames
The first part of the job in setting in window frames is to assemble the various parts of the sash. In good construction, all joints between the members of the frame are set in white lead. This seals the joint against moisture and insures that the frame will have a good long life.
You will have to tack a few temporary braces across the frame to hold it plumb until it is installed in the opening that was cut in the wall for it. Before the frame is installed, give it a good priming coat of white-lead paint. This is very important, for unless all the wood on the frame is covered with paint, it will absorb moisture and you will be troubled with sticking sashes and even rotting frames.
The two important points in setting the frames in the openings are to be sure that the frames are plumb and to be sure that there is no air space between the frame and the studding around the opening, which would allow air or moisture to get into the rooms. If the openings in the frame were cut accurately according to the dimensions given in the framing plans, tack a strip of waterproof building paper 8" or 10" wide all around the opening to the sheathing. If the opening is too large, install a false casing around it before putting the building paper on. This casing should come out flush with the sheathing.
If you used sheathing that is 3/4" thick, the frame can go into place without any additional work, but if you used a thinner sheathing, you will have to build onto the frame to make it fit properly.
This can be done by tacking wood strips to the rear of the frame casing. The strips should be wide enough to make up the difference between the actual thickness of the sheathing used and three-quarters of an inch, which is the thickness of the sheathing that the frame was intended for.
Take plenty of time when placing the frame in the opening to see that it is properly centered and is plumb. Small wedges around the sides will help you get it just right. After this, nail it in place with 8d common nails. Sink the heads below the wood surface and fill the resulting hole with putty.
To make sure that you have a good, airtight joint between frame and rough opening, it is wTell worth taking the time to pack insulation between them. This takes only a minute.
The sashes can be installed now or later on. If you are going to use plaster on the walls, it is best to hold off installing the sashes, because you will need plenty of air circulating through the house to dry out the plaster. Also, because of the large amount of moisture present in the plaster, the sashes are almost sure to absorb some of it and expand, which will cause them to stick.
Instsall Window Glazing
You can purchase sashes with the glass already in place, but there is a considerable saving in doing this work yourself. It is one of those jobs that you can do at odd moments—at the end of a working day perhaps, when you do not have time or energy enough to undertake anything big.
There are several grades of glass, but “A” and “B” are adequate for our purposes. The glass should be cut 1/8" or 1/16" smaller than the opening in the sash to allow for any irregularities.
Before the glass is put in, the entire sash should be given a priming coat of white-lead paint, just as was done with the frame.
Be sure that the little recess that the glass fits against is wrell painted; unless it is, the wood will absorb the oil out of the putty and cause it to dry out and crack.
Now apply a thin bed of putty along the shoulder of the recess and force the pane gently
into place until the putty makes contact all along the edges of the glass. Now install the glazier points. You will need between 4 and 6 of these along each edge. They can be driven into place with a screwdriver, but be careful not to crack the glass.
After they are in place, apply the triangular strip of putty that makes a tight joint between the glass and the sash. You can use an ordinary putty knife and, after you
have done a few sashes, you will probably acquire considerable skill. If you wish, you can use a special little tool for this purpose that is a lot easier to handle than an ordinary putty knife. Give the putty a couple of days to dry and then give it a coat of paint.
Installing Exterior Door Frames
Just like window frames, door frames can be had all pre-cut and ready to be fitted together. The same care in regard to coating joints with white lead and giving the frame a priming coat of paint, should apply to these frames as to window frames.
The first step is to install a door sill, and this should be just thick enough so that it comes up flush with the finished floor. If you are going to lay a finished floor of hardwood, the sill should extend above the sub-floor for the thickness of the finish flooring. If you are going to use some other type of flooring, such as linoleum, figure out the thickness of this material, which will probably be 3/32" or 1/8", and add the thickness of the plywood or composition board that is going on over the sub-flooring.
Once you have this figure, cut into the house sill to the necessary depth to allow the door sill to come even with the finished floor. Door sills, or thresholds, are usually made of hardwood. You can also get inetal ones with a spring-loaded lip which engages into a recess cut along the bottom edge of the door, thus making a tight joint.
Take the same precautions to get the door frame on plumb that you did with the windows. Use tar paper or building paper around the edges to make a tight joint, and also pack in insulation.
There is no point at this time in hanging the outside doors; if you do, they are certain to be damaged as materials are brought into the house.
Build Interior Partition Walls
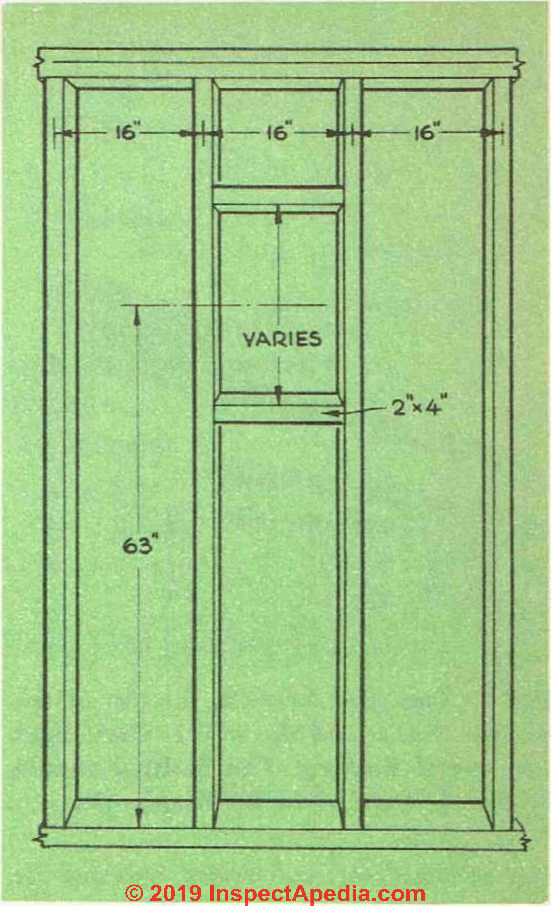 The next job at hand is to put up the framework for the inside partitions. This is built in just the same way as that for the outside walls. A 2" x 4" sole plate is nailed to the floor and the studding spaced along this even' 16".
Be sure to get each piece of studding plumb. Along the top of the studding is a double 2" x 4" that serves as a top plate. Interior partitions can be made up in sections on the floor and then set up into position. Be sure that vour measurements and cutting are accurate, so that the partitions come snug against the ceiling joists.
The floor plans show interior partition framing along with the measurements for the door and closet openings. Fig. 15 in Chapter 8 FRAMING THE HOUSE show's a detail of how the interior partitions are joined to the outside wall.
You will note from the floor plans that one wall in the bath is framed with 2" x 6"s rather than 2" x 4"s. This is done to provide enough room inside the wall for the vent stack of the plumbing system. If ordinary 2" x 4"s were used, the wall would not be wide enough for the vent stack to pass through and you would have to build some sort of box around it. The extra thickness also allows recessed medicine cabinets and shelves to be built into the wall.
Fig. 1. Framing and opening in the bathroom wall for the medicine cabinet.
If you are going to use a warm-air system with wall registers for heating, openings for these must be left in the partition walls. The same holds true if recessed convectors are to be used.
Framing around the chimney and fireplace should be kept 2" away from the masonry, and the space between the wood and masonrv should be filled with a fire-resistant insulation.
Framing around door openings is double, and you can save yourself a lot of work right here by making these openings as accurate and plumb as possible.
Fig. 1, illustrates how to frame the opening above the bathroom wrash basin for the recessed medicine cabinet.
This cabinet will be installed after the bathroom wall has been covered. You will find that when special horizontal studs have been installed between several of the vertical studs in the bath, these serve as bases to which you can attach the various bathroom wall fixtures, such as towel racks, soap dishes, etc.
If plaster is used for the bathroom interior wall, these additional header-studs are not vital, because fixtures can be attached to the plaster with various types of anchor bolts.
The studs are necessary, however, if wallboard is used, because ’wallboard alone is not strong enough to support these fixtures and it is not always practical to place the fixtures where they can he attached to the wall studding.
Install Flashing at Chimney, Windows, Doors, Plumbing Vents
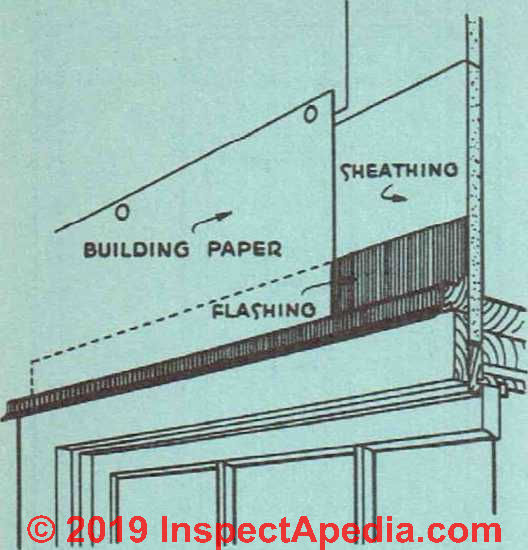 Metal flashing to make a watertight about the house. For example, it is joint is required in a number of places required around the chimney, at the top of windows and doors, around the vent pipe where it comes through the roof, around dormer windows and at similar points. Either copper, aluminum or stainless steel can be used for flashing.
Fig. 2. The joint between the ton of the window frame and the wall is made tight with metal dashing. The flashing should be installed under the building paper.
Sometimes galvanized iron is used, but this is not too effective because, in time, the metal will rust, and replacing worn or rusty flashing can be a difficult business. The same holds for tar paper, which is often used for flashing on cheap jobs. The best rule to follow when selecting flashing is to use a material that will last at least as long as the roofing or siding.
Copper makes excellent flashing, not only because it is long wearing, but also because it is soft and is easy to work with. Aluminum and stainless steel are just as good as but somewhat more difficult to work with than copper.
Be sure that the nails you use with flashing are rust-proof and that they are made of the same material as the flashing. For example, don’t use aluminum nails on copper flashing.
Flashing is applied to the top of window and door frames before the siding goes on. The flashing is nailed to the sheathing, is brought over the top of the window or door frame, and then bent under and nailed.
In this way, after the siding is in place, the joint between siding and frame is quite watertight and all the nails used to hold the flashing in place are concealed and not exposed to the weather. See Fig. 2.
More details on flashing are covered as we arrive at various points "where it is required.
Book Contents - List of Chapters
BUILD YOUR DREAM HOME at InspectApedia.com - online encyclopedia of building & environmental inspection, testing, diagnosis, repair, & problem prevention advice.
...
Continue reading at SIDING CHOICES & INSTALLATION - next chapter in this book, or go to book contents at BUILD YOUR DREAM HOME, or select a topic from the closely-related articles below, or see the complete ARTICLE INDEX.
Or see these
Recommended Articles
- ARCHITECTURE & BUILDING COMPONENT ID - home
- ARCHITECTURE DICTIONARY of BUILDINGS & COMPONENTS
- BUILD YOUR DREAM HOME
- CONSTRUCTION DICTIONARY
- FLASHING, DOOR DETAILS
- FLASHING MEMBRANES PEEL & STICK
- GLOSSARY of BUILDING TERMS
- LOW-E WINDOW GLAZING
- WINDOW FLASHING & SEALING GUIDE
- WINDOW FLASHING & SEALING GUIDE
Suggested citation for this web page
WINDOW & DOOR FRAMES, INSIDE PARTITIONS, FLASHING INSTALLATION at InspectApedia.com - online encyclopedia of building & environmental inspection, testing, diagnosis, repair, & problem prevention advice.
Or see this
INDEX to RELATED ARTICLES: ARTICLE INDEX to BUILDING ARCHITECTURE
Or use the SEARCH BOX found below to Ask a Question or Search InspectApedia
Or see
INDEX to RELATED ARTICLES: ARTICLE INDEX to DOORS & WINDOWS
Or use the SEARCH BOX found below to Ask a Question or Search InspectApedia
Ask a Question or Search InspectApedia
Share this article:Questions & answers or comments about how to identify the architectural style of buildings and building components
Try the search box just below, or if you prefer, post a question or comment in the Comments box below and we will respond promptly.
Search the InspectApedia website
Note: appearance of your Comment below may be delayed: if your comment contains an image, photograph, web link, or text that looks to the software as if it might be a web link, your posting will appear after it has been approved by a moderator. Apologies for the delay.
Only one image can be added per comment but you can post as many comments, and therefore images, as you like.
You will not receive a notification when a response to your question has been posted.
Please bookmark this page to make it easy for you to check back for our response.
IF above you see "Comment Form is loading comments..." then COMMENT BOX - countable.ca / bawkbox.com IS NOT WORKING.
In any case you are welcome to send an email directly to us at InspectApedia.com at editor@inspectApedia.com
We'll reply to you directly. Please help us help you by noting, in your email, the URL of the InspectApedia page where you wanted to comment.
Citations & References
In addition to any citations in the article above, a full list is available on request.
- In addition to citations & references found in this article, see the research citations given at the end of the related articles found at our suggested
CONTINUE READING or RECOMMENDED ARTICLES.
- Carson, Dunlop & Associates Ltd., 120 Carlton Street Suite 407, Toronto ON M5A 4K2. Tel: (416) 964-9415 1-800-268-7070 Email: info@carsondunlop.com. Alan Carson is a past president of ASHI, the American Society of Home Inspectors.
Thanks to Alan Carson and Bob Dunlop, for permission for InspectAPedia to use text excerpts from The HOME REFERENCE BOOK - the Encyclopedia of Homes and to use illustrations from The ILLUSTRATED HOME .
Carson Dunlop Associates provides extensive home inspection education and report writing material. In gratitude we provide links to tsome Carson Dunlop Associates products and services.
 |
HOME | ABOUT | ASK a QUESTION | CONTACT | CONTENT USE POLICY | DESCRIPTION | POLICIES | PRIVACY | |
| © 2026 - 1985 Publisher InspectApedia.com - Daniel Friedman | |||||||||