 Exterior Siding Choices & Installation
Chapter 11 of How to Build Your Dream Home © 2020 InspectApedia.com

- POST a QUESTION or COMMENT about how to identify the architectural style of buildings and building components
How to choose & install exterior siding.
This article series provides an updated version of Hubbard Cobb's Your Dream Home, illustrated by Sigman-Ward, first published by Wm. H. Wise & Co. New York, 1950.
InspectAPedia tolerates no conflicts of interest. We have no relationship with advertisers, products, or services discussed at this website.
- Daniel Friedman, Publisher/Editor/Author - See WHO ARE WE?
How to Install Exterior Siding
This is Chapter 11 of BUILD YOUR DREAM HOME at InspectApedia.com - online encyclopedia of building & environmental inspection, testing, diagnosis, repair, & problem prevention advice.
This web page is also available as SIDING CHOICES & INSTALLATION [eBook] , or as a PDF image at EXTERIOR SIDING [PDF] original page images
When it comes to the siding for the outside walls of your house, you have a wide choice of materials to choose from. You can use some sort of wood siding, such as shingles, bevel or drop siding, or plywood. Then there are asbestos or asphalt shingles, or stucco, brick veneer or even aluminum siding.
Selecting the Type of Siding
The type of siding used on the walls is going to have a great deal to do with the over-all outside appearance of your home, so make your selection with care. For the man building a house by himself, it is best to stick to materials that lie is more or less used to working with —wood or asbestos or asphalt. Stucco can be applied by the amateur but it calls for different skills than carpentry.
Brick veneer is something that calls for a really skilled brick-layer, because the veneer must be tied to the sheathing and, unless this is done correctly, the veneer may buckle or crack.
Every type of siding can be applied over diagonal or horizontal wood sheathing. If plywood was used for sheathing, special barbed nails must be used to install the siding since ordinary nails will not hold properly in the plywood. If composition sheathing was used, you can apply only bevel or drop siding because shingles cannot be nailed to it. Of course, if you wish to take the time, you can install furring or nailing strips along the sheathing, or recess them into the sheathing, and these strips will serve as a nailing base for shingles or other types of siding.
Building Paper / House Wrap
Before any sort of siding is applied over wood sheathing, it must be covered with building paper. The purpose of this paper is to keep air and moisture out of the house. Homes built without paper will he drafty on windy days. Also, rain or moisture is likely to penetrate through the siding and dampen the sheathing and interior wall. Building paper, on the other hand, should not be counted on to provide any great degree of insulation against heat flow.
There are a great many types of building paper on the market and some of them are worthless for our purpose. The best paper you can buy will be both moisture-resistant and airtight, and be strong enough so that you can put it up easily without its tearing. Some very inexpensive brands of building paper are no better than blotting paper—they are hard to put up because they are so soft that they tear, and rather than shedding water, they absorb it.
Use a good quality of paper and allow plenty for overlap at all seams. Do not have any joints come at the corners of the building because, as far as the siding goes, these are probably the first places that moisture will enter. The paper should be applied over the sheathing in horizontal strips, working from the bottom up. If you use a strong paper, it can be held in place with a few large-head rust-proof roofing nails or with a few wood cleats, which are to be removed as the siding is installed. See Fig. 1.
Some types of composition sheathing come with a covering of waterproof paper; you do not need to put building paper over them. But be very sure that you have the proper sheathing before you decide not to use building paper.
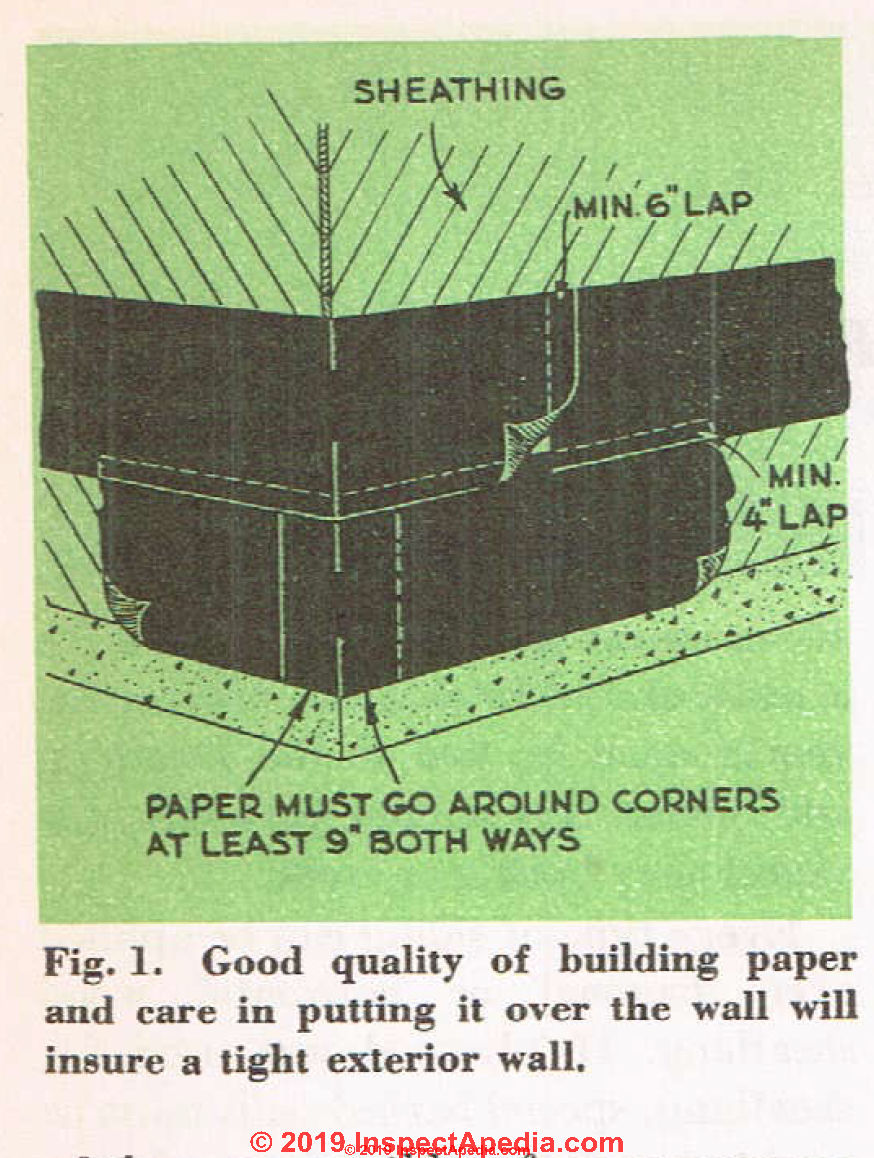
Fig. 1. Good quality of building paper and care in putting it over the wall will insure a tight exterior wall.
Wood Siding: Bevel Siding, Ship Lap, Drop Siding
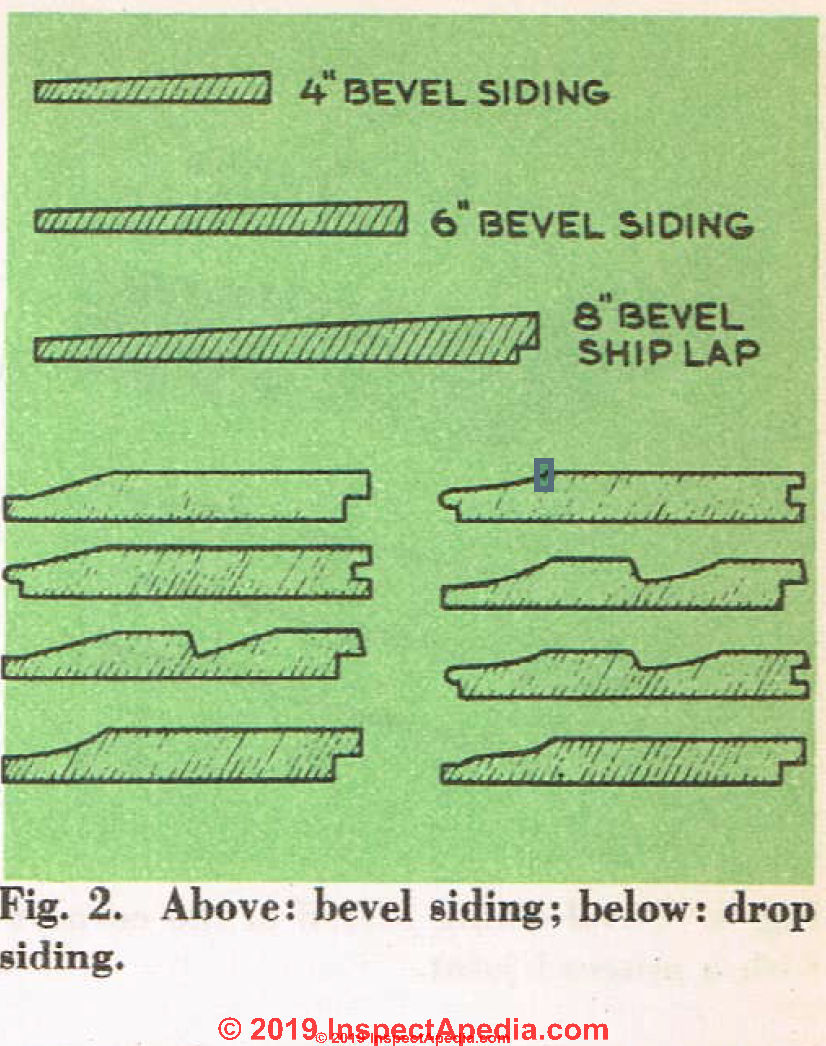 Fig. 2 show's several types of wood siding that are in common use today. Both bevel and drop siding can be had in various widths from 4" up to 12".
Wood Siding Corners, Corner Boards
The first thing that must be done before the wood siding goes up is to decide how the corners are going to be treated. It is very important that you get a tight weatherproof joint between each piece of siding at the corners.
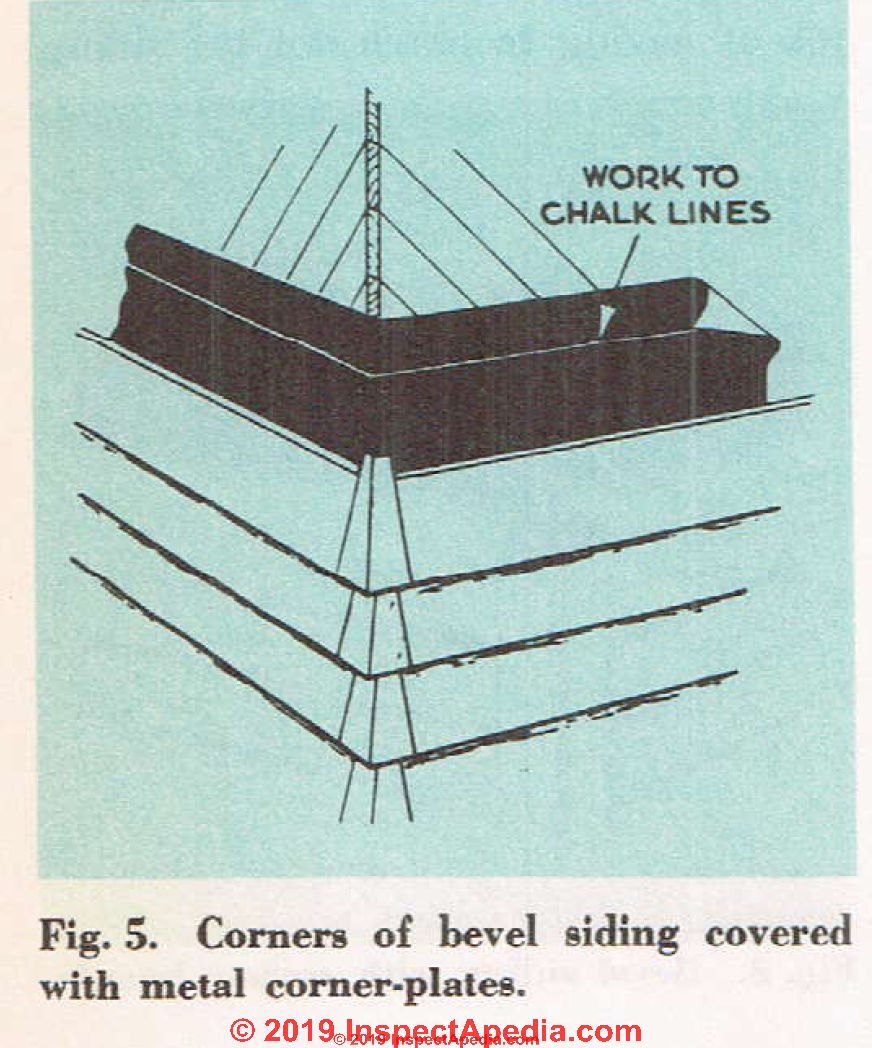
Figs. 3, 4 and 5 [below] show three common methods of treating the corners. Fig. 3 shows the use of corner boards. This produces a very tight joint if the pieces of siding are all cut to the correct length
In Fig. 4 the pieces of siding have mitered joints. Such joints require a good deal of time to make up because each board must be cut and fitted with care or else you wTill have a seam that allows moisture to enter.
Fig. 5 shows a corner made with metal corners, which can be purchased at lumber yards. They are very easy to install.
Fig. 2. Wood Siding Patterns and Types
If you decide to use corner boards, they must be in place before the siding goes on. In some construction, the corner boards are put up after the siding is in place, but this is very bad practice. It leaves open seams between the edges of the boards and the siding that allow moisture to enter unless the time is taken to back each board with oakum and caulking compound.
One of the corners boards should be a little wider than the other so that, when they are overlapped to make a butt joint, they will be of equal width. If you have used composition sheathing-boards, you have another problem, namely, to avoid having the corner boards so wide that there is no place left on the corner posts to nail the siding to. You must remember that if siding is applied over composition sheathing, it cannot be nailed to the sheathing but only to the studs and corner posts.
The corner boards must be somewhat thicker than the siding.
Be sure these boards are on plumb. If they are not, aside from the fact that they will look poorljT, you are going to have a hard time cutting the ends of siding at the right angle to get a tight fit.
The amount of lap given pieces of bevel siding will depend on the width of the siding.
- 4" siding is lapped 3/4";
- 5" siding is lapped 1";
- 6" to 12" siding is lapped 1 1/2"
Of course, yon can vary this somewhat, especially to give a greater amount of lap, so that the top and bottom of the siding will come flush with the top and bottom of window and door openings.
This will eliminate the job of having to notch out the siding so that it can be fitted around these openings. See Figs. 6 and 7.
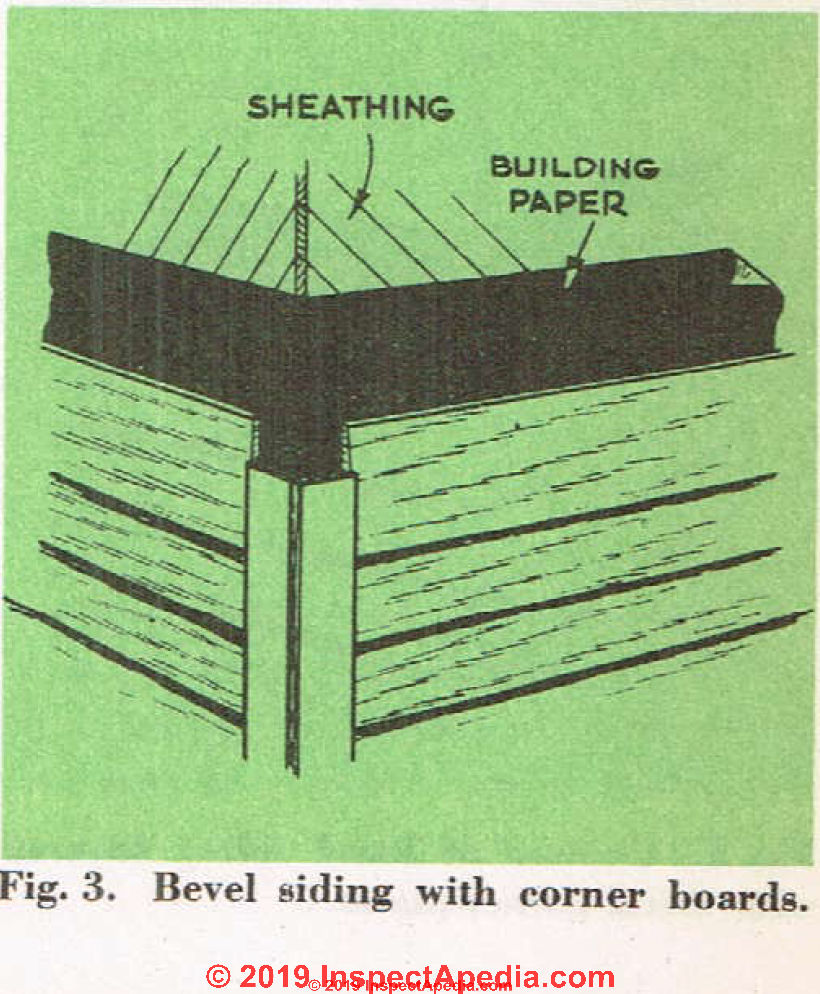
Fig. 3. Bevel siding with corner boards.
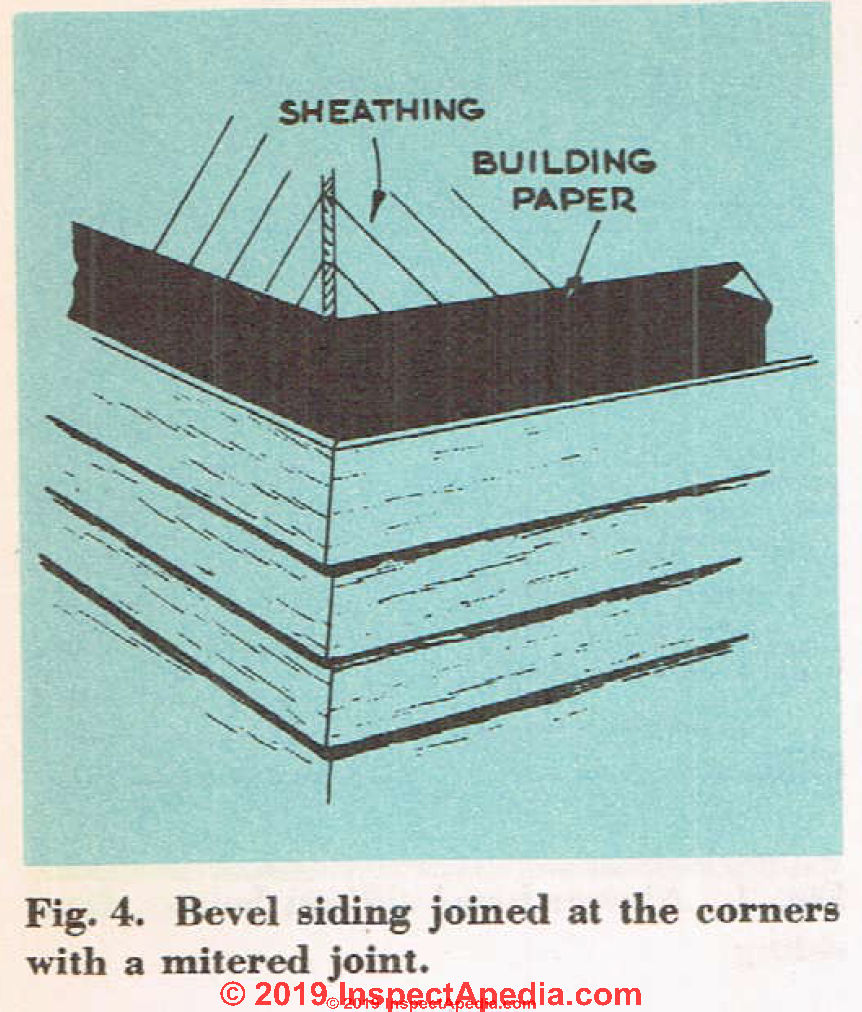
Fig. 4. Bevel siding joined at the corners with a mitered joint.
In view of this, it would be wise to figure out the spacing of the siding before it goes on, so that if a slight variation in the lapping is necessary, it can be distributed among several pieces rather than taken up by just one or two.
It is also a good idea to mark the location of each piece of siding on the corner boards and at some other interval along the wall, so that you will know exactly where each piece is to go; in addition, you can string a line between these points to make sure that each piece is horizontal.
For best results, siding should be fairly well seasoned. The siding should be applied during dry weather and should never go on when wet or over wet sheathing.
Installing Bevel Siding - Standard Clapboards
 The first step in applying bevel siding after the corner boards are up is to tack a strip of wood lath along the bottom of the sill, so that the first piece of siding will have the same slant to it as those that follow.
Some authorities claim it is wise to paint the back of each piece of siding before it is nailed in place. The purpose of this is to prevent moisture inside the house from penetrating the siding and causing the paint on the outside surface to peel.
If the siding is dry and you are willing to take the time required, it is probably worth-while doing this.
On the other hand, if the siding is green or damp, it is best not to seal it up with paint; allow it to go unfinished so that it can dry out.
The ends of the siding, however, should be given a coat of white-lead paint [or its modern substitute, alkyd primer]. It is at the edges mostly, that siding absorbs moisture.
Fig. 5. Corners of bevel siding covered wdth metal corner-plates.
The siding should be cut with a nice even joint and you want to have each piece fitting rather snugly against the adjoining piece and the corner boards.
In very high class work, a diagonal cut is used where one piece of siding joins the next.
Siding nailed over wood sheathing can be nailed with 8d nails.
These must be rust-resisting casing nails and should be spaced about every 16". The nails are driven through the overlap of each piece so that every piece is held with two nails at each point.
See Fig. 8. below. If the siding is applied over composition sheathing, the nails should be driven in only where there is studding in back.
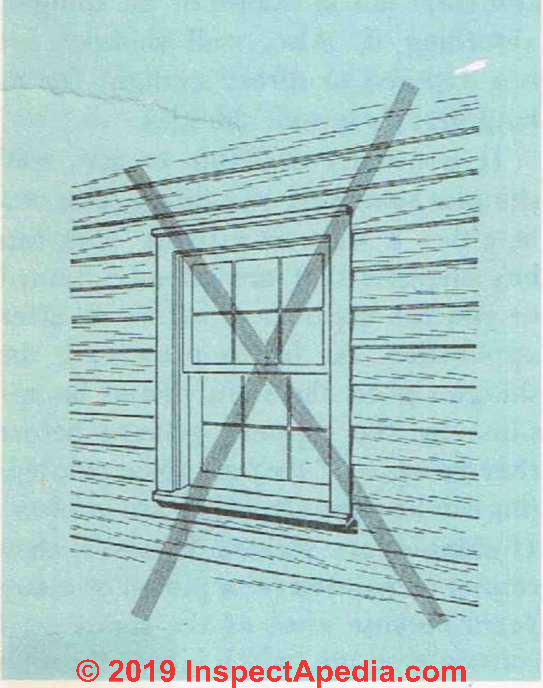
Fig. 6. Incorrect method of applying siding. Note that the shadow line of the siding does not come flush with the top and bottom of the window opening.
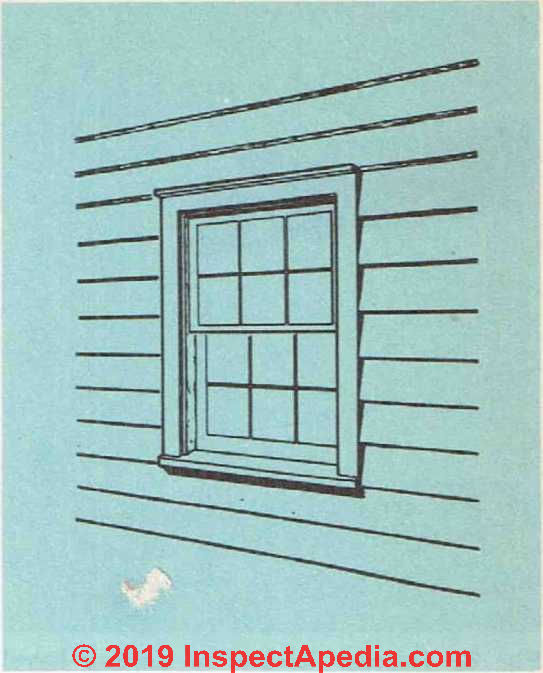
Fig. 7. Correct method of applying siding.
Ten-penny or even longer nails may be required to pass through the composition sheathing and penetrate the studding. If the nails tend to split the siding, drill holes for them a little smaller than the diameter of the nail.
The nails should be set into the wood and then puttied. This will prevent them from staining the siding.
Drop Siding Installation Details
This type of wood siding is usually either tongue-and-groove or shiplap. This means that you will have more difficulty laying out the siding so that the tops and bottoms come flush with wall openings than is the case with bevel siding, where the amount of overlap can be varied. You can get some leeway by not having the tongue tit all the way into the groove, but this may give a joint that will leak as the wood shrinks.
See Fig. 9.
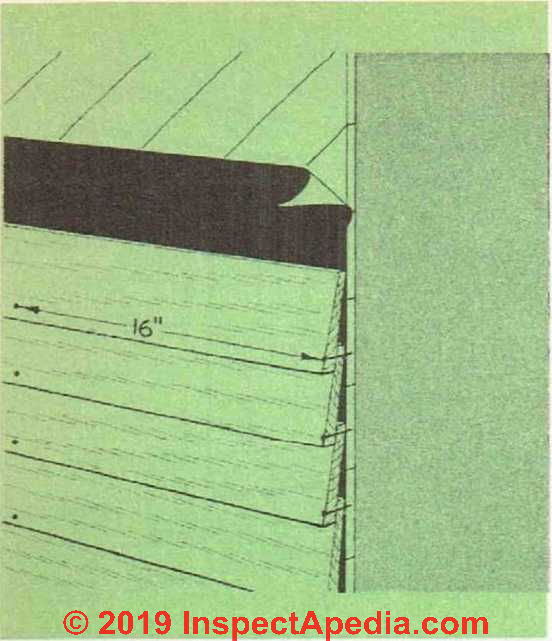
Fig. 8. Correct method of nailing bevel exterior siding.
Drop siding is face-nailed with casing nails.
Drop siding is thicker than bevel siding and is often applied directly over the studs without any sheathing at all. In this case, the building paper is hung in vertical sheets between the wall studs. If the building frame has been properly braced with let-in braces and is not to be used for year-round living in cold climates, there is nothing very wrong with this practice.
However, it should be used only on summer cottages, garages and other buildings of this type. Do not use it on a home that will have to be heated during the winter months.
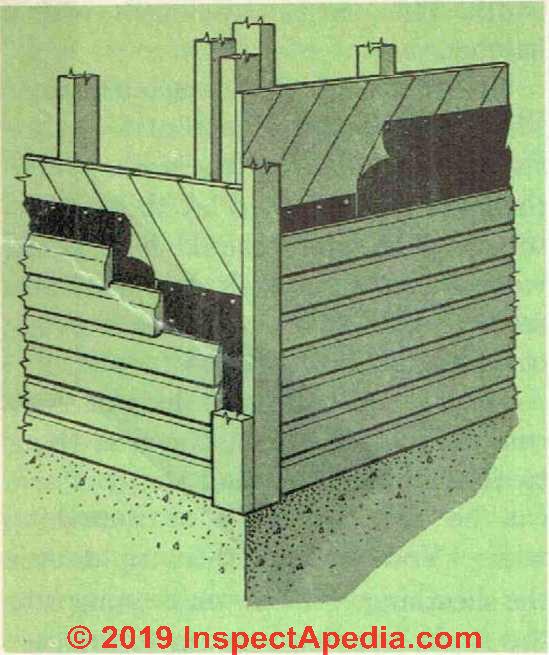
Fig. 9. Drop siding must always be applied with corner boards. The corner boards must be installed before the siding goes on.
Wood Shingle Installation
 Wood shingles are applied over building paper in the same way as w’ood siding. As mentioned before, they can be applied only over wood sheathing unless wood strips are first installed over or into composition sheathing to provide a nailing base.
When applied over plywood, barbed nails [or ring shank nails] must be used.
While it is best to use edge-grain shingles for walls, flat-grain shingles can he used with less chance of damage than when used on the roof—moisture runs off a wall faster than off a roof and there is less chance of the shingles absorbing it. Also, wall shingles are not exposed to direct sunlight for as long periods as roof shingles.
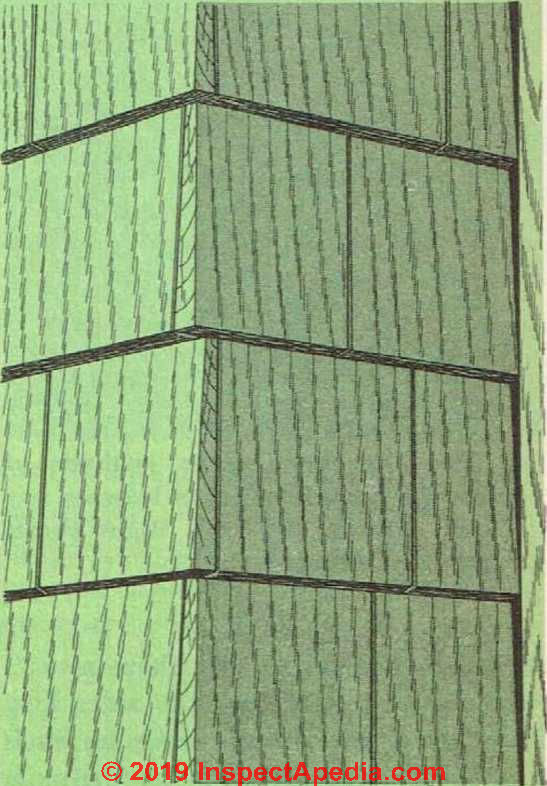
Fig. 10. One way to treat shingles at the corners. Note that the joints are staggered at each course.
It is usually desirable to give wall shingles some sort of a finish. This can be either a stain or a paint. You can buy shingles that are already stained or you can stain them before or after application.
As far as preserving the shingles goes, the stain should be applied by the dipping process before they go up, or if they are to be painted, this can be done after they are in place.
If shingles are stained, however, they cannot be painted for a period of many vears because most of the stains used contain creosote [no longer true, creosote is a carcinogen - Ed.], which bleeds through oil paints.
Shingles for the wall come in the same sizes as those for the roof, namely, 16", 18" and 24" long. Because of their location, wall shingles can be given a longer weather-exposure than those used for roofing.
Use the following table for weather-exposure for wall joints
- 16" long wood shingles: expose 7 1/2" to the weather
- 18" long wood shingles: expose 8 1/2" to the weather
- 24" long wood shingles: expose 11" to the weather
At corners, you can either use corner boards, as for wood siding, or make the corners with shingles. Fig 10 shows how the lap in each course is broken to get a weathertight job.
Start the laying of the shingles at a corner at the base of the wall. As a rule, the first course is double and the butt of this course should be about 1' below the house sill.
 Be sure that the vertical oints do not fall right over one another. There should be a space of about 1/4"' between each shingle.
Before you lay up the rest of the shingles, figure out the spacing so that the shadow line of a course will fall flush with the top and bottom of window openings.
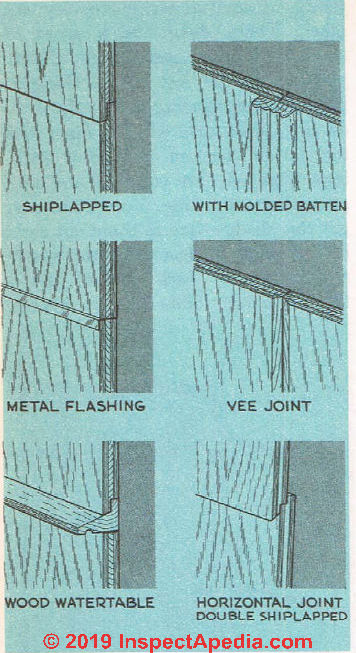
Fig. 11. shows three methods of treating the horizontal joints between sections of exterior plywood. Right shows vertical joint treatment.
This will save you time and a lot of cutting and fitting. You can usually get this shadow line to come out right by increasing or decreasing the weather-exposure of each course just a little.
Vertical joints between courses should be broken so that there are 2" or more of overlap on the side. Use 2 rust-resistant [hot dipped galvanized or stainless steel] shingle nails on each shingle
The best position for the nails is an inch or two above the exposure line and about 3/4" from the edge. It is best not to use shingles that are too wide.
Split any shingle over 8' in width. This can be done easily with a hatchet.
To be sure of getting each course of shingles absolutely horizontal, tack a strip of wood along the walls where the butts are to lie and lay the shingles to this. The board should be checked with a level. A chalk line will also serve, but it will not produce as accurate a job as the strip of wood.
If you want to lay shingles over composition sheathing, the first thing to do is to install nailing strips.
These can be either 1" x 3"s or something wider. You can nail them right over the sheathing, with the nails going into the studs, but this is going to increase the over-all thickness of the wall so that you will need special window and door frames.
The other method of installing the nailing strips is to recess them into the sheathing.
This takes a good deal of time, regardless of whether it is done before or after the sheathing is up, but in the long run it is probably better than having to use special frames for the openings.
The nailing strips should be spaced at the same distance from one another as the length of shingle that is exposed to the weather.
Exterior Plywood Siding Installation
 Plywood makes a very satisfactory' type of siding, but you must be sure to get the exterior type that will not be damaged by moisture. If the plywood is applied over sheathing, you can use 1/4" stock.
Plywood siding comes in widths running from 2 1/2' to 4'. [Modern exterior plywood siding in 2019 is nominal 1/2" thick, typically sold in 4' x 8' or 4' x 12' sheet sizes and in a variety of textures, patterns, and groove designs. ]
These sheets can be applied either vertically or horizontally to the house framework.
They are nailed with non-corrosive nails, which are spaced about every 6".
Fig. 12. Exterior siding with different joint treatments can he used to very good effect.
Watch out: for water entry and leaks at horizontal plywood siding joints; use Zee-flashing at these junctures to prevent water entry. - Ed.
Fig. 11 shows several different ways in which the joints between sections of plywood can be treated. The edges of each sheet should be coated with a thick lead compound before the sheet is put in place. A compound made for this purpose can be obtained from your local dealer.
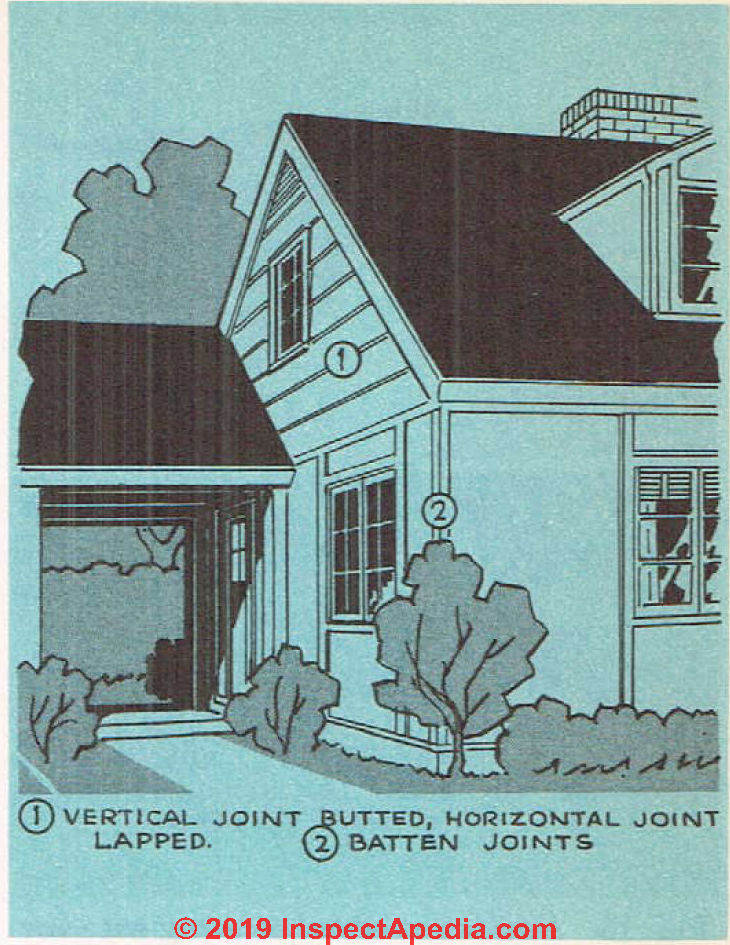
Figs. 12, 13, 14 and 15 show several ways to use plywood siding.
It is not necessary, of course, to use the same type of siding for the entire house.
You may find it more interesting to use one type for the lower portion and another for the gable ends.
This is a matter of choice.
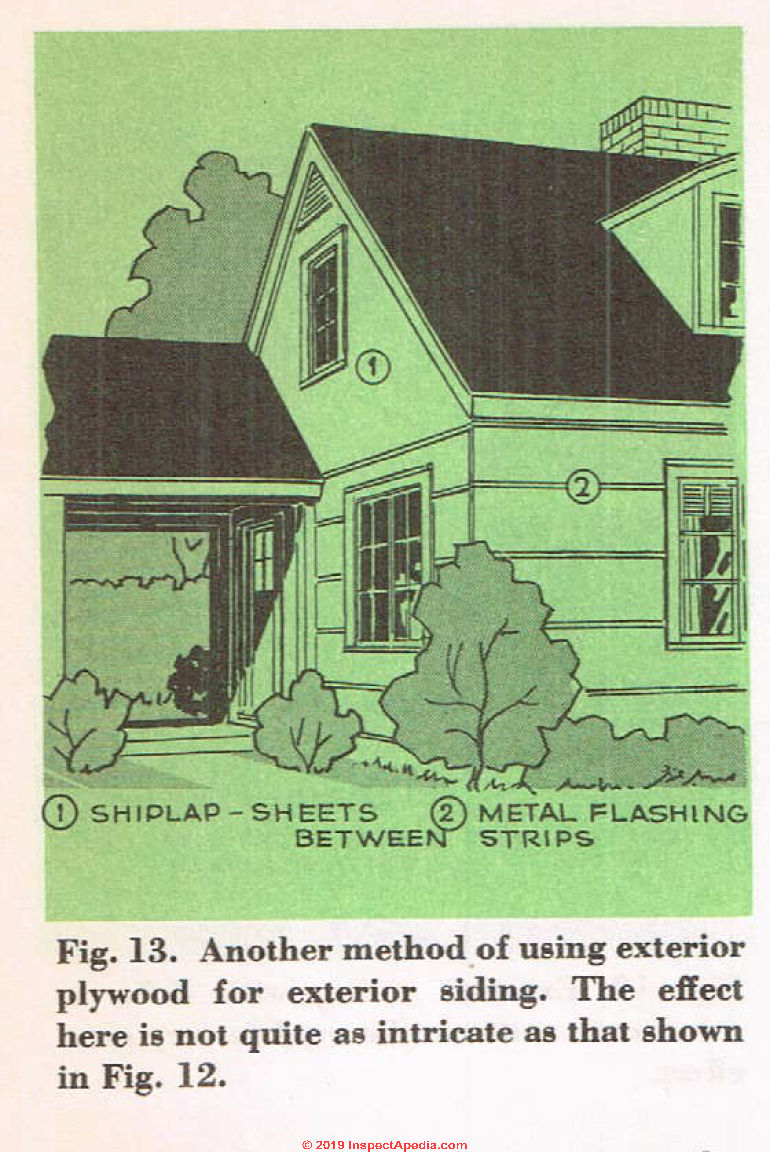
Fig. 13. Another method of using exterior plywood for exterior siding. The effect here is not quite as intricate as that shown in Fig. 12.

Fig. 14. Plywood siding wtih scalloped edges along the gables.
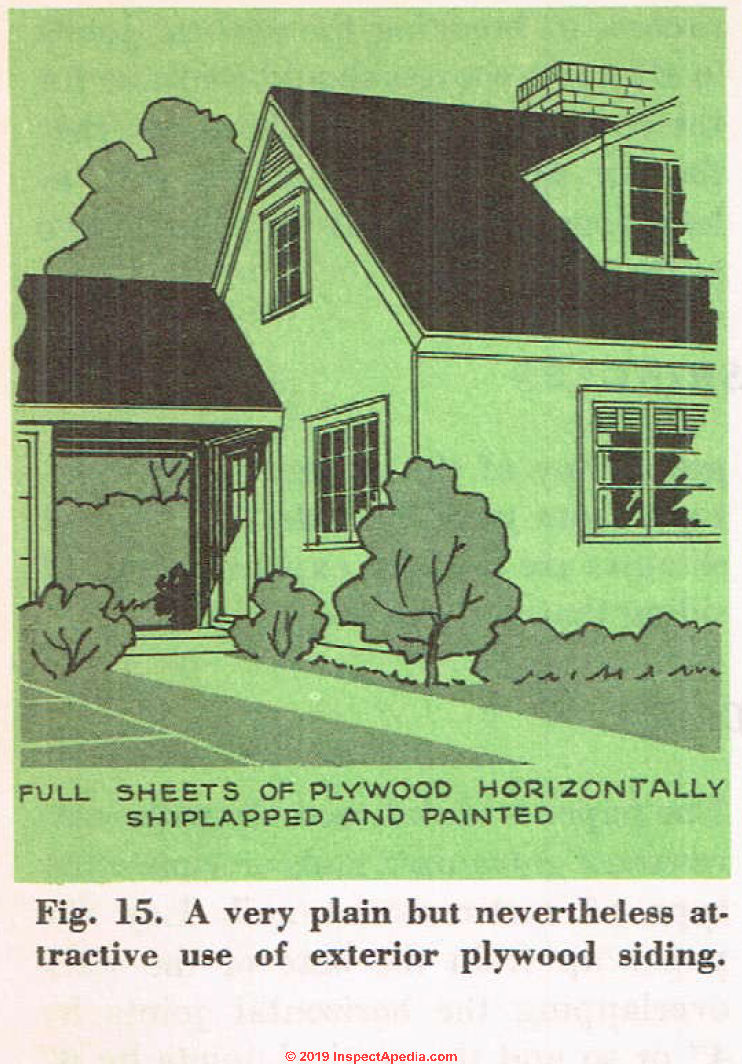
Fig. 15. A very plain but nevertheless at- Fig. 16. The use of corner boards with tractive use of exterior plywood siding, asbestos siding shingles.
Asbestos Cement / Fiber Cement Shingle Siding Installation
 Rather than use a wood siding, you may prefer one of the composition types, such as asbestos shingles. These shingles come in various sizes and colors and, if the plain shingle is used, can be painted. They are made out of asbestos fibers and Portland cement and are both fire- and decav-resistant.
Asbestos wall-shingles [or modern fiber cement shingles] that are properly installed should last the life of the building.
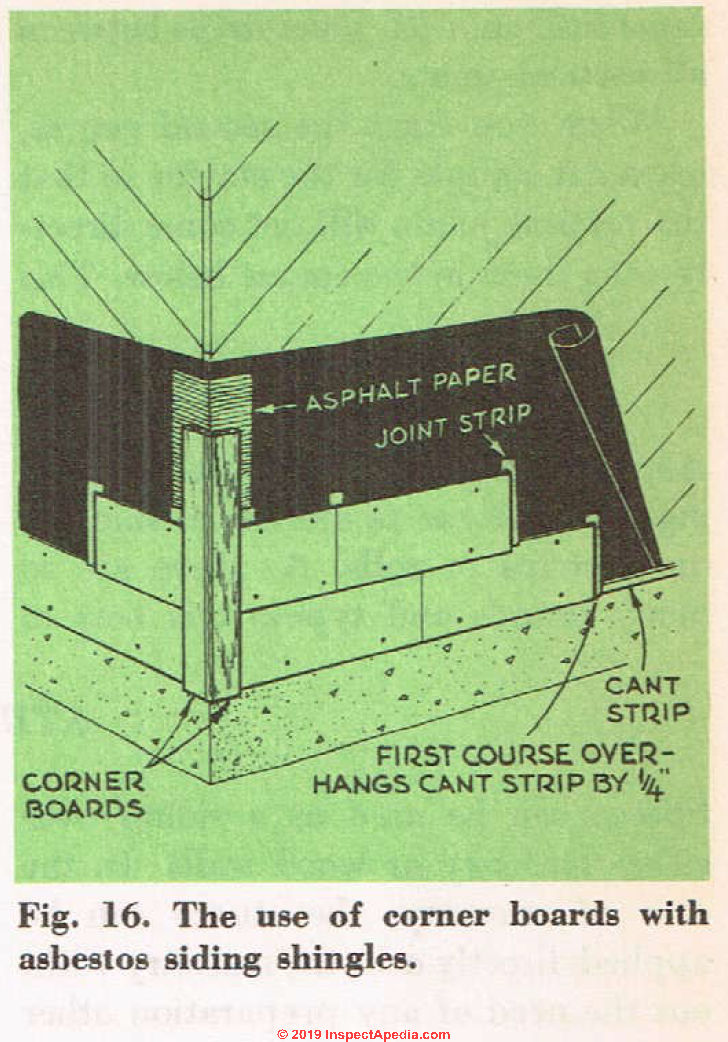
Fig. 16. The use of corner boards with fiber cement shingles or in the 1950s, asbestos cement or asbestos siding shingles.
These shingles are rather brittle, so care must be taken not to crack or break them. It will be necessary from time to time to cut a shingle: the best tool to use is a shingle cutter, which you can probably rent from your local dealer. This machine also has an attachment for making nail holes.
The shingles already have nail holes in them, but, of course, additional holes are necessary when a shingle is cut.
You run into the same conditions with asbestos shingles that you do with wood shingles—they can he put on directly over w’ood sheathing, but for composition sheathing, nailing strips have to be installed.
If you plan to use asbestos shingles for siding, be sure to get a full set of the installation directions put out by the manufacturer.
As with other types of siding, asbestos shingles are laid over waterproof paper. You can use the same sort of corner boards as for wood siding or the shingles can be joined at the corners with a butt joint.
Alternate this joint for each course and use a rasp to smooth out the edges of the shingles so that you get a good tight fit. The corners should be flashed with a wide strip of asphalt paper or metal set vertically. See Fig. 16.
After you have decided how to handle the corners, tack a cant strip of 1" x %" stock along the base of the wall. It must be perfectly level. The first course of shingles should overhang this strip of wood by 1/4". See Fig. 17.
Tack a strip of wood or use a chalk line to indicate the position on the wall where the tops of the first course of shingles should be set. The exact location of this line will depend on what size of shingles is used.
The corner shingle should be the first one installed. If you are using corner boards, place a joint strip (these should be purchased along with the shingles and are used under each vertical joint) vertically along side the edge of the corner board.
If you are not using corner boards but are making the corners with shingles, bend this strip around the corner. The first shingle that is put on in the first course should be full length.
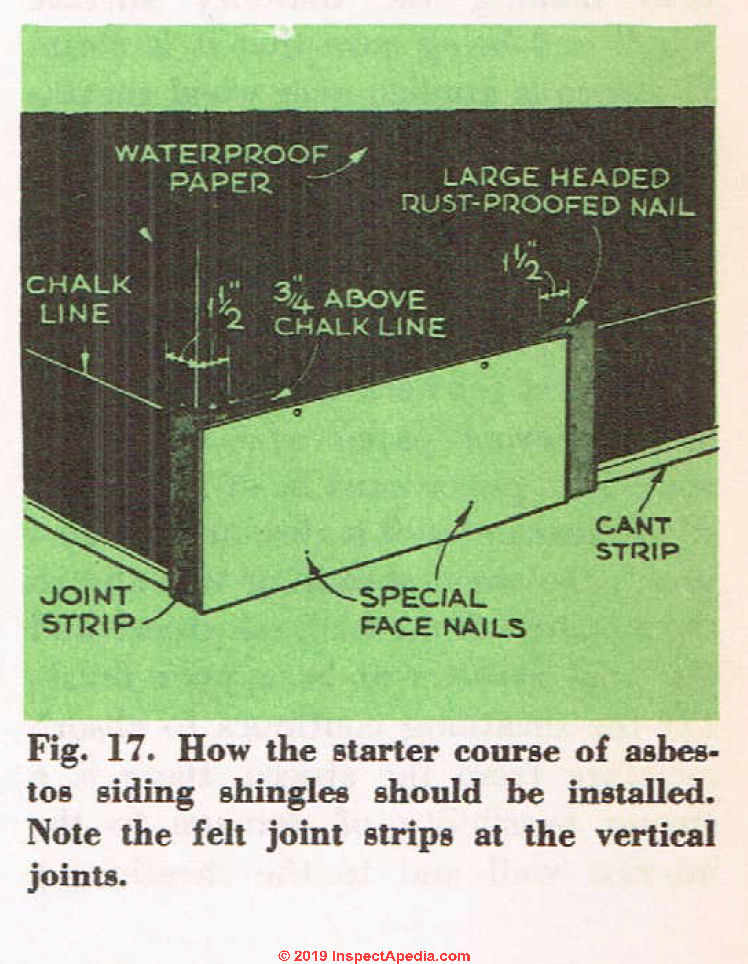
Fig. 17. How the starter course of asbestos siding shingles should be installed. Note the felt joint strips at the vertical joints.
It should be nailed with 1XA" rust-proof nails driven in through the holes provided in the shingles. Drive in the end and middle nails, leaving the far end of the shingle loose. Be careful when driving in the nails not to crack the shingles. Drive the nails in snugly but do not try to drive them tight against the shingle.
Now slip a piece of joint strip under the free end of the shingle and nail the free end in place. The butts should be secured with special nails that are alloy-faced to prevent them from staining the shingles. The heads are small so that they will not show up. Be sure to use only this type of nail for the butt ends.
The rest of the course can now be installed in the same fashion, with joint strips between all vertical joints.
When you start the second course, use a cut shingle for the starter so that the vertical joints will not come directly over those in the course below. This process of breaking the vertical joints in alternate courses should continue for the entire job. Be sure, however, that the cut shingles are secured with at least four nails, two at the top and two at the bottom.
Asphalt Shingle Siding
Asphalt shingles were also used for siding [in the 1950s and 60's. These were provided as individual shingles or in strips or rolls. As there are so many brands and types, it is best to get a copy of the application instructions from your local dealer. Asphalt shingles are the least expensive type of siding that you can use.
Exterior Stucco Wall Installation
 Stucco can be used as a siding over either masonry or wood walls. In the case of masonry, the stucco can be applied directly over the masonry without the need of any preparation other than making the masonry surface rough and being sure that it is clean. If stucco is applied over wood sheathing, you will need a covering of waterproof paper and metal reinforcement lath.
Stucco Over Wood Sheathing
The first job here is to apply a layer of waterproof paper over the entire wall. This paper must be of high quality because unless it is absolutely water-proof, the wood sheathing will absorb the moisture from the fresh stucco and the final result will be a poor finish.
(If the sheathing continues to absorb moisture from the stucco, there is a strong possibility of damage to the interior wall and to the sheathing.)
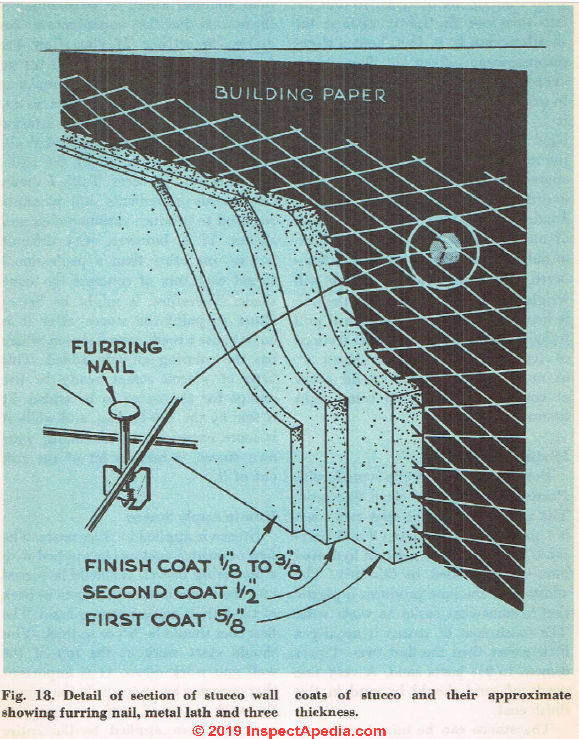
Fig. 18. Detail of section of stucco wall coats of stucco and their approximate showing furring nail, metal lath and three thickness.
The paper is nailed securely with rust-resistant galvanized nails or some other type of rust-resistant nail. Lay the paper up from the base of the wall, overlapping the horizontal joints by 4" or so and the vertical joints by 6" or more.
Double the paper around the corners. After the paper is in place, make sure that all seams around door and window frames are tight.
Open seams should be packed with waterproof paper or caulking compound. This is important because the frames of windows and doors are also apt to absorb moisture from the fresh stucco and then they will expand.
If you want to have a good stucco job, be sure to use the right lath. There is only one type of lath to use for this job, and that is a non-rusting metal lath. Ordinary metal lath is not suitable—it will definitely rust in time.
Wood lath is not suitable for exterior stucco installations — if it should become damp it will expand and cause the stucco to crack. So be sure to get need special rust-proof nails for the the rust-proof metal lath.
You will need special rust-proof nails for the lath, too. These nails, as you can see from Fig. 18 above, are designed so that the lath does not fit tightly against the sheathing but is, in fact, kept a slight distance away—about 1/4".
This is done in order to allow the first coat of stucco to get in back of the lath, where, after it is hard, it will provide a strong bond between the whole stucco covering and the lath. The nails should be spaced about every 8" along the lath in order to provide maximum support.
Inadequate nailing of any stucco support system can be the cause of much trouble later on in the form of bulges and so on.
It must be remembered that three coats of stucco will weigh a great deal, and unless the lath is firmly attached, the stucco will pull it loose. Joints between the sections of lath should be lapped about 2" or more and no joints should occur at corners. Let the lath come right around.
Recipe to Mix Traditional Portland Cement Stucco
Portland-cement stucco is made with Portland cement and clean fine sand. The usual mix for the first two coats is 1 part cement and from 3 to 5 parts sand.
If you wish, 10 per cent hydrated lime can be added to this mix. The addition of the lime produces a plastic that is somewhat easier to work with.
The finish coat of stucco is usually a little richer than the first two—1 part cement to 2XA parts sand. A very fine grade of sand should be used in this finish coat.
The stucco can be mixed either by hand or by machine. Remember that you do not want to mix more stucco than you can apply in 30 minutes— the normal time that cement mortar requires for setting. If you allow the fresh stucco to remain too long before it is applied or if you try to make it workable again by adding more water, vou are going to produce an inferior stucco that may not be any good at all.
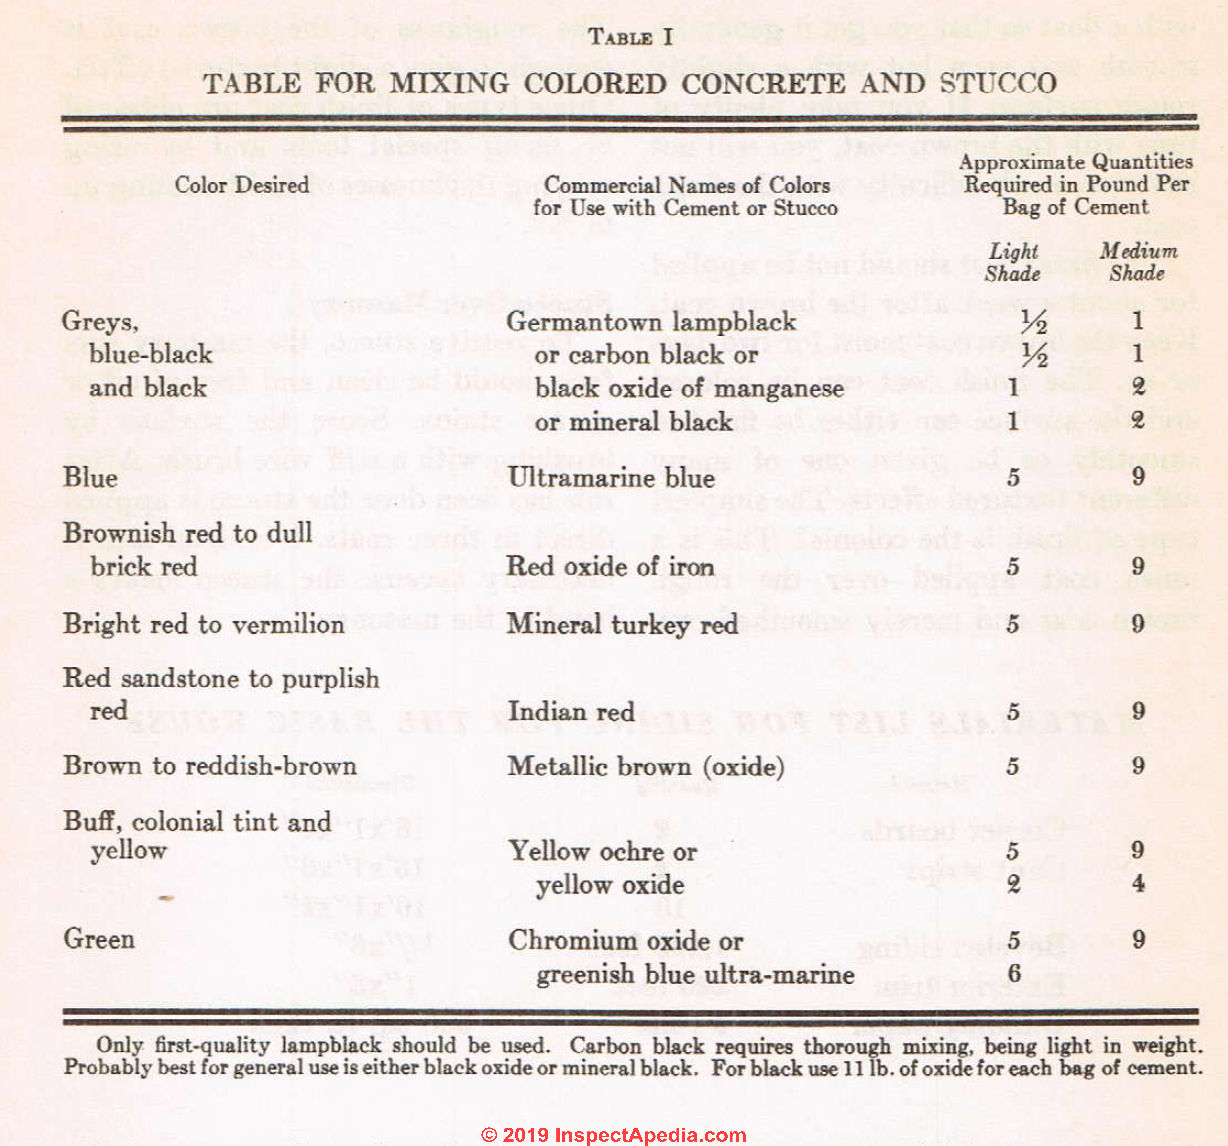
Stucco can be colored by the addition of certain powders. Table I shows the various ingredients and amounts required to produce various colors and shades. It is, however, very difficult for anyone other than a professional to get each mix of concrete the same shade.
Therefore, it might be better either to paint the stucco after it is on or to use a ready mixed stucco, which has the coloring already added. This type of stucco comes ready to use except for the water to be added. It is sold by the 100-lb. bag, and while it is more expensive than making your own stucco, it takes a lot of the risk out of it.
How to Apply Portland Cement Stucco
Stucco is applied in three coats.
Stucco First Coat: Scratch Coat
The first or scratch coat can be applied with a plastering trowel. It should be forced into the metal lath until it gets in back of the lath to make a strong bond. The first coat should be 5/8" or so thick.
You should start work at the top of the wall and work down. It is important that once you begin to apply the stucco, the work go ahead until one complete coat has been applied to the entire surface. Before the scratch coat has time to set hard, score it so that you will have a rough surface for the next coat of stucco to bond to.
Table of Ingredients for Mixing Colored Concrete & Stucco
[Click to enlarge any image]
Only first-quality lampblack should be used. Carbon black requires thorough mixing, being light in weight. Probably best for general use is either black oxide or mineral black. For black use 11 lb. of oxide for each bag of cement.
You should allow at least two days for the first coat to set before you apply the second. The exact time will depend, however, on weather conditions. If it is damp or wet, you might extend the time to three or four days. If the weather is dry and hot, dampen the stucco with water so that it will not dry out too quickly.
Stucco exposed to direct sun should be kept covered while it is fresh.
Stucco Second Coat: Brown Coat
The second or brown coat should be about 1/2" thick. The main purpose of this coat is to even out any irregularities in the scratch coat so that when the finish coat is applied you will have a smooth even surface.
For this reason, the thickness of the brown coat can be varied to suit the requirements. The brown coat should be worked over with a float so that you get it generally smooth and even but with a slightly rough surface. If you take plenty of time with the brown coat, you will not have too much difficulty with the finish coat.
Stucco Third Coat: Finish Coat
The finish coat should not be applied for about a week after the brown coat. Keep the brown coat moist for two days or so. The finish coat can be colored and the surface can either be finished smoothly or be given one of many different textured effects. The simplest type of finish is the colonial. This is a finish coat applied over the rough brown coat and merely smoothed out.
The roughness of the brown coat is enough to give a slight textured effect. Other types of finish coat are obtained by using special tools and by using varying thicknesses of finish coating up to
How to Apply Stucco Over Masonry
To receive stucco, the masonry surface should be clean and free of oil or grease stains. Score the surface by brushing with a stiff wire brush. After this has been done the stucco is applied direct in three coats. No metal lath is necessary because the stucco makes a bond to the masonry.
MATERIALS LIST FOR SIDING FOR THE BASIC HOUSE
Materials List For Siding For The Basic House |
||
|
Material |
Quantity |
Dimensions |
|
Corner boards |
2 |
16' x 1" x 4" |
|
Cant strips |
2 |
16' x 1" x 6" |
|
10 |
16"' x 1" x 2" | |
|
Beveled siding |
1,200 feet |
1/2" x 6" |
|
Exterior trim |
220 feet |
1" x 3" |
|
Building paper |
5 rolls |
500 sq. ft. each |
...
Continue reading at INSULATING YOUR SELF-BUILT HOME - next chapter in this book, or go to book contents at BUILD YOUR DREAM HOME, or select a topic from the closely-related articles below, or see the complete ARTICLE INDEX.
Or see these
Recommended Articles
- ASBESTOS CEMENT SIDING - home
- BRICK FOUNDATIONS & WALLS - home
- BUILD YOUR DREAM HOME
- CAULKS & SEALANTS, EXTERIOR
- DECK & PORCH CONSTRUCTION - home
- EIFS & STUCCO EXTERIORS
- EXTERIORS of BUILDINGS - home
- EXTERIOR WALL SIDING TRIM & FINISHES
- FIBER CEMENT PRODUCT MANUFACTURERS
- FOUNDATION WATERPROOFING
- GUTTERS & DOWNSPOUTS - home
- PAINT FAILURE, DIAGNOSIS, CURE, PREVENTION - home
- SIDING, FIBER CEMENT SHINGLE DEFECT DIAGNOSIS
- SIDING TYPES, INSTALLATION, DEFECTS - home
- STUCCO WALL METHODS & INSTALLATION
Suggested citation for this web page
SIDING CHOICES & INSTALLATION at InspectApedia.com - online encyclopedia of building & environmental inspection, testing, diagnosis, repair, & problem prevention advice.
Or see this
INDEX to RELATED ARTICLES: ARTICLE INDEX to BUILDING ARCHITECTURE
Or use the SEARCH BOX found below to Ask a Question or Search InspectApedia
Or see
INDEX to RELATED ARTICLES: ARTICLE INDEX to EXTERIORS of BUILDINGS
Or use the SEARCH BOX found below to Ask a Question or Search InspectApedia
Ask a Question or Search InspectApedia
Share this article:Questions & answers or comments about how to identify the architectural style of buildings and building components
Try the search box just below, or if you prefer, post a question or comment in the Comments box below and we will respond promptly.
Search the InspectApedia website
Note: appearance of your Comment below may be delayed: if your comment contains an image, photograph, web link, or text that looks to the software as if it might be a web link, your posting will appear after it has been approved by a moderator. Apologies for the delay.
Only one image can be added per comment but you can post as many comments, and therefore images, as you like.
You will not receive a notification when a response to your question has been posted.
Please bookmark this page to make it easy for you to check back for our response.
IF above you see "Comment Form is loading comments..." then COMMENT BOX - countable.ca / bawkbox.com IS NOT WORKING.
In any case you are welcome to send an email directly to us at InspectApedia.com at editor@inspectApedia.com
We'll reply to you directly. Please help us help you by noting, in your email, the URL of the InspectApedia page where you wanted to comment.
Citations & References
In addition to any citations in the article above, a full list is available on request.
- In addition to citations & references found in this article, see the research citations given at the end of the related articles found at our suggested
CONTINUE READING or RECOMMENDED ARTICLES.
- Carson, Dunlop & Associates Ltd., 120 Carlton Street Suite 407, Toronto ON M5A 4K2. Tel: (416) 964-9415 1-800-268-7070 Email: info@carsondunlop.com. Alan Carson is a past president of ASHI, the American Society of Home Inspectors.
Thanks to Alan Carson and Bob Dunlop, for permission for InspectAPedia to use text excerpts from The HOME REFERENCE BOOK - the Encyclopedia of Homes and to use illustrations from The ILLUSTRATED HOME .
Carson Dunlop Associates provides extensive home inspection education and report writing material. In gratitude we provide links to tsome Carson Dunlop Associates products and services.
 |
HOME | ABOUT | ASK a QUESTION | CONTACT | CONTENT USE POLICY | DESCRIPTION | POLICIES | PRIVACY | |
| © 2026 - 1985 Publisher InspectApedia.com - Daniel Friedman | |||||||||