
InspectAPedia® FREE Encyclopedia of Building & Environmental Construction, Diagnosis, Maintenance & Repair |
Question? Just ask us! InspectAPedia
|
 Not Enough Space in Electrical Boxes for Aluminum Wiring Repair using Pigtailing?
Example of aluminum wiring repair using "close-wired" AlumiConn™ connectors
- POST a QUESTION or COMMENT about solving space problems that arise in electrical boxes when repairing aluminum wiring
Aluminum wiring repair junction box space problems:
Tthis article describes options for fitting copper pigtail wires and wire connectors into electrical junction boxes where solid conductor aluminum electrical wiring is installed. Here we explain the acceptable methods to repair aluminum wiring, including which aluminum wire connectors to use for safest results.
Photo at page top shows a reader's close-wired AlumiConn™ splice connector used to repair aluminum wiring, copper pigtailed to the electrical receptacle, the AlumiConn™ then accepts the original solid-conductor aluminum wires for a good-performing repair and electrical safety improvement provided that all of the connections are made following the manufacturer's and US CPSC recommendations.
InspectAPedia tolerates no conflicts of interest. We have no relationship with advertisers, products, or services discussed at this website.
- Daniel Friedman, Publisher/Editor/Author - See WHO ARE WE?
Not Enough Space in the Electrical Boxes to Use Copper Pigtailing on Aluminum Wire?
Technical note on limited space in electrical boxes when pigtailing copper to aluminum electrical wiring:
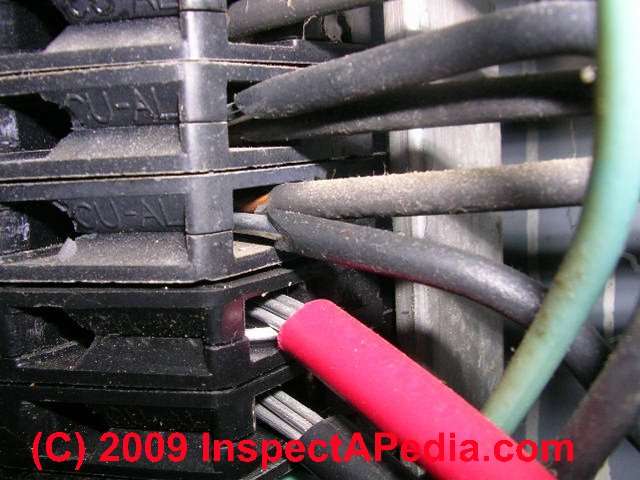
Both the AlumiConn™ and the COPALUM™ connectors (as well as the not-recommended Ideal65 purple Twister™) occupy about the same volume of space during aluminum wiring repair by pigtailing copper to aluminum wires.
In some cases there may be so little free space inside the electrical box that it is difficult to push the pigtailed wires and device back into the wall safely and without damaging or loosening connectors.
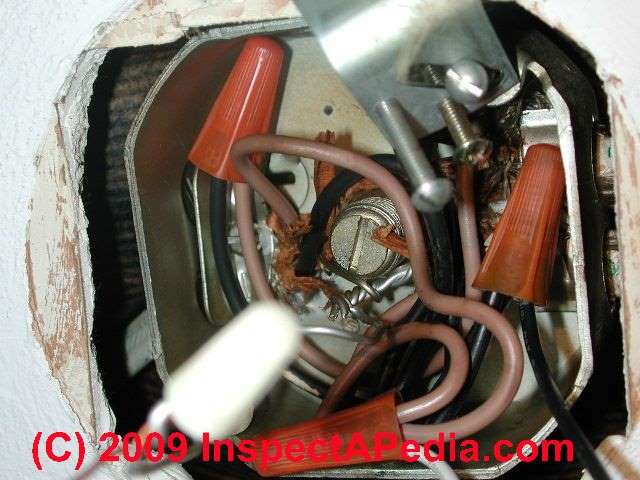
Our photo (above) shows an improper "aluminum and copper" wire repair using double-tapping under a single circuit breaker screw.
See details at DOUBLE TAPPED CIRCUIT BREAKERS
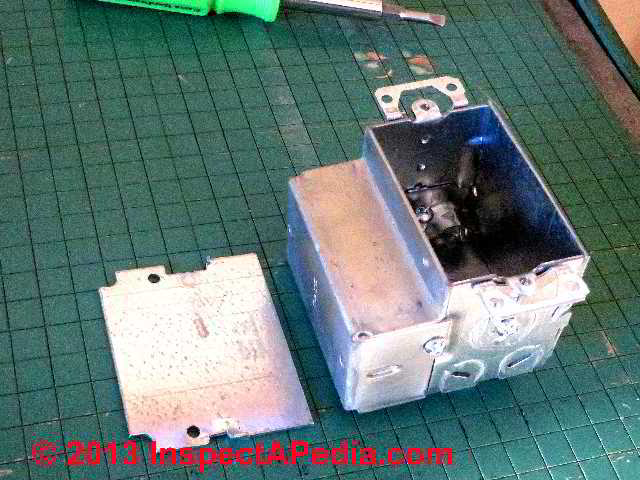
 There was plenty of room in this electrical panel to use one of the recommended copper-to-aluminum connectors to repair this aluminum wire. But in electrical boxes for wire splices, switches, and receptacles in a building, space may be more limited. Options to handle the limited space for copper to aluminum pigtail wires and connectors include:
- Use thinner (front to back) electrical devices:
switches and electrical receptacles may be available that are thinner in their front-to-back dimension, making it easier to add the copper to aluminum pigtails and connectors and still push the switch or receptacle back into the wall. - Install electrical box extensions -
using a "side car" screw-on box extender or, if the box is deep-set into the wall, a box depth extender, it is possible to add several cubic inches of space to an existing electrical box without necessarily opening the wall itself. - Install a larger cubic-inch electrical box -
this step is most disruptive as it means opening the wall cavity at each location where space inside the existing electrical box is inadequate for aluminum wire repairs. T
his approach is reasonable if just one or two of these cases occurs, but if most of the electrical boxes are too small at a building the repair cost may be significantly increased if you have to install many larger electrical boxes.
Even if you intend to gain the needed space by installing a deeper electrical box that is the same in width and height (as opposed to a box that is also wider or taller), the labor will be increased by the work of removing the old electrical box and disconnecting its wires in order to install a new retrofit-type and deeper electrical box. - GFCI devices and aluminum wiring repair:
If you are retrofitting a GFCI electrical outlet as well as repairing aluminum electrical wiring at a building, because GFCI devices are generally larger than standard electrical receptacles, you may find that it is impossible to push the GFCI back into the electrical box along with the copper pigtails and connectors.
In this case you should consider using a conventional (non-GFCI) electrical receptacle or even a thinner (front-to-back) electrical receptacle in that location. Provide ground fault protection(GFCI) (or arc fault protection - AFCI) by installing a GFCI or AFCI circuit breaker in the electrical panel to supply electrical power to that circuit. - More Reading provides a complete list articles closely related to this one.
Ways to Make Space for Aluminum-to-Copper Pigtailing in Electrical Boxes
 Reader Question: need more space for using the AlumiConn™ connectors
I have read your web pages concerning the "permanent repair" methods for dealing with aluminum wiring. Thank you for the detailed information, including some of the reasoning behind the details. I have purchased AlumiConn™ connectors and I have begun converting my wiring with these connectors.
Watch out: repairing aluminum wiring using twist-on connectors such as shown in the photo at left is not recommended and may be unsafe.
My question is as follows:
A typical box containing a switch contains the following wires: hot/neutral/ground IN, hot/neutral/ground OUT, switched-hot/neutral/ground to light fixture. Conversion to AlumiConn™ connectors would be as follows:
- AlumiConn™ connector #1: AL hot in, AL hot out, CU pigtail to switch
- AlumiConn™ connector #2: AL neutral in, AL neutral out, AL neutral from light fixture
- AlumiConn™ connector #3: CU pigtail from switch, AL switched-hot to light fixture
- AlumiConn™ connector #4: AL ground in, AL ground out, AL ground from light fixture
Note that this configuration does not include a ground connection to the metal electrical box.
If such a connection is required, then yet one more AlumiConn connector (#5) would be required. With some work I was able to get all 4 AlumiConn™ connectors to fit in the box, but the box will not accommodate a 5th connector.
Also, I don't see the value of a ground connection to the metal electrical box for a switch. Is grounding the electrical box required in this case? - C.J. 8/31/2013
Reply:
 Space is indeed the Achilles heel of this repair. I would not want to leave a metal box ungrounded. Have you looked at using an add on "sidecar" box extension? It clips on to the site of the existing box and hides inside the wall.
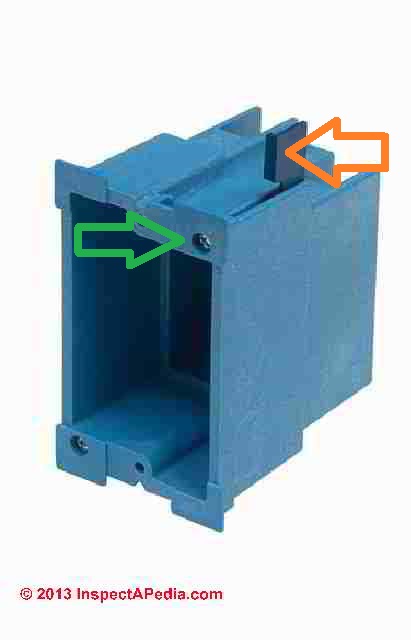
Some electrical boxes installed as original work are stamped out of a single piece of steel and cannot be expanded. Others called "gangable" metallic boxes such as by (Thomas & Betts - Steel City Brand) installed as original work included side plates that could be removed to install a sidecar extension.
Gangable electrical boxes can be expanded by adding another box along the open (away from the stud or joist) side of the existing box (requiring a larger wall opening), or by adding a "side car" extension that hides behind the wall surface.
Sketch at left: illustrates the removable side-plates on a gang-type electrical box. Boxes of this type can be expanded along their open side - the side that has not been already fastened to a stud or joist.
To add an electrical box extension you must have access to the top or bottom screw on the open side of the box to remove the side plate - that's where you'd add on a second gangable box as an extension or a side-car hidden box extension.
Watch out: it will be almost impossible to extend an original-work metallic box size using an extension without cutting open and thus damaging the wall at one side of the box. However in my OPINION drywall repairs are trivial compared with the cost of complete re-wiring with all copper in a building with aluminum wired branch circuits.
Reader follow-up:
The web postings about the use of AlumiConn™ connectors mentions electrical box extenders - that extend the box horizontally in the wall (as you suggested), as well as deeper boxes.
A deeper box might work, but it is difficult to replace the old box with a deeper one without incurring significant wall damage. I have not been able to find any electrical box sidecar or horizontal extender that can be retro-fitted (attached) to an existing box. The boxes in this house were installed when the house was built.
In the typical case, they contain a single switch or outlet. The boxes are 2" wide x 3" high, and do not have removal sides (or back). While it might be possible to drill / cut the side of a box in the wall, I have not been able to find any "extender" that could be attached after the box was cut open.
The only "sidecar" box that I have found is for use in new construction. It is a complete box with a side pocket. It does not attach to an existing box. It is made by Thomas & Betts, part no. SNO-18.
[Note: no, the product you name is for new work, not old work or renovation extensions of electrical box size in an existing finished wall. rather, the T&B SNO-18 is a pre-cast plastic electrical box providing a "behind-the-wall" space extension, preserving a small wall outlet opening; this is not a box side or behind-wall extender. Take a look at gang-box and gang-box extensions illustrated below. - Ed. ]
You wrote: Have you looked at using an add on "sidecar" box extension? It clips on to the site (side?) of the existing box and hides inside the wall.
Can you provide a reference for such a part? - C.J.
Reply: Where to buy a side-car extension to add space to an electrical receptacle or switch box
 I [DF] drove over to Danbury toP&M Electric supply (29 Federal Road, Danbury CT 06810, Tel: 203-744-7445),
a large electrical supplier, to pick up a "side car" box extension and a metal gang box to illustrate how a box can be expanded in this approach.
The RAC535 X-cube adapter .5cui retails for $1.79 and a RAC519 2 12/D NMC switch box retails for $2.45.
At left you can see the original side plate removed from the electrical gang box and the sidecar extension installed in its place, gaining wiring space in this switch box.
Notice that the sidecar box extender is deliberately made less deep than the electrical box so that the added space provided by the sidecar extension can hide behind the drywall in the finished wall.
But ultimately the side-car expansion approach will be messy and difficult unless
- the metal switch or receptacle box is a gang-able type with a removable side panel.
- the existing metal box and its wires can be pulled out of the wall;
this is possible if the box was screwed to a stud or joist through the box internal side openings but impossible (without cutting the wall) if it was screwed or nailed using box external side fasteners inside the wall.
If you are going to this much trouble to add wiring space, why not just change to a larger or deeper plastic box, gaining space and reducing the number of ground connections needed?
Recommendations for Gaining Electrical Wiring Space: old work retrofit boxes & plastic electrical boxes

I would not try cutting metal boxes in the wall to try to make more space - it would probably violate code, damage wires by nicking them thus making a horrible mess to repair, and damage the wall too.
As I described above, gangable- types of metal electrical boxes have sides that are connected to a U-bent top,back,bottom section by two screws and a clip; on these boxes it's easy to remove one side and replace it with a side-car extension. That's how I made more space in boxes where we had this problem.
But that extension is far easier when the wall is not already covered by drywall - in that case it's a trivial step because the side of the box that is not fastened to the stud is open for attack and easily replaced.
Sketch at left illustrates using steel wall-clips to support an old-work replacement electrical box that can be inserted through an existing opening in a finished-wall.
When the wall has been covered by drywall it is still possible to make a box extension but to do so the existing box has to be pulled out of the wall first - which can damage the wall and wires if you're not careful.
 A better approach where more wiring space is needed is to remove the existing electrical box and install a deeper box in the same opening. At left we show an image of the thin metal clips that can be used (with care) to support a metal electrical box in an old-work or retrofit installation - adapted from Steel City products.
But if going to the trouble of replacing the electrical box entirely, going to plastic has the advantages I describe below.
Shown at above left is an "old work" or retrofit electrical box that is secured to the wall by screw-operated plastic ears that turn up and then pinch the box front flanges against the wall exterior. Electrical boxes of this design, depending on size, cost about $1.00 U.S.
Watch out: I cannot emphasize enough how important it is not to nick or damage the insulation on the existing wires as doing so can lead to too-short wires to permit the pigtailing work needed or can create still more in-box space problems.
Illustration at left shows an old-work retrofit electrical switch or receptacle box made of plastic. Using a box of this type can gain needed wiring space while fitting into an existing wall opening in a finished wall.
And pulling an existing electrical box out of a wall is more difficult in the (most common) cases where the box was nailed to the side of a stud (or ceiling joist). It's more feasible when the box is fastened by screws.
See GANG BOX EXTENDERS for WIRING SPACE
- Use an old-work or renovation electrical box
for easier securing in the wall: once the old box has been pulled out of the all and carefully removed from the original wires, we might choose renovation-type boxes that use any of several clip systems to hold the new box securely in the wall opening.
See OLD WORK ELECTRICAL BOXES for RETROFIT - Gain wiring space by installing a deeper electrical box
of same width and height: we can replace the old box with a deeper one to gain more space - if the wall depth or ceiling/floor depth permit. The advantage of this approach is that the opening in the wall and the final wall plate sizes can both remain as-is - Change from metal to plastic electrical box:
we can replace the old metal electrical box with a plastic one - eliminating the need to ground the box and thus reducing the number of splice connectors in the box - gaining much needed space.
See ELECTRICAL JUNCTION BOX TYPES
 Once we agree that pulling out the old box is necessary to extend its size the options of replacing it change significantly:
- Install a larger electrical box:
we can replace an old small metal box with a 4x4-inch box (metal or plastic) in cases where there are still more splices to be made; enlarging the wall or ceiling opening to accommodate the larger electrical box can actually reduce the need for cosmetic repairs to the wall afterwards; instead we end up with a quad of receptacles instead of a duplex, along with a larger electrical box cover, or a duplex plus half-blind cover.
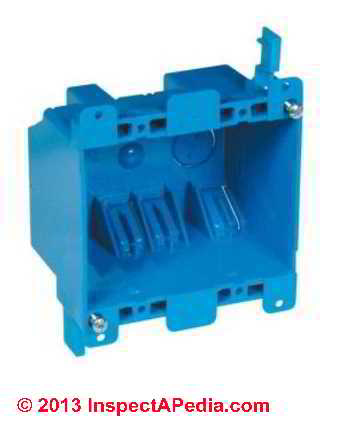
Shown at above-left is a 2-Gang plastic old-work or retrofit 25 cubic-inch plastic electrical box produced by Carlon and available at Home Depot stores. According to the manufacturer,
The Carlon Zip Box Blue 2 Gang 25 cu. in. Old Work Non-Metallic Switch and Outlet Box is designed to work with non-metallic sheathed cable in accordance with Article 314 of the National Electric Code.
Great for light commercial and residential applications, the box is crafted with non-conductive PVC for durability and is fire rated and UL listed to help ensure safety. - Home Depot stores
All of these suggestions, when made by people who have never actually tried to do this job, under-state the extent to which drywall around an electrical box opening is likely to be damaged during all of this fooling around. It is more realistic to plan to have to make drywall and painting repairs after this job - at least in some tight locations.
The electrical box size increase procedure benefits by a few simple dry walling tips:
- use dash patch or other fast-setting drywall compound, along with paper or plastic mesh tape if necessary, to fill in and smooth over accidentally or deliberately-enlarged wall openings around the electrical box.
- If you're lucky (luck is rare) and the original wall surface was white, a final skim coat of white joint compound will be a close match that some occupants can live with until time to re-paint.
The bottom line is that repairing aluminum wiring by pigtailing using an approved connector is less costly than re-wiring but either approach - re-wiring or pigtailing that leads to need for larger electrical boxes just to physically cram in all of the parts needed is likely to lead to wall repair work too. It's a messier and more labor-costly job than some might like to admit.
But then, re-wiring also involves cuts, holes, and snaking and wall damage during wiring routing and replacement.
Send me some photos of your project if you can - it would certainly help the discussion and help other readers in the future
Field Experience with Using the King Innovations AlumiConn Connectors for Aluminum Wiring Pigtail Repairs
In order to understand the practicalities associated with installing AlumiConn connectors I have added the connectors to a small number of boxes. From this experience I have gained some experience in the installation process, and also drawn some conclusions for the remaining work ahead.
I have purchases 3-port AlumiConn™ connectors at Home Depot (the only type I found on their shelves). In noticed sometime in the past week that King Innovations is now selling 2-port connectors and 3-port connectors. I think the 2-port connectors is a new product. I will be asking my local Home Depot to please stock them. I would also like to see a 4-port connector but so far I don't see such a product.
In the typical suburban tract house (like mine) there are somewhere between 50 and 100 electrical boxes that need to be converted. All of the boxes are metal, and they were installed when the house was built. The majority of the wall boxes are 3" x 2". None of the boxes were designed to be extended.
The walls and ceilings are covered with 1/2" drywall and the electrical boxes protrude through the drywall. The drywall has a textured finish which was applied when the house was built. Any wall or ceiling damage is very hard to fix due to the need to patch, then re-texture and then paint the damaged area. It is very difficult to match the existing wall texture.
Furthermore, a small supply of matching paint for each color in the house may not be available - thus requiring the purchase of new paint matched with a photo spectrometer. It can also be expected to require painting the entire wall to avoid the appearance of an obvious patch.
A 12" long piece of 3/8" wood dowel works well to push electrical wires and connectors around in an electrical box.
There are a number of common electrical configurations in the boxes. These configurations, along with some comments are as follows:
Duplex Outlet Wiring Connections
The hot in, hot out, 1 duplex receptacle.
Requires 3 triple port AlumiConn connectors.
Grounding of the electrical box can be done in either of 2 ways:
(1) The outlet receptacle contains a grounding screw that attaches to a metal band. The band holds the receptacle together and also provides the tabs by which the receptacle is attached to the box. Screwing the receptacle to the box will result in grounding the box.
(2) Two copper pigtails can be attached to the ground screw of the receptacle One pigtail is connected to an AlumiConn connector to which the ground line for the IN and OUT lines is connected. The other pigtail is attached to the box. In either case, the 3 triple port connectors can be pushed into the electrical box without too much trouble.
Watch out: be sure to follow the manufacturer's recommended torque settings to assure a successful aluminum wire repair. Details are at The AlumiConn Torque settings
Single light switch (single pole, single through):Wiring Connections
hot in, hot out, switched-hot + neutral
Requires 4 triple port connectors and 1 double port connector (for a total of 5 connectors).
In my experience so far I was able to get 4, but not 5 AlumiConn connectors pushed into the box.
This leaves me with the following (lousy) choices. I have not yet decided which I will use.
#1 - Omit the electrical ground:
Connect the ground lines of hot in, hot out and switched-hot wires in an AlumiConn™ connector and leave the metal box ungrounded (not desirable). [And unsafe - Ed.]
#2 - Replace the metal box with a plastic box.
This will eliminate the need to ground the box. I have not yet tried to remove the old box, but I think I can do this without damaging the wall. I will need to first slightly loosen the box from the stud so that a hack saw blade will fit between the box and the stud.
The loosening will require a properly designed crowbar (such as a leaf from an automobile leaf spring). This may cause some damage to the drywall on the other side of the box opening. Hand hacksaw the nail at the top and bottom of the box that hold the box to the stud.
Attach a piece of string to the end of each of the wires entering the box. Loosen the screw that secures the wire to the box and push the wire into the wall, keeping the other end of the string outside of the wall. Remove the box from the wall by first pushing the box into the wall, then rotate it 90 degrees about a horizontal axis (push the top in, pull the bottom out), then pulling the box through the drywall opening. Install a new plastic box using retro-fit attachment bars (sometimes called "Madison bars").
#3 - Attach a copper pigtail to the electrical box
and twist all of the ground lines (3 aluminum + 1 copper) together with a "long" twist. Apply NoAlox to the end and bind with a wire nut. I think this is probably a reasonable practical solution, but it does not meet CPSC recommendations. [And is not a recommended repair approach for aluminum wiring - Ed.]
3-way light switch (single pole, double through) wiring connections
hot in, hot out, 3-conductor switched-hot + neutral
Requires 4 triple port connectors and 2 double port connectors (for a total of 6 connectors
I know that I will not be able to make this number of connectors fit in a box.
Replacing the box with plastic (as described above) will reduce the connector count from 6 to 5.
If the replacement box is a deep box, then the 5 connectors should fit.
Other common configurations
- 2-receptacle box (switch + outlet)
- 2-receptacle box (2 duplex outlets)
- 2-receptacle box (2 switches)
- receptacle box (usually n switches), some may be 3-way
Thanks, - C.J. 9/6/2013
Time to Repair Aluminum Wiring by Pigtailing with the AlumiConn™ connector
My experience so far is that conversion of an outlet box that contains no surprises (just hot in + hot out) takes about 20 minutes to convert. This is the time from unscrewing the cover plate to getting the cover plate back on after the conversion. A box containing an on/off switch takes longer.
I have also found that planning the exact placement in repacking the wires and AlumiConn™ connectors back into the box is essential. The lack of forethought can result in re-packing multiple times - very undesirable due to "excess" re-bending of wires (I am always fearful of a break, especially of the aluminum wire) and lost time. - C.J.
Typical Pigtail Wire Lengths for Repairing Aluminum Wiring by Pigtailing with the AlumiConn™ connector
I have also experimented with the length of the copper pigtail. I tried 3", 4" and 5". While there are exceptions, I think the 3" length is a little too short - it provides insufficient length to easily tighten the set screws on the AlumiConn™ connectors, and make attachment to an outlet or switch, and bend the wire around when repacking. 4" is a good length. 5" works fine, but adds more wire than necessary. - C.J.
Reply: where to buy electrical box extensions - but going to larger or deeper plastic "old work" boxes is probably better for adding the AlumiConn wire splice connectors
As a preliminary response, I think I agree that going to plastic boxes is a good option; In some locations, going to a larger box and thus enlarging the opening in an existing wall can be done with enough care that the wall re-finishing problem can be avoided. If there is just slight damage or over-sized cutting around a box, there are oversized box covers that can work extend past that evidence. And I agree that a 4-port connector would be a significant help.
I followed up with King Innovations too, asking about the availability of their connectors in a wider range of sizes.
But ultimately the side-car expansion approach will be messy and difficult unless - the metal switch or receptacle box is a gang-able type with a removable side panel. - the existing metal box and its wires can be pulled out of the wall; this is possible if the box was screwed to a stud or joist through the box internal side openings but impossible (without cutting the wall) if it was screwed or nailed using box external side fasteners inside the wall. - DF 8 Sept 2013
Electrical box extensions & supplies for aluminum wire repairs needing more space
- Thomas & Betts (ABB Group) Steel City electrical boxes, Thomas & Betts Corporation 8155 T&B Boulevard Memphis, TN 38125 Phone: 901-252-5000, Phone: 800-816-7809 Fax: 800-816-7810 Email: elec_custserv@tnb.com Website: http://www.tnb.com/
- Home Depot stores
- Loews Building Supply stores
- Local electrical contracting suppliers in your area
- U.S. Patent No. 5,117,996, June 2, 1992 describes an electrical box extension submitted by William J. McShane, Philadelphia, PA. McShane patented a number of electrical box extension designs to accommodate wall thickness changes as well as space additions.
- Danbury toP&M Electric supply (29 Federal Road, Danbury CT 06810, Tel: 203-744-7445), The RAC535 X-cube adapter .5cui steel sidecar electrical box space extender retails for $1.79 and a RAC519 2 12/D NMC gang-type electrical switch steel box retails for $2.45.
Reader follow-up:
If time permits I expect to be doing some additional box conversions this week. I will take pictures and send them to you as you requested. I am committed to this conversion effort (I have the whole house to do!), but it is not my first priority, so the work progresses as I have time to work on it. I expect it will string out over the next few months. FYI, I will be out of town from Sept 16 to Oct. 10.
I will take some closer notes on the time involved, but my experience so far is that conversion of an outlet box that contains no surprises (just hot in + hot out) takes about 20 minutes to convert. This is the time from unscrewing the cover plate to getting the cover plate back on after the conversion.
A box containing an on/off switch takes longer. I have also found that planning the exact placement in repacking the wires and AlumiConn connectors back into the box is essential. The lack of forethought can result in re-packing multiple times - very undesirable due to "excess" re-bending of wires (I am always fearful of a break, especially of the aluminum wire) and lost time.
I have also experimented with the length of the copper pigtail. I tried 3", 4" and 5". While there are exceptions, I think the 3" length is a little too short - it provides insufficient length to easily tighten the set screws on the AlumiConn connectors, and make attachment to an outlet or switch, and bend the wire around when repacking. 4" is a good length. 5" works fine, but adds more wire than necessary. - C.J. 9/9/2013
Reply:
About using the AlumiConn, also keep in mind that while the company has confidence in the success of their special torquing method that involves counting turns rather than using the $100 SK torque screwdriver, the tested and listed approach requires setting the actual torque using the SK screwdriver.
See
The AlumiConn Torque settings specified by King - DF 9/9/2013
Reader follow-up: new idea for gaining wiring space when using the AlumiConn for aluminum wire repairs
I have “converted” a few more boxes and I have come to some new conclusions, as described below.
I inventoried all of the boxes that must be converted in the house, and the content of each box (e.g. 2-way switch, 3-way switch, light, single box, ganged box, etc.). I then calculated the number and type of connectors that is required for each box. For my house.
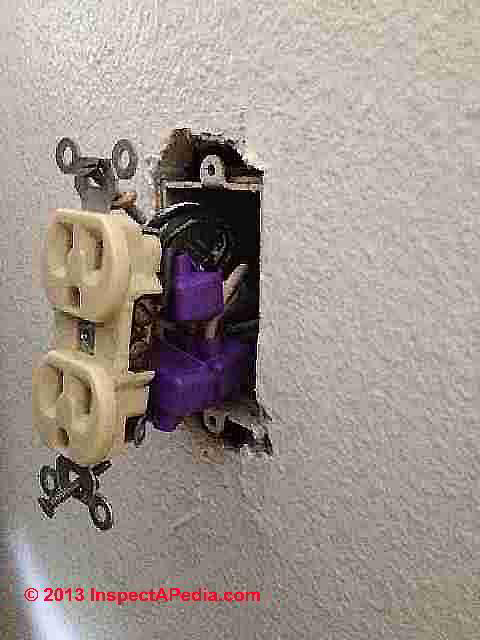
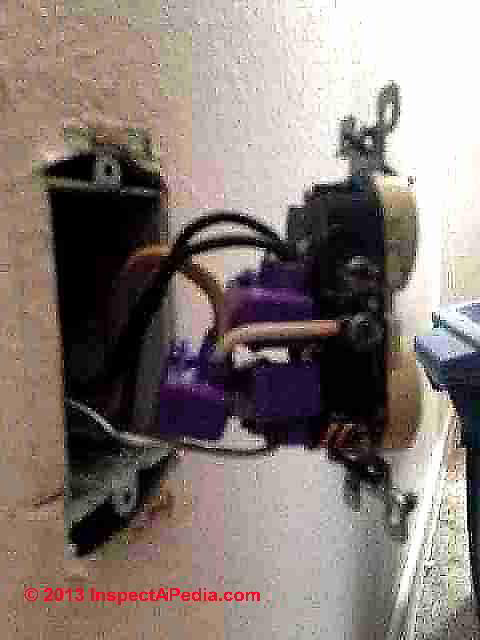
Photo at left: reader's suggestion for close-wiring the AlumiConn splice connectors to the back of the electrical receptacle to gain wiring space during repair of aluminum electrical wiring. Showing the neutral and ground wire connections.
There are 76 boxes
I need 107 2-port connectors (about 40% of the total connectors)
I need 146 3-port connectors (about 60% of the total connectors)
While I can technically use 3-port connectors for all of the 2-port requirements, the high count of 2-port connectors in this analysis, and the limited space in a box, drives me to seek availability of 2-port connectors before I proceed to convert any boxes that requires a 2-port connector.
I have requested that Home Depot offer the 2-port connector by (1) contacting the electrical department of my local Home Depot, and (2) emailing the customer service interface of Home Depot. I have not yet, but I intend to, attempt to purchase the 2-port connectors by a Home Depot special order.
Single outlet boxes are probably the simplest to convert. They require only 3-port connectors, and they require only 3 in a box. I have chosen to concentrate on converting these boxes while I pursue access to the 2-port connectors.
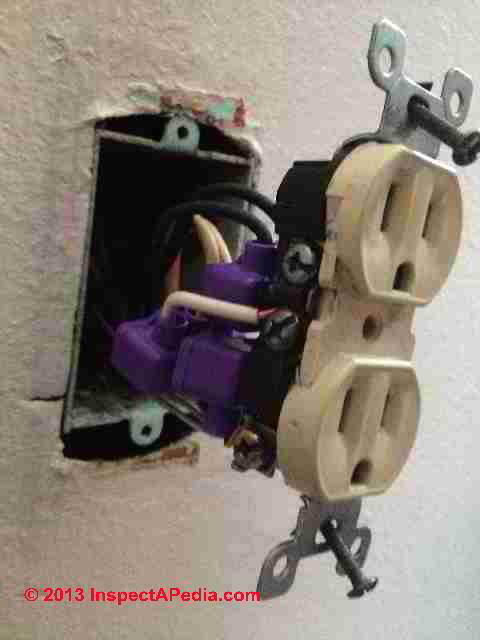
Photo at left: reader's suggestion for close-wiring the AlumiConn splice connectors to the back of the electrical receptacle to gain wiring space during repair of aluminum electrical wiring. Showing the black or "hot" wire connections.
Watch out: sharp bends in electrical wiring are not recommended and may make for unreliable connections.
Changing this receptacle to a clamp-type back-wired receptacle might help but a root problem is that the requirement to give access to the remaining connection points to insert the original wires into the AlumiConn make this installation difficult. A revised AlumiConn connector design might accommodate close-wiring to the devices while still giving access fo insert the aluminum wires- Ed.
I have significantly changed the method for installing the AlumiConn connectors in an outlet box.from what I wrote to you earlier My earlier approach was to install the connectors with a 4” or so copper pigtail to the outlet. Then jam all of the wires and connectors into the box.
While this works, I think a better approach is to attach the AlumiConn connectors to the outlet with the shortest possible pigtail, placing the connectors immediately behind the outlet.
Then, connect the in and out lines to these connectors. The outlet configuration in this house has the ground pin of the outlets located at the bottom. With this configuration, the ground connection to the outlet is at the bottom of the outlet. I think this makes the best use of the limited space in the box. I install is performed as follows:
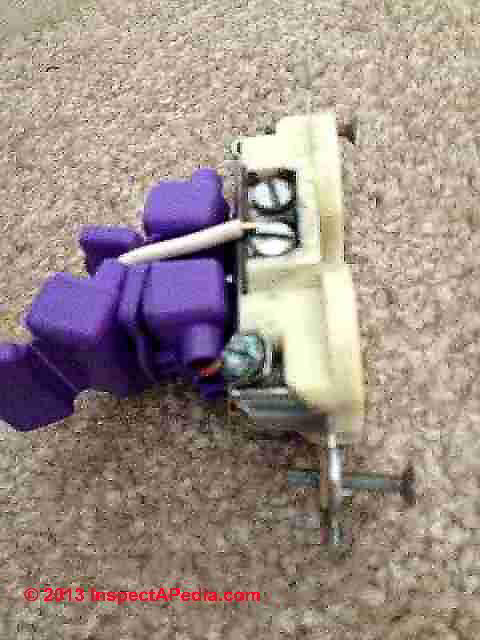
Photo at left: reader's suggestion for close-wiring the AlumiConn splice connectors to the back of the electrical receptacle to gain wiring space during repair of aluminum electrical wiring. Showing the aluminum wires connected to the close-wired AlumiConn that is in turn copper-pigtailed to the original receptacles.
Open the box and observe the wiring configuration. In the typical case, the “in” and “out” wires enter the box from the top. The bottom ports of the box are not used.
I remove the screw and bracket that is used for securing wires that enter the box through the bottom ports, since these are not needed and they consume valuable space. With this configuration, at the bottom of the box there is now more space from the front to the back than there is at the top (where the wires enter).
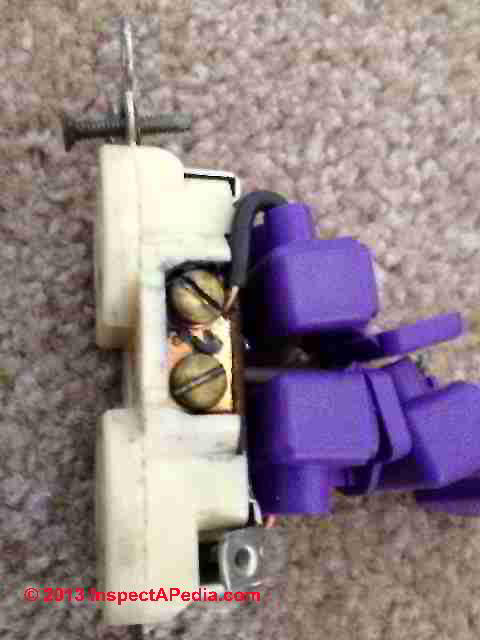
Place a 3-port AlumiConn connector for the ground line immediately behind, and at the bottom of the outlet device, with the ports positioned in the “down” orientation.
Next, a short pigtail is connected between the ground terminal on the outlet and the nearest port of the 3-port connector. Next place an AlumiConn connector immediately behind the upper part of the outlet with the ports positioned in the “up” orientation.
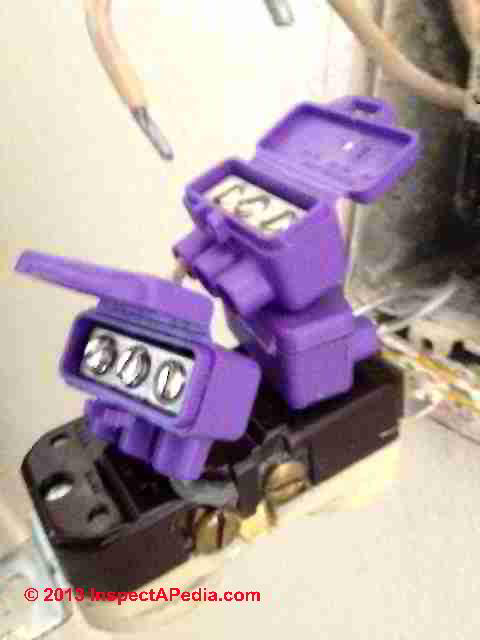
Photo at left: reader's suggestion for close-wiring the AlumiConn splice connector.
Next, a short pigtail between the hot screw of the outlet and the nearest port of the 3-port connector is attached. Next position an AlumiConn connector in a “stacked” fashion immediately behind the previously attached ground connector, with the ports positioned in the “up” orientation.
During installation of the outlet into the box (described later), this arrangement will place the stacked connector at the bottom of the box where there is more space. In the stacked position the pigtail is slightly longer than in the pigtail used for the other wires where the connector is immediately behind the outlet.
Pigtail wires are cut to a length of about 2 3/8” from a piece of 3-conductor romex (e.g. 14-2 with ground). The neutral line for the stacked connector requires the full 2 3/8" length. The hot and ground pigtail wires are made by trimming the 2 3/8 piece to a slightly shorter length. I call this assembly the “composite outlet assembly”.
Once the pigtails and associated connectors are attached, connect the ground lines to the ground connector of the composite assembly. Next attach the hot lines to the composite. This order provides good access to the set screws in order to tighten these screws in the AlumiConn connectors that are immediately behind the outlet. Finally, attach the wires to the stacked neutral connector.
Photo at left: reader's suggestion for close-wiring the AlumiConn splice connector.
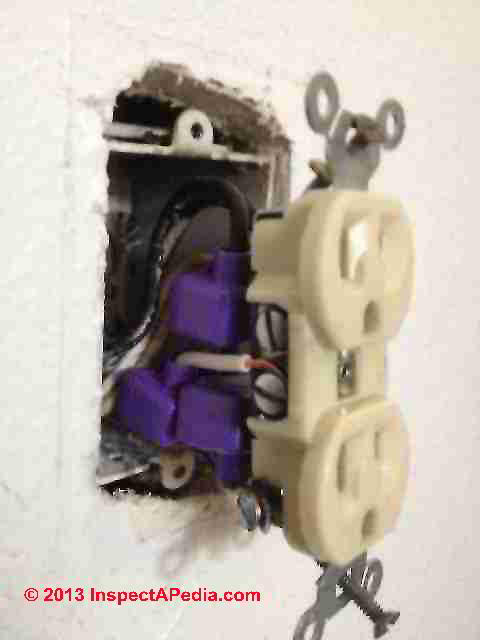
With all of the wires connected, the composite assembly is pushed into the box, with the stacked connector being pushed into the bottom void of the box.
The attached photos show the outlet laying on the floor, in its “composite” form, and then as it is attached to the input and output lines, ready for pushing into the box.
I hope this helps and that the photos are what you were interested in. If not let me know and I'll try again - I have lots more to do. As I mentioned earlier, I will be away for a few weeks. I am leaving on Sept 17 and probably won't be doing any more work on this project before I leave. I will resume work when I return. C.J. 9/13/2013
Reply: examples of usable vs. bad back-wired electrical receptacles for the AlumiConn pigtailing approach to aluminum wiring repair
It seems that no one has taken the trouble to report in illustrated detail on how they install the AlumiConn for this repair. Your text and photos will be important for many other people.
Your idea of connecting the AlumiConn™ closely to the back of the receptacle or switch is an interesting one and may work well; I noted in your photo that you are wiring the pigtail by connecting it around the side screw terminal on the receptacle. I have a suggestion that might improve the wiring by avoiding sharp bends in the connecting pigtail - a known source of trouble in wiring.
Photo at above left: reader's suggestion for close-wiring the AlumiConn splice connector.
A slightly more expensive receptacle and switch like the one I show permits wiring with a straight-in connecting wire; the wire is inserted behind a clamp that is tightened by turning the screw on the receptacle or switch side. Take a look at the electrical " outlet" receptacle shown below.
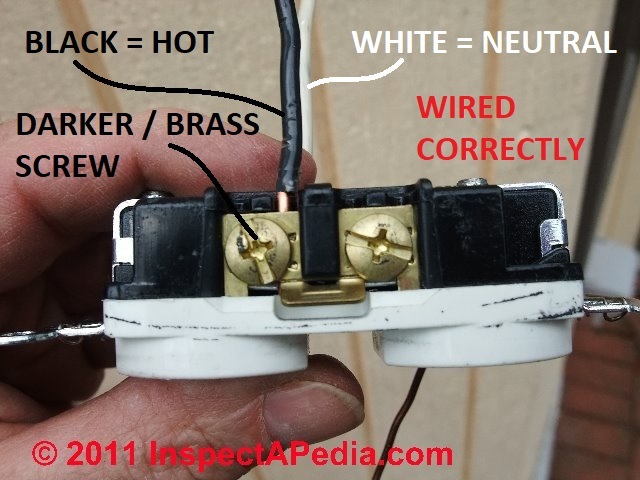
The back wired clamp-type connector design electrical receptacle shown above is described beginning at HOW TO ADD an ELECTRICAL OUTLET. You can also purchase electrical switches that use the same type of connector.
Because the form factor width of the AlumiConn™ does not precisely match the width of a receptacle there will still be some wire bending, but less than when wrapping the connection around the screw on the device side.
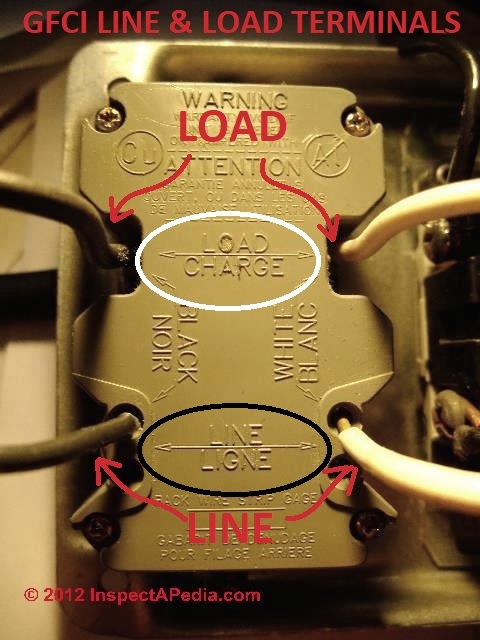
You can see a different example (using a GFCI device) of back-wiring in this article
Using clamp type (not push-in type) connectors on electrical receptacles and switches will gain some space and reduce some of the sharp wiring bends when using the AlumiConn for aluminum wiring repairs.
The purchase of new receptacles and switches adds some cost to the aluminum wire repair job - in my OPINION a justified expenditure, more so where at least some of the original electrical receptacles and switches, now more than 30 years old, are likely to be worn and less reliable.
Watch out: I strongly advise against using the older or lower-cost back-wired devices that sport a simple push-in spring-type connector for back-wiring. That connection is unreliable and more likely not to tolerate the pushing and shoving involved in wiring pigtails and AlumiConns™.
And unlike the screw-clamp-type connectors that work well in back-wiring, the push-in spring type backwired connectors make a poor physical connection between the device and the wire surface - just the very edge of a spring.
Daniel
Reader follow-up:
 Thanks for the comments. In regards to the "wrap around" connection, I think the key is the statement in the referenced article that says: "The receptacle we used for these photos happens to be a 20-A rated device that permits the wire to be inserted straight into a clamp that is tightened against the wire by the screw."
I agree that the clamping onto a straight section of wire would be better. Unfortunately, the receptacles in this house are not built with such a provision. I also agree with the warning about the rear "push in" style. I have never liked these - as you said, the electrical connection is on a spring loaded knife edge and provides a very poor pathway for electrical flow.
Photo at left: reader's close-wired AlumiConn™ splice connector used to repair aluminum wiring, copper pigtailed to the electrical receptacle, the AlumiConn™ then accepts the original solid-conductor aluminum wires for a good-performing repair and electrical safety improvement provided that all of the connections are made following the manufacturer's and US CPSC recommendations.
I have never used the push connections when I have purchased devices that have them. I once had a light fixture that blinked occasionally. I ultimately tracked the problem down to the push in connection on the outlet to which the light was connected. The outlet was installed with a push connection when the house was built. Over the years that I owned the place I reworked the wiring to eliminate all push-in connections.
When I first saw this connection method many years ago I couldn't believe that such a crummy method would be allowed. This probably exposes my naivete in such matters.
Manufacturers can produce anything. It would only be by some government decree that such devices would not be permitted to be sold. The retail industry has too strong of a lobby to make this happen. The government could dictate that they cannot be used - but this transfers the issue to code enforcement, which is a completely different affair. I can see that there is little chance of expunging such poor methods from use.
After all, at my local Home Depot I can purchase outlets that are made by Leviton and marked for use with aluminum and copper wiring. I couldn't believe it. Upon further investigation I discovered that Leviton makes one device and puts different labeling on it, according to what some high volume buying agent wants. I would call this false, to the point of fraudulent advertising. But the world is full of this, so what's new. Buyers must always beware.
Watch out: even though one may find for sale electrical receptacles and switches marked by the manufacturer as AL-CU or COALR or similarly, the US CPSC and other experts DO NOT RECOMMEND use of THOSE DEVICES. Aronstein has reported that the device listing process has not required independent testing or evidence that the devices actually function acceptably in field use. Details are
at ALUMINUM WIRING REPAIR COALR & CU-AL and
at ALUMINUM WIRING REPAIRS NOT-RECOMMENDED - Ed.
I took the photos using my cell phone (iPhone 4s). It does not have a resolution setting for taking pictures. I transferred the photos to my laptop by email from the phone, then download to the laptop, then upload for email attachment. to you. Sending the photos by email from the phone allows sending the photos at a reduced resolution (in order to reduce the size of the file to be sent). I chose the lower resolution.
With your comments I retransmitted the photos to the PC at full resolution - they are attached. - C.J. 9/14/13
Reply:
I've posted your AlumiConn repair example photos throughout our discussion and together we invite comments from King Innovations, the US CPSC., Dr. Aronstein, or other readers - D.F. 9/17/13
...
Reader Comments, Questions & Answers About The Article Above
Below you will find questions and answers previously posted on this page at its page bottom reader comment box.
Reader Q&A - also see RECOMMENDED ARTICLES & FAQs
Question: What is the 3rd AlumiConn connector for?
I'm confused. What is the 3rd AlumiConn connector for? Shouldn't it only require two- one for each socket of the outlet? (Sept 2, 2014) Ivan said:
Reply:
The AlumiConn is a generic connector that can suit more than one particular application. But WATCH OUT since the wires within an individual ALumiConn are all made common you certainly would NOT run separate hot and neutral or ground wires all into the same individual single connector - that'd be called a short circuit.
You will need a connector for
- the hot wires in the receptacle box, that may include hot in, hot to receptacle, and hot out to the next receptacle in the chain
- the neutral wires in the box - same as above
- the ground wires
(Sept 28, 2014) Ivan said:
The 8/3 gauge was stranded.
Question: Whats wrong with attaching the ground to the socket or the box if metal?
Whats wrong with attaching the ground to the socket or the box if metal?
"Whats wrong with attaching the ground to the socket or the box if metal?" I mean without a connector. (Sept 20, 2014) Ivan said:
Reply:
The method you describe produces an unreliable ground, risks fire or death by electrocution
Question: co/alu rated switches and receptacles
(Jan 24, 2015) mnoswad said:
just change out to co/alu rated switches and receptacles
Reply:
MNO
Your advice is, regrettably, improper and dangerous. There is no independent data supporting the use of CO/ALU or COALR devices as an effective, safe repair for aluminum electrical wiring.
Furthermore such devices, even if they worked (which data does not support though they may be "legal"), would not address all of the other AL-to-AL wiring splices in the building.
See the Recommended Articles at CONTINUE READING below.
...
Continue reading at ALUMINUM WIRING REPAIRS NOT-RECOMMENDED or select a topic from the closely-related articles below, or see the complete ARTICLE INDEX.
Or see these
Recommended Articles
- ALUMINUM-WIRED HOMES, REDUCE THE HAZARD - PDF
- ALUMINUM WIRING IDENTIFICATION
- ALUMINUM WIRING REPAIR METHODS
- ALUMINUM WIRING REPAIRS NOT-RECOMMENDED
- ALUMINUM WIRING REPAIR ELECTRICIANS
- ALUMINUM WIRING REPAIRS NOT-RECOMMENDED
- ELECTRICAL JUNCTION BOX TYPES
- REDUCE THE AL WIRE RISK: DETAILS
Suggested citation for this web page
ALUMINUM WIRE REPAIR SPLICE SPACE at InspectApedia.com - online encyclopedia of building & environmental inspection, testing, diagnosis, repair, & problem prevention advice.
Or see this
INDEX to RELATED ARTICLES: ARTICLE INDEX to ELECTRICAL INSPECTION & TESTING
Or use the SEARCH BOX found below to Ask a Question or Search InspectApedia
Ask a Question or Search InspectApedia
Try the search box just below, or if you prefer, post a question or comment in the Comments box below and we will respond promptly.
Search the InspectApedia website
Note: appearance of your Comment below may be delayed: if your comment contains an image, photograph, web link, or text that looks to the software as if it might be a web link, your posting will appear after it has been approved by a moderator. Apologies for the delay.
Only one image can be added per comment but you can post as many comments, and therefore images, as you like.
You will not receive a notification when a response to your question has been posted.
Please bookmark this page to make it easy for you to check back for our response.
Comments


IF above you see "Comment Form is loading comments..." then COMMENT BOX - countable.ca / bawkbox.com IS NOT WORKING.
In any case you are welcome to send an email directly to us at InspectApedia.com at editor@inspectApedia.com
We'll reply to you directly. Please help us help you by noting, in your email, the URL of the InspectApedia page where you wanted to comment.
Citations & References
In addition to any citations in the article above, a full list is available on request.
- Dr. Jess Aronstein, protune@aol.com is a research consultant and an electrical engineer in Schenectady, NY. Dr. Aronstein provides forensic engineering services and independent laboratory testing for various agencies. Dr. Aronstein has published widely on and has designed and conducted tests on aluminum wiring failures, Federal Pacific Stab-Lok electrical equipment, and numerous electrical products and hazards. See ALUMINUM WIRING BIBLIOGRAPHY and see FPE HAZARD ARTICLES, STUDIES for examples.
- "The Influence of Corrosion Inhibitor and Surface Abrasion on the Failure of Aluminum-Wired Twist-on Connections", Aronstein, J.; Campbell, W., Components, Hybrids, and Manufacturing Technology, IEEE Transactions on Volume 7, Issue 1, Mar 1984 Page(s): 20 - 24
- [1]AlumiConn [Website: AlCopStore.com ] ™ AlCopStore.com
223 Salt Lick Road, #279,
St. Peters, MO 63376
Tel: 866-826-2256, Fax: 636-754-0500, Email Sales: pking@AlCopStore.com, Email General Inquiry: info@AlCopStore.com - [2] "Repairing Aluminum Wiring," [As updated 2011] U.S. Consumer Product Safety Commission Publication available online
- [3] "Record of Commission Action, Commissioners Voting by Ballot", CPSC Publication No. 516, Repairing Aluminum Wiring (original version op.cit.), (Briefing package dated March 15, 2011), Quoting:
The Commission voted unanimously (5-0)·to approve republication of CPSC Publication No. 516, Repairing Aluminum Wiring, with the explicit recognition that the COPALUM and AlumiConn connectors currently are the only products that meet the agency's standards to prevent aluminum wire fire hazards
Copy on file as /aluminum/Pub516_Alumi_Conn.pdf - [4] Dr. Jess Aronstein, protune@aol.com is a research consultant and an electrical engineer in Schenectady, NY. Dr. Aronstein provides forensic engineering services and independent laboratory testing for various agencies. Dr. Aronstein has published widely on and has designed and conducted tests on aluminum wiring failures, Federal Pacific Stab-Lok electrical equipment, and numerous electrical products and hazards. See ALUMINUM WIRING BIBLIOGRAPHY and see FPE HAZARD ARTICLES, STUDIES for examples.
- [5] "The Influence of Corrosion Inhibitor and Surface Abrasion on the Failure of Aluminum-Wired Twist-on Connections", Aronstein, J.; Campbell, W., Components, Hybrids, and Manufacturing Technology, IEEE Transactions on Volume 7, Issue 1, Mar 1984 Page(s): 20 - 24
- 05/21/2007 Reducing the Fire Hazards in Aluminum-Wired Homes, [.pdf document], Jess Aronstein, Ph.D., 21 May 2007. This document answers most technical questions about the hazards and remedies of aluminum electrical wiring and includes a report on independent test results of alternative products and methods for repairing aluminum wiring. Some of the sections of this very thorough document are listed below:
- Our recommended books about building & mechanical systems design, inspection, problem diagnosis, and repair, and about indoor environment and IAQ testing, diagnosis, and cleanup are at the InspectAPedia Bookstore. Also see our Book Reviews - InspectAPedia.
- FAQs on author/website credibility
- In addition to citations & references found in this article, see the research citations given at the end of the related articles found at our suggested
CONTINUE READING or RECOMMENDED ARTICLES.
- Carson, Dunlop & Associates Ltd., 120 Carlton Street Suite 407, Toronto ON M5A 4K2. Tel: (416) 964-9415 1-800-268-7070 Email: info@carsondunlop.com. Alan Carson is a past president of ASHI, the American Society of Home Inspectors.
Thanks to Alan Carson and Bob Dunlop, for permission for InspectAPedia to use text excerpts from The HOME REFERENCE BOOK - the Encyclopedia of Homes and to use illustrations from The ILLUSTRATED HOME .
Carson Dunlop Associates provides extensive home inspection education and report writing material. In gratitude we provide links to tsome Carson Dunlop Associates products and services.
 | HOME | ABOUT | ASK a QUESTION | CONTACT | CONTENT USE POLICY | DESCRIPTION | POLICIES | PRIVACY | |
| © 2025 - 1985 Publisher InspectApedia.com - Daniel Friedman | |||||||||