
InspectAPedia® FREE Encyclopedia of Building & Environmental Construction, Diagnosis, Maintenance & Repair |
Question? Just ask us! InspectAPedia
|
 Guide to Installing or Repairing Vinyl Siding &Trim
- POST a QUESTION or COMMENT about how to select, install, troubleshoot, & repair vinyl siding
How to install vinyl siding:
This article describes how to choose & install vinyl siding on buildings, including vinyl siding materials, installation, nailing, flashing, and trim. We describe the composition & properties of vinyl siding such as use of PVC, siding thickness, siding profiles, and how vinyl siding lock and nailing flanges work.
We give detailed specifications for installing vinyl siding including corner posts, fixture mounting blocks, use of J and F channel, nailing guidelines, horizontal overlap, trim details and options, and how to assure proper waterproofing at a vinyl-clad building.
InspectAPedia tolerates no conflicts of interest. We have no relationship with advertisers, products, or services discussed at this website.
- Daniel Friedman, Publisher/Editor/Author - See WHO ARE WE?
Vinyl Siding: Product Choices & Proper Siding Installation Details
 Adapted/paraphrased with permission from Best Practices Guide to Residential Construction (Steve Bliss, J Wiley & Sons) . Steven Bliss.
This article series discusses best practices construction details for building exteriors, including water and air barriers, building flashing products & installation, wood siding material choices & installation, vinyl siding, stucco exteriors, building trim, exterior caulks and sealants, exterior building adhesives, and choices and application of exterior finishes on buildings: paints, stains.
[Click to enlarge any image]
Vinyl siding is the leading choice for residential siding in the United States, accounting for an estimated 36% of the siding market. It owes its popularity to its low cost and low maintenance needs.
When first introduced in the late 1950s, vinyl was criticized for fading rapidly, turning brittle in cold weather, and buckling (or “oil-canning”) in hot weather.
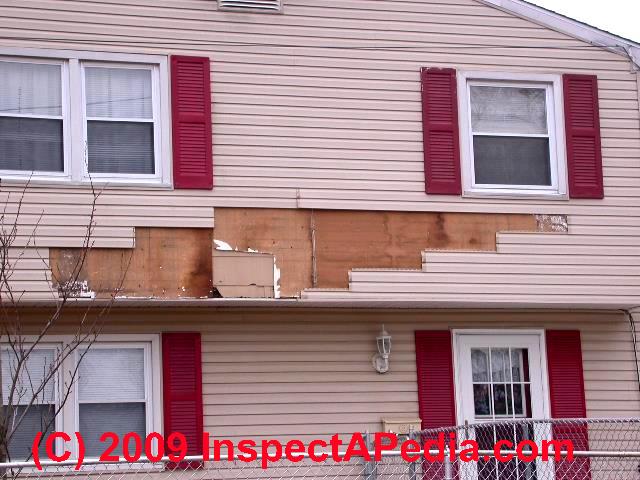
Vinyl siding, if not properly installed, is also vulnerable to siding or trim blow-offs in high winds [especially on the gable-ends of houses-DF] as our photo (left) demonstrates.
Through the use of additives to the resin and better installation techniques, however, manufacturers have addressed these concerns, and vinyl is finding its way onto more higher-end projects. Today’s premium products typically carry a 50-year, or “lifetime,” prorated warranty.
Article Contents:
- VINYL SIDING INSTALLATION - home
- VINYL SIDING BUCKLED WARPED separate article series, causes, diagnosis
- VINYL SIDING COMPOSITION: plastic polyvinyl chloride (PVC) & additives
- VINYL SIDING OXIDATION, White Dusting, Color Shifts, Shatter Resistance
- VINYL SIDING THICKNESS
- VINYL SIDING PROFILES, TEXTURES
- VINYL SIDING LOCK & NAIL FLANGES
- VINYL SIDING INSTALLATION MANUALS
- VINYL SIDING INSTALLATION PROCEDURES
- VINYL SIDING CORNER POSTS
- VINYL SIDING FIXTURE MOUNTING
- J CHANNEL, F CHANNEL for Windows, Door Trim, Soffits and Vinyl Siding
- J-CHANNEL ERRORS Over Windows: Leaks in Vinyl Siding
- VINYL SIDING NAILING GUIDELINES - Mistakes mean Blow-Off or Buckling Siding
- VINYL SIDING BUTT JOINT OVERLAP
- VINYL SOFFIT & FASCIA PRODUCTS
- VINYL SIDED WALL THERMAL MOVEMENT - proper nailing, no caulking
- VINYL SIDING TRIM DETAILS
- VINYL SIDING TRIM, WOOD
- VINYL SIDING INSTALLATION TIMING
- VINYL SIDING INSTALLATION TIPS
- VINYL SIDING UN-LOCK TOOL
- VINYL SIDING WALL WATERPROOFING - housewrap, flashings
- VINYL SIDING REPAIR - How to Repair Loose Vinyl Siding or Remove and Reinstall Part of a Vinyl-Clad Wall
Vinyl Siding Material Composition: plastic polyvinyl chloride (PVC) & additives

Vinyl siding is composed of the plastic polyvinyl chloride (PVC) blended with a number of additives for specific properties: plasticizers for flexibility; stabilizers to prevent oxidation; UV radiation absorbers, such as titanium dioxide, to prevent fading and degradation; and pigments to add color.
Fillers are added to hold down costs, and the resin is extruded into a wide variety of the shapes that mimic natural siding materials. PVC is inherently fire resistant and carries a Class 1(A) fire-rating.
Our photo (left) shows a 1920's home that was re-sided with vinyl by the editor [DF] Poughkeepsie, NY.
Watch out: for an understanding of plastic or odor issues and potential health concerns
see VINYL CHLORIDE HEALTH INFO
and VINYL SIDING or WINDOW PLASTIC ODORS
Vinyl Siding Oxidation, White Dusting, Color Shifts, Shatter Resistance
While enhanced formulas have improved vinyl’s performance over the years, it is not impervious to the elements. Oxidation still occurs and, over time, may cause a white dusting on the surface, particularly in wet, cloudy climates such as the Northeast or Northwest. In freezing weather, a stray baseball can still shatter a panel.
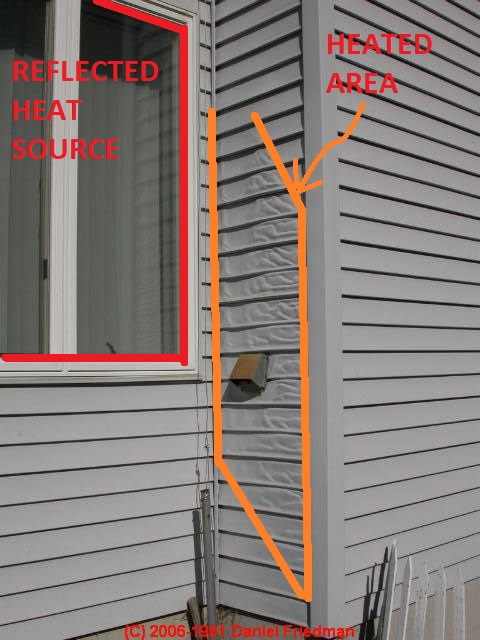
Also sunlight tends to fade dark colors, and excessive heat will soften and potentially distort the vinyl. To minimize the effects of heat and sunlight, most vinyl colors are muted, although some darker colors are available with special additives to stabilize the vinyl.
Watch out: we sometimes find badly buckled or even burned vinyl building siding where someone placed a barbecue grill too close to the exterior wall (photo above left).
See VINYL SIDING BUCKLED WARPED for details about heat damaged and rippled or sagged vinyl siding.
See VINYL SIDING INSTALLATION PROCEDURES for suggestions and tools that are used to remove and replace vinyl siding in the middle of a wall.
Watch out: Information about vinyl products (not just siding) that may produce odors or have other environmental concerns can be found
and VINYL SIDING or WINDOW PLASTIC ODORS.
Vinyl Siding Thickness
Nowadays most vinyl siding is extruded in a two-layer process that puts the more expensive weather resistant resins only in the outer layer to save costs.
While building codes allow vinyl siding as thin as .032 inch (32 mils), premium products range from about 40 to 50 mils, with the thicker products typically costing proportionately more.
Some contractors prefer a heavier material for residing jobs to better smooth over the irregular substrate.
Vinyl Siding Profiles & Textures
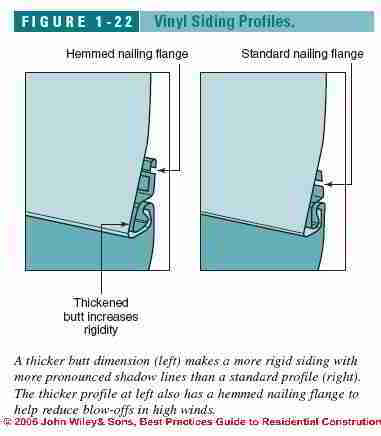
The rigidity of the siding, however, is more a function of its profile and particularly the thickness of the butt edge, which typically ranges from 1/2 to 3/4-inch (Figure 1-22)
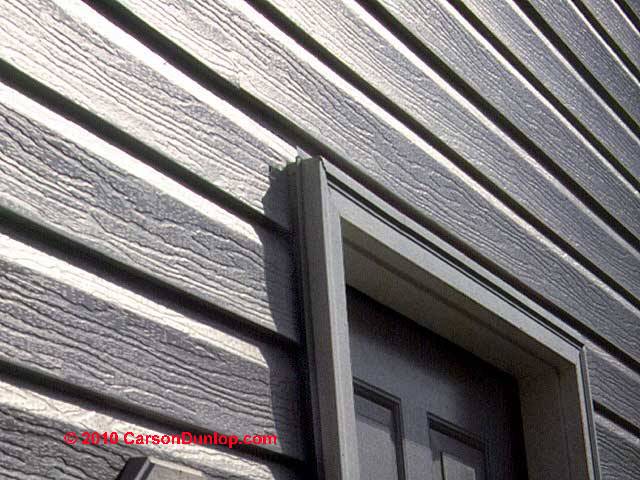
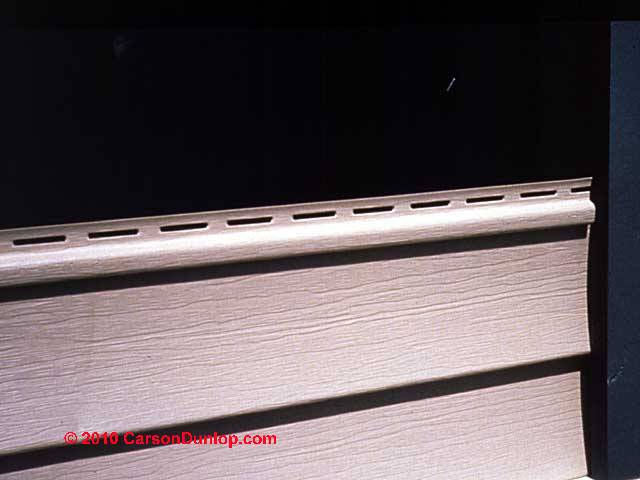
Our photo of ship-lap profile vinyl siding (left) was provided courtesy of Carson Dunlop Associates, a Toronto home inspection, education & report writing tool company [ carsondunlop.com ].
In general, more rigid products are easier to install, but they have more pronounced shadow lines at joints.
Siding panels come in several profiles, usually containing two to four courses of siding per panel. Panels range from 6 to 10 inches in width and are typically 12 feet long, although some manufacturers offer greater lengths.
Finishes found on vinyl wall siding range from completely smooth to heavily textured. A lightly textured finish most closely mimics painted wood siding.
Watch out: some thin or possibly poorly-formulated thin-wall vinyl siding products maybe more prone to warping, buckling, or failing to stay locked in position. Details are
at VINYL SIDING BUCKLED WARPED
Lock and Nailing Flanges on Vinyl Siding
All vinyl siding panels have a locking tab at the bottom of each panel that snaps over the top tab of the panel below.
[Click to see an enlarged, detailed version of any image.]
Because of problems with blow-offs in high winds, some of the premium panels feature reinforced nailing flanges, either with a thickened extrusion or a hem as shown in Figure 1-22.
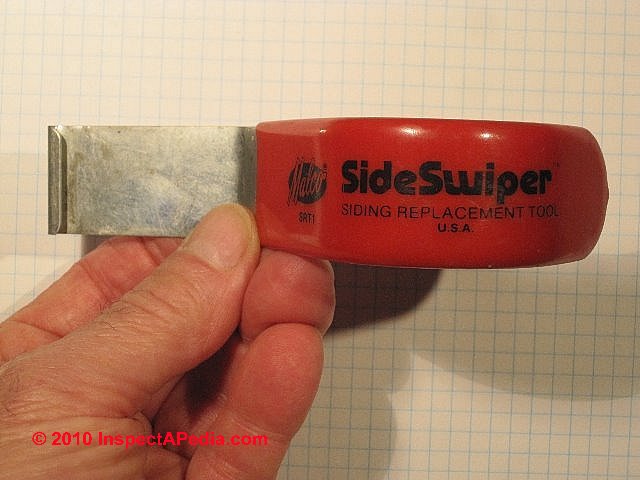
Tip: If you need to disassemble vinyl siding that has already been installed, especially if you don't want to have to take apart the whole wall, pick up a vinyl siding clinching tool at your building supply store.
This simple hooked blade looks a bit like the old frog knife used to clean horses hooves, but it serves a modern purpose of unhooking and re-hooking vinyl siding in the middle of a wall - DF.
-- Adapted with permission from Best Practices Guide to Residential Construction (Steve Bliss, J Wiley & Sons) .
Installation Procedures for Vinyl Siding
Waterproofing Details for Vinyl Siding-Clad Walls: housewrap, flashings
Vinyl siding is not waterproof. Since wind-driven rain will penetrate at lap joints, corner boards, and other penetrations, all new siding jobs should begin with the installation of a weather-resistant drainage plane consisting of building paper or plastic housewrap and integrated flashings.
On re-siding jobs, any leaks should be repaired in the original flashing or cladding before installation begins.
See WATER BARRIERS, EXTERIOR for details, and also see our additional discussion about building codes and weather barriers behind vinyl siding found
at SIDING VINYL.
Thermal Movement in Vinyl-Sided Walls - proper nailing, no caulking avoids buckling or gaps
Because of its high coefficient of expansion, the key to successful installation of vinyl siding is to allow it to move freely as temperatures change.
A 12-foot length will vary in length up to 1/2 inch over a 100°F temperature change.
For that reason, manufacturers recommend leaving 1/4 inch clearance at receiving trim located at corners, windows, mounting blocks, or other places where the siding terminates or is notched.
Increase the clearance to 3/8 inch when installing in temperatures below 40°F.
Our photo (left, courtesy of Carson Dunlop Associates ) shows the standard nailing flange used on most vinyl siding products - in this case with no nails installed. Just below we discuss how vinyl siding should be nailed.
Do not caulk the vinyl siding panels at overlap joints or at ends where they meet receiving trim.
Heat damaged Vinyl Siding
at VINYL SIDING BUCKLED WARPED we discuss the range of sagged, rippled, and damaged vinyl siding and suggest most likely causes such as heat or bending.
There we collect reader comments, guesses, and opinions about what caused the weird wrinkled vinyl shown in our photo at left.
Clue: this is not thermal expansion.
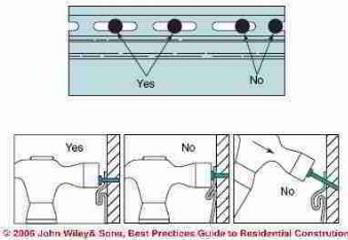
Nailing Guidelines for Vinyl Siding - Mistakes mean Blow-Off or Buckling Siding
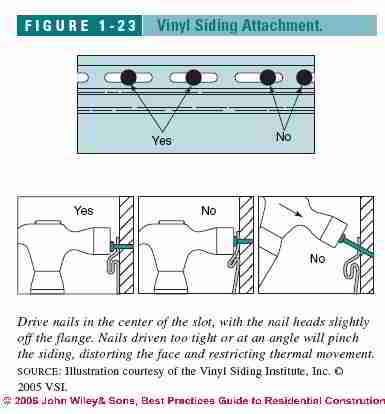
Nails in vinyl siding can also restrict movement and cause buckling problems. To prevent this, do not nail the siding tight. Instead, “hang” the siding by driving nails in the center of the nailing slots and leaving 1/32 to 1/16-inch (the thickness of a dime) between the fastener head and the siding.
Drive nails straight since the head of an angled nail can pinch and distort the siding. Use corrosion-resistant nails with heads at least 5/15-inch in diameter, such as roofing nails, driven at least 3/4-inch into solid wood (Figure 1-23).
Standard nailing spacing for vinyl siding is 16 inches on-center for horizontal panels, 12 inches for vertical panels. In high-wind areas, use extra nails and choose a product with a hemmed or reinforced nailing flange. Carson Dunlop's photo (below) demonstrates aluminum roofing nails used to hang vinyl siding on a building wall.

Experienced vinyl siding installers who want to avoid siding blow-off refer to "hanging vinyl siding" on the building wall rather than "nailing vinyl siding to the building wall" precisely to remind workers not to nail siding so tightly that it buckles when heated.
See VINYL SIDING INSPECTION & REPAIR
On a wall section long enough to have spliced sections of vinyl wall siding in a given siding course, if we see vinyl wall siding that is buckled, we also check to see if the siding moves freely left and right on the wall. It's easy to either use the butt of your hand to try to slide a siding panel left or right - it should move about 1/2" or so.
If the siding feels tight we may check further by grasping the end or edge of a siding section to see if we can pull or push it.
When locking the vinyl siding panels into position, do not force them up or pull them down to adjust the alignment. Too tight panels can tear and too-loose panels can unlock and come loose. One exception is at the band joint between the first and second floor where panels may come unlocked due to shrinkage of the framing. To compensate for this, some contractors pull the panels a little tight over the band joist area.
For a detailed guide to types and causes of buckled, broken, bent, or rippled vinyl siding on buildings
see VINYL SIDING BUCKLED WARPED
Overlap Specifications for Horizontal Vinyl Siding Joints

Where more than one panel is needed along a run, overlap the two panels by about an inch, with the overlapped edge facing away from high traffic areas so they will be less visible.
Overlaps should be staggered at least 3 feet and in a random pattern to avoid creating a visual seam or step effect up the wall. Where possible, use a single piece of siding across the wall.
The fewer joints, the more attractive and water-resistant the job will be.
Our vinyl siding butt joint photo (left) shows how not to install this material.
Fixture Mounting Blocks on Vinyl Siding
Exterior fixtures—such as light fixtures, electrical panels, and hose bibs—can also cause problems if they are fastened through the siding, restricting its free movement.
Siding manufacturers sell mounting blocks with integral J-channel to hold panel ends and allow for movement.
Or the contractor can install wood mounting blocks before installing the siding and trim them with J-channel or utility trim.
Trim Details for Vinyl Siding
The appearance of a vinyl siding job often has more to do with the trim details than with the siding itself. By using wider trim pieces and avoiding the overuse of J-channel, the installer can produce a more attractive finished product.
Manufacturers sell a wide range of accessories in PVC, aluminum, or vinyl-coated aluminum.
Most contractors fabricate at least some of their trim pieces on site from either prefinished or vinyl-coated aluminum coil stock, using a sheet-metal break and other specialized tools.
Like vinyl siding, aluminum trim has a high coefficient of expansion so installation details need to accommodate movement. Avoid putting nails in the face of flat pieces of coil stock and allow 1/4 inch at edges for expansion and contraction. Where possible, use a vinyl receiving channel, roofing drip cap, or another piece of trim to support long runs of flat aluminum trim, minimizing the use of nails.
Where nails are required, use slotted nail holes, which can be made using a slot punch.
Repainted aluminum or stainless-steel nails are available to match siding and trim colors. A one-inch hem placed along one edge of flat trim, such as fascia, will help minimize buckling or oil-canning.
Soffit and Fascia Products Used with Vinyl Siding
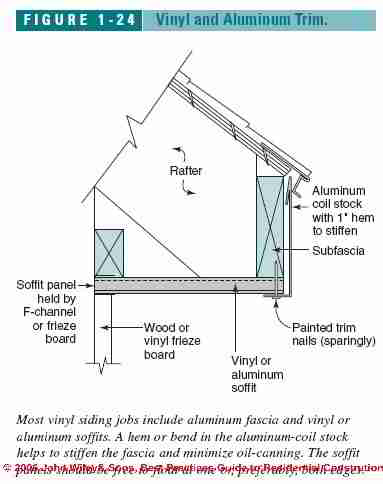
Most vinyl siding jobs include aluminum fascia trim and vinyl or aluminum soffit panels.
[Click to see an enlarged, detailed version of any image.]
The fascia is typically secured at the top, either by the drip edge or a piece of vinyl utility trim, although it can also be fastened with a few face-nails (through slotted holes) if the nails will be hidden by a gutter.
The bottom lip of the fascia should be nailed sparingly in slotted holes to allow movement (Figure 1-24 at left).
The outside edge of the aluminum or vinyl soffit panels can be supported by the receiving channel (J-channel or F-channel) or by the L bend at the bottom of the fascia, as shown in Figure 1-24.
The back edge of the soffit is either supported by receiving channel or a wood or vinyl frieze board.
These details allow the fascia and soffit panels to move freely to accommodate thermal expansion and avoid buckling.
Windows and Door Trim with Vinyl Sided Walls - Using J-Channels
Window and door trim is perhaps the most conspicuous part of a vinyl siding job. Good planning is important. If possible, plan the job so a full butt of the siding lands on top of the windows.
At window bottoms avoid the use of 3/4inch J-channel, which lets the unrestricted siding buckle. Instead use utility trim or under-sill trim to hold the siding tight here and at other horizontal projections.
Where the vinyl has been notched below a window, use a snap-lock punch to create raised lugs along the top edge of the siding, locking it into the under-sill trim.
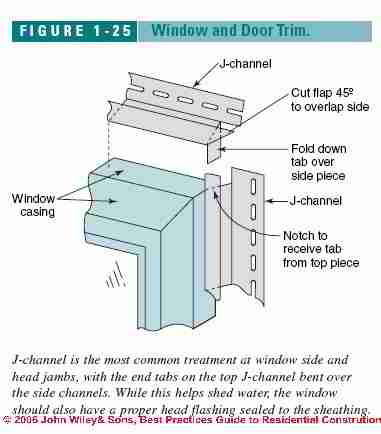
At window side and head jambs, J-channel is the most common treatment, with end tabs on the top J-channel bent over the side channels to deflect water (Figure 1-25).
While this detail helps shed water, it is important to note that J-channel does not serve as window head flashing. The window head should be properly flashed with the window’s top flange or drip cap lapped under the sheathing wrap and sealed to the sheathing with flashing tape.
Installing the Corner Post with Vinyl Siding
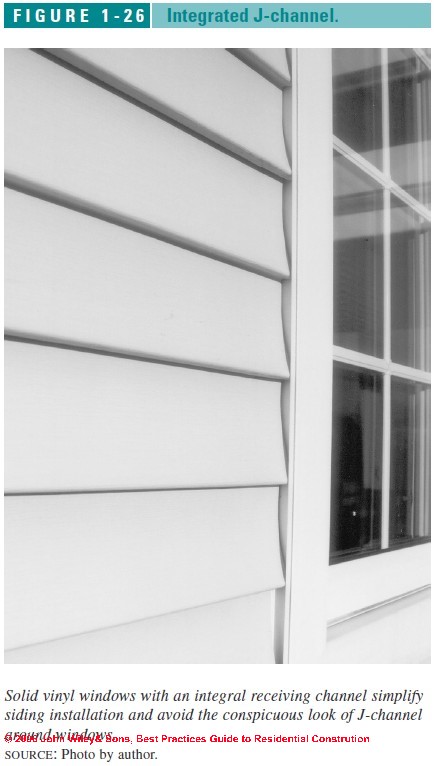
To simplify installation and avoid the conspicuous look of J-channel around windows, one option is to use solid vinyl windows with an integral J-channel (Figure 1-26 far left).
For the more traditional look of flat trim around the window, you can use vinyl widow casing, which is typically 2 1/2 inches wide with an integral J-channel.
Corners.
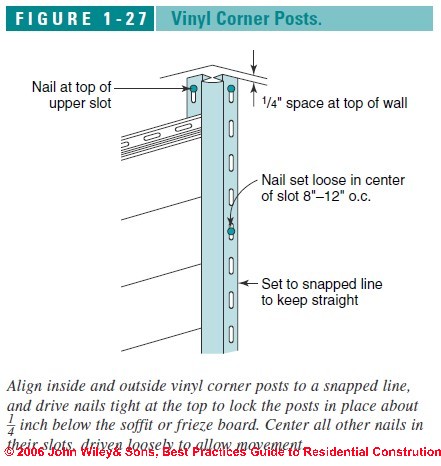
Set the inside and outside vinyl corner posts about 1/4 inch below the soffit or frieze above, and lock them in place with nails at the top of the uppermost nailing slots.
Then nail in the center of the slots every 6 to 12 inches so that any movement is downward, not upward.
Vinyl corner trim tends to be wavy, so following a snapped line is helpful (Figure 1-27 above right).
Vinyl-Siding J-Channel Errors Over Windows: Leaks

In our photo at above left it looks like really sloppy J-channel work during siding installation, leaving a leak at the window sill.
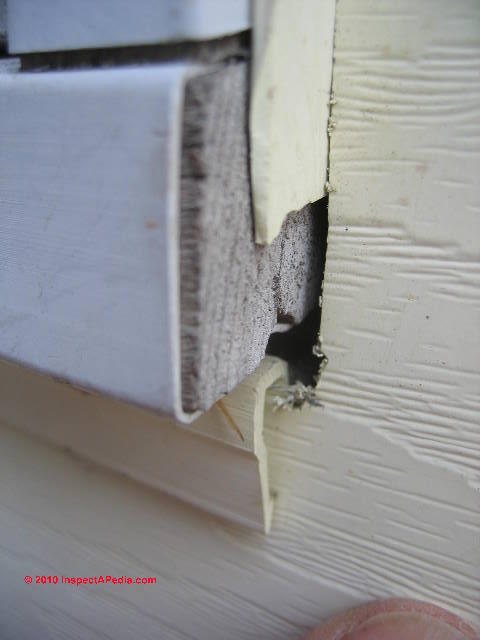
Our photo of improperly-cut J-channel trim around a window (above right) shows a more serious problem than may be immediately apparent.
In Spackenkill, Poughkeepsie, NY we found an entire neighborhood of homes in which nearly all of the windows were rotted beyond repair due to this error. The same installer had done all the J-channel vinyl siding work on all the homes.
Also see VINYL SIDING J-CHANNEL MISTAKES Cause Costly Building Damage
Watch out: J-Channel errors can rot windows and doors: Wind-blown rain sent inside the J-channel trim and into the window structure was the problem caused because the installer didn't follow the manufacturer's instructions.
Properly the top J-channel is trimmed to include a tab bent over the vertical J-channel to route water outside, not inside the trim. The little flap and proper J-channel installation details are shown in Figure 1-25.
Wood Trim Installation with Vinyl Siding
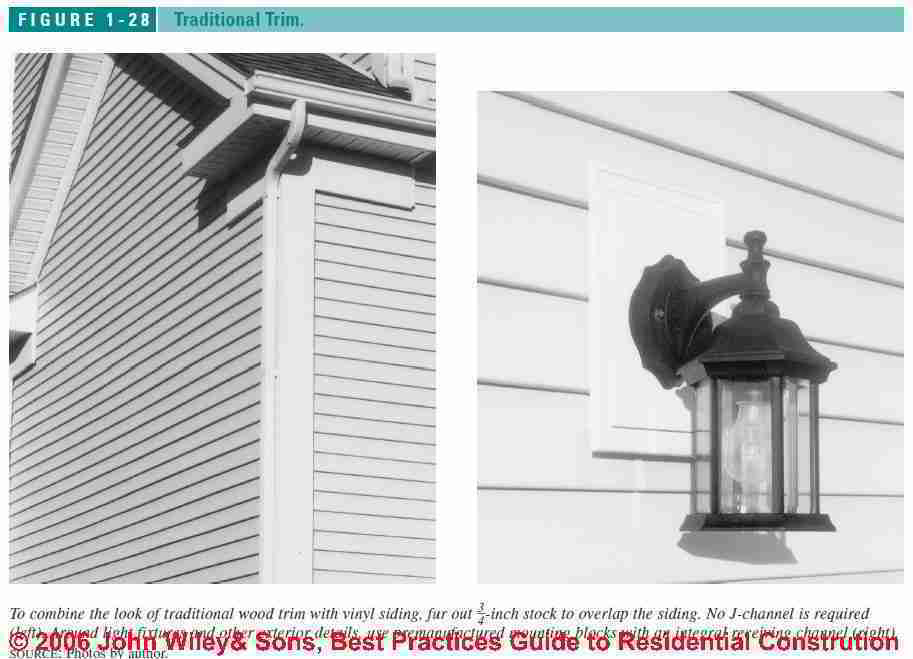
For those attracted to the low-maintenance appeal of vinyl siding but who want the look of traditional trim, builders can use wood or composite trim rabbeted or built out to create a receiving channel for the siding.
For example, 5/4--inch corner boards can be rabbeted to receive the siding, or standard 3/4-inch stock can be furred out the thickness of the vinyl siding to create a similar effect (see Figure 1-28).
Window and door casings in a vinyl-sided wall can be fashioned the same way.
Either use a furring strip to raise the casing above the vinyl siding or use a thicker profile with a rabbet.
At the bottom of the window, you can partially conceal the undersill trim in the rabbet. To shed water, the head casing will still need conventional head flashing and J-channel, but these will be relatively inconspicuous.
- - Adapted with permission from Best Practices Guide to Residential Construction (Steve Bliss, J Wiley & Sons) .
Ten Tips for a Good Vinyl Siding Installation
The following suggestions are adapted from CertainTeed's vinyl and polymer siding installation guide cited and adapted just below. Bold and non-italic text has been added. As the company notes, (quoting)
... even the best products fall short of expectations if they are not installed properly. Following these ten recommendations—the basics of a professional installation—can help ensure a quality installation that fulfills homeowners’ expectations and reduces call backs. - Certainteed (2015) cited below.
- Install vinyl siding on smooth flat wall sheathing:
Install all siding and accessories over a smooth, flat surface. Always install siding over a rigid sheathing, and never install it over open studs. - Install vinyl siding over house wrap or a water barrier:
Vinyl siding is not a watertight material. Install a weather-resistant barrier, like CertainTeed CertaWrap and flash around all windows and doors before installing vinyl siding and trim.
See HOUSEWRAP AIR & VAPOR BARRIERS
and
See VAPOR BARRIERS, VINYL SIDING - How to cut vinyl siding:
There are three recommended ways to cut vinyl siding: For rip cuts, score the panel with a knife or vinyl blade and bend the panel back and forth. Use aviator snips or shears to fit panels around windows and doors. For cross cuts, use a circular saw with a plywood blade in the reverse position. - Vinyl siding end gap clearance at vertical abutments:
Always leave room for expansion and contraction into receiving channels like outside cornerposts, inside cornerposts, and J-channel. If the temperature is above 40°, leave 1/4"; if the temperature is below 40°, leave 3/8".
See VINYL SIDING CORNER POSTS
Watch out: this end clearance pertains to vertical surfaces such as trim against which the siding ends abut. It does not mean you leave gaps between abutting coursed of siding themselves. Rather, those overlap so that when siding shrinks in cool temperatures gaps won't appear. See note 5 below. - Vinyl siding butt joint overlap specifications:
When installing horizontal vinyl siding panels 12' 6" in length or shorter, overlap the factory notches 1" to 1-1/4" (depending on the temperature).
See VINYL SIDING BUTT JOINT OVERLAP - Vinyl siding nailing schedule & placement: Always nail in the center of the nail slots: 16" on center for siding;
8" to 12" for accessories.
See VINYL SIDING NAILING GUIDELINES - Hang the siding, don't nail it tight: DO NOT NAIL TIGHT! Always leave 1/8" to 1/16" between the nail
head and the wall surface to allow for movement when the panel
expands and contracts.
Watch out: failure to follow this recommendation is a common cause of ugly buckled vinyl siding courses. If the siding is nailed tight to the wall it will buckle when it warms and expands even if the end gap clearances at step 4 were provided. - Vertical accessories & window top j-channel:
Hang vertical accessories from the top of the top nail slot. If the accessory is longer than 12', hang it from the top two nail slots.
See VINYL SIDING FIXTURE MOUNTING - Siding course overlap direction:
Lap away from the highest traffic pattern, typically the front of the house. Keep laps at least 3' apart from course to course, and install three courses between laps above each other. - Top or last siding course detail: Finish the last piece of siding into utility trim or dual utility trim.
- Georgia-Pacific, "Vinyl Siding & Accessories Installation Guide" [PDF], Georgia-Pacific, Website: http://www.gpvinylsiding.com/, retrieved 2015/10/30, original source: use the website link given at left.
Other vinyl siding installation manuals are listed at VINYL SIDING INSTALLATION MANUALS
Vinyl Siding Un-Lock Tool to Remove or Repair Vinyl Siding
Use this Siding Hook to Remove or Replace Vinyl Siding
This discussion has moved to a new article now
at VINYL SIDING HOOK to REMOVE & REPLACE
There we show how to use this vinyl siding hook or siding removal tool to un-hook vinyl siding to permit repair, replacement or other work.
When Does the Siding Go On? Building Construction Sequence
Moved to : BUILDING DRY-IN, DEFINITION - construction stages or phases
...
Reader Comments, Questions & Answers About The Article Above
Below you will find questions and answers previously posted on this page at its page bottom reader comment box.
Reader Q&A - also see RECOMMENDED ARTICLES & FAQs
On 2020-08-06 - by (mod) -
Not in my view
On 2020-08-05 by Christy Carrasquillo
What if you only replace the siding on one side of your house? Does this compromise the moisture barrier / house wrap beneath for the other 3 sides?
On 2020-06-29 by (mod) - siding is not waterproof
Re-posting from private email:
Anonymous wrote: have a quick question about vinyl siding, and I really respect your expertise.
y wife and I were wondering if it is advisable to install vinyl siding over lap board siding--or would it be better to remove the old siding first. We have solid redwood siding, and it is in decent shape, but we are concerned about the possibility of moisture getting in behind the vinyl siding.
What are your thoughts?
Thank you for providing an invaluable resource for homeowners!
Moderator reply:
No siding product is waterproof, even wood clapboards, though years of paint and caulk can limit water penetration.
You'd want to put house-wrap behind your vinyl whether you tear off the old clapboards or not. Housewrap, properly installed, plus proper flashing and sealing around openings like windows and doors, is intended to assure that any water penetrating the siding is directed back outside through the drainage plane behind the siding rather than leaking into the building interior.
See HOUSEWRAP PRODUCT CHOICES
But leaving the original wood clapboards in place is far less costly than a tear-off and that's what's usually done.
An installer might be able to nail the new siding atop the housewrap that was right over the clapboards, or she might install furring strips to make nailing easier- it depends on the width of the original clapboards and the nailing width of the new siding. (Furring is often necessary to avoid wavy finished wall siding).
However siding over existing clapboards means if you don't build out the trim around windows and doors etc. your home will look as if it has sunken eyes - not so nice, so you'll want to discuss that detail with your contractor. take care to build out around wall penetrations too, such as at exterior lights or electrical receptacles, to reduce the chance of leaks into the wall structure.
On 2019-04-13 - by (mod) -
All vinyl components are normally "hung" rather than "nailed" - which is a techie way of saying if you nail it tight to the building sheathing you're asking for buckling as the siding heats up in sunlight. There are two steps to avoiding buckling: nail loosely enough that you can slide the vinyl siding or J-channel or corner trim back and forth by hand, and keep the manufacturer-suggested clearance distances at the ends of siding where it abuts vertical trim.
On 2019-04-10 by jim
it says every where to nail siding loose on installing corners it says leave 1/4 below soffit and lock in place with nail at end hanging the siding .Does this mean nail the top nail tight leaving no 1/16 gap like everything else?
On 2017-05-02 - by (mod) -
If the house wrap is already installed and was installed correctly you will be okay.
On 2017-05-02 by Teresa
My home was stripped todayvto prepare for vinyl siding. I'm awful nervous bout rain tonight. If the exterior gets wet, should they just proceed as usual or give it a good drying time?
...
Continue reading at VINYL SIDING INSPECTION & REPAIR or select a topic from the closely-related articles below, or see the complete ARTICLE INDEX.
Or see VINYL SIDING INSTALLATION FAQs - questions and answers posted originally on this page
Or see these
Recommended Articles
- SIDING TYPES, INSTALLATION, DEFECTS - home
- SIDING VINYL - home
- VAPOR BARRIERS, VINYL SIDING
- VINYL SIDING BUCKLED WARPED
- VINYL SIDING CLEANING METHODS
- VINYL SIDING CLEARANCE TO GROUND
- VINYL SIDING DEFORMED by SUNLIGHT
- VINYL SIDING FIRE DAMAGED
- VINYL SIDING GAPS, HOLES, CRACKS
- VINYL SIDING GRILL COOKER DAMAGE
- VINYL SIDING HOOK to REMOVE & REPLACE
- VINYL SIDING IMPACT DAMAGE
- VINYL SIDING INSPECTION & REPAIR
- VINYL SIDING INSTALLATION
- VINYL SIDING INSTALLATION MANUALS
- VINYL SIDING INSTALLATION PROCEDURES
- VINYL SIDING LEAKS
- VINYL SIDING LOOSE, BLOW-OFFS
- VINYL SIDING MOVEMENT DAMAGE
- VINYL SIDING STAINS
- VINYL SIDING STAIN CLEANING METHODS
- VINYL SIDING or WINDOW PLASTIC ODORS
- VINYL CHLORIDE HEALTH INFO
Suggested citation for this web page
VINYL SIDING INSTALLATION at InspectApedia.com - online encyclopedia of building & environmental inspection, testing, diagnosis, repair, & problem prevention advice.
Or see this
INDEX to RELATED ARTICLES: ARTICLE INDEX to BUILDING SIDING
Or use the SEARCH BOX found below to Ask a Question or Search InspectApedia
Ask a Question or Search InspectApedia
Questions & answers or comments about how to select, install, troubleshoot, & repair vinyl siding.
Try the search box just below, or if you prefer, post a question or comment in the Comments box below and we will respond promptly.
Search the InspectApedia website
Note: appearance of your Comment below may be delayed: if your comment contains an image, photograph, web link, or text that looks to the software as if it might be a web link, your posting will appear after it has been approved by a moderator. Apologies for the delay.
Only one image can be added per comment but you can post as many comments, and therefore images, as you like.
You will not receive a notification when a response to your question has been posted.
Please bookmark this page to make it easy for you to check back for our response.
IF above you see "Comment Form is loading comments..." then COMMENT BOX - countable.ca / bawkbox.com IS NOT WORKING.
In any case you are welcome to send an email directly to us at InspectApedia.com at editor@inspectApedia.com
We'll reply to you directly. Please help us help you by noting, in your email, the URL of the InspectApedia page where you wanted to comment.
Citations & References
In addition to any citations in the article above, a full list is available on request.
- Best Practices Guide to Residential Construction, by Steven Bliss. John Wiley & Sons, 2006. ISBN-10: 0471648361, ISBN-13: 978-0471648369, Hardcover: 320 pages, available from Amazon.com and also Wiley.com. See our book review of this publication.
- Mark Cramer Inspection Services Mark Cramer, Tampa Florida, Mr. Cramer is a past president of ASHI, the American Society of Home Inspectors and is a Florida home inspector and home inspection educator. Mr. Cramer serves on the ASHI Home Inspection Standards. Contact Mark Cramer at: 727-595-4211 mark@BestTampaInspector.com
- John Cranor [Website: /www.house-whisperer.com ] is an ASHI member and a home inspector (The House Whisperer) is located in Glen Allen, VA 23060. He is also a contributor to InspectApedia.com in several technical areas such as plumbing and appliances (dryer vents). Contact Mr. Cranor at 804-873-8534 or by Email: johncranor@verizon.net
- Paul Galow [Website galowconsulting.com ] - technical consultant on networking, LAN design, applications support. Galow Consulting Services [Website galowconsulting.com ] , 914-204-1749, email: paulgalow@galowconsulting.com
- John Rudy, Advantage Home Inspections, Flemington N.J. 08822 home inspector, 908-806- 6364, Home, Radon & Termite Inspections, Central & Parts of North New Jersey, email: jonadvantage1@yahoo.com
- Malco® Products siding tools are available from that company, including the SideSwiper II SRT2 discussed at Malco's website. Websearch 09/07/2010 http://malcoproducts.com/product/roofing-siding-gutter/siding-vinyl/siding-tools-vinyl/sideswiper-ii. Malco also produces other vinyl siding repair tools such as aprons, awls, hole punches, saw blades, and tools for for fiber cement products including power-assisted cutters
- Parmetol, a wood preservative recommended by the manufacturer was used as a fungicidal additive to paint on the Blue Poplar wood sculpture in Amsterdam, by artist Mari Shields [Website marishields.com ] [ - art conservation consult DJF-artist MS 2010]
- In addition to citations & references found in this article, see the research citations given at the end of the related articles found at our suggested
CONTINUE READING or RECOMMENDED ARTICLES.
- Carson, Dunlop & Associates Ltd., 120 Carlton Street Suite 407, Toronto ON M5A 4K2. Tel: (416) 964-9415 1-800-268-7070 Email: info@carsondunlop.com. Alan Carson is a past president of ASHI, the American Society of Home Inspectors.
Thanks to Alan Carson and Bob Dunlop, for permission for InspectAPedia to use text excerpts from The HOME REFERENCE BOOK - the Encyclopedia of Homes and to use illustrations from The ILLUSTRATED HOME .
Carson Dunlop Associates provides extensive home inspection education and report writing material. In gratitude we provide links to tsome Carson Dunlop Associates products and services.
 | HOME | ABOUT | ASK a QUESTION | CONTACT | CONTENT USE POLICY | DESCRIPTION | POLICIES | PRIVACY | |
| © 2025 - 1985 Publisher InspectApedia.com - Daniel Friedman | |||||||||