 Arsenic in Drinking
Water Test
Arsenic in Drinking
Water Test
Example test of arsenic in San Miguel de Allende water supply
- POST a QUESTION or COMMENT about tests for arsenic in drinking water and about how arsenic contaminants are removed from water
Arsenic in drinking water test procedure & test results.
Here we describe using a DIY test kit for arsenic in drinking water and give results that we found for a municipal water supply in San Miguel de Allende.
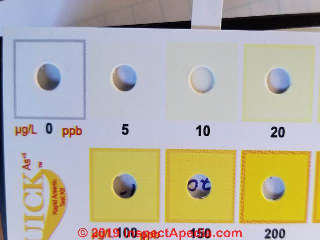
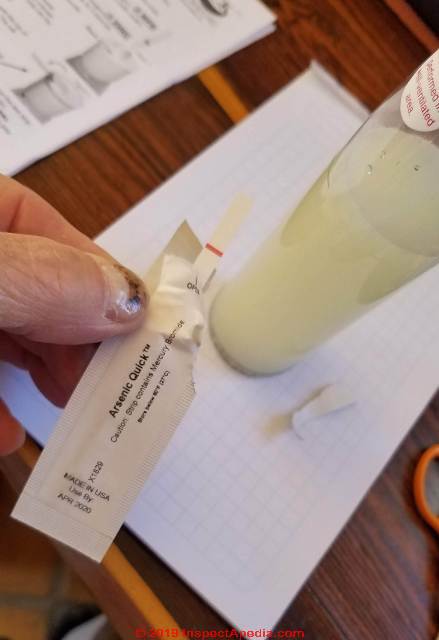
Shown at page top: our test of city drinking water in San Miguel de Allende, performed on 25 March 2019 using a Quick As Rapid Test™ found between 5 and somewhere less than 10 ppb of arsenic in the water supply.
This article series discusses the detection of arsenic in drinking water, sources of arsenic in water, arsenic exposure limits, and how to remove arsenic from drinking water.
InspectAPedia tolerates no conflicts of interest. We have no relationship with advertisers, products, or services discussed at this website.
- Daniel Friedman, Publisher/Editor/Author - See WHO ARE WE?
Test Procedure & Results for Arsenic Contamination in Drinking Water
 While the arsenic MCL goal set by the US EPA is zero, the current minimum contaminant level (MCL) for arsenic in drinking water for total arsenic level, regardless of whether the arsenic is in inorganic form is 10 ppb or 0.10 ppm or 0.010 µg/L (micrograms per litre).
The U.S. EPA has set this arsenic standard for drinking water at .010 parts per million to protect consumers served by public water systems from the effects of long-term, chronic exposure to arsenic.
Public water systems have been required to comply with this standard since January 23, 2006.
[Click to enlarge any image]
We used an arsenic in water test kit provided by Industrial Test Systems, Inc., available from various vendors including Amazon and also from ITS in the UK. Contact information for the company is given at the end of this article.
If you plan to use this test kit you may want to supplement the manufacturer's instructions with the illustrations and extra commentary given here. I found that some sections of the print in the packaged instructions was so microscopic as to require a magnifying glass to read those details.
Arsenic Test Kit Contents
This arsenic test kit provides reagent chemicals and test strips sufficient to conduct five tests for arsenic in water - provided you don't foul up any of the tests (as I will demonstrate).
The kit includes the following items:
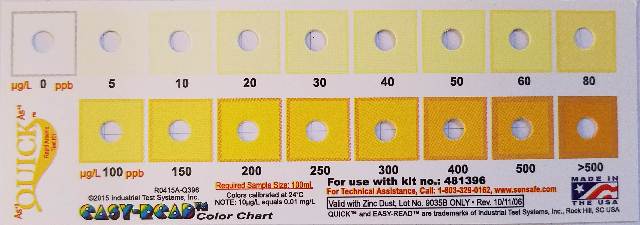
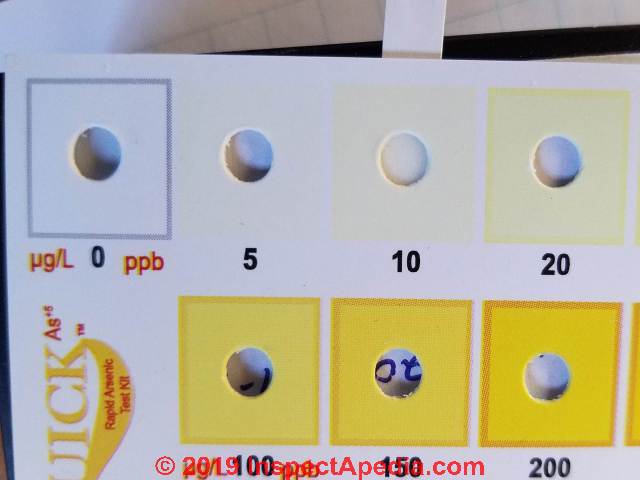
- A Quick™ color chart against which the arsenic gas test strips are compared to estimate the arsenic level in the water test sample - shown above

- A reaction bottle with a line marking 100 ml - the requisite water test volume - shown above.
I used a fine black marker to darken the 100 ml line on the bottle but that step is not necessary.
- Two bottle caps: a yellow cap used to close the bottle when shaking to mix chemicals into the water sample, and a white cap with a folding spout used to secure the arsenic test strip in place once the test sample of water has been prepared.
The yellow cap is shown in my photo of the reaction bottle above.
Watch out: throughout the test procedure and particularly if you are conducting multiple arsenic in water tests as we did, it is essential that the white cap and its spout are kept perfectly dry. If there is water or reagent liquid in the white cap or spout it can contaminate the arsenic test strip and will give you inaccurate results.
In my photo above I'm showing the arsenic test strip as it is inserted properly into the raised spout of the white bottle cap. When inserting the strip check first that the cap is dry.
Then insert the strip (after following the kit instructions that require reagent preparation first) such that the red line faces the back of the cap. The strip is inserted until the red line is at the tip of the spout.
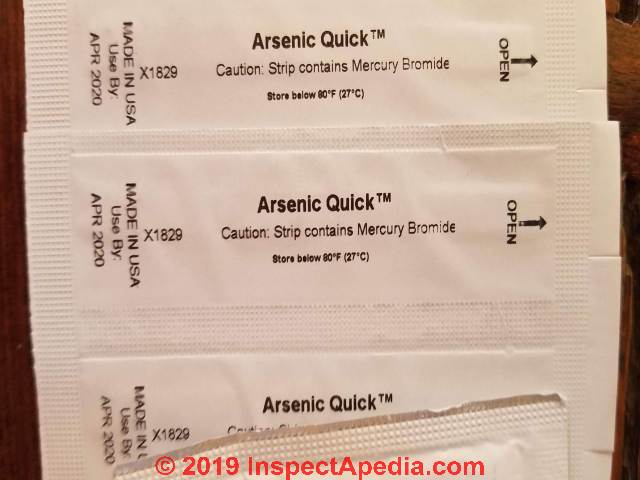
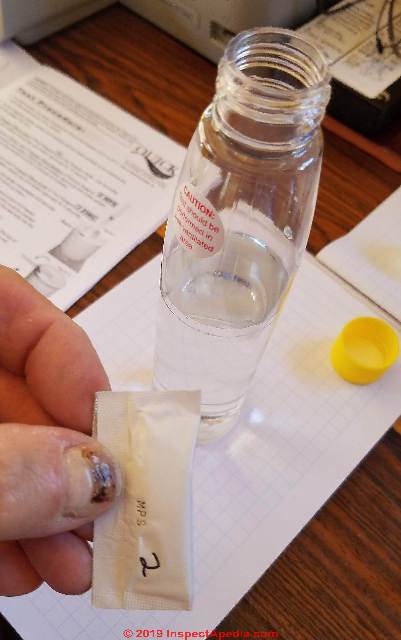
- Arsenic Quick™ test strips - Four long thin foil packets, each containing a single arsenic test strip - a plastic strip with a red marker line and a chemically-treated sensor pad
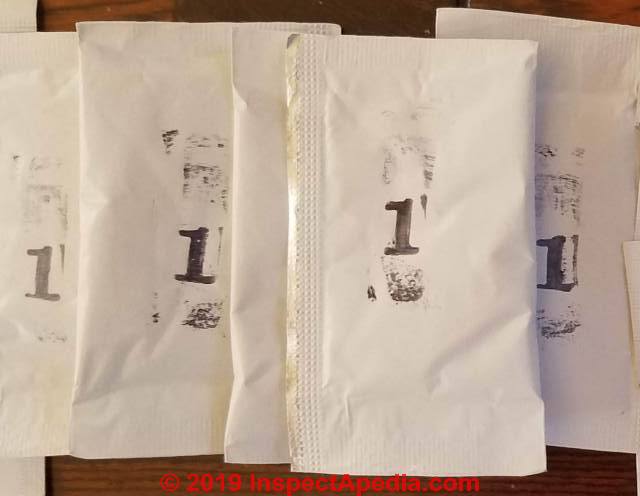
- First reagent: marked 1, in four large "pillows" or foil packets
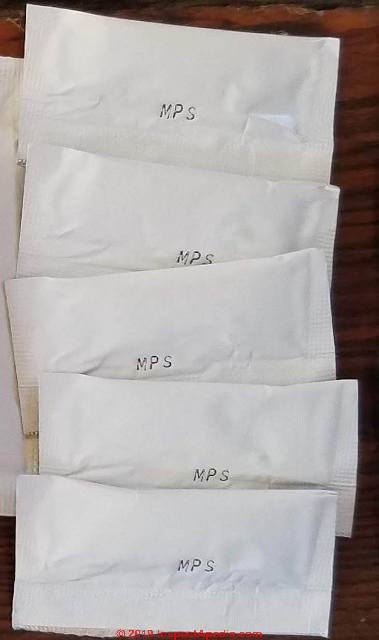
- Second reagent: four small powder pillows or packets marked 2 MPS - shown above
Watch out: our reagent packets were marked MPS but not with the digit #2. Read the packet labels carefully. I marked "2" on the MPS packets before starting the procedure.
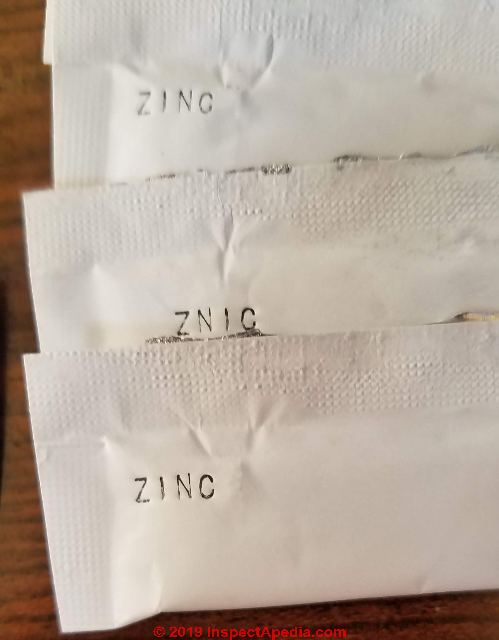
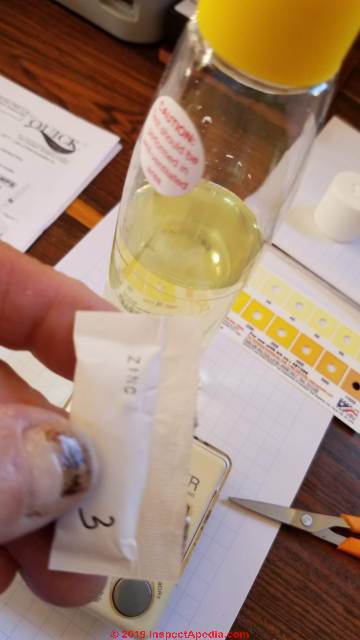
- Third reagent: four small packets of powdered zinc marked 3 ZINC
Our third reagent packets were clearly marked ZINC but did not bear the number "3" - a digit that was easy to add with a felt tip pen for those who don't trust themselves to be careful.
Watch out: opening the zinc packet carelessly or squeezing it once it's open can send a burst of fine zinc dust into your nose or eyes. - A small plastic bag intended to dispose of used test strips. The test strips contain mercury bromide and should be disposed-of in this bag or its equivalent.
What else you will need to conduct this arsenic test
To use this arsenic test kit successfully and accurately you will also want to have at hand
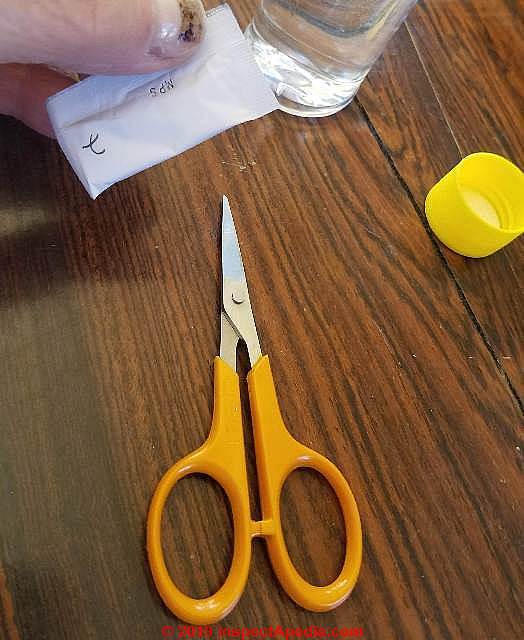
- A pair of scissors to open the reagent packets.
Using scissors reduces the chance that fumbling fingers trying to open a reagent packet by brute tearing will spill the dry chemicals.
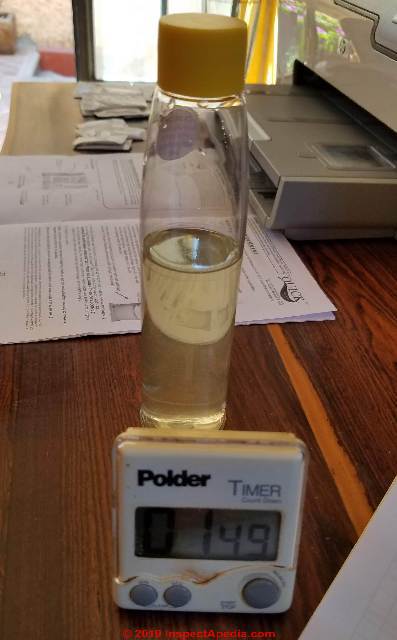
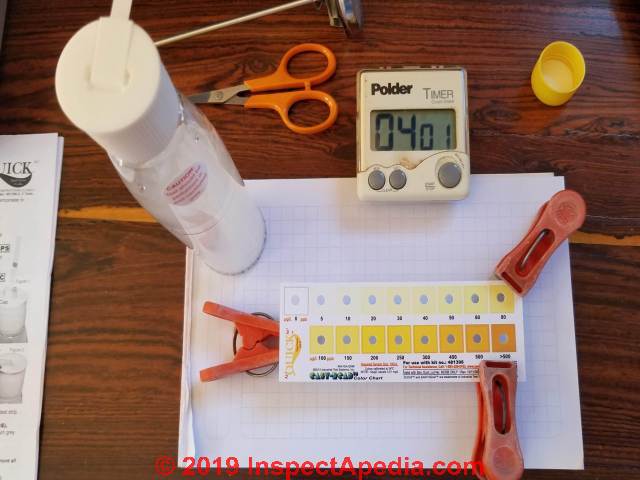
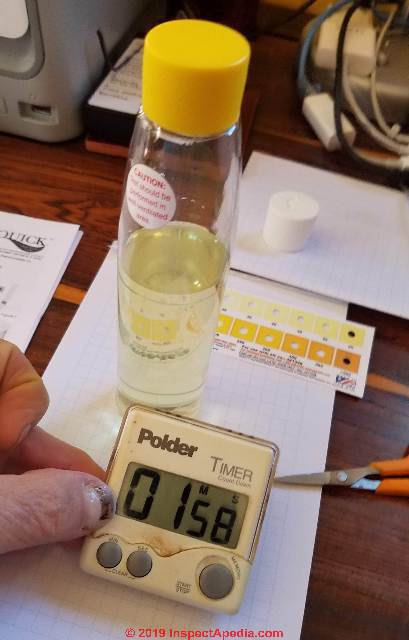
- A timer to time reagent mixing times to the kit's specifications.
A simple kitchen timer like the one shown above makes timing the reagent rest-steps easy and accurate.
You'll see that you will need to time a two-minute rest period (reagent #1) and a ten-minute period for exposing the test strip to gases produced in the reaction bottle later in the procedure.
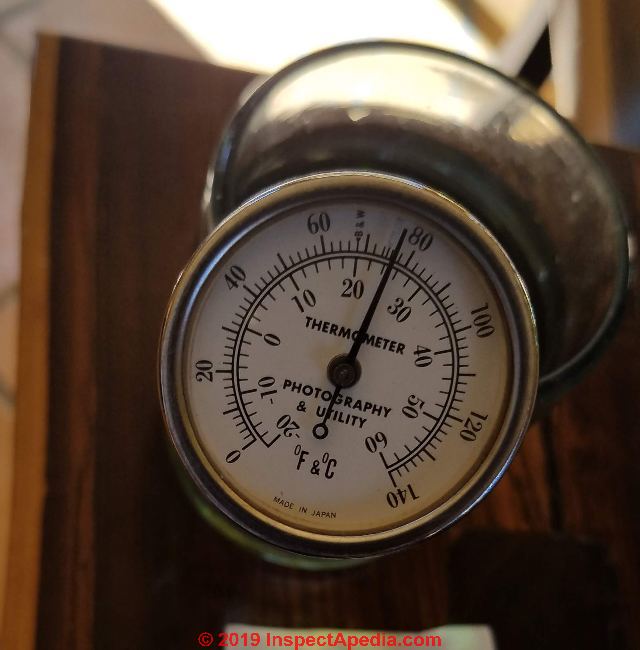
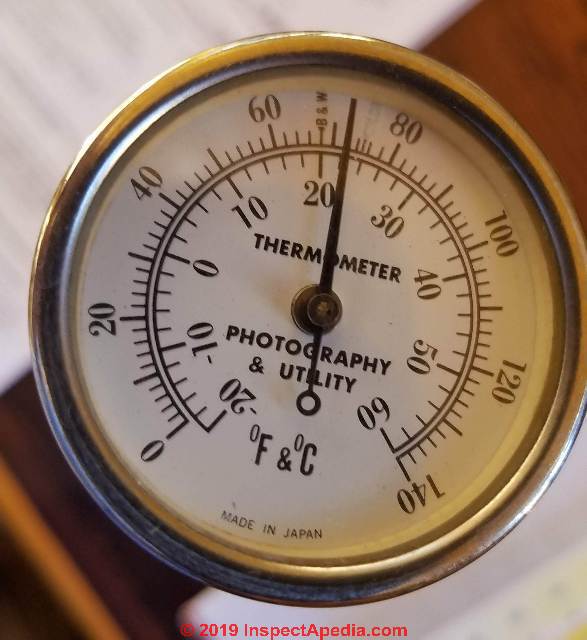
- A fast-acting thermometer to confirm that your water test sample is in the required temperature range of 22°C to 28°C.
I used the stainless-steel probe-type photographic thermometer shown above as it responds quickly to temperature and it's very easy to read. The inner arc of numbers is the Centigrade scale on this thermometer.
If you click to enlarge the image above you'll see the thermometer immersed in one of our water test samples is reading just under 25°C.
- Clean water sample containers: optionally you may want, as I did, three clean glasses that can each hold more than 100 ml of water for each of the test samples to be processed.
I took care to use glasses that were different in appearance as a substitute for stick-on labels to be sure we didn't confuse which water sample was from which source.
How to Use the Arsenic in Water Test
This test for arsenic levels in drinking water can be conducted by a consumer who is capable of following detailed instructions and who is willing to take are to obey the safety recommendations of the manufacturer.
It is not a difficult procedure, but as with all procedures we describe at InspectApedia.com, our description will include specific warnings at points that may trip you up.
For example:
Watch out: this arsenic test kit uses potentially hazardous chemicals and produces both hydrogen gas (explosive) and arsine gas (toxic). So you must be sure to read all of the instructions with care and to follow them accurately.
That includes a warning to conduct the test in a well-ventilated area and away from open flames.
The manufacturer, doubtless thanks to their lawyer, also advise that you read the Material Data Safety Sheet or MSDS - four columns of microscopic print included in the instruction booklet - before handling any chemicals.
The manufacturer describes ten steps in this arsenic test, to which we add comments based on our use of the procedure.
Preliminary Step A: Prepare the Test Work Area
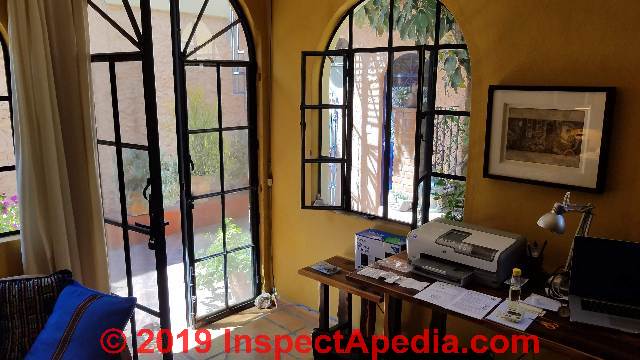
Choose a work area that provides a clean work surface in a well-ventilated area. We worked at a desktop in a small office where we could open windows on two sides as well as opening a doorway to the outdoors.
By opening windows and doors we made sure that the area was very well ventilated. You could also work outside provided the work area is protected from direct sun and from significant wind and airborne dust and debris.
I expect some readers will suggest I should have worked at a cleaned-off lab table and with an exhaust hood. But the test scene shown in our photo above is perhaps a more "real-world" practical example of the Quick™ arsenic test procedure. You don't need much space to conduct this test but the work area should be ventilated, clean, and well-lit.
Preliminary step B: Choose your arsenic-in-water test sample source & Collect the Sample(s)
To calibrate and compare the performance of this arsenic test we chose three water sources:

- Un-treated water provided by the municipal water supply system in San Miguel de Allende, Guanajuato, Mexico.
Watch out: when drawing a sample of municipal drinking water to test for any contaminant such as arsenic, bacteria, lead, take the water sample from a tap as close to the municipal source as possible and be sure that the sample is collected ahead of any in-building water treatment equipment.
Let the water run long enough that its temperature feels cooler than when you first opened the tap. In most municipalities this will mean that you've drawn water from the water main in the street, not water that has been sitting in and may be contaminated by building water piping.
(In some communities such as Phoenix Arizona I found that incoming water is pretty warm regardless of how long it is run. )
Watch out: You cannot assume that the level of arsenic in your drinking water as measured on a specific day or even specific hour will remain constant throughout the year.
Many municipalities provide public drinking water that derives from multiple sources.
San Miguel de Allende water typically is provided by nine different water wells, each of which can provide water of different properties.
Water delivered to different areas in that city as well as many others may vary in properties both at different times of the day and depending on exactly which well's water is being delivered in which neighborhood and processed (in some cities) by different water treatment facilities.
In addition there are significant seasonal differences in the level of contaminants in water wells as the water table rises and falls during wet versus dry seasons.
Our water test sample for this arsenic test was drawn at mid-day in the Colonia San Antonio on 25 March 2019.
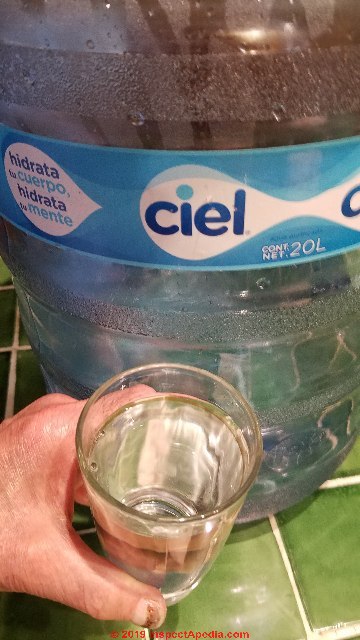
- "Purified" water delivered by a local bottled-water supplier, Ciel™. Ciel is a brand of bottled water owned by the Coca-Cola company.
Ciel's water is bottled and sold in Angola, Mexico, and Morocco. In Mexico Ciel's share of the bottled-water market is a bit under 20% as of 2015. - Wikipedia.
Used as a control sample, we expected to detect no arsenic in water from this sample. (And indeed that was the case).
Using a known arsenic-free water sample is a means of testing the test and your test procedure as well. You could use distilled water or another water source known to be arsenic -free.

- Water from an in-home treatment equipment: (shown above) municipal water from the same source as in source #1 above, but after the water had passed through a home water treatment system that included a water softener, sediment filter, charcoal filter, and UV light treatment system.
We expected that the charcoal filter might reduce the arsenic level somewhat.
Arsenic in Water Test Procedure Steps
OK now we have our work area set-up and our water samples collected and our test kit open and ready for use.
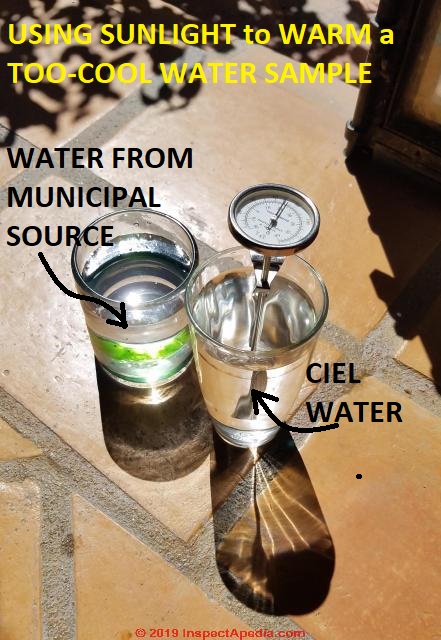
- Check the temperature of your test sample water before or after you pour it into the reaction bottle to be sure it's at the right temperature.
As you can see in the photo above, when we found that our sample water temperature was below the required temperature range of 22°C to 28°C we simply put the sample in the sun for a few minutes to let it warm.
Above: thermometer showing that test water has reached the minimum-acceptable temperature of 22°C
Below: the reaction bottle showing the yellow cap and the 100 ml fill-line for the water sample to be tested for arsenic.
- Water into reaction bottle: Then we poured the test water into the reaction bottle to fill to the 100 ml. line shown in the photo above.
Watch out: Notice that the yellow cap is in place - a reminder that the yellow cap must be used when shaking the bottle to mix the reagent in step #3 below. Read the instructions and follow them with care.
If by mistake you put the white cap - with the spout - on the bottle and if you get it wet you'll have to rinse and dry the white cap before the test can be properly conducted.
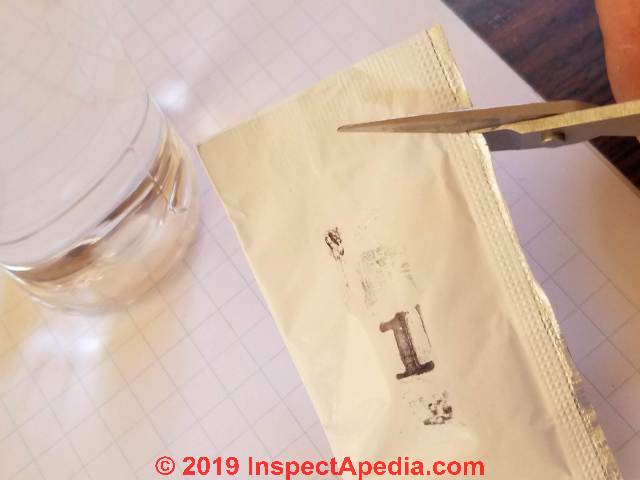
- Add reagent powder packet #1 (the largest "pillow-packet" marked with a 1) to the bottle by cutting it open and carefully pouring it into the reaction bottle.
Reagent Packet Opening Tip: ITS Quick™ instructions suggest tapping each pillow-packet upright onto a hard surface to move powder down a bit inside of the package before cutting it open. This helps avoid spilling some of the reagent when the packet is cut open.
Then using the yellow cap, close the bottle and shake it vigorously, keeping the bottle "upright", for 15 seconds.
Watch out: take care not to spill the reagent powder outside of the bottle mouth. Haste makes waste. Or if you do spill a few grains of reagent onto the paper atop which you wisely placed the reaction bottle, you can simply fold the paper in half and pour the spilled grains of reagent back into the bottle.
Above I'm pouring a few spilled grains of reagent #1 into the reaction bottle. Let this be a lesson to us to take more care pouring reagents into bottles.
Below: adding reagent #2.
- Add reagent powder packet #2 marked MPS to the reaction bottle by removing the yellow cap, cutting the top of the packet and pouring it (carefully this time) into the bottle, then replacing the yellow cap.
You'll see that this reagent imparts a yellowish colour to the test water.
With the bottle capped (yellow!) shake upright vigorously for 15 seconds, then
Let the bottle stand upright and "rest" for two minutes - according to Quick™ this is to minimize sulfide interference in the arsenic test.
Above: our kitchen timer has started the two-minute rest period required after adding reagent #2 to the reaction bottle in the Quick™ arsenic test procedure.
Below: preparing to open the third reagent in the arsenic test kit: the zinc packet.
- Add reagent powder packet #3 Zinc to the reaction bottle by removing the yellow cap and cutting open and pouring the zinc powder into the bottle.
Watch out: before adding the zinc check the white bottle cap you're going to use in step 6 to be sure that it is perfectly clean and dry - or clean and dry it if necessary.
Do this now because you won't have time to fool around with washing and drying the cap after adding the zinc packet - that starts the production of a gas to be detected by the arsenic test strip.
Watch out: when cutting open the zinc packet that you don't disturb and inhale a puff of fine zinc powder that likes to waft upwards when you open this reagent.
After cutting the packet top off with your cute little scissors, if you squeeze the packet sides to open it with too much vigor, you'll see a little cloud of zinc powder waft upwards. Another reason to work in a well-ventilated area.
Close the bottle with the yellow cap and shake upright vigorously for just 5 seconds.
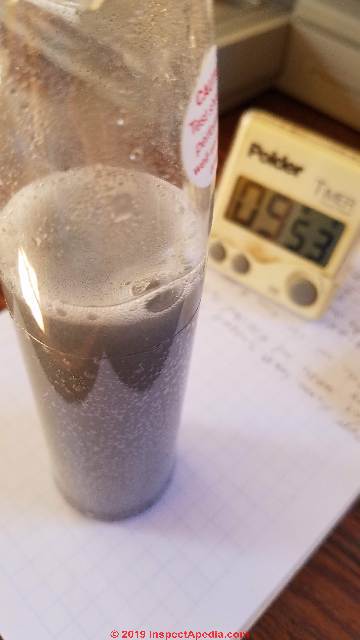
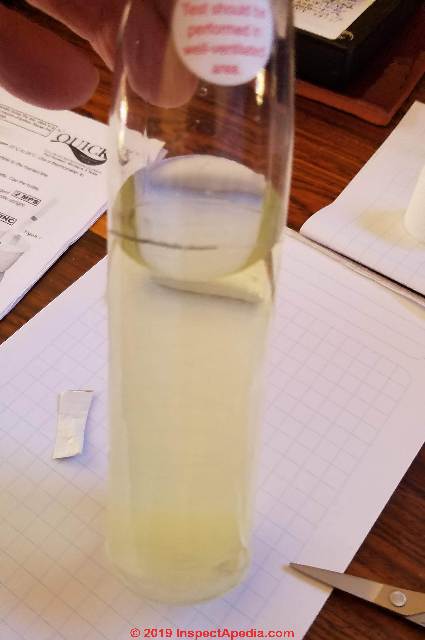
Above: once the gray reagent has been added to the reaction bottle the test solution turns gray and begins bubbling - that's normal. The off-gassing produced by the arsenic test kit's chemistry is what is to be tested by the arsenic test strip described below.
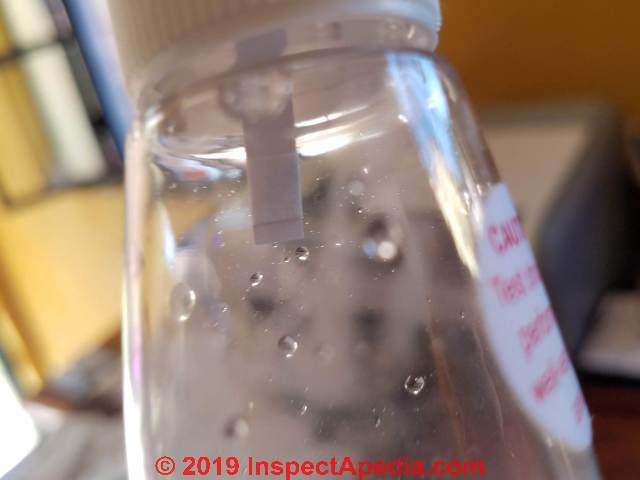
Below: for step 6 the white bottle cap has been installed with its spout in the open position.
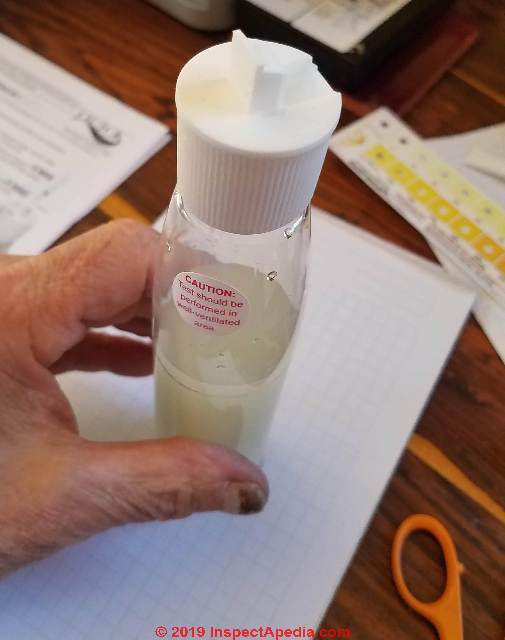
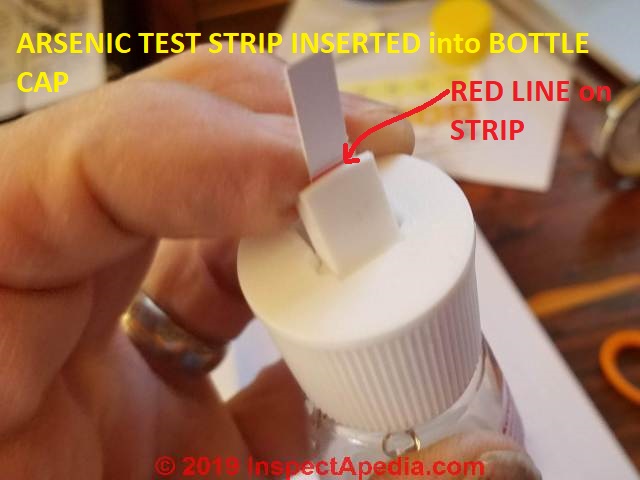
- Install the white bottle cap. Remove the yellow mixing cap and after lifting its spout to the open position, install the white cap on the reaction bottle.
The white cap spout is going to be used to hold the arsenic test strip suspended in the bottle so that it can be exposed to gases created by the addition of zinc.
Watch out: you have just 30 seconds to complete step 6 - installing the white cap - step 6, and inserting the test strip and securing it in the white cap step 7. Be prepared with the white cap and test strip close at hand.
Watch out: as ITS and the Quick™ instructions warn as do I, take great care that the white cap and its spout interior are completely dry when installing the cap on the bottle as well as when continuing with the test.
If the cap or cap spout become wet with water or test chemicals you will contaminate and ruin the arsenic test strip that's to be inserted in the next step in this procedure.
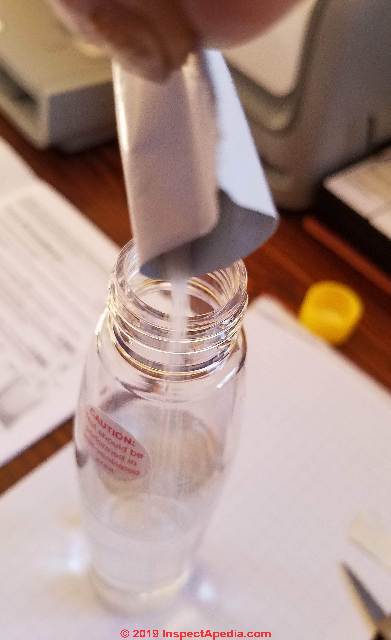
- Insert the arsenic test strip into the cap - DO NOT DROP IT into the bottle.
Remove an arsenic test strip from its packet and insert it with proper orientation into the white cap spout.
Watch out: be sure that the red line on the test strip is facing the "back" of the white cap spout as shown in my photo above. This line gives you the proper length of strip to insert into the bottle and it assures that the actual sensor tip on the test strip is properly oriented inside the gas, above the liquid, in the reaction bottle.
When the strip is properly positioned, fold the bottle spout over closed - this will hold the test strip in place.
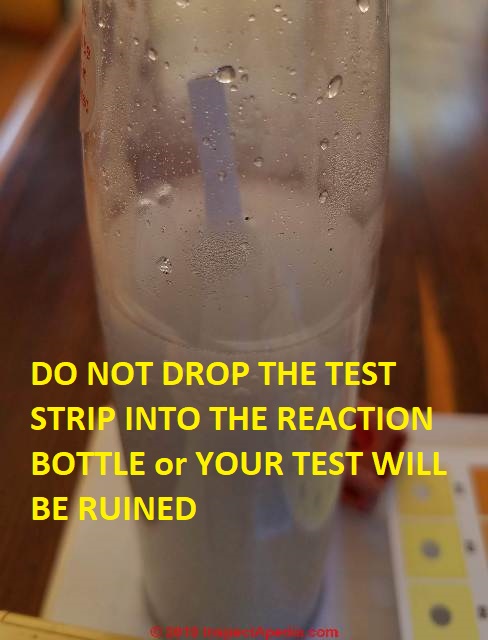
Watch out: in this procedure take care to never let go of the plastic test strip before the spout is folded over as the strip will immediately fall down into the liquid in the reaction bottle, ruining your test.
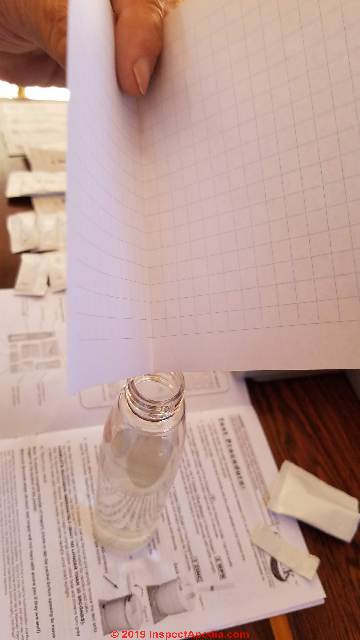
Below you can see the plastic test strip for arsenic as it is properly-suspended in the reaction bottle. The plastic strip as shown below will perform a valid test.
Below you can see the results of failing to keep a grip on the plastic strip. The test below is in-valid or ruined.
Below: the timer is counting down 10 minutes to accomplish step 8 in the arsenic test procedure.
- 10 Minute Reaction time: using a timer, allow the arsenic test strip to remain suspended and exposed to gases in the reaction bottle for ten minutes.
In our photo above you can see that we have just over 4 minutes remaining of our 10 minute exposure time for the arsenic test strip.
I've also prepared the color comparison chart using plastic clothes pins to hold the chart off of my work surface, making it easy to hold the test strip beneath each opening of the color chart to estimate the arsenic level found by the test.
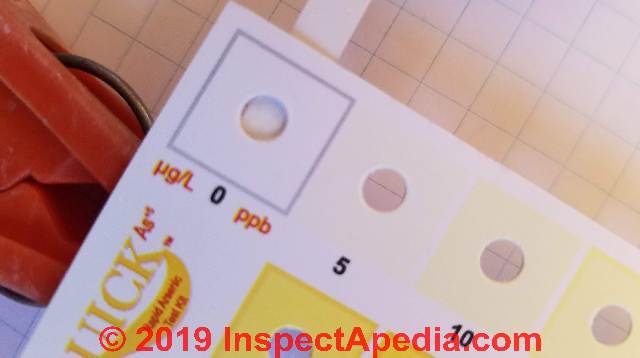
You will see that the reaction tab on the arsenic test strip will, in the presence of arsenic (arsine gas), change from colorless (white) to a color change ranging from pale yellow to darker brown depending on the level of arsenic detected.
The Arsine reacts with the Mercuric Bromide on the test strip to form mixed Mercury halogens (such as AsH2 HgBr) that appear with a color change from white to yellow or brown. - ITS Instructions cited below.
In our photo above we see that the color strip test pad is just a bit darker than the 0 ppb color square so we know there was some arsenic detected in this test of water in San Miguel de Allende.
[Click to enlarge any image]
- Remove the test strip, compare it with the color chart quickly, to note the arsenic level detected.
Watch out: when you remove the test strip from the bottle, take care not to drop it into the bottle, and move quickly to compare it with the color chart.
You will have just 30 seconds to read the test strip against the color chart after removing it from the bottle.
After that the colored sensor pad on the strip fades and any reading of arsenic level will be inaccurate.
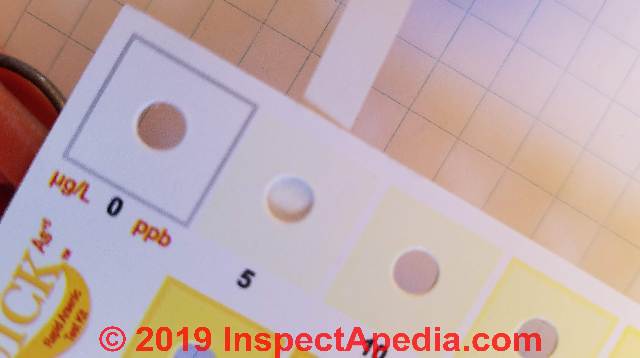
Above: by holding the colored pad on the arsenic test strip just below each opening on the color chart, you can get a reasonable reading of the arsenic level color match.
By comparing among the three closest colors you can decide that the strip is lighter than the next-higher number and darker than the next-lower number.
In my example above the closest color match was the 5 ppb color square.
Below you can see that the same test strip is notably lighter in colour than the reference color for 10 ppb of arsenic.
Watch out: make this comparison in an area well-lit by natural sunlight (but not in direct sun) for the most-accurate reading.
- Record the arsenic level detected by the test and dispose of test chemicals and strip safely.
Watch out: because the test strips contain a hazardous substance - mercury bromide - the manufacturer recommends that you dispose of used arsenic test strips in the small plastic bag provided.
Similarly you should not pour used arsenic test liquids down the drain of a fixture used for drinking water. (We poured ours into a toilet).
Asbestos Levels in Water: Test Results Summary
ITS Quick™ Asbestos Test Results |
|
| Water Sample1 | Arsenic Level Detected |
| Municipal water supply, outside faucet2 | 1-5 ppb |
| Municipal water supply, after in-house water treatment3 | <5 ppb |
| Bottled water control sample4 | 0 |
Notes to the table above
- Test Location: Col. San Antonio, San Miguel de Allende, Guanajuato, Mexico
Test Date: 2019/03/25, 10:00 AM - Ran water until temperature stabilized, drew water from water main
- House treatment does not specifically address arsenic but includes water softener, charcoal & sediment filters, UV light
- Ciel™ brand bottled water, a Coca-Cola® subsidiary
Arsenic in Water Test Kit Sources
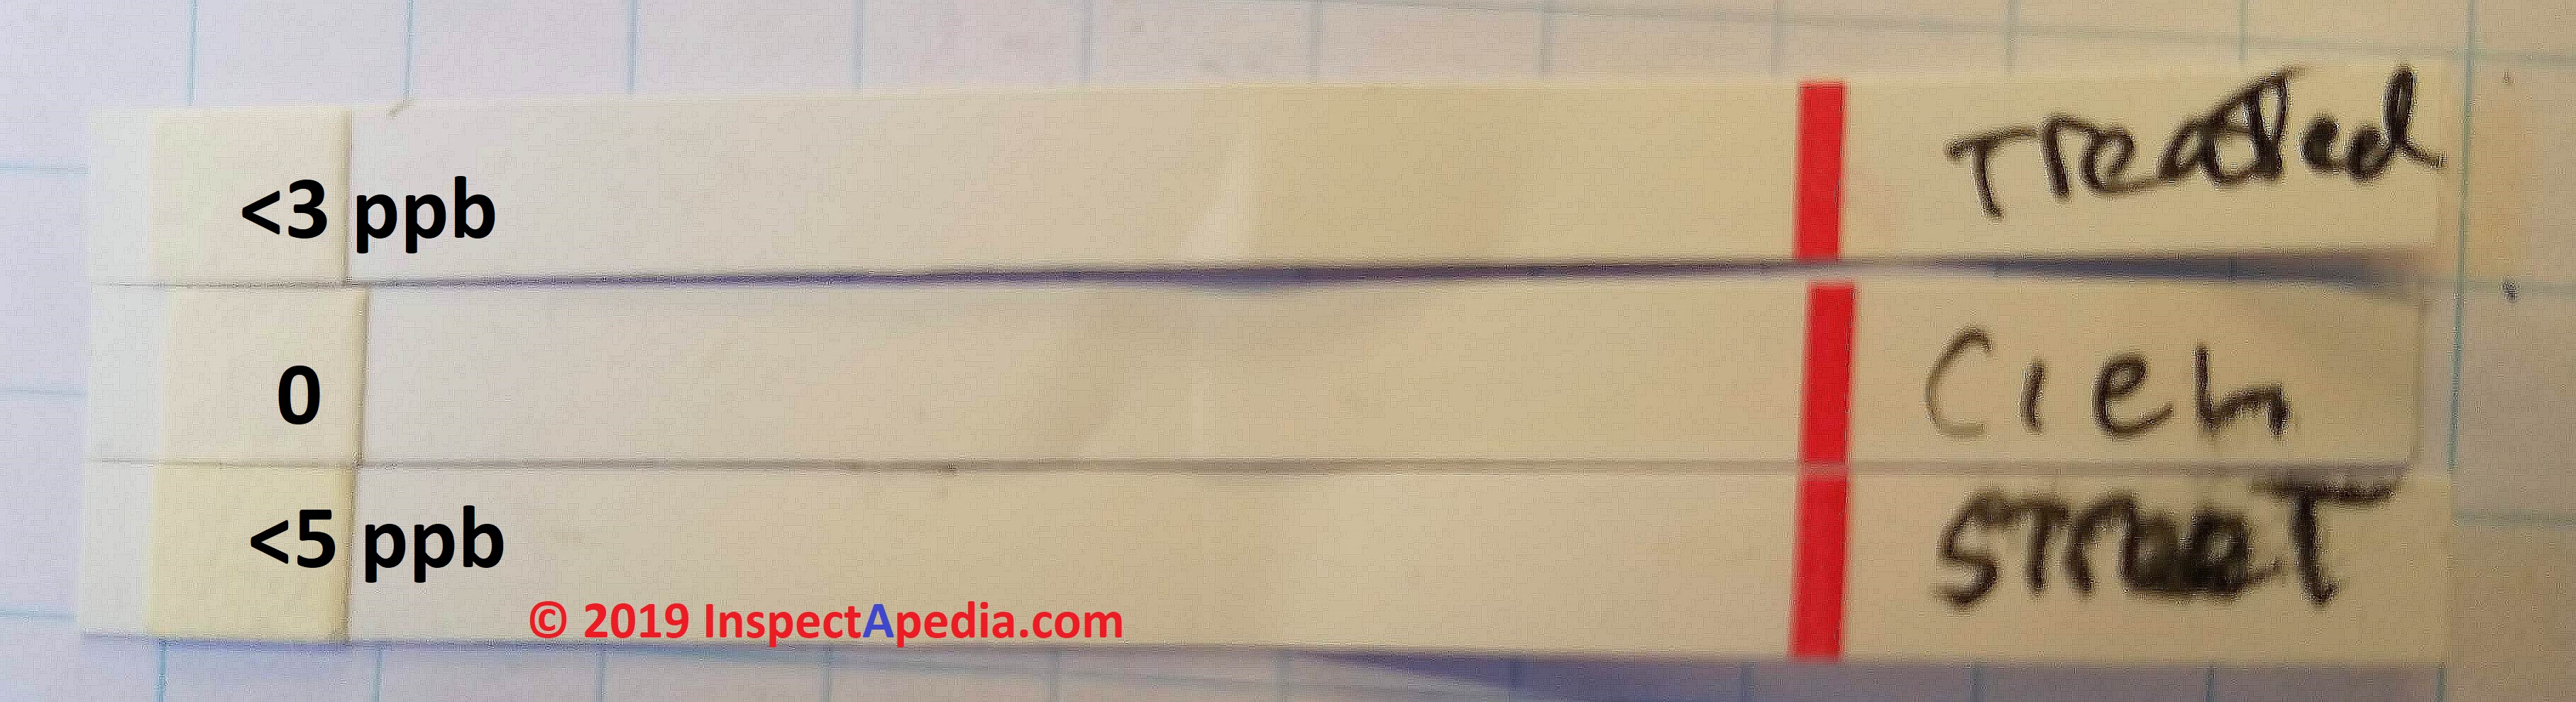 Photo: here are our used test strips from Industrial Test Systems Quick™ arsenic test, showing the color change in the strip tip, provided with the caveat that because of the elapsed times the colors of the indicator tabs when this photo was taken were no longer accurate.
Readings of test strips in this test kit need to be taken within 30 seconds of removal of the strip from the reaction bottle.
Typical arsenic in water or soil test kits are sold at prices ranging from under $30. U.S. to several hundred dollars (for multiple tests), and additionally electronic instruments that can detect arsenic such as the Quick™ Arsenic Scan 481305 are available though at much higher cost ($2000. U.S.).
Watch out: in 2006, Seven arsenic field test kits [BVC, ECO, Hach, LaMotte, Merck, Quick II, and TraceDetect.] were evaluated for their ability to detect arsenic III, V, and a combination of species, and their performance was compared with that of graphite furnace atomic absorption spectrophotometry. Performance was evaluated for precision, accuracy, matrix effects, linearity, operator bias, and ease of use. ...
However, accuracy, as calculated using percent recoveries, varied greatly among the test kits. ...
Results indicated that two of the seven field test kits met acceptable criteria of accuracy, precision, linearity, expense, and ease of use as defined by the authors.
Given the varied performance among the testing kits, the authors concluded that water professionals should be cautious in choosing field test kits for noncompliance analyses.. - Spear 2006
- BVC-100, Arsenic test kit, Asian Arsenic Network, Fukuoka, Japan
- ECO-W100, Arsenic test kit, Asian Arsenic Network, Fukuoka, Japan
- FilterWater.com, Arsenic Quick Test Kit (100 tests) Tel: 800-439-0263 Website: http://www.filterwater.com/p-209-arsenic-quick-test-kit-100-tests.aspx
Website excerpt:
Arsenic Test Kit for Water & Soil , contains 100 tests to detect Arsenic III (organic) and Arsenic V (inorganic) in drinking water. Verified performance! Kit comes in a blue plastic case. This test kit was designed to give the user repeatable accurate results without sacrificing cost and time.
Designed using cutting-edge chemistry, Arsenic Quick™ reports results in only 12 minutes. Additionally, there are no dangerous chemicals needed to run this kit to test water quality. With only one simple test procedure (using 3 reagents),
Arsenic Quick is a must for any lab testing water quality, water testing professional, or service technician who values accurate, rapid results without sacrificing cost.
Test detects presence of organic Arsenic III As(III), and inorganic Arsenic V As(V) in drinking water. Color matching chart and colored step by step instructions are included.
Detection Range: 0, 5, 10, 20, 30, 40, 50, 60, 80, 100, 150, 200, 250, 300, 400, 500, >500 ppb (μg/L) - Hach Arsenic Low Range Test Kit, Hach Company
P.O. Box 389
Loveland, Colorado
80539-0389
Phone: 800-227-4224
Fax: 970-669-2932
www.Hach.com Offices world wide including Canada, China, Europe, Latin America, Australia, New Zealand, India, Singapore.
Hach arsenic test strips provide results within a range of 0 - 500 ppb. This reliable method recovers 100% of inorganic arsenic in samples and allows detection of arsenic levels in the field to assess compliance with the EPA Arsenic Rule.
No lab analysis needed—detect arsenic levels in the field to assess compliance with the EPA Arsenic Rule Reliable test strip method recovers 100% of inorganic arsenic in samples - Industrial Test Systems, Inc., 1876 Langston St., Rock Hill SC 29730 USA, Tel: 800-861-9712, Email: its@sensafe.com Website: arsenickits.com
QUICK AS+3 AS+5 RAPID ARSENIC TETS KIT INSTRUCTIONS Kit #481396-5 [PDF] (5 tests) used in the arsenic test described on this page. Retrieved 2019/03/27 original source: https://sensafe.com/content/481396-5.pdf
Technical review requested 2019/03/27
Excerpts from the instructions: This Arsenic Test Kit provides a safe, simple, and precise way to test for Arsenic from 0.5 to 6 μg/L. For accurate results when Arsenic value is above 6 μg/L, perform a dilution of the water sample so that the value will read below 6 μg/L.
Follow the instructions carefully to get reliable results.
All components are supplied in the kit except for a timer and thermometer. This test tolerates up to 2.0 mg/L Hydrogen Sulfide without interference. No interference was found for this test kit for Antimony up to 0.5mg/L.
No interference from Iron or Sulfate was found. Higher levels of Hydrogen Sulfide can be corrected for by diluting (only where sensitivity needs are not compromised).
There were no interferences from other components typically found in tap water.
It is recommended that the water sample be 22ºC - 28ºC. For reference, record the temperature at which the sample was run. Use kit within the shelf life as marked.
...
About the Patented Reaction (Modified Gutzeit method):
Inorganic Arsenic compounds in the water sample are converted to Arsine (AsH3 ) gas by the reaction of Zinc Dust and Tartaric Acid. Ferrous and Nickel salts have been added to accelerate this reaction.
The Arsine reacts with the Mercuric Bromide on the test strip to form mixed Mercury halogens (such as AsH2 HgBr) that appear with a color change from white to yellow or brown.
Potassium Peroxymonosulfate (second reagent) is added to oxidize Hydrogen Sulfide to Sulfate. - ITS, Ultra-Low II Quick™ AS+5 Rapid Arsenic Test Kit INSTRUCTIONS [PDF] ,(2019) aka Quick II, Industrial Test Systems, Inc., Rock Hill, S.C. Op. Cit. - this test kit is included in the Spear 2006 paper cited below.
- ITS Europe, Ltd., UK Centre for Homeland Security, Building 7, Chilmark, Salisbury, Wiltshire SP3 5DU, UK, Tel: +44 (0) 1722 717911 Email: itseurope@sensafe.com
- LaMotte, Chestertown, Md. Note: as of 2019/03/27 this company's Arsenic test kit listing appeared to have been removed.
http://www.lamotte.com/en/drinking-water/individual-test-kits#Arsenic - Merck and Company Inc., Whitehouse Station, N.J. - Merck Millipore Website: http://www.merckmillipore.com (good luck trying to find this company's literature in English if you are not in the U.S.)
- SenSafe, website: https://sensafe.com/contact-us - see Industrial Test Systems, ITS cited abovce.
- TraceDetect Nano-BandTM Explorer, ANALYSIS of ARSENIC in WATER ETV JOINT VERIFICATION STATEMENT [PDF], TraceDetect, 180 North Canal St., Seattle, WA 98103, Tel: 206-523-2009, Website: www.tracedetect.com Email: sales@tracedetect.com. retrieved 2019/03/27 original source https://archive.epa.gov/nrmrl/archive-etv/web/pdf/01_vs_nano_band.pdf
...
Continue reading at ARSENIC in DRINKING WATER - at InspectApedia.com, sources, standards, exposure limits, research, removal methods, also discusses swimming in water high in arsenic., or select a topic from the closely-related articles below, or see the complete ARTICLE INDEX.
Also see these
Recommended Articles
- AIR QUALITY STUDY San Miguel de Allende
- ARSENIC GREEN in WALLPAPER
- ARSENIC HAZARDS at BUILDINGS for more about arsenic poisoning from this arsenic element in its gaseous form.
- DRINKING WATER CONTAMINANT LEVELS - MAXIMUM ALLOWED
- BACTERIA TEST GUIDE
- CHEMICAL CONTAMINANTS in WATER
- REVERSE OSMOSIS WATER TREATMENT
- WALLPAPER ARSENIC + MOLD POISONING from green-pigmented wallpaper using arsenic green in our index to mold-related illnesses
- WATER HARDNESS TEST San Miguel de Allende
- WATER QUALITY & QUANTITY San Miguel de Allende - Calidad y cantidad de agua en San Miguel de Allende, Guanajuato
- WATER TESTS for CONTAMINANTS - home
- WATER QUALITY TEST CHOICES & WATER TEST FEES - home
- WATER QUALITY & QUANTITY San Miguel de Allende
Suggested citation for this web page
ARSENIC in DRINKING WATER TEST at InspectApedia.com - online encyclopedia of building & environmental inspection, testing, diagnosis, repair, & problem prevention advice.
Or see this
INDEX to RELATED ARTICLES: ARTICLE INDEX to WATER TESTING
Or use the SEARCH BOX found below to Ask a Question or Search InspectApedia
Ask a Question or Search InspectApedia
Questions & answers or comments about tests for arsenic in drinking water and about how arsenic contaminants are removed from water.
Try the search box just below, or if you prefer, post a question or comment in the Comments box below and we will respond promptly.
Search the InspectApedia website
Note: appearance of your Comment below may be delayed: if your comment contains an image, photograph, web link, or text that looks to the software as if it might be a web link, your posting will appear after it has been approved by a moderator. Apologies for the delay.
Only one image can be added per comment but you can post as many comments, and therefore images, as you like.
You will not receive a notification when a response to your question has been posted.
Please bookmark this page to make it easy for you to check back for our response.
IF above you see "Comment Form is loading comments..." then COMMENT BOX - countable.ca / bawkbox.com IS NOT WORKING.
In any case you are welcome to send an email directly to us at InspectApedia.com at editor@inspectApedia.com
We'll reply to you directly. Please help us help you by noting, in your email, the URL of the InspectApedia page where you wanted to comment.
Citations & References
In addition to any citations in the article above, a full list is available on request.
- In addition to citations & references found in this article, see the research citations given at the end of the related articles found at our suggested
CONTINUE READING or RECOMMENDED ARTICLES.
- Carson, Dunlop & Associates Ltd., 120 Carlton Street Suite 407, Toronto ON M5A 4K2. Tel: (416) 964-9415 1-800-268-7070 Email: info@carsondunlop.com. Alan Carson is a past president of ASHI, the American Society of Home Inspectors.
Thanks to Alan Carson and Bob Dunlop, for permission for InspectAPedia to use text excerpts from The HOME REFERENCE BOOK - the Encyclopedia of Homes and to use illustrations from The ILLUSTRATED HOME .
Carson Dunlop Associates provides extensive home inspection education and report writing material. In gratitude we provide links to tsome Carson Dunlop Associates products and services.
 |
HOME | ABOUT | ASK a QUESTION | CONTACT | CONTENT USE POLICY | DESCRIPTION | POLICIES | PRIVACY | |
| © 2026 - 1985 Publisher InspectApedia.com - Daniel Friedman | |||||||||