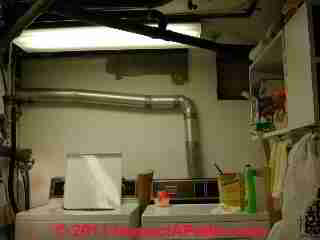
 Clothes Dryer Exhaust Vent Installation
Dryer vent duct installation specifications
- POST a QUESTION or COMMENT about clothes dryer exhaust venting, ducting installation procedures, codes, standards
Clothes dryer exhaust vent installation codes & specifications:
How to install a clothes dryer exhaust vent: choosing materials, routing vent ducting, dryer vent duct connections, dryer vent termination at an exterior wall.
Also we explain and illustrate problems that result from improper dryer vent installation design, materials, routing, and filtering including dryer vent clogging, clothes dryer fire hazards, building moisture and mold problems, and increased clothes dryer operating costs due to poor or blocked dryer vents.
This article series describes good practices for clothes dryer vent installation, lint traps, wall vents, filters, and screens. We include a list of clothes dryer fire safety hazards and other clothes dryer installation or maintenance mistakes that are either unsafe or that interfere with effective, economical dryer operation.
We discuss types of dryer vent ducting and dryer vent doors or opening protection devices.
InspectAPedia tolerates no conflicts of interest. We have no relationship with advertisers, products, or services discussed at this website.
- Daniel Friedman, Publisher/Editor/Author - See WHO ARE WE?
Clothes Dryer Exhaust Vent Installation: Safe & Effective Installation of Clothes Dryer Exhaust Vent Ducts
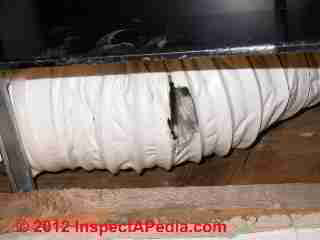
Most clothes dryer exhaust vent installations use 4" diameter vent piping, the minimum-allowed.
But the variety of materials and duct prices can fool you into making a bad or even a dangerous choice. Clothes dryer exhaust duct material choices that you are likely to find at building supply stores include the materials listed below, and illustrated throughout this article.
Article Contents
- DRYER EXHAUST VENT DUCT MATERIAL & SIZE
- DRYER EXHAUST VENT HOOD TYPES
- DRYER EXHAUST VENT INSTALLATION & ELBOWS
- DRYER EXHAUST VENT ROUTING OPTIONS
- DRYER EXHAUST VENT MISTAKES
- DRYER EXHAUST VENTED INTO ATTIC
- DRYER EXHAUST VENTED THROUGH ROOF
- DRYER EXAUST VENTED INTO CRAWL
Choices of Clothes Dryer Exhaust System Duct Material & Size
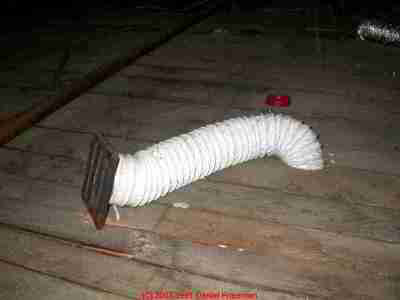
Flex-duct: plastic & wire flexible dryer vent duct (photo at above-left), a coil of spring wire covered with a thin, usually white, plastic. Although we have observed this material widely used in homes as "dryer vent ducting" it should not be used for that purpose.
Cranor elaborates: "Plastic" dryer duct" sold at various suppliers does not say on the packaging that it can be used for clothes dryer ducts....it specifically says bathroom venting.
Plastic duct is not a UL approved dryer duct material, not code approved and its use will void any dryer manufacturer warranty."
What's wrong with using this material at a clothes dryer? It is not safe, not durable, and not effective.
Here are other clothes dryer vent materials we have encountered:
- Flex duct: mylar covered wire-ribbed [mylar]
plastic flex duct (photo at left), a product nearly identical to the flex duct described above, but more tear resistant.
This material too is easily crushed, as you can see in our photo. And like the plastic flexible "duct vent" material described above, the spiraling wire-supported surface of this duct clogs rapidly with lint.
This dryer duct option is not recommended. - Flex duct: semi-rigid metal flexible
dryer duct, made of aluminum (lighter, less costly, easily bent and damaged if not handled carefully) or steel (a bit heavier, more resistant to kinks, crushing, dents during installation)
- Solid metal rigid dryer duct, aluminum;
functional, modest cost, easy to handle, but requires use of elbows to make bends handled by flex duct installations. Smooth surfaces of solid metal duct work slow lint accumulation.
- Solid metal rigid dryer duct, steel:
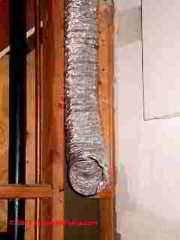
(shown above) functional, slightly higher cost, a bit more difficult to assemble, requires use of elbows to make bends handled by flex duct installations, more difficult to cut than aluminum or plastic, very durable, recommended for permanent and inaccessible installations in ceilings & walls.
Smooth surfaces of solid metal duct work resist lint accumulation.
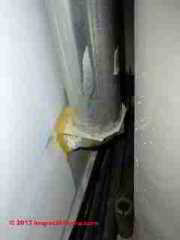
Watch out: do not use sheet metal screws that protrude through into the vent interior: they catch lint and increase the risk of dryer vent clogging and a subsequent fire. - Solid plastic dryer duct
installations using 4" PVC piping, bulkier, joints require gluing, cut with a hand saw.
Watch out: plastic piping might show up as a dryer vent in some homes but it is not code-approved and should not be used for this purpose.
Like other clog-prone vent materials this is an unsafe option. As Crnor elaborates:
"PVC is not an option, its not code approved or allowed by any dryer manufacturer.
PVC clogs worse than metal. ...I believe there is a static issue with PVC because I have seen it used numerous times and every time there is a thick layer of lint lining the walls of the PVC pipe."
Advantages of using metal dryer vent vent duct material
Watch out: Use rigid or semi-rigid metal dryer vent material [we recommend rigid metal dryer vent ducting]: Virtually all independent authorities, including the US CPSC, Underwriters Laboratories, and the Association of Home Appliance Manufacturers, and experienced home inspectors such as Cranor all recommend the use of rigid or semi-rigid metal ducting for clothes dryer exhaust venting. [2][4][5][6][7][8]
And we prefer rigid, solid metal dryer vent ducting wherever possible. An acceptable alternative that is nearly as effective is semi-rigid metal duct work, though we have found that that material is easily dented, crushed, or damaged.
Metal ducts, having a smooth interior surface provide these advantages when used on clothes dryer systems:
- provide better air flow, smoother internal surface,
- slower accumulation of lint debris inside the duct system
- reduce dryer time and operating costs,
- are more fire safe,
- are less easily punctured and leaky,
- won't sag due to weight of accumulating moisture or lint, and
- are easier to clean.
Clothes Dryer Exhaust Duct Vent Hood Types
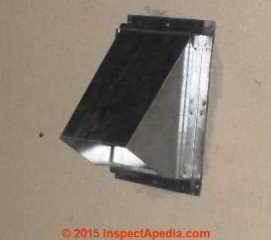
Above: an angled clothes dryer exhaust vent hood. Two other types: a box hood that is quite similar, and a louvered hood are also provided.
Details are at CLOTHES DRYER VENT TERMINATION & SCREENS
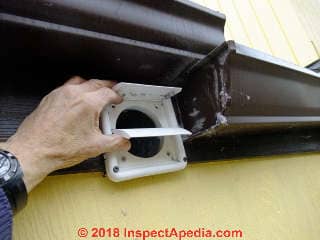
Watch out: we have found serious and chronic lint clogging of louvered dryer exhaust vent hoods IF the hood uses multiple louvers that are small in width.
Above: I'm checking a two-louver dryer wall vent hood that is somewhat resistant to lint clogging.
Clothes Dryer Vent Line Installation & Elbows
For optimum clothes dryer venting we use 4" or larger galvanized metal duct sections and elbows, though aluminum is also acceptable in most locations.
Flexible clothes dryer is easy to install, avoids having to mess with elbows in the duct system, and is inexpensive, but that material restricts air flow and may sag, giving you areas that
collect water and risk leaking into the building.
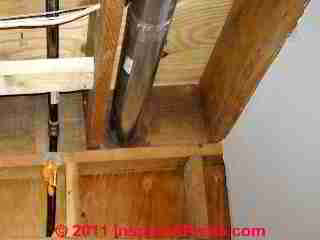
Our dryer vent installation photos just below illustrate use of 4" galvanized metal dryer ducts.
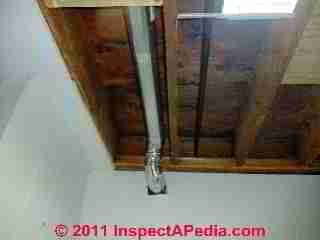
Above you can see that we had to use a pair of elbows to lift the dryer vent duct into the building ceiling cavity.
The dryer vent joints are secured with foil tape.
Watch out: some manufacturers recommend against using sheet metal screws to secure dryer duct sections because the screws collect lint. Also if you have ever tried reaching into a dryer exhaust duct to clean it by hand and had your arm ripped open by the SMS screw you may have another objection.
At above right our second dryer vent duct photo illustrates passage of the duct through the rim joist.
Notice that we carefully caulked this opening both inside (shown) and outside the wall (not shown).
This duct section can be inspected and if necessary cleaned by removing the outside vent cover. Photos courtesy of Eric Galow, Galow Homes.
We secure connected dryer vent duct sections
using metal foil tape at each vent section. (See the dryer vent duct photos just above).
Watch out: manufacturers typically advise against using screws to secure dryer vent duct sections as the end of the screw protruding into the duct interior increases lint-trapping and may make the vent duct harder to clean.
Specs for using flex duct for dryer venting
If despite our recommendation for metal exhaust duct material you nevertheless are using flexible fan duct, stretch the flexduct tight to keep it as straight and smooth inside as possible. Long sloppy bending flexduct runs significantly reduce the performance of the vent fan.
Connect the flexduct to the fan itself using plastic ties, or second best, duct tape. Keep all connections tight and avoid air leaks.
Connecting the dryer vent to the back of the clothes dryer
space is usually tight between the clothes dryer and its exhaust vent because homeowners want to push the dryer back as close to the wall as possible.
If you use flexible or even semi-rigid duct for the dryer connection at this location (a most common practice) the duct is likely to be bent and crushed closed, increasing dryer operating time, cost, and fire risk.
Our photo above illustrates how we connected a clothes dryer outlet through a laundry room wall into an adjoining utility room where the duct could rise to its ceiling and outdoor exit destination.
On the other side of the wall in the photo shown above a periscope type connection adapted the dryer outlet to the through-wall vent.
A "banjo-type" or "periscope type" metal dryer vent connector makes the 90 degree bend connection at the back of the clothes dryer where space is limited.
Our photo below illustrates a typical clothes dryer periscope vent that permits the back of the dryer to be placed closer to the wall than would be possible with round dryer vent ducting.
The periscope clothes dryer vent shown is distributed by Whirlpool and depending on size can be purchased for about $20. U.S.D.
Periscope dryer vents are usually telescoping in length and sold in ranges such as 0-18" tall, or longer.
The vent provides better air flow than a partly-squashed flexible duct dryer vent, and it resists crushing, therefore it's safer. The minimum clearance to the rear wall for this type of clothes dryer vent is 2 1/2".
The vent shown can be used on clothes dryers made by Admiral, Amana, Caloric, Crosley, Estate, Inglis, Jenn-Air, KitchenAid, Roper, Vesta, and Whirlpool.
Maximum clothes dryer duct length & number of bends or elbows:
Keep the vent duct sections as short, straight, and directly routed to the building exterior as you possibly can. Our metal dryer vent installation shown just below has the right idea, though not a very neat installation and not properly sloped.
 Industry standards recommend that the maximum "concealed" rigid metal ducted clothes dryer vent length be no more than 25 feet (IRC; some codes permit 35-feet).
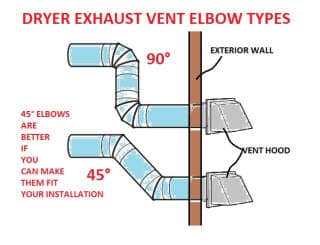
That 25-foot maximum length should be reduced by 2 1/2 feet for each 45 degree bend in the ducting, and by another five feet for each 90 degree bend in the vent duct.
So a clothes dryer vent with three 90 degree bends to come out of the back of the dryer, run up a wall, and then across a ceiling or under a floor to a wall vent would have a maximum length of (25 - (3x5=15)) just ten feet!
An exception to this length reduction for dryer vent elbows may be permitted for large-radius bend dryer vent products such as Dryer-Ell®.
That's because a normal 4-inch 90-degree metal dryer vent elbow bends 90 degrees in a 4-inch radius while the Dryer-Ell product makes its bend over a more gradual 10-inch radius. [Dryer-Ell is at http://dryer-ell.com/ ].
Model codes permit use of large-radius dryer vent elbows:
Section M1502.6 of the 2006 International Residential Code, Section 504.6.4 of the 2009 International Mechanical Code, Section M1502.4 of the 2009 International Residential Code, Section 504.6.4 of the 2012 International Mechanical Code and Section M1502.4 of the 2012 International Residential Code all permit large radius elbows.
However the installation instructions and recommendations from the individual clothes dryer manufacturer are the final authority on how the dryer should be installed.
Some dryer manufacturers permit installations with dryer exhaust venting of much greater lengths [though perhaps combined with a requirement to avoid use of 90 degree turns in the duct system]
"The 2012 International Residential Code (IRC) is pretty specific when it comes to dryer exhaust venting.
The maximum length for dryer exhaust duct
cannot exceed 35 feet from the dryer location to the wall or roof termination. " (Fantech 2012)
Also see CLOTHES DRYER VENT BOOSTER FANS
Slope the clothes dryer vent duct downwards towards its building exit
this will avoid condensation accumulating inside the ductwork and dripping back into the building ceilings or insulation.
It's fine for the dryer vent to rise vertically to enter the building ceiling, but within the ceiling the vent should slope downwards towards its exit point at the building exterior wall.
The same design should be applied to dryer vents that turn down to exit the building below a floor and/or through a basement or crawl space ceiling.
Provide one or more dryer vent duct inspection access points
at which you can disconnect and open the dryer duct system for inspection and cleaning.
This is especially critical in long dryer runs through ceilings and walls where the risk of blockage and fire would be increased. There should be no section of dryer exhaust vent ducting that is inaccessible for inspection and cleaning.
Insulation around the dryer vent is not normally necessary
if you install straight, well-supported metal ductwork sloping to its exit point at the building wall.
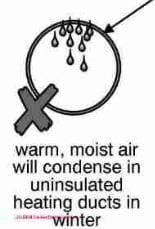
But if ductwork must be routed up and down through space such as an attic, air conditioned interior, or dryer vents routed through a cool crawl space where otherwise the duct will be exposed to cold air the result will be a significant level of condensation within the dryer vent duct system.
For such areas and routing you should consider using insulated solid metal ducting or insulated flex duct to avoid condensation buildup, corrosion
or leaks into the structure.
Install a secure, self-closing screened exhaust vent cover
the vent hood, outside the building at the end of the clothes dryer vent line in order to prevent rodents or birds from entering the ductwork.
Also see CLOTHES DRYER VENT TERMINATION & SCREENS
Clothes Dryer Exhaust Vent Routing Options
Get the Clothes Dryer Moisture & Lint Outside of the Building.
Every manufacturer's clothes dryer vent fan installation guide that we reviewed emphasized: make sure that the vent ducting carries moist air all the way outside of the building.
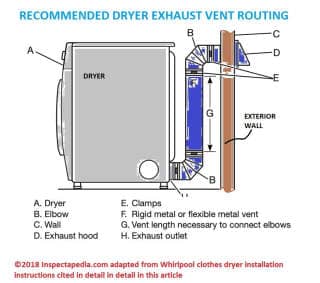
The preferred or most-recommended dryer vent routing is shown above, adapted from Whirlpool dryer vent instructions cited in detail below.
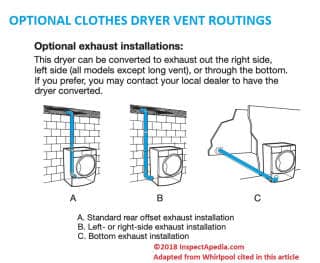
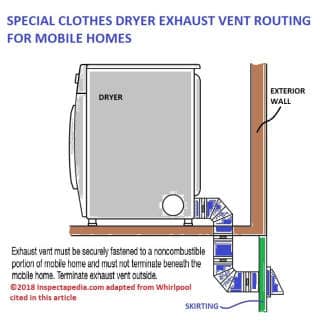
Our sketches shown here, adapted from Whirlpool clothes dryer installation recommendations cited at the end of this article, show typical clothes dryer vent routing options including a special provision for routing the dryer exhaust outside through a crawl space below a mobile home.
In some areas where winter air is very dry homeowners may choose to temporarily spill dryer vent air directly into the building interior in order to try to raise the indoor humidity level. This approach violates manufacturer instructions and is unsafe.
Do not spill the laundry vent air directly into the building attic or roof cavity, basement, crawl space, or other hidden building interior areas.
Doing so will lead to moisture condensation on building surfaces, wet, damaged, moldy building insulation, wet building framing members, wall, floor or roof sheathing. In these locations spilling laundry dryer vent moisture will certainly encourage mold growth.
And Cranor points out that spilling dryer vent products into the building can be a dangerous carbon monoxide hazard as well, at least for gas-powered clothes dryers.
Even if the dryer exhaust vent does extend to the outdoors, an improperly sloped, damaged, or disconnected dryer vent can leak moisture, lint, dust, and even dangerous carbon monoxide (CO) into the building. Leak stains in building ceilings may be traced to condensate leakage from an overhead clothes dryer vent.
Complete details about clothes dryer exhaust vent installation are provided below in this article
at CLOTHES DRYER VENT INSTALLATION DETAILS
Dryer vent duct routing mistakes
Clothes dryer exhaust vents should be directed to the building exterior. Do not vent the clothes dryer indoors nor into an attic, crawl space, or other enclosed area.
Vent the dryer duct to outside
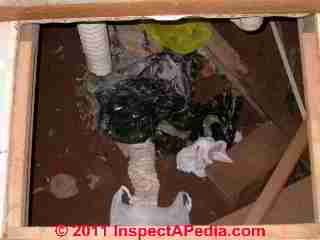
Our photo above shows a dryer vent spilling directly below the building first floor into a soaking wet crawl space.
Along with trash, debris, and other water entry sources, this crawl space was a moldy mess that had led to wet building insulation, mold contamination, and damage to the structure.
Clothes Dryers that Vent into the Attic?
Do not vent clothes dryers directly into the attic space
you're only putting more moisture into an area where it is already going to be a problem, inviting mold growth on wood surfaces and hidden mold growth in building insulation.
See MOLD in FIBERGLASS INSULATION
Clothes Dryer Vent Up Through Roof?
Avoid through-roof dryer vent exits
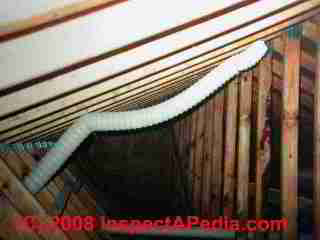
Our photo (left) shows a typical attempt at venting a upper floor clothes dryer through the attic and into a ridge vent - this direction of vent exit may seem convenient but we don't like it much.
In the photo (left) the droopy flex-duct will certainly invite clothes dryer moisture to condense and run back to the home's ceiling rather than exiting at the ridge.
The through-roof vent approach gives us another roof penetration, a possible leak spot, and it almost assures that condensing moisture will drip down the vent duct and into the building ceiling.
Additional roof top dryer vent photos below illustrate a vent that became lint clogged and that was snow-covered (and blocked) in winter.
Also see CLOTHES DRYER VENT INTO ATTIC?
Clothes Dryers that Vent into the Crawl Space?
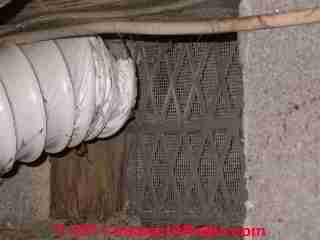
Our second clothes dryer vent exhaust mistake is shown above: the installer hung the vent opening at the crawl space vent screen.
Not only did lint clog the crawl space vent, but most of the damp dryer exhaust air soon was being spilled into the crawl space ceiling.
Special provisions for dryer venting in mobile homes
Above: a clothes dryer exhaust vent installed in a mobile home can be vented down through the crawl space and outside through the skirting wall, but must never be vented to terminate right in the crawl space.
Exhaust vent must be securely fastened to a noncombustible portion of mobile home and must not terminate beneath the mobile home. Terminate exhaust vent outside. - (Whirlpool 2012)
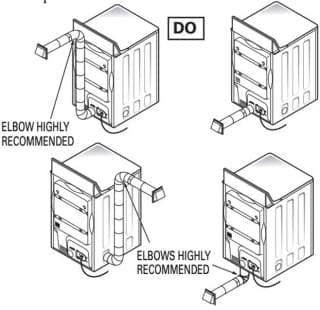
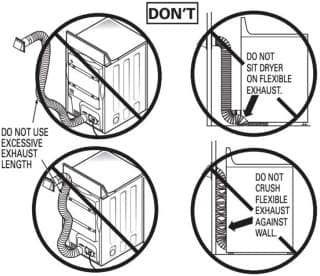
Typical Clothes Dryer Vent Routing Summary
Above and below: Do's and Dont's of clothes dryer exhaust venting routing as suggested by GE and cited in DRYER INSTALLATION MANUALS
Clothes Dryer Installation & Operation Manuals
Now found at DRYER INSTALLATION & OPERATION MANUALS
Clothes Dryer & Dryer Vent Temperatures
This discussion, now found at CLOTHES DRYER TEMPERATURES gives the various temperatures found inside of clothes dryers, in and at the clothes dryer tumbler or drum, heater, and in the dryer exhaust vent during both normal safe operation and during unsafe conditions that risk a dryer fire or building fire.
We include a table of the temperatures that occur inside of clothes dryers at different places in the equipment and in its venting system and we describe unsafe dryer operating temperatures.
Clothes Dryer Exhaust Vent Installation, Dryer Temperatures, Dryer Fires Research
This reference & research material has moved to CLOTHES DRYER FIRE RESEARCH
...
Reader Comments, Questions & Answers About The Article Above
Below you will find questions and answers previously posted on this page at its page bottom reader comment box.
Reader Q&A - also see RECOMMENDED ARTICLES & FAQs
On 2022-10-10 by Michael Bierman - Is it safe to have an upside down U shape connecting the dryer to the wall ?
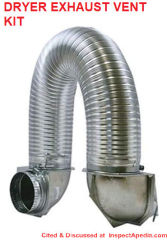 Is it safe to have an upside down U shape connecting the dryer to the wall both ending at roughly the same hight (total height of the U is ~14-18") (pretty much as shown in the picture)? This makes it much easier to have enough extra when moving the dryer away from the wall but I am not certain if this is too restrictive on the flow. This is the vent kit in question
(reposted by moderator without disallowed link)
On 2022-10-11 by InspectApedia (Editor) - upside down U shape connecting the dryer to the wall
@Michael Bierman,
Yes you can use that inverted U dryer exhaust vent kit - the up-side is it's easier to pull the dryer out, and the down-side is that there is some constriction of exhaust and more collection of lint-dust that will require cleaning for dryer effectiveness, operating cost management, and safety.
Watch out: however to review the TOTAL exhaust vent length permitted in the installation instructions for your clothes dryer and to add to that length the effective additional length of what I estimate amounts to at least 3 90-degree elbows or bends in the vent routing.
OPINION: Watch out: Also I'm a bit reluctant to buy the very specific dryer vent connector you cited-to at Amazon. It's a "re-furbished product" that has been "tested" but with no test standard or detail I'm less confident than I might be about a new product, and I can't but wonder if the exhaust was returned because it didn't work properly or safely for its prior user.
On 2022-07-01 by Babs - What type of tape can I use to seal the duct joints?
I am redirecting the electric dryer vent to exit into the floor. Inside the machine I must change the heat duct direction. What type of tape can I use to seal the duct joints inside the machine. I am finding foil tape rated to 300f. Is that sufficient. I find no other tape or sealant rated higher. The ducts are steel.
On 2022-07-01 by InspectApedia-911 (mod) - seal the duct joints with aluminum foil tape
@Babs,
Aluminum foil tape is what most installers use. It's perfectly functional.
On 2022-05-06 by Jenn - I think my dryer vent is unsafe
Contractors installed this today and it feels to me like a fire hazard. Aren't in-wall installations supposed to be solid pipe?
On 2022-05-06 by Mak Church (mod)
@Jenn,
Try again to add a photo using the Add Image button.It's common and acceptable practice to use a flexible metal exhaust vent duct; better IMO is smooth-walled pipe;
What would not be a recommended practice would be installing plastic-and-wire flexible dryer duct through a concealed space such as a wall or ceiling cavity.
On 2022-04-12 by Troy - do I need to raise the dryer vent outlet or can it be close to the ground?
We're moving into a new home and the laundry room is upstairs. However, the garage also has a drain and water hookups, but no dryer vent and would have more room than the tiny laundry room in the house. These are on an outside wall.
I was thinking of just drilling through the drywall and concrete to install a vent leading outside using a short straight duct. Other than making sure the path through the wall is clear, are there any concerns with having the vent outside at ground level?
Would I need to raise it higher than the dryer's connector (on the bottom rear of the dryer), or is it okay to have it close to the ground?
On 2022-04-12 by Danjoefriedman (mod)
@Troy,
I hope you will take a look at the dryer vent installation advice given on the page above as you will see there are several considerations.
With respect to close to the ground, if you live in an area where there's no fall there's a concern that your dryer vent may be blocked by snow.
On 2022-04-08 by Brian - direct the dryer vent away from the AC condenser
The dryer is located next to the outside wall in the garage...so the duct is very close to the vent the way it should be. Unfortunately, the vent blows directly on the A/C condenser, and besides the extra heat the coils need to be constantly cleaned of lint.
I need to direct the vent away from the condenser but it can't be moved left of right because there is a door one way and a bedroom wall the other. My idea was to move the duct up the wall about 6-8 feet but feel like there should be a simpler solution.
On 2022-04-09 by Inspectapedia Com Moderator
@Brian,
I agree that clothes dryer lint fouling of an AC condenser coil is a problem worth attending. You can probably run a dryer vent extension up and out on the interior wall or up and out as an extension on the exterior wall.
On 2022-03-24 by Pauline - vent dryer exhaust up and through attic to outside - use a lint trap?
I have to vent up and through attic to outside. Could I put a T at the bend with access to the bottom of the T so that most of the lint would drop into that trap, making it easy to do monthly clean out there and then annual maintenance to the run in the attic
On 2022-03-25 by Inspectapedia Com Moderator
@Pauline,
Thanks for the dryer vent lint trap question.
It's an interesting idea but not one I'd recommend;
The air velocity is pushing lint along with air in direction of the trap. I don't think that a Tee in a sloped or horizontal line will help you out.
Watch out: some lint traps sold for dryer exhaust lines are prohibited by plumbing codes in many jurisdictions as they form a fire hazard.
Use solid metal dryer duct, and be sure it's accessible for cleaning.
On 2022-02-12 by Jodi - route a dryer vent through a concrete wall?
Can I pipe through concrete to the outside or is going up and out through wood preferred?
On 2022-02-12 by Inspectapedia Com Moderator - cut a hole through concrete if necessary
@Jodi,
Indeed it is quite possible to cut a hole through concrete in the diameter necessary to pass a dryer exhaust vent. Any commercial plumber probably already has the proper hole saw. I've done it myself and I can testify that what's needed is the proper hole saw bit and a heavy duty impact hammer type commercial drill.
But if the re-routing upwards to go through a wood-framed wall is not going to cause an excessively-long dryer exhaust vent route I recommend that as it's orders of magnitude easier, quicker,. cheaper.
Illustration here: a 4-inch diamond-tipped hole saw.
On 2022-02-06 by Jerome - dryer exhaust vent hood flap is sticking
Should the dryer exhaust vent hood flap prevent cold air backdraft from occurring?
On 2022-02-06 by Inspectapedia Com Moderator
@Jerome,
Yes.
If your dryer exhaust vent flap is sticking you may simply need to clean out accumulated lint.Free up that flap or your dryer will take much longer to dry clothes, increasing your utility bills, and it could become unsafe (overheating) as well.
On 2022-01-13 by Anon - help with dryer vent issue - takes hours to dry clothes
Re-posting from private email:
I was hopeful you could offer someone in our area (Westside Cleveland, Ohio) that could help us with a venting issue? Our dryer is on second floor and is vented into attic and your to roof. The dryer takes hours to dry clothes. When I open dryer door (front loader) the door is all wet and barely hot! My husband took off the flex duct to the wall /dryer and he pulled out ‘wet lint’! There is a stain (water? ) in soffit above dryer. I am thinking this is from improper ventilation and causing water/mold?
I’ve called an appliance company and they directed me to a chimney company?
They said they could put a ‘sleeve’ and help with this issue?
I don’t know what to do? Who can help us vent this properly? My husband did it initially and knows now it wasn’t correct. Ugh. Any help is appreciated!
- Anon 2021/01/07
On 2022-01-13 by Inspectapedia Com Moderator
@Anon,
Let's start by identifying your dryer brand and model and then getting a copy of the installation manual. You will see that there are limitations to the diameter, bends, and length of dryer duct for the dryer to work correctly.Now if you disconnect the dryer from the ductwork and run it and its exhaust is normal at its outlet and if you further inspect your vent system and its length and routing against the dryer vent specifications you can see quite clearly where the difficulty will be.
You may already realize this but the concerns are not simply dryer leaving clothes wet or taking too long there's also potential fire hazard if a dryer vent exhaust is blocked. Any appliance installer or Builder with any experience in dryer installation should be able to look at your system and compare it with the specifications in the manual.
The idea of installing a liner in a vent or chimney has absolutely nothing to do with proper dryer venting. It sounds as if the chimney people want to do what they know how to do but they haven't, at least in your explanation to me translated that into something that fits a clothes dryer and its requirements.
On 2021-09-25 by Leighann - moisture issues in new house - bad dryer venting?
I’ve been having moisture issues in my new house. There was mold on attic sheathing that was attributed to an old leak and remediated prior to closing. Visible water spots on ceiling persisted and we replaced the roof, added a ridge vent, opened the soffits and removed the insulation that had been blocking them (likely also covered in mold which still needs to be addressed).
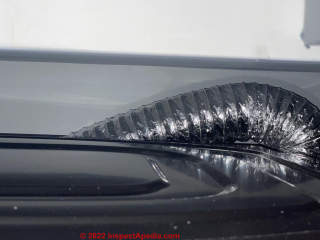
Our inspector was not great and said the roof had 10+ years but was actually pretty shot. In trying to diagnose the problem issue, I’ve stumbled on the fact that my contractor seems to have vented my dryer in a very shoddy, worrisome way with improper material (Flexible mylar? That’s taped?)
It runs through the attic. I’m not totally sure how. I believe it goes straight up and through the roof as there are 2 black hoods following construction with 1 presumably for the bathroom fan. I won’t go up there as it’s unfinished and gross. It’s probably time I buy a respirator and inspect for myself.
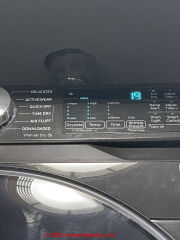
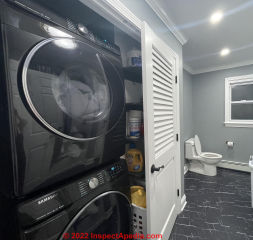
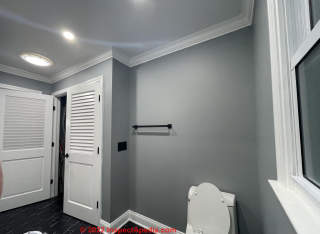
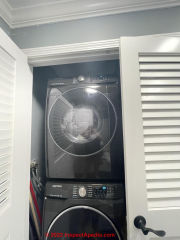
This bathroom closet is the permanent home for my laundry after a costly remodel. How would I go about safely venting this dryer since the attic is not advisable… Or is there a way to use rigid metal piping is it strategically placed elbows that would be adequate?
I don’t want unsightly ductwork visible in my brand new bathroom but I definitely don’t want moisture damage and safety concerns. Providing several angles of the bathroom for reference.
On 2021-09-25 by Inspectapedia Com Moderator - read the clothes dryer venting suggestions
@Leighann,
It would be worth taking the time to read the clothes dryer venting suggestions in this article series. You'll see that you want to route your dryer vent through the shortest possible distance, with the fewest number of bends, and using solid metal vent duct for best airflow. You'll also see that the manufacturer of your dryer will tell you the maximum venting distance that the clothes dryer can use. You also read that the equivalent distance is affected by each elbow or bend.
If you read that material you will see the best installation practices for dryer venting.
I can't comment further about your particular dryer vent because we have no actual information about the distances, directions, etc.
If you're afraid to go into those areas of the building needed to be inspected to understand how your dryer is actually vented and where it terminates you might want to get someone else to do that for you.
I agree that proper venting is important and in your particular case, given that you've already described attic moisture problems, you want to be doubly sure that the venting is effective and is terminating outdoors.
On 2021-07-09 by Chris r - how to fix bad dryer duct routing
Hey there. I’m having a problem with moisture inside my dryer and it’s a good amount of it. My duct work just goes straight up like 6 feet and then turns left and goes straight about 10 feet to outside my house, where it has a louvered style vent.
I can’t tell if the pipe is insulated because it’s in the wall. What can I do to fix this issue. The dryer is in my above ground basement. The temp in my basement is like 65-70 at all times and the outside temp when I’m having the issue is above 85+ and possibly more or less when it’s humid.
About 8-9 feet below the outside vent is my air conditioner which blows air upward, just adding this info in case it adds to the moisture issue. What should I do or what can I do to stop the moisture.
If I have to redo it I will but will need an exact proper way to fix it. Any help would be greatly appreciated. Thanks in advance.
On 2021-07-09 by Inspectapedia Com Moderator - problem with moisture inside my dryer
@Chris r,
We have some more diagnosis to do yet but a couple of starting thoughts are one, that that run is a bit long with multiple elbow. It would be good to start with the dryer installation manual to see what the manufacturer permits for total effective and length including the effects of all of the elbows.
And secondly you've identified what sounds like an important problem in that the exhaust from your outside air conditioning compressor condenser unit fan may be creating a back pressure when the dryer is trying to exhaust. The result is that it blocks part of the airflow therefore increasing dryer time and moisture levels.
If you can confirm that the vent size and length are within the manufacturer's permitted specifications and then first thing to check is for lint blockage. Because you won't have access to the length of the dryer vent that extends across a ceiling you may first just see how much lint is inside the dryer vent near the wall exit.If looking in there you see a lot of it, you might need use inspection camera to confirm the presence or absence of lint further back in the vent .
On 2021-04-19 by Derrick - heat from my dryer vent is causing discoloration on neighbor's concrete basement wall
My neighbor claims that the heat from my dryer vent is causing discoloration on his concrete basement wall as well as causing his vinyl siding to pop. Given that his wall that is in question is at least 4 feet away are either one of these actually possible??\
On 2021-04-19 by (mod)
@Derrick,
It seems unlikely, but nobody can provide an absolute answer to your question from brief text alone; perhaps you can attach some photos of the situation and of the discoloration and popped siding - one photo per comment but as many comments as you need.
On 2021-04-19 by Derrick - diagnose concrete surface spalling & relate to dryer exhaust?
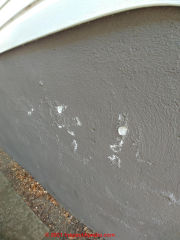
Dan, thank you , I have attached an Image of the alleged concrete damage. Distance to his wall from our vent is 6ft exactly to where the damage is it is at least 10 ft from the vent. As for the siding I cannot see anything wrong at all.
On 2021-04-19 by (mod)
@Derrick,
That's a good photo to let me understand the type of problem at the wall, a picture of failure on a wall that has been repainted at least once, typically associated with moisture.It will be useful to have an opinion about the moisture source. It also would be useful (not essential) to have a photograph of the wall before it was painted.
But I need to see some other photos showing the whole area of the wall as well as groups of photo giving perspective showing the relationship of your structure to your neighbors.Surface spalling on painted and even un-painted concrete is common and is pretty much always related to moisture; If the spalling were caused by your dryer exhaust vent then we'd expect to see the spalling pattern matching the dryer exhaust pattern where it would blow against that wall - and nowhere else.
On 2021-03-27 by Tony - need to move dryer & vent "UP" then back down
I must move a electric dryer to the other side of the room. I can only vent up, over a electric hot water heater, then across the water heater, then down, then through a cabinet to the existing exterior exhaust hole In the wall. Can I go up, then down as described? The run length is 6 feet.
On 2021-03-29 by (mod) - up and back down venting must be "correct and safe"
@Tony,
You can vent up and back down, but keep in mind that as you restrict the air flow by that configuration you increase the dryer operating cost, slow drying time, and increase the risk of lint blockage and (with older dryers) a fire.
The run you cite seems short (just 6 ft) but keep in mind that every elbow restricts flow equivalent to some number of feet.
So to be "correct and safe" in your installation, compare your routing, lengths AND number or bends, with the allowable dryer vent run lengths and bends in both the dryer's installation manual for your specific dryer brand and model and also in our Recommended Articles
the live links for
DRYER EXHAUST VENT INSTALLATION & ELBOWS
and
DRYER EXHAUST VENT MISTAKES
On 2021-01-25 by Norm - Can a dryer vent be vented downward
Can a dryer vent (Natural Gas dryer) be vented from the first floor downward and out to the exterior through the basement, or does it have to rise to avoid CO issues?
On 2021-01-25 - by (mod)
Norm:
A clothes dryer vent can vent downwards but only for a limited - short - distance; venting too far down before venting out risks providing more backpressure than the dryer's exhaust can overcome; the result is not only the CO issue that you cite (for gas dryers) but overheating (a fire), and even at best, long dry time and increased operating cost.
Take a look at the installation instructions for your specific gas dryer brand and model and you ought to find the limits specified in routing the exhaust vent.
And in the live links at Recommended Articles above see
DRYER EXHAUST VENT ROUTING OPTIONS
DRYER EXHAUST VENT MISTAKES
On 2020-11-21 by Frederic Lombard dryer can vent up along ceiling in earth-embedded home but ...
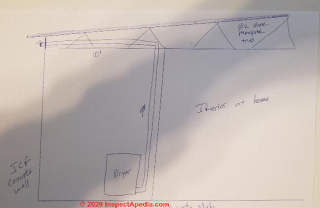 I am building an earth-embedded home where the top 18" of the ICF concrete back wall will be above grade.
The location of the clothes dryer is not against an outside wall. Can I run the vent up to above the ceiling then run the vent along the truss and out the back under the eave and through a soffit?
The dryer is in an unconditioned space under the same roof as the house, but not considered part of the house, more like a basement at same grade as the house.
On 2020-11-21 by (mod) -
Frederic
Yes you can certainly run the dryer vent up along the ceiling and back out under the eve of your house.
However you need to look closely at the total run length and the number of elbows or bands in the routing because those may be too many for your dryer vent safely.The risk would be overheating and fire or simply increase dryer operating cost.
If the road is too long in equivalent length which means including elbows, check with the dryer manufacturer to see if they will permit use of a booster exhaust fan.
On 2020-02-01 by MikeE - Using standard dryer vent diameter will exceed the recommended length of exhaust piping.
Further to my comment. Using standard dryer vent diameter will exceed the recommended length of exhaust piping.
Are there any issues with running the dryer exhaust into a 6" or 8" diameter galvanized steel duct to reduce pressure losses and access an outside wall.
My dryer currently exhausts into the garage (house built in 1978) and I know it should exhaust to the outside.
On 2020-02-04 - by (mod) -
Good question;
Generally you can and should go to a larger diameter duct if you're exceeding the duct length for the 4" diameter material.
most dryer installation manuals include a table of length, including the effects of elbows etc, and show that by going to a larger diameter you can get a longer run. Let's start with your dryer brand and model and find its IO manual.
On 2019-09-12 by John h - can a dryer vent go up 4 ft then run approx 15 ft to outside
Can a drier vent go up 4 ft than run aprox 15 ft to outside
On 2019-09-12 - by (mod)
John
Probably yes.
From the article above we read:
Industry standards recommend that the maximum "concealed" rigid metal ducted clothes dryer vent length be no more than 25 feet (IRC; some codes permit 35-feet).
That 25-foot maximum length should be reduced by 2 1/2 feet for each 45 degree bend in the ducting, and by another five feet for each 90 degree bend in the vent duct.
---
For your case I am assuming you'll need a 90 degree bend
- at the base or exit from the dryer
- at the top of your 4 ft. run to go to horizontal
So multiply the number of bends (2) by 2.5 ft and we have 5 ft. of equivalent run length for the two elbows.
Add that to your straight runs:
4 ft. + 14 ft. + 5 ft = 23 ft - that's less than the 25 ft. guideline so you should be ok.
On 2019-01-08 by Robert Root - Can my dryer vent touch drywall
Can my dryer vent touch drywall
On 2019-01-08 - by (mod) -
For a residential clothes dryer exhaust vent using materials and routing approved by the manufacturer you would not have an issue with the vent touching or being close to drywall.
On 2017-07-17 by Brady Bisel - specs for dryer vent clearance through walls & insulation
I can’t seem to find anything pertaining to the specs for walls that the dryer exhaust vent is cut and routed to.
By that I mean any specs on the proximity of insulation in wall cavities surrounding dryer exhaust duct and drywall or other wall materials like wood paneling that are combustible and whether or not there needs to be an inch or more space of any of the above mentioned materials
On 2017-07-17 - by (mod) - specs on the proximity of insulation in wall cavities surrounding dryer exhaust duct
Thanks for the great question, Brady. I appreciate it because you point out an area that we should clarify:
Clothes dryer vents are generally installed as zero-clearance, that-is, in direct contact with wall exterior covering (siding), wall framing, insulation in the wall cavity and the interior wall covering.
The reason that direct contact between the dryer exhaust vent and building materials is safe *in normal and proper operating conditions* is that normal dryer operating temperatures in the dryer drum range between 125F and 135F. (GE Corporation, ret. 2017).The highest temperature claim I've read is 150 degF (perhaps an unsubstantiated opinion).
The air temperature of air exiting the dryer's heater and at the point of entry into the dryer drum or "tumbler" may be hotter, at around 175 F.
The highest temperatures occurring inside the clothes dryer are in the heater element or burner itself where they can reach between 250˚ C and 400˚ C (Marks, 2012) as cited in Bonaccorso (2012) in what I find is one of the most informed studies of clothes dryer temperatures and fire safetyI will add links to this research in the list of references and research in the article above - you may need to clear your browser cache and wait 24 hours for amendments to this web page to appear in you server.
These temperatures are well below the point of pyrolysis - 200-300 degF - at which a chemical change in combustible materials exposed to relatively low heat but sufficient to lower their combustion point to a dangerous level.I explain this phenomenon at PYROLYSIS EXPLAINED
Watch out: there are, however, potential fire hazards associated with clothes dryers that can come from other conditions, discussed
at CLOTHES DRYER VENT SAFETY HAZARDS -
Watch out: there are also clearance distances specified between the wall exhaust point and other features -
see CLOTHES DRYER VENT CLEARANCES
For example, blowing dryer lint all over the air intake of an air conditioner compressor/condenser unit will lead to higher air conditioning or heat pump operating costs, high temperatures at the unit, and possibly expensive damage to it.
...
Continue reading at CLOTHES DRYER VENT CLEARANCES & TERMINATION - distances required around clothes dryer exhaust vent terminations or exhaust hoods, or select a topic from the closely-related articles below, or see the complete ARTICLE INDEX.
Or see these
Recommended Articles
- CLOTHES DRYER INSTALLATION & REPAIR - home
- CLOTHES DRYER INSTALLATION & OPERATION MANUALS
- CLOTHES DRYER FIRE HAZARD WARNINGS
- CLOTHES DRYER FIRE RESEARCH
- CLOTHES DRYER LINT FILTER HAZARDS
- CLOTHES DRYER LINT CLOG RESISTANT SCREENS
- CLOTHES DRYER SAFETY CHECKLIST
- CLOTHES DRYER TEMPERATURES
- CLOTHES DRYER TEMPERATURE MEASUREMENTS
- CLOTHES DRYER VENTING - home
- CLOTHES DRYER VENT BOOSTER FANS
- CLOTHES DRYER VENT CLEARANCES & TERMINATION
- CLOTHES DRYER LINT CLOG RESISTANT SCREENS
- CLOTHES DRYER VENT CODES
- CLOTHES DRYER VENT ENERGY SAVINGS
- CLOTHES DRYER VENT INSTALLATION
- CLOTHES DRYER VENT TERMINATION & SCREENS
- DRYER EXHAUST VENT DUCT MATERIAL & SIZE
- DRYER EXHAUST VENT HOOD TYPES
- DRYER EXHAUST VENT INSTALLATION & ELBOWS
- DRYER EXHAUST VENT ROUTING OPTIONS
- DRYER EXHAUST VENT MISTAKES
- DRYER EXHAUST VENTED INTO ATTIC
- DRYER EXHAUST VENTED THROUGH ROOF
- DRYER EXAUST VENTED INTO CRAWL
Suggested citation for this web page
CLOTHES DRYER VENT INSTALLATION at InspectApedia.com - online encyclopedia of building & environmental inspection, testing, diagnosis, repair, & problem prevention advice.
Or see this
INDEX to RELATED ARTICLES: ARTICLE INDEX to APPLIANCE REPAIR
Or use the SEARCH BOX found below to Ask a Question or Search InspectApedia
Ask a Question or Search InspectApedia
Questions & Answers on bathroom vent fan and fan ducting installation procedures, codes, standards.
Try the search box just below, or if you prefer, post a question or comment in the Comments box below and we will respond promptly.
Search the InspectApedia website
Note: appearance of your Comment below may be delayed: if your comment contains an image, photograph, web link, or text that looks to the software as if it might be a web link, your posting will appear after it has been approved by a moderator. Apologies for the delay.
Only one image can be added per comment but you can post as many comments, and therefore images, as you like.
You will not receive a notification when a response to your question has been posted.
Please bookmark this page to make it easy for you to check back for our response.
IF above you see "Comment Form is loading comments..." then COMMENT BOX - countable.ca / bawkbox.com IS NOT WORKING.
In any case you are welcome to send an email directly to us at InspectApedia.com at editor@inspectApedia.com
We'll reply to you directly. Please help us help you by noting, in your email, the URL of the InspectApedia page where you wanted to comment.
Citations & References
In addition to any citations in the article above, a full list is available on request.
- John Cranor [Website: /www.house-whisperer.com ] , ASHI certified home inspector (house-whisperer.com) in Richmond, VA, can be reached by email to: johncranor@verizon.net or by telephone at 804-873-8534. Technical review, email, 1/2012
- Our recommended books about building & mechanical systems design, inspection, problem diagnosis, and repair, and about indoor environment and IAQ testing, diagnosis, and cleanup are at the InspectAPedia Bookstore. Also see our Book Reviews - InspectAPedia.
- In addition to citations & references found in this article, see the research citations given at the end of the related articles found at our suggested
CONTINUE READING or RECOMMENDED ARTICLES.
- Carson, Dunlop & Associates Ltd., 120 Carlton Street Suite 407, Toronto ON M5A 4K2. Tel: (416) 964-9415 1-800-268-7070 Email: info@carsondunlop.com. Alan Carson is a past president of ASHI, the American Society of Home Inspectors.
Thanks to Alan Carson and Bob Dunlop, for permission for InspectAPedia to use text excerpts from The HOME REFERENCE BOOK - the Encyclopedia of Homes and to use illustrations from The ILLUSTRATED HOME .
Carson Dunlop Associates provides extensive home inspection education and report writing material. In gratitude we provide links to tsome Carson Dunlop Associates products and services.


