 Asphalt Shingle Starter Strips
Improve roof shingle wind resistance
- POST a QUESTION or COMMENT about about the cellophane strip protecting the glue strip on asphalt roof shingles: should it be removed or not?
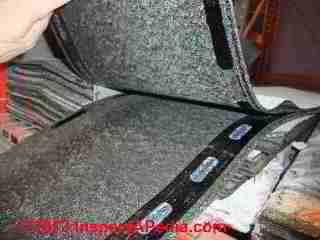
Cellophane strip found on / between asphalt roof shingles:
This article describes the cellophane strips found between individual asphalt roof shingles - atop the glue strip. We explain the purpose of this cellophane strip.
We answer the question: " Should we remove the cellophane strip over the shingle adhesive when nailing shingles or should it be left in place?" We cite authoritative research from industry experts as well as from shingle manufacturers themselves to give a definitive answer to the asphalt shingle release strip removal question: leave it in place.
InspectAPedia tolerates no conflicts of interest. We have no relationship with advertisers, products, or services discussed at this website.
- Daniel Friedman, Publisher/Editor/Author - See WHO ARE WE?
Installing Asphalt Shingle Starter Strips
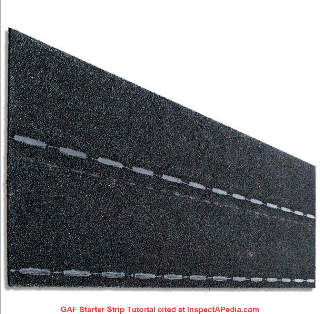
 The illustration shows a GAF asphalt shingle starter strip - the GAF QuickStart®.
[Click to enlarge any image]
Question: ok to use liquid nails to glue the shingles onto the drip edge?
2019/03/30 Anonymous wrote:
Starter strips bottom side have a cellophane protective strip that touches the metal drip edge. Nails are 3 inches from the edge of the starter strip.
Is it ok using Liquid Nails Fuze it at this 3 inch area will where the glue is on the metal drip but the glue is also touching the cellophane-protective strip on the underside of the starter strip.
Under hurricane conditions on leading edge of roof, will this cellophane-protective strip peel away from the underside of the starter strip leaving the glue only sticking to the metal drip edge and not the underside of the starter strip itself?
(The glue was touching the cellophane protective strip and not the underside of the starter strip itself!)
Seems so and no one comments on this?
This question was posted originally
at CELLOPHANE STRIP ADHESIVE ADEQUACY in HIGH WIND AREAS
A reply to this question was (by my error) posted originally
at ASPHALT SHINGLE CELLOPHANE STRIP REMOVAL as discussed by private email.
Reply:
Thanks for an interesting question that I'd not considered.
The cellophane is, as you recognize, intended to keep the shingle strips from sticking together when in the bundle.
When they're applied to the roof the cellophane won't be in a position to get in the way of the glue on the underside of that same shingle strip.
However I agree that a more wind-resistant roof would be glued down right at the very lowest edge (and also at the gable end edges) - a detail I've seen specified in some hurricane zone roof instructions.
The cellophane strip is less than 1" in width.
For best adhesion of the shingle at the roof edges, I'd be sure that my adhesive contacted more of the shingle's lower edge, over the drip edge, than just the cellophane.
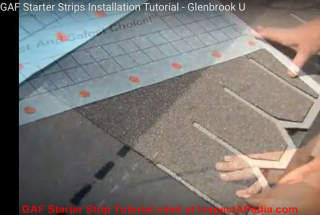
Or consider using a peel-and-stick starter strip like the starter strips shown here, excerpted from from GAF's high wind resistance roofing starter strip tutorial that we cite in detail below.
Notice the position of the glue strips in two rows on the full 12" width (nominal, products may vary) starter strip, but don't be mis-led.
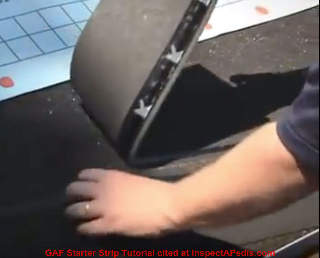
When nailing on shingles that use an exposure of less than 6", this full-sized shingle is perforated at its center and is to be separated into two half-width pieces before installation.
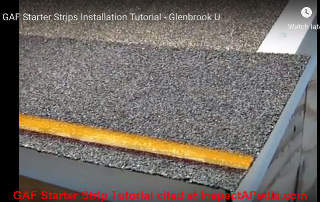
As you see in our next illustration (again from GAF) below, the yellow line is showing the proper position of the exposed glue strip near the starter strip's lower edge.
This position of the glue strip combined with nailing the starter strip as instructed is intended to give good resistance against wind up-lift at the roof edges in areas of high wind zones.
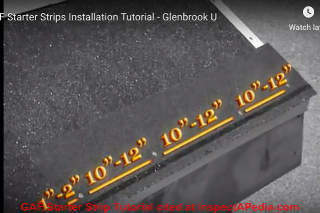
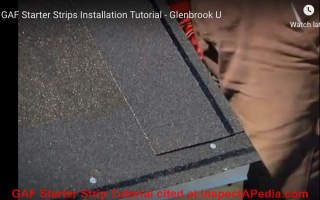
The half-width full length starter strip is nailed with a 1/4 to 1 1/4" overhang past the drip edge or roof edge. Roofing underlayment and drip edge have of course been applied first.
Notice where the nails are placed on these special starter strips. The nails are 1 1/2 to 3" above the bottom edge of the roof.
It was this cellophane on the under-side of the starter strip and close to the roof edge, that prompted your question about using further adhesive.
With shingle nails placed this close to the roof eaves edge or rake edge (1 1/2 to 3" ), it's not likely that you need to add additional adhesive below the starter strip.
Nothing in GAF's tutorial suggests that extra adhesive is necessary in that location.
Similarly here's GAF showing laying the starter strip along the rake edge (gable end edges). Note that it's installed after and atop the bottom edge starter strip along the eaves.
Our next illustration shows using the full-width starter strip (below) when installing asphalt shingles that have a greater than 6" exposure.
Notice that the starter strip is installed in full width (two glue strips) with the glue strips facing UP and the cellophane protective strip "down" (not in view here).
Below we see the starter strip being installed along the rake edge of the same roof after the eaves edge starter strips are in place.
The rake edge starter is also installed glue-up, half-width full length, starting about 3" up from the lower roof edge.
The nailing schedule is essentially the same as with the eaves edge starter strip.
Thanks to GAF for these details, as cited just below.
Reader follow-up: the cellophane is wider than 1"
Also in the opinion section others wrote that the cellophane protective strip under the starter strip is less than 1 inch.
This is incorrect on GAF Pro Start strips as they are much wider than the inch as noted.
The glue strip that faces up for the shingle to bind to is much less than 1 inch but not the protective cellophane strip under it which is much wider.
Almost as wide as the photo attached from your link [below].
I also posed the same question in an e-mail to GAF technical support and waiting on a answer from them.
I also do believe as noted in you link they do have a very narrow strip of the starter bottom side that has no cellophane at this outer edge. I will make sure that is glued down to the drip edge also.
For your info in 1987 I put heavyweight 3 tab shingles on my new home and also glued down the edges and rakes. Then 5 years later in 1992 we had hurricane Andrew hit Louisiana with over 130 mph winds here in my city.
I did not lose one shingle! New roof now and I want to do all I can to secure all edges!
Moderator reply:
In sum it seems to me that the three manufacturers whose data I found with ease all seem to think that nailing the starter close to the edge is sufficient, and of course the cellophane is irrelevant to the shingles above.
When you glue the starter down to the roof below you're gluing to either the drip edge or housewrap - neither of which has great adhesive acceptance in my experience, especially the housewrap. The mfgs don't advise that step but also don't comment on it so I much look forward to what the manufacturer says in response to your inquiry.
Having on occasion glued roofing down to the drip edge I can tell you that it adds work (and a requirement for new drip edge) at re-roof time as it can be impossible to separate well-adhered felt or starter strips or anything else that's well glued.
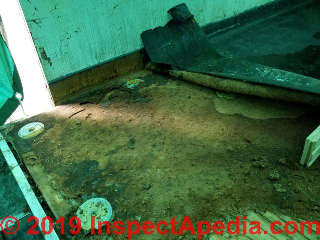
On this EPDM roof in New York, while repairing a leak we had to wreck the drip edge as well as the fiberboard underlayment to get up the old glued-down EPDM during the repair job - perfectly normal in flat and low slope roof repair.
Asphalt Shingle Starter Strip Installation Instructions, Codes, Standards
- FEMA ASPHALT SHINGLE ROOFING FOR HIGH WIND REGIONS, HOME BUILDERS' GUIDE TO COASTAL CONSTRUCTION [PDF] FEMA 499, August 2005, Technical Fact Sheet No. 20, [To recommend practices for installing asphalt roof shingles that will enhance wind resistance in high-wind, coastal regions.]
- FEMA, Asphalt Shingle Roofing for High Wind Regions, Home Builder's Guide to Coastal Construction, Technical Guide No. 73, retrieved 3/5/13
- GAF's asphalt starter strip installation tutorial video, GAF HQ, World Headquarters, 1 Campus Drive, Parsippany, NJ 07054 USA, Website: https://www.gaf.com Tel: 1-973-628-3000 retrieved 2019/03/30, original source: www.gaf.com/en-us/roofing-products/residential-roofing-products/starter-strip-shingles/premium/weatherblocker
Also at YouTube at https://www.youtube.com/watch?v=8dC0mtN8LVc - GAF WeatherBlocker™ PREMIUM EAVE/RAKE STARTER STRIP INSTRUCTIONS [PDF] retrieved 2019/03/30, original source: www.gaf.com/en-us/document-library/documents/productdocuments/residentialroofingdocuments
/starterstripdocuments/starterstripshinglespremiumdocuments
/weatherblockerdocuments/WeatherBlocker_Starter_Strip__Installation_Instructions_EnglishSpanishFrench.pdf - GAF Pro-Field STEEP SLOPE ROOFING INSTRUCTIONS [PDF] Starter Strips & Wind Resistance are discussed beginning on p. 150, retrieved 2019/03/30, original source: www.gaf.com/en-us/document-library/documents/productdocuments/residentialroofingdocuments /atticventilationproductsdocuments/exhaustventsdocument
- Malarkey Roofing SMART START WINDSOR STARTER SHINGLE INSTRUCTIONS [PDF] (2018), Malarkey Roofing Products, PO BOx 17217, Portland OR 97217-0217 USA retrieved 2019/03/30, original source: https://malarkeyroofing.com/uploads/WEB_StarterShingleInstallation.pdf
- Owens Corning STARTER STRIP SHINGLE INSTRUCTIONS [PDF] (2014) Owens Corning Corp., One Owens Corning Pkwy, Toledo OH 43659, USA Website: https://www.owenscorning.com/ roofingTel: 1-800-GET-PINK retrieved 2019/03/30, original source: http://www.owenscorning.com/NetworkShare
/Roofing/10004070-Starter-Strip-Data-Sheet-Installation-Instruction.pdf - Owens Corning STARTER STRIP PLUS DATA SHEET [PDF] (2010) op. cit., retrieved 2019/03/30, original source: https://www.owenscorning.com/https://roofingca.owenscorning.com/docs/installationinstructions/10011118-Starter-Strip-Plus-Data-Sheet.pdf
- Owens Corning STARTER SHINGLE ROLL INSTRUCTIONS [PDF] (2009) op. cit.,
also cited by Florida Building DBPR 2601 Blair Stone Road, Tallahassee FL 32399 Phone: 850-487-1824
http://www.floridabuilding.org/upload/PR_Instl_Docs/FL10674_R5_II_STARTERS.pdf including Florida Product Approval
...
Reader Comments, Questions & Answers About The Article Above
Below you will find questions and answers previously posted on this page at its page bottom reader comment box.
Reader Q&A - also see RECOMMENDED ARTICLES & FAQs
On 2021-04-15 by (mod) - proper asphalt shingle starter course
 @3robert,
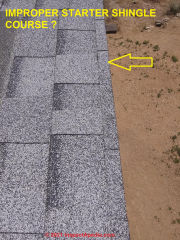
Not in my opinion, as long as the shingles are the type shown in your photo below - shingles without a notch or opening between shingle tabs, and as long as the shingles are properly-nailed and as long as there is a proper starter course underneath those shingles at the lower edge; it's probably only a cosmetic note.
But it is a clue of an inexperienced roofer who didn't follow the manufacturer's installation instructions. In an unusual case that might raise a shingle warranty issue.
Gently *don't break a shingle nor fall off a ladder * lift up the shingles just a bit to look underneath that first course to be sure a starter shingle course was installed.
Proper asphalt shingle starter course details
Once the drip edge and felt underlayment are in place on the roof, the starter course is made by either using manufacturer-provided or roofer-prepared pre-cut starter shingles or strips, OR roof shingles are flipped upside down so that the head of the shingle is "down-roof", then nailed in place
. We might cut the first starter shingle's width by 6" or 12" so that the actual first course of shingles can begin with a full shingle without leaving a shingle butt joint directly over a starter shingle butt joint.
A better approach is to measure the roof width at the eaves and cut your first and last shingles of the first course so that any odd amount is split 50:50 with the right and left sides of the roof - this is just a cosmetic deatil that would be visible principally on conventional notched 3-tab shingles.
Watch out: on a conventional notched 3-tab asphalt shingle roof, if you omit the starter course then those notches will leave roofing felt and roof deck exposed, giving a short life to the roof lower edge or eaves and inviting early leaks into the roof structure.
On 2021-04-15 by 3robert
Will it hurt to have a single on the Eve only be like two inches of exposure - see photo above.
This Q&A were posted originally
...
Continue reading at ASPHALT SHINGLE LIFE / WEAR FACTORS or select a topic from the closely-related articles below, or see the complete ARTICLE INDEX.
Or see these
Recommended Articles
- ASPHALT ROOF SHINGLES - home
Suggested citation for this web page
ASPHALT SHINGLE STARTER STRIPS at InspectApedia.com - online encyclopedia of building & environmental inspection, testing, diagnosis, repair, & problem prevention advice.
Or see this
INDEX to RELATED ARTICLES: ARTICLE INDEX to BUILDING ROOFING
Or use the SEARCH BOX found below to Ask a Question or Search InspectApedia
Ask a Question or Search InspectApedia
Try the search box just below, or if you prefer, post a question or comment in the Comments box below and we will respond promptly.
Search the InspectApedia website
Note: appearance of your Comment below may be delayed: if your comment contains an image, photograph, web link, or text that looks to the software as if it might be a web link, your posting will appear after it has been approved by a moderator. Apologies for the delay.
Only one image can be added per comment but you can post as many comments, and therefore images, as you like.
You will not receive a notification when a response to your question has been posted.
Please bookmark this page to make it easy for you to check back for our response.
IF above you see "Comment Form is loading comments..." then COMMENT BOX - countable.ca / bawkbox.com IS NOT WORKING.
In any case you are welcome to send an email directly to us at InspectApedia.com at editor@inspectApedia.com
We'll reply to you directly. Please help us help you by noting, in your email, the URL of the InspectApedia page where you wanted to comment.
Citations & References
In addition to any citations in the article above, a full list is available on request.
- [6] Thanks to Leonard Wheeler, Retired DCA Disaster Assessment Engineer for Hurricane Andrew, for questions leading to clarification on the proper handling of asphalt shingle glue strip protective cellophane during roof installation 3/29/09 .
- [7] Thanks to James A. Skees, PE, President and Sr. Forensic Engineer, OnTheRock Engineering, LLC, 604 W. Jefferson Street, LaGrange, KY 40031
502-225-6203 FAX 225-6204, for commenting on the roof cellophane strip problem, on wind damage to roof shingles, shingle blow off, improper shingle nailing, and roof shingle laddering underlying defects, August 2010. Mr. Skees is a forensic engineer who works for insurance companies. Mr. Skees can also be reached by email at jimskees@ontherockeng.com
The company has published online a sample Tornado Report
"Residential Wind Damage Evaluation", Wind Damage Sample, found at http://www.ontherockeng.com/Sample%20Tornado%20Report.pdf - [8] GAF Materials Corporation, Grand Timberline Premium Architectural Shingle Application Instructions.
http://www.gaf.com/Content/Documents/20573.pdf discusses the requirements for successful asphalt shingle installation including the condition of the roof deck, the use of roofing felt underlayment, the selection of roofing nails by type and length and penetration of the roof decking, and the role of glue strips on the back side of asphalt roof shingles. - [9] "Clear Plastic Release Film ... Leave On or Take Off?", Technical Advisory Bulletin No. TAB-R-2011-106, 04/11/2011, GAF Technical Services Department, GAF Corporation, Technical Services Tel: 800-766-3411, Website: www.gaf.com retrieved 6/13/2013 original source http://www.gaf.com/Warranties_Technical_Documents/Steep_Slope_Technical_ Advisory_Bulletins/2011_Steep_Slope_Technical _Advisory_Bulletins_English/TAB_R_2011_106_Clear_Plastic_Release_Film_ Leave_on_or_Take_Off_Steep_Slope_Technical_Point.pdf
- Roofing The Right Way, Steven Bolt, McGraw-Hill Professional; 3rd edition (November 1, 1996), ISBN-13: 978-0070066502, p. 350 for one of many citations on this point.
- "Hurricane Damage to Residential Structures: Risk and Mitigation", Jon K. Ayscue,
The Johns Hopkins University, Baltimore, Maryland, published by the Natural Hazards Research and Applications Information Center, Institute of Behavioral Science, University of Colorado, November 1996. Abstract:
"Property damage and loss from hurricanes have increased with population growth in coastal areas, and climatic factors point to more frequent and intense hurricanes in the future. This paper describes potential hurricane hazards from wind and water. Damage to residential structures from three recent intense hurricanes - Hugo, Andrew, and Iniki - shows that wind is responsible for greater property loss than water. The current state-of-the-art building technology is sufficient to reduce damage from hurricanes when properly applied, and this paper discusses those building techniques that can mitigate hurricane damage and recommends measures for mitigating future hurricane damage to homes." - online at www.colorado.edu/hazards/publications/wp/wp94/wp94.html - "Evaluating OSB for Coastal Roofs," Paul Fisette, Coastal Contractor, Winter 2005, online at coastalcontractor.net/pdf/2005/0501/0501eval.pdf . Fisette cites: "Jose Mitrani, a civil engineer and professor at Florida. International University in Miami, was ... Florida’s official damage assessment team. ... After Hurricane Andrew, Florida code advisers ruled OSB sheathing inferior to plywood."
- In addition to citations & references found in this article, see the research citations given at the end of the related articles found at our suggested
CONTINUE READING or RECOMMENDED ARTICLES.
- Carson, Dunlop & Associates Ltd., 120 Carlton Street Suite 407, Toronto ON M5A 4K2. Tel: (416) 964-9415 1-800-268-7070 Email: info@carsondunlop.com. Alan Carson is a past president of ASHI, the American Society of Home Inspectors.
Thanks to Alan Carson and Bob Dunlop, for permission for InspectAPedia to use text excerpts from The HOME REFERENCE BOOK - the Encyclopedia of Homes and to use illustrations from The ILLUSTRATED HOME .
Carson Dunlop Associates provides extensive home inspection education and report writing material. In gratitude we provide links to tsome Carson Dunlop Associates products and services.


