 Frost-Proof Sillcock Installation& Leak Repair
Install, diagnose & fix leaky frostproof sillcock anti-siphon valve
- POST a QUESTION or COMMENT about outdoor wall faucets, sillcocks, hose bibbs, and freezeproof or frostproof faucets or faucet troubleshooting
Diagnose & fix frostproof or anti-siphon type hose bibb & sillcock leaks.
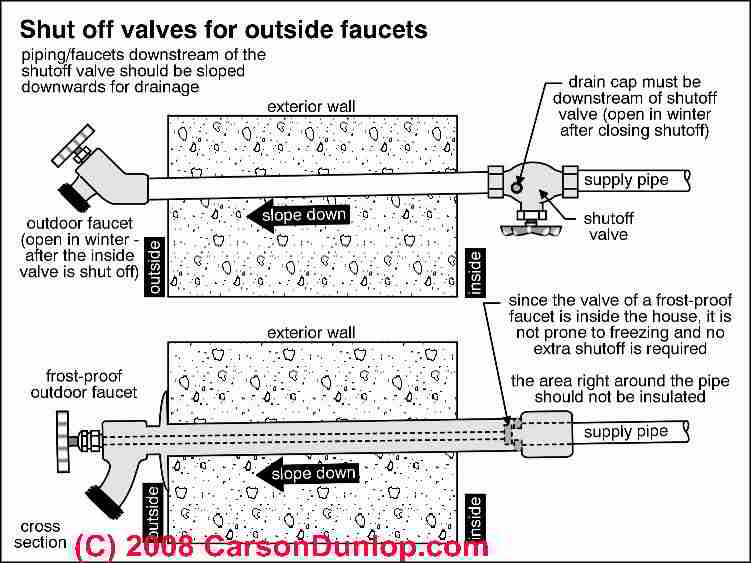
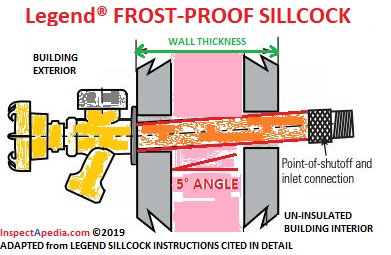
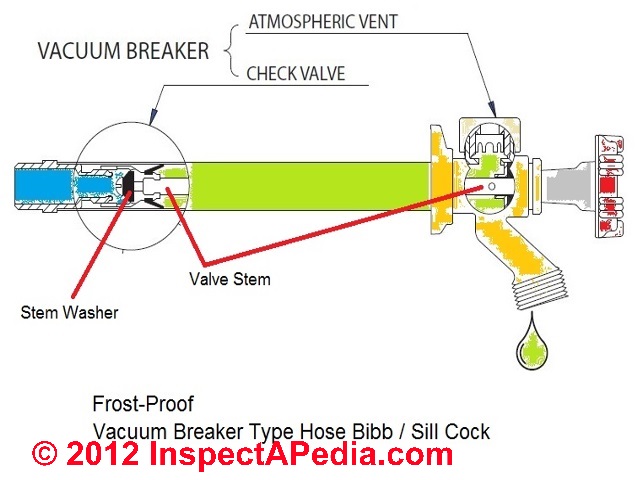
As our illustration at page top explains, the long shaft (green) of this frost-proof faucet permits the actual stem washer and valve seat to be located on the warm side of the building exterior wall.
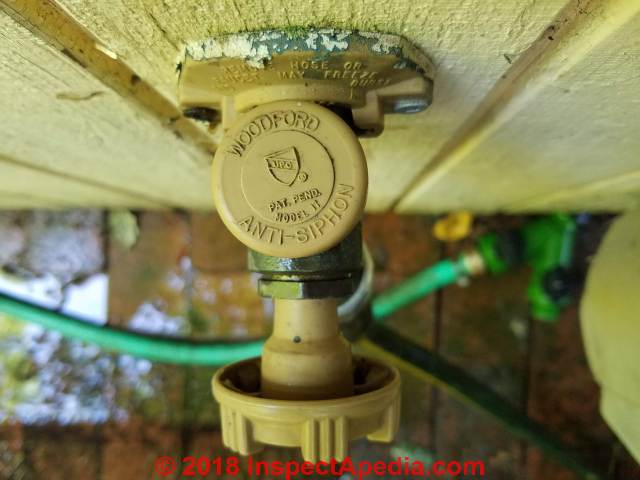
Using the popular Woodford Model 17, we illustrate & explain the steps in replacing a leaky frostproof sillcock also referred to as an anti-siphon valve as it includes that feature as well.
InspectAPedia tolerates no conflicts of interest. We have no relationship with advertisers, products, or services discussed at this website.
- Daniel Friedman, Publisher/Editor/Author - See WHO ARE WE?
How to Install or Repair a Leaky Frost-proof Outdoor Faucet SillCock or Hose Bibb
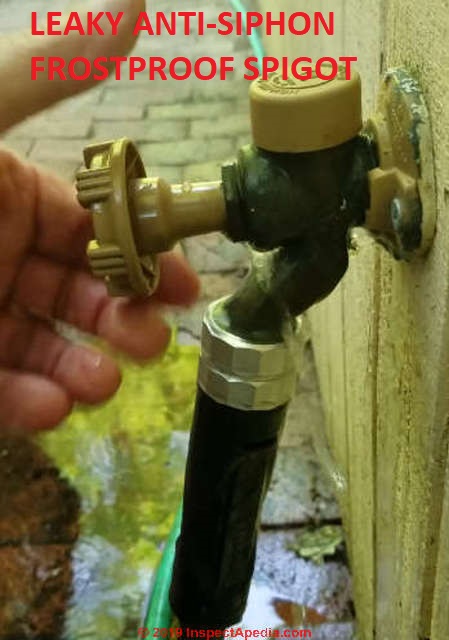
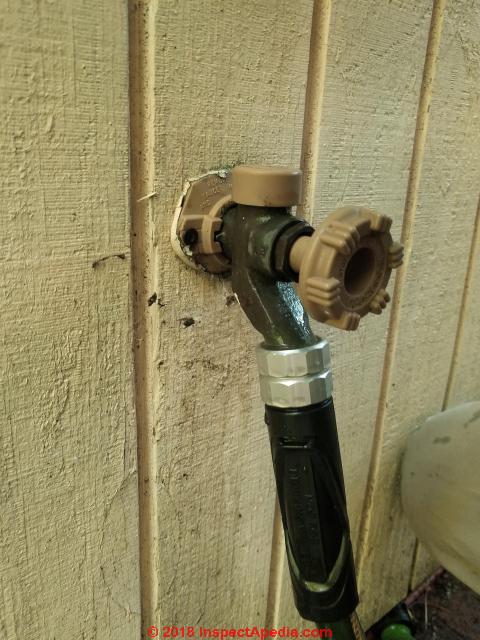
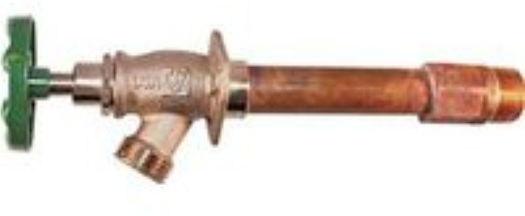
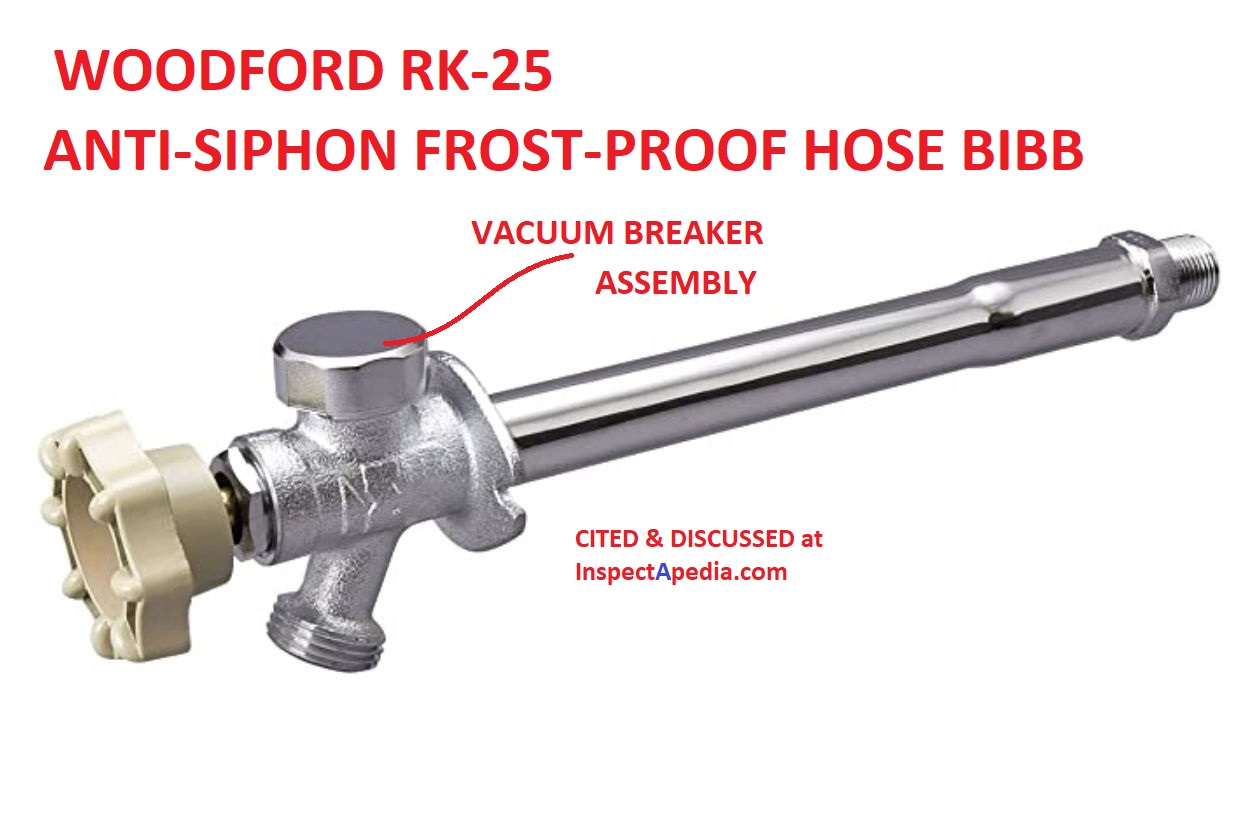
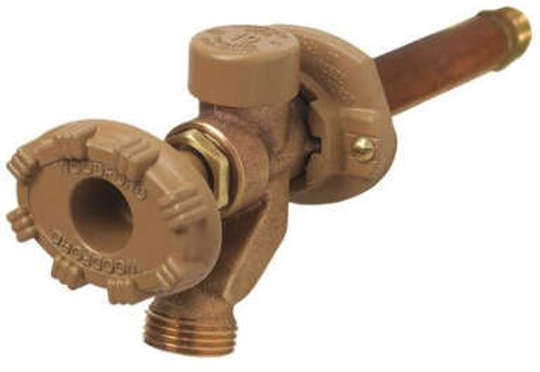
Frost-proof or freeze-proof outdoor hose bibbs or sillcocks use longer-stem frost-proof outdoor faucet (illustrated in our photo above anbd shown in a sketch below).
These are required in new construction in most jurisdictions. This outdoor includes a vacuum breaker is designed to permit water to drain out of the faucet when the faucet is closed.
Article Contents
- WHAT IS an ANTI-SIPHON FROST-PROOF FAUCET?
- WHY USE an ANTI-SIPHON FAUCET / VALVE?
- IDENTIFY OUTDOOR FAUCET TYPE: Frost-proof vs Traditional Hose Bibb use different parts so we start by figuring out which type we are repairing.
If your outdoor hose bibb or faucet looks like the one above, repair steps are given on this page.
YARD HYDRANT vs FROST-PROOF FAUCET - what's the difference? - FROST-PROOF VALVE LEAK REPAIR - STEP by STEP - fix a frost-proof valve that drips or leaks at the faucet mouth or at its shutoff valve stem - is the leak at the valve itself or at its anti-siphon device?
- VALVE ANTI-SIPHON DEVICE REPAIR - fix a leaky anti-siphon device at the valve top
- WHERE to BUY ANTI-SIPHON FROST-PROOF FAUCETS - brands, models, installation instruction PDFs
Sketch above, courtesy of Carson Dunlop Associates, a Toronto home inspection, report writing and education firm.
This article series describes outdoor faucets, hose bibbs, sillcocks, or hose hookups, how they work, where they should be installed, freeze-proofing hose hookups, and troubleshooting or repairing stuck, broken, or dripping outdoor faucets.
...
Basics of Anti-Siphon Frost-Proof Outdoor Faucets
Explanation of the faucet's anti-siphon feature
The vent (allowing air into the faucet) combines with a check valve to prevent back-flow of unsanitary water from a garden hose backwards into the building water supply piping.
Explanation of the faucet's frost-proof feature
The long faucet body of a frost-proof hose bibb is long enough to extend fully through the building exterior wall or foundation and into indoor or heated space, places the actual shut-off stem washer and valve-seat inside the building.
The sketch above, showing the two types of outdoor water faucets is provided courtesy of Carson Dunlop Associates, a Toronto home inspection, education, and report-writing company.
Slope the Frost-Proof Faucet Down Towards its Mouth
Frost-proof outdoor faucets are installed with the faucet body sloping down from its connection inside the building. The low point should be the faucets opening that should also be facing down.
This position assures that when the faucet is turned off, any water remaining inside the faucet body will drain fully.
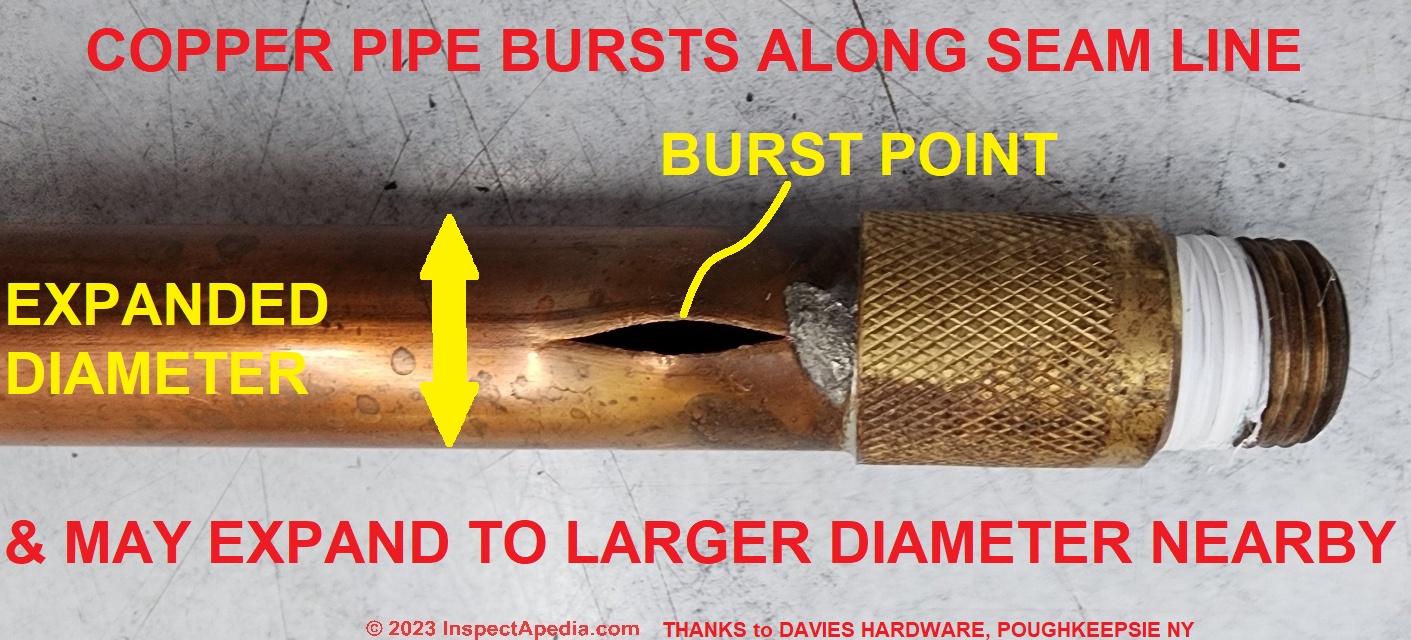
Our friends at Davies Hardware, 806 Main St. in Poughkeepsie, NY showed us this frozen, burst "frost proof" sillcock" as an example of what happens if the faucet is improperl-installed sloping down towards the inside of the building.
Our detailed photo below shows that the pipe burst along what appears to be a manufacturing seam or stress line.
Davies also warns that when repairing frozen burst copper pipe or tubing, you may have to cut out and replace more than you thought: the same forces that split the pipe inside the building at its low-end (that held water that then froze), also expand or "stretch" the diameter of the copper tubing nearby.
As a result you may find that just cutting out the split section of a frozen, burst copper pipe won't be enough. The remaining pipe end may still be too large to fit into a copper sweat fitting like a coupling or union. You'll need to cut back more of the frozen, expanded copper pipe.
Don't Leave Garden Hose Connected to Sillcock
Watch out: as we explained when describing standard compression type hose bibbs, you should never leave a garden hose attached to the outdoor faucet in winter.
Even with a frost-proof faucet, water in the hose may add to the risk that the faucet will be freeze damaged by preventing the faucet from draining fully even when it is turned to the "off" position.
...
What Kind of Faucet Have I Got?
Before starting to tear things apart or to buy repair parts, let's check that we know what kind of faucet we're repairing: the procedures and parts are not the same.
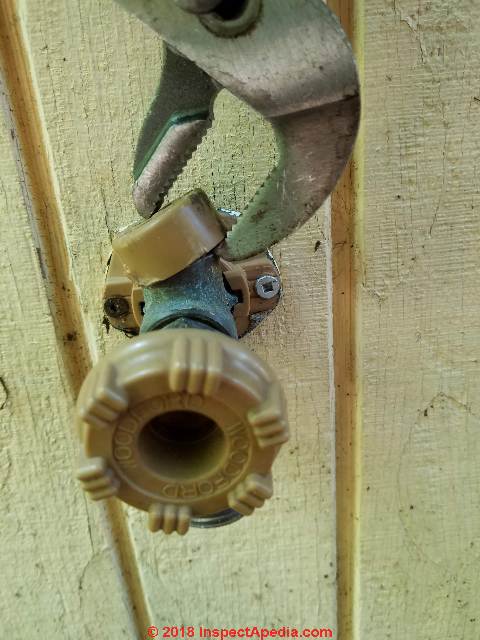
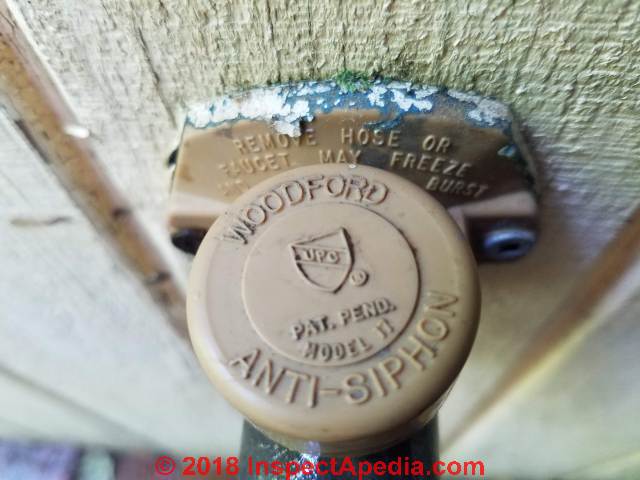
Our photo above is a typical frost-free anti-siphon faucet, or "Woodford" valve. Repairing that faucet is discussed here on this page.
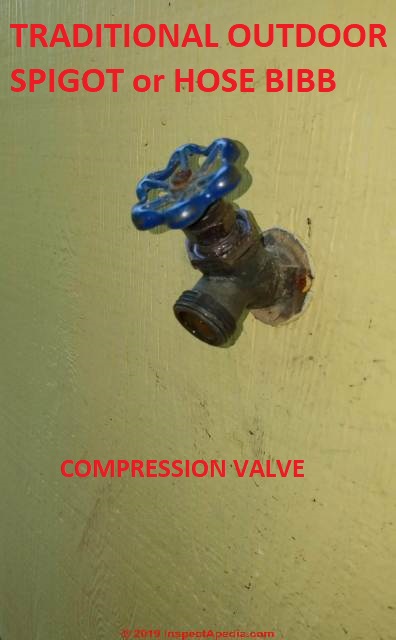
If your outdoor faucet looks like our next photo shown below and if needs repair, it is NOT a frost-proof anti-siphon valve, it's a traditional compression valve faucet or spigot. You want to see the leak repairs starting
...
Why do we Want an Anti-Siphon Faucet?
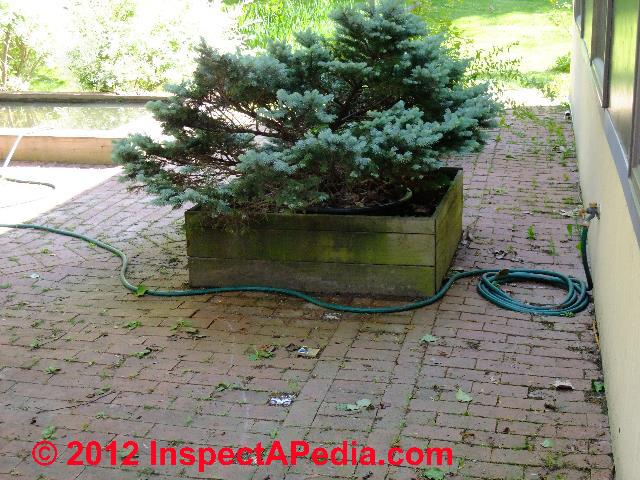
How might we get backflow from a garden hose into the building piping? Easy. Suppose you are filling an above-ground pool, or a fish pond, with your garden hose.
The above-ground pond in our photo at left includes three levels, at least two of which are high enough to cause water back-flow when the pond fill-hose is left connected as shown in our photo.
As long as the upper surface of water in such an outdoor water container is higher than the hose bibb location on the building, the potential for back-flow occurs.
Back-flow of water from such a source through an open hose bibb faucet would then occur if the building happened to lose water pressure.
Also see CROSS CONNECTIONS, PLUMBING.
...
How to Repair Sillcock Leaks at the Anti-Siphon Valve
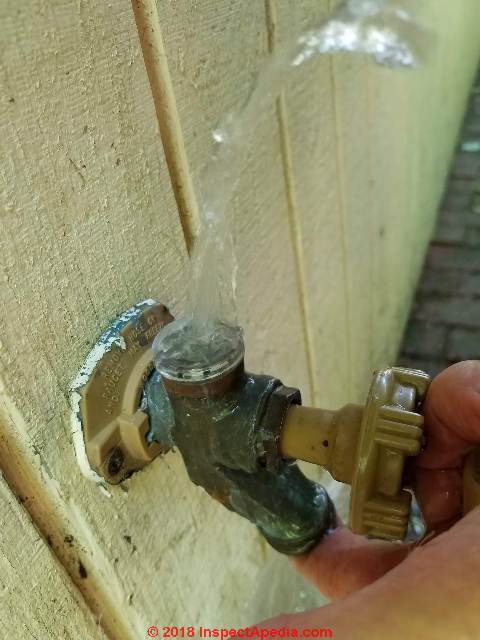
This leaky anti-siphon / frost-proof hose bibb is the same one as shown earlier in this article, before it leaked.
The hose bibb worked perfectly for about fifteen years before in a sudden change of behaviour it began gushing water when the faucet was opened.
Repair a frost-free anti-siphon sillcock
Reader question: I would like to replace the only the stem assembly (4 inch, spring loaded) in my frost free anti-siphon sillcock. Where the handle attaches the stem assembly is very bent.
Also, to replace the whole sillcock would require I open a hole in the bedroom wall.
I'm having trouble finding the replacement part and would like to know if anyone can identify the attached stem assembly and know where I could find one. Thanks - 2018/06/27 Jim said:
Moderator's Reply:
Take the valve stem that you removed to a good hardware store and you may find they have a plethora of replacements one of which will match.
You can also look through the frost-proof sillcock brands and installation instructions found at
WHERE to BUY ANTI-SIPHON FROST-PROOF FAUCETS - brands, models, installation instruction PDFs
Or if you can see a brand and model on the sillcock, such as the Woodford No. 17 shown above on this page, you can buy the exact parts from your local plumber supplier or you can order replacement parts from online vendors.
I agree that for a typical frost-proof sillcock installed in a building wall above ground you will have no access without cutting an access opening in the wall from inside or outside.
The Woodford sillcock shown above is installed in a wall outside of a bathroom on a wall abutted inside by a cast iron bath tub. There is no access from inside the building whatsoever.
You'd have to demolish the bathroom to remove the bathtub.
A plumber having to replace the entire sill-cock would cut an access opening from outside, make the repair, then repair the wall.
Reader follow-up:
Found the frost free anti-siphon hose bib at a local plumbing supply store
It only cost about $20. I will rob the stem assembly from the new hose bib and insert it into the old (still good) hose bib. Will save time and money from cutting a hole in my wall to get to the pipe connection and replace the whole thing.
Moderator Reply: How to Replace the Anti Siphon Valve on a Frost Free Woodford No. 17 hose bibb
Very smart, Jim.
But before replacing the valve stem, let's be sure we understand just where the leak is occurring.
You can identify the brand and model of your frost-free anti-siphon faucet by looking at the cap - photo below.
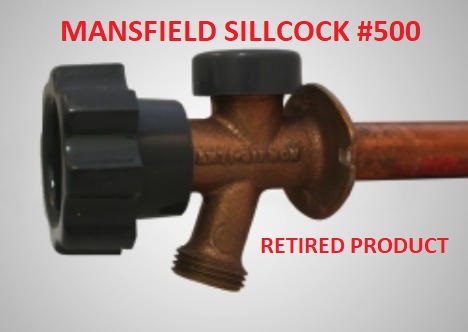
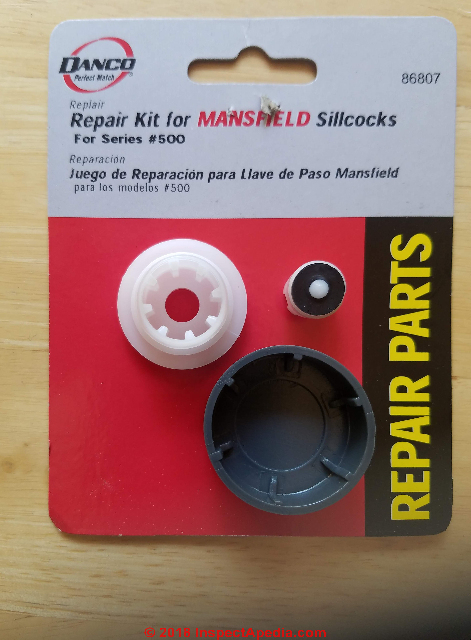
Mansfield sillcocks series #500 use a gray plastic cap on the anti-siphon valve.
Woodford sillcocks use tan colored plastic and the anti-siphon valve cap is marked WOODFORD MODEL 17 ANTI SIPHON.
Find the Exact Sillcock Leak Before Trying to Repair It
Now look very closely at where water is leaking out of the valve.
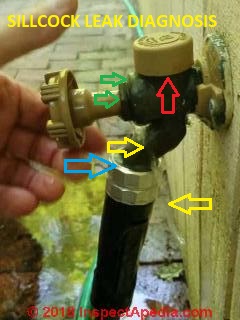 In our photo above water is gushing out of this sillcock valve, but we need to look more-closely to see exactly where the leak is originating. In my photo the yellow arrows point to the gush of water.
The blue arrow points to the most-common leak point at a hose bibb: leaks at the hose connection to the faucet mouth. Remove the hose and replace the hose washer and re-tighten it.
The green arrows point to occasional leaks at the valve stem or its packing washer.
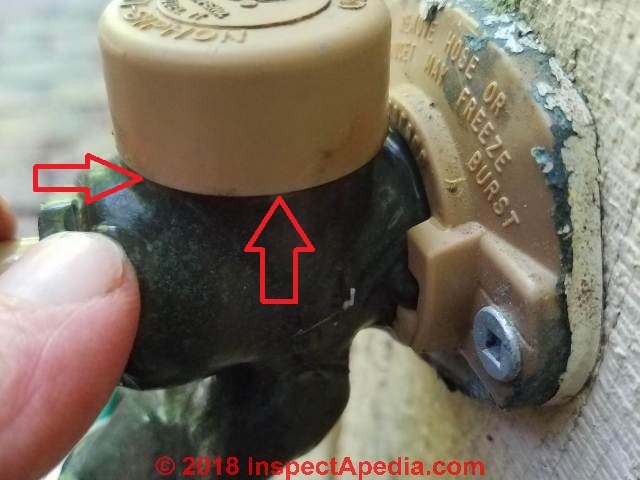
The red arrow points to the point at which water will leak if the hose bibb or sillcock's anti-siphon valve has failed.
Here are three different cases:
- If water leaks from the valve outlet when the faucet handle is closed, (blue arrow)
then the valve stem washer, or (rarely) the valve stem itself may need replacement. - If water leaks around the valve handle stem (green arrows )
then the valve packing or packing washer is leaking and might need to be replaced, though on occasion a slight gentle tightening of the packing nut will stop such a leak. - If water leaks from the plastic cap
covering the anti-siphon valve when the valve is open (red arrow and also the photo below) then the anti-siphon valve assembly (simple plastic parts) should be replaced.
If the leak is at the brown (or gray on some brands) plastic cap on top of the anti-siphon hose bibb like the Woodford No. 17, those parts can be replaced quite easily without replacing the entire valve and without removing the valve stem at all.
Does your frost-free anti siphon valve look like the Woodford model No. 17 I show here?
Other frost-proof sillcocks such as Mansfield have similar features and can be repaired by ordering the proper repair kit for your valve brand and model.
Watch out: repair parts are generally not interchangeable between sillcock brands.
A Mansfield repair kit sold by Danco for the Mansfield-brand Series #500 sillcocks will not, for example, repair a Woodford-brand Model #17 sillcock.
Even though the white plastic anti siphon cap threads will fit into some other brands of sillcocks (such as Woodford) the Mansfield#500 anti siphon valve will NOT work in the Woodford Model #17 - we tried it and found that it simply leaked like mad.
Woodford sells sillcock faucet repair kits for all of their product line through plumbing suppliers, building supply stores, as well as online vendors and by their own website given at the end of this article.
All of these parts can be replaced on the Woodford hose bibb working from outside.
However if the leak problem is only at the anti-siphon valve a simpler and less costly repair will be sufficient: remove the plastic cap, un-screw the anti-siphon valve, and replace the two parts (the threaded fitting and the washer-bearing pressure-operated valve seal inside) with the parts from the repair kit.
Then snap the new plastic cover cap in place.
...
How to Replace the Anti Siphon Valve on a Woodford Model 17 Hose Bibb
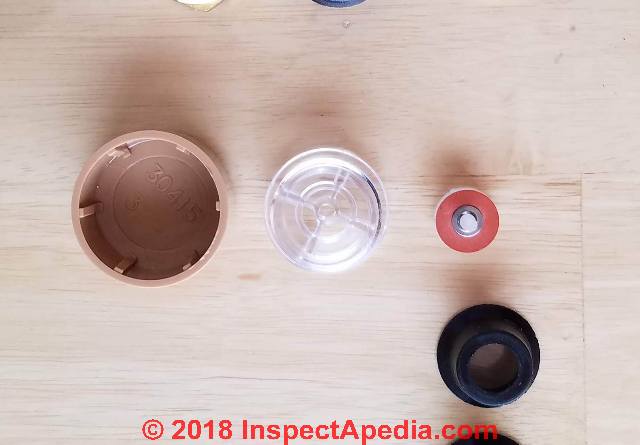
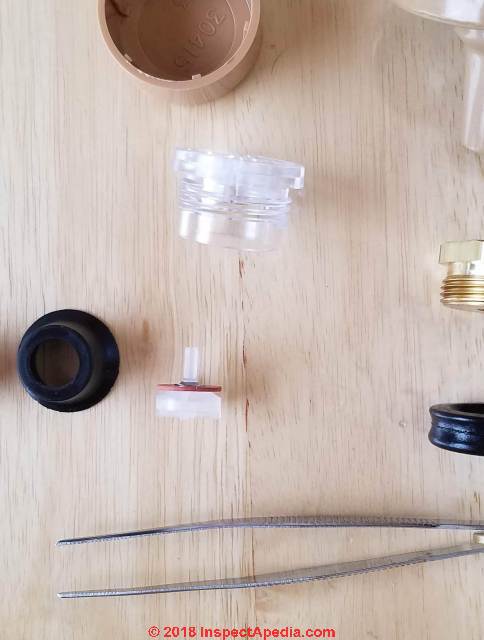
Above are the three parts you'll need.
At your local plumbing or hardware store as well as from online vendors or building suppliers you can buy a replacement kit that includes just these items.
Step 1: remove the plastic anti siphon valve cap
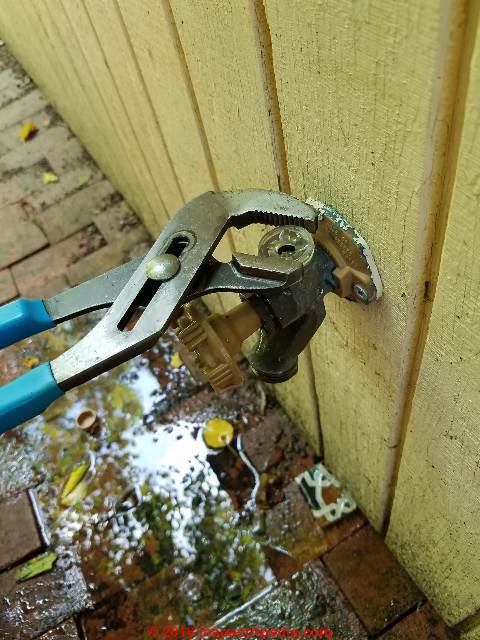
Step 2: un-screw the anti-siphon valve
My photo above shows what happens if you turn water on at this point: that's because the anti-siphon valve or its washer is dislocated or the valve is damaged.
I've successfully disassembled, cleaned-up and re-assembled old anti-siphon valve parts to repair a leak like this but a better approach is to simply replace the parts. That's a more-reliable repair.
My photo just above shows loosening the plastic anti-siphon valve assembly.
Once loosened, you can un-screw this plastic part by hand.
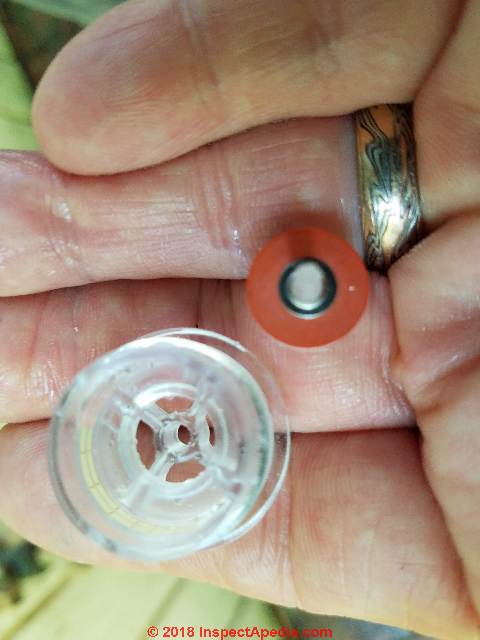
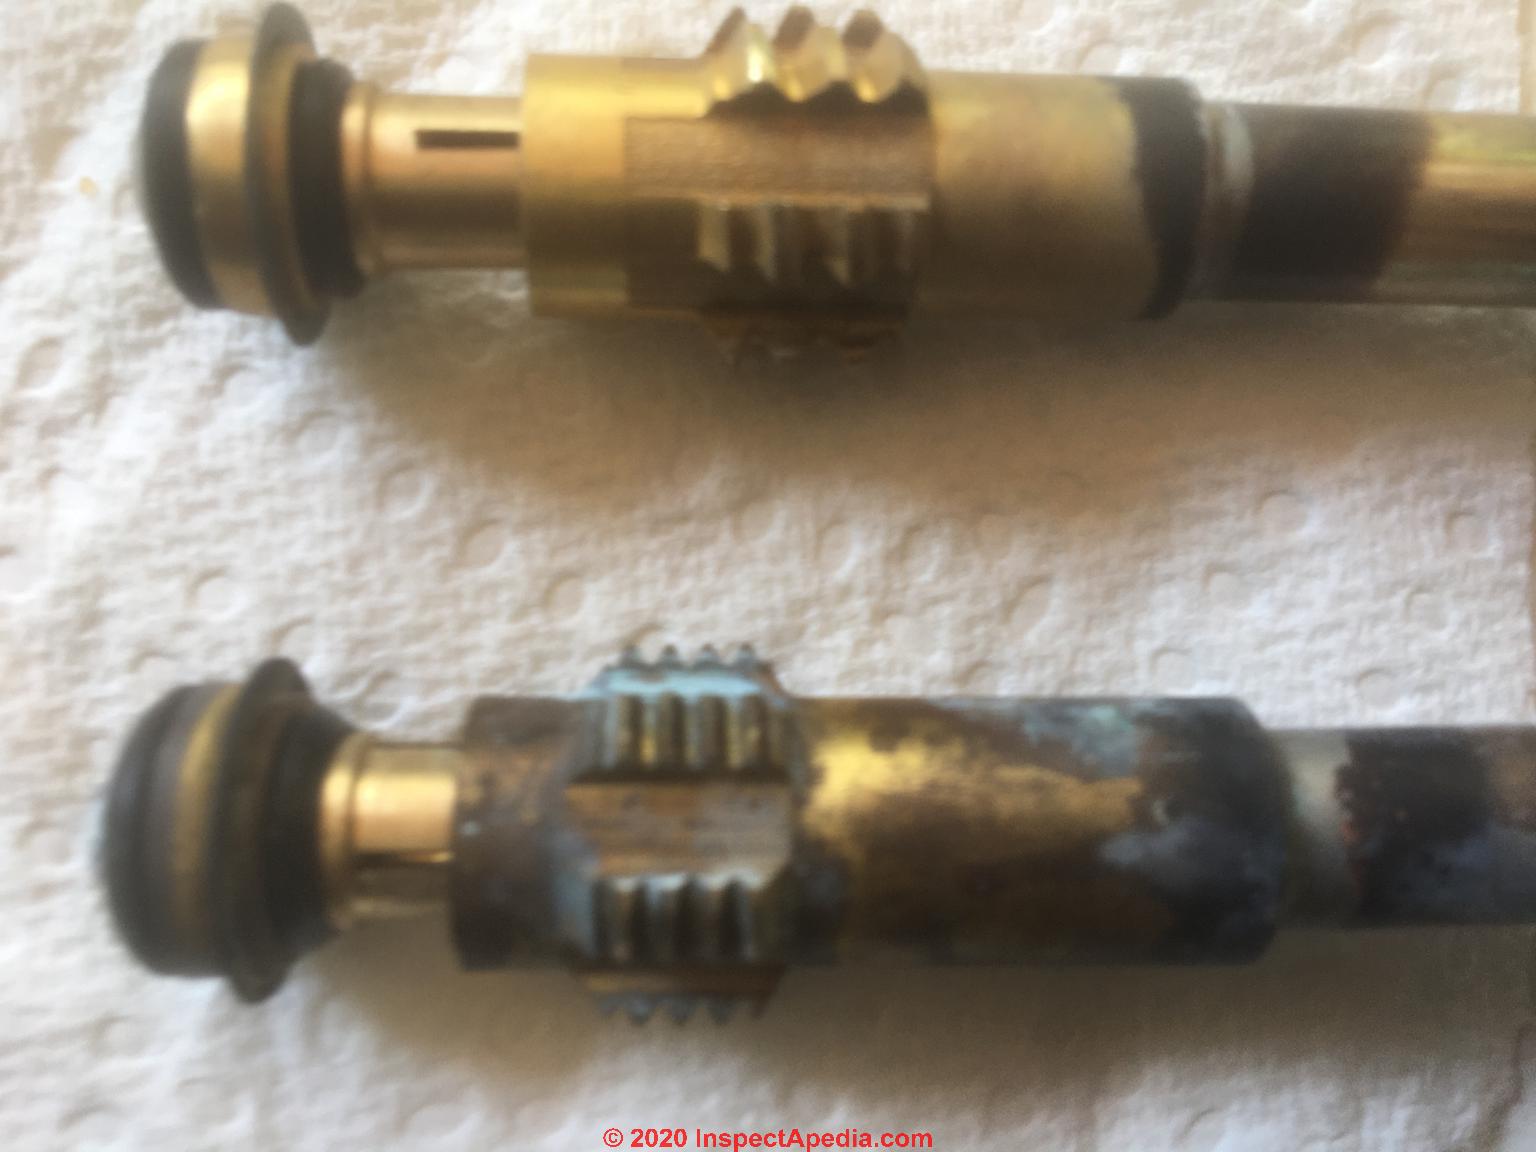
Below I'm holding the old anti-siphon valve parts (first photo) and the replacement parts (second photo).
The replacement anti-siphon valve parts look different but they work just fine in older Woodford Model 17 sillcocks.
Step 3: insert the new anti-siphon valve parts in the proper position
First put the smaller valve component into the underside of the clear plastic cap so that the washer is up inside the cap, not down towards the faucet body.
Turn this assembly over so that you can thread it carefully into the brass body of the sillcock.
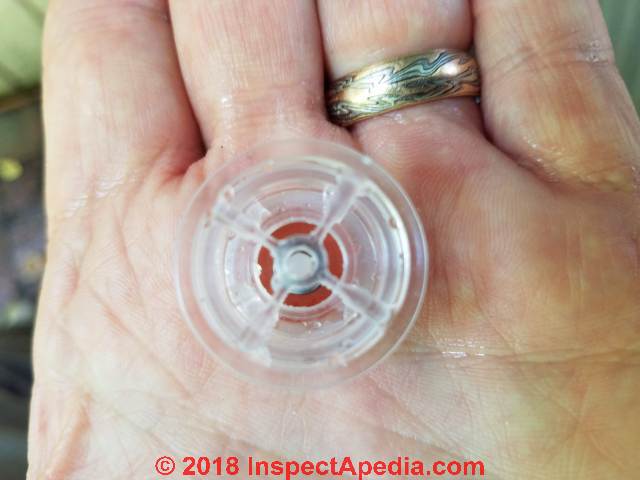
In my photo I'm holding the assembled valve with its upper side "up" - you can see through the clear plastic that the plastic pin on the red washer-bearing plunger is through the small hole in the center of the clear cap.
Take care not to cross thread the anti-siphon valve plastic part.
If the small center plunger falls down into the valve, use a tiny screwdriver or equivalent to center it in the valve head space so that when you screw down the threaded valve top the plunger moves into the hole in the center of the top.
Step 4: Tighten the replacement anti siphon valve
Tighten the assembly by hand and then gently snug it down with your gooseneck pliers. Don't over-tighten the valve and take care not to damage these plastic parts.
Step 5: Replace the anti siphon valve plastic cap
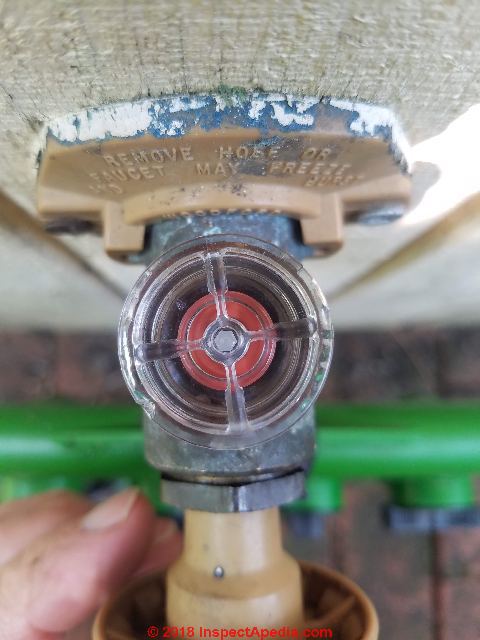
Watch out: before replacing the cap, turn on the hose bibb - open the faucet handle - and verify that the sillcock's anti-siphon valve is not leaking.
You'll see water enter the clear plastic valve top and you may notice the red washered plunger snap up against the under-side of the valve top.
Water should not be leaking out of the anti-siphon valve at this point though of course, water is pouring all over your feet as you've opened the sillcock.
In my photo above [Click to enlarge any image] you may see that there's water inside of the valve, because I've opened the sillcock for testing.
Below, I've replaced the original cap - it just snaps in place.
You can use the new plastic cap. But I re-installed the old plastic cap for a trial run as it's obvious that you can't remove the plastic cap again without chewing it up with your pliers.
I kept the new un-damaged cap in reserve, planning to install it to replace the ugly chewed-up original cap once I'm sure that the repair was successful.
Update: the repairs shown on this page were made in 2018; as of October 2024 the sillcock has continued to perform perfectly with no furhter leaks.
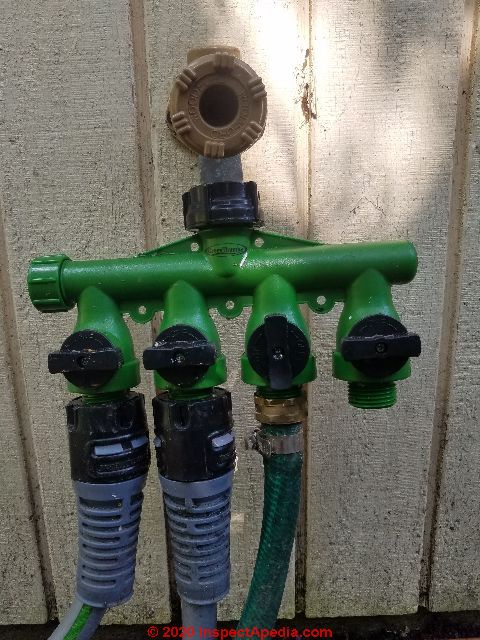
Step 6: Mistake to Avoid: A Closed Hose Manifold will Blow the Anti-Siphon Valve on a Sillcock
Watch out: especially if water pressure is high at your building, if you install and close any type of shutoff valve downstream from the sillcock's outlet and then open the sillcock valve the water pressure may blow out the anti-siphon valve.
To avoid that fiasco, BEFORE OPENING THE SILLCOCK be sure that AT LEAST ONE DOWNSTREAM VALVE is OPEN.
Watch out: excerpt from instructions for installation of the Legend Valve sillcock cited just below:
Avoid the use of hose bibb accessories such as hose
manifolds, hose Y-splitters or sprinkler timers, which
may cause the TM-550 to malfunction. .
The TM-550 is designed and certified in accordance with ASSE Standard 1019 Section 1.2.1, for non-continuous pressure service: Not more than twelve hours of continuous water pressure. Outlet-mounted devices may cause sudden or continuous, damaging.
...
Replacing the Entire Frost-Proof Anti-Siphon Sillcock Valve
 Watch out: while you cannot simply pull out a sillcock that was soldered in place, valves are sold terminating in either a solder-type or sweat fitting OR in a threaded fitting.
IF you knew that your valve is at threaded fitting installation, it might be possible to unscrew an existing sillcock like the Woodford valve shown below from outside the building.
You would remove the screws in the plastic mounting flange and then attempt to remove it, wrap the replacement sillcock valve threads with teflon tape and screw the new one back in place.
But there are some serious risks with this "easy" sillcock replacement approach:
- Flooded wall cavity:
If you were not able to completely shut off water supplying the sillcock when you remove it you will flood the wall cavity, wet the insulation, and risk a serious water damage or mold contamination problem. - Wet wall cavity:
Even if you were successful in shutting off the water supplying the sillcock when you remove it some water is likely to spill out of the valve as well as the supply pipe into the wall cavity: same hazards as above, though smaller in scope. - Continued leaks into the wall cavity:
because you cannot see the plumbing connection between the sillcock and the receiving plumbing fitting in the wall cavity, there is a risk that your connection leaks continuously, ultimately causing the same sort of damages as in warnings #1 or #2 above.
To avoid these risks, if you cannot repair the hose bibb / sillcock by installing a repair kit or a new valve stem and repair kit while leaving the valve body in place, I'd cut an access opening in the exterior wall or in the interior drywall if that location is accessible, and I'd inspect for leaks before, during, and after the repair.
...
Difference between Anti Siphon Valve Hose Bibbs, Sillcocks, & Yard Hydrants
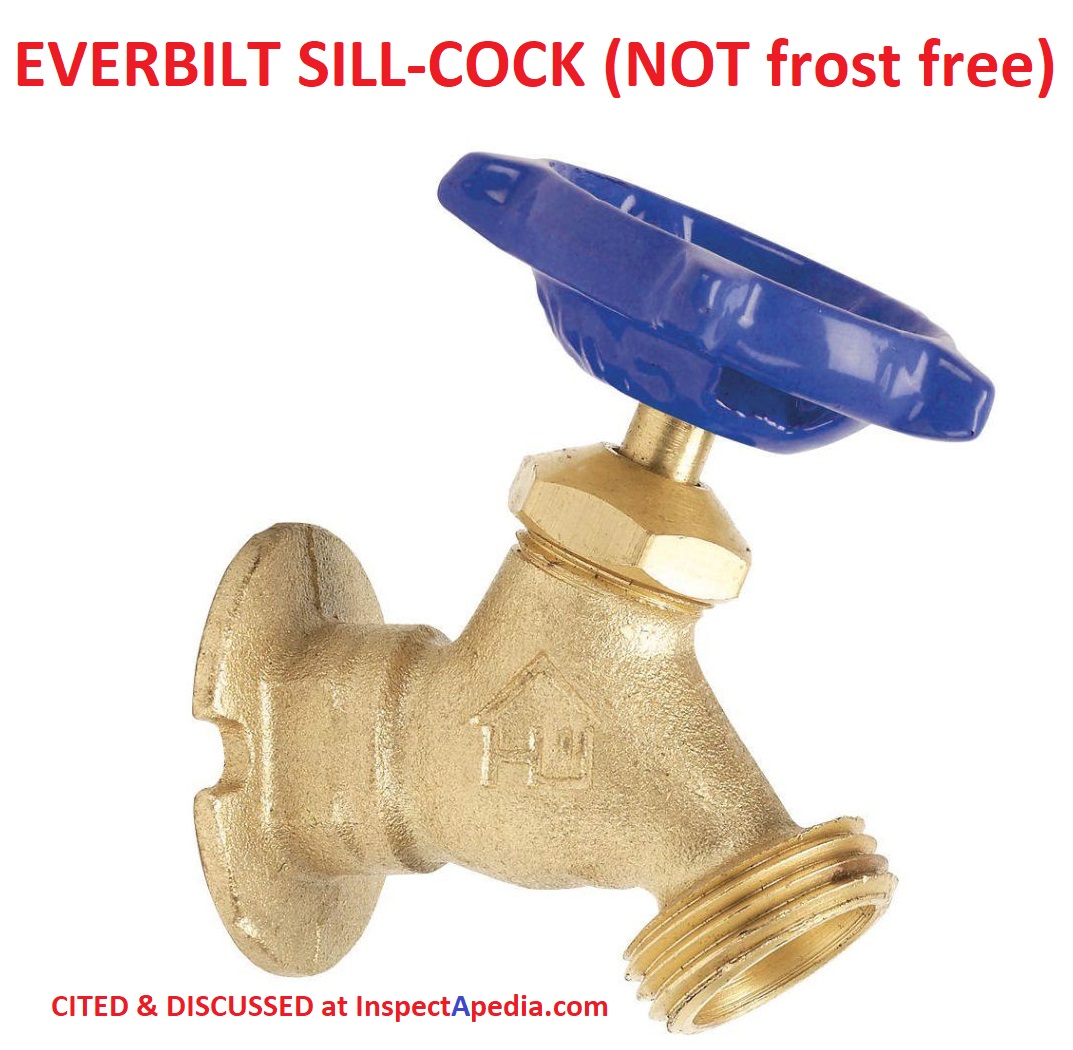 What's the difference between a regular sillcock, a frost-free sillcock, and a yard hydrant?
Sillcock: Here we illustrate first a conventional sillcock or hose bibb intended to be mounted on the exterior wall of a building, supplied by building cold water (usually) piping.
This is NOT a frost-proof sillcock and this valve does NOT include an anti-siphon feature.
This sillcock valve is intended for use in climates where freezing is not a concern.
In a freezing climate where hose bibbs like this one are installed, the plumber should have installed a shut-off valve inside the heated building interior.
Before freezing weather arrives the indoor shutoff valve is closed and then the sillcock or hose-bibb is opened to drain.
Watch out: be sure you shut off the water supply to this valve indoors before freezing weather. Otherwise the valve and piping near it can freeze, burst, and may leak into the building, causing costly damage.
Watch out: when you turn off the in-building water supply to this type of hose bibb or sill cock, remember to go back outside and open the valve so that it will drain completely - to avoid possible frost damage to the valve.
When you open the valve to drain it check to be sure that water stops dripping in a few minutes. If water continues to run or drip then the indoor shut-off valve is not fully closed, or is leaky and needs repair.
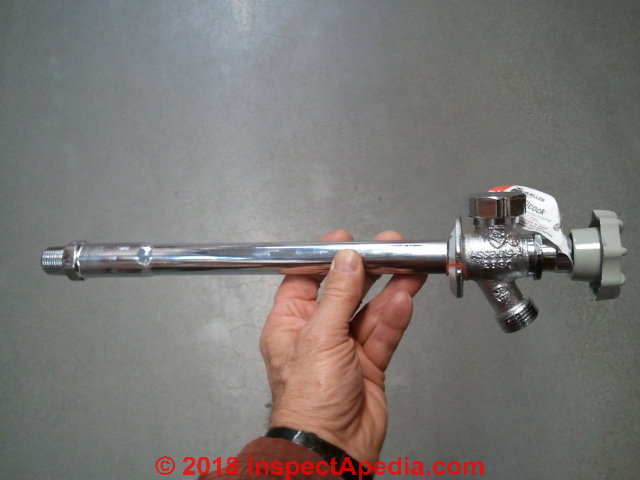
Frost-Proof Sillcocks like the valve shown just above (from a Home Depot store) are designed to drain out when turned off.
The same features that improve drainage out of the valvce when it's closed provide an anti-siphon feature that prevents back-siphonage of hose water (or nasty water into which the end of the hose rests) back into the building water supply where it might contaminate building piping.
The photo shows the long valve body that assures that the actual shutoff is inside the heated space.
Sillcocks discussed in the article above, also called "hose bibbs" are used to provide an outdoor water or hose hook-up at a building wall.
The water supply piping to the sillcock is routed through the building, in cold climates through a heated space, then must pass through the building wall to the exterior where a hose connection is provided.
Sillcocks may not be lead-free - including those listed below.
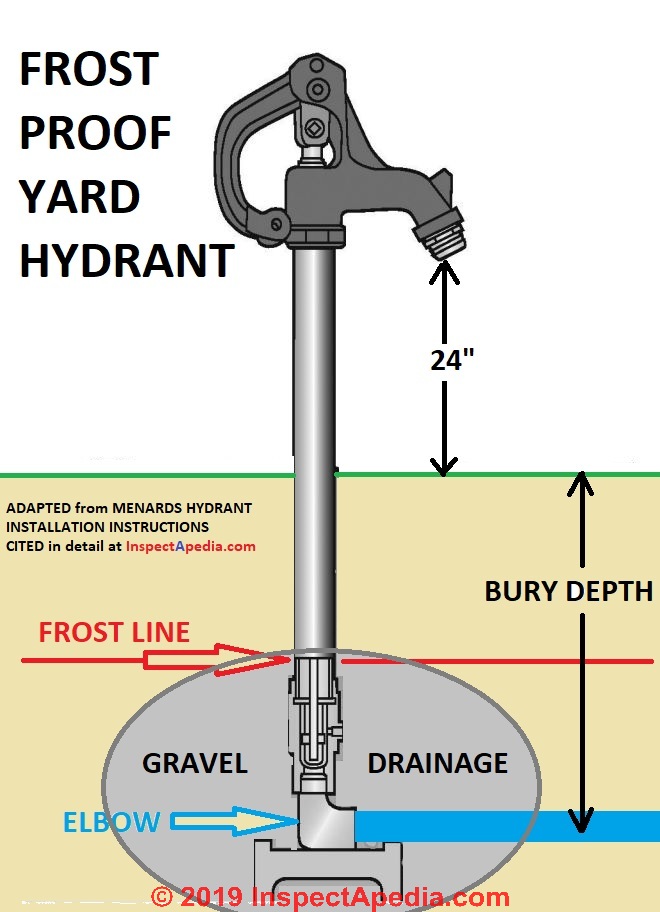
Frost Proof Yard Hydrants: a yard hydrant is usually a free-standing outdoor water supply spigot used for watering or for livestock.
It is fed by underground water piping. As you'll note from our illustration below, adapted from Menards' yard hydrant installation instructions cited further below, to be frost-proof or freeze-damage-proof, there are several features required:
- The hydrant's valve should be below the frost line - the deepest point in the soil that is expected to freeze during cold weather
- The water supply piping to the hydrant should be below the frost line
- A gravel bed is provided around the yard hydrant's buried valve. This gravel allows the hydrant's vertical standpipe to drain out when the hydrant valve is closed.
- Typically water pressure to the hydrant is at 80 psi or less and recommended operating pressure is 20-40 psi.
- Support (a concrete block or large stone) is placed under the elbow at the bottom of the hydrant to prevent settlement of the hydrant assembly in loose soil caused by hydrant drainage.
- Watch out: if the hydrant is to be installed below a paved area or inside of a barn or outbuilding, a drain pipe and drywell or equivalent must be provided into which the hydrant can drain when it's turned off.
Otherwise hydrant drainage may result in a muddy area inside the building or a wet area in or frost damage to the pavement.
Watch out: most plumbing codes will require a vacuum breaker on the yard hydrant's water supply piping to prevent potential back-contamination of the building water supply piping and water itself.
Watch out: some sillcocks and yard hydrants, even including anti-siphon ball valves and sillcock models contain lead and do not comply with the U.S. Safe Drinking Water Act.
Those valves should NOT be be used anywhere that water passing through them will be consumed by humans nor (in our OPINION) other animals including livestock and for fish ponds.
Watch out: Never leave a hose attached to the hydrant after use. This will prevent the hydrant from draining properly and will cause the hydrant to freeze in cold weather.
Leaving the hose attached could also siphon contaminants back into the water system. - this quote appears in literature from Everbilt and from Watersource.
...
Where to Buy & Installation Instructions for Sill-cocks & Hydrants
There is a nearly-overwhelming number of sillcock brands that specifically advertise that they are lead free, including some of the following.
- American Valve FREEZE-PROOF SILLCOCK INSTALLATION INSTRUCTIONS [PDF], Model M73AS, American Valve, retrieved 2019/08/13 original source: https://www.americanvalve.com/perch/resources/pages-from-avm73as-installationv102-19-003.pdf
- ARROWHEAD FROST-PROOF WALL HYDRANT INSTALLATION, USE, REPAIR GUIDE [PDF], Arrowhead 456-06LF 1/2" frost free hydrant, length for 3 3/4" wall thickness (shown above) retrieved 2019/08/13, original source: http://champion-arrowhead.com/media/wysiwyg/PDFs/Frost-Free_Hydrant_Guide.pdf
Arrowhead frost-proof hydrants (sillcocks) are sold in lengths suitable for various wall thicknesses: 4", 6", 8", 10", 12" and 14" walls . This document also includes details on how to de-code the frost-proof sillcock model number to be sure that you're buying the correct device for your wall thickness AND the inlet piping type (such as push-fit, PEX, Crip Pex, threaded copper, sweat copper, etc.
- B&K Industries 104-117 10-inch Frost Free Sillcocks (shown abovem, sold at plumbing suppliers and online at Amazon)
- BMI Canada, BMI FROST PROOF FAUCET INSTALLATION INSTRUCTIONS [PDF] BMI, 3437, Grande Allee Blvd, Boisbriand, Quebec J7H 1H5 Canada, Tel: 1-800-361-1452, also offices in Mississsauga ON, retrieved 2019/08/13, original source: http://www.bmicanada.com/products/bmi_specs_frost_free_installation.pdf
- Boshart Industries, Boshart 0865(P)-Series self-draining vacuum breaker ("anti-siphon) Spec Sheet [PDF]
Boshart Industries, 25Whaley Ave., Milverton Ontario Canada N0K 1M0 Tel: 800-561-3164 Website: www.boshart.com - Cash Acme #24636 Frostproof sillcock, 1/2" x 12" long.
- Everbilt Frost-Proof Yard Hydrant INSTALLATION & ADJUSTMENT INSTRUCTIONS [PDF], sold at Home Depot stores, retrieved 2019/08/13, original source: https://images.homedepot-static.com/catalog/pdfImages/f5/f5f0c554-952d-4a4a-8649-3b85788d9f58.pdf
Excerpt: Watch out: Never leave a hose attached to the hydrant after use. This will prevent the hydrant from draining properly and will cause the hydrant to freeze in cold weather. Leaving the hose attached could also siphon contaminants back into the water system. - this quote appears in literature also from Watersource. - Jomar Valve, Jomar T540-G (lead-free dezincification-resistant brass) [PDF] Jomar Valve, 7243 Miller Dr. Warren, MI 48092 USA Tel: 1-800-325-5690 Web: www.jomar.com
- Legend Valve, MODEL TM-550 MULTI-TURN ANTI-SIPHON FROST-FREE SILLCOCK INSTALLATION INSTRUCTIONS [PDF] Legend Valves, 300 N. Opdyke Rd. Auburn Hills, MI 48326 USA Tel: (800) 752-2082 Website: www.legendvalve.com retrieved 2019/08/13, original source: http://www.legendvalve.com/images/technical/IOM_TM-550_multi-turn_FFSC.pdf
- Mansfield Sillcocks, 4515 East 139th Street
Grandview, MO 64030 USA, Website: www.prier.com, Tel: 800-362-9055 Prier purchased Mansfield's Brass Division in 2007
Note: Mansfield's 500-series Anti-Siphon wall hydrant is a retired product. Parts for the current Prier 400-series sillcock are NOT interchangeable with the older 500-series.
However both Prier and a separate company, Danco Inc., Irving TX USA 75062 sell (made in China) repair kits for that sillcock. - Matco-Norca Valves, Matco 212 Frost Freer Sillcock, Anti Siphon Spec-Sheet [PDF] , 1944 Route 22 PO Box 27 Brewster, New York 10509 Toll-Free: 800-68-VALVE (688-2583) New York Toll-Free: 800-431-2082 Texas Toll-Free: 800-935-5456 Illinois Toll-Free: 844-412-5068 California Toll-Free: 866-532-8306 Website: https://www.matco-norca.com
- Menards YARD HYDRANT INSTALLATION GUIDE [PDF] retrieved 2019/08/13 and 2023/06/24, original source: sp.menardc.com/main/items/media/EAGLE025/Use_And_Care_Manual/y2installinstructions.pdf
- Merrill Manufacturing, MERRILL C-1000 YARD HYDRANT INSTALLATION INSTRUCTIONS [PDF], retrieved 2019/08/13 fdrom suppliesdepot . com original source https://www.merrillmfg.com/product/installation-instructions-c-1000-series-yard-hydrant
- Mueller 104-405 ProLine FrostFree Sillcock Valves (shown above) - sold at hardware stores, plumbing suppliers, building suppliers; there are at least 19 models of Mueller anti-siphon frost-free sillcocks or frost-free hydrants or hose bibbs with varying lengths, materials, dimensions.
- Prier Heavy Pattern Angle Sill Faucets, MANSFIELD STYLE 300-DIAMOND SERIES WALL HYDRANT INSTALLATION INSTRUCTIONS [PDF] Prier, 4515 East 139th Street
Grandview, MO 64030
(800) 362-9055
Fax (800) 362-1463 Website: www.PRIER.com
Prier produces both "Freezeless" wall hydrants such as their 300/400/500 -series Freezeless hydrants (and more models such as the C-134/234 Series Freezeless wall hydrant) , and sill faucets that are not frost-protected.
Excerpt:
PRIER Heavy Pattern Angle Sill Faucets are designed for areas that require water service, but are not subject to freezing temperatures. Typical installations include basements, garages and for outdoor installations in mild climates. The heavy pattern design with solid brass stem assures years of reliable service with minimal maintenance. - Proline frost-free sillcocks, widely sold at plumbing suppliers and online
- Raven Products, #FP-1132-series w/ ceramic cartridge sillcocks, frostproof Website: www.ravenproducts.us - sells only to wholesalers
- SharkBite Frost Free Sillcocks, available from
SharkBite Plumbing Solutions, SharkBite USA 2300 Defoor Hills Rd. NW Atlanta, GA 30318 USA Tel: 1-877-700-4242
SharkBite Canada 74 Alex Avenue Vaughan, Ontario, L4L 5X1 Canada, tel: 1-888-820-0120 retrieved 2020/01/19 original source: https://www.sharkbite.com/
SHARKBITE INSTALLATION GUIDE [PDF] (2018) Reliance Worldwide Corporation 2300 Defoor Hills Rd NW, Atlanta, GA 30318 Phone: 1-877-700-4242 Fax: 1-877-700-4280 rwc.com Reliance Worldwide Corporation (Canada) Inc. 74 Alex Avenue Vaughan, Ontario, L4L 5X1 Phone: 1-888-820-0120 Sales Inquiries: canadasales@rwc.com Orders: canadaorders@rwc.com retrieved 2019/08/13 original source: https://www.sharkbite.com/sites/g/files/rgohfh321/files/2018-05/SharkBite_Installation_Instructions_2018_WEB.pdf - Simmons FROST PROOF YTARD HYDRANT REPAIR INSTRUCTIONS [PDF], Simmons Manufacturing P.O. Box 1509 McDonough, GA. 30253 1608 Highway 20 East McDonough, GA. 30252 USA Tel: (800) 241-1935, retrieved 2019/08/13 original source: http://www.simmonsmfg.com/wp-content/uploads/2012/11/HydrRepairInstr.pdf
- Sioux Chief Sioux-Chief FROST PROOF SILLCOCK ANTI SIPHON OPERATING INSTRUCTIONS [PDF] Sioux Chief, P.O. Box 397 24110 South Peculiar Drive Peculiar, Missouri 64078 U.S.A Tel: 1-800-821-3944 Email: info@siouxchief.com Website: https://www.siouxchief.com retrieved 2019/08/13 original source: https://www.siouxchief.com/docs/default-source/technical-documents/installations/supply/frost-proof-anti-siphon-sillcock---instruction-sheet
- YARD HYDRANT INSTALLATION INSTRUCTIONS [PDF], Fairfield Department of Health, retrieved 2019/08/13 original source: https://www.myfdh.org/pdf/Yard-Hydrant-Installation.pdf
- Watersource, WATERSOURCE YARD HYDRANT INSTALLATION [PDF], Watersource, P.O. Box 3795 Mansfield, Ohio 44907 USA, Tel: 800.346.7611 Website: www.watersourceusa.com retrieved 2019/08/13 from northerntool.com
- Watts Corporation, Series FHB-1, FHB-2 ANTI-SIPHON FROST-PROOF SILLCOCK INSTALLATION [PDF] Watts
USA: T: (978) 689-6066 Watts.com
Canada: T: (905) 332-4090 Watts.ca
Latin America: T: (52) 81-1001-8600 Watts.com
Watts also sells a lead-free series LF8 hose connection vacuum breaker that is an add-on vacuum breaker between an existing hose bibb and a garden hose.
Excerpts from product description:
Series LF8 is a line of unique vacuum breakers specially made to permit the attachment of portable hoses to hose thread faucets.
Designed to prevent the flow of contaminated water back into the potable water supply, these devices require no plumbing changes and screw directly onto sill cocks. The Series LF8 features Lead Free* construction to comply with Lead Free* installation requirements.
Series LF8 can be used on a wide variety of installations, such as service sinks, swimming pools, photo developing tanks, laundry tubs, wash racks, dairy barns, marinas and general outside gardening uses. - source: http://media.wattswater.com/ES-LF8.pdf 2018/07/17 - Webstone Valves (a NIBCO) brand, HOW TO SWT A BALL VALVE Installation Instructions [PDF] Webstone, a brand of NIBCO 60A Solferino Street Worcester, MA 01604 USA Tel: (800) 225-9529 retrieved 2019/08/13 original source: http://www.webstonevalves.com/customer/wecoin/PDF/swt_instructions.pdf
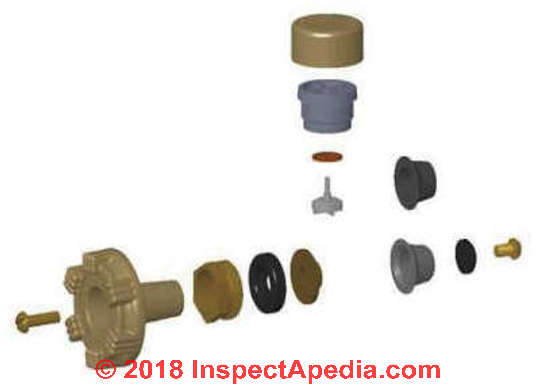
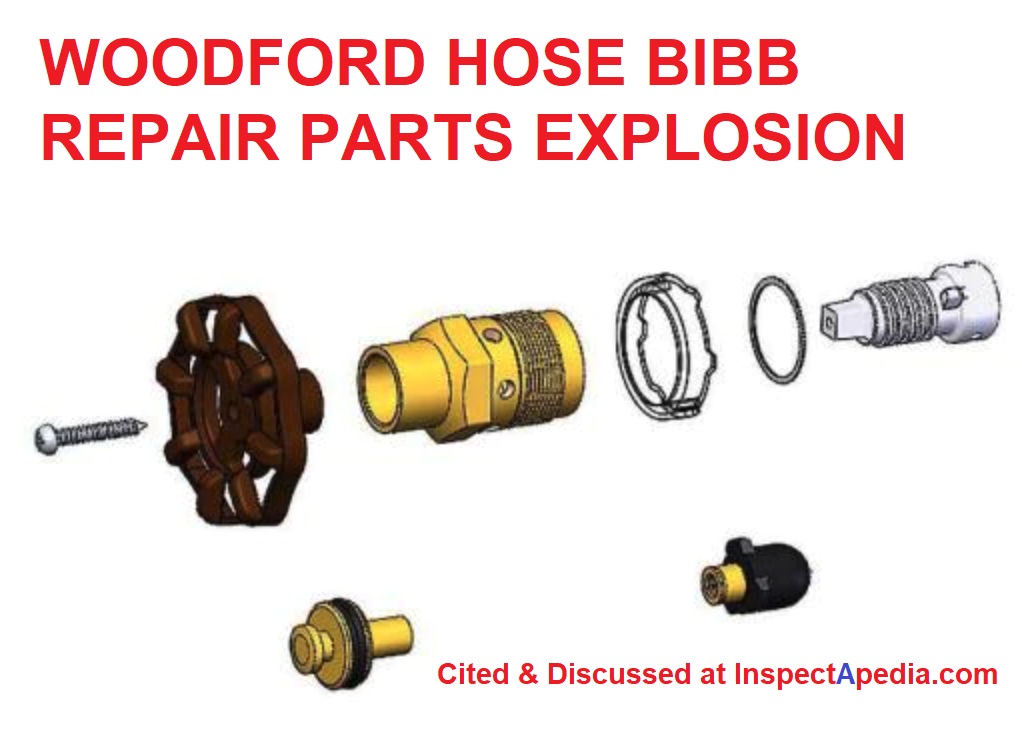
Below we show a parts explosion giving details of the repair parts in a Woodford valve.
- Woodford ANTI-BURST FREEZELESS WALL FAUCET INSTALLATION INSTRUCTIONS [PDF], Models 16 (without anti-siphon) & 19 (with anti-siphon protection), Woodford Manufacturing Company, 2121 Waynoka Rd., Colorado Springs CO 80915 USA, Website: www.woodfordmfg.com, Tel: 800-621-6032, email: sales@woodfordmfg.com
Woodford is a division of WCM Industries, Inc. retrieved 2019/08/13 original source https://www.woodfordmfg.com/woodford/Installation/16-19%20Installation%20Instructions.pdf - other manufacturers, varying by country.
...
Reader Comments, Questions & Answers About The Article Above
Below you will find questions and answers previously posted on this page at its page bottom reader comment box.
Reader Q&A - also see RECOMMENDED ARTICLES & FAQs
Match the threads on replacement sillcock valve stems
@Tony Paccione, I had that "turn forever" problem for a sillcock valve with a new stem I just bought.
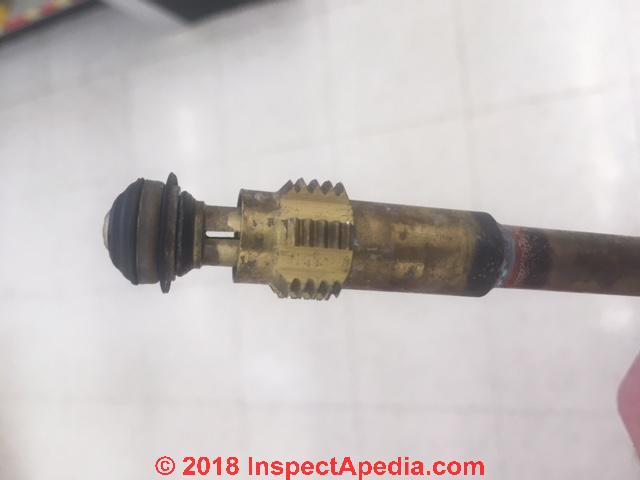
Finally, by comparing the old-vs-new stem, I immediately saw the reason: the stems were alike EXCEPT for the thread pitch.
The advice from danjoefriedman is important -- in addition to checking the thread condition, realize that the "same" stem isn't really the same unless it's the same brand name; no standardization. - On 2020-06-23 by Jim F.
Reply by (mod) - how to get the plumbing parts with the right thread size or pitch
Jim
Thank you so much for the helpful post and photo.
I have also run into the "wrong threads" problem on other plumbing repairs, such as in trying to connect up or find fittings to marry flare fittings, compression fittings, and normal or standard US "NPT" thread pipe fittings.For example some flare fittings are sold in both a coarse thread and fine thread version.
I use several easy "tricks" to check thread compatability, similar to your own experience:
1. find a fitting or part that screws properly onto the "old" part and use that matching fitting (cap, nipple, etc) to select and buy the proper replacement part
2. Use a thread gauge (shown below)
3. Make note of devices using special threads or even reverse threads (uncommon but does occur)
Mansfield 500 series hydrant stem rebuild - threads don't match
I have rebuilt my Mansfield 500 series hydrant stem with the items in the repair kit. This is the first time this has been done, the house was built in 1992.
Now that it is rebuilt, the threaded end of the stem (inside the house) will not "catch".
I cannot screw this stem in. What could be the problem?
The new handle is assembled but it continually turns both left and right. Please assist/advise. Thanks
Tony Paccione
Brick, NJ 08723
avp0713@comcast.net On 2020-05-15 by Tony Paccione
-
Reply by (mod) - check plumbing valve stem lengths, threads, fit
Tony,
Do you still have the old parts?
If so, lets compare old and new hydrant stem lengths
Also, shine a light into the receiving end and check thread condition.
On 2020-04-16 by Greg Report of persistent leaks at valve stems when outdoor Model 17 Hose Bibbs installed
I've installed brand new model 17 bibbs at three different addresses over the past 4 years. Each has persistent leaking at the valve stem when the faucet is 'on".
This occurs whether the faucet is 'fully 'on' or 'partially 'on'. This is VERY frustrating, being that the faucets are brand new. Is this a design flaw?
Reply by (mod) -
Quite possibly, Greg, moreso depending on who actually made the hose bibbs.
Am I right that simply tightening the packing nut around the valve stem doesn't fix the trouble?Watch out: I've sometimes found that all of my X'es had problem "Y" because I was making the same mistake at each installation - so let's step through the installation instructions with care.
Woodford RK-17 anti-siphon valve was leaking.
Woodford RK-17 anti-siphon valve was leaking. I removed the cap and tried to loosen the clear plastic body of the anti-siphon piece. The top of the valve broke off and I can't remove the threaded part of the valve. Any ideas how to loosen it? - On 2019-05-02 by Mike
Reply by (mod) -
Since the entire plastic part needs to be removed anyway I don't feel bad about gouging it up in order to create a slotted which I can insert a screwdriver or other tool to try turning it.
Sometimes you can also tap the plastic carefully with a small screwdriver to cause it to turn in a counterclockwise Direction
Steps in getting my DIY hose bibb / sillcock inspected and approved
I am plumbing by myself, an addition to my home. In the addition, the plumbing will consist of; 1) a clothes washer connection, and drain. 2) a utility tub connection and drain. 3) A hose bib connection for outside use.
Once I have all the water and drain lines in place, do I have to charge the water lines with water, to pass the building code inspection or just have them run to where they will go, and I don't even have to have them connected to faucets etc?
Will the inspector want to look at my 'actual',/ physical, water connections, ( to the utility tub faucet and clothes washer water connections and the out door faucet) Thank you for this opportunity to ask my questions, and I look forward to reading your reply.
I want to install a outside water hose bib on a 1/2 inch thick OSB wall that has vinyl siding on the outside. The wall studs are 2x4s. Do I want a freeze proof hose bib, and if so, what type, and size to buy? Eventually, This plumbing will have to be code inspector approved.
Oor do I not need a freeze proof type here to pass inspection? If I don't then what type, and size etc. would I need to buy?
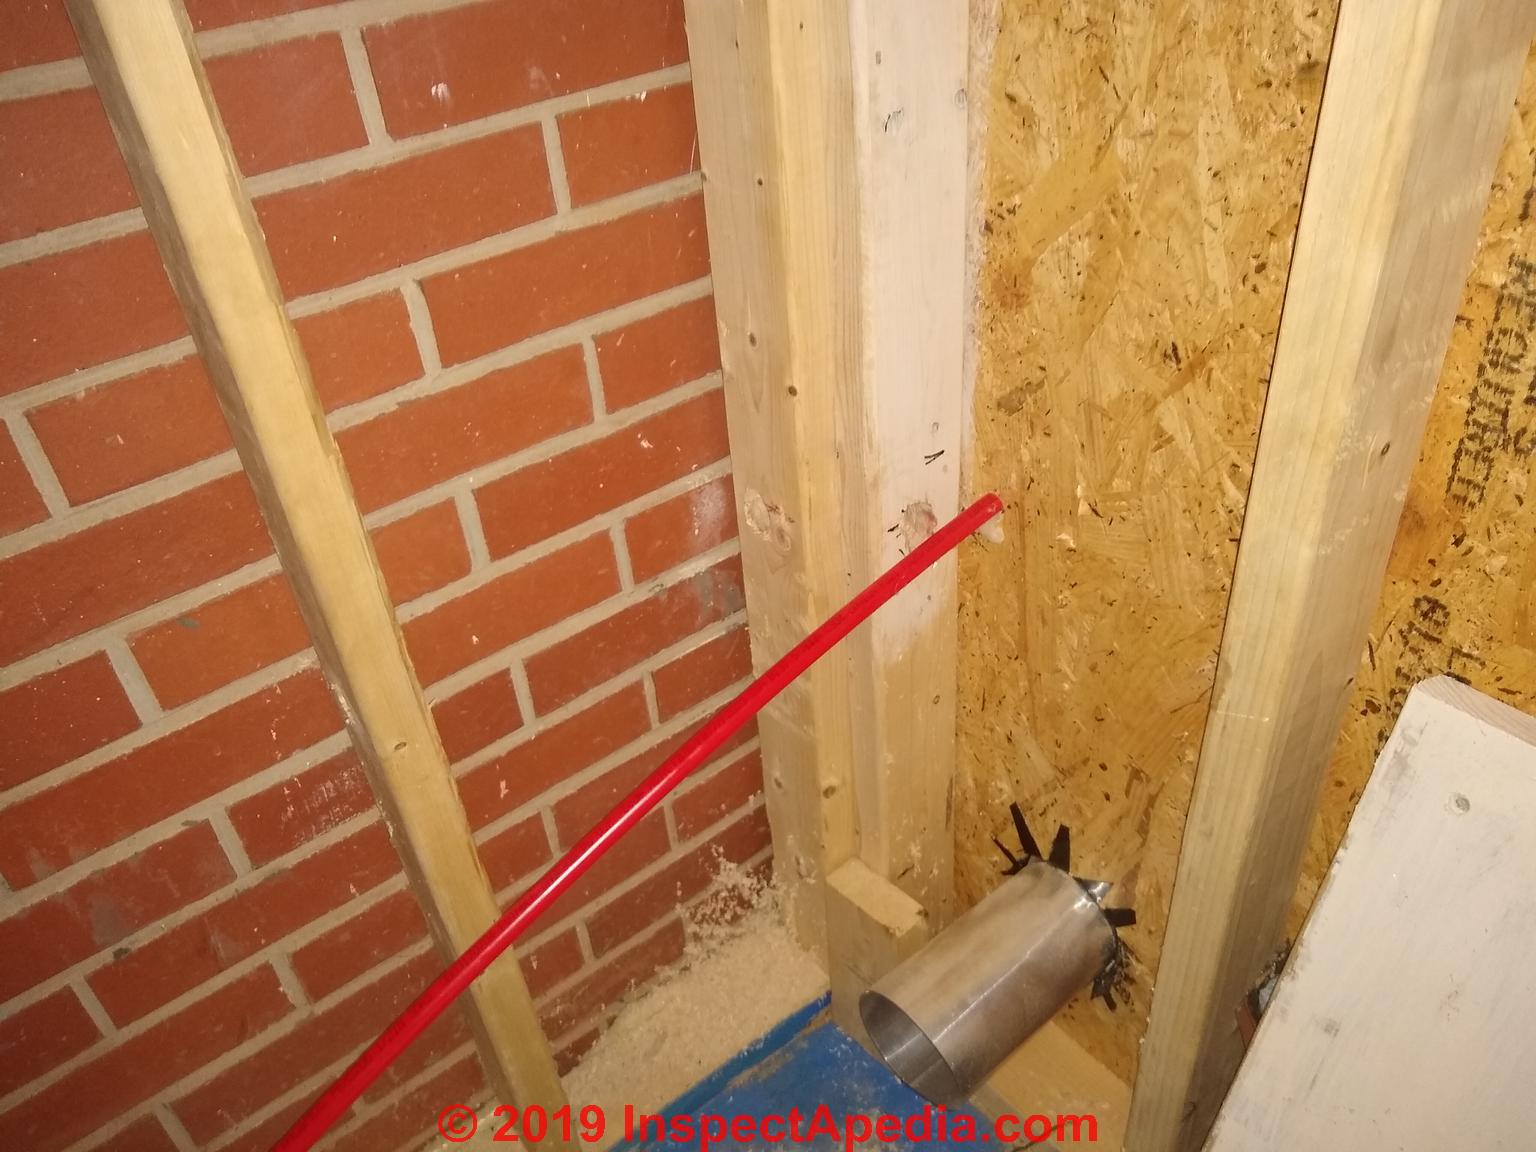
To help you visualize the area I am working in, I have attached a picture of the area and wall that the 1/2 inch PEX line will pass through to feed the hose bib. I'll look for your reply.
And thank you for this great web site, and the ability to send you questions! - On 2019-08-12 by Dave
This Q&A were posted originally
at PLUMBING SYSTEM INSPECT DIAGNOSE REPAIR
Reply by (mod) -
Dave
If you're in a freezing climate it makes sense to install a frost-proof hose bib. Details are at FAUCET, SILLCOCK ANTI SIPHON / FROSTPROOF LEAK REPAIR
Most likely - varying by the country and city where you live - you need a building or plumbing permit and at least two inspections, a rough-in inspection and a final inspection.
Mounting a sillcock (hose bib) through OSB covered with vinyl siding and connecting to PEX (why are you running red (hot water) PEX to an outdoor sillcock?) you may need blocking inside the wall between studs to be sure your sillcock is securely mounted.
This illustration is from the sillcock installation instructions for a Legend Model TM-550 Multi-Turn Anti-Siphon
Frost-Free Sillcock Installation Instructions - details are at the article I already cited
...
Continue reading at FAUCETS, OUTDOOR HOSE BIBBS - topic home, or select a topic from the closely-related articles below, or see the complete ARTICLE INDEX.
Or see these
Recommended Articles
- EMERGENCY WATER SHUTOFF VALVE - how to stop water flow to permit plumbing repairs if there's no working shutoff valve
- FAUCETS & CONTROLS, KITCHEN & BATH
- FAUCETS, OUTDOOR HOSE BIBBS - home
- FAUCET, OUTDOOR HOSE BIBB LEAK REPAIR - traditional hose faucet leak repairs
- FAUCET, SILLCOCK ANTI SIPHON / FROSTPROOF LEAK REPAIR - frostproof Woodford type outdoor faucet leak repairs
- FREEZE-PROOF PIPES
- FREEZING FORCE of ICE
- PIPE FREEZE-BURST PATTERNS
- PLUMBING CONTROLS & VALVES - photos and descriptions of all types of plumbing valves.
Suggested citation for this web page
FAUCET, SILLCOCK ANTI SIPHON / FROSTPROOF LEAK REPAIR at InspectApedia.com - online encyclopedia of building & environmental inspection, testing, diagnosis, repair, & problem prevention advice.
Or see this
INDEX to RELATED ARTICLES: ARTICLE INDEX to PLUMBING VALVES
Or use the SEARCH BOX found below to Ask a Question or Search InspectApedia
Ask a Question or Search InspectApedia
Try the search box just below, or if you prefer, post a question or comment in the Comments box below and we will respond promptly.
Search the InspectApedia website
Note: appearance of your Comment below may be delayed: if your comment contains an image, photograph, web link, or text that looks to the software as if it might be a web link, your posting will appear after it has been approved by a moderator. Apologies for the delay.
Only one image can be added per comment but you can post as many comments, and therefore images, as you like.
You will not receive a notification when a response to your question has been posted.
Please bookmark this page to make it easy for you to check back for our response.
IF above you see "Comment Form is loading comments..." then COMMENT BOX - countable.ca / bawkbox.com IS NOT WORKING.
In any case you are welcome to send an email directly to us at InspectApedia.com at editor@inspectApedia.com
We'll reply to you directly. Please help us help you by noting, in your email, the URL of the InspectApedia page where you wanted to comment.
Citations & References
In addition to any citations in the article above, a full list is available on request.
- [2] "New Electric Heat Tapes Help Prevent Fires," US Consumer Product Safety Commission (CPSC) #00936
- [3] Carson Dunlop provides home inspection education including the ASHI-adopted a Home Inspection Home Study Course, and publications such as the Home Reference Book, the Home Reference eBook, and report writing materials including the Horizon report writer, and home inspection services. Alan Carson is a past president of ASHI, the American Society of Home Inspectors.
- [4] "Freezeproof Your House," Mike McClintock, Rodale's New Shelter, p. 30, October 1985 (approximate date)
- [5] "How to Winterize Your Pipes," Mike McClintock, Homeowners How-To Magazine, p. 59-62, Nov-Dec
- [8] "Cross Connections", Michigan Department of Environmental Quality Water Bureau, Lansing Operations Division, Tel: 517-241-1300, web search 5/12/12, original source: http://www.a2gov.org/government/publicservices/customerservice
/Documents/customerservice_waterdeqCrossConnBrochure.pdf - [9] "How a Frost-Proof Faucet Works", Woodford Manufacturing Company, 2121 Waynoka Road, Colorado Springs, Colorado 80915, Phone: (800) 621-6032, Website: woodfordmfg.com, Email: sales@woodfordmfg.com, WCM Industries, Inc., web search 5/12/12, original source: http://www.wcmind.com/woodford/Troubleshooting/19%20Troubleshooting.pdf
- [10] "Anti-Burst Freezeless Wall Faucet Model 16 & 19, Installation Instructions", Woodford Manufacturing Company, 2121 Waynoka Road, Colorado Springs, Colorado 80915, Phone: (800) 621-6032, Website: woodfordmfg.com, Email: sales@woodfordmfg.com, WCM Industries, Inc., web search 5/12/12, original source:
http://www.wcmind.com/woodford/Installation/16-19%20Installation%20Instructions.pdf - [11] "How a Standard Frost-Proof Faucet Works", Woodford Manufacturing Company, 2121 Waynoka Road, Colorado Springs, Colorado 80915, Phone: (800) 621-6032, Website: woodfordmfg.com, Email: sales@woodfordmfg.com, WCM Industries, Inc., web search 5/12/12, original source: http://www.wcmind.com/woodford/HowAFaucet/How%20a%20
Standard%20Frost-Proof%20Faucet%20Works.pdf - [12] "Cast Brass Hose Bibbs with separate tamper-proof vacuum breaker", Watts Regulator, ES-SC8, 2005, Watts Regulator USA: 815 Chestnut St., No., Andover MA 01845-6098, website: www.wattsreg.com; Canada: Watts Regulator, 5435 North Service Rd., Burlington ONT L7L 5H7, website: www.wattscanada.ca
- Hose bibb synonyms: sill cock, sillcock, hose faucet, outdoor wall faucet, frost-proof faucet, freeze-proof faucet, freezeless wall faucet, hose bib, sill cock, hose hook-up.
- In addition to citations & references found in this article, see the research citations given at the end of the related articles found at our suggested
CONTINUE READING or RECOMMENDED ARTICLES.
- Carson, Dunlop & Associates Ltd., 120 Carlton Street Suite 407, Toronto ON M5A 4K2. Tel: (416) 964-9415 1-800-268-7070 Email: info@carsondunlop.com. Alan Carson is a past president of ASHI, the American Society of Home Inspectors.
Thanks to Alan Carson and Bob Dunlop, for permission for InspectAPedia to use text excerpts from The HOME REFERENCE BOOK - the Encyclopedia of Homes and to use illustrations from The ILLUSTRATED HOME .
Carson Dunlop Associates provides extensive home inspection education and report writing material. In gratitude we provide links to tsome Carson Dunlop Associates products and services.


