 Faucet Washer Replacement
How to fix dripping faucets, taps, hose spigots

- POST a QUESTION or COMMENT about outdoor wall faucets, sillcocks, hose bibbs, and freezeproof or frostproof faucets or faucet troubleshooting
How to fix a faucet or hose bibb that drips.
This article series describes outdoor faucets, hose bibbs, sillcocks, or hose hookups, how they work, where they should be installed, freeze-proofing hose hookups, and troubleshooting or repairing stuck, broken, or dripping outdoor faucets.aky outdoor faucet repair instructions address each of these faucet leak locations & types and suggest a repair sequence from easiest that may work to more challenging faucet repairs that may be necessary.
These leaky faucet repairs, illustrated using an outdoor hose bibb, work equally well at many indoor sink, shower, or tub faucets as well.
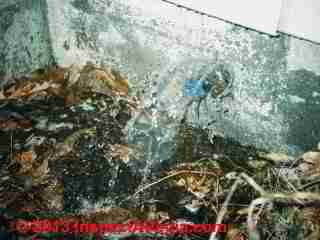
Our photo at page top shows water gushing out of the building wall just above the foundation.
The owner/occupant had forgotten to turn off water to the outside hose hook-up, leaving that line full of water. The water line just inside the foundation froze and burst. When the weather warmed and the ice melted, the faucet ran full blast!
InspectAPedia tolerates no conflicts of interest. We have no relationship with advertisers, products, or services discussed at this website.
- Daniel Friedman, Publisher/Editor/Author - See WHO ARE WE?
How to Fix a Dripping Hose Faucet or Stop Valve: Replace the Valve Stem Washer
 If the faucet or hose bibb drips when the valve is closed tightly, and if there is no leakage around the valve stem, then the problem is probably the valve stem washer - you'll want to replace just the washer itself.
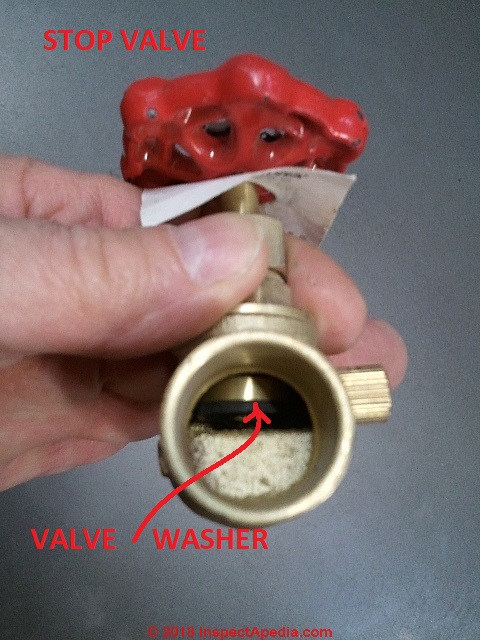
Other types of water shutoff valves such as gate valves and ball valves do not have a replaceable stop washer or valve washer like the one pointed to by the red arrow in our photo.
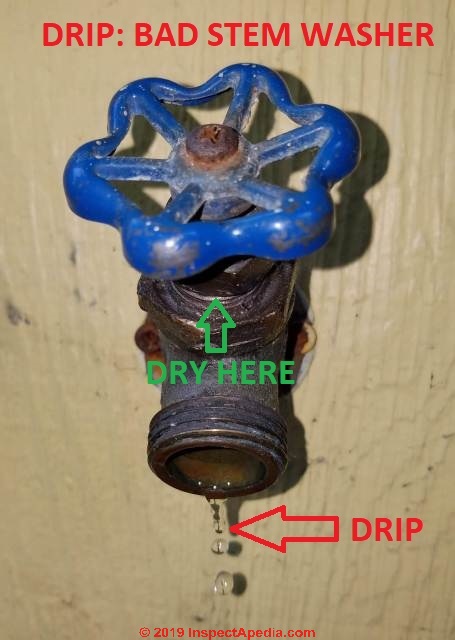
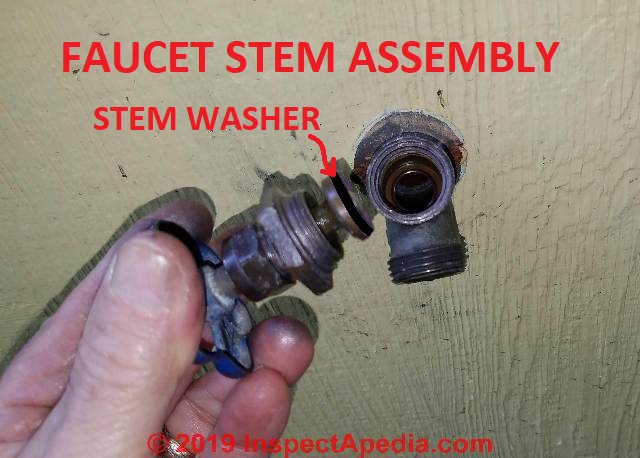
First we double check that we've made the correct diagnosis of the cause of this drippy faucet.
If you see water dripping from the faucet mouth (red arrow where I wrote DRIP)
and if there is no water around the valve stem packing (green arrow where I wrote DRY HERE) then yeah the problem is a leak at the valve stem washer or valve seat.
This is an easier repair that you'd think, but I'll also warn you of when to stop so we don't make matters worse.
Article Contents
- IDENTIFY FAUCET TYPE: Frost-proof vs Traditional Hose Bibb use different parts
If your outdoor hose bibb or faucet looks like the one above, the repair steps are given by the link just below. - REPLACE LEAKLY FAUCET WASHER, STEP by STEP - replace a leaky faucet washer
- REPAIR LEAKY FAUCET VALVE SEAT - special tool grinds out grooves to improve seal
- REMOVE / REPLACE CORRODED or BROKEN FAUCET WASHER SCREW - it's easier than you think
- TRIM FAUCET WASHER THAT DOESN'T FIT - too big? Make it fit!
- REPLACE FAUCET VALVE STEM BONNET PACKING - to fix leaks around the valve stem, replace the dome packing
...
What Kind of Faucet Have I Got? Woodford type Frost-Proof or Traditional Hose Bibb
Older Conventional Hose Bibb (Not Frost Proof)
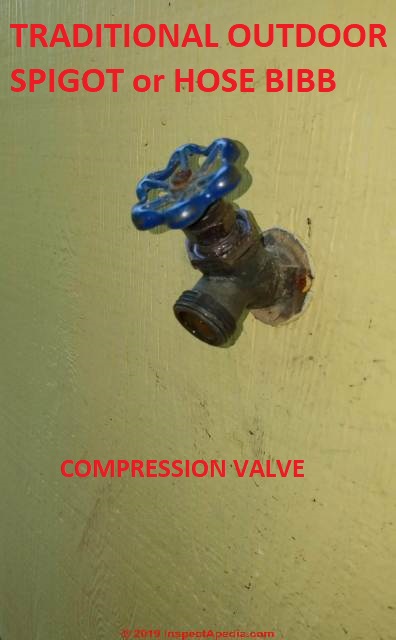
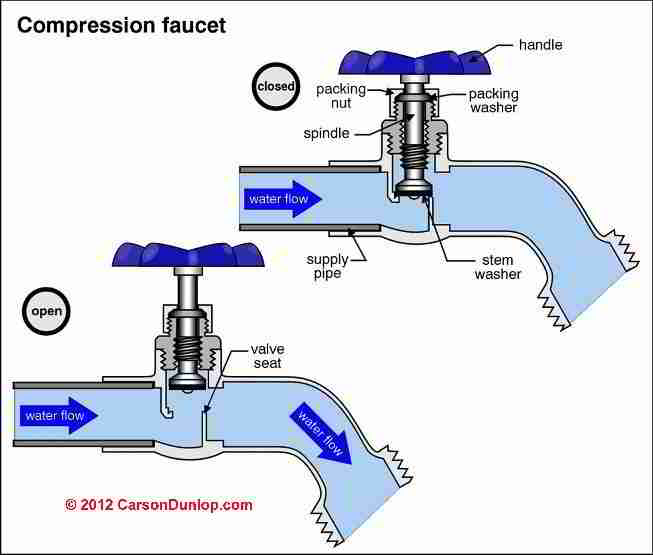
If your outdoor faucet looks like our d photo above and if needs repair, it is NOT a frost-proof anti-siphon valve, it's a traditional compression valve faucet or spigot.
If the faucet is dripping from its spout stay right here: we'll explain how to change out or replace the faucet washer below on this page
at REPLACE LEAKLY FAUCET WASHER, STEP by STEP.,
Other leak repairs for this traditional compression valves are given
at FAUCETS, OUTDOOR HOSE BIBBS
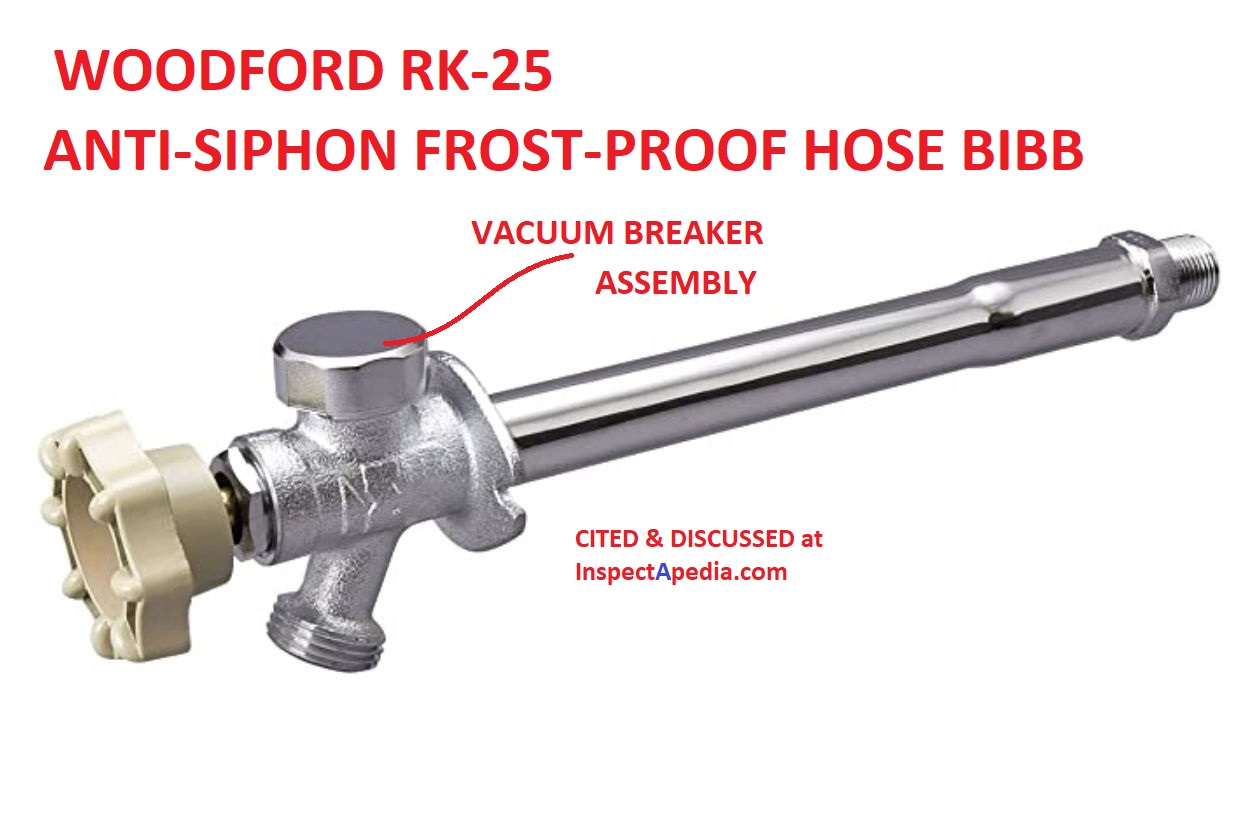
Woodford type Frost-Proof Hose Bibb
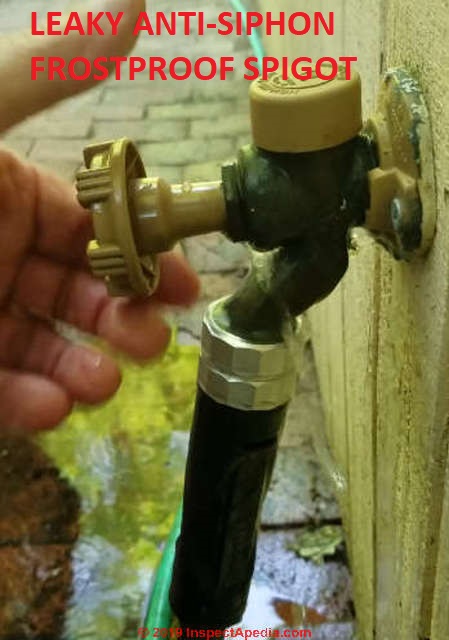
Our photo above is a typical frost-free anti-siphon faucet, or "Woodford" valve.
Repairing that faucet is discussed separatelly
at FAUCET, SILLCOCK ANTI SIPHON LEAK REPAIR
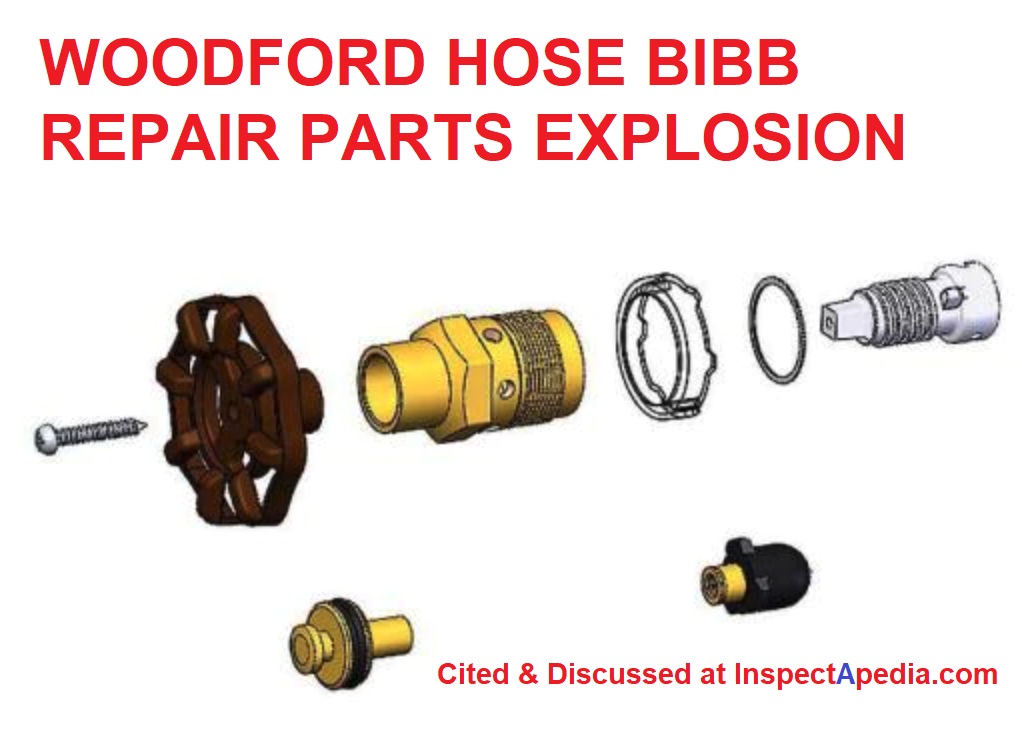
Below are illustrations of the working parts of a Woodford type hose bibb
...
Step By Step Hose Bibb Leak Repair
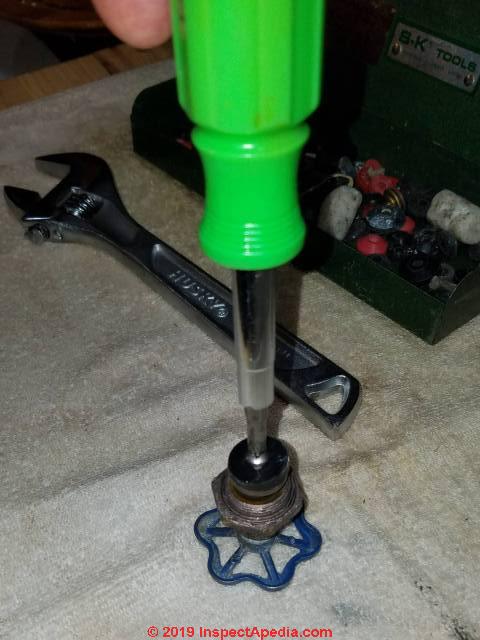
First collect the tools You'll Need
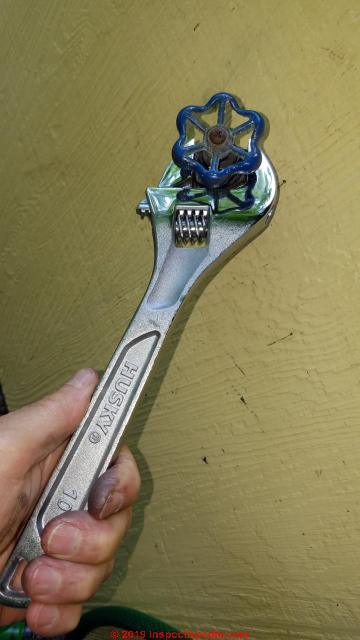
You will need an adjustable wrench, a flat blade and possibly Phillips-blade screwdriver, and you would be smart to have a bit of plumbing grease or anti-seize compound.

In my photo is also a box of assorted faucet washers I've collected beginning when I was ten - you don't need all these. I also show a can of anti-seize compound - enough for a lifetime: I've been using this can since 1978 and it's still half-full.
There's also a disassembled faucet assembly in the photo - for now pretend it's not there, OK?
OK so where is the valve stem washer? You can't see it because it's hiding inside the faucet assembly. In our photo below, the red arrow points to the stem washer's location inside of a typical stop valve. To find and replace this hidden but critical faucet leak-stopper we'll need to disassemble the faucet.
Our photo shows the position of the valve washer in a conventional stop valve. You'll find similar washers in hose bibbs and many other water valves of this type.
You will need a replacement stem washer, but if you don't already have a lifetime supply like I do, there's no point in buying one of those cute little fellows before you've disassembled the leaky faucet as you won't know what size is needed.
Replace the Hose Faucet Stem Washer, Step-by-Step
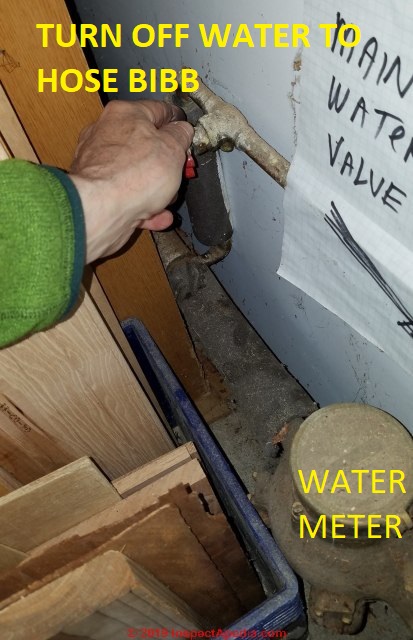
- Turn off the water shutoff that feeds this water pipe.
Or if there is - as we'd hope - an indoor shutoff valve that turns off water to just the outdoor faucet, that's even better as you don't have to shut the whole building's water supply down during your repair.
Follow the water pipes from the water meter or from where pipes enter your building and find the pipe that supplies water to the outdoor spigot.
Look for a valve that will turn off water to the spigot.
For help see WATER SHUTOFF VALVE LOCATION - turn off water supply before trying to repair the faucet
Fall-back alternative: turn off water to the whole building.
Still can't shut off the water?
Then see EMERGENCY WATER SHUTOFF VALVE - how to stop water flow to permit plumbing repairs if there's no working shutoff valve
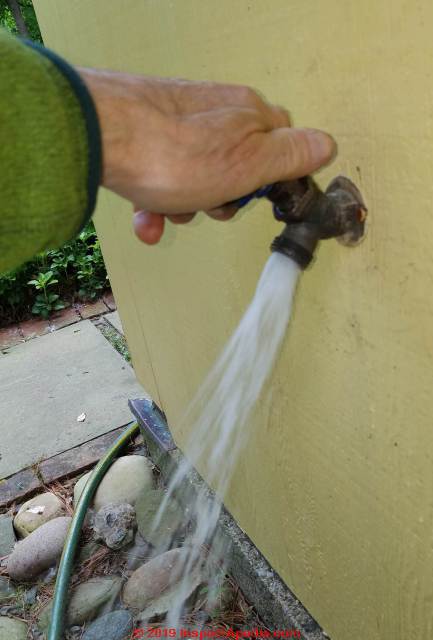
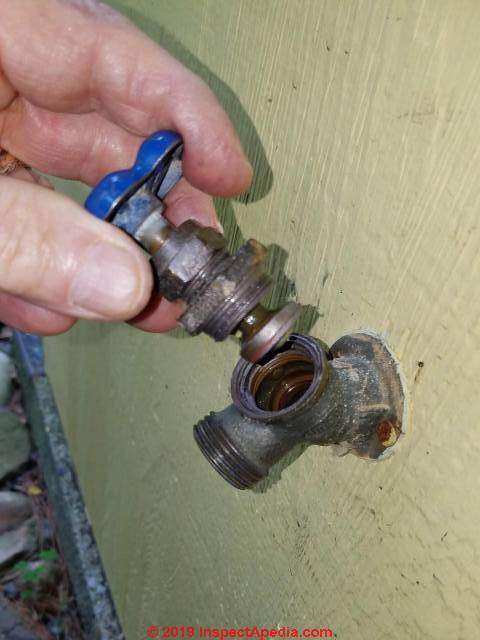
- Open the leaky faucet
to drain off water and pressure (photos above). At first water will gush out of the spigot because there was water under pressure in the piping even though you turned the water off inside.
But in a second or two water will stop flowing at the faucet and you're ready to proceed with disassembly.
Really? Well usually. Sometimes water keeps running, maybe more slowly - that tells us that the shut-off you closed indoors is itself not working.
Now what?
If the flow is very slight and if you have some nerve you can do the repair anyway - after all the water spilling while you look for the right sized faucet washer, drive to and fro between the house and the hardware store, stop for a bag of chips - it's all falling outside, right?
Watch out: On the other hand if the flow is gushing it's time to stop and call your plumber who can use other secret methods like plugs or freezing to stop water flow to permit the repair.
- Remove the faucet handle:
Unscrew the center screw that holds the faucet handle in place and remove it to gain working room.
Watch out: Take care not to break off the screw if it's rusted or frozen as making that mistake probably means you'll have to replace the whole faucet assembly. If you can't get the handle center screw off don't worry, we can manage this repair anyway.
On this faucet the handle screw was rusted in place - we decided to leave it alone.
- Loosen the faucet packing nut -
(this may not be necessary) On an older outdoor hose bibb or spigot the packing nut is a smaller one closest to the valve handle - as you'll see in my photo below.
However on some faucets including most indoor ones, the packing nut covers or hides a smaller nut - the faucet stem assembly retaining nut that must be loosened to permit removal of the stem assembly from the faucet body. Occasionally both nuts are directly accessible.
In the latter case you may be able to leave the packing nut alone, or to just loosen it a bit. You can also click to enlarge Carson Dunlop's faucet drawing above on this page to see exactly where the stem nut and packing nut are found.
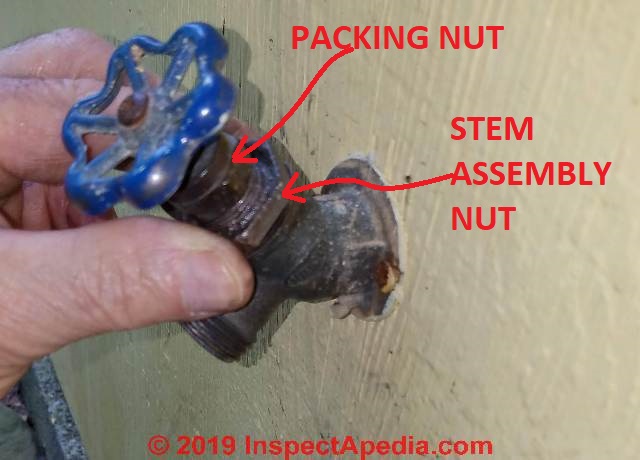
Watch out: be sure you're attacking the right part - when you need to remove a faucet stem assembly to replace the stem washer, it's the stem assembly nut, the larger one closer to the faucet body, that you want to un-screw, NOT the packing nut.
If the faucet packing nut or stem assembly nut are corroded and "frozen" in place try wetting the parts around the stem and threads using a penetrating oil. Let that oil soak in and penetrate the threaded fittings for a time - a few minutes to overnight, depending on how terrible is the corrosion.
Often that patience will permit disassembly of corroded pipe or faucet parts without resorting to cursing or broken parts.

Above: examples of penetrating oils that can help free up corroded or stuck threaded plumbing fittings and faucet parts.
- Unscrew the Faucet Stem Assembly Retaining Nut -
unscrew the stem assembly retaining nut that holds the faucet stem or spindle into the faucet body.
Watch out: if using what seems to you reasonable force you cannot turn the faucet stem assembly retaining nut, first be sure your wrench is in the right place - some brass faucet bodies also include a cast octagonal-faced part that was intended to be held with a wrench when screwing in the retaining nut so as to avoid twisting the whole assembly, bending a pipe, and causing a horrible leak.
Watch out again: if using reasonable force and having been sure you're attacking the correct nut you still can't turn it, you may want to quit and call someone who knows what she's doing: a plumber.
If you apply too much force and twist a pipe or break parts you'll create a bigger problem and you'll be sorry.
How to use an adjustable wrench or "Crescent™ Wrench"
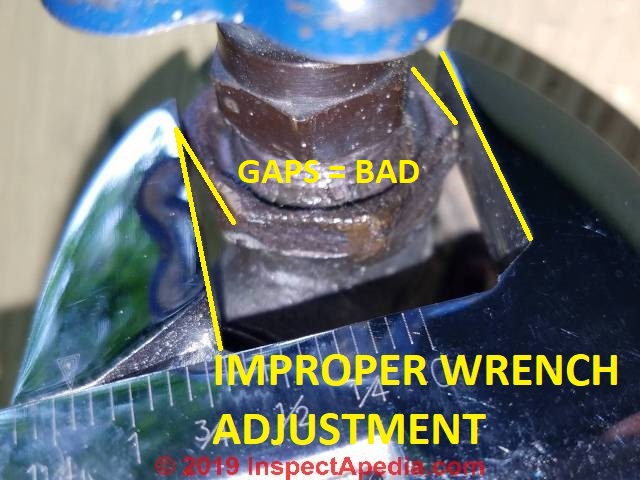
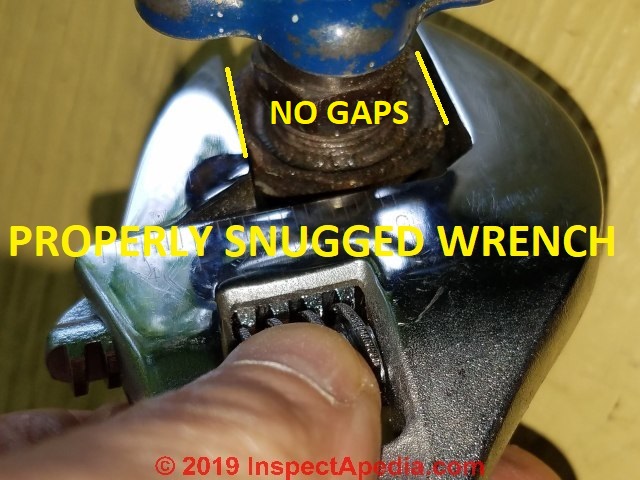
Watch out: look closely at our two photos below: when using an adjustable wrench to loosen or tighten any nut it is important to adjust the wrench to fit snugly against the facets of the nut.
DO NOT set your wrench as it is in the first photo with sloppy space. Instead adjust the wrench as shown in the second photo.
Otherwise you will strip off the facets of the nut you are turning and ultimately your wrench will slip and you'll bang your knuckles to a bleeding pulp.
Watch out one last time: if you can't turn the nut, stop and remember the movie Jaws: when the giant shark bites the boat in half one of the actors looks up and says calmly: You're going to need a bigger boat.
Well you don't want a bigger wrench. Attacking the part with a huge wrench increases the risk that you bend the whole assembly and bust it wide open. Don't do that.
- Remove the faucet spindle assembly:
once you've loosened the faucet stem assembly retaining nut enough to turn it by hand, continue by unscrewing it from the faucet body.
Once removed if you flip over the whole assembly you will see the golden fleece you've been seeking: the stem washer secured to the bottom of the spindle assembly, usually by a brass or stainless steel screw.
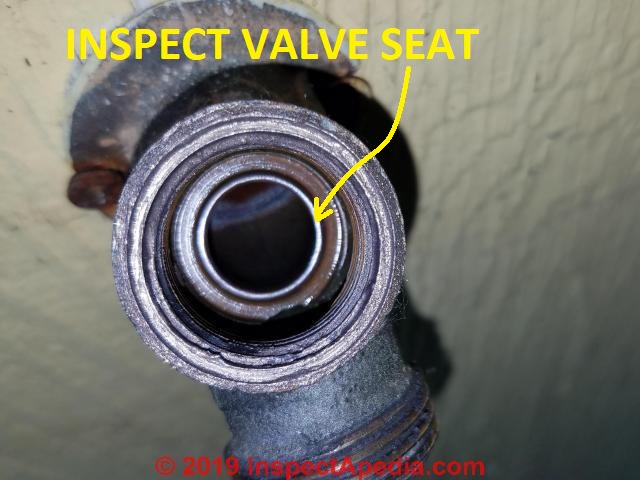
Watch out: here is where we can save some wasted effort. STOP and inspect the faucet valve seat closely - look for damage like nicks or grooves.
Above: this valve seat looks perfect. On others I've seen corrosion, nicks, and grooves that will cause a leak even if the stem washer is replaced.
Just below is a view of the stem washer from a leaky outdoor spigot that dripped constantly. This rubber stem washer was removed from a spigot installed on a New York home in the 1960s.
- Inspect the faucet parts:
with the stem assembly removed, take a look down into the faucet itself. See that round ridge in there?
That's the valve seat against which the faucet washer presses to close the valve. If the round ridge looks smooth you're in business - all you need to do is replace the faucet washer.
If the round ridge is a little corroded or has a tiny notch that's a leak that will need repair - we'll tell you how to do that in a moment.
If the round ridge is beautiful, all smooth, like in my photo above, then all you just need is a new faucet washer and perhaps a faucet washer screw.
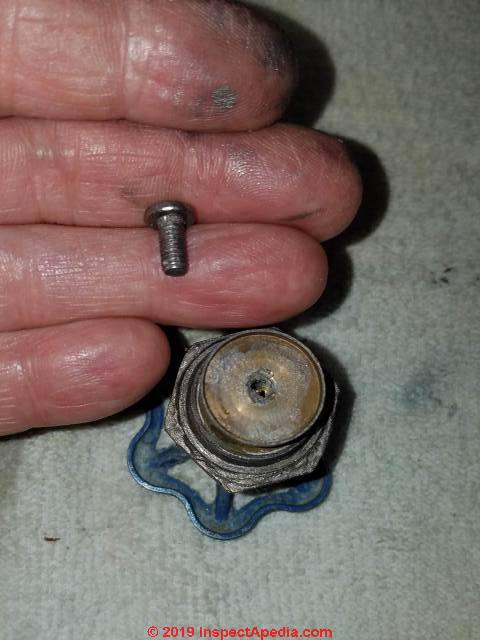
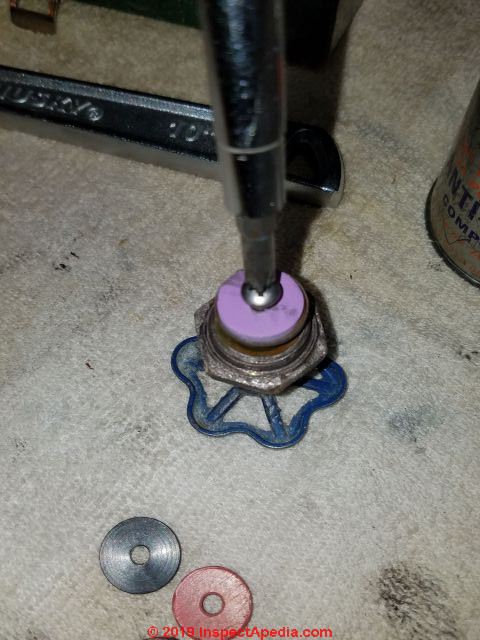
- Remove & replace the stem washer,
by un-screwing the center screw that holds the little washer in place - you'll remove and replace the washer and while you're at it, if the screw is not in perfect condition, replace that too.
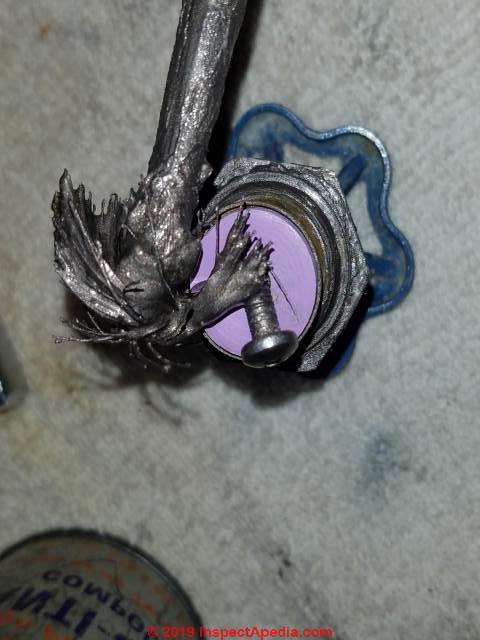
Really? OK so what if the brass screw head is a mucky soft green corroded blob - the phillips screwdriver doesn't get any grip on the screw - you can't turn it. Don't give up. I've successfully restored really ugly stem assemblies.
First try gripping the screw with a pair of small Vise-Grip™ pliers. Pinch them tight against the screw and you can usually un-screw it even if it could not be turned with a screw driver.
Oops! Ok so the screw head just disintegrated. Before giving up let's try one more trick. Using a small screw driver, pry off the old faucet washer. That will leave a length of screw shaft exposed. Try those ViseGrips™ once more, gripping the screw shaft and turning it carefully counter-clockwise. It unscrews? You're back in business.
While you've got things apart, inspect the body of the stem assembly - sometimes the base against which the washer is compressed is broken or cracked - in that case the whole faucet assembly needs replacement.
In the case of this valve the stem assembly was in great shape and the screw, a stainless steel one, was re-usable. The problem was the faucet washer, whose details we show below.
Take the old washer for a ride to the hardware store - after all that's going to be its final voyage.
There you can match the old cracked broken washer with a new model. IF the old stem washer is gone completely - possible but not common - then bring along the faucet stem assembly as you can match a new stem washer and washer screw to that part.
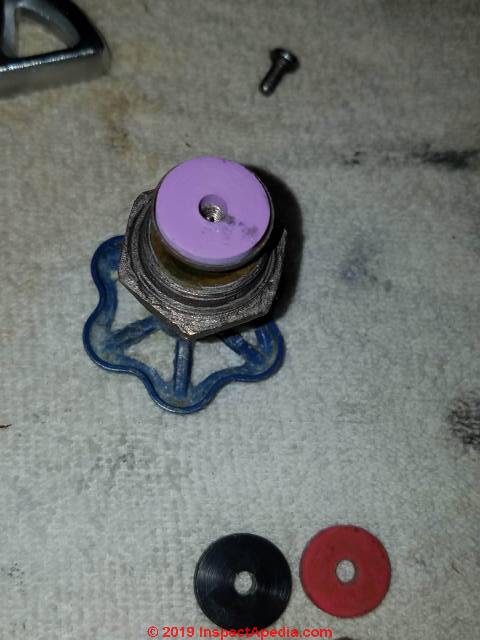
Just set the new washer in place (smooth side out, side with any embossed writing hidden against the stem base) and insert and turn in the new stem washer screw.
We use a small dab of non-hardening teflon paste on the new stem washer screw to make a future repair easy.
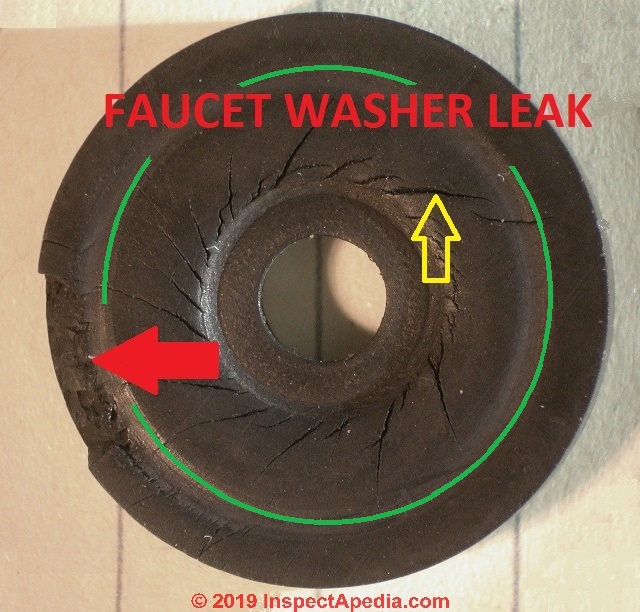
With a close look under a stereo microscope you can see why this faucet was leaking. All it takes is a small chip or bit of damage to the stem washer to have a drippy leak.
The green circle marks the outer edge of the depression left in the washer by the round valve seat against which this washer was intended to seal. Any defect in the washer near this line will mean a leak.
With half a century of service this rubber dried and cracked (yellow arrow) and finally a bit of the rubber chipped off and was lost (red arrow) causing a dripping leak at the valve seat
- Re-assemble the parts
in the reverse order of your disassembly.
We put a bit of teflon paste or anti-seize compound on the threads of the remaining parts during re-assembly, also to make life easier for the next person who'll do this job again twenty years from now.
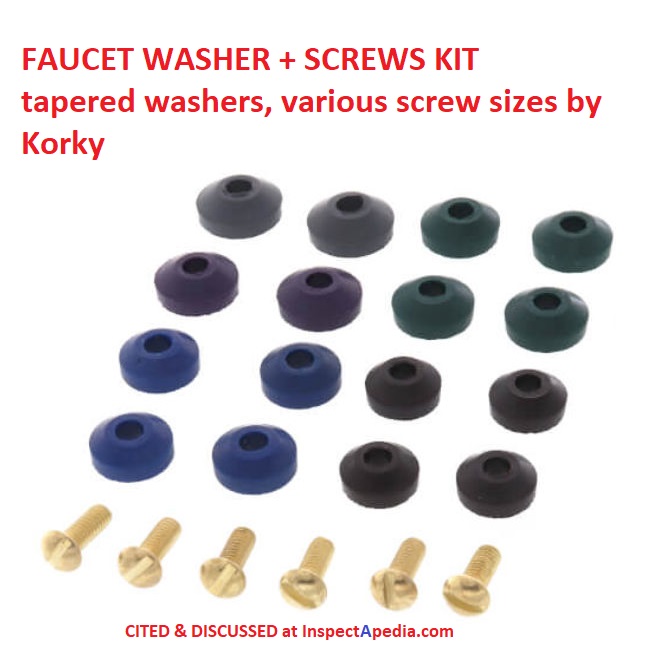
Watch out: Modern faucet washers are color coded: the purple washer in my photos is a nominal 1/2" washer. Made in China.
It was a fraction too small and squashed and became concave when I tightened the screw - a disappointment that meant I had to take care not to over-tighten the screw.
As long as the washer nearly fills the pan into which it sits it'll be ok, but it means that the thin pan lip is exposed to corrosion and a shorter life.
But don't use a washer that's too big to sit in the recessed pan or your assembly will either not fit back into the faucet body or the washer will bend, crack, break, and the faucet will leak again - soon.
-
Put the faucet stem assembly back into the faucet body:
Now we're ready to return the faucet stem assembly to the faucet body and screw it back in.
Close the faucet by turning the handle in but before doing so check that you've snuggled down both the stem retaining nut (first) and the stem packing nut (second).
Watch out: before screwing the faucet stem assembly back into the faucet body, open or un-screw the faucet stem to the "open" position in the assembly.
Otherwise the stem bottom may press against the faucet seat during installation and you won't be able to screw the assembly fully into the faucet body.
I am not including photos of tightening the faucet stem assembly in place - but don't over-tighten. Just firm and snug. It won't leak.
Next we'll go back inside and turn the water supply back on.
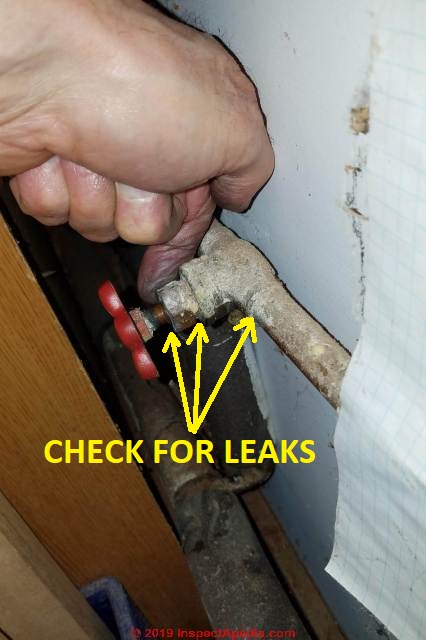
- Turn the water on & check for leaks:
Turn the water back on - you should see no leaking. If there is leaking around the stem tighten the stem packing nut slightly.
You will not see any more dripping or leaks - if things went well. If there is still dripping from the faucet mouth then the problem is worse than just a bad washer: there's probably a groove or corrosion on the valve seat itself.
Watch out: when turning any water control valve back on check that valve for leaks too before you walk away - we don't want to leave water dripping inside the building - doing so invites mold, rot, insects, trouble.
If you've been using tools that twist and bang around on water pipes remember to check nearby solder joints too.
What do we do about that annoying trouble? Kick yourself for not inspecting at the valve seat for damage before you put everything back together. Then read on.
...
How to Repair a Faucet Valve Seat
If the dripping hose faucet still leaks after a new washer has been installed
we suspect that either the stem washer you installed is not the right one or that the valve seat itself has become corroded or damaged.
Especially when a valve stem washer has been leaking for a long time, the passage of water through the valve can literally cut or corrode a slot in the valve seat.
Photo above: that raised round "rim" pointed to by my yellow arrow is the valve "seat" against which a faucet washer must press and seal to turn a faucet off. Sometimes with age the valve seat develops a cut or notch, usually from prolonged leaks due to a bad faucet washer.
But once the faucet valve seat is "notched" a new faucet washer may not be enough to stop a drippy faucet - we need to smooth out that raised rim to provide a good sealing surface for the faucet washer.
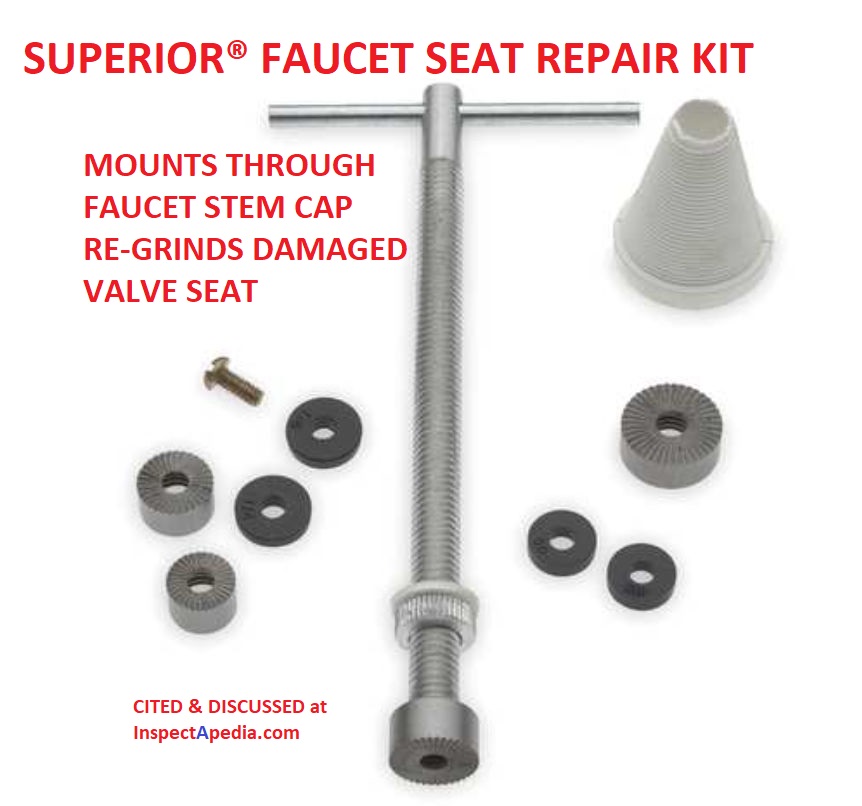
Shown below is a typical inexpensive valve-seat damage repair tool that might still salvage the leaky faucet repair job.
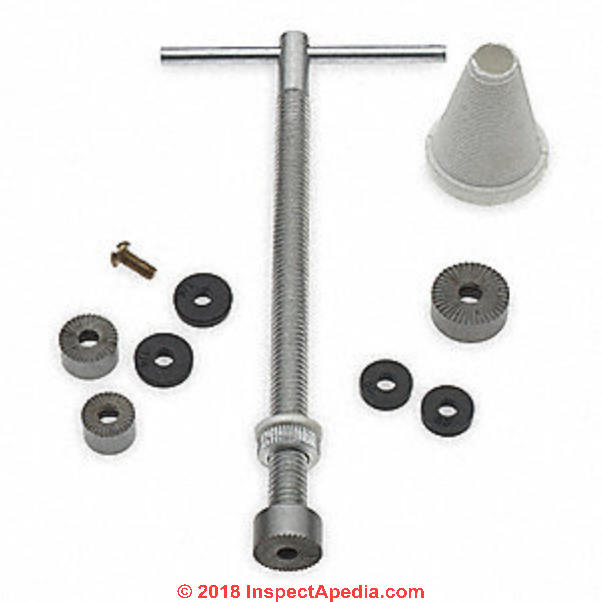
The valve seat repair tool mounts through the faucet cap and provides a cutting wheel and handle designed to allow re-surfacing of the valve seat.
The faucet-re-seater kit shown here is inexpensive (less than $10. USD) and is sold by plumbing suppliers, by Grainger.com and other online vendors.
Disassemble the faucet spindle and handle assembly as we described above.
Inspect the valve seat inside the faucet. Often you will see a small groove in the valve seat that has been worn through the seat by dripping water.
If that groove is shallow you can often smooth the faucet seat to a sealable condition by purchasing and using a faucet valve seat repair tool at any hardware store or building supplier.
The faucet valve seat repair tool includes a stem that fits inside the packing nut of your faucet, and a round "grinder" face that mounts on the end of the stem. Select a grinder face that fits inside the diameter of your valve and covers the valve seat.
By assembling the faucet seat repair grinder and stem through the packing nut, the grinder will be held in the proper position (with the grinder parallel to the valve seat). Pressing on and turning the valve stem repair resurfacing tool may suffice to "grind" the valve seat back to a smooth condition.
If not, but if the seat is almost perfect, the valve may still shut off without dripping when you install a new stem washer. If not, you will most likely need to replace the faucet entirely.
Other faucets have a screw-in valve seat that can be replaced entirely once the valve has been disassembled.
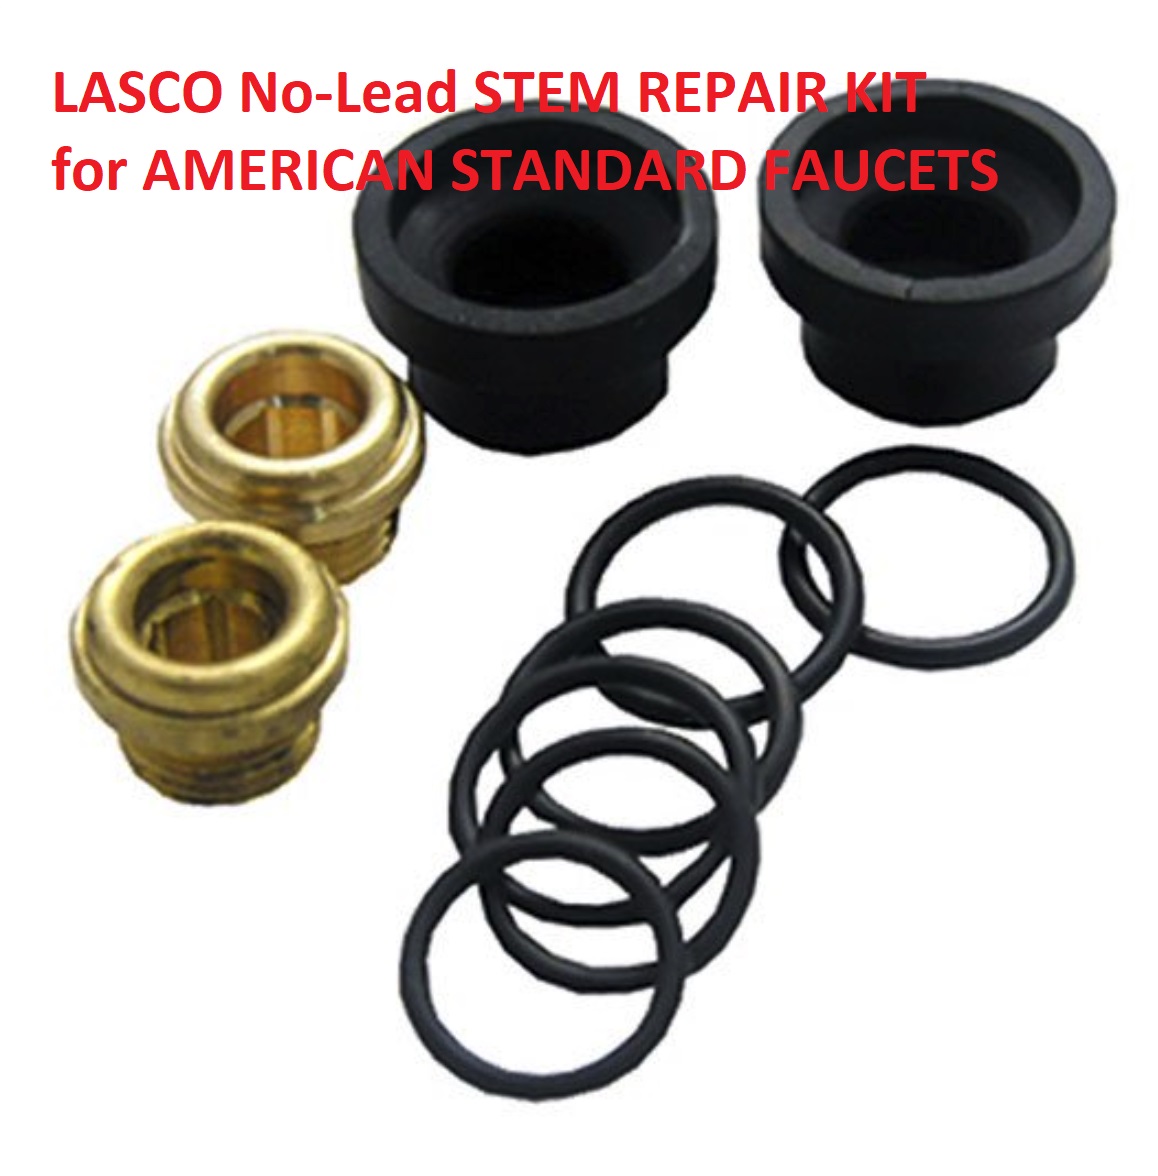
Shown below is Lasco's No-Lead Aqua-Seal valve seat repair kit for American Standard Brand faucets. Lasco's valve seat repair kit as well as others are availble from local hardware stores, plumbing suppliers, and online vendors such as amazon.com.
...
Drill & Tap to Remove Corroded or Broken-Off Faucet Washer Screw
 InspectApedia reader said: I was able to get the washer out but unfortunately the screw is so corroded when I tried getting it out with vice grips, it just crumbled.
I like your idea of buying a whole faucet if necessary to get the complete washer handle, dome nut or bonnet, packing, o-ring, shaft, and faucet washer assembly all together.
I keep coming back for more advice because I have had great success following your instructions. I was successful in removing that mangled screw if you can believe it. I'll tell you how I did it. First I applied some "Oops" brand remover. I figured it might act as a loosening agent.
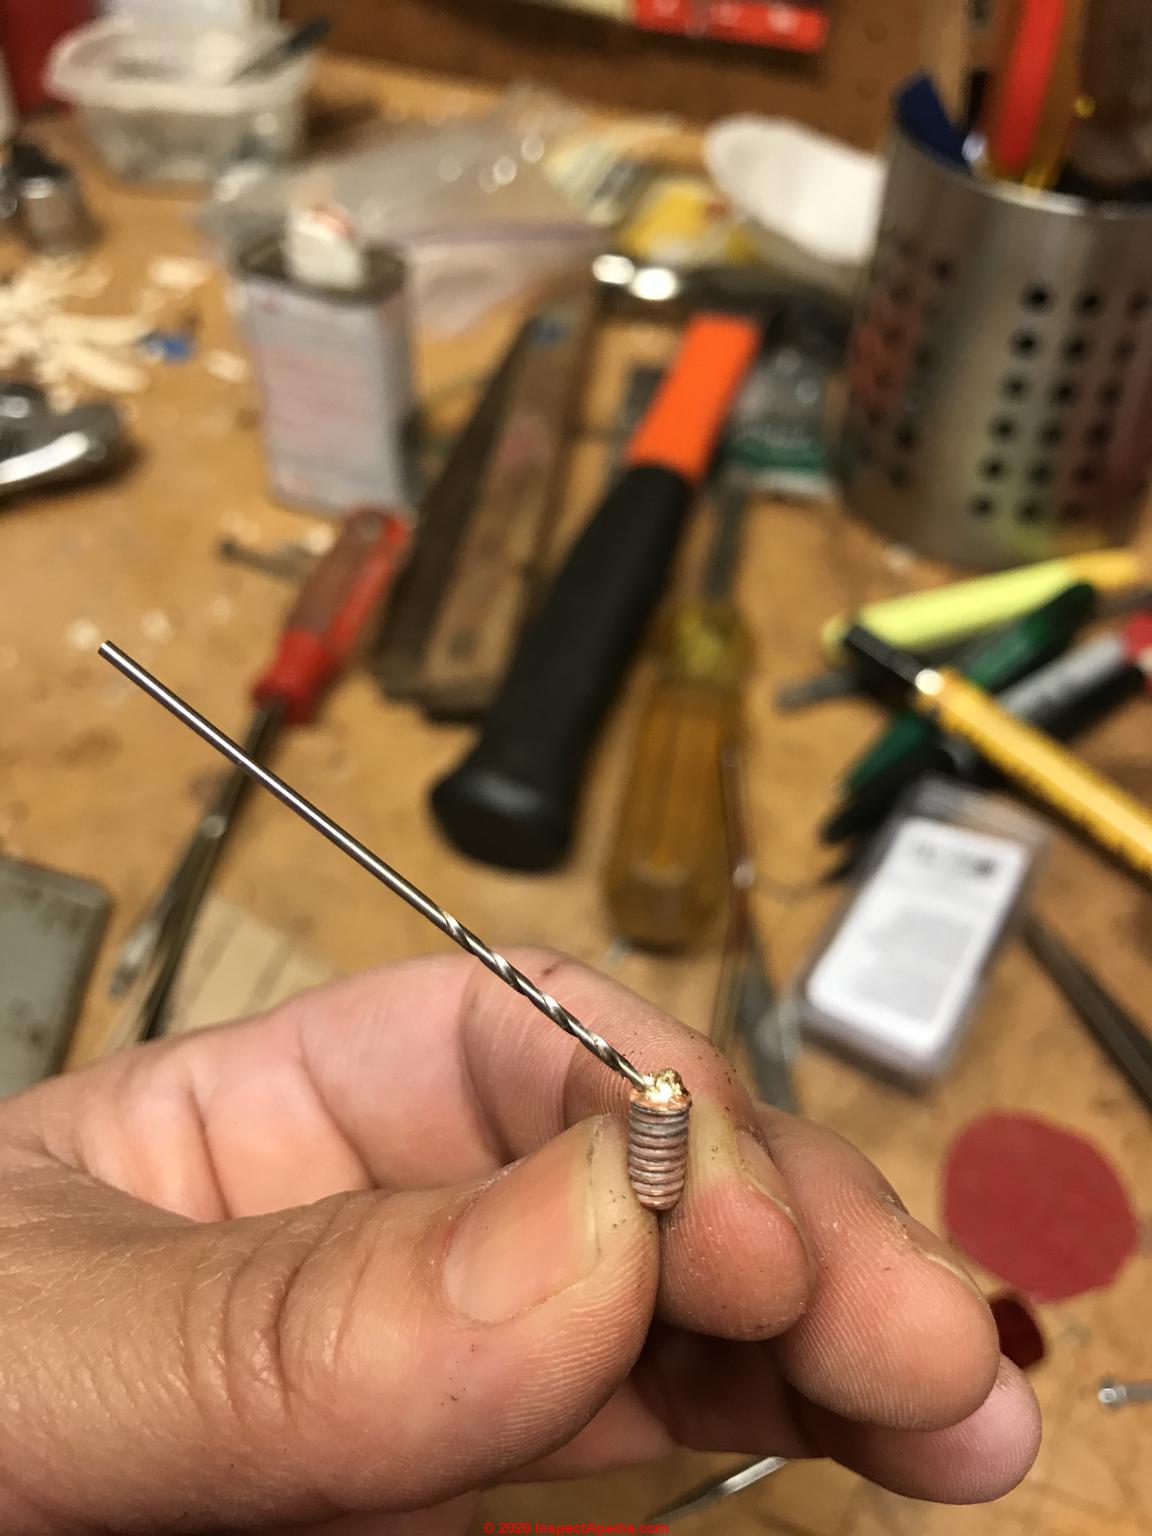
I'm not sure if it affected it or not. Next, since the screw turned out to be brass, I used a teeny, tiny drill bit to drill a hole through it diagonally, being careful not to hit the threads on the other side.
Creating this tiny hole enabled me to grasp the "point" of the screw with wire cutters.
The sharp edge of the wire cutters facilitated grabbing on. And I turned, and lo and behold the screw came out. I did not have another screw the proper length, but I took a longer brass screw, cut it with a hacksaw and presto, I was able to install the new washer.
And it worked! No more leaks with the water on. However, now it is now leaking at the packing nut when the water is on. I will follow your advice to stop that leak.
Thanks so much for posting! This saved me $400! I'm going to post a video when it's all complete and if it's ok, I am going to reference your site. Thanks again! - CVB 2020/06/04
Moderator reply: Also try a screw extractor or a thread tapping tool to fix old faucet washer screw opening
Glad to assist CV and thanks for the follow-up on using a drill to help get a bite to remove the corroded faucet washer screw. Below I show a small screw extractor set made by Hanson and selling for under $10. U.S.
You drill a small hole in the broken-off screw, just as in your photo above, and then gently tap in the screw extractor and turn it counter-clockwise to pull out the old broken-off screw.

I have had similar success by drilling and then using a tiny extraction tool to either get a bite on the corroded screw or sometimes I've used a tapping tool to basically grind out the old brass and renew the threads for the same or one size larger faucet washer screw.
Another option for faucet washer repair: use a faucet washer retainer clip
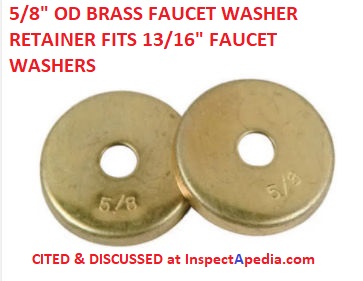
If you cant find a replacement assembly its also possible to drill out and re-tap the part or to use a snap in or snap-on washer retainer that uses a spring clip rather than threads to hold the faucet washer onto the base of the valve stem.
Ask your plumbing supplier to show you sizes of Hose Bibb Washer Retainers and select one that will hold the proper washer required for your hose bibb.
They're a bit hard to find but we've used a replacement valve stem faucet retainer called a "threadless spring clip faucet washer retainer" of two types:
1. a combined washer and brass expanding shaft that simply pushes into the cleaned-out hole where the corroded brass retaining screw used to fit
2. a clip-over washer/retainer combined that clips into the the recessed exterior of the end of the valve stem base.
These are sold in various standard washer diameters such as 5/8" - you'll need to match the diameter of the faucet or hose bibb valve stem you are repairing.
These washer retainers, shown above, work with the Perlick Stem type of faucet and may not fit other faucet stem assemblies.
...
Standard hose bibb washer won't fit: how do I fix it?
This is amazing. I'm having trouble finding a washer that fits my 1987 hose bibb.
The nominal 1/2 is just a little too big and won't fit in the recessed pan. The 3/8M is a little too small and leaves about 1+ MM around the edge of the pan.
I'm going to try a 3/8L and see if that fits better, but wondering if you have any other suggestions. - On 2021-04-26 by Christopher Campbell S
Reply by (mod) -
@Christopher Campbell,
When I have had this problem I've simply used a sharp single edged razor blade or utility knife to work carefully on a suitable surface to trim a little off of the oversized washer.Followup by Christopher Campbell
GENIUS!!! I think the 3/8L may do the trick, but if not, this is what I'm doing.
...
Hose Bibb Valve Stem Bonnet Packing Repair & Parts
How to Replace a Faucet Valve Stem Packing
- Turn off the main water shutoff that feeds this water pipe
- Open the faucet to drain off water and pressure.
- Remove the faucet handle - this means loosening the screw in the center of the handle that holds the handle to the faucet stem or spindle.
- Gently wiggle the faucet handle side to side while pulling it away from the faucet stem to remove it.
- Unscrew the packing nut - this should expose the packing washer.
- Pull off the packing washer and install a new one of the same size and type.
Tip: old plumbers used to carry a graphite-impregnated string that could be coiled around the valve stem and tightened in place in lieu of the factory-provided packing washer.
As the domed packing nut is tightened the graphite string (still available from plumbing suppliers) squashes to seal around the valve stem.
Stem packing is still sold both in graphite string form and in teflon string form by Larsen and other suppliers.
In a pinch, when I could not find a matching graphite or nylon dome-shaped valve stem packing washer I've sued a nylon bonnet packing (used on Crane tub faucets) or a thick rubber shower stem valve packing washer that squashed enough to fit other brand valve stems.
Bring your valve stem to your hardware store and find a stem packing washer that is snug around the stem diameter. - Replace the packing nut and faucet handle and close the faucet.
Tip: tighten the packing nut snugly - until you feel resistance when you turn the faucet handle, but don't make it so tight that you crack the nut or so tight that turning the handle is difficult. - Turn the water supply back on and check for leaks.
- Tighten the packing nut further if water is leaking around the stem.
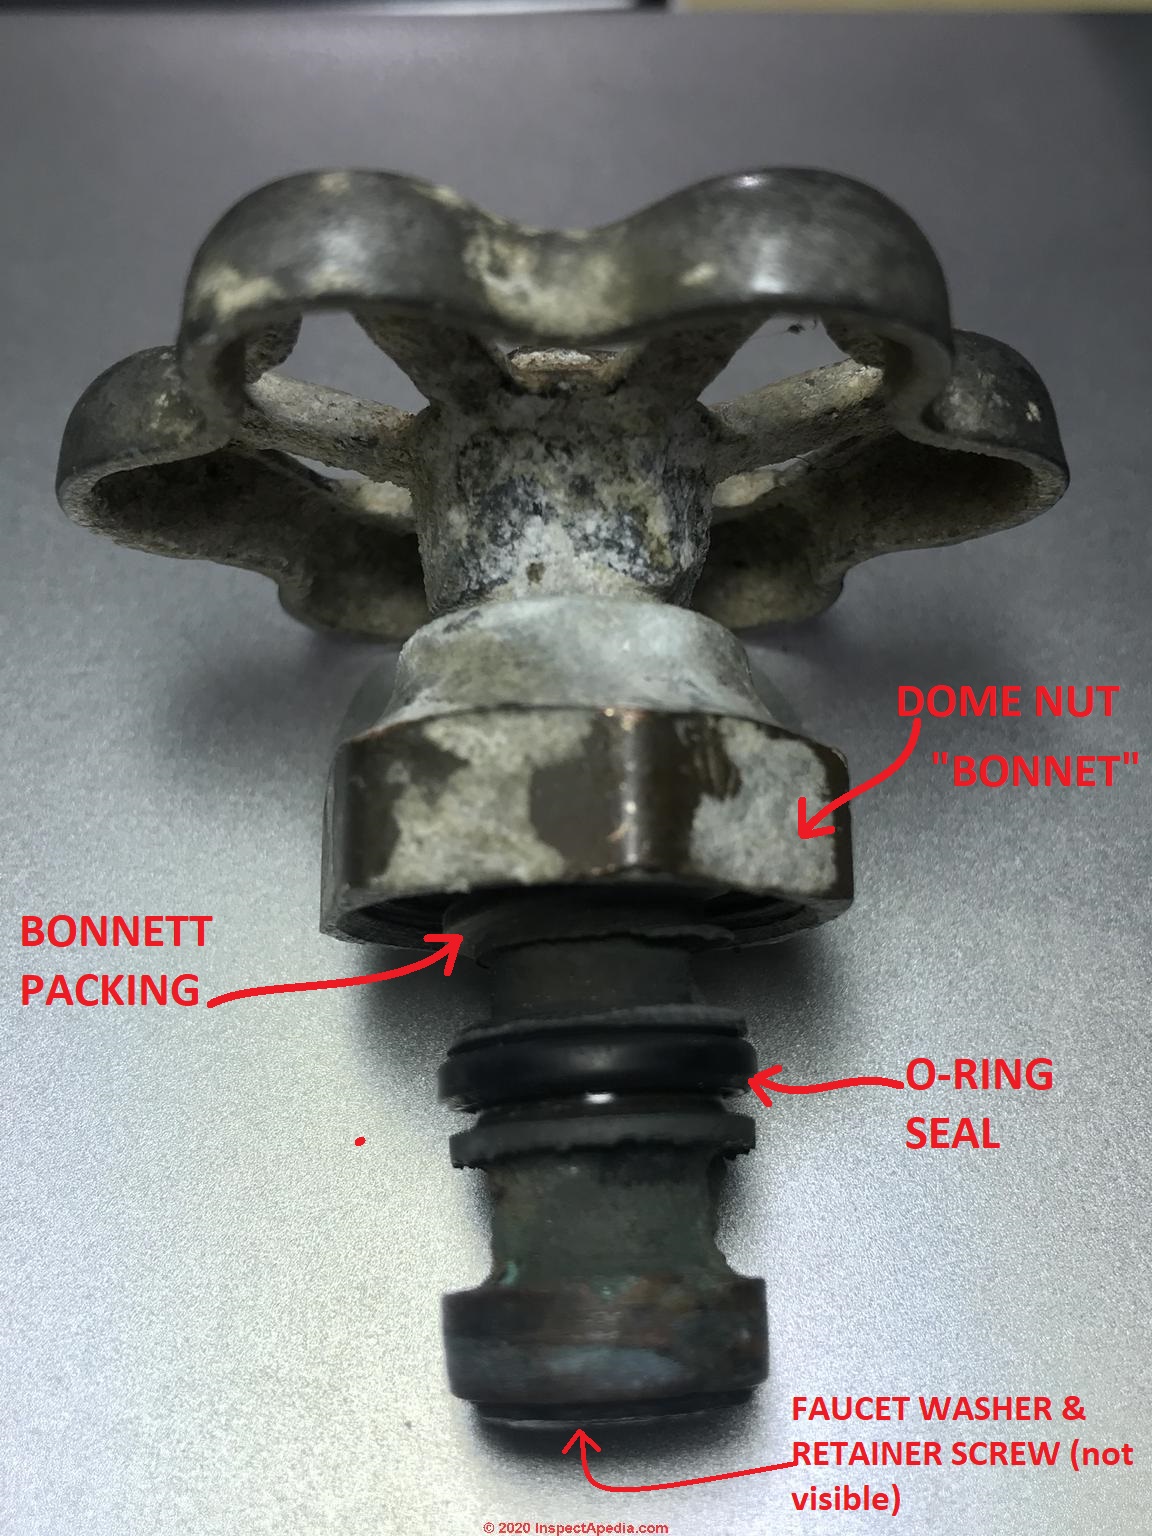
Above: outdoor hose bibb needing a new bonnet packing, was leaking around the valve stem. (Photo courtesy of InspectApedia reader CVB).
If your outdoor spigot or "hose bibb"is leaking around the valve stem shaft just under the handle, you probably need to replace the valve stem packing, but first try gently tightening the bonnet nut - the outermost large nut around the valve stem and found under the faucet handle.

Watch out: other faucet washers or O-rings may need replacement, including
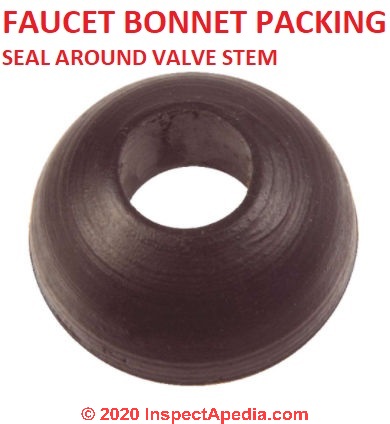
- Stem Packing or "Bonnet Packing"
or or dome packing found under the stem cap - prevents leakage around the valve stem under the faucet handle.
The packing may be graphite impregnated string or teflon or PTFE string, or it may be a formed dome of fibre and graphite or rubber - the packing is compressed around the valve stem to stop leaks around the handle.
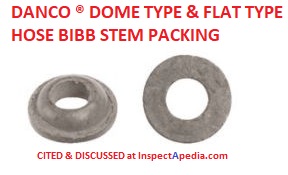
Formed bonnet packings may be flat or domed - you'll need to match the shape of the original one found in your hose bibb.
or

- Gaskets or flat washers between the valve stem cap and stem base
- O-rings around the valve stem - some faucets use an O-ring that may also need replacement.
Bring your leaky faucet parts to your hardware store to match the O-ring or other washer or gasket diameter as well as thickness for a proper fit.
...
Reader Comments, Questions & Answers About The Article Above
Below you will find questions and answers previously posted on this page at its page bottom reader comment box.
Reader Q&A - also see RECOMMENDED ARTICLES & FAQs
Fix outdoor wall faucet that leaks after replacing dome packing washer
I am repairing an outdoor wall faucet that was spewing water around the stem. The nut holding the handle to the stem is quite rusted in place. I found a new spigot whose handle/stem assembly seems identical to my old one.
It has a dome packing washer that I believe is what disintegrated on my old faucet. (Note: I tried just adding packing under the dome of my old stem, but the space between the dome and the stem is too large, and the packing just oozed out.) The new stem assembly fits my old spigot body and seems to work really well.
The faucet is located on the front of the house where the water pressure is at its highest. I attached a hose with nozzle closed and turned the water on. I tightened the packing nut slowly until there is a very small slow drip around the packing nut.
I the water is coming from the bottom of the packing nut where the threads are.
At this point should I continue tightening until the drip is gone, or should I add stem packing between the dome packing washer and the stem threads that go into the faucet?
Or should I use pipe tape on the threads of the spigot where the dome nut attaches?
Thank you in advance! - On 2021-05-20
by Robin Daniel
Reply by danjoefriedman (mod) - outdoor wall faucet spewing water around the stem
@Robin Daniel,
It's possible that the dome nut packing or washer is under-sized in outer diameter OD;If you're confident it's proper, try a bit of teflon paste on the nut threads; then tighten the stem washer dome nut packing nut carefully and make sure you're not using so much force that you're at risk of breaking the component.
Faucet leaks at valve stem
Re: Outdoor Wall Faucets - I have installed a hose-based sprinkler and timer on my faucet. For it to work without manual intervention, I must leave the faucet partially open all the time. When I do, leaks occur at the faucet valve stem.
There are no leaks when the valve is closed. What should I do to prevent leakage from a partially opened valve with the water flow well closed at the end of the hose at the sprinkler? - On 2021-05-09 by Richard Greenburg
Reply by (mod) -
@Richard Greenburg,
Most hose bibbs or faucets have a cap nut that surrounds the faucet handle stem.
Sometimes you can stop leaking by slightly tightening that nut which in turn compresses packing around the valve stem.
If that does not work the faucet can be disassembled and new packing installed.
Do I have the wrong faucet washer? Faucet handle turns continuously between open and shut.
 Great info on hose bib repair! I replaced the faucet washer on my spigot and it stopped the leak but now I have to be careful not to turn the handle too far or the faucet will turn on again.
I suspect I have the wrong faucet washer. Any advice? - On 2021-04-05 by Jackstirjohn
Reply by (mod) - Details on repairing an outside hose bibb / faucet using Woodford parts
@Jackstirjohn,
Thank you for the question: I've not encountered a hose bibb valve that leaks or re-opens when the handle is turned in too far.
A couple of things to check:
1. loose or worn dome packing washer around the valve stem - found in the dome of the hose bibb
2. a loose or wobbly stop washer assembly on the bottom of the valve stem;
3. washer thickness: also double check that the new stop washer or compression washer you installed is as thick as the original.
4. leaky faucet stop rim: Also check that there is not a groove etched or worn into the ribbed mating surface against which the stop washer is compressed when the valve is closed.
5. worn faucet stem or stripped threads: Also check that the coarse-threaded stem of the valve is not itself worn and wobbly - you may need to replace the entire upper assembly - the compression stem and bonnet assembly for your hose bibb.Take the old assembly to your hardware store or plumbing supplier (wearing a mask) for an exact match. (See illustration below using a Woodford anti-siphon hose bibb faucet as an example)
6. rotating internal ceramic disc in faucet: some faucets that use an internal disc (usually ceramic and usually not with a stop washer) can rotate too far and the disc opening comes around to the open position again; a faucet is worn internally or the wrong disc is installed or the disc is not properly seated and secured in place.
Tip on not giving up on a bad screw on a stem washer. Pliers or Vise-Grip.
Thanks for the tip on not giving up on a bad screw on a stem washer. I had one that was recessed in a "frostproof" hose bib so I wasn't even able to get vise-grips on it but after some WD40 I was able to unscrew it from the end with needlenose pliers. - On 2020-11-04 by Brad
Reply by (mod) -
Good going, Brad. You were able to salvage the valve with that perserverence.
Thanks for the feedback - that may help and encourage some other readers.
How to fix a badly-corroded faucet stem end & washer
I have the problem of a mucky soft green corroded blob. If I can't dig out the washer and unscrew it, is there somewhere I can buy just the assembly and faucet wheel? - On 2020-06-02 by CVB -
On 2020-06-03 - by (mod) -
CV
Sometimes we can remove the corroded, half-dissolved brass screw that holds the faucet washer in place, then replace both washer and screw - that's the nicest and least-expensive repair.
Shown above: A Korky 38BP beveled faucet washer and brass mounting screw kit
Unfortunately there are probably 500 parts variations in faucet stop assemblies, but if you remove the existing one you might find that you can match it at your local hardware store;
On occasion when I couldn't get a replacement stem assembly, and provided that the stem seat inside the faucet body is ok, I've even bought an entirely new faucet of same model and brand (after checking that the internal stem parts still match), then taken out the stem assembly from the new faucet and inserted it into the old one.That's still less cost and trouble than de-soldering and replacing the whole faucet.
Expanding the topic a bit to include the valve seat in the faucet body:
If the valve seat in the faucet body is slightly pitted or nicked (so it drips even with a new washer) a simple faucet grinding tool can often smooth the seat enough to work.
This faucet re-seating kit is made by Superior tool and is widely sold.
The hose bibb or other faucet stem assembly has to match the original faucet in thread, length, and stem seal diameter.
Otherwise we're looking at replacing the entire faucet assembly. In that case it's better to replace it with an anti-siphon frost-proof valve like the one shown below.An example for a complete replacement stem assembly for an outdoor, frost-proof hose bibb is below,
B&K's anti-siphon frost proof hose bibb replacement assembly for a Woodford RK-25 frost proof hose bibb.
On 2020-06-03 by CVB - compression valve hose bibb stem assembly parts
I was able to dig the washer out but unfortunately the screw was so badly corroded it just crumbled when I went at it with vice grips.
Mine is a compression valve but does not have a rod. It's very much like the one in your example. I like the idea of purchasing a whole faucet, I'll see if that is a solution.
I've purchased a Y-splitter for now so I can use the bibb, but I'll have to be careful in the winter. I'm not in a Northern state. I'm determined to fix this myself. Thanks for your help.
On 2020-06-04 - by (mod) -
Very nice going, CVB
and thank you for the follow up. The details will be a help to others.
Thank you to our readers for their generous comments:
On 2020-05-21 by Sharon - thank you for your very informative and thorough explanation
I just want to thank you for your very informative and thorough explanation of how to replace my faucet washer.
I am not a plumber. I like to fix things myself, and your pictures and comments on those pictures and the detailed instructions and warnings are just so helpful.
I use this hose frequently and just noticed it leaking a few days ago.It's been going strong for 25 years. I am going to try to replace the washer tomorrow.
Already have a good plumbing supply store to go to, and will be adding teflon paste, anti-seize compound and a faucet re-seater kit to my purchases there. It's okay if that makes it a bit more expensive for a washer. I have other, equally old faucets to attend to.
If I can get the faucet stem retaining nut off, I will be thrilled. That's what I'm most nervous about at this point. I send much gratitude your way. If I can get this, and I see no reason why I can't, I will be unbearable to be around for awhile.
It's so gratifying to be able to know what you've done and that you've done it properly. Plus it saves me a lot of money, which isn't bad either. Blessings to you!
On 2020-05-21 - by (mod) - tip for working on any faucet: find the nearest water shut-off & hope that one works
Sharon
Thank you so much for the kind comment. Do let me know how the repair goes, take photos if you can and I can perhaps offer useful comment or answer questions that may arise.
If you have a shutoff valve ahead of the hose bibb that's to be repaired, close it and then open the hose bibb (faucet) to be sure the shutoff worked.If it successfully closes the line then you can work as slowly as needed without having to shut down water to the whole house.
...
Continue reading at FAUCETS, OUTDOOR HOSE BIBBS - topic home, or select a topic from the closely-related articles below, or see the complete ARTICLE INDEX.
Or see these
Recommended Articles
- EMERGENCY WATER SHUTOFF VALVE - how to stop water flow to permit plumbing repairs if there's no working shutoff valve
- FAUCETS & CONTROLS, KITCHEN & BATH
- FAUCETS, OUTDOOR HOSE BIBBS - home
- FAUCET, OUTDOOR HOSE BIBB LEAK REPAIR - traditional hose faucet leak repairs
- FAUCET, SILLCOCK ANTI SIPHON LEAK REPAIR - frostproof Woodford type outdoor faucet leak repairs
- FREEZE-PROOF PIPES
- PLUMBING CONTROLS & VALVES - photos and descriptions of all types of plumbing valves.
- WATER SHUTOFF VALVE LOCATION - turn off water supply before trying to repair the faucet
Suggested citation for this web page
FAUCET, OUTDOOR HOSE BIBB LEAK REPAIR at InspectApedia.com - online encyclopedia of building & environmental inspection, testing, diagnosis, repair, & problem prevention advice.
Or see this
INDEX to RELATED ARTICLES: ARTICLE INDEX to PLUMBING VALVES
Or use the SEARCH BOX found below to Ask a Question or Search InspectApedia
Ask a Question or Search InspectApedia
Share this article:Try the search box just below, or if you prefer, post a question or comment in the Comments box below and we will respond promptly.
Search the InspectApedia website
Note: appearance of your Comment below may be delayed: if your comment contains an image, photograph, web link, or text that looks to the software as if it might be a web link, your posting will appear after it has been approved by a moderator. Apologies for the delay.
Only one image can be added per comment but you can post as many comments, and therefore images, as you like.
You will not receive a notification when a response to your question has been posted.
Please bookmark this page to make it easy for you to check back for our response.
IF above you see "Comment Form is loading comments..." then COMMENT BOX - countable.ca / bawkbox.com IS NOT WORKING.
In any case you are welcome to send an email directly to us at InspectApedia.com at editor@inspectApedia.com
We'll reply to you directly. Please help us help you by noting, in your email, the URL of the InspectApedia page where you wanted to comment.
Citations & Reviewers
In addition to any citations in the article above, a full list is available on request.
- [12] CAST BRASS HOSE BIBBS [PDF] with separate tamper-proof vacuum breaker", Watts Regulator, ES-SC8, 2005, Watts Regulator USA: 815 Chestnut St., No., Andover MA 01845-6098, website: www.wattsreg.com; Canada: Watts Regulator, 5435 North Service Rd., Burlington ONT L7L 5H7, website: www.wattscanada.ca
- Hose bibb synonyms: sill cock, sillcock, hose faucet, outdoor wall faucet, frost-proof faucet, freeze-proof faucet, freezeless wall faucet, hose bib, sill cock, hose hook-up.
- In addition to citations & references found in this article, see the research citations given at the end of the related articles found at our suggested
CONTINUE READING or RECOMMENDED ARTICLES.
- Carson, Dunlop & Associates Ltd., 120 Carlton Street Suite 407, Toronto ON M5A 4K2. Tel: (416) 964-9415 1-800-268-7070 Email: info@carsondunlop.com. Alan Carson is a past president of ASHI, the American Society of Home Inspectors.
Thanks to Alan Carson and Bob Dunlop, for permission for InspectAPedia to use text excerpts from The HOME REFERENCE BOOK - the Encyclopedia of Homes and to use illustrations from The ILLUSTRATED HOME .
Carson Dunlop Associates provides extensive home inspection education and report writing material. In gratitude we provide links to tsome Carson Dunlop Associates products and services.
 |
HOME | ABOUT | ASK a QUESTION | CONTACT | CONTENT USE POLICY | DESCRIPTION | POLICIES | PRIVACY | |
| © 2026 - 1985 Publisher InspectApedia.com - Daniel Friedman | |||||||||