
InspectAPedia® FREE Encyclopedia of Building & Environmental Construction, Diagnosis, Maintenance & Repair |
Question? Just ask us! InspectAPedia
|
 How to Adust Point-of-use & Plumbing Fixture Anti Scald Valves
- POST a QUESTION or COMMENT about anti scald devices and mixing valves on hot water systems
How to adjust the output hot water temperature at a tub or shower control:
Using the Pfister single-handle plumbing fixture control as an example this article describes how to access and set the hot water temperature that will be provided by an anti-scald device that is built into the plumbing fixture control.
Most built-in or point-of-use hot water temperature controls include either an adjustment disc or screw or a temperature range control disc that can be set to a range of hot water output temperatures.
In this anti-scald or hot water tempearture control article series we explain how to buy, install, adjust and inspect anti-scald equipment to prevent hot water burns. We explain what a mixing valve, tempering valve, or anti-scald valve is, where and why these valves are installed on hot water systems, and how they work.
InspectAPedia tolerates no conflicts of interest. We have no relationship with advertisers, products, or services discussed at this website.
- Daniel Friedman, Publisher/Editor/Author - See WHO ARE WE?
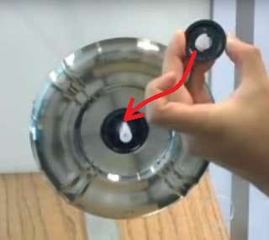
How to Adjust a Point of Use Anti Scald Valve Hot Water Output Temperature
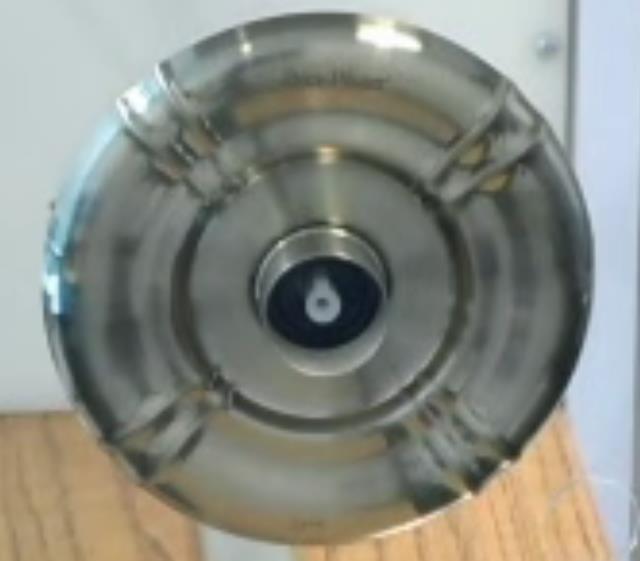
Above: photo of a Pfister series 0x8 series tub or shower valve that includes an integral anti-scald device that can be adjusted to three hot water temperature ranges. These photos are adapted from the Pfister tempeature adjustment video that is cited at the end of these notes.
Reader Question: how do I adjust a Pfister anti-scald valve at my shower?
2016/01/03 ian paul said:
So I have a Pfister with the anti scald valve in my shower. It's the only anti scald valve in my house and I can never take a really warm shower and it's killing me! Is there any modification I can do to get it warmer because adjusting it doesn't work
Reply: how to increase the hot water temperaturea at a Pfister anti-scald valve: 10 easy steps
Ian
Check first the incoming water temperature to the valve - if the incoming temp is low the valve isn't doing a thing.
Once you've made that check and assured that you have hot water arriving at the valve, there is an internal Pfister anti-scald valve setting that can be adjusted: On some Pfister valves, after you take off the valve handle itself you will see a removable disk through which the valve stem passes. Using the slot in that disc, turn the disc to the left to INCREASE the hot water temperature. I would try just about a 1/4 turn first.
If you find that the adjustment made the water too hot turn the disc back to the right 1/8 turn.
If you find that the Pfister anti scald valve adjustment was not enough - water is still too cool - use the slot to turn the valve an additional 1/4 turn to the left again.
Turning the slotted Pfister valve adjuster to the "left" or counter-clockwise is "opening" the valve further, letting more hot water flow.
On the 0X8 series Pfister anti-scald tub and shower control valves there is three-position plastic temperature-stop disc that can be re-positioned within the valve to choose among three hot water temperature ranges. Below, adapting, expanding and commenting on Pfister's own instructions (cited below) we describe how to find and adjust that control.
1. Turn off water to the Pfister anti-scald valve. Some Pfister valve models include an integral stop right at the valve (red arrow) that can shut off water - if your installation included provision of an access to the wall in which the valve has been installed.
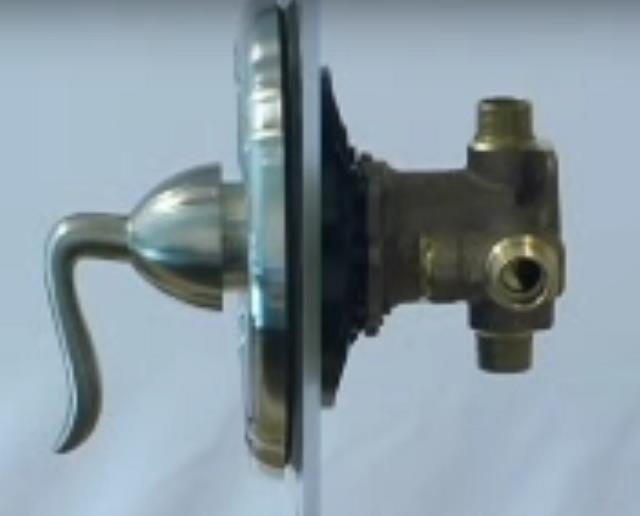
The photo above shows the bronze or brass integral water shutoff control found on some Pfister valves.
To access this control you'll need access to the wall cavity side of the valve - often provided by a plumbing access port. If your valve does not include this shutoff or if it is not accessible just turn off water to the building or to the bath where the valve is being serviced.
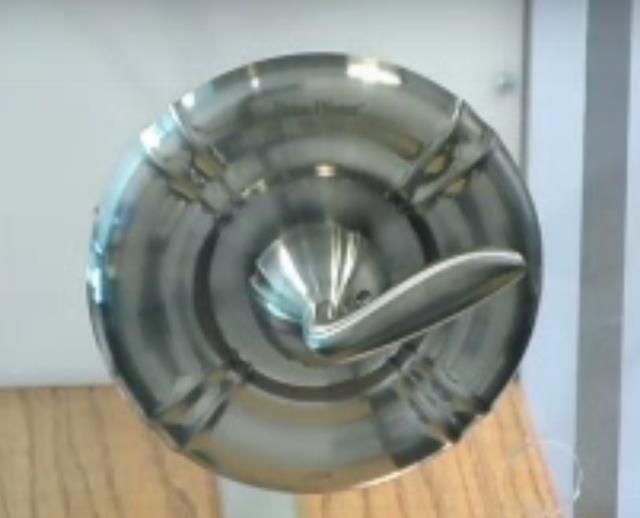
2. Remove the valve handle by removing the allen screw on the handle shaft. You'll need a 3/32" allen key wrench. Like most screws, leftie-loosie or turn counter clockwise or to the left to loosen the screw.
With the set-screw removed you can pull the handle straight out from the wall. Pfister notes that depending on your valve model, you may need to remove a button, screw and hub separately.
Watch out: don't lose the little set-screw, or if you do you will have to stop by your local hardware store to buy a replacement to permit re-installation of the valve handle. I close the tub drain or cover the shower drain so that when I drop this tiny part it doesn't go down the drain.
Note in the photo above that there may be a setscrew or button (red arrow) in the center of the white stem that needs to be removed.
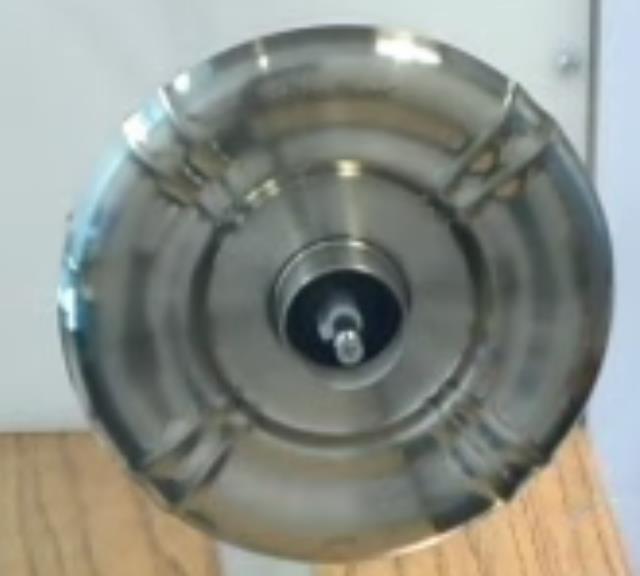
3. Remove the valve cover retainer sleeve by turning it to the left (counter clockwise).
The sleeve is the round pipe-like protrusion projecting from the center of the valve. This sleeve holds in place the larger round escutcheon or trim that surrounds the valve, but you can leave that trim in place during this job.
Note in the photo above that the retainer sleeve (red arrow) is still in place.
4. Check the position of the white plastic stem on the valve: the notch or protrusion should be pointing "up" towards 12 O'clock.
If it is not properly positioned you may need to use the valve handle to turn the stem to the proper position.
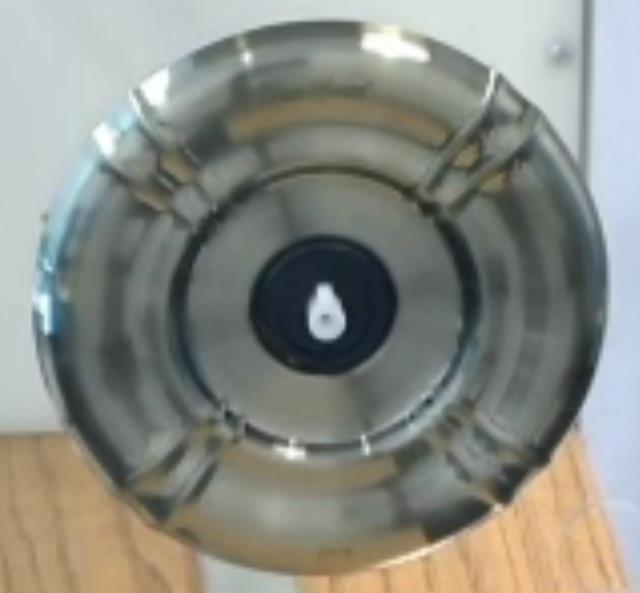
In the photo above the retainer sleeve has been removed and the white stem (orange arrow) is in the 12 O'clock position (blue arrow).
5. Remove the temperature stop: this is a black adjustable gear disc that surrounds the stem. You'll see that this gear will fit in only one position into the valve assembly, but I would take note of which side of the gear was facing "out" when you removed it.
Place the gear down with the facing-out side "up" when you set it down so that you can pick it up and re-install it properly later. This disc is the temperature setting device for the Pfister 0X8 series valves and has three setting positions marked on the edge of the disc: A = hottest, B= less-hot, C= warm.
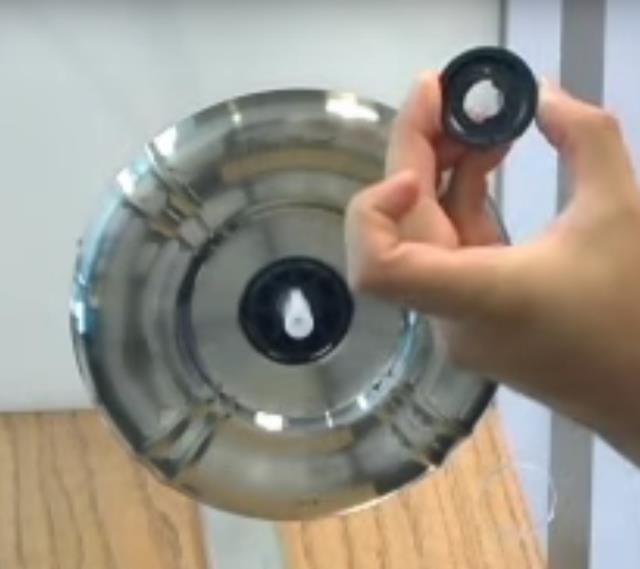
The photo above, clipped from Pfister's video (link cited below) shows the technician holding the temperature stop disc.
6. Replace the temperature stop at one of its three temperature-setting positions: With the disc outer-surface facing you, the A-setting is the right-most or clockwise-most position and the C-setting is at the left-most or counter-clockiwse-most position.
Replace the disc into the valve body in one of its three positions - you will see that it will slip into the valve body in one of three positions (the disc's A, B, or C position will be at 12 O'clock when you re-insert the disc). This disc will in turn assure that the stem cannot move beyond the point controlled by the disc.
Watch out: if the Pfister valve tempeature stop disc does not slip into a position from which it will not rotate within the valve body then you have probably not located it properly and you won't be able to re-assemble the valve parts correctly.
7. Replace the valve cover retaining sleeve by screwing it back in (clockwise or to the right).
8. Replace the valve handle by pushing it back onto the valve stem. Take care to locate the handle onto the valve stem without damaging the stem itself. Feel and fit the handle, don't pound it into place.
9. Replace the allen screw that secures the valve handle in place.
10. Turn the water supply back on and check the new tub or shower hot water temperature. Remember to let your hot wate run long enough that the temperature is not being significantly dropped by the pipes through which it is flowing.
The manufacturer of your anti-scald valve, Pfister, offers a video showing how to adjust the valve temperature on the Pfister faucet 0X8 series valve, as well as warranty and technical support. We'll provide that information below.
- Pfister Faucets 19701 DaVinci Lake Forest, California 92610, Email help: PricePfister@custhelp.comWebsite: http://www.pfisterfaucets.com/ Warranty parts & technical support telephone: 1-800-732-8238 - retrieved 2016/01/03, original source for anti scald valve adjustment video from Pfister: http://www.pfisterfaucets.com/how-to-center/how-to-videos/0x8-temperature-adjust
Built-in Plumbing Fixture Anti-Scald Valve Point-of-Use Safety Warnings
Watch out: read the installation instructions from the manufacturer of the product you are installing, both to make sure it's installed properly and thus will work as expected, and also so that you understand what to expect by way of hot water temperature control the product handles.
...
Continue reading at POINT of USE BUILT-IN FIXTURE ANTI-SCALD VALVES or select a topic from the closely-related articles below, or see the complete ARTICLE INDEX.
Or see these
Recommended Articles
- ANTI SCALD VALVES & TEMPERATURE CONTROL / MIXING VALVES - home
- DEFINE Mixing Valves, Anti Scald Valve
- BURN CAUSES, HOT WATER
- ANTI SCALD VALVE OPERATION
- ANTI SCALD VALVE at TANKLESS COIL
- ANTI-SCALD WATER TEMPERATURE CONTROL TYPES
- MANUAL ANTI-SCALD TEMPERING VALVES
- POINT of USE BUILT-IN FIXTURE ANTI-SCALD VALVES
- HOT WATER QUANTITY IMPROVEMENT via ANTI-SCALD VALVE
- SAFETY WARNINGS for ANTI-SCALD VALVES
- ANTI_SCALD VALVES & HOT WATER QUANTITY
- ANTI-SCALD VALVE INSPECTION
- ANTI SCALD VALVE PROTECTION, Best Practices
- HOT WATER ANTI-SCALD REGULATIONS
- HOT WATER QUANTITY IMPROVEMENT - not enough hot water
- TABLE OF SCALDING TEMPERATURES & TIMES
- WATER HEATER SAFETY
- WATER HEATER TEMPERATURE ADJUSTMENT CONTROLS - home
- WATER HEATER TEMPERATURE TOO COLD or TOO HOT
Suggested citation for this web page
POINT of USE ANTI-SCALD WATER TEMPERATURE ADJUST Pfister at InspectApedia.com - online encyclopedia of building & environmental inspection, testing, diagnosis, repair, & problem prevention advice.
Or see this
INDEX to RELATED ARTICLES: ARTICLE INDEX to WATER HEATERS
Or use the SEARCH BOX found below to Ask a Question or Search InspectApedia
Ask a Question or Search InspectApedia
Questions & answers or comments about anti scald devices and mixing valves on hot water systems
Try the search box just below, or if you prefer, post a question or comment in the Comments box below and we will respond promptly.
Search the InspectApedia website
Note: appearance of your Comment below may be delayed: if your comment contains an image, photograph, web link, or text that looks to the software as if it might be a web link, your posting will appear after it has been approved by a moderator. Apologies for the delay.
Only one image can be added per comment but you can post as many comments, and therefore images, as you like.
You will not receive a notification when a response to your question has been posted.
Please bookmark this page to make it easy for you to check back for our response.
IF above you see "Comment Form is loading comments..." then COMMENT BOX - countable.ca / bawkbox.com IS NOT WORKING.
In any case you are welcome to send an email directly to us at InspectApedia.com at editor@inspectApedia.com
We'll reply to you directly. Please help us help you by noting, in your email, the URL of the InspectApedia page where you wanted to comment.
Citations & References
In addition to any citations in the article above, a full list is available on request.
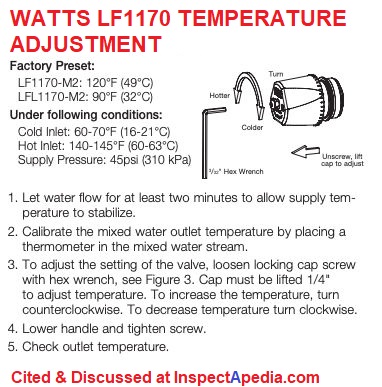
- Watts Series LF1170 and LFL1170 Hot Water Temperature Control Valves SPECIFICATIONS [PDF] (2019), Watts Regulator Co. (2013), USA Tel: (978) 688-1811, Fax: (978) 794-1848,
Website: www.watts.com,
Canada: Tel: (905) 332-4090, Fax: (905) 332-7068, Website: www.watts.ca
Excerpt: This 1 inch lead free hot water control valve is designed for installation on water heating equipment to provide tempered water to point-of-use fixtures and is ideal for radiant heat applications.
The double throttling design combines hot and cold water control for a sensitive response to water temperature changes in the mixing chamber.
It consists of a lead free brass body, solder union connections, solid wax hydraulic principle thermostat, integral filter washers and check valves, virtual shutoff upon loss of cold water supply, and a locking mechanism for the temperature setting.
The maximum pressure is 150 psi (10.3 bar). The adjustable field range temperature is 60 to 120 degrees F (16 to 49 degrees C). - Watts Series LF1170 and LFL1170 Hot Water Temperature Control Valves INSTALLATION INSTRUCTIONS [PDF] Installation, operating, and adjustment instructions for the LF1170 and LFL1170 mixing valves.
- "BDS Series Oil-Fired Hot Water Boilers, Installation Instructions, Models GS-080 -> Crown BDS-236", Crown Boiler Company, BDS 12-99, Crown Boiler Co.
P.O. Box 14818
3633 I Street
Philadelphia, PA 19134
(215) 535-8900,
Website: http://www.crownboiler.com, retrieved 2/26/2014, original source: http://www.crownboiler.com/manuals/content/ All_Models/BDS%20Series%20%28all%20models%29.pdf
The following link provides access to literature or manuals for previous Crown products:
http://www.crownboiler.com/Support/Manuals-And-Literature/Previous-Products - Mark Cramer Inspection Services Mark Cramer, Tampa Florida, Mr. Cramer is a past president of ASHI, the American Society of Home Inspectors and is a Florida home inspector and home inspection educator. Mr. Cramer serves on the ASHI Home Inspection Standards. Contact Mark Cramer at: 727-595-4211 mark@BestTampaInspector.com
- John Cranor [Website: /www.house-whisperer.com ] is an ASHI member and a home inspector (The House Whisperer) is located in Glen Allen, VA 23060. He is also a contributor to InspectApedia.com in several technical areas such as plumbing and appliances (dryer vents). Contact Mr. Cranor at 804-873-8534 or by Email: johncranor@verizon.net
- A.O. Smith water heater safety sticker: 182734-000 Rev.00 observed on the gas fired water heater shown at High Efficiency Gas Water Heaters
- Thanks to Bruce Jones, Renewable Energy Solutions Manager, for suggesting clarifications about which way to turn the mixing valve to make water supply hotter or colder. email August 2010.
- Thanks to reader J.S.A. for discussing hot water mixing valves and which way to turn the valve - July 2010
- Thanks to reader Athena for discussing hot water mixing valves and which way to turn the valve to make water hotter or cooler - October 2010.
- Thanks to reader Chris Martino for pointing out inconsistent text about which way to turn the hot water mixing valve or tempering valve. December 2010.
- Thanks to reader Bob for discussing clarifications needed to text about which way to turn the hot water mixing valve. January 2011.
- "Domestic Hot Water Scald Burn Lawsuits, The Who, What, When, Why, Where, How", Dr. D. Bynum Jr., Vernon L. Petri, Esq., John T. Myers, paralegal, Seminar and Technical Paper for the 25-28 Oct 98 Annual ASPE Meeting at the Indianapolis Convention Center, Indianapolis IN, websearch 09/21/2010,original source: http://media.wattswater.com/F-H20LS-Reprint.pdf [Large PDF]
- [5] "Water Saving Tips: For Residential Water Use, Indoors and Out", Alliance for Water Efficiency, 300 W Adams Street, Suite 601 Chicago, Illinois 60606, Tel: 773-360-5100, 866-730-A4WE, Email: jeffrey@a4we.org, web search 12/14/11, original source: plumbingefficiencyresearchcoalition.org/
- [6] "Danger in the Shower: 2008 Forum Looks at Hot Water", John Koeller, Home Energy, Jan/Feb 2009, Home Energy Magazine, 1250 Addison Street Suite 211B, Berkeley, Ca. 94702, Tel: (510) 524-5405 Email: contact@homeenergy.org
- Fuel Oil & Oil Heating Magazine, 3621 Hill Rd., Parsippany, NJ 07054, 973-331-9545
- Domestic and Commercial Oil Burners, Charles H. Burkhardt, McGraw Hill Book Company, New York 3rd Ed 1969.
- National Fuel Gas Code (Z223.1) $16.00 and National Fuel Gas Code Handbook (Z223.2) $47.00 American Gas Association (A.G.A.), 1515 Wilson Boulevard, Arlington, VA 22209 also available from National Fire Protection Association, Batterymarch Park, Quincy, MA 02269. Fundamentals of Gas Appliance Venting and Ventilation, 1985, American Gas Association Laboratories, Engineering Services Department. American Gas Association, 1515 Wilson Boulevard, Arlington, VA 22209. Catalog #XHO585. Reprinted 1989.
- The Steam Book, 1984, Training and Education Department, Fluid Handling Division, ITT [probably out of print, possibly available from several home inspection supply companies] Fuel Oil and Oil Heat Magazine, October 1990, offers an update,
- Principles of Steam Heating, $13.25 includes postage. Fuel oil & Oil Heat Magazine, 389 Passaic Ave., Fairfield, NJ 07004.
- The Lost Art of Steam Heating, Dan Holohan, 516-579-3046 FAX
- Principles of Steam Heating, Dan Holohan, technical editor of Fuel Oil and Oil Heat magazine, 389 Passaic Ave., Fairfield, NJ 07004 ($12.+1.25 postage/handling).
- "Residential Steam Heating Systems", Instructional Technologies Institute, Inc., 145 "D" Grassy Plain St., Bethel, CT 06801 800/227-1663 [home inspection training material] 1987
- "Residential Hydronic (circulating hot water) Heating Systems", Instructional Technologies Institute, Inc., 145 "D" Grassy Plain St., Bethel, CT 06801 800/227-1663 [home inspection training material] 1987
- "Warm Air Heating Systems". Instructional Technologies Institute, Inc., 145 "D" Grassy Plain St., Bethel, CT 06801 800/227-1663 [home inspection training material] 1987
- Heating, Ventilating, and Air Conditioning Volume I, Heating Fundamentals,
- Boilers, Boiler Conversions, James E. Brumbaugh, ISBN 0-672-23389-4 (v. 1) Volume II, Oil, Gas, and Coal Burners, Controls, Ducts, Piping, Valves, James E. Brumbaugh, ISBN 0-672-23390-7 (v. 2) Volume III, Radiant Heating, Water Heaters, Ventilation, Air Conditioning, Heat Pumps, Air Cleaners, James E. Brumbaugh, ISBN 0-672-23383-5 (v. 3) or ISBN 0-672-23380-0 (set) Special Sales Director, Macmillan Publishing Co., 866 Third Ave., New York, NY 10022. Macmillan Publishing Co., NY
- Installation Guide for Residential Hydronic Heating Systems
- Installation Guide #200, The Hydronics Institute, 35 Russo Place, Berkeley Heights, NJ 07922
- The ABC's of Retention Head Oil Burners, National Association of Oil Heat Service Managers, TM 115, National Old Timers' Association of the Energy Industry, PO Box 168, Mineola, NY 11501. (Excellent tips on spotting problems on oil-fired heating equipment. Booklet.)
- In addition to citations & references found in this article, see the research citations given at the end of the related articles found at our suggested
CONTINUE READING or RECOMMENDED ARTICLES.
[Click to enlarge any image]
- Carson, Dunlop & Associates Ltd., 120 Carlton Street Suite 407, Toronto ON M5A 4K2. Tel: (416) 964-9415 1-800-268-7070 Email: info@carsondunlop.com. Alan Carson is a past president of ASHI, the American Society of Home Inspectors.
Thanks to Alan Carson and Bob Dunlop, for permission for InspectAPedia to use text excerpts from The HOME REFERENCE BOOK - the Encyclopedia of Homes and to use illustrations from The ILLUSTRATED HOME .
Carson Dunlop Associates provides extensive home inspection education and report writing material. In gratitude we provide links to tsome Carson Dunlop Associates products and services.
 | HOME | ABOUT | ASK a QUESTION | CONTACT | CONTENT USE POLICY | DESCRIPTION | POLICIES | PRIVACY | |
| © 2025 - 1985 Publisher InspectApedia.com - Daniel Friedman | |||||||||