 Floor Board Damage Cut-Out & Replace Procedure
How to replace badly-damaged flooring
- POST a QUESTION or COMMENT about the diagnosis & repair of wood & engineered wood floors
Wood & engineered wood floor board replacement:
How to cut and replace badly-damaged floor boards in a wood or engineered wood floor.
This article series explains repair methods for all types of damage that occurs on various types of wood flooring in buildings. We explain what to do about gaps between interior floor boards, and we also address deterioration and problems with outside wood decks and porch floors, and we also describe repair approaches for various wood floor damage.
InspectAPedia tolerates no conflicts of interest. We have no relationship with advertisers, products, or services discussed at this website.
- Daniel Friedman, Publisher/Editor/Author - See WHO ARE WE?
Cut-out & Insert Methods for Replacing Damaged Wood Floor Boards
 How to Cut-and-Replace Damaged Floor Boards
Solid wood plank floor boards can be cut and removed and replaced with matching wood by working with a drill, chisels, and an oscillating blade thin-kerf saw.
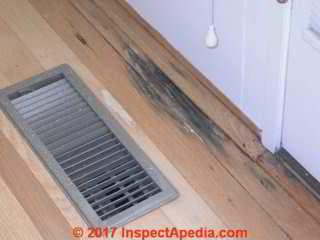
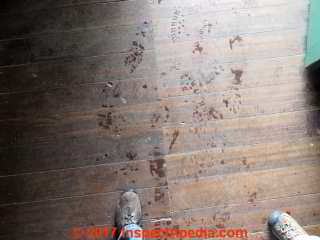
Our photo shows an unfortunate situation: leaks at the entry door went on so long that the floor and subfloor were actually rotted and soft. But someone did an expensive floor re-finishing job and simply polyurethaned right over the rotted floor.
Replacing the rotted floor boards before the floor sanding and refinishing job might have been a nicer approach.
[Click to enlarge any image]
Watch out: do you really need to cut and replace damaged floor boards?
It is always smart to use the least-invasive, least-destructive repair or renovation method you can. Floor boards that have been stained, gouged, scratched can often be repaired in place.
See WOOD FLOOR DAMAGE REPAIR for other wood floor repair procedures.
These flooring cut and replace methods, designed originally for replacing solid wood flooring, are either difficult or possibly not suitable at all for repairing plastic laminate flooring nor for small areas of damaged engineered wood nor other wood floor types, but still, they can sometimes be used, with care, for both replacing badly-damaged, rotted, or deep-stained solid wood and engineered wood flooring.
You will want to be sure you have the right tools on hand, the right adhesive, and that you prepare the job to protect the surrounding floor to get the best results from any flooring remove-and-replace job.
- Tools & Supplies to Cut & Replace damaged flooring include at least the following:
Construction adhesive or other glue that won't interact with or ruin pre-finished wood flooring, engineered wood flooring, or plastic laminate flooring. Depending on the adhesive you may need a caulk gun and you may need cleanup chemicals like odorless paint thinner, and clean rags.
Drop cloths or plastic so that you don't foul up the surrounding floor with your tools, glue, equipment
Hammer & wood block to tap replacement floor boards into place
Masking tape
Metal straight edge (steel works better than softer aluminum) - I use a framing square
Measuring tape
Odorless paint thinner or other glue clean-up solvent that won't damage your flooring
Replacement flooring that matches the original or is as close to it as you can obtain (time and photo-exposure may mean the original floor is darker than the replacement boards)
Shop vac or equivalent to remove all dust and scraps from the cut-out floor opening
Small thin-kerf circular saw or equivalent
Utility knife, also referred to as a drywall knife or a mat knife
- Use a small circular saw with a thin blade, finishing the cut by chisel if necessary. A compact circular saw such as those made by Dremel, Genesis, Makita, MasterMind, Rockwell, Rotorrazer Von Haus, and Worx can work well in this application.
I have also used a sawzall, a circular saw, and a thin blade in a Milwaukee small circular tile saw to cut and remove larger areas of damaged flooring but you must work with great care not to over-cut or to run the saw kerf into intact boards you intended to leave in place. Such cuts must be finished by hand with a hand saw or chisel.
Oscillating blade saws that can cut flooring or other wood using a thin kerf blade are made by Bosch, Dremel, Fein and other manufacturers.
Watch out: it is virtually impossible to make a perfectly-straight end-cut into flooring using a jig saw or a sawzall. As a result the butt joint of a section of replacement flooring to the existing in-place flooring will look horrible. Here are some tips for getting dead straight end cuts across replacement floor boards:
Shown below: a Makita SH01 12V 3/8" circular saw (now discontinued by Makita). For many years I used a still-smaller version of this saw with a very thin fine-toothed blade as an excellent tool for restoring damaged flooring. The base permits tilting to obtain the back cut end cuts I describe above.
Watch out: When using any straight bladed saw such as a an oscillating blade, be darn sure that your blade is not wobbling side to side or it will be impossible to make a dead-straight cut.
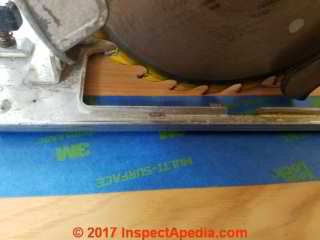
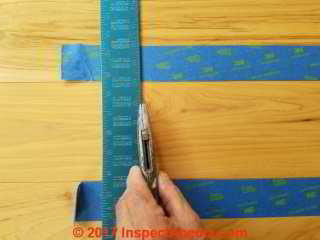
- Tape a straight edge along the floor as a saw guide to keep your cuts dead straight at both end cuts and along the side of a board to be removed. In my photo below I've left out the straight edge in order to permit a view of the actual cut line given by my blue masking tape.
- Protect surrounding flooring from scratches during sawing by blue painter's tape (masking tape) on the floor surfaces around the cuts. I also put the same masking tape on the shoe of my circular saw.
I want to get a very clean edge on the floor boards that will remain in place. My photo shows that I'm going to run the saw blade just about a mm away from the blue tape where I've both taped and pre-scored my flooring before starting the cut.
I use a utility knife to pre-score both long cuts and board end cross cuts as I'll expand upon below.
- Make your actual side cut 1/10" or more into the to-be-removed-board, that is, 1/10" from the side-edges of the boards that are to remain in place in order to avoid nicking or damaging those boards.
The slight scrap of the removed-board that remains after the side cut can easily be removed by hand after the board end-cuts are complete.I set my saw blade depth to the thickness of the flooring. In my opinion it's not a catastrophe if the blade cuts a 1/6" into the subfloor below - perhaps cutting the felt or rosin paper under the floor but not enough to damage the subfloor below.
To make my cuts along the floor board lengths, I take great care that my saw blade does not nick the edges of the flooring that is to remain in place. It's better to leave a bit of wood of the to-be-removed board that you later clean up with a utility knife than to ruin the edge of the flooring that's to remain in place.
Watch out: when using a circular saw, take care not to over-cut past the end cut lines on your boards or you'll have to extend the repair area to correct for that mistake.
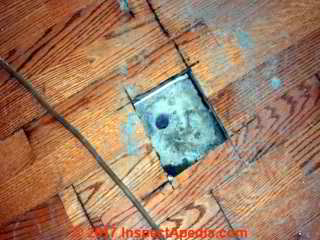
Our photo below, not one of my jobs, shows really ugly overcuts at the corners of a rectangle where flooring was cut out with a circular saw. I think someone drilled the hole to try to drain water from below a wet, buckling wood floor.
- Watch out: more about overcuts: I stop my saw when the upper edge of the blade reaches the end of the cut, and I finish the cut by hand with a flooring saw or a chisel or even a utility knife.
If you over-cut past the rectangular area you want to repair you'll face an ever-expanding area of flooring to remove that may not stop until you reach a wall: don't do that.
If the flooring is very thin plastic or vinyl flooring planks I might try making the entire cut without a saw at all, using multiple scores with a utility knife and a metal ruler. Take great care not to cut into the boards that are to remain or you'll be sorry about how the "repair" looks later.
Normally you will need to complete both side cuts and end cuts into a wood floor by using a utility knife or a fine chisel. I use a utility knife to clean up those edges in the cut-out repair area before trying to snap new boards in place.
- Prepare your end cut by making a preliminary cut line using a metal straight edge and a utility knife. Pre-scoring a saw cut line with a utility knife, especially along end cuts across the grain, help avoid raising or chipping out the ends of the boards that remain in place.
Cut into the existing floor with your utility knife 1/10" or more. This will prevent uplift and chipping out of wood splinters or grains from the end of the floor boards that are to remain in place.
Watch out: it's easy for the knife to skip off of the ruler and cut your fingers to smithereens.
Getting blood all over the floor creates still more cleanup work and having to run out for stitches also slows the whole job down a day or more. (Speaking from personal experience.)
To start my end-cuts or corner cuts I might drill into and through the floor outer floor boards to be removed at the corners of the cut-out area, but take care that the drilled hole does not touch or extend into the boards that are to remain in place or you'll have ugly arc-openings in your finished flooring.
The drilled holes make it easier to start my saw blade and to stop it without cutting into the surrounding floor area. But I do not use a jigsaw for the actual cuts - having learned the hard way that my cuts were not sufficiently straight.
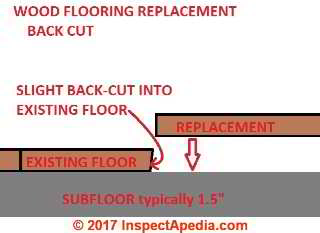
- Make your end cut into the existing floor using a slight back-cut angle (shown above) so that if necessary the uppermost side of the floor board can be trimmed dead straight using a metal straight edge and utility knife
- Replacement Floor Board Cutting Tips
When cutting my new boards to fit, I cut the boards a mm+ long and I angle my saw blade just a couple of degrees to bevel the replacement boards on their ends so that I get a perfect butting fit against the edges of the boards that are already in place.
It's easier to very slightly shorten a too-long board by sanding the outer edge of its bevel with a sanding block (keep it straight) than to drive back to the supplier to buy more replacement material because I cut the boards too short and faced an ugly gap.
A conventional 3/4" wood floor board can be toe-nailed through the tongue using a power finish- or flooring nailer but for small repairs you're not likely to have that tool at hand. In that case if you're using small 4d or 6d finishing nails or ring-shanked or spiral flooring nails, pre-drill the tongue so that you don't split the board.
Make your end cut of the replacement boards using a chop saw set precisely to 90 degrees across the board end and 5 degrees of back cut. Use a fine-toothed carbide saw blade
- Remove the damaged wood boards. You may need to pry out the first cut-out board using a utility knife. Take care not to score or nick the edges of the flooring that remains in place.
- Prepare the Replacement Flooring. Tongue & Groove flooring is normally installed with the groove of each successive board snapping onto the tongue of the already-in-place board.
That means that with the old boards removed I [or now you] will have to cut the tongue off of the last new board section that must marry into the groove of the last in-place flooring.
I prepare all of the replacement boards and check the fit of their lengths, one by one, before starting to nail or glue them in place. That lets me make any final fine-tuning adjustments.
Then depending on the area and type of flooring I may use a combination of nailing and gluing or just gluing to install the new floor boards.
Vacuum out all of the dust and debris in the work area. You'll be sorry if a bit of sawdust keeps you from snapping the new floor boards down level with the existing floor.
Watch out: if you snap a replacement board down into a floor opening that has even a small bit of debris left in place the board may not rest flush and you'll have a devil of a time getting it back out without damaging the floor. Be sure the receiving opening is perfectly-prepared and clean before inserting the new board. - Insert the replacement board into the cutout opening, having prepared the opening with a small amount of construction adhesive if needed to avoid face-nailing the repair board.
Photo above: abutting sections of old and newer wood flooring following a wood floor repair in the Deans Cottage, Christchurch, New Zealand. [Click to enlarge any image]
- Gluing In the Replacement Floor Boards
I use construction adhesive to glue the final wood board in place rather than leaving exposed nails in its surface, or for a laminated type floor board replacement over an area of 3 feet or less, I glue my new laminate floor boards down directly to the subfloor.
If there was felt or rosin paper below the floor repair area, if you are gluing to the subfloor you'll have to remove it in order to successfully glue down the replacement flooring section. Otherwise you're relying on the strength of the underlayment, typically red rosin paper or 15# felt to hold the floor patch in place - not a strong repair.
For the glue-down-to-subfloor method I place my dabs of glue at 4-6" intervals on the board underside and in thin dabs along the lower edge of the board edges at the same intervals.
Watch out: However gluing wood flooring directly to the subfloor is NOT the best wood or engineered wood floor repair approach. The problem is that you may create a "stuck island" in the middle of what is designed to be a "floating" floor. A floating floor permits movement of the wood or engineered wood flooring as temperature and humidity vary. Your stuck-island of glued-down flooring could cause floor buckling or cracking.
A better floor patch glue-in approach is to put a small bead of construction adhesive along all four of the lower half of the edges of the boards of the original floor - that is, around the edges of the cutout hole into which new floor boards are to be replaced. That will secure the new boards to the edges of the old boards and should permit the whole floor assembly to move as needed. Leave the underlayment in place for this approach.Watch out: don't use too much glue. Too much glue under the boards may prevent you from pressing the new board fully down flush with the existing floor.
Too much glue on the edges of boards will ooze up through the floor board joints and look horrible.
Knowing that I tend to over-do the glue I also keep some odorless paint thinner at hand to remove any excess adhesive without dissolving the finish on the replacement boards.
- Weight the replacement board during the glue dry/cure time.
The drying time depends on the adhesive being used but is usually an hour or more. A stack of encyclopedias works well. If I'm worried that the replacement board may be above the existing floor I might place a board on top of the replacement section so that my book-weights push it down a bit more aggressively.
...
Continue reading at WOOD FLOOR DAMAGE REPAIR or select a topic from the closely-related articles below, or see the complete ARTICLE INDEX.
Or see these
Wood Floor Articles
- ANIMAL STAINS & MARKS in BUILDINGS
- FLOOR DAMAGE DIAGNOSIS
- WOOD FLOOR AGE TYPES HISTORY - home
- WOOD FLOOR DAMAGE REPAIR
- BOARD CUPPING CAUSES
- BUCKLED WOOD FLOORING
- CUPPED WOOD FLOOR BOARDS
- FLOOR DAMAGE DIAGNOSIS
- FLOOR, WOOD MOISTURE
- GAPS BETWEEN FLOOR BOARDS
- GAPS in RADIANT HEATED WOOD FLOORS
- LAMINATE FLOOR DAMAGE REPAIR
- LAMINATE WOOD FLOOR
- LOOSE NOISY FLOOR REPAIR
- MOLD DAMAGED WOOD FLOORING
- PET STAINED WOOD FLOORS
- PET STAINS & MARKS in BUILDING
- SCRATCHED WOOD FLOORING
- SQUEAKY FLOOR BOARD
- WOOD FLOOR BOARD REPLACEMENT
- WOOD FLOOR REFINISHING SAFETY
- WOOD FLOOR ENGINEERED, REPAIRS
- WOOD FLOOR FINISHES
- WOOD FLOOR INSTALLATION
- WOOD FLOOR MOISTURE
- WOOD FLOOR, PARQUET
- WOOD FLOOR RADIANT HEAT
- WOOD FLOOR SOLID STRIP, PLANK
Suggested citation for this web page
WOOD FLOOR BOARD REPLACEMENT at InspectApedia.com - online encyclopedia of building & environmental inspection, testing, diagnosis, repair, & problem prevention advice.
Or see this
INDEX to RELATED ARTICLES: ARTICLE INDEX to BUILDING FLOORING
Or use the SEARCH BOX found below to Ask a Question or Search InspectApedia
Or see
INDEX to RELATED ARTICLES: ARTICLE INDEX to BUILDING INTERIORS
Or use the SEARCH BOX found below to Ask a Question or Search InspectApedia
Ask a Question or Search InspectApedia
Try the search box just below, or if you prefer, post a question or comment in the Comments box below and we will respond promptly.
Search the InspectApedia website
Note: appearance of your Comment below may be delayed: if your comment contains an image, photograph, web link, or text that looks to the software as if it might be a web link, your posting will appear after it has been approved by a moderator. Apologies for the delay.
Only one image can be added per comment but you can post as many comments, and therefore images, as you like.
You will not receive a notification when a response to your question has been posted.
Please bookmark this page to make it easy for you to check back for our response.
Comments
IF above you see "Comment Form is loading comments..." then COMMENT BOX - countable.ca / bawkbox.com IS NOT WORKING.
In any case you are welcome to send an email directly to us at InspectApedia.com at editor@inspectApedia.com
We'll reply to you directly. Please help us help you by noting, in your email, the URL of the InspectApedia page where you wanted to comment.
Citations & References
In addition to any citations in the article above, a full list is available on request.
- Simpson, W.T., ed., "Dry Kiln Opeator's Manual", Agriculture Handbook 188, USDA Forest Service
- Simpson, William, TenWolde, Anton, "Physical Properties and Moisture Relations of Wood", [PDF] from U.S. FPL, Forest Products Laboratory, Wood Handbook - Wood as an engineering material", 1999, Gen. Tech. Rep. FPL-GTR-113, Madison WI, U.S. Department of Agriculture (USDA) Forest Service, FPL. - retrieved 12/20/2014, original source: http://www.woodweb.com/Resources/wood_eng_handbook/Ch03.pdf
- Skaar, C., Wood Water RElations, 1988, Springer-Verlag, New York 1988
- Stamm, A.J., Loughborough W.K., Thermodynamics of the swelling of wood, Journal of Physical Chemistry 1935, 39(1):121
- Best Practices Guide to Residential Construction, by Steven Bliss. John Wiley & Sons, 2006. ISBN-10: 0471648361, ISBN-13: 978-0471648369, Hardcover: 320 pages, available from Amazon.com and also Wiley.com. See our book review of this publication.
- Building Research Council, BRC, nee Small Homes Council, SHC, School of Architecture, University of Illinois at Urbana-Champaign, brc.arch.uiuc.edu. "The Small Homes Council (our original name) was organized in 1944 during the war at the request of the President of the University of Illinois to consider the role of the university in meeting the demand for housing in the United States. Soldiers would be coming home after the war and would be needing good low-cost housing. ... In 1993, the Council became part of the School of Architecture, and since then has been known as the School of Architecture-Building Research Council. ... The Council's researchers answered many critical questions that would affect the quality of the nation's housing stock.
- Our recommended books about building & mechanical systems design, inspection, problem diagnosis, and repair, and about indoor environment and IAQ testing, diagnosis, and cleanup are at the InspectAPedia Bookstore. Also see our Book Reviews - InspectAPedia.
- ASTM F 1637, Standard Practice for Safe Walking Surfaces, (Similar to the above standards)
- Stanton, .F., et al., National Bureau of Standards Special Publication 506: 143-151
- In addition to citations & references found in this article, see the research citations given at the end of the related articles found at our suggested
CONTINUE READING or RECOMMENDED ARTICLES.
- Carson, Dunlop & Associates Ltd., 120 Carlton Street Suite 407, Toronto ON M5A 4K2. Tel: (416) 964-9415 1-800-268-7070 Email: info@carsondunlop.com. Alan Carson is a past president of ASHI, the American Society of Home Inspectors.
Thanks to Alan Carson and Bob Dunlop, for permission for InspectAPedia to use text excerpts from The HOME REFERENCE BOOK - the Encyclopedia of Homes and to use illustrations from The ILLUSTRATED HOME .
Carson Dunlop Associates provides extensive home inspection education and report writing material. In gratitude we provide links to tsome Carson Dunlop Associates products and services.



No one has commented yet. Be the first!