 Best Practices Guide to Wood Floor Installation
- POST a QUESTION or COMMENT about how to install a wood floor
How to install wood flooring:
This article explains the best practices used when installing wood flooring in buildings, including installation details for different surfaces: concrete, underlayment, etc.
Described here: Subfloor Specifications for Solid Wood Flooring Installations. Guide to Installing Solid Wood Flooring Over Concrete. Guide to Nailing Solid Wood Flooring: Nailing Specs. Installing wood flooring over radiant heat, guide. Where to buy wood flooring products for building interiors: manufacturers, wood flooring industry associations.
This article series discusses and provides a best construction practices guide to the selection and installation of building interior surface materials, carpeting, doors, drywall, trim, flooring, lighting, plaster, materials, finishes, and sound control materials.
InspectAPedia tolerates no conflicts of interest. We have no relationship with advertisers, products, or services discussed at this website.
- Daniel Friedman, Publisher/Editor/Author - See WHO ARE WE?
Installation Procedures for Solid Wood Flooring
 As described in the book, Best Practices Guide to Residential Construction (Steve Bliss, J Wiley & Sons) Chapter 5, Interior Finish:
Standard 3/4-inch strip or plank flooring is nailed through the tongue into a sound, dry wood subfloor—either plywood, oriented-strand board (OSB), or solid planks.
If installed over a slab, the subfloor can either be floated or nailed to the slab.
[Click to enlarge any image]
Subfloor Specifications for Solid Wood Flooring Installations
In new construction, the best subfloor for wood flooring is nailed and glued 3/4-inch T&G plywood, with the finish flooring installed perpendicular to the joists if possible.
Research conducted by the National Oak Flooring Manufacturers Association (NOFMA) has shown that 5/8-inch plywood or 3/4-inch OSB also have adequate nail-holding ability for hardwood flooring, although OSB can swell if it gets wet.
Before installing the flooring, nail or screw any loose spots, and shim or sand down any uneven spots to prevent squeaks.
Then lay down a layer of 15-pound asphalt felt, which reduces the flow of water vapor into the flooring. The added friction also helps restrict movement in the flooring.
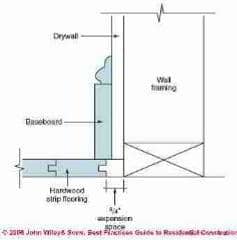
Leave a 3/4-inch expansion space along the edges on the long side of the flooring to accommodate any movement.
The expansion space can be concealed with baseboard and shoe molding or by cutting back the drywall (Figure 5-8).
Guide to Installing Solid Wood Flooring Over Concrete
For below-grade installations, use a laminated flooring product. For slabs-on-grade, a plywood subfloor is required—either nailed to the slab or floated on top. The slab should be poured over granular backfill with a vapor barrier and must be dry before installation.
To test for dryness, duct-tape a one-square-foot piece of polyethylene film to the floor for 24 hours. If the film is clouded or beaded up with moisture, the slab is too wet. Slabs less than 60 days old are usually too wet. Use heat and ventilation, if necessary, to speed up the drying time.
The slab should be level to 1/4-inch in 10 feet. Level any uneven spots with clean mason’s sand or a floor leveling compound. Next, lay down a 6-mil polyethylene vapor barrier.

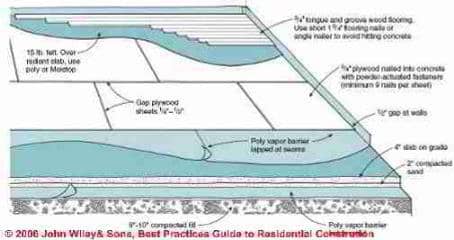
On a dry slab where moisture problems are not anticipated, the nail-on method is preferred.
Nail 3/4-inch plywood to the concrete with powder-actuated fasteners using at least nine nails per panel (Figure 5-9).
Leave 1/4 to 1/ 2-inch between sheets and 1/2-inch around the room perimeter for expansion. Start alternating courses with half sheets so the joints are staggered.
Lay 15-pound felt over the plywood and install the flooring. To avoid puncturing the vapor barrier and hitting the concrete, use shorter 1 3/ 4-inch flooring nails or an angled adapter on the floor nailer.

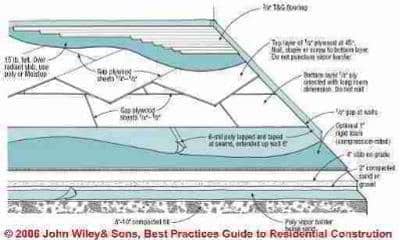
If there is any question about moisture coming up through the slab, use the floating method (Figure 5-10).
As an extra precaution, tape the laps in the poly vapor barrier and run it a few inches up the wall. Next lay down, but do not nail, 4x8 sheets of 1/2 -inch plywood with the long edge oriented along the length of the room. Leave a 1/4- to 1/2-inch gap between sheets and 3/4- inch around the room perimeter.
Next, lay another layer of 1/2-inch plywood oriented at 45 degrees to the first layer with the same spacing, and staple, screw, or nail (7/8-inch ring-shank nails) the top layer to the bottom, being careful not to puncture the vapor barrier. Finally, cover the plywood with 15-pound felt and install the flooring.
To insulate the floor, a layer of compression-rated foam insulation can go between the poly vapor barrier and the plywood.
Guide to Nailing Solid Wood Flooring: Nailing Specs
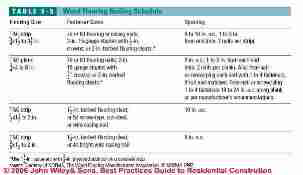
In general, the more nails in wood flooring, the less likely there is to be movement or squeaks. The recommended nailing schedule for 3/4-inch-thick strip flooring is every 8 to 10 inches with a 7d or 8d flooring nail (see Table 5-5). If the subfloor is less than 3/4-inch thick, nail into the joists with one nail between each joist. Stagger the ends of strip flooring at least 6 inches.
For plank flooring 4 inches and wider, the minimum nail spacing is 8 inches; closer is better.
With boards over 5 inches wide, if the ends are not end-matched (with T&G), the ends will tend to cup or curl unless face-nailed or screwed and plugged with two to three fasteners.
It is also a good idea to secure the flooring along its length with face-nails or screws and plugs.
If nailing, use wedge or screw-shank flooring nails set below the surface, or decorative nails left exposed for a traditional appearance.
Drive the face nails about 30 degrees away from the center to help reduce cupping. Use two to three nails across for planks up to 5 inches, three to four nails for planks up to 8 inches.
- - Adapted with permission from Best Practices Guide to Residential Construction (Steve Bliss, J Wiley & Sons) .
Resources: Manufacturers, Industry Associations, & Sources of Indoor Wall Materials, Flooring, Carpeting, Lighting, Sound Control Materials
Prefinished Wood Flooring
- Alloc Inc. www.alloc.com Snap-together, no-glue long-strip and single-strip laminated flooring
- Anderson Hardwood Floors www.andersonfloors.com Laminated strip, nail, glue, and floating
- Armstrong World Industries www.armstrong.com Bruce, Hartco, and Robbins prefinished plank and engineered strip
- BHK of America www.bhkuniclic.com Snap-together, no-glue laminated wood flooring
- Columbia Wood Flooring www.columbiaflooring.com Prefinished solid strip
- Duro-Design www.duro-design.com Floating click-lock oak flooring
- Gammapar www.gammapar.com Engineered wood strip with oil, UV-cured urethane, or acrylic-impregnated finish
- Junkers Hardwood www.junkershardwood.com Floating solid strip with metal clip installation
- Kahrs www.kahrs.com Laminated strip with UV-cured acrylic urethane, nail, glue, or floating
- Lauzon www.lauzonltd.com Prefinished strip, laminated strip, and click-lock laminated plank
- Mannington Mills www.mannington.com Laminated strip and plank with polyurethane and aluminum-oxide finish
- Medallion Hardwood Flooring www.medallionhardwood.com Prefinished solid hardwood strip and plank with aluminum-oxide finish
- Tarkett Wood Floors www.harris-tarkett.com Prefinished solid hardwood, laminated, and long-strip flooring
- MercierWood Flooring www.mercierdurable.com Prefinished solid strip and laminated strip with aluminum-oxide finish
- PermaGrain Hardwood Flooring www.permagrain.com Acrylic-impregnated laminated strip and plank
- Zickgraf Hardwood Flooring www.zickgraf.com Prefinished solid strip with UV-cured urethane with diamond and aluminum oxide
Bamboo Flooring Producers & Sources
- Details: see BAMBOO FLOORING
- Bamtex (a division of Wood Flooring International) www.bamtex.com Laminated bamboo and palm flooring
- Duro-Design www.duro-design.com Laminated bamboo flooring with durable water-based finish
- Gammapar www.gammapar.com Acrylic-impregnated bamboo flooring
- Hawa Bamboo Flooring www.hawabamboo.com Prefinished bamboo flooring with aluminum-oxide finish
- Natural Cork www.naturalcork.com Prefinished glue-down or nail-down 3-ply bamboo planks with aluminum-oxide finish
Resilient Flooring Manufacturers List
- Congoleum www.congoleum.com Vinyl sheet flooring and tiles
- Domco (division of Domco Tarkett Group) www.domco.com Vinyl sheet flooring and tiles
- Forbo www.forbo-flooring.com Linoleum sheet and tiles
- Mannington Mills www.mannington.com Vinyl sheet flooring and tiles
- Nova Distinctive Floors www.novafloorings.com Laminated linoleum surface over fiberboard and cork planks, floating installation
- Tarkett www.tarkettna.com Vinyl sheet flooring and tiles
Cork Flooring Manufacturers & Sources
- american Cork Products Co. www.amcork.com Prefinished parquet tiles and floating floor planks
- Amorim Revestimentos (formerly Ipocork) www.wicanders.com Floating or glue-down laminated cork tiles with UV-acrylic or oil finish
- BHK of America www.bhkuniclic.com Snap-together, no-glue, laminated cork flooring with UV-acrylic finish
- Expanko Cork Inc. www.expanko.com Cork tiles with wax or polyurethane finish
- Korq Inc. (212) 758-2593
- Natural Cork www.naturalcork.com Glue-down cork tiles and floating laminated planks with UV-cured acrylic finish
- Nova Distinctive Floors www.novafloorings.com Laminated cork planks with glue-down and floating click-lock installation
- WECork www.wecork.com Cork tiles, sheets, and floating floors
Polymer (Urethane), MDF, and Vinyl Trim Producers & Sources
- Burton Mouldings www.burton-mouldings.com MDF(medium-density fiberboard), polymer, flex, and wood
- Fypon www.fypon.com Polymer moldings and components
- Nu-Wood www.nu-wood.com Polymer moldings and components
- Outwater Plastics www.outwater.com Polymer moldings and components
- RAS Industries www.rasindustries.com Polymer moldings and components
- Royal Mouldings (formerly Marley Mouldings) www.royalmouldings.com Polymer, polystyrene, expanded-PVC, CPVC, and acrylic molding profiles and components
Flexible Trim Manufacturers & Sources
- Flex Trim www.flextrim.com Flexible polymer moldings
- Resin Art www.resinart.com Flexible polymer moldings
Wood Flooring Industry & Trade Associations for Wood Products, Flooring and Floor Installation
- Forest Stewardship Program www.fscus.org
- FloorFacts www.floorfacts.com
- National Oak Flooring Manufacturers Association (NOFMA) www.nofma.com
- National Wood Flooring Association www.woodfloors.org
- Painting and Decorating Contractors of America www.pdca.org
- Smartwood/Rainforest Alliance www.smartwood.org
- - Adapted with permission from Best Practices Guide to Residential Construction (Steve Bliss, J Wiley & Sons) .
...
Continue reading at FLOOR, WOOD FINISHES or select a topic from the closely-related articles below, or see the complete ARTICLE INDEX.
Or see
Suggested citation for this web page
FLOOR, WOOD INSTALLATION GUIDE at InspectApedia.com - online encyclopedia of building & environmental inspection, testing, diagnosis, repair, & problem prevention advice.
Or see this
INDEX to RELATED ARTICLES: ARTICLE INDEX to BUILDING FLOORING
Or use the SEARCH BOX found below to Ask a Question or Search InspectApedia
Or see
INDEX to RELATED ARTICLES: ARTICLE INDEX to BUILDING INTERIORS
Or use the SEARCH BOX found below to Ask a Question or Search InspectApedia
Ask a Question or Search InspectApedia
Try the search box just below, or if you prefer, post a question or comment in the Comments box below and we will respond promptly.
Search the InspectApedia website
Note: appearance of your Comment below may be delayed: if your comment contains an image, photograph, web link, or text that looks to the software as if it might be a web link, your posting will appear after it has been approved by a moderator. Apologies for the delay.
Only one image can be added per comment but you can post as many comments, and therefore images, as you like.
You will not receive a notification when a response to your question has been posted.
Please bookmark this page to make it easy for you to check back for our response.
IF above you see "Comment Form is loading comments..." then COMMENT BOX - countable.ca / bawkbox.com IS NOT WORKING.
In any case you are welcome to send an email directly to us at InspectApedia.com at editor@inspectApedia.com
We'll reply to you directly. Please help us help you by noting, in your email, the URL of the InspectApedia page where you wanted to comment.
Citations & References
In addition to any citations in the article above, a full list is available on request.
- Steve Bliss's Building Advisor at buildingadvisor.com helps homeowners & contractors plan & complete successful building & remodeling projects: buying land, site work, building design, cost estimating, materials & components, & project management through complete construction. Email: info@buildingadvisor.com
Steven Bliss served as editorial director and co-publisher of The Journal of Light Construction for 16 years and previously as building technology editor for Progressive Builder and Solar Age magazines. He worked in the building trades as a carpenter and design/build contractor for more than ten years and holds a masters degree from the Harvard Graduate School of Education. Excerpts from his recent book, Best Practices Guide to Residential Construction, Wiley (November 18, 2005) ISBN-10: 0471648361, ISBN-13: 978-0471648369, appear throughout this website, with permission and courtesy of Wiley & Sons. Best Practices Guide is available from the publisher, J. Wiley & Sons, and also at Amazon.com - Our recommended books about building & mechanical systems design, inspection, problem diagnosis, and repair, and about indoor environment and IAQ testing, diagnosis, and cleanup are at the InspectAPedia Bookstore. Also see our Book Reviews - InspectAPedia.
- Stephenson, Elliott O., THE ELIMINATION OF UNSAFE GUARDRAILS, A PROGRESS REPORT [PDF] Building Standards, March-April 1993
- "Are Functional Handrails Within Our Grasp" Jake Pauls, Building Standards, January-February 1991
- Access Ramp building codes:
- UBC 1003.3.4.3
- BOCA 1016.3
- ADA 4.8.2
- IBC 1010.2
- Access Ramp Standards:
- ADA (Americans with Disabilities Act), Public Law 101-336. 7/26/90 is very often cited by other sources for good design of stairs and ramps etc. even where disabled individuals are not the design target.
- ANSI A117.4 Accessible and Usable buildings and Facilities (earlier version was incorporated into the ADA)
- ASTM F 1637, Standard Practice for Safe Walking Surfaces, (Similar to the above standards)
- America's Favorite Homes, mail-order catalogues as a guide to popular early 20th-century houses, Robert Schweitzer, Michael W.R. Davis, 1990, Wayne State University Press ISBN 0814320066 (may be available from Wayne State University Press)
- In addition to citations & references found in this article, see the research citations given at the end of the related articles found at our suggested
CONTINUE READING or RECOMMENDED ARTICLES.
- Carson, Dunlop & Associates Ltd., 120 Carlton Street Suite 407, Toronto ON M5A 4K2. Tel: (416) 964-9415 1-800-268-7070 Email: info@carsondunlop.com. Alan Carson is a past president of ASHI, the American Society of Home Inspectors.
Thanks to Alan Carson and Bob Dunlop, for permission for InspectAPedia to use text excerpts from The HOME REFERENCE BOOK - the Encyclopedia of Homes and to use illustrations from The ILLUSTRATED HOME .
Carson Dunlop Associates provides extensive home inspection education and report writing material. In gratitude we provide links to tsome Carson Dunlop Associates products and services.


