
InspectAPedia®FREE Encyclopedia of Building & Environmental Construction, Diagnosis, Maintenance & Repair |
Question? Just ask us! InspectAPedia
|
 Squeaky Floorboard Repair
How to repair loose or noisy wood flooring
- POST a QUESTION or COMMENT about repairing wood floors that are squeaky, loose, bouncy, or noisy
Wood floor noise or loose board repairs: this article describes repair procedures for wood flooring that is loose, noisy, squeaky, bouncy or otherwise getting on your nerves.
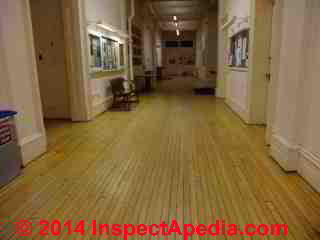
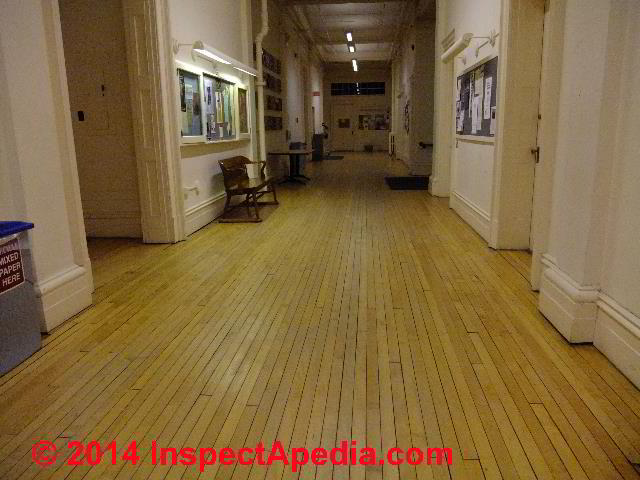
We explain the steps in repairing loose noisy flooring from above or from below, describing the use of nails, glues, screws, wedges, or additions support, depending on what's needed and what access is possible. Shown at page top, an older wood floor in Rockefeller Hall, Vassar College - DF.
InspectAPedia tolerates no conflicts of interest. We have no relationship with advertisers, products, or services discussed at this website.
- Daniel Friedman, Publisher/Editor/Author - See WHO ARE WE?
Loose or Squeaky Floorboard Diagnosis & Repair Suggestions
 Reader Question: 3/23/2014 Nick Ellicott City
The floors I need help with have loose boards, gap at the top step tread and the house doesn't have air conditioning.
The floors were laid in 1939. Would sub flooring have been laid this long ago and is that why there are loose boards and is very squeaky in places? No pet stains, no dark spots should I sand or just fill with sawdust slurry and oil.
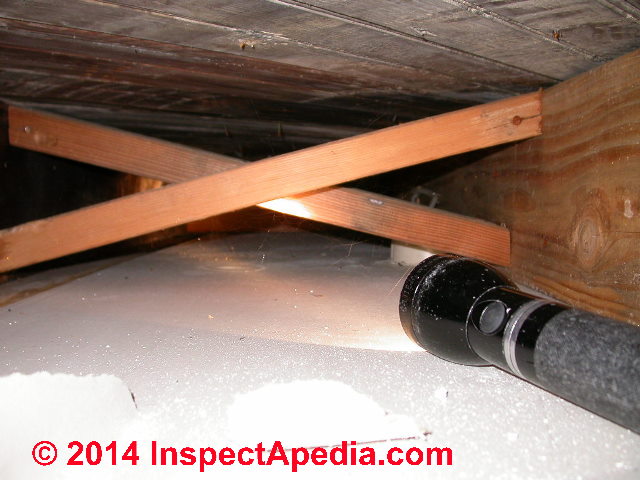
[Click to enlarge any image]
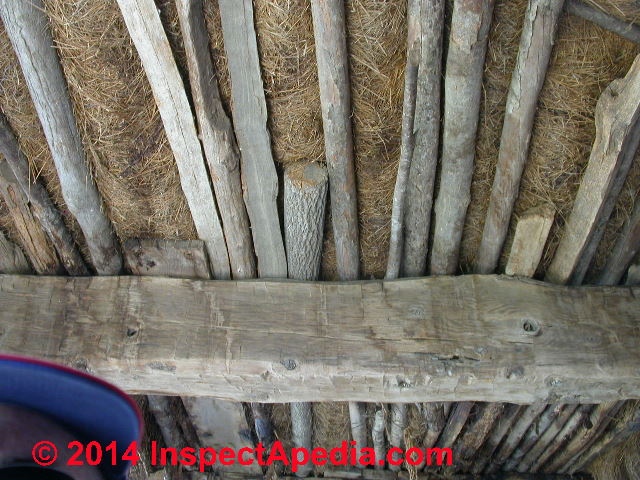
OK so the "floor" we show at left is a bit extreme - it's not really a floor. but walking into this barn on the hay-covered floor shown from below, I nearly killed myself stepping through the "floor" - watch out.
Reply: use sawdust to fill wood floor gaps?
Nick I'm unclear on what we're discussing here, so can only make some guesses.
By 1939 many homes had wood floors installed over wood subfloor - the way to find out is to examine both sides of the floor, but one can also often infer or guess or discover the floor structure just from the top surface by noticing the floor type (wideboard vs. newer solid oak or pine narrow board flooring) and by probing gaps between floor boards to see if a subfloor is encountered.
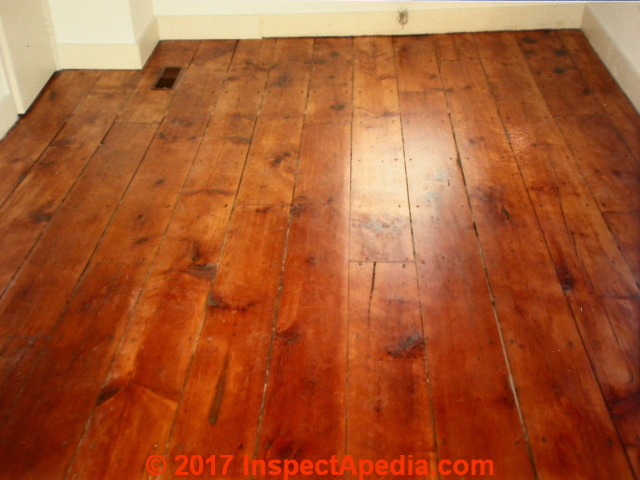
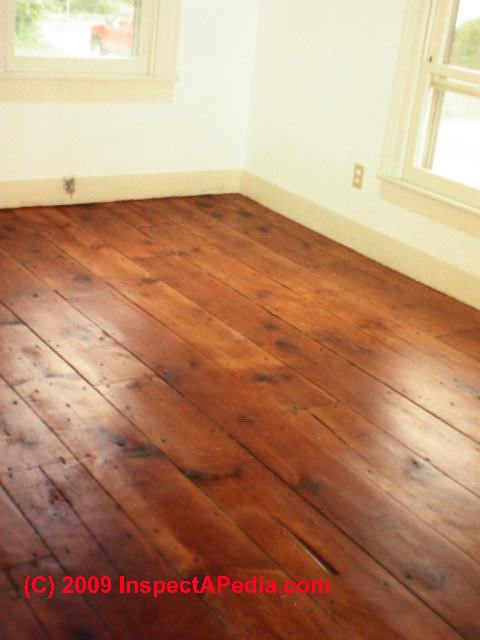
The 19th century wideboard pine floor shown below was installed directly to joists.

About using sawdust to fill wood floor gaps
 Really? Though I understand the claim that it's flexible, I would not fill gaps in wood flooring with sawdust and oil nor anything else, both because I'm uncertain about odor and fire safety issues from the mixture you describe and because gaps in wood floors vary in width seasonally as temperatures and moisture change. And I think it looks ugly too.
Filling gaps between wood floor boards invites later buckling or causes further compression of the edges of boards when they next expand.
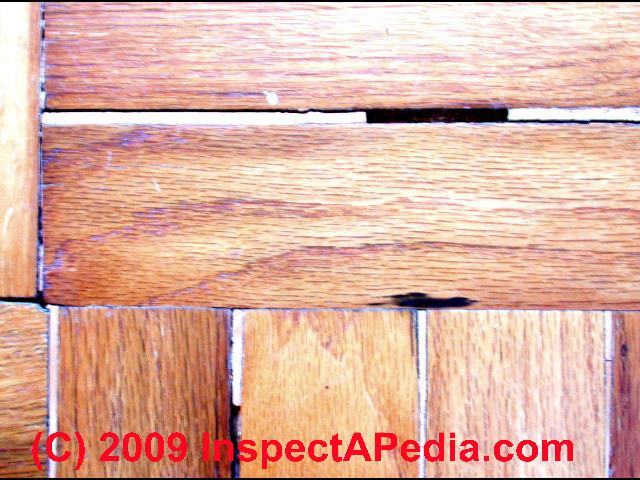
You can see that's what's been happening with the putty-filled wood floor gaps in my parquet wood floor gap photo just above.
When I re-finished the 1860's floor shown above and in more-detail below (28 West Street, Wappingers Falls NY) I actually removed as much of the ugly yellow wood filler as I could, and I left gaps that were as wide as 3/16".
Larger gaps can be a dangerous trip hazard for people wearing spike-heeled shoes.
You can see my "before" and "after" photos.
We put no stain on this floor. I removed old stains and debris, hand-sanded, set loose boards, and polyurethaned the result.
Once the poly was in place the floor was beautiful.
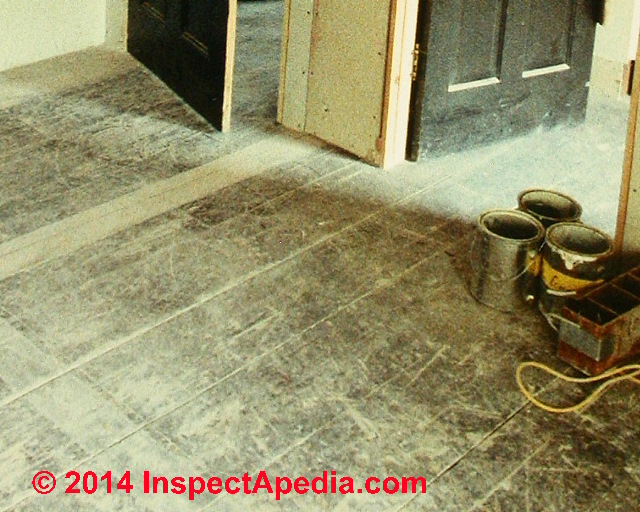
I prefer to vacuum out dirt and debris after sanding and then re-finish.
If gaps are so wide as to be a hazard, say 3/16" or larger, then it might be appropriate to cut in a loose-fitting filler strip but that's rarely needed except in areas of actual floor damage. I've done this using a wood similar in grade and grain as the original, staining it to match.
See GAPS BETWEEN FLOOR BOARDS for details.
Watch out: making any gap filling repair in a wood floor invites further compression, future gaps, and floor damage if the repair does not leave adequate movement space for the seasonal expansion and compression that occur in wood.
How much space is needed? It depends on the wood species, building moisture levels, and where the floor is located . For example a wood floor over a potentially damp crawl area is going to be subject to more moisture and more expansion.
Perhaps if I saw some sharp photo (use the CONTACT link on our pages) I could comment more usefully.
Follow-up:
Thanks Dan. I will examine the underneath and see if there is subflooring. They are very squeaky in some places. Can I nail down the squeaky areas? I saw the sawdust on a Youtube video.
This is my first DIY project, do you suggest hand sanding? I also saw cleaning the floors with vinegar. The finished stain color is ideal. I don't want to do too much and ruin them. Your thoughts.
Reply: filling wood floor gaps (don't) & sanding wood floors during a restoration
I made a DIY video on how to perform micro-surgery on a broken ankle myself, but I wouldn't recommend following my advice. An orthopedist will do a better job. More seriously, ...
How to repair a squeaky wood floor from below
 Squeaky wood floors are caused by movement in one or more boards that rub together as you walk over them or as building temperatures and moisture level change.
Start by walking around to find just where the flooring is loose or squeaky. If possible also inspect below since what you can access and what you can see will help decide how the floor can or should best be repaired.
If the floor structure itself is bouncy you may want to do more than just secure loose floor boards, adding cross-bridging between joists (photo at left), adding sister joists or adding an intermediate girder or beam below.
Our photo at left shows 3/4" solid oak flooring nailed directly to the floor joists - there is no subfloor installed in this Haddonfield New Jersey home built in the 1960's.
[Click to enlarge any image]
Ideally we repair loose wood flooring by screwing up or nailing-up from beneath the floor, through the subflooring or best on an angle through the floor joists, through the subfloor (if present) and into the bottom 3/4 of thickness of the finish flooring above..
It helps to have a heavy-friend step near the loose board from above while we're screwing up from below - to help your from-below screw pull the board down. But see my foot-injury warnings below.
Using a wedge & polyurethane glue between the joist top and subflooring to quiet a noisy floor
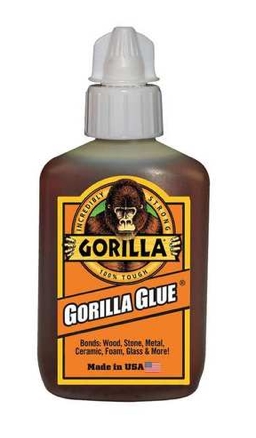 If you can access the floor from below and see that it's the subfloor that has lifted off of a floor joist, try driving a thin wedge into place between the subfloor underside and the joist top. I put a dab of Gorilla glue on my wedge (if it's not a historic restoration job) knowing that the glue will expand and both hold and fill the joint.
I do NOT drive the wedge tight into the gap I leave it loose but glue-coated - avoiding the risk of accidentally separating the subfloor from the joist top still further - making problems worse.
Tips for Working with Gorilla Glue or other Polyurethanes
Let the expanding polyurethane glue do the work. Let the glue dry to its expanded foamy yellow state. If you need to clean glue off of a finished wood floor surface, odorless paint thinner can dissolve this glue before it has cured. When it's hardened it's easy to cut away excess glue but trying to work on the glue when it's still wet is a mess that you'll never get off of your skin.
If the wood is very dry I wipe my wedge with a slightly damp rag before gluing, increasing the expansion rate of the glue.
Sometimes we can inject some glue into a sub-floor space itself before screwing down. If you use an expanding polyurethane glue like Gorilla Glue™, the combination of that expansion + screwing will quiet down most troublesome boards.
Don't buy a big container of polyurethane glue to fix a small problem. I find it doesn't keep.
Alternatively, for some floor board squeaks experts suggest shooting a bit of graphite powder into the squeaking joint. I'm not a fan of blowing graphite around but for one or two modest repairs you might give it a try.
Adding support below squeaky loose floor boards
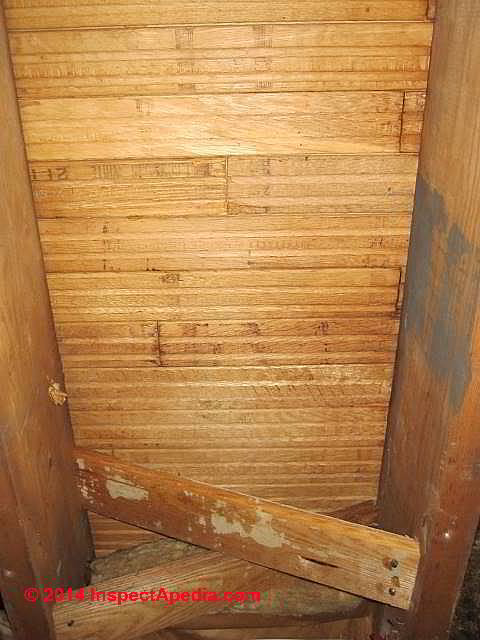
 at left I'm inspecting the under-side and framing of an older floor (no subflooring) nailed right to the floor joists. You'll notice the cross bracing, but check out the red arrow - I'm pointing to a spot where the flooring was lifted off of the joist top.
IF we can't pull this floor down to stabilize it with screws driven along the line of my green arrow from below we'll try using an expanding glue.
The glue will both bond and fill the gap between joist top and floor under-side without making things worse by actually pushing the floor up still further - as you might do if you over-drive a wedge.
Thanks to the cross bracing, even though these 2x8 joists were rather modest in dimension, this floor was not bouncy, just squeaky.
On a very old floor where no subflooring is in place we nail through the floor joist top or if there is a "floating" butt joint between two boards not ending over a joist we may screw up a 3/4" or thicker solid plywood plate to the underside of the floor (if a wide area of support is needed) or best we nail 2x lumber of the same depth (or less) as the floor joists, as a block between floor joists.
Locate the block below the squeakiest section of flooring and screw up through the top edge of the blocking into the subfloor and flooring.
For a horribly noisy wood floor you may need to add multiple blocks between the joists, placing blocking about 4 feet on center and nailed into opposing joists.
Watch out: for straight-up support plate repairs to a loose or squeaky wood floor be sure to use screws that are short enough as not to protrude through the finish floor surface above, after allowing for any depth to which the screw will sink into the underside of the board as you tighten it.
Do we use finishing nails, ring-shank nails or screws to secure a loose floor board?
 Usually screws work better than nails to secure loose flooring, especially when repairing the floor from below.
The screw can pull down a board while nailing it may have less satisfactory results.
If the thickness of the finished floor is less than about 5/16" in thickness, working on an angle and with care you may still have success but there's a good chance that your screws from below are not likely to hold.
The wood flooring at left is 3/4" thick solid hickory - plenty of thickness to hold a screw from beneath, but this wood is so hard that if you are repairing it from above you'll need to pre-drill holes.
Watch out: don't use more nails or screws than necessary or you may damage the board or even make things worse.
Watch out: don't drill a screw up through the finished floor or worse screw your friend's foot to the floor above.
How to repair a loose or squeaky wood floor from above
If we cannot access the loose, squeaky floor from below (because the neighbor won't let us in or because there is a concrete structure or expensive ceiling in the way) we can still secure the squeaky or loose floor from above, driving trim screws or larger screws on an appropriate angle to pull the loose board down and snug it up.
Should you use nails or screws? If the board is loose but not hard to pull down, using 6d stainless ring-shank nails driven through a pre-drilled (smaller bit than nail) hole may work best and will allow you to counter-sink the nail head at least 1/8" below the floor surface.
For floor boards that are hard to pull down by nailing screws may be more effective.
What about those ugly screw heads in the repaired floor? For a more cosmetically perfect wood floor repair we sometimes use a very sharp gouge to lift a bit of flooring off of the surface without breaking the wood-chip away.
Then we drive and counter-sink our screw (or nail) in the depression provided by the gouge. When the fastener has been counter-sunk we glue the raised gouge back down.
An alternative to the floor repair using the "lift-a-chip" method is to drill out and countersink screws, filling the hole with a matched plug sanded and stained to be unobtrusive. I'm not a fan of this approach unless we are going to be installing a regular and attractive pattern of plugs in the floor and I'd avoid it entirely on a historic and valuable wood floor.
 I use a bit of waxed paper atop the floor gouge and weigh it down with a flat chunk of iron we keep around for that purpose.
When the glue is dry the waxed paper lets me lift away the weight and if necessary remove any excess glue that seeped out of the repair.
This process can make a nearly-invisible repair in even a fine wood floor.
Sanding old wood floors: advice
About hand sanding versus power sanding, the answer is, as Mark Cramer says, ... it depends.
On a hardwood floor with plenty of wood thickness and deep damage we might use a power sander along with an edger.
On an antique (often soft-wood) floor like the one shown at left we use a combination of sharp hand scrapers and hand sanding. In my opinion sanding an antique or historic floor dead flat produces a weird and inappropriate finish.
In general using the least destructive, least invasive method is best.
The floor shown here was antique wide pine board with ship-lap joints that had been installed around 1860. We discuss it further and include a "before" photo
at FLOOR WOOD AGE TYPES HISTORY
...
Reader Comments, Questions & Answers About The Article Above
Below you will find questions and answers previously posted on this page at its page bottom reader comment box.
Reader Q&A - also see RECOMMENDED ARTICLES & FAQs
On 2021-10-14 1 by inspectapedia.com.moderator (mod) - insert sealant to quiet squeaky area of otherwise inaccessible laminate or engineered wood finish flooring
@Ann Hughes,
I don't love my solution but don't know one better:
In the center of the squeeking area of the floor, use a caulk gun to inject a blob of clear silicone sealant - you don't need to fill the whole area, just squeeze in enough to make an estimated blob size of an inch or two in diameter.
Then wipe off the excess sealant using a damp cloth, leaving your 1/8" hole filled flush (or if you want to get fancy, recessed so you can fill it with an attempted match to the original floor). I think you'll find the hole barely noticeable.
Then stay OFF of the floor in that area for at least 24 hours; 48 hours would be better because in my experience squirting silicone sealant into a tightly-closed space with little air can take longer than normal to harden.
You could also use an expanding polyurethane glue like Gorilla glue that would work well, but you'll need to have a bit of odorless paint thinner on hand to clean up the over-spill: it's messier and harder to clean than silicone sealant and I worry that you could foul up the floor's surface finish, that's why I suggested the silicone sealant instead.
If you decide to use polyurethane, which has the advantage of expanding into the open space below the floor, you'll want to use blue masking tape over the insertion hole during curing or glue will continue to ooze back up out of the insertion opening as it cures.
On 2021-10-14 by Ann Hughes
I have an engineered wood floor all through my ground floor. There is a 3ft square patch just as you step off the last stair where the sub floor seems to be damaged as the boards are squeeking and dropping when you stand on them.
This is only a small patch and I do not want to have to replace the whole hall area for such a small piece.
Can you give me some advice as to what would be the best course of action. I understand that the wood has been nailed and glued. ?
On 2018-05-10 by (mod)
 Sure Sharon. A mechanics's stethoscope is in essence a doctor's stethoscope but the round disc that amplifies sound is replaced by a solid steel rod. The tip of the rod is pressed against various surfaces to see where sound seems loudest. A mechanic uses the device to locate a bad bearing or other engine noise.
You can find these at your local auto parts store or at Walmart or online, or you could make your own if you have a medical stethoscope at hand.
Here's an example since Comments box lost our earlier image
On 2018-05-09 by Sharon K
Thank you so much for your reply.
I will try a mechanic's stethoscope, which no one else suggested and which was unknown to me. I appreciate your knowledge and your sharing of it.
On 2018-05-08 by n (mod)
Your engineers guess is probably the best one from what you have told me. There are company specializing in noise analysis and diagnosis though I am not sure that it would be cost Justified for the situation.
Or you could try listening more carefully with a mechanic's stethoscope to narrow down the specific building components that are moving. Off of what people do is identify the most likely culprit and try to make some changes that will prove that that was the source when the noise abate's.
On 2018-05-08 by Sharon K
The Apr 20 2014 answer to Judith said "one would want a confident and accurate diagnosis of the cause of the problem". Ceilings and perhaps walls in two bedrooms of my house have tapping and banging noises day and night, sometimes at about 1/2 hour intervals.
The structural engineer saw no cracks anywhere and said it was probably caused by the flat roof and New Mexico temperature variations and day/night issues. The carpet guy tacked down some screws where the floor seemed to have movement.
The HVAC man balanced the condenser on the roof. The noise persists. Who should I ask for a diagnosis?
On 2014-04-21 by mod)
Judith before assigning responsibility for who shouuld do what one would want a confident and accurate diagnosis of the cause of the problem you describe.
I agree that water or high moisture in a crawl space can be a problem in a home and in my OPINION is itself unacceptable.
But there are other causes for floor damage including installation error - depending on the floor type, materials, subfloor, etc.
On 2014-04-20 by Judith stewart
Two year old home encapsulated in crawl space our hardwood floors pop all over should the builder replace the floor
...
Continue reading at FLOORING NOISES in BUILDINGS or select a topic from the closely-related articles below, or see the complete ARTICLE INDEX.
Or see these
Recommended Articles
- FLOOR NOISE CONTROL
- FLOOR WOOD AGE TYPES HISTORY - home
- FLOORING NOISES in BUILDINGS - topic home
- FRAMING BLOCKING & BRACING - stiffen the floor structure
- WOOD FLOOR DAMAGE REPAIR - home
Also see Mike Litchfield's RENOVATION 4th EDITION: Completely Revised and Updated, [Book sold via Amazon] Taunton Press; 4th ed. (2012), ISBN-10: 1600854923 ISBN-13: 978-1600854927.
Suggested citation for this web page
LOOSE NOISY FLOOR REPAIR at InspectApedia.com - online encyclopedia of building & environmental inspection, testing, diagnosis, repair, & problem prevention advice.
Or see this
INDEX to RELATED ARTICLES: ARTICLE INDEX to BUILDING FLOORING
Or use the SEARCH BOX found below to Ask a Question or Search InspectApedia
Ask a Question or Search InspectApedia
Try the search box just below, or if you prefer, post a question or comment in the Comments box below and we will respond promptly.
Search the InspectApedia website
Note: appearance of your Comment below may be delayed: if your comment contains an image, photograph, web link, or text that looks to the software as if it might be a web link, your posting will appear after it has been approved by a moderator. Apologies for the delay.
Only one image can be added per comment but you can post as many comments, and therefore images, as you like.
You will not receive a notification when a response to your question has been posted.
Please bookmark this page to make it easy for you to check back for our response.
IF above you see "Comment Form is loading comments..." then COMMENT BOX - countable.ca / bawkbox.com IS NOT WORKING.
In any case you are welcome to send an email directly to us at InspectApedia.com at editor@inspectApedia.com
We'll reply to you directly. Please help us help you by noting, in your email, the URL of the InspectApedia page where you wanted to comment.
Citations & References
In addition to any citations in the article above, a full list is available on request.
- America's Favorite Homes, mail-order catalogues as a guide to popular early 20th-century houses, Robert Schweitzer, Michael W.R. Davis, 1990, Wayne State University Press ISBN 0814320066 (may be available from Wayne State University Press)
- American Plywood Association, APA, "Portland Manufacturing Company, No. 1, a series of monographs on the history of plywood manufacturing",Plywood Pioneers Association, 31 March, 1967, www.apawood.org
- Best Practices Guide to Residential Construction, by Steven Bliss. John Wiley & Sons, 2006. ISBN-10: 0471648361, ISBN-13: 978-0471648369, Hardcover: 320 pages, available from Amazon.com and also Wiley.com. See our book review of this publication.
- Michael W. Litchfield, Renovation, A Complete Guide, 2nd Ed., Prentice Hall, 1991, ISBN 0-13-159336-6, ISBN-13: 978-0131593367, Pearson P T R; 2 Sub edition (August 1990)
- Pergo AB, division of Perstorp AB, is a Swedish manufacturer or modern laminate flooring products. Information about the U.S. company can be found at http://www.pergo.com where we obtained historical data used in our discussion of the age of flooring materials in buildings.
- Plank House Construction: webslog from plankhouse.wordpress.com/2009/01/25/plank-house-construction/ and where plank houses were built by native Americans, see
Large 1:6 Scale Plank House Construction / P8094228, Photographer: Mike Meuser
06/12/2007 documented at yurokplankhouse.com where scale model Museum quality Yurok Plank Houses are being sold to raise money for the Blue Creek -Ah Pah Traditional Yurok Village project - bluecreekahpah.org - Our recommended books about building & mechanical systems design, inspection, problem diagnosis, and repair, and about indoor environment and IAQ testing, diagnosis, and cleanup are at the InspectAPedia Bookstore. Also see our Book Reviews - InspectAPedia.
- In addition to citations & references found in this article, see the research citations given at the end of the related articles found at our suggested
CONTINUE READING or RECOMMENDED ARTICLES.
- Carson, Dunlop & Associates Ltd., 120 Carlton Street Suite 407, Toronto ON M5A 4K2. Tel: (416) 964-9415 1-800-268-7070 Email: info@carsondunlop.com. Alan Carson is a past president of ASHI, the American Society of Home Inspectors.
Thanks to Alan Carson and Bob Dunlop, for permission for InspectAPedia to use text excerpts from The HOME REFERENCE BOOK - the Encyclopedia of Homes and to use illustrations from The ILLUSTRATED HOME .
Carson Dunlop Associates provides extensive home inspection education and report writing material. In gratitude we provide links to tsome Carson Dunlop Associates products and services.
 |
HOME | ABOUT | ASK a QUESTION | CONTACT | CONTENT USE POLICY | DESCRIPTION | POLICIES | PRIVACY | |
| © 2026 - 1985 Publisher InspectApedia.com - Daniel Friedman | |||||||||