 Stone Chimneys
Stone chimney flashing options to avoid or stop leaks
- POST a QUESTION or COMMENT about chimney flashing leaks & defects that are found by an on-roof inspection
Stone chimney construction, inspection, flashing details, leak repairs.
This article series describes chimney inspection on the roof, reporting on flashing and leak problems, and inspecting and diagnosing cracks in the sides of a brick chimney.
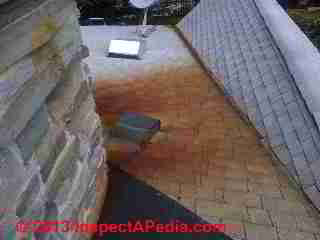
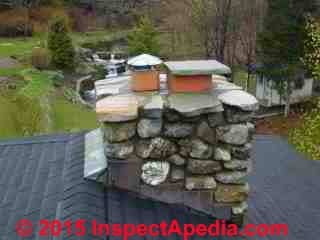
Above: this stone chimney was flashed with copper during construction, using multiple stepped counter-flashing let into reglets cut into the sides of the stone chimney. This chimney also sports an unusual stone top crown; That flat stone laid over the fireplace flue was placed to stop water entry down the flue when the homeowner abandoned use of her fireplace.
InspectAPedia tolerates no conflicts of interest. We have no relationship with advertisers, products, or services discussed at this website.
- Daniel Friedman, Publisher/Editor/Author - See WHO ARE WE?
Stone Chimneys & Stone Chimney Flashing Methods
 Here we discuss common problems found at stone or stone-faced chimneys, with particular attention to options offering answers to "what's the best way to install or repair flashing around a stone chimney".
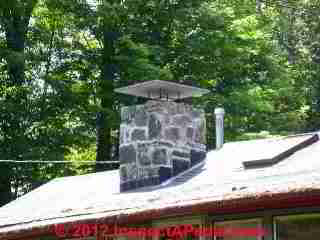
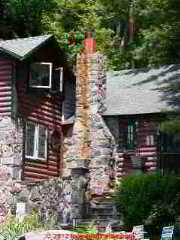
Above: rust stains down a stone chimney in Dutchess County, New York. Notice that the chimney has lots its chimney cap (possibly the original source of those red rust stains), and that the flue extends quite a bit above the stone surround.
On closer inspection the top crown or seal around the flue was mostly missing as well, and water was leaking into the flue, risking frost damage and potentially causing a fire or carbon monoxide hazard at this home.
[Click to enlarge any image]
Details of Flashing a True Stone or River Stone Chimney
Some roofers or masons use the following solutions to avoid leaks around a stone chimney:
- Flash the chimney during construction -1: Install the flashing and counterflashing during construction of the chimney, running the counter flashing through the rising stone and up against the chimney flue tile liner.
This approach can work, of course, only during construction. This is the most-reliable method of flashing a stone chimney to avoid future leaks. - Flash the chimney during construction -2: During chimney construction, take care to arrange the stone courses to provide a "slot" so that it will be easy to later cut a reglet into a roughly-horizontal mortar joint about a foot above the roof surface, into which the chimney counter-flashing lip can be inserted and sealed.
As with the first option above, this only works during chimney construction or re-construction.
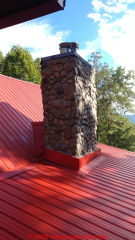
Photo above: rectangular stone chimneys are easy to flash because of their rather straight mortar joints. The red stains below this stone chimney are discussed separately
at CHIMNEY STAINS & LEAKS
Also see CHIMNEY CAP & CROWN DEFINITIONS for more examples of rust damage at chimney tops, caps, and crowns.
- Use a grinder to cut the necessary flashing reglet: For stone that can be cut with a masonry blade, saw a reglet in straight lines into the stones and mortar to permit proper insertion and sealing of the chimney's counter-flashing.
Be sure that the reglet is cut an inch or more deep into the mortar so that when you install the counter flashing it can easily extend out and over any projecting stones lower in the chimney face.
We find that some stone is soft enough to make these cuts while other, particulary most rounded river stone is just too hard to saw.
For chimneys built using rectangular stone like that shown in our photo above, you can cut reglets for counter flashing for one or more steps around the chimney faces; this approach is easy and can work to replace leaky chimney flashing. - Concrete box at chimney base: Construct a concrete box or apron around the entire base of the chimney, extending up about a foot (varying height depending on roof slope, geometry, and climate).
The concrete seals against the irregular surface of the chimney and the concrete itself is then flashed and sealed to assure no water gets between the concrete and the stone (where water and frost could otherwise still damage the chimney and its flashing.
Your roofer may have done this behind that box flashing - we can't see inside at this point but pressing against the flashing might tell us if there's solid concrete behind it, or your roofing contractor may have documented what she did. - Silicone sealant repairs: Seal the joint at the counterflashing top to the stone chimney face using a high quality silicone sealant, after thoroughly-cleaning the metal and stone and mortar surfaces so as to assure a complete and perfect bond.
- Use formable metal flashing: Use copper (or previously lead) flashing that can be hammered and formed to fit each step in the chimney face, cut into the mortar above stones in the chimney. Seal the reglet let into the mortar using silicone sealant (some roofers or masons may use mortar).
I've inspected a few chimneys into which a roofer tried inserting rubber EPDM roofing or modified bitumen as a flashing and counter-flashing. I'm not confident that this is a durable repair but it may work on some stone chimneys as an alternative to copper. - Remove stones at the lower chimney faces about 12" from the roof surface sufficient to fill the area with mortar that can be cut to provide a reglet into which counterflashing lip can be inserted and sealed.
Be sure that the reglet is cut an inch or more deep into the mortar so that when you install the counter flashing it can easily extend out and over any projecting stones lower in the chimney face. - Flash the entire chimney exterior: Less common but shown in some chimney flashing patents, and perhaps appropriate where a chimney is not visible from the ground, at a particularly-troublesome leaky stone chimney, the roofer may enclose the entire face of the chimney with metal flashing, extending that up under the chimney crown or top seal.
This approach can leak-proof the chimney but at an aesthetic cost: there is no longer a stone chimney visible on the building.
- Large chimney cap or crown overhang: installing a chimney cap on the flue or crown around the chimney top sized to provide a 2-3-inch overhang past the chimney walls can reduce the flow of water down the chimney face, also reducing leaks traced to water pentration at mortar joints in any masonry chimney, stone, brick, or block.
Also see DISPUTE RESOLUTION on ROOF JOB PROBLEMS
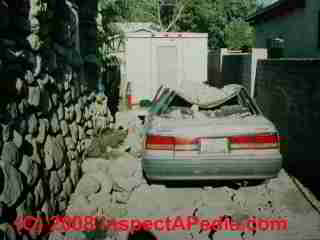
Watch out: for homes built in an earthquake zone, stone chimneys can be particularly hazardous as they were often built without adequate steel reinforcement, as we see in my photo of a collased stone chimney following the Northridge earthquake.
Those details are at EARTHQUAKE DAMAGED CHIMNEYS
Research on Stone Chimney Construction, Flashing, Troubleshooting, Repair
- Carroll, J. O. H. N. "Flashing a Chimney." FINE HOMEBUILDING (2001): 100-105.
- Santo, Philip. "Chimney stacks and roof detailing." In Inspections and Reports on Dwellings, pp. 153-164. Routledge, 2016.
- Gatherum, Roy. "Flashing for chimney-bonnet." U.S. Patent Application 10/294,498, filed September 25, 2003.
Excerpt:... the same problems, though they may be addressed slightly differently in each case, apply to exterior siding, brick, stone, and other treatments applied to the exterior. One solution is to additionally provide a metal or polymeric resin flashing to problem areas, with a similar object as is done in roofing, to provide for water management around the problem areas and to minimize intrusion of water by directing it over or around such problem areas. Usually such a flashing, when provided, is applied above the opening, the object being to direct water out and around or over the opening without entering it. One difficulty with the prior solutions is that water can sometimes seep back under conventional flashing, - Scott, Alan W. "The specification and repair of stone slate roofing within the Yorkshire Dales National Park." Structural Survey (2001).
Excerpt: Accessible chimney stacks should be inspected and repaired, so preventing a need for access over newly … however, lead should be incorporated with code 4 soaker and code 5 flashing. Occasionally stone DPCs or bedded slate are installed and again these details ... - Wiltshier, Simon. "Old Masonry Chimneys: Are They Safe?." In First Australasian Conference on Engineering Heritage 1994: Old Ways in a New Land; Preprints of Papers, p. 191. Institution of Engineers, Australia, 1994.
Question: What should I do about ongoing flashing leaks at my stone chimney?
I purchased a home in Franklin, NC early last year 2019. The person who inspected the home notified us there was a leak around the chimney.
We decided it was best to have the whole metal roof replaced. It has been just over a year now and we still have a leak around my chimney.
The company we hired has been out to my house several times to try to fix the leak and it is still leaking.
They cut into the river rock around my homes chimney to create a metal box. They never replaced the old metal flashing around the chimney when they first came out to install a new metal roof.
I even told the person who first came out to give an estimate there was a leak around the chimney.
So they decided instead of replacing the flashing they would install a metal box around are homes chimney. I feel the metal/tin they're using isn't the proper material to be used sense I have gone online to do some research.
I have read online, that when a roofing company does this they should solder the edges together.
I was told by the roofing company we hired that the metal they are using can't be soldered.
The box they have build is screwed together on each edge and sealed. What should I do?
- Todd
This Q&A were posted originally
Moderator reply:
Todd:
Because your chimney is made of hard, rounded river stone it's nearly impossible to actually saw a reglet into the chimney into which the counterflashing can be sealed.
Use of metal flashing around a chimney on a metal roof is perfectly normal and reasonable, though some metals are easier to work-with and form to the chimney than others.
 It's not necessary to solder the edges of roof flashing material and except for working with copper that's not normally attempted. In fact on a metal roof, without special precautions, soldered joints in the metal can lead to flexing as temperatures vary, causing the solder joint to break and fail and leak.
Most critical is the physical arrangement of the flashing, with the counter-flashing properly cut into the chimney at its top, sealed at that location, and properly overlaps at the bottom.
Screwing flashing together might be needed at some locations but of course proper use of sealant between overlapping flashings and sealant around any cuts or screw openings may be important - moreso in some screw opening locations.
It is particularly difficult to flash around stone chimneys because the stones form an irregular surface making mating of the counter-flashing difficult, and because stone is so hard that the usual approach that works well with block or brick chimneys - sawing a kerf into the chimney into which the top of the counter-flashing is inserted - is difficult.
Roofers used to use lead flashing around such irregular surfaces because it could be deformed to better fit the surface. Because we now avoid using lead entirely that's not an option.
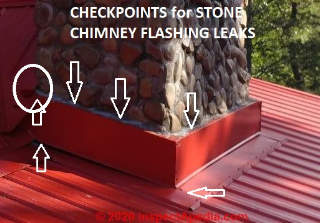
Pay close attention to how the counterflashing top edge is sealed against the chimney and look more closely inside, opening the ceiling if necessary, to find exactly where the leak is occurring. Otherwise we're a bit in the dark on this one. On your photo I've indicated some common trouble spots that may leak at flashing around a stone chimney.
...
Continue reading at FLASHING, CHIMNEY MISTAKES & LEAKS - topic home, or select a topic from the closely-related articles below, or see the complete ARTICLE INDEX.
Or see these
Recommended Articles
- CHIMNEY CAP & CROWN DEFINITIONS the difference between a chimney rain cap and a chimney top seal - two different possible leak problems.
- CHIMNEY CHASE CONSTRUCTION
- CHIMNEY DAMAGE by LEAKS & FROST
- CHIMNEY INSPECTION at ROOFTOP
- CHIMNEY RAIN CAP / RAIN COVER INSPECTION
- CHIMNEY SHOULDER LEAKS
- CHIMNEY STAINS, INDOORS
- CHIMNEY STAINS & LEAKS
- CLAY TILE ROOF FLASHING LEAKS
- CRACKED CHIMNEYS, MASONRY BLOCK
- FLASHING, CHIMNEY MISTAKES & LEAKS
- FLASHING for METAL ROOFS
- FLASHING WALL DETAILS - Roof-wall, roof-chimney & siding bottom
- MASTIC, CUTBACK ADHESIVE, FLASHING CEMENT ASBESTOS
- MASONRY CHIMNEY GUIDE
- STONE CHIMNEYS, FLASHING, LEAK REPAIR
Suggested citation for this web page
STONE CHIMNEYS, FLASHING, LEAK REPAIR at InspectApedia.com - online encyclopedia of building & environmental inspection, testing, diagnosis, repair, & problem prevention advice.
Or see this
INDEX to RELATED ARTICLES: ARTICLE INDEX to CHIMNEYS & FLUES
Or use the SEARCH BOX found below to Ask a Question or Search InspectApedia
Ask a Question or Search InspectApedia
Questions & answers or comments about chimney flashing leaks & defects that are found by an on-roof inspection.
Try the search box just below, or if you prefer, post a question or comment in the Comments box below and we will respond promptly.
Search the InspectApedia website
Note: appearance of your Comment below may be delayed: if your comment contains an image, photograph, web link, or text that looks to the software as if it might be a web link, your posting will appear after it has been approved by a moderator. Apologies for the delay.
Only one image can be added per comment but you can post as many comments, and therefore images, as you like.
You will not receive a notification when a response to your question has been posted.
Please bookmark this page to make it easy for you to check back for our response.
IF above you see "Comment Form is loading comments..." then COMMENT BOX - countable.ca / bawkbox.com IS NOT WORKING.
In any case you are welcome to send an email directly to us at InspectApedia.com at editor@inspectApedia.com
We'll reply to you directly. Please help us help you by noting, in your email, the URL of the InspectApedia page where you wanted to comment.
Citations & References
In addition to any citations in the article above, a full list is available on request.
- Mark Cramer Inspection Services Mark Cramer, Tampa Florida, Mr. Cramer is a past president of ASHI, the American Society of Home Inspectors and is a Florida home inspector and home inspection educator. Mr. Cramer serves on the ASHI Home Inspection Standards. Contact Mark Cramer at: 727-595-4211 mark@BestTampaInspector.com
- Roger Hankeyis principal of Hankey and Brown home inspectors, Eden Prairie, MN, technical review by Roger Hankey, prior chairman, Standards Committee, American Society of Home Inspectors - ASHI. 952 829-0044 - hankeyandbrown.com
- Thanks to reader & roofer Jim McKay, for discussion of roof cricket or saddle construction, 11/2010
- NFPA 211 - Standards for Chimneys & Fireplaces, NFPA 211: Standard for Chimneys, Fireplaces, Vents, and Solid Fuel-Burning Appliances, 2006 Edition (older editions and standards are found at the same bookstore)
- NFPA #211-3.1 1988 - Specific to chimneys, fireplaces, vents and solid fuel burning appliances.
- NFPA # 54-7.1 1992 - Specific to venting of equipment with fan-assisted combustion systems.
- New York 1979 Uniform Fire Prevention & Building Code, The "requirement" for 8" of solid masonry OR for use of a flue liner was listed in the One and Two Family Dwelling Code for New York, in 1979, in Chapter 9, Chimneys and Fireplaces, New York 1979 Building and Fire Prevention Code:
- "Top Ten Chimney (and related) Problems Encountered by One Chimney Sweep," Hudson Valley ASHI education seminar, 3 January 2000, contributed by Bob Hansen, ASHI
- Our recommended books about building & mechanical systems design, inspection, problem diagnosis, and repair, and about indoor environment and IAQ testing, diagnosis, and cleanup are at the InspectAPedia Bookstore. Also see our Book Reviews - InspectAPedia.
- NFPA 211 - 3-2 - Construction of Masonry Chimneys
- Chimney Safety Institute of America - Chimney Fires: Causes, Effects, Evaluation
- National Chimney Sweep Guild - Yellow Pages of Suppliers
- In addition to citations & references found in this article, see the research citations given at the end of the related articles found at our suggested
CONTINUE READING or RECOMMENDED ARTICLES.
- Carson, Dunlop & Associates Ltd., 120 Carlton Street Suite 407, Toronto ON M5A 4K2. Tel: (416) 964-9415 1-800-268-7070 Email: info@carsondunlop.com. Alan Carson is a past president of ASHI, the American Society of Home Inspectors.
Thanks to Alan Carson and Bob Dunlop, for permission for InspectAPedia to use text excerpts from The HOME REFERENCE BOOK - the Encyclopedia of Homes and to use illustrations from The ILLUSTRATED HOME .
Carson Dunlop Associates provides extensive home inspection education and report writing material. In gratitude we provide links to tsome Carson Dunlop Associates products and services.


