 Digital Camera Settings Used for Photography through the Microscope
- POST a QUESTION or COMMENT about digital camera settings when taking photos through a microscope
Digital camera settings for microphotography:
This article explains the optimum settings to use when taking digital camera photographs through the microscope.
The purpose of this paper is to help microscopists photograph, store, and use digital microphotographs using modern digital cameras and transmitted-light microscopes. Discussion focuses on selection of cameras adapt well to microscope eyepieces or trinocular heads, and on camera settings and procedures to obtain best quality photographs. We also discuss image resolution and size settings and make recommendations. Cameras used as examples in this paper include the Nikon Coolpix series 990, 995, and 4500.
InspectAPedia tolerates no conflicts of interest. We have no relationship with advertisers, products, or services discussed at this website.
- Daniel Friedman, Publisher/Editor/Author - See WHO ARE WE?
Digital Camera Settings Used for Microscope Photography

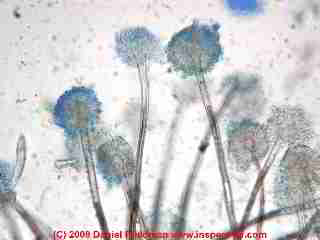
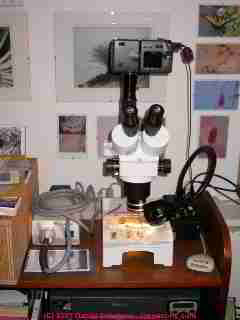
[The photograph at page very top is one of our earliest attempts at photographing Aspergillus sp. using lacto phenol cotton blue stain. Even a beginner can obtain very good microphotographs with just a little care. The photograph shown here is of one of our stereoscopic microscopes in use for making digital photographs.
Article Contents
The techniques discussed in this paper work well with digital cameras and any type of microscope, low power stereo zoom to high power forensic polarized light microscopes.]
PAAA 2005 Symposium, University of Tulsa, Tulsa Oklahoma - June 2-5, 2005 - updated 02/23/2009 - updated 2015/10/25
Note: the latest version of this document can be found at
InspectAPedia.com/Microscopy/Digital_Photography_by_Microscope.php
last update 20 August 2007 © Daniel Friedman All Rights Reserved
The Nikon Coolpix 900-series and the 4500 camera can take wonderful photos on fully automatic, but to make photomicrographs you may have more success if you make use of some of the manual camera settings as follows (for the Coolpix 990. Find and make the comparable settings in the 850, 950 and 4500 menus). Most other digital cameras will have a similar set of camera setting options but they may be organized around a different menu system. Find and adjust the equivalent settings on your particular camera, using the guidelines listed below.
Automatic Settings for digital cameras with the microscope
In general the "automatic" settings of the camera work pretty well - it has general modes of "Automatic", Manual, Program, and Shutter - set by holding Mode (Func 1) button on camera top and turning the thumb wheel - your camera should start in "Automatic".
Image print size, resolution, and disk space
The camera has a number of image size (3:2, XGA, VGA, FINE) settings and within XGA and VGA you also specify the resolution (Basic, Normal, Fine, and "HI" the last of which makes a huge TIFF file you don't normally want). Image size refers to the intended final display or print size. Resolution refers to the level of data compression in the stored image file. Larger size and higher resolution mean larger image files (and more disk space consumption).
We usually shoot at XGA-Fine which will let us print a high-resolution 8x10 photo if we want a printout, but keeps the disk file sizes down to a manageable 200-300K bytes. You could shoot at XGA-Fine with good result but if you ever want to crop and zoom in on a particle in your photo you may not like the quality. If you want to save disk space and if you never plan to zoom in or enlarge your images, shoot at VGA-Fine which will produce excellent but smaller photos. Remember however that often you may want to enlarge a portion of a photomicrograph to see detail or for publication. You can't do much enlarging of a "VGA" image.
To email photos to someone you'll want to use a photo editing program to make a smaller, lower-resolution image to get the file size down to about 30K. (Folks who have the CD-ROM from the Laurentides Spore Camp received down-sized images which you'll see don't stand up to close scrutiny nor to any zooming.)
Some experts argue that one need not bother to keep images of higher resolution than the resolution capacity of the printer to be used for final images. Because we use images for reference and identification (email-exchange) purposes, often with images cropped and enlarged, and because we rarely print large images, the choice of image size is not reduced to printer resolution.
In sum: for image library purposes and printing up to 8x10 you do not need to store high resolution, large image size files - which wastes disk space. However if you need to crop and enlarge a portion of a photographic image you will want to shoot at higher resolutions and perhaps sizes. If in the microscope we know in advance I'm going to want to crop and enlarge we shoot at fine or high resolution image sizes. we have not required use of uncompressed TIFF type images for these purposes.
Manual setting mode for Nikon Coolpix series Cameras with the microscope
Turn the camera on to "Manual" mode" Not to confuse with the "Automatic" overall MODE setting above, to use the Coolpix through the microscope eyepiece we shoot with the ON-OFF DIAL in "Manual" mode (as opposed to fully Automatic) - set the dial that turns the camera on to "M" rather than "A".
- Access the camera settings menu for basic photo settings:
- White Balance
For digital photos through the microscope - A (auto) will work, but better, mount and focus on one of your typical slides on the microscope stage. Move the slide so that there are few particles in the field of view - mostly white space, or all white space. Then use the camera's menu, at "White Balance" select "White Bal Preset,"then select "measure," and the camera will set a reasonable white balance for your microscope and slide set-up. This should produce images with color very close to what you see through the eyepiece. If this is not the case, you may have changed some microscope settings and you'll need to repeat this process. - Metering - Matrix or Center Weighted
- Continuous - S (single shot not continuous shooting)
- Best Shot Selector - Off
- Lens - Normal
- *** Image Adjustment: either Auto or we prefer "More Contrast" but you should try "Auto" or "Normal" alternatives as well.
- *** Image Sharpening: either Auto or we prefer "High" but you should try "Auto" or "Normal" alternatives as well.
- Set the camera to Macro Mode
On the back of the camera the bottom left button "M focus" press repeatedly until you see the little Tulip Flower in the upper right display. Now on the upper right of the camera back adjust the zoom (Ranges between "wide angle" and "telephoto") until you see the tulip flower turn yellow - which means you are in "Macro Lens" mode. (On the 850 just turn the dial to "CSM" mode.) - Infinity as an alternative to Macro Mode
Macro mode and auto focus can often focus the camera to produce a better image than a human can do manually. However if the object of interest lacks strong lines and contrast, the camera may have trouble focusing. Alternatively, you may wish to be sure the focus concentrates on specific features or ornamentation. For these purposes, set the camera to infinity mode, and then observing the image in the camera LCD, you can fine-tune the camera focus by adjusting the microscope stage height slightly up or down as needed. - Turn off auto flash:
On the back of the camera bottom center button, press until you see a circle with a slash through the flash lightning icon.
Press the "Menu" button on the back of the camera (above the display screen) and then using the round thumb button to scroll and select, and the "picture taking" button to select each setting (there are shortcuts which I'm leaving out for simplicity), choose the following settings:
The *** items are helpful for better photomicrographs but are not essential.
...
Continue reading at MICROSCOPE CAMERA FOCUSING TIPS or select a topic from the closely-related articles below, or see the complete ARTICLE INDEX.
Or see these
Recommended Articles
- FORENSIC LAB TECHNICAL PROCEDURES - home
- MICROSCOPE DIGITAL PHOTOGRAPHY
- TECHNICAL & LAB PROCEDURES
- WORLD TRADE` CENTER 9-11 DUST PHOTOS
Suggested citation for this web page
MICROSCOPE CAMERA SETTINGS at InspectApedia.com - online encyclopedia of building & environmental inspection, testing, diagnosis, repair, & problem prevention advice.
Or see this
INDEX to RELATED ARTICLES: ARTICLE INDEX to BUILDING FORENSICS
Or use the SEARCH BOX found below to Ask a Question or Search InspectApedia
Ask a Question or Search InspectApedia
Try the search box just below, or if you prefer, post a question or comment in the Comments box below and we will respond promptly.
Search the InspectApedia website
Note: appearance of your Comment below may be delayed: if your comment contains an image, photograph, web link, or text that looks to the software as if it might be a web link, your posting will appear after it has been approved by a moderator. Apologies for the delay.
Only one image can be added per comment but you can post as many comments, and therefore images, as you like.
You will not receive a notification when a response to your question has been posted.
Please bookmark this page to make it easy for you to check back for our response.
IF above you see "Comment Form is loading comments..." then COMMENT BOX - countable.ca / bawkbox.com IS NOT WORKING.
In any case you are welcome to send an email directly to us at InspectApedia.com at editor@inspectApedia.com
We'll reply to you directly. Please help us help you by noting, in your email, the URL of the InspectApedia page where you wanted to comment.
Citations & References
In addition to any citations in the article above, a full list is available on request.
- Our recommended books about building & mechanical systems design, inspection, problem diagnosis, and repair, and about indoor environment and IAQ testing, diagnosis, and cleanup are at the InspectAPedia Bookstore. Also see our Book Reviews - InspectAPedia.
- In addition to citations & references found in this article, see the research citations given at the end of the related articles found at our suggested
CONTINUE READING or RECOMMENDED ARTICLES.
- Carson, Dunlop & Associates Ltd., 120 Carlton Street Suite 407, Toronto ON M5A 4K2. Tel: (416) 964-9415 1-800-268-7070 Email: info@carsondunlop.com. Alan Carson is a past president of ASHI, the American Society of Home Inspectors.
Thanks to Alan Carson and Bob Dunlop, for permission for InspectAPedia to use text excerpts from The HOME REFERENCE BOOK - the Encyclopedia of Homes and to use illustrations from The ILLUSTRATED HOME .
Carson Dunlop Associates provides extensive home inspection education and report writing material. In gratitude we provide links to tsome Carson Dunlop Associates products and services.

