
InspectAPedia®FREE Encyclopedia of Building & Environmental Construction, Diagnosis, Maintenance & Repair |
Question? Just ask us! InspectAPedia
|
 Roof Valley Flashing Installation Details
Best Practices

- POST a QUESTION or COMMENT about roof valley flashing
Valley Flashing for Roofs:
This article discusses details and specifications for roof valley flashing for best construction & roof leak resistance.
We describe how to construct three common styles of roof valley: open valley, closed-cut valley, and woven roof valley, and we include roof valley underlayment and nailing specifications.
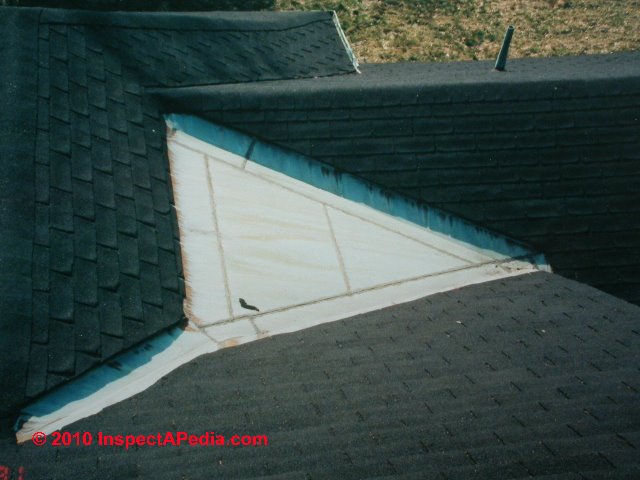
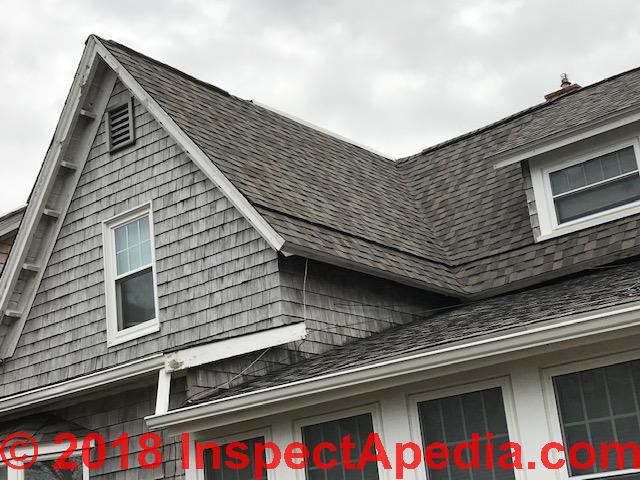
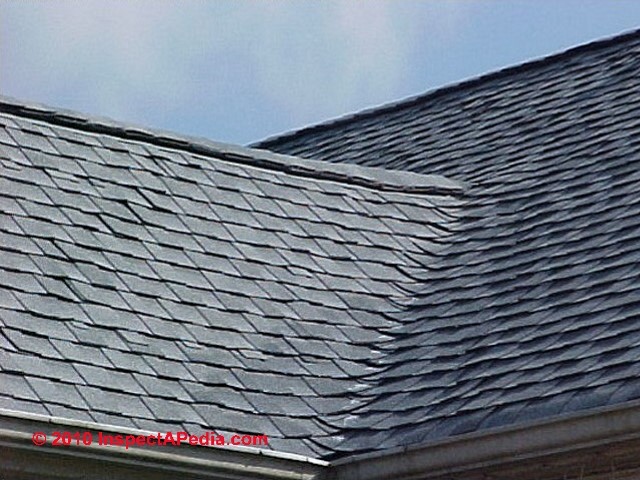
Page top photo: that Vee-shaped metal roof section drains a large volume of water into the end of intersecting roof valleys where unless a large capacity gutter is installed, the valley drain will over-shoot and may risk building water entry.
InspectAPedia tolerates no conflicts of interest. We have no relationship with advertisers, products, or services discussed at this website.
- Daniel Friedman, Publisher/Editor/Author - See WHO ARE WE?
Valley Flashing Requirements for Asphalt Shingle Roofs
 Adapted/paraphrased with permission from Best Practices Guide to Residential Construction (Steve Bliss, J Wiley & Sons) , chapter on BEST ROOFING PRACTICES:
Because valleys catch water rushing down two roof planes, they are likely places for roof leaks.
Here we describe proper roof valley construction to handle roof runoff from intersecting roof planes without causing building leaks.
Article Contents
- ROOF VALLEY UNDERLAYMENT REQUIREMENTS
- OPEN ROOF VALLEY DESIGN SPECIFICATIONS
- METAL VALLEY FLASHING EDGE FASTENING METHODS - clips, cleats, nails at open valleys
- METAL VALLEY LENGTH WARNING
- CLOSED CUT ROOF VALLEY DESIGN SPECIFICATIONS
- WOVEN ROOF VALLEY DESIGNS
- DEAD END ROOF VALLEYS - mean leaks, possible fixes
- ROOF VALLEY SLOPE WARNINGS - too much or too little?
- ROOF VALLEY FLASHING MANUALS, RESEARCH & STANDARDS
...
Valley Underlayment Requirements for Asphalt Shingle Roofs
 Leaks can be caused
by water rushing up the opposite side of the valley or from
wear and tear caused by the channeled water, snow and ice
buildup, or traffic on the roof.
Leaks can be caused
by water rushing up the opposite side of the valley or from
wear and tear caused by the channeled water, snow and ice
buildup, or traffic on the roof.
For that reason all valleys should start with a leak proof underlayment system to back up the shingle or metal valley detail.
Start by cleaning any loose nails or other debris and nailing down any sheathing nails that are sticking up. If eaves flashing is used, it should cross the valley centerline each way and be installed before the valley underlayment (see “Eaves Flashing,” discussed
in ROOFING UNDERLAYMENT BEST PRACTICES).
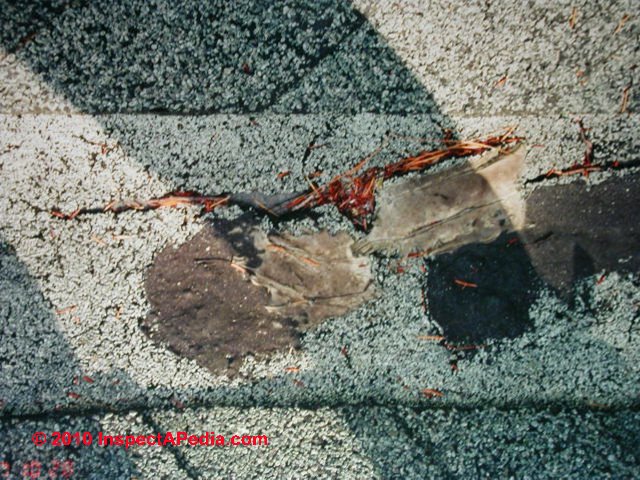
Photo: cracks and damage in this roof valley mean that the roof is depending entirely on the valley underlayment to protect the building from roof leaks.
Next install a 36-inch-wide strip of self-adhering bituminous membrane in 10- to 15-foot lengths up the valley.
Keep the membrane tight to the sheathing at the valley center, since any hollow sections could be easily punctured. Next install the 15-pound felt underlayment across the roof, lapping over the valley flashing by at least 6 inches.
NRCA (Lile) recommends that the underlayment should always be centered in the valley, not what you might think that where a steep slope intersects with a more gently-sloped roof section - keep the underlayment centered rather than extending the underlayment further into the lower-sloped roof area.- Ed.
Roll roofing is also an acceptable underlayment for asphalt shingle valleys, although it is more prone to crack and is not self-healing around nails.
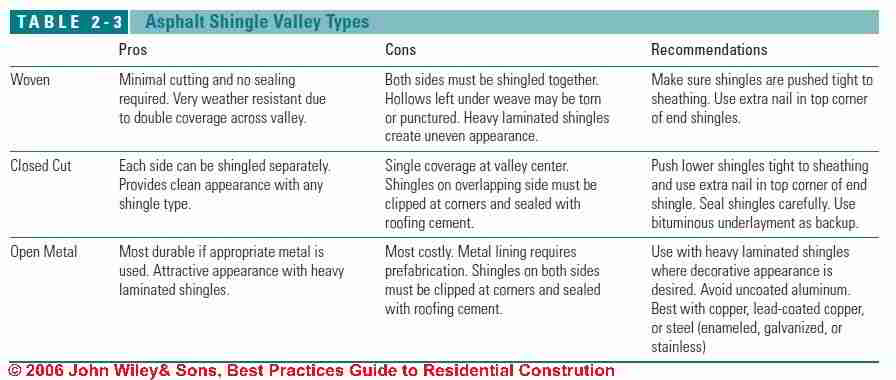
After the underlayment is complete, the valley can be completed in any of the following ways (Table 2-3 above - click to enlarge the tables or illustrations in these articles).
Durability of Roll Roofing Used as Roof Valley Flashing
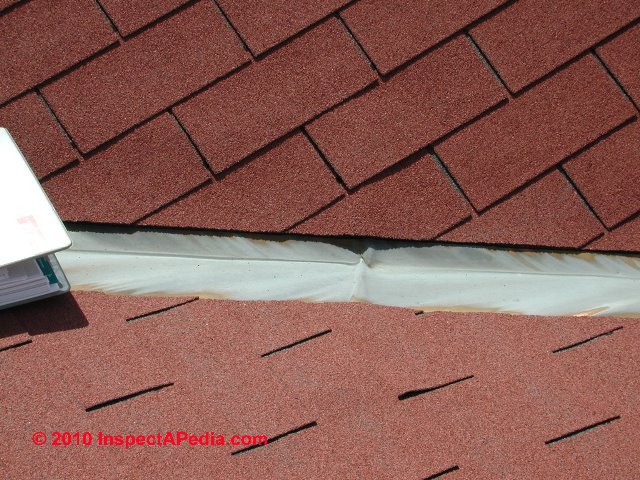
Our roof valley photo (above-left) shows roll roofing used as the exposed valley flashing for an open roof valley - an accepted practice.
In our OPINION -DF, while roll roofing (or peel and stick ice and water shield membrane) work well as roof valley underlayment, using roll roofing as the final surface in an open roof valley is not as durable as the metal lined valley options or closed-cut or woven valleys discussed below.
If you consider that a roof valley drains water from two or more intersecting roof planes you realize that more water flows down this roof area than anywhere else on most roofs, meaning that we want the most durable materials in this location. - Ed.
In sum, the water volume and velocity running through roof valleys is often quite a bit more aggressive than other roof slope surfaces where the same material might have lasted longer.
Continuing from from Best Practices Guide to Residential Construction (Steve Bliss, J Wiley & Sons) :
Shingle Nailing Details Near Roof Valleys:
NRCA (Lile) recommends that fasteners should not be located within 6-inches (152mm) of the valley center when installing any roofing material, including roll roofing and asphalt roof shingles - Ed.
...
Open Valley Details for Asphalt Shingle Roofs
With a heavy-gauge, noncorrosive metal
lining, open valleys are the most durable valley and
the most costly.
See our discussion of alternative flashing materials found
An economical version uses two layers of roll roofing for the lining, which should last as long as an asphalt roof.
NRCA (Lile) recommends that roof valley flashing metal for open roof valleys should be 26-gauge (0.45mm) galvanized steel or equivalent noncorrosive, nonstaining metal. Lile points out that valleys lined with roll roofing are not as durable. - Ed.
The bottom layer of roll roofing goes on with the gravel facing downward; the top layer with the gravel facing upward.
Nail along the edges every 12 to 18 inches, keeping the material tight against the roof sheathing.
Metal valley linings should be 2 to 3 feet wide and no more than 8 or 10 feet in length to prevent wrinkling from lengthwise expansion.
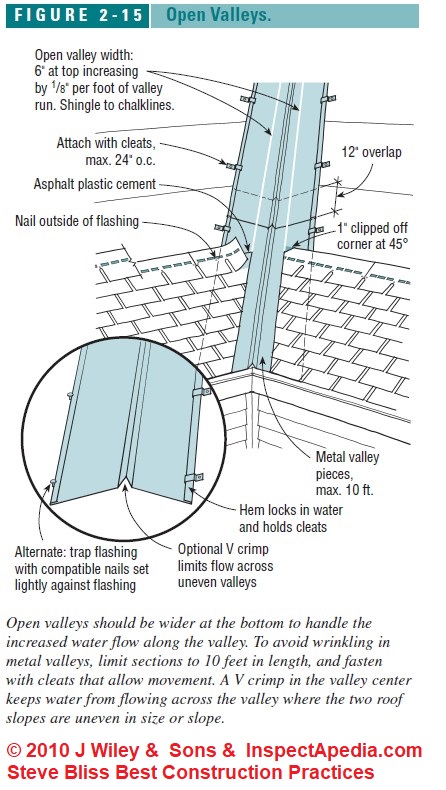
The valley lining, whether asphalt or metal, should have 6 inches open at the top (3 inches on either side of the valley centerline) and increase by 1/8 inch for each foot of valley length to accommodate the greater flow further down the valley.
So a 16-foot valley would have 6 inches open at the top and 8 inches at the bottom (see Figure 2-15 above).
...
How to Secure Metal Roof-Valley by Clips / Cleats or Edge-Trapping Roofing Nails
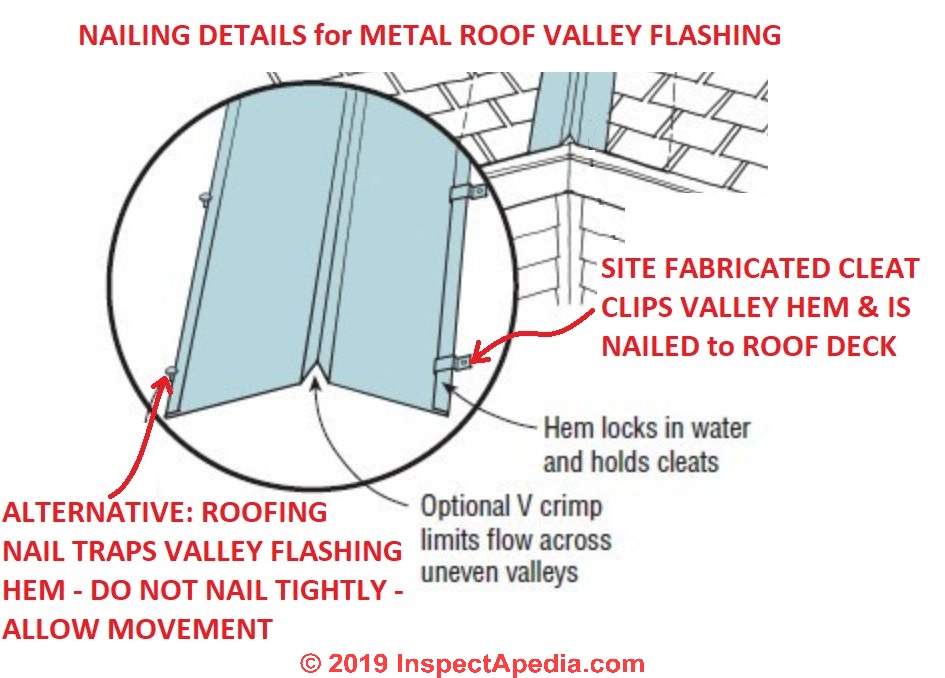
The installer fabricates simple clips or valley flashing cleats whose bent edge interlocks with the folded-over or hemmed edges of the metal roof valley flashing to secure the valley to the roof deck. Use roof valley cleats at intervals of 24" o.c. or less.
Using clips permits movement in the valley as temperatures change. Without this feature a metal valley may flex and crack as temperatures change.
Make Metal Roof Valley Clips / Cleats
- Get some of the flashing material that matches your valley flashing in metal and thickness
- Cut some strips - the dimensions are NOT critical - maybe 3/4 to 1 1/2" wide x roughly 5-6" long
- Bend one end of each strip over roughly 3/4" to 1" but do not hammer it tightly-flat
- The cleat bent-over edge is then slipped into the bent-over edge seam of the valley flashing, tapped gently flat - not very tight - and its other end nailed to the roof deck.
An alternative to fabricated valley cleats is the use of roofing nails whose head is set to pin down the edge of the valley flashing.
Watch out: Do not simply nail right through metal valley flashing to secure it to the roof. The inability of the nailed flashing to move with temperature changes will contribute to buckling and ultimately cracks and leaks.
...
Maximum Safe Length for Metal Roof Valley Sections
Some roofers design valley width to widen as it nears its lower end on roofs with very long valley runs, figuring that the increased quantity of water on the lower roof might otherwise cause excessive shingle wear or increase the risk of leaking past the valley edge seals.
But a different and our (DJF) experience more common problem is constructing a metal lined roof valley using lengths of valley flashing that are too long. Why is that a problem? Thermal expansion cracks lead to valley leaks.
Watch out: Our below illustrates the cross-valley wrinkle that occurs by repeated heating and cooling in long segments of metal roof valley flashing - this flexing eventually breaks the flashing leading to a roof valley leak.
This is what happens if a single section of valley flashing is too long: it heats and buckles and eventually breaks and leaks.
Below is a photo of a buckled, cracked and leaking roof valley caused by just this problem.

Overlap metal roof valley sections by 12 inches, and seal the lap with a flexible sealant, such as polyurethane or butyl, on roofs shallower than 5:12.
Where two roof valleys meet,
for example above a gable dormer, a soldered joint is likely to break from the movement. You can see in our roof valley photo (left) that there has been a history of patching at the valley intersection on this roof.
A lead cap overlaid 6 inches onto each valley is an effective way to seal the top.
Where the roof slopes are uneven or one roof is larger than the other, a 1- to 1 1/2 -inch-high V crimp in the middle of the metal valley will prevent the uneven flow from running up one side of the valley.
The crimp also stiffens the valley. A hem is also desirable, both to stop any overflow water and to provide a place to attach nailing clips, which hold the flashing securely while allowing movement. Nails wedged against the edge of the flashing and driven lightly against the flashing may also be used.
Clips and nails should be the same metal as the valley or a compatible metal that will not cause galvanic corrosion.
See GALVANIC SCALE & METAL CORROSION or see page 83 in the printed text Steve Bliss - Best Practices Guide to Residential Construction - (J Wiley) .
Shingles should overlap the valley lining by at least 6 inches.
With a roll roofing valley, keep the nails at least 6 inches from the valley centerline.
With a metal liner, nail 1/2 inch outside the liner. Seal each shingle to the liner and overlapping shingle with a 3-inch-wide bead of plastic roofing cement.
...
Closed-Cut Valley Installation Details for Asphalt Shingle Roofs
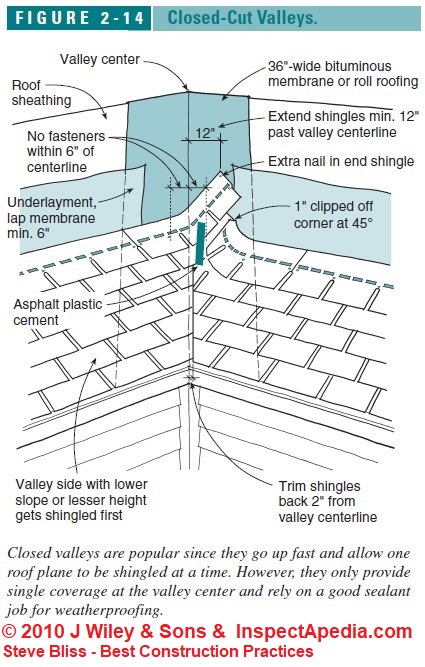
NRCA (Lile) explains that closed-cut valleys combine some of the advantages of other valley types: their partial-open design improves roof drainage down the valley (compared with a woven or irregularly-shaped valley), and they are relatively abuse resistant.
A closed cut roof valley will have at least four layers of roof materials: one layer each of felt underlayment, mineral-surfaced roll roofing, and two layers of shingles. Closed-cut shingle valleys work fine with strip shingles, and laminated asphalt shingles.
But, Lile continues, for double-layer T-lock or double-layer individual lock-down shingles, the minimum valley slope should be 5" in 12".
Above: a closed cut valley asphalt shingle roof, courtesy of InspectApedia.com reader Margaret.
Finally, he warns that single-layer (3-tab) shingles can't be used in a closed-cut valley because nails may be needed to hold tabs at or near the valley center. - Ed.
Continuing from from Best Practices Guide to Residential Construction:
A closed-cut asphalt shingle roof valley starts the same way as a woven valley, with the first course of shingles run across the valley from both roof planes, lapping the shingle from the larger or steeper roof plane over the shingle from the smaller/shallower plane.
Then continue roofing the smaller or lower slope
roof plane, running each course at least 12 inches past
the valley centerline.
Press the shingles tight into the valley
and nail in place, locating no fasteners within 6 inches of
the valley center and adding an extra nail at the end of each
shingle that crosses the valley (see Figure 2-14). Do not
allow any butt joints to fall in the valley.
Next, snap a chalk line 2 inches out from the valley centerline on the opposite slope and shingle up the other side of the valley, holding nails back 6 inches from the valley center.
Our photo above of a closed-cut valley on a group home in upstate New York shows that the roofer had a different idea about where the cut-line should go - s/he kept the cut line high out of the valley.
Trim each shingle to the guide line as you go, or run them long and trim them later. In either case, clip about 1 inch off the uphill corner of each shingle to help direct rushing water into the valley.
Finally seal each shingle to the valley and to the overlapping shingle with a 3-inch-wide bead of plastic roofing cement.
Closed valleys go up quickly and provide a clean appearance with either standard or laminated shingles. If sealed well, they provide adequate protection.
...
Woven Shingle Valley Installation Details for Asphalt Shingle Roofs
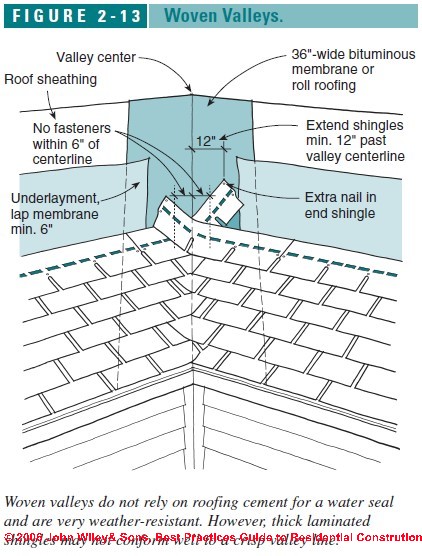
NRCA (Lile) points out that woven roof valleys are limited to cutout-style 3-tab asphalt roof shingles (as there are no openings to weave solid or architectural or dimensional or laminate style asphalt shingles together), and he adds that the valley's slope should be at least 4" in 12" or steeper, installed typically over a layer of mineral granule faced roll roofing.
Lile also warns that woven valleys have some drawbacks in areas where moss is likely to grow between the shingle cutouts, hindering roof drainage. - Ed.
Continuing from from Best Practices Guide to Residential Construction:
On the first course across the valley, the shingle from the larger or steeper roof plane overlaps the shingle from the smaller or shallower plane.
Extend the end of each shingle at least 12 inches beyond the valley centerline and avoid placing any butt joints near the valley center.
Press the shingles tight into the valley when nailing and place no fasteners within 6 inches of the valley center.
Add an extra nail at the end of each shingle that crosses the valley (see Figure 2-13 above).
Continue to the top of the valley. Done correctly, woven valleys are very weather-resistant and best for high wind regions, but they are somewhat slow to install.
Woven valleys work better with three-tab shingles than with heavy laminated shingles, which do not conform well to a crisp valley line.
Our woven valley photo (above-left) courtesy of Frank Albert, shows a valley constructed using laminated asphalt shingles.
...
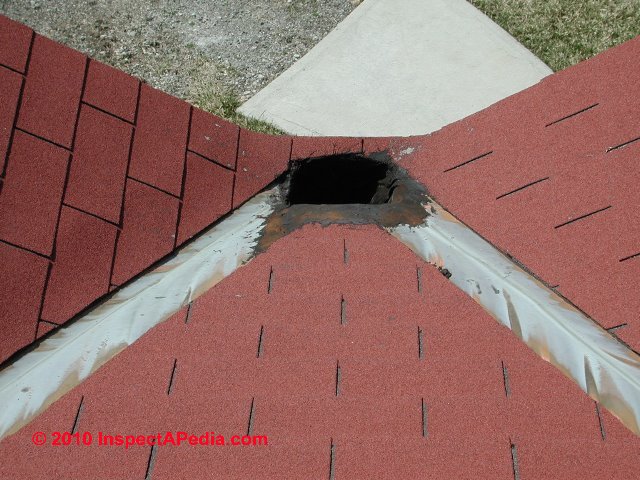
Dead End Roof Valleys = Disaster
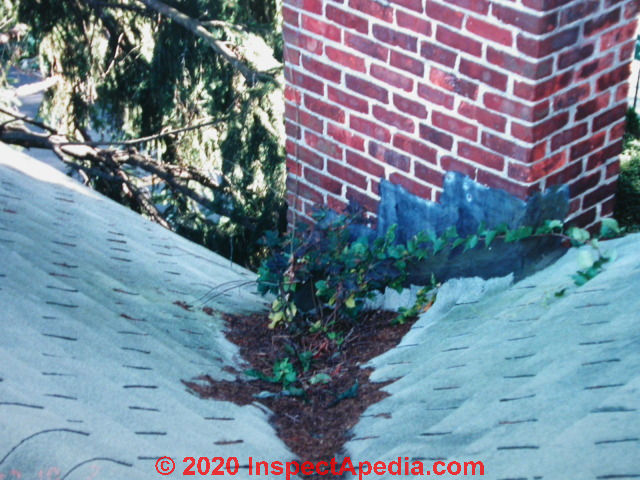
A "dead valley" on any roof is formed by two intersecting roof slopes that form a Vee whose bottom end is blocked such as by the chimney in the photo just above.
When we inspected this home we found a history of leaks around the chimney, showing up as water stains in the ceilings below.
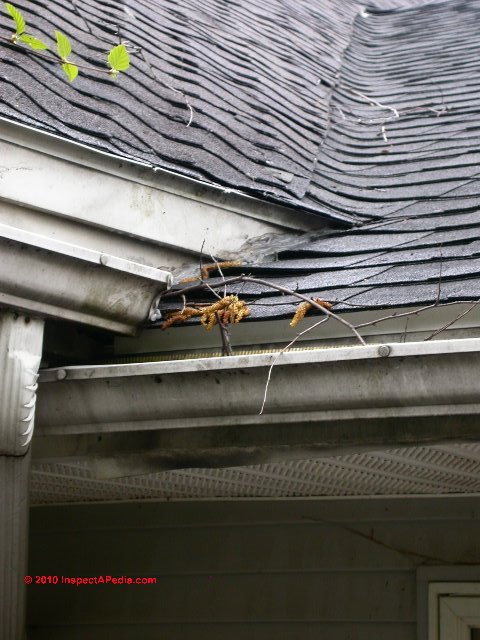
On this particular roof, the dead roof valley leak risk and shortened shingle life in the valley are exacerbated by the nearby trees and even a vine whose leaves further clog the valley, holding water in the valley and increasing the risk of roof leaks.
In sum, this bad roofing practice is called "dead valley" or a a "dead-end" roof valley or an obstructed roof valley: a roof valley that terminates at an obstruction (like a chimney) and thus does not conduct runoff to the edge of the roof and away.
How to Fix a Dead End Roof Valley
Is there a "fix" for the horrible dead-end valley shown above? Certainly, though it requires a bit of thought.
When we inspected the house above, and because no one wanted to bear the trouble and cost of moving the chimney, we suggested that the roof be stripped back to three feet above the highest point at which the chimney blocks the roof valley drain.
The roofer then constructs a cricket that slopes away from the chimney and down onto the roof deck, shaped so that water from the valley up-roof drains to the left in this photo, around the chimney and down to the roof edge.

A more expedient and less costly alternative that might work would be to line the whole problem roof area with an impermeable roof membrane such as ice and water shield.
...
Roof Valley Slope Warnings
 Where two roof slopes intersect to form a valley, the slope in the valley itself will always be less than that of the two abutting roof surfaces.
A nice summary of the concerns for problems of either reduced drainage or even ponding (on low-slope roofs) was given by Mark Graham, NRCA's vice president for Technical Services, in Professional Roofing back in 2018:
For example, where roofs with a 4:12 slope intersect at a valley, the valley's actual slope is only about 3:12.
To accommodate this, designers should consider greater than the minimum recommended roof slope for steep-slope roof designs with valleys or other complex geometries.
Also, steep-slope roof areas with long rafter lengths experience greater amounts of water runoff than roof areas with short rafter lengths.
To better accommodate this water runoff, designers should consider roof slopes greater than the minimum recommended slope.
For low-slope roofs where a tapered insulation cricket or saddle creates a valley, the valley's slope will be less than that of the cricket or saddle.
Some ponding water along cricket and saddle valleys typically will occur and should be anticipated. (Graham 2018)
...
Roof Valley Standards, Materials, Sources
- Asphalt Roofing Manufacturers Association ARMA, Web: https://www.asphaltroofing.org/
750 National Press Building, 529 14th Street, NW, Washington, DC 20045, Tel: 202 / 207-0917www.asphaltroofing.org - ASTM International, 100 Barr Harbor Drive, PO Box C700, West Conshohocken, PA, 19428-2959 USA The ASTM standards listed below can be purchased in fulltext directly from http://www.astm.org/
- Cedar Shake & Shingle Bureau, CEDAR SHINGLE / SHAKE ROOF VALLEY DETAILS [PDF] U.S Address Cedar Shake and Shingle Bureau P.O. Box 1178 Sumas, WA 98295-1178 USA,
Canadian Address Cedar Shake and Shingle Bureau 300 – 34334 Forrest Terrace Abbotsford, B.C. V2S 1G7 CANADA, Website: https://www.cedarbureau.org/ - retrieved 2022/09/25 original source: https://www.cedarbureau.org/wp-content/uploads/2020/05/Page-011-Roof-Valley-Flashing-Details.pdf - Graham, Mark, ROOF SLOPE GUIDELINES [PDF] Professional Roofing August 2017, Professional Roofing Magazine, O'Hare International Center 10255 W. Higgins Road, Suite 600 Rosemont, IL 60018-5607 USA, Tel: (847) 299-9070 Email: professionalroofing@professionalroofing.net - retrieved 2022/09/26, original source: https://www.professionalroofing.net/Articles/Roof-slope-guidelines--08-01-2018/4284
- NRCA - National Roofing Contractors Association - Website: www.nrca.net 10255 W. Higgins Road, Suite 600, Rosemont, IL 60018-5607, Tel: (847) 299-9070 Fax: (847) 299-1183
- Cedar Shake and Shingle Bureau www.cedarbureau.org
- Metal Roofing Alliance www.metalroofing.com
- NRCA - National Roofing Contractors Association - Website: www.nrca.net 10255 W. Higgins Road, Suite 600, Rosemont, IL 60018-5607, Tel: (847) 299-9070 Fax: (847) 299-1183
- Tile Roofing Institute www.tileroofing.org
- AZ CITIZEN'S GUIDE to RE-ROOFING YOUR HOME [PDF] - City of Scottsdale Arizona Government, 3939 N. Drinkwater Blvd. Scottsdale, AZ 85251 USA Tel: 480-312-3111 TTY: 1-800-367-8939 (Arizona Relay Service), retrieved 2020/01/08 and de-novo 2022/09/26, original source: https://www.scottsdaleaz.gov/Assets/ScottsdaleAZ/Building/Re-RoofingHandout.pdf
- AZ WORKMANSHIP STANDARDS for LICENSED CONTRACTORS [PDF] Arizona Registrar of Contractors, MAIN OFFICE 1700 W. Washington St. Ste. 105 Phoenix, AZ 85007-2812 USA, Tel: (602) 542-1525 TDD (602) 542-1588 - original source: https://roc.az.gov/sites/default/files/files/minimum_industry_standards.pdf
- NY New York State Building Code: ROOF VALLEYS, in Chapter 9, (2015)
Excerpt:
R905.2.8.2 [Roof] Valleys
Valley linings shall be installed in accordance with the manufacturer's instructions before applying shingles. Valley linings of the following types shall be permitted:
1. For open valleys (valley lining exposed) lined with metal, the valley lining shall be not less than 24 inches (610 mm) wide and of any of the corrosion-resistant metals in TABLE R905.2.8.2.
2. For open valleys, valley lining of two plies of mineral-surfaced roll roofing, complying with ASTM D 3909 or ASTM D 6380 Class M, shall be permitted. The bottom layer shall be 18 inches (457 mm) and the top layer not less than 36 inches (914 mm) wide.
3. For closed valleys (valley covered with shingles), valley lining of one ply of smooth roll roofing complying with ASTM D 6380 and not less than 36 inches wide (914 mm) or valley lining as described in Item 1 or 2 shall be permitted.
Self-adhering polymer modified bitumen underlayment complying with ASTM D 1970 shall be permitted in lieu of the lining material. - Lile, Frank, A FEW OPTIONS FOR INSTALLING ASPHALT SHINGLES IN A VALLEY [PDF] Professional Roofing, NRCA, February 1998 p. 76
-- Adapted with permission from Best Practices Guide to Residential Construction (Steve Bliss, J Wiley & Sons) .
Thank you to our readers for their generous comments
Good information on this site. - (Aug 1, 2012) Tom
...
...
Continue reading at ROOF WALL FLASHING DETAILS or select a topic from the closely-related articles below, or see the complete ARTICLE INDEX.
Or see ROOF FLASHING, ASPHALT SHINGLE VALLEY FAQs - questions and answers posted originally on this page
Or see these
Recommended Articles
- DORMER SIDE / ROOF FLASHING
- FLASHING, ASPHALT SHINGLE VALLEYS
- FLASHING, CLAY TILE ROOFS
- FLASHING MEMBRANES PEEL & STICK
- FLASHING for METAL ROOFS
- FLASHING ROOF DEFECTS LIST
- FLASHING ROOF WALL DETAILS
- FLASHING WOOD ROOF DETAILS
- ROOF FLASHING DEFECTS LIST
- ROOF WALL FLASHING DETAILS
- ROOF-WALL FLASHING SNAFU
Suggested citation for this web page
ROOF FLASHING, ASPHALT SHINGLE VALLEYS at InspectApedia.com - online encyclopedia of building & environmental inspection, testing, diagnosis, repair, & problem prevention advice.
Or see this
INDEX to RELATED ARTICLES: ARTICLE INDEX to BUILDING FLASHING
Or use the SEARCH BOX found below to Ask a Question or Search InspectApedia
Ask a Question or Search InspectApedia
Try the search box just below, or if you prefer, post a question or comment in the Comments box below and we will respond promptly.
Search the InspectApedia website
Note: appearance of your Comment below may be delayed: if your comment contains an image, photograph, web link, or text that looks to the software as if it might be a web link, your posting will appear after it has been approved by a moderator. Apologies for the delay.
Only one image can be added per comment but you can post as many comments, and therefore images, as you like.
You will not receive a notification when a response to your question has been posted.
Please bookmark this page to make it easy for you to check back for our response.
IF above you see "Comment Form is loading comments..." then COMMENT BOX - countable.ca / bawkbox.com IS NOT WORKING.
In any case you are welcome to send an email directly to us at InspectApedia.com at editor@inspectApedia.com
We'll reply to you directly. Please help us help you by noting, in your email, the URL of the InspectApedia page where you wanted to comment.
Citations & References
In addition to any citations in the article above, a full list is available on request.
- UL - Underwriters Laboratories - https://www.ul.com/
2600 N.W. Lake Rd.
Camas, WA 98607-8542
Tel: 1.877.854.3577 / Fax: 1.360.817.6278 E-mail: cec.us@us.ul.com - Best Practices Guide to Residential Construction, by Steven Bliss. John Wiley & Sons, 2006. ISBN-10: 0471648361, ISBN-13: 978-0471648369, Hardcover: 320 pages, available from Amazon.com and also Wiley.com. See our book review of this publication.
- Decks and Porches, the JLC Guide to, Best Practices for Outdoor Spaces, Steve Bliss (Editor), The Journal of Light Construction, Williston VT, 2010 ISBN 10: 1-928580-42-4, ISBN 13: 978-1-928580-42-3, available from Amazon.com
- The Journal of Light Construction has generously given reprint permission to InspectAPedia.com for this article. All rights and contents are ©Journal of Light Construction and may not be reproduced in any form.
- Architectural elements: the technological revolution: Galvanized iron roof plates and corrugated sheets; cast iron facades, columns, door and window caps, ... (American historical catalog collection), Diana S Waite, available used out of Amazon.
- Asphalt Roofing Residential Manual from ARMA the Asphalt Roofing Manufacturers Association Website https://www.asphaltroofing.org/product/residential-asphalt-roofing-manual/ ,
- Building Pathology, Deterioration, Diagnostics, and Intervention, Samuel Y. Harris, P.E., AIA, Esq., ISBN 0-471-33172-4, John Wiley & Sons, 2001 [General building science-DF] ISBN-10: 0471331724 ISBN-13: 978-0471331728
- Building Pathology: Principles and Practice, David Watt, Wiley-Blackwell; 2 edition (March 7, 2008) ISBN-10: 1405161035 ISBN-13: 978-1405161039
- Built-Up Roof Systems, Manual C.W. Griffin, Mcgraw-Hill (Tx); 2nd edition (July 1982), ISBN-10: 0070247838, ISBN-13: 978-0070247833
- Concrete Folded Plate Roofs, C. Wilby PhD BSc CEng FICE FIStructE (Author), Butterworth-Heinemann, 1998, ISBN-10: 0340662662, ISBN-13: 978-0340662663
- Concrete Roofing Tile, History of the, Batsford, 1959, AISN B000HLLOUC (availble used)
- Copper Roofing, by CDA
- Copper Roofing, Master specifications for copper roofing and sheet metal work in building construction: Institutional, commercial, industrial, I.E. Anderson, 1961 (hard to find)
- Corrugated Iron, Building on the Frontier, Simon Holloway
- Green Roof Plants: A Resource and Planting Guide, Edmund C. Snodgrass, Lucie L. Snodgrass, Timber Press, Incorporated, 2006, ISBN-10: 0881927872, ISBN-13: 978-0881927870. The text covers moisture needs, heat tolerance, hardiness, bloom color, foliage characteristics, and height of 350 species and cultivars.
- Green Roof Construction and Maintenance, Kelley Luckett, McGraw-Hill Professional, 2009, ISBN-10: 007160880X, ISBN-13: 978-0071608800, quoting:
Key questions to ask at each stage of the green building process Tested tips and techniques for successful structural design Construction methods for new and existing buildings Information on insulation, drainage, detailing, irrigation, and plant selection Details on optimal soil formulation Illustrations featuring various stages of construction
Best practices for green roof maintenance A survey of environmental benefits, including evapo-transpiration, storm-water management, habitat restoration, and improvement of air quality Tips on the LEED design and certification process Considerations for assessing return on investment Color photographs of successfully installed green roofs Useful checklists, tables, and charts - Problems in Roofing Design, B. Harrison McCampbell, Butterworth Heineman, 1991 ISBN 0-7506-9162-X (available used)
- Roofing The Right Way, Steven Bolt, McGraw-Hill Professional; 3rd Ed (1996), ISBN-10: 0070066507, ISBN-13: 978-0070066502
- Slate Roofs, National Slate Association, 1926, reprinted 1977 by Vermont Structural Slate Co., Inc., Fair Haven, VT 05743, 802-265-4933/34. (We recommend this book if you can find it. It has gone in and out of print on occasion.)
- Roof Tiling & Slating, a Practical Guide, Kevin Taylor, Crowood Press (2008), ISBN 978-1847970237,
If you have never fixed a roof tile or slate before but have wondered how to go about repairing or replacing them, then this is the book for you. Many of the technical books about roof tiling and slating are rather vague and conveniently ignore some of the trickier problems and how they can be resolved.
In Roof Tiling and Slating, the author rejects this cautious approach. Kevin Taylor uses both his extensive knowledge of the trade and his ability to explain the subject in easily understandable terms, to demonstrate how to carry out the work safely to a high standard, using tried and tested methods.
This clay roof tile guide considers the various types of tiles, slates, and roofing materials on the market as well as their uses, how to estimate the required quantities, and where to buy them.
It also discusses how to check and assess a roof and how to identify and rectify problems; describes how to efficiently "set out" roofs from small, simple jobs to larger and more complicated projects, thus making the work quicker, simpler, and neater; examines the correct and the incorrect ways of installing background materials such as underlay, battens, and valley liners; explains how to install interlocking tiles, plain tiles, and artificial and natural slates; covers both modern and traditional methods and skills, including cutting materials by hand without the assistance of power tools; and provides invaluable guidance on repairs and maintenance issues, and highlights common mistakes and how they can be avoided.
The author, Kevin Taylor, works for the National Federation of Roofing Contractors as a technical manager presenting technical advice and providing education and training for young roofers. - The Slate Roof Bible, Joseph Jenkins, www.jenkinsslate.com, 143 Forest Lane, PO Box 607, Grove City, PA 16127 - 866-641-7141 (We recommend this book).
- Slate Roofing in Canada (Studi4es in archaeology, architecture, and history),
- Smart Guide: Roofing: Step-by-Step Projects, Creative Homeowner (Ed), 2004, ISBN-10: 1580111491, ISBN-13: 978-1580111492
- Solar heating, radiative cooling and thermal movement: Their effects on built-up roofing (United States. National Bureau of Standards. Technical note), William C Cullen, Superintendent of Documents, U.S. Govt. Print. Off (1963), ASIN: B0007FTV2Q
- Tile Roofs of Alfred: A Clay Tradition in Alfred NY
- WEATHER RESISTIVE BARRIERS [PDF] U.S. Department of Energy", how to select and install housewrap and other types of weather resistive barriers
- Wood Shingle Roofs, Care and Maintenance of wood shingle and shake roofs, (EC), Stanley S. Niemiec (out of print)
- In addition to citations & references found in this article, see the research citations given at the end of the related articles found at our suggested
CONTINUE READING or RECOMMENDED ARTICLES.
- Carson, Dunlop & Associates Ltd., 120 Carlton Street Suite 407, Toronto ON M5A 4K2. Tel: (416) 964-9415 1-800-268-7070 Email: info@carsondunlop.com. Alan Carson is a past president of ASHI, the American Society of Home Inspectors.
Thanks to Alan Carson and Bob Dunlop, for permission for InspectAPedia to use text excerpts from The HOME REFERENCE BOOK - the Encyclopedia of Homes and to use illustrations from The ILLUSTRATED HOME .
Carson Dunlop Associates provides extensive home inspection education and report writing material. In gratitude we provide links to tsome Carson Dunlop Associates products and services.
 |
HOME | ABOUT | ASK a QUESTION | CONTACT | CONTENT USE POLICY | DESCRIPTION | POLICIES | PRIVACY | |
| © 2026 - 1985 Publisher InspectApedia.com - Daniel Friedman | |||||||||