
InspectAPedia®FREE Encyclopedia of Building & Environmental Construction, Diagnosis, Maintenance & Repair |
Question? Just ask us! InspectAPedia
|
 New / Spec House Defects, Repairs
Numerous defects in a costly "spec" house
required engineered and other repairs:
Contractor Dispute Resolution
- POST a QUESTION or COMMENT about roof & floor trusses and truss construction specifications & practices
Identifying and repairing extensive, expensive defects in a new home includes difficult negotiations with the original builder, hiring additional experts, and absorbing, by the new owner, a lot of the repair costs.
This article describes the new owner's experience with the discovery and resolution of structural defects, improper construction, even a bit of rot damage.
InspectAPedia tolerates no conflicts of interest. We have no relationship with advertisers, products, or services discussed at this website.
- Daniel Friedman, Publisher/Editor/Author - See WHO ARE WE?
Spec House Needed Many Repairs
 Special thank - you to our InspectApedia reader [anonymous] who has provided extensive documentation of the discovery of and repairs to numerous problems found after purchasing a new "spec-built" home in Washington State in 2014.
Ultimately the homeowner was able to obtain proper repairs to some serious structural and other problems in the home, as is detailed here.
Article Contents
- FLOOR DAMAGE & REPAIRS
- TRUSS DAMAGE, MISSING, MODIFIED
- ROT in NEW HOUSE CRAWL SPACE
- SKETCH PLANS for TRUSS REPAIRS
- ENGINEER'S REPAIR INSTRUCTIONS - a number of significant construction defects & required repairs
The homeowner writes: [minor editing by us]
This thank-you email is overdue. In 2014 I purchased a new home (spec build by a reputable home seller in Western WA).
Within a few months of moving in, the house was becoming much creakier than any house I had ever owned or experienced. Additionally, there were large drywall separations occurring at many of the corners of rooms.
I did have the home inspected when I bought it, but I can't fault the inspector; Most of these defects were largely hidden.
The home is a 2 story, with crawl space. The first floor framing is post, beam, 2x12 joists, the second story framing is open-web truss joists, the roof framing is prefabricated trusses. For reference, the home purchase price was approximately $750,000.
Very early in the project, I was working with the "regular" warranty department with the builder. Here are some cell phone pics of their first repair, which was done without engineering review or plans.
This was before I knew the extent of the problem, or proper remediation techniques. This repair was ineffective. This repair is mentioned later in engineering documents, and it was re-done, per engineering specifications.
With a lot of research (much of it from InspectAPedia), I was able to learn a lot about building codes, gather the appropriate photographic evidence, find out that issues were even larger than I expected, hire a structural engineer to generate an independent report, and convince the builder to repair the framing of my home over a period of approximately 1.5 years. The repair was performed in phases due to the scope.
The defects were substantial enough to require most of the finish flooring and subfloor to be removed in order to access and repair the defects - so the builder needed to rent temporary housing for us, hire movers to move our belongings into pods, and perform the remediation in one section of the home at a time.
Most of the pictures of the open web truss joists were initially performed with an inexpensive USB borescope camera from Amazon. Later, as I realized the extent of the defects, I removed can-light fixtures in order to insert a larger camera into the open web space to obtain higher quality images.
All repairs were completed by 2018. I sold it in 2021 for approximately $1.4M as we were moving out-of-state.
(There were no further issues with the house at the time we moved; by the end; it was the sturdiest home I'd ever lived in, and likely the most well-constructed in the neighborhood, since I was the only owner who was persistent enough to get the construction defects addressed).
I found that the builder would largely ignore my requests, or try to delay my repair requests until the point where I had necessary proof to support the assertion that there were specific construction defects, and then mailed them via certified mail to the builder.
I know this is mentioned in a lot of resources, but for a homeowner who is using your site, this is a valuable piece of ancillary information that may help them. Home builders can be extremely proficient at carefully crafting responses in order to delay taking actions. (as a business decision, this makes sense, since there's always a chance that a homeowner would need to move, get tired of pursuing a claim, etc).
At the conclusion of the remediation, I insisted on receiving a copy of the full engineering documentation supporting all the repairs, and the builder sent me a thumb drive that not only included the requested documentation, but a pull from their mailserver showing all correspondence related to my home.
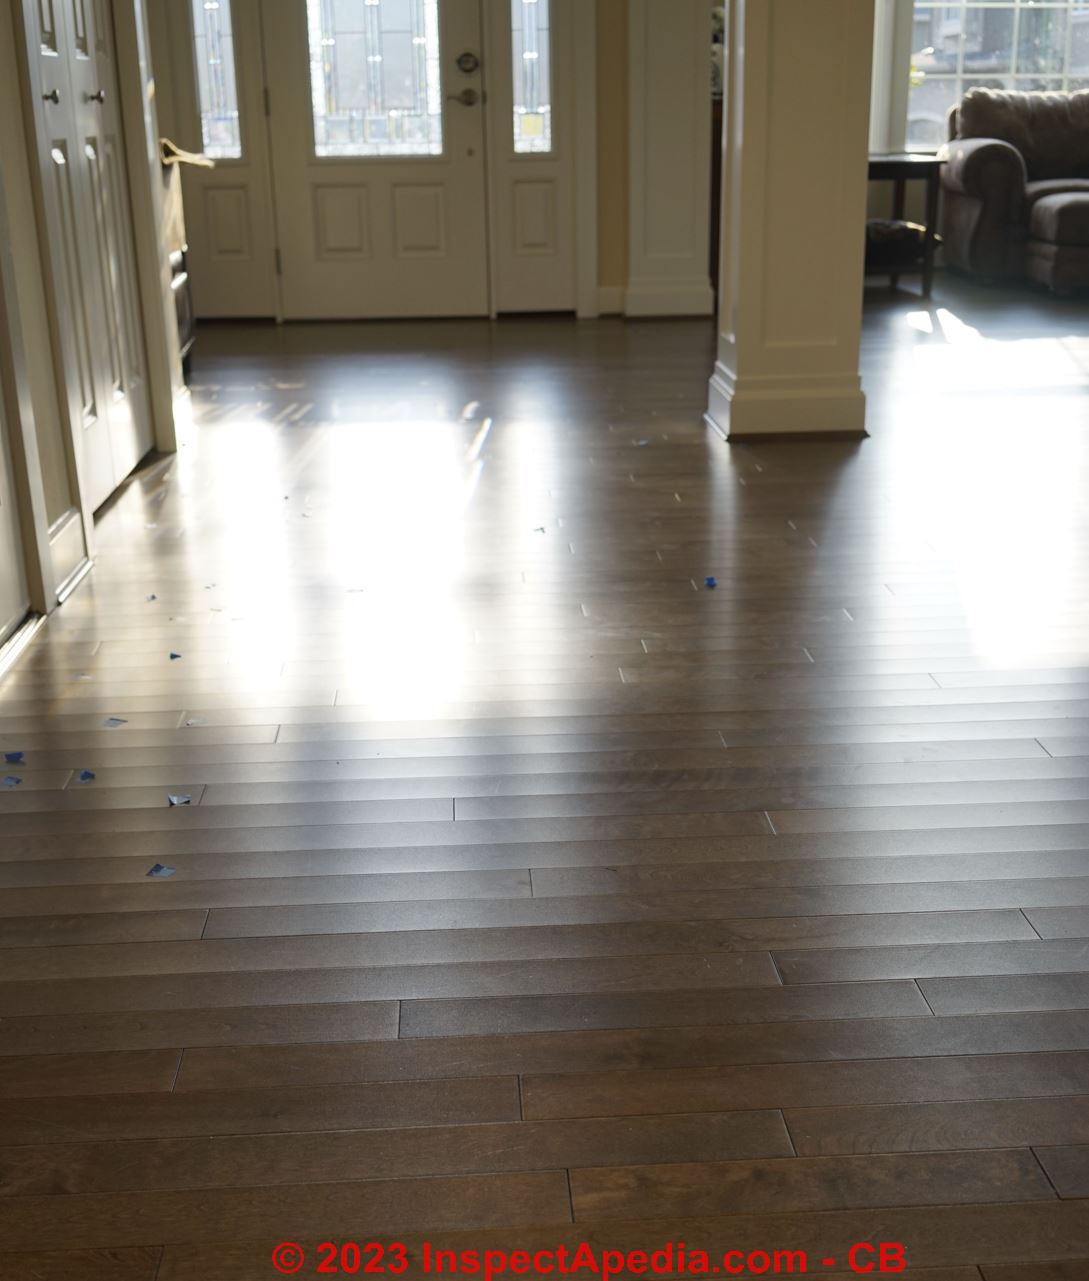
Floors Improperly Installed in New Home
As far as finish flooring, the initial hardwood (~1000 sq ft, 3.25" width, 3/4" thick Mirage) was not properly acclimated, and cupped badly and popped up off the subfloor in many locations. It was attached with staples.
This was one of the first defects we noticed, and the builder paid for multiple inspections from NWFA certified inspectors - they all agreed it was an inadequate install.
The builder eventually agreed to replace it as part of the larger defect remediation plan.
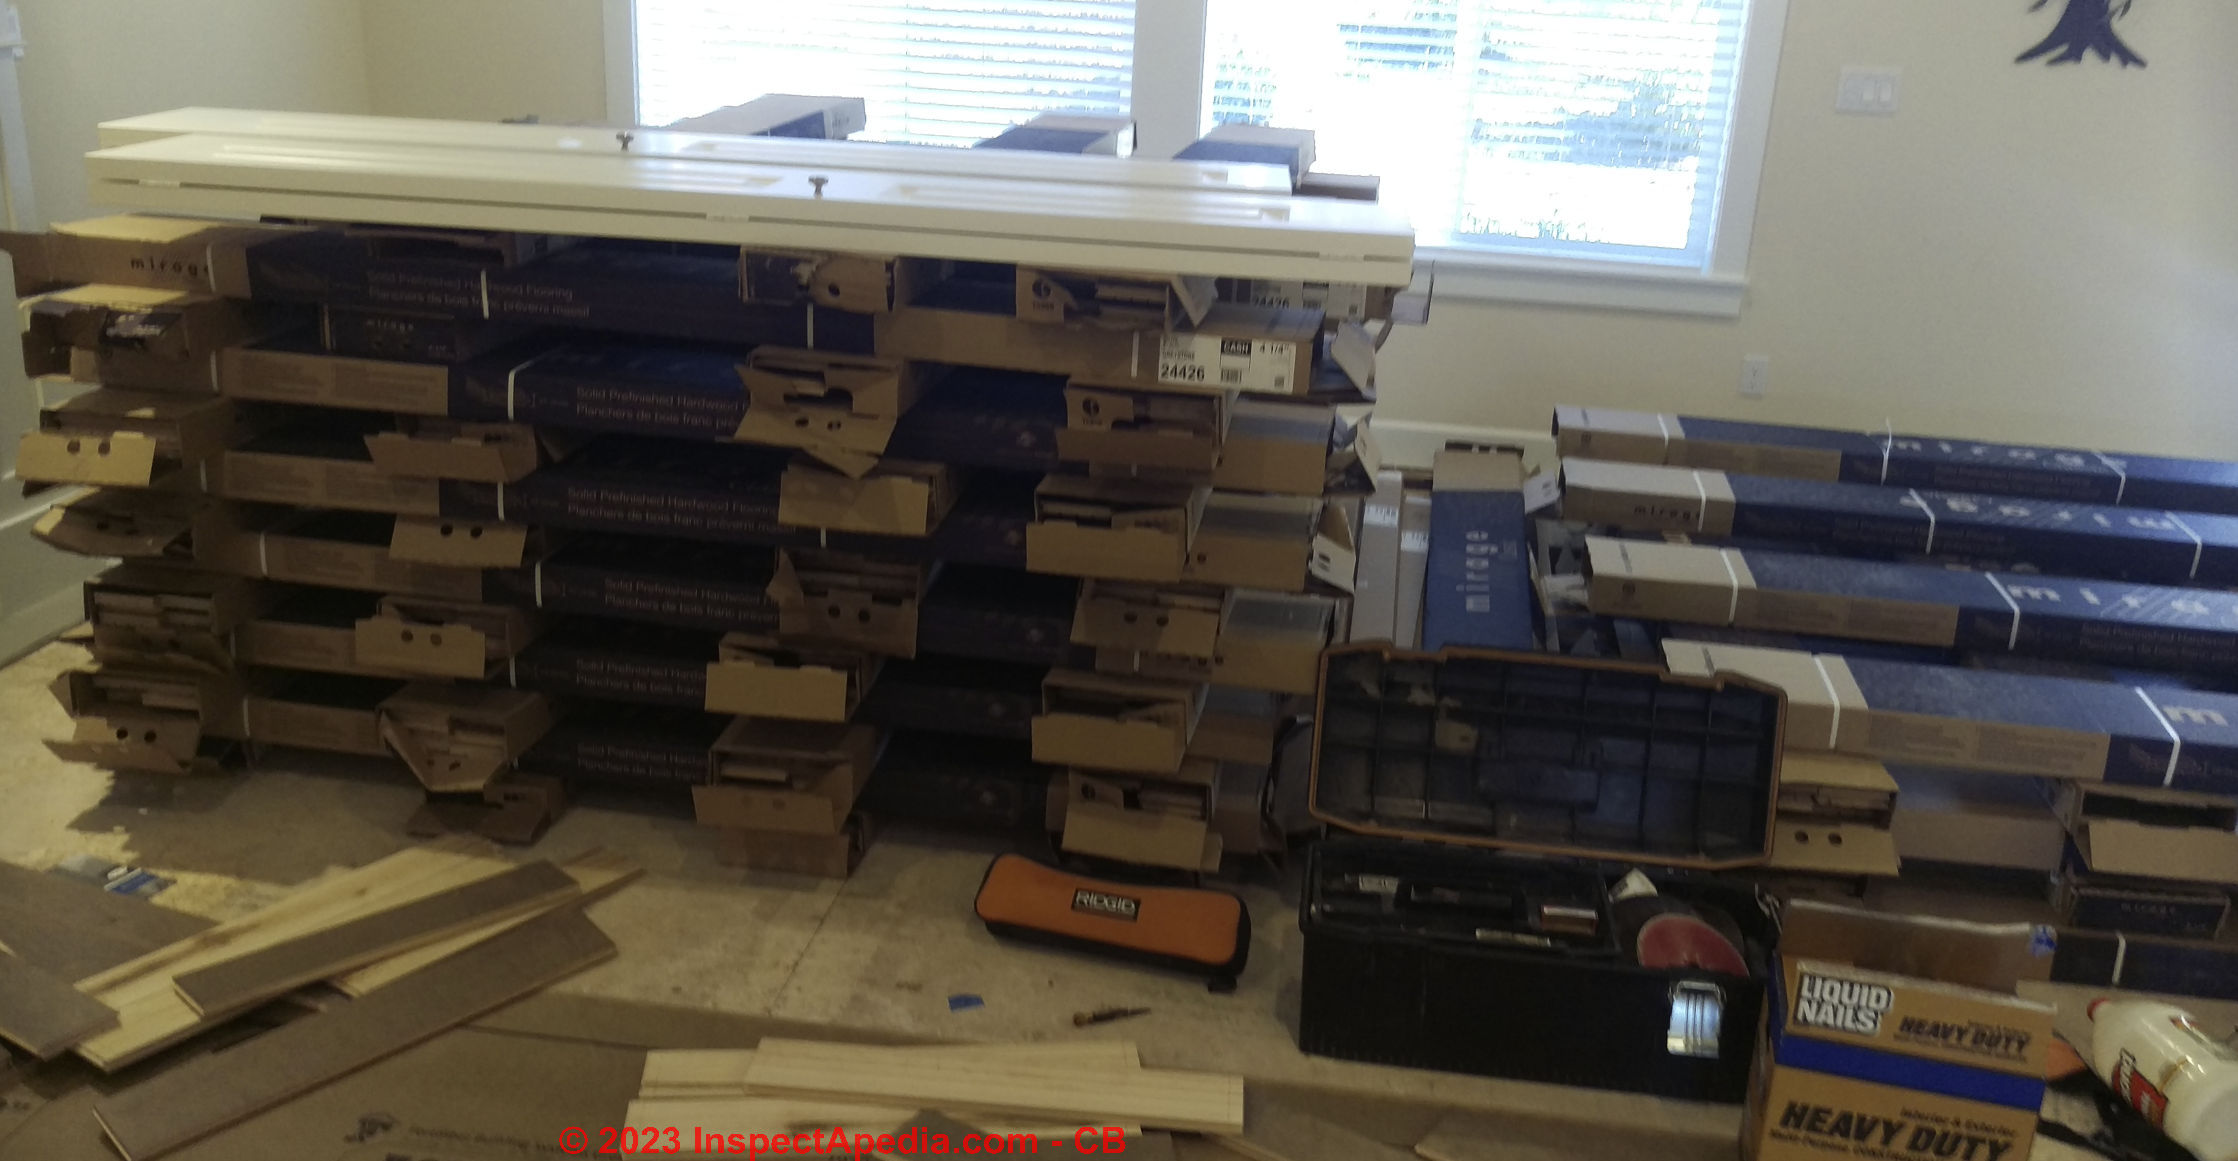
3.25" width birch prefinished was no longer available from the same manufacturer, so the builder let me choose any flooring. I chose a 4.5" width, 3/4" thick, prefinished Mirage maple floor. The installers allowed it to acclimate for ~3 days, but in the initial boxes.
At this point, I was becoming much more proficient in dealing with general construction processes. I knew that the moisture content of the hardwood and floor needed to be similar, within ~2% if I remember correctly. I bought an inexpensive moisture meter that showed that the subfloor was around 9%, and the hardwood was around 1% moisture content.
The builder had hired a general contractor for this phase. He had a moisture meter that connected to his phone, and it showed the same delta;
The hardwood was very dry. And finally, the installer had a "ligno" brand moisture meter that also showed a problem. (I think it showed something like 3% vs 9%). We checked many boards. They wanted to install regardless.
The general contractor lived a couple hours away, and the floor contractor just wanted to get on to the next job. I went outside to call my contact at the builder and express my concerns.
When I came back inside (15 minutes later) they had 3 sample boards that showed 8% moisture. Knowing what I know now, I still wouldn't have let them install it since I knew that "random" samples were coming up as too dry. At the time, I was trusting the fact that there was both a subcontractor and a general contractor on-site and that they had my best interest in mind.
At the end of the first day, I noticed this at the exposed flooring where they stopped.
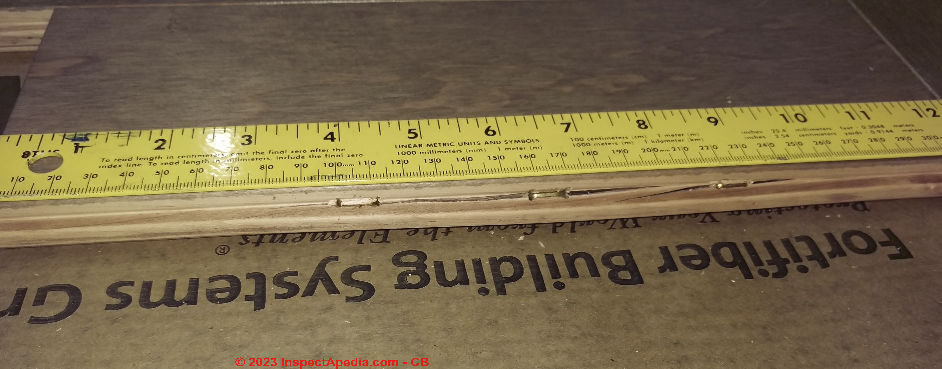
This seemed like the fasteners were too deep, too close to the end, and too many of them. About half the floor had been installed. On day 2, I showed these issues to the general contractor, the installer, and called the builder.
Yep, the mirage installation documents specify that the fasteners should be installed every 6-8", not every 2" i.

The next day, the contract said they heard I was a "particular" customer, and intentionally used extra staples to ensure a strong connection. I pointed out that this was splitting all the boards diagonally along the blind nailing location, and resulting in an incorrect installation. I
had to go to work. I let the general contractor know this was unacceptable, but I was still trusting the general contractor that he would make things right. When I returned from work, the general contractor said that it was only one row that had too many fasteners, and that they were installed too deep.
He said the contractor mis-spoke when stating they installed too many fasteners, and installed them too deep. He said they removed the one (and only) incorrectly installed row, and then finished installing the rest of the floor.
As you'd probably expect, this hardwood floor failed within a couple months as it acclimated. (boards popped way up, it was very loud, cupped, buckling, etc.
Again, the builder hired an NWFA inspector who confirmed the floor was not installed per the manufacturer's instructions.
I found neodymium magnets were great for finding fasteners!
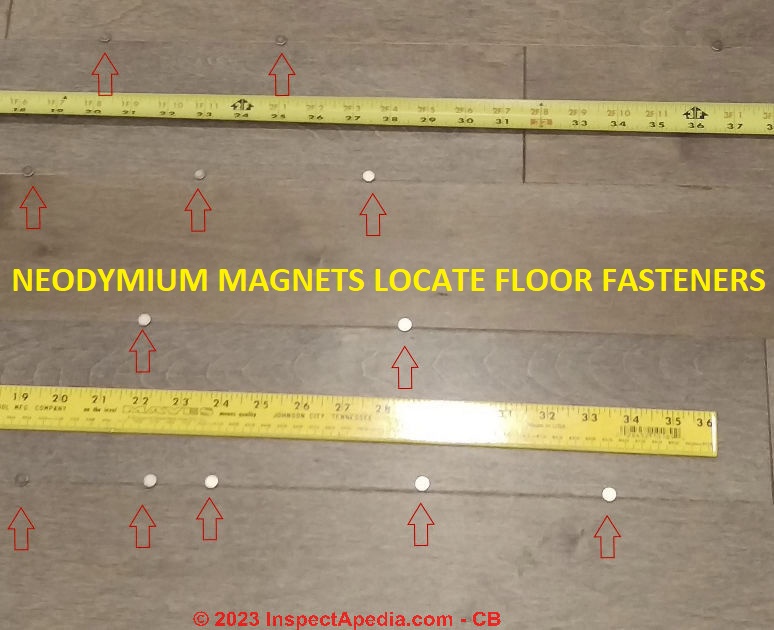
[Those little magnets allowed the owner to demostrate fastener spacing errors and to estimate how widespread those errors were without first tearing up the floor. Just drop a handful of magnets on the floor and let them find the floor fasteners. - Ed.]
The builder ended up writing me a check for the cost of the hardwood floor plus the installation. (around $20 per sq ft, which was reasonable in 2017). The earlier installer also overestimated how much hardwood was needed, so they left me a few hundred sq ft of new materials.

So... over the next 2 years, I decided to remove the hardwood myself (in sections), use an angle grinder to remove the staples, and then glue it down uses Bostick's Best adhesive, which is specified for 3/4" solid hardwood installs by both Mirage and Bostick.
This was ridiculously difficult. The glue gets everywhere.
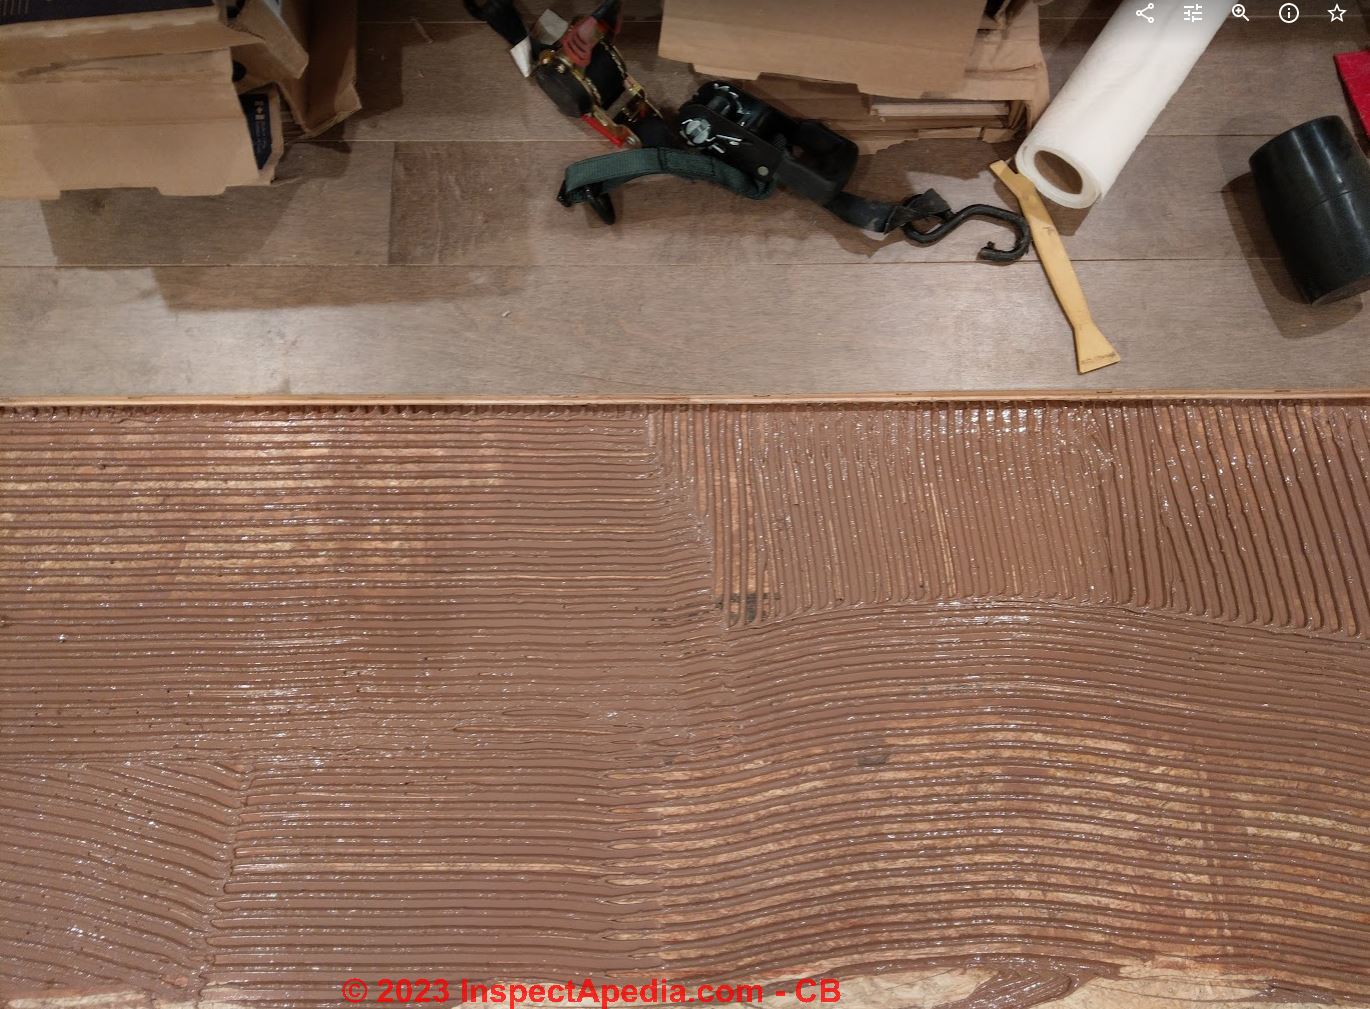
You have to use many strap clamps to get the solid wood to line up straight (unlike engineers hardwood floors, solid wood likes to warp; Apparently when nailing a hardwood, this can be fixed as you go, but when you're gluing, strap clamps (and a sledge) are needed to get the gaps out.
However, in the end, this was the best looking/feeling hardwood floor I've ever been on. It was perfectly silent, and perfectly flat.
We were only able to enjoy it for a couple years before we moved out of state :)
Floor Framing & Subfloor SNAFUs
The first floor [framing] issues were different. Generally, just sloppy construction, and the use of "green" lumber in the crawlspace for posts and beams, and kiln dried joists.
When walking around on the first floor, it was possible to see the beams teeter/cantilever due to large caps between subfloor & joists, joists & beams, beams & posts, and posts and concrete pillars.
The fix was to remove all insulation from the crawlspace, shim all gaps with wooden shims coated in polyurethane construction adhesive. This was very effective.
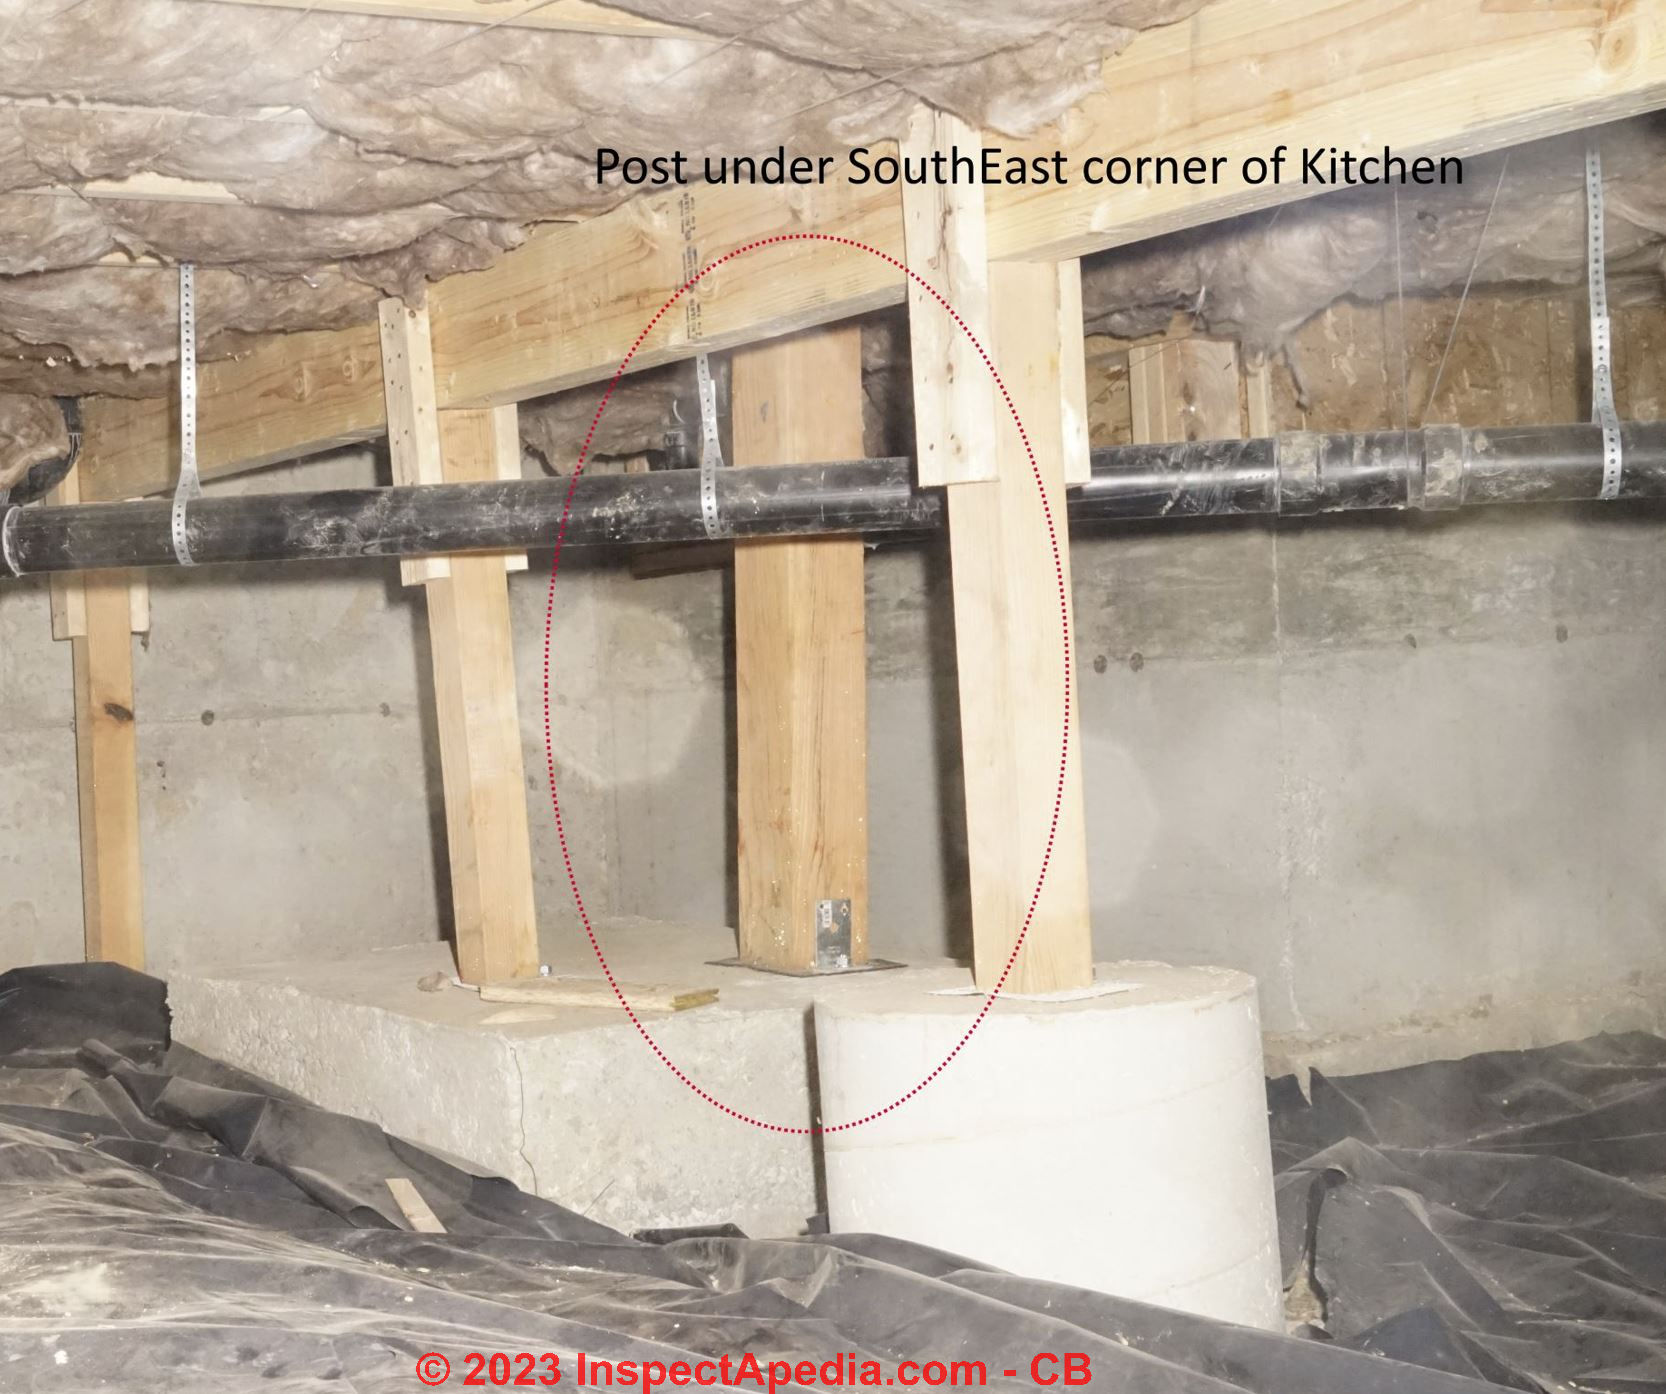
There was apparently no code issue with the very out-of-plumb post, which turned out to be a second story load-bearing post.
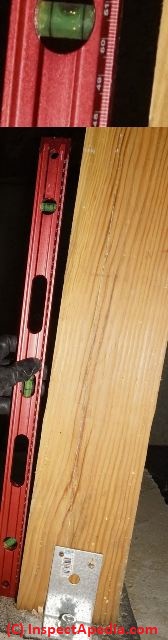
I consulted with my structural engineer, and he confirmed that he was unaware of a plumb requirement. (weird!). So that particular item didn't require remediation.
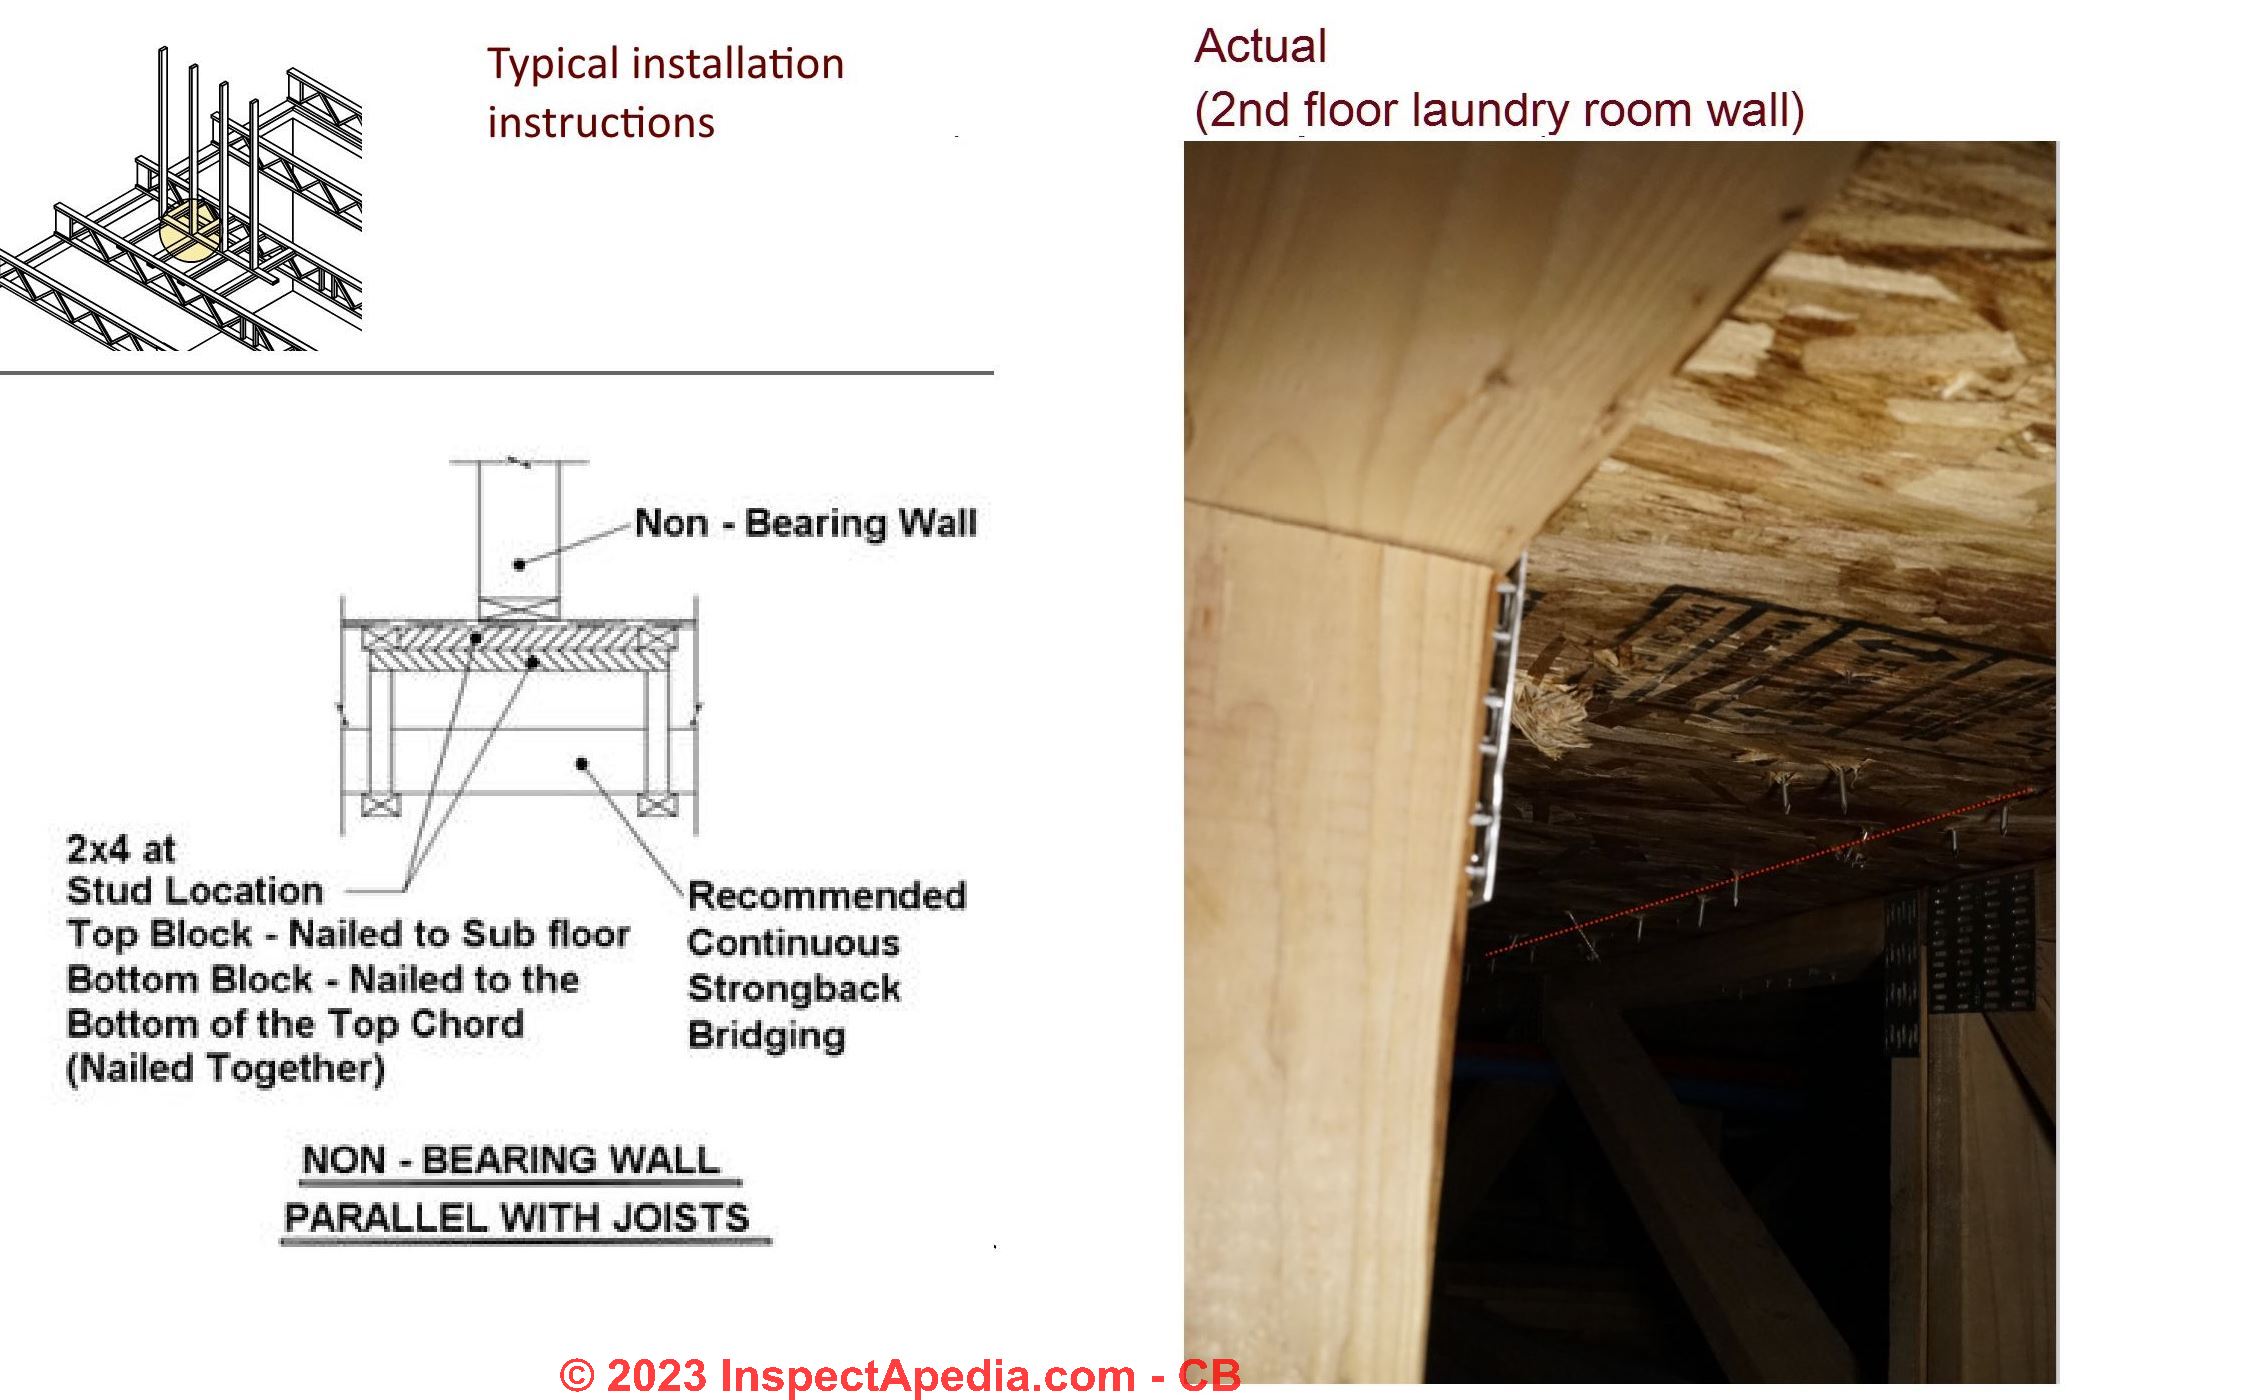
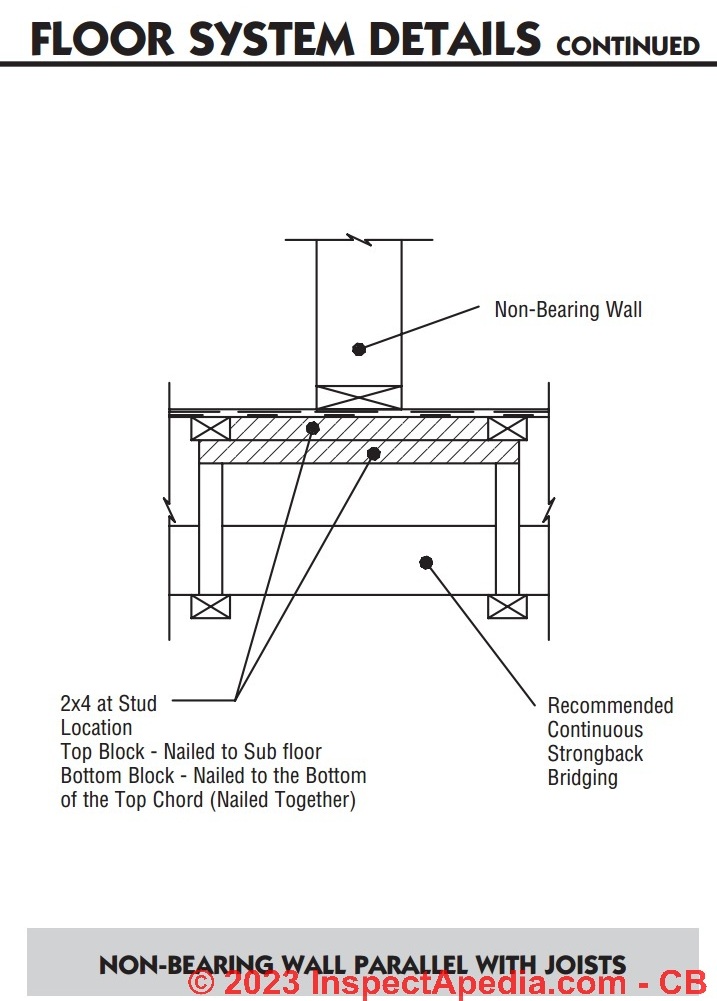
Interior (non-load-bearing) walls need support, especially on the second floor. This caused issues (sagging floor, drywall cracks) and was also remediated. (however, I don't think code actually requires this to be installed correctly in WA state; the builder still addressed it)
[Click to enlarge any image]
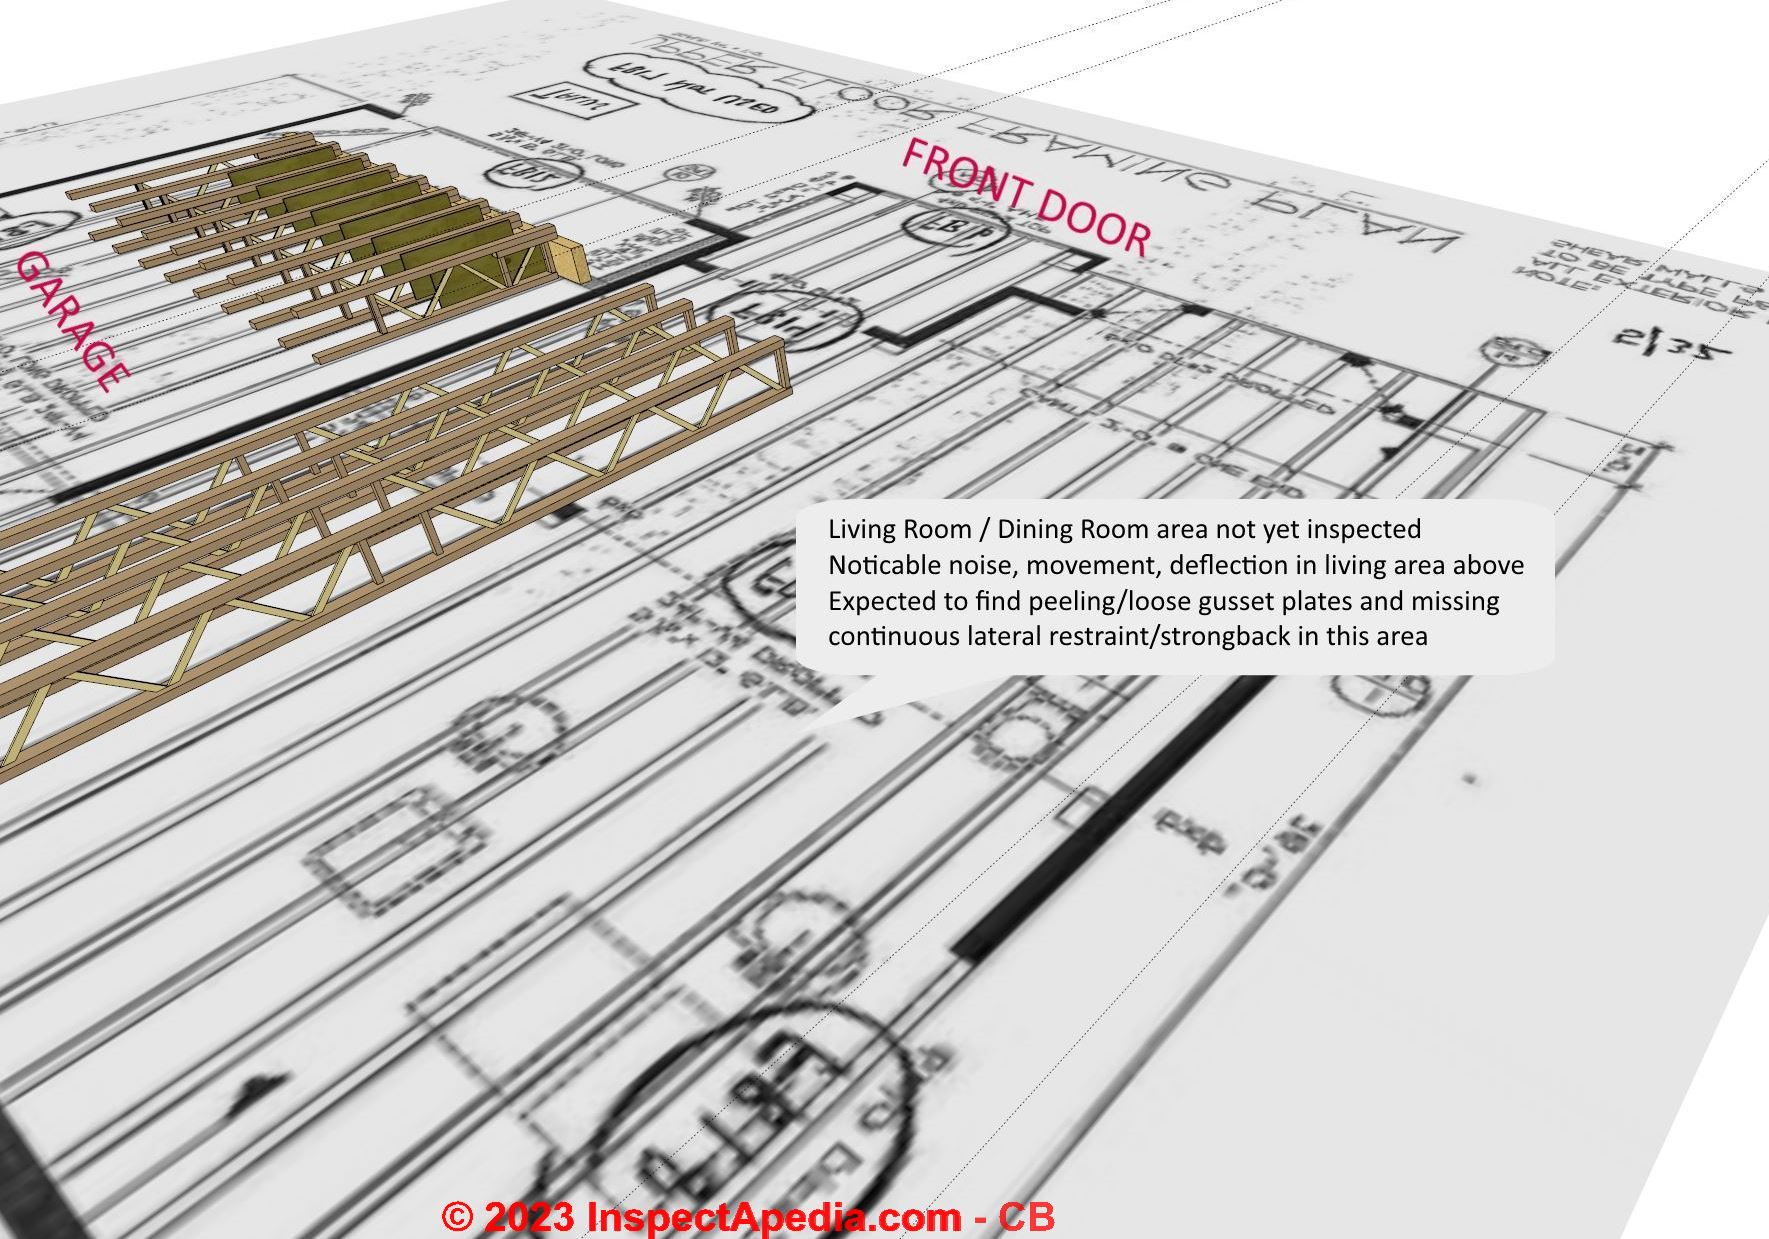
Damaged & Improperly-Modified Trusses in New Home
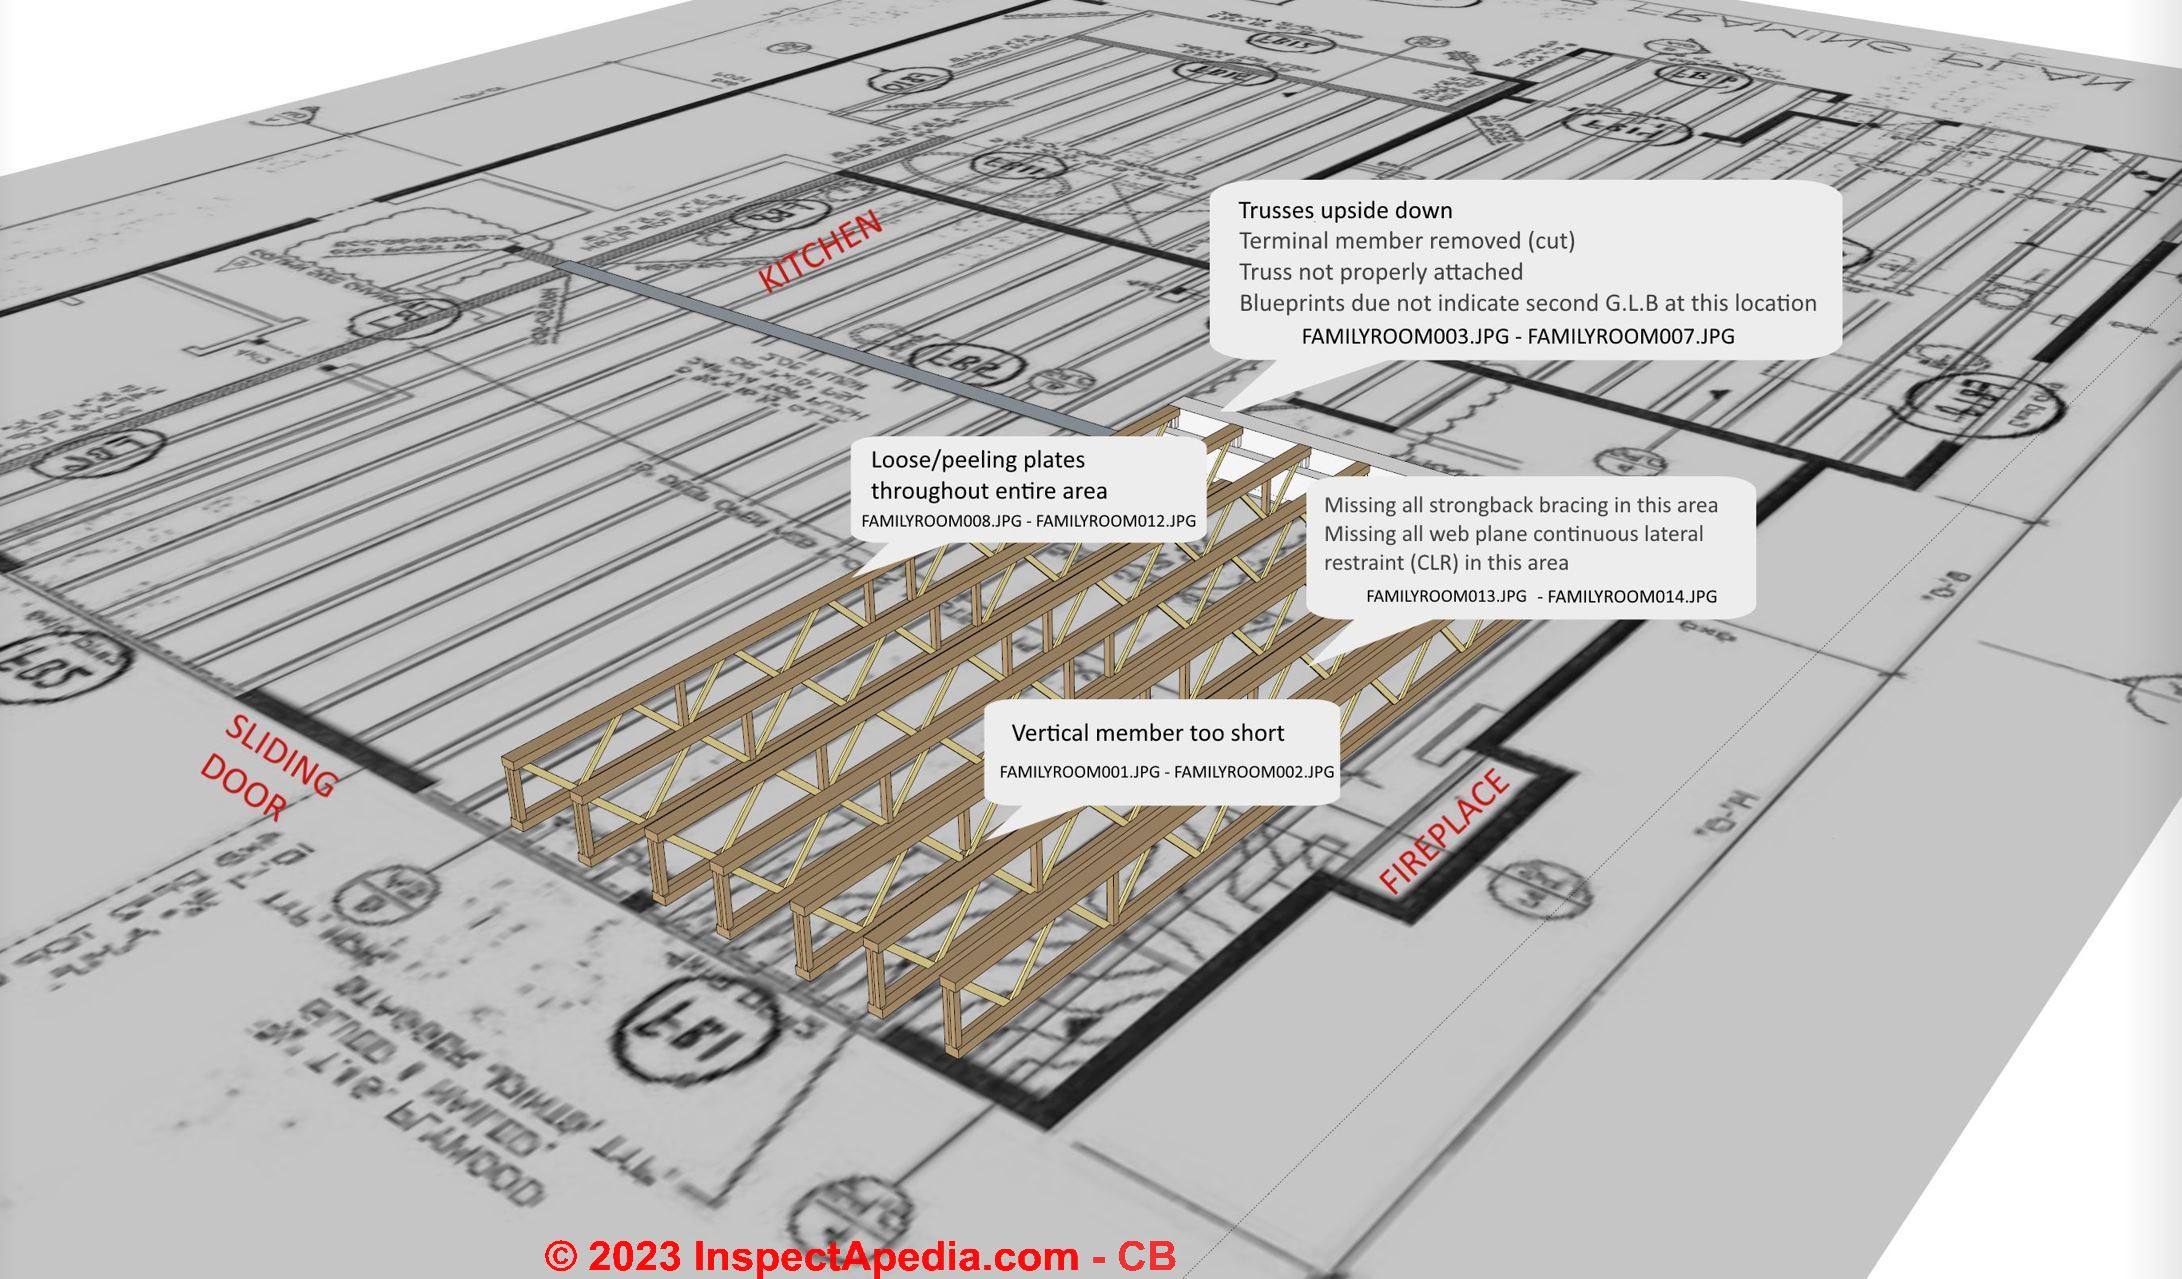
We found damaged trusses, both roof trusses and floor trusses. Damage was mostly loosened or separated gusset plates, though a few of them had suffered also from improper repair attempts.
In addition, the builder had omitted strongback reinforcement members along floor trusses or had run the horizontal strongback members but failed to bother to attach them to the trusses they were supposed to reinforce.
There was also a surprising split in the vertical member of a floor truss.
Truss Chord Cut Off
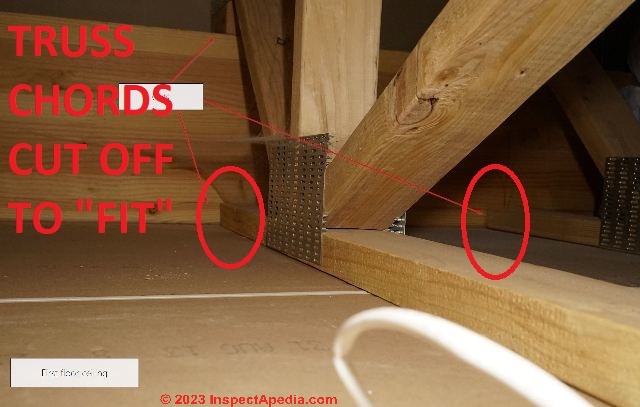
Above: The trusses in this building area were "too long" to fit so the builder simply cut off the ends of the bottom truss chord.
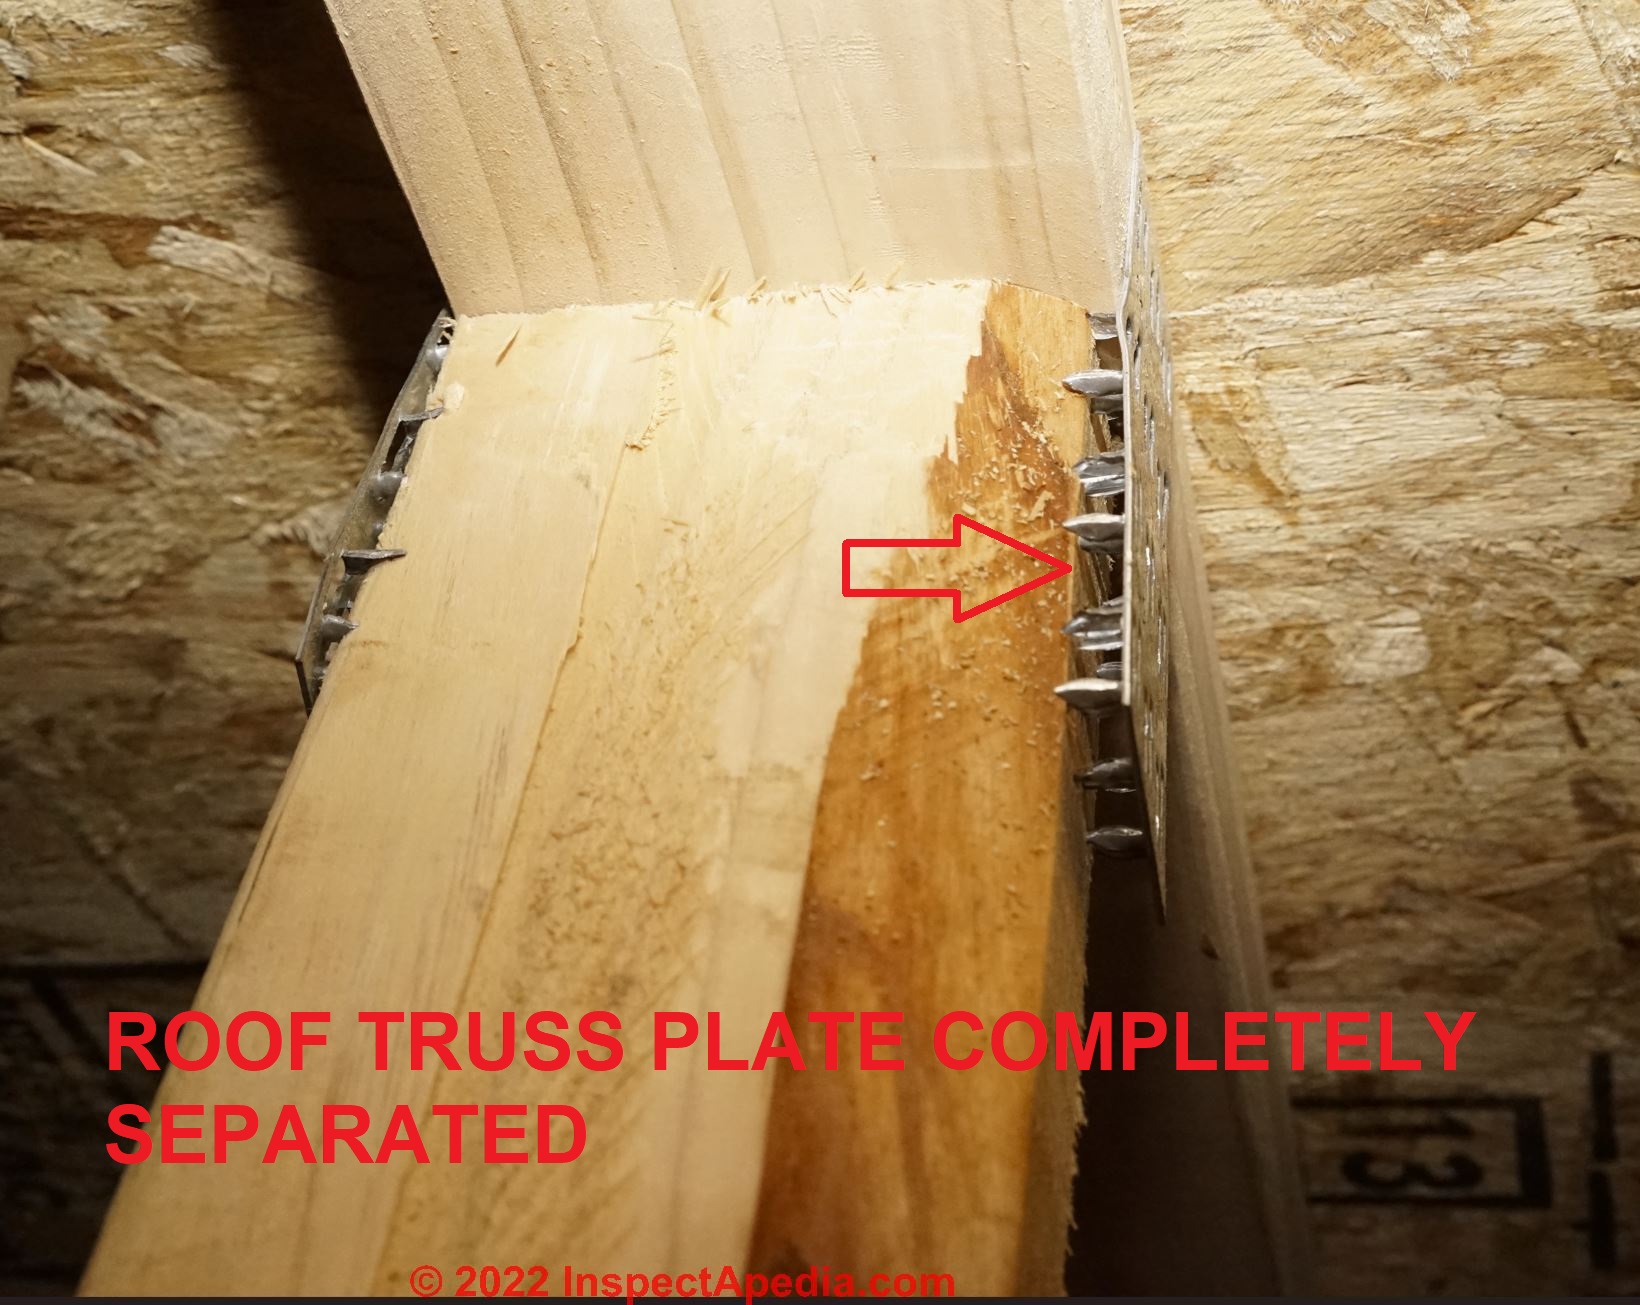
Truss Plates Separated From Truss Chords or Members
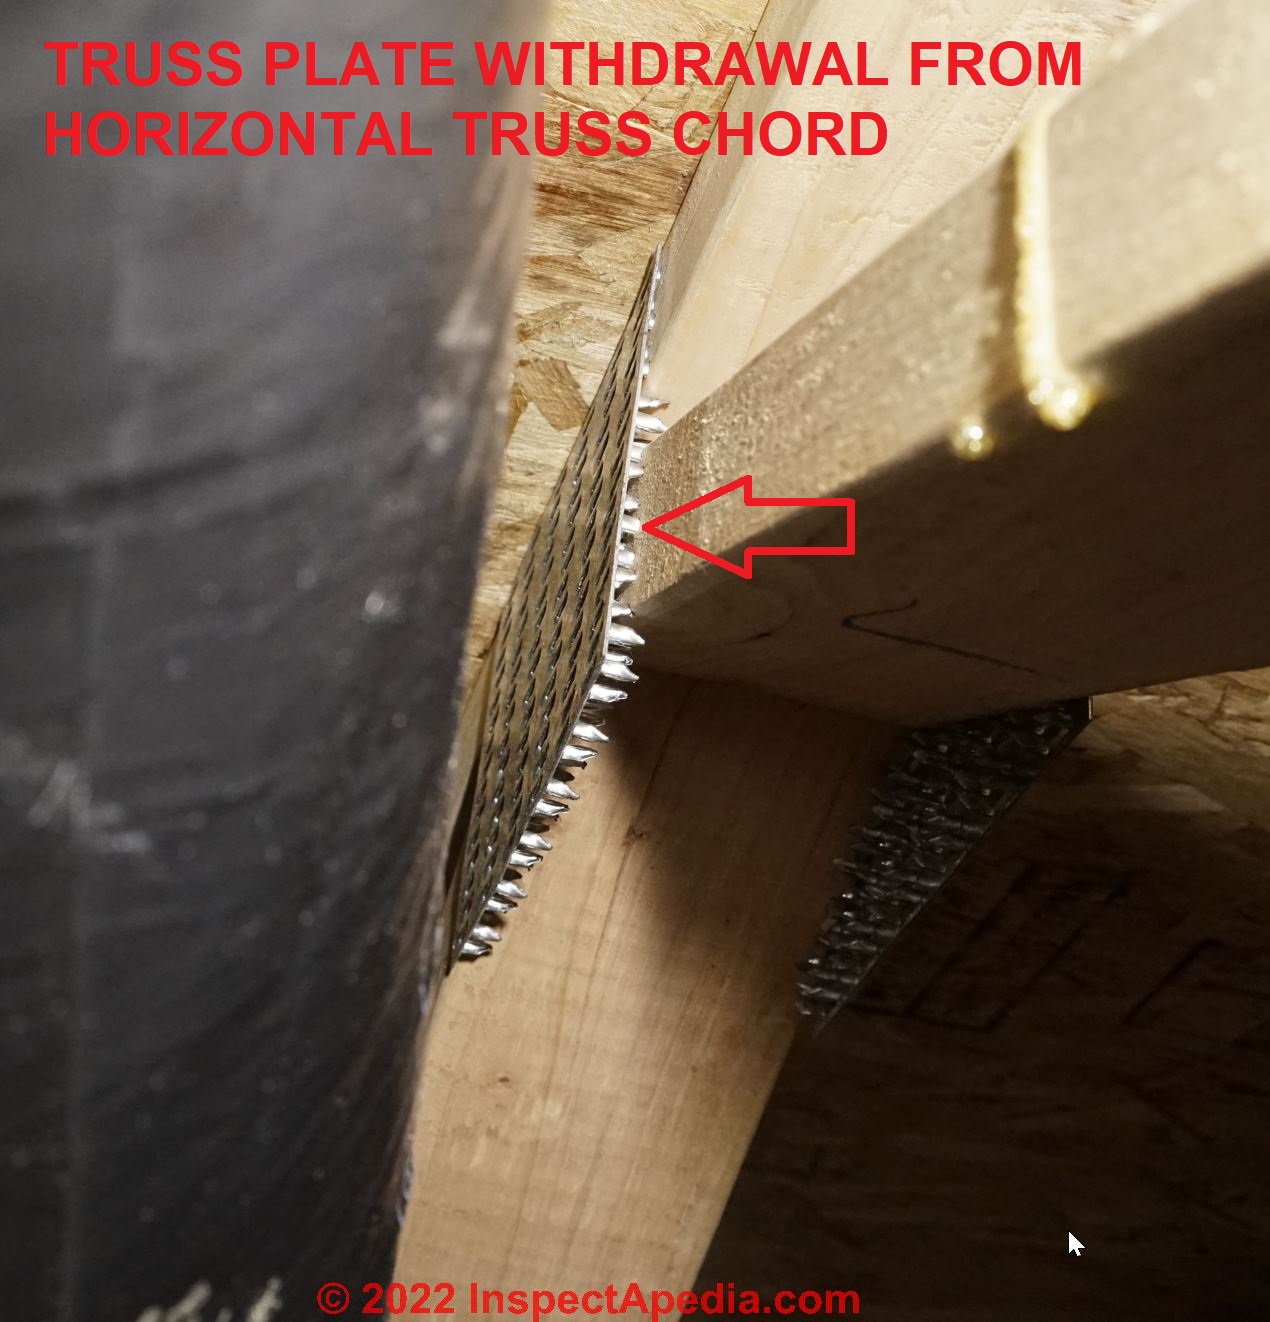
Some of these truss connector failure photos were contributed courtesy of an InspectApedia reader who found these conditions at a new home in Washington state, beginning in 2014.
Truss Member Split or Damaged
 InspectApedia.com CB")
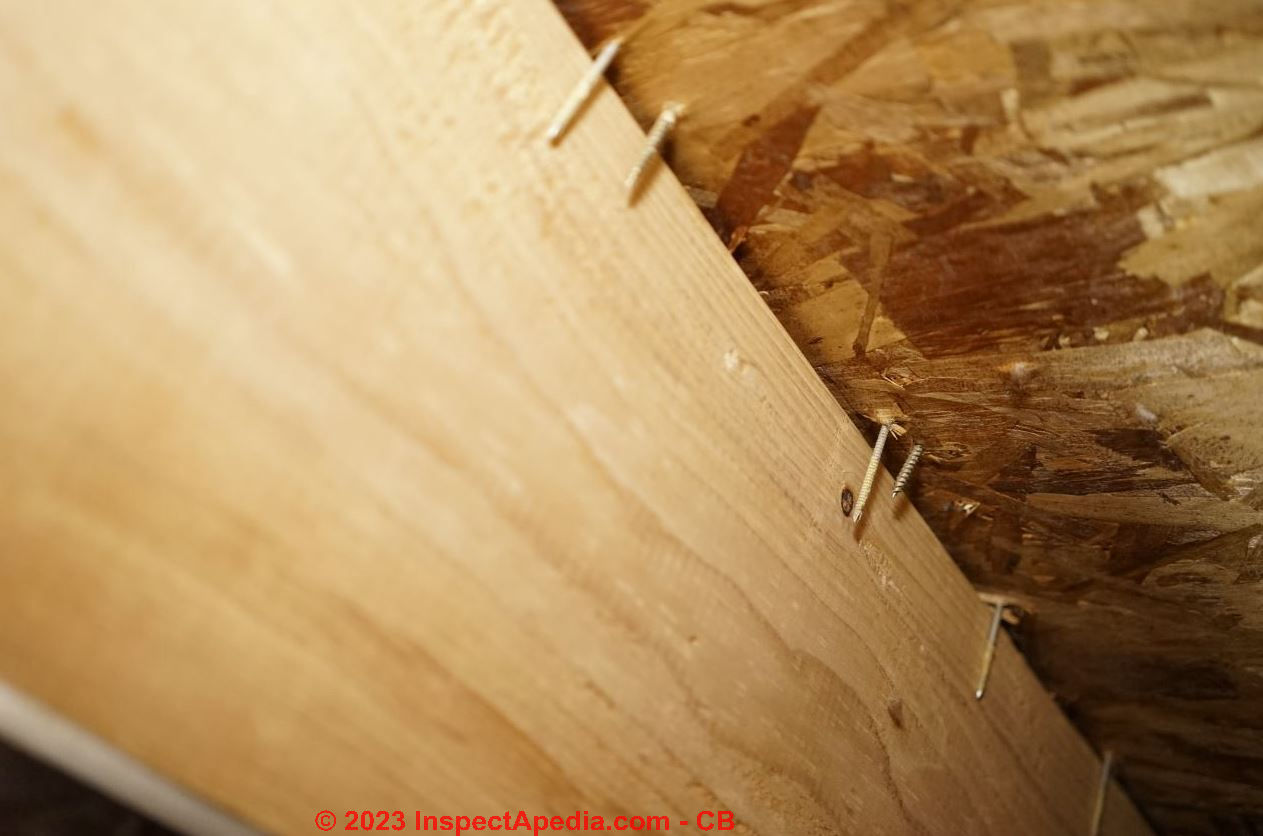
- Split or broken truss members - above, a vertical member of this truss was split. It was repaired using structural screws sent through the exterior wall sheathing. Photo courtesy of C.B.
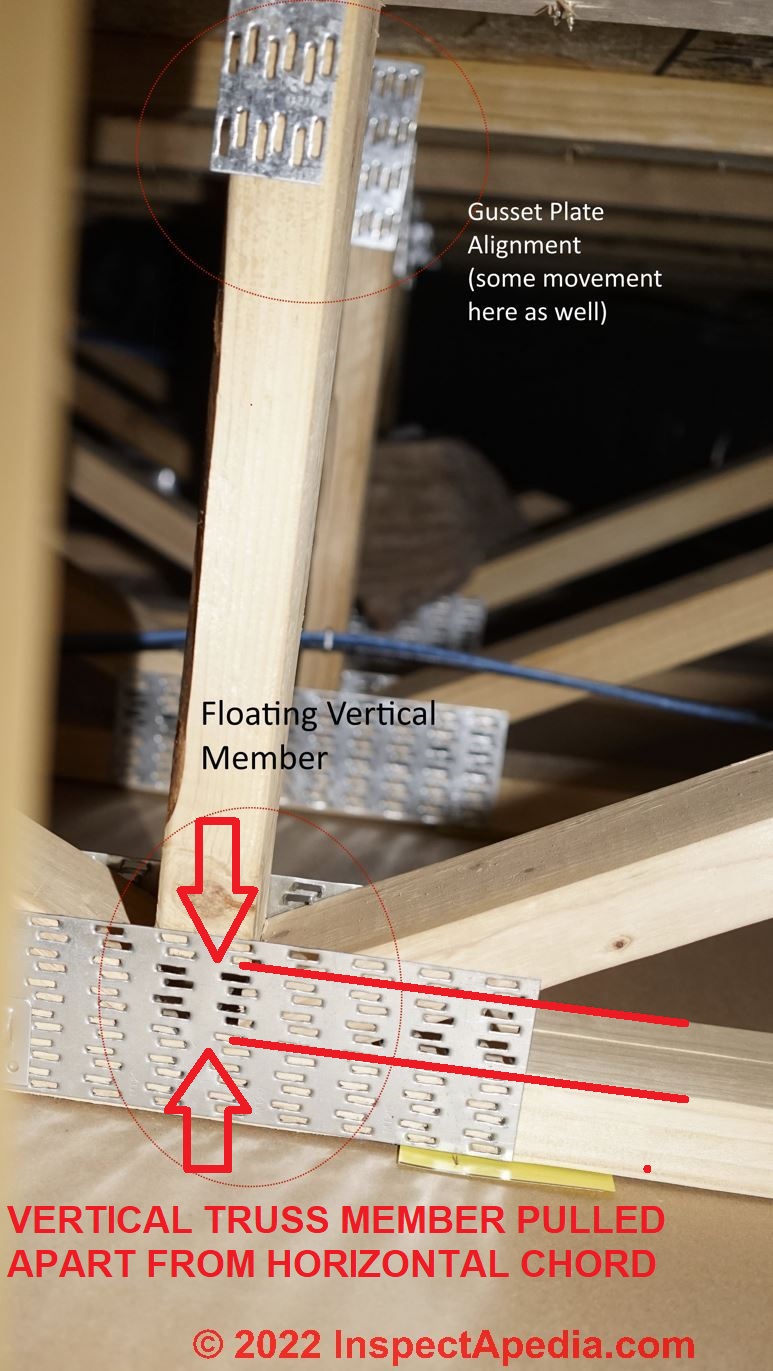
Truss Vertical Member Separated From Truss Chord
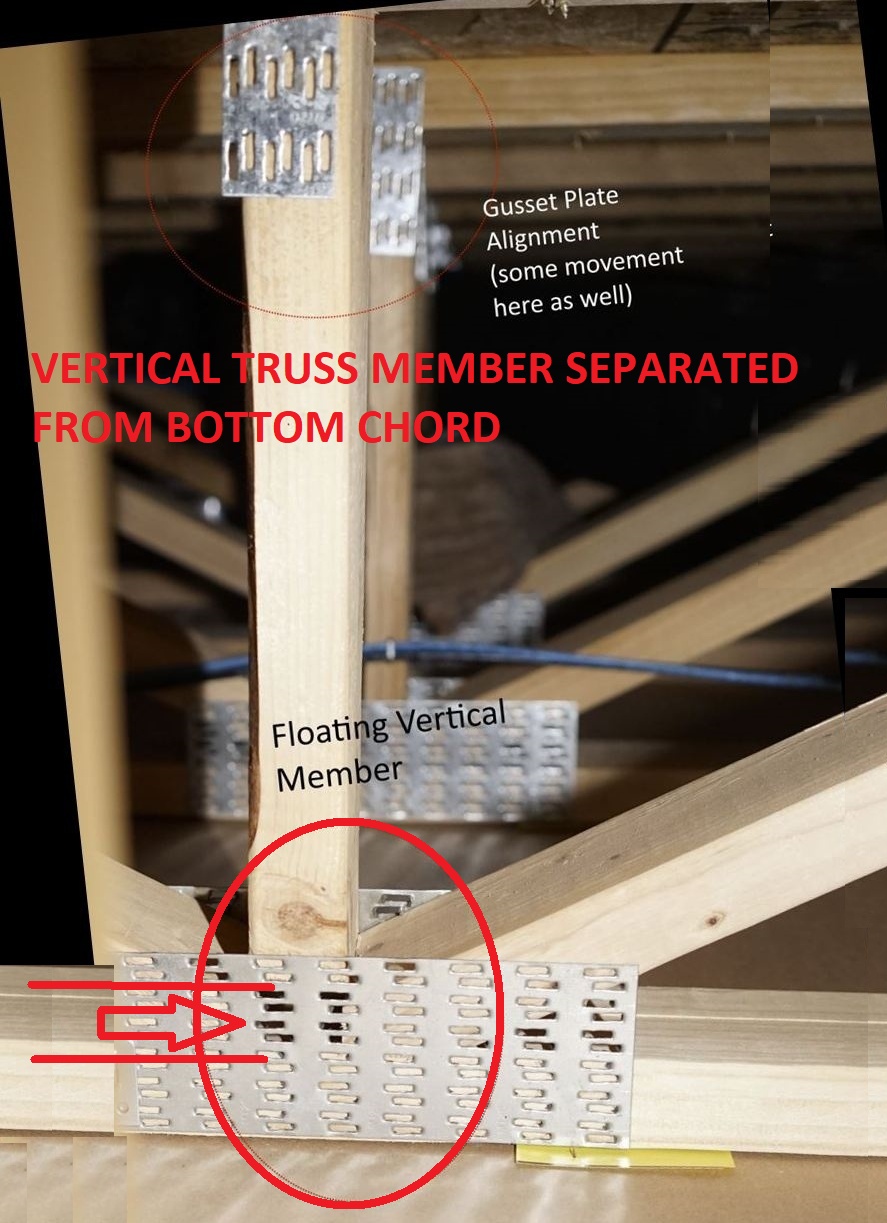
We found this hidden damage in the truss framing of the second floor of the home: open floor truss web joints, shown above. The vertical truss member has separated nearly an inch from the bottom truss chord.
We might suspect this defect if the floor above is bouncy or saggy or noisy, or we might see sagging ceilings below, especially close to mid-span.
Truss Vertical Member Cut Away to Fit Glulam Beam
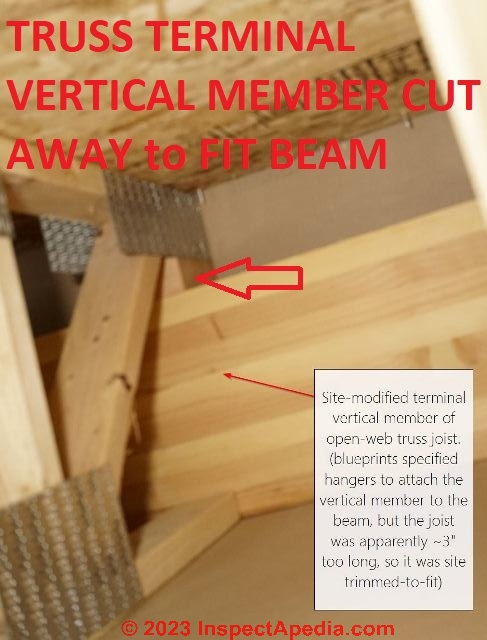
Above: the plans required a horizontal glulam beam that didn't "fit" so the builder just cut away the final vertical member of these floor trusses.
Vertical or Horizontal Separation of Truss Members: Plate or Connector Failure
Below: Vertical separation of truss components due to truss plate separation, probably due to truss mishandling at the jobsite.
Since I had so much digital documentation, hiring a structural engineer was relatively inexpensive. ~$500.

The engineer believed that the open-web truss joists were likely mishandled, which resulted in the metal gusset/connector plates withdrawing. These metal connector plates were hammered back in, which is not permitted.
Improper Truss Plate Repairs
Below: an inadequate truss plate repair effort: hammering nails through the truss plate without engineering recommendation.

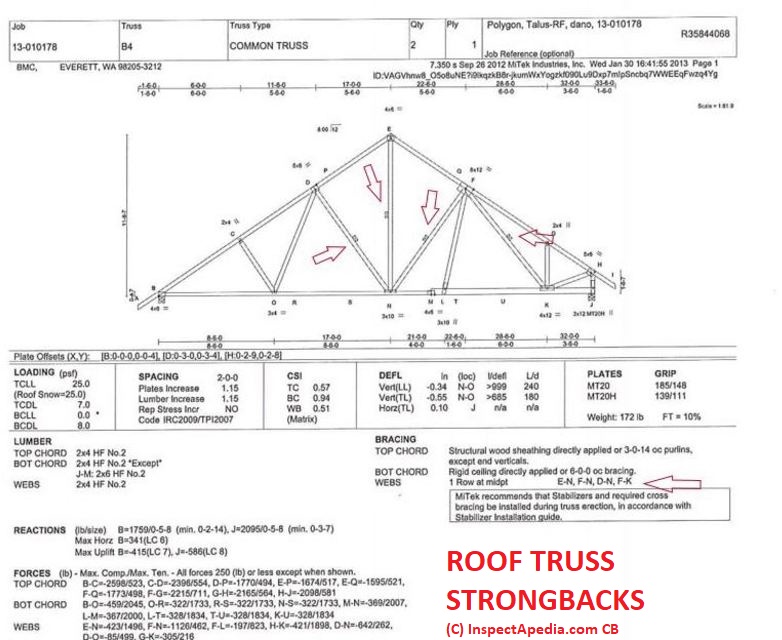
Strongbacks - Lateral Bracing - Missing at Roof Trusses
The roof trusses were missing all continuous lateral restraints as well.
Below: sketch marks areas where roof truss bracing had been omitted by the builder.
Below: floor truss repairs showing the new strongback running through the trusses, attached to the bottom chord, along with plywood gussets between the strongback and the truss top chord.
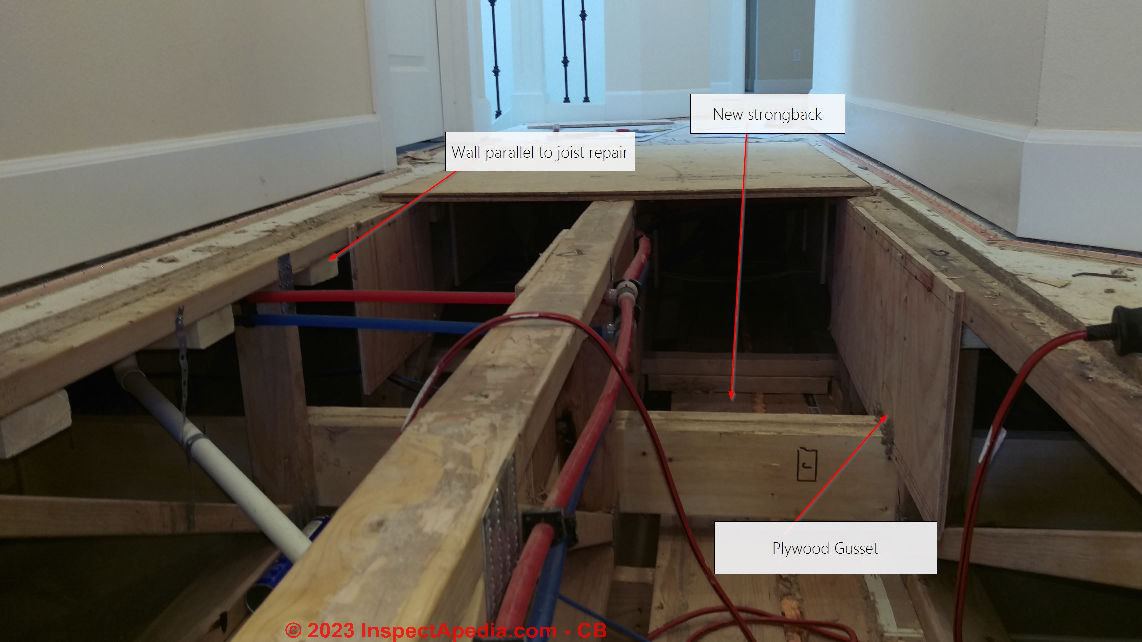
The photo also shows blocking and support below a non-load-bearing partition wall that runs parallel to the floor trusses.
Strongbacks not installed or not secured to Trusses
The builder also left out many strongbacks / continuous lateral restraints, which led to additional movement.
This omission may be what caused the issue with the connector plates to be more quickly noticed by the occupant (me) than if they had included sufficient lateral restraints.
Details about truss inspection, troubleshooting and repair are found
Rotted Lumber in New Home
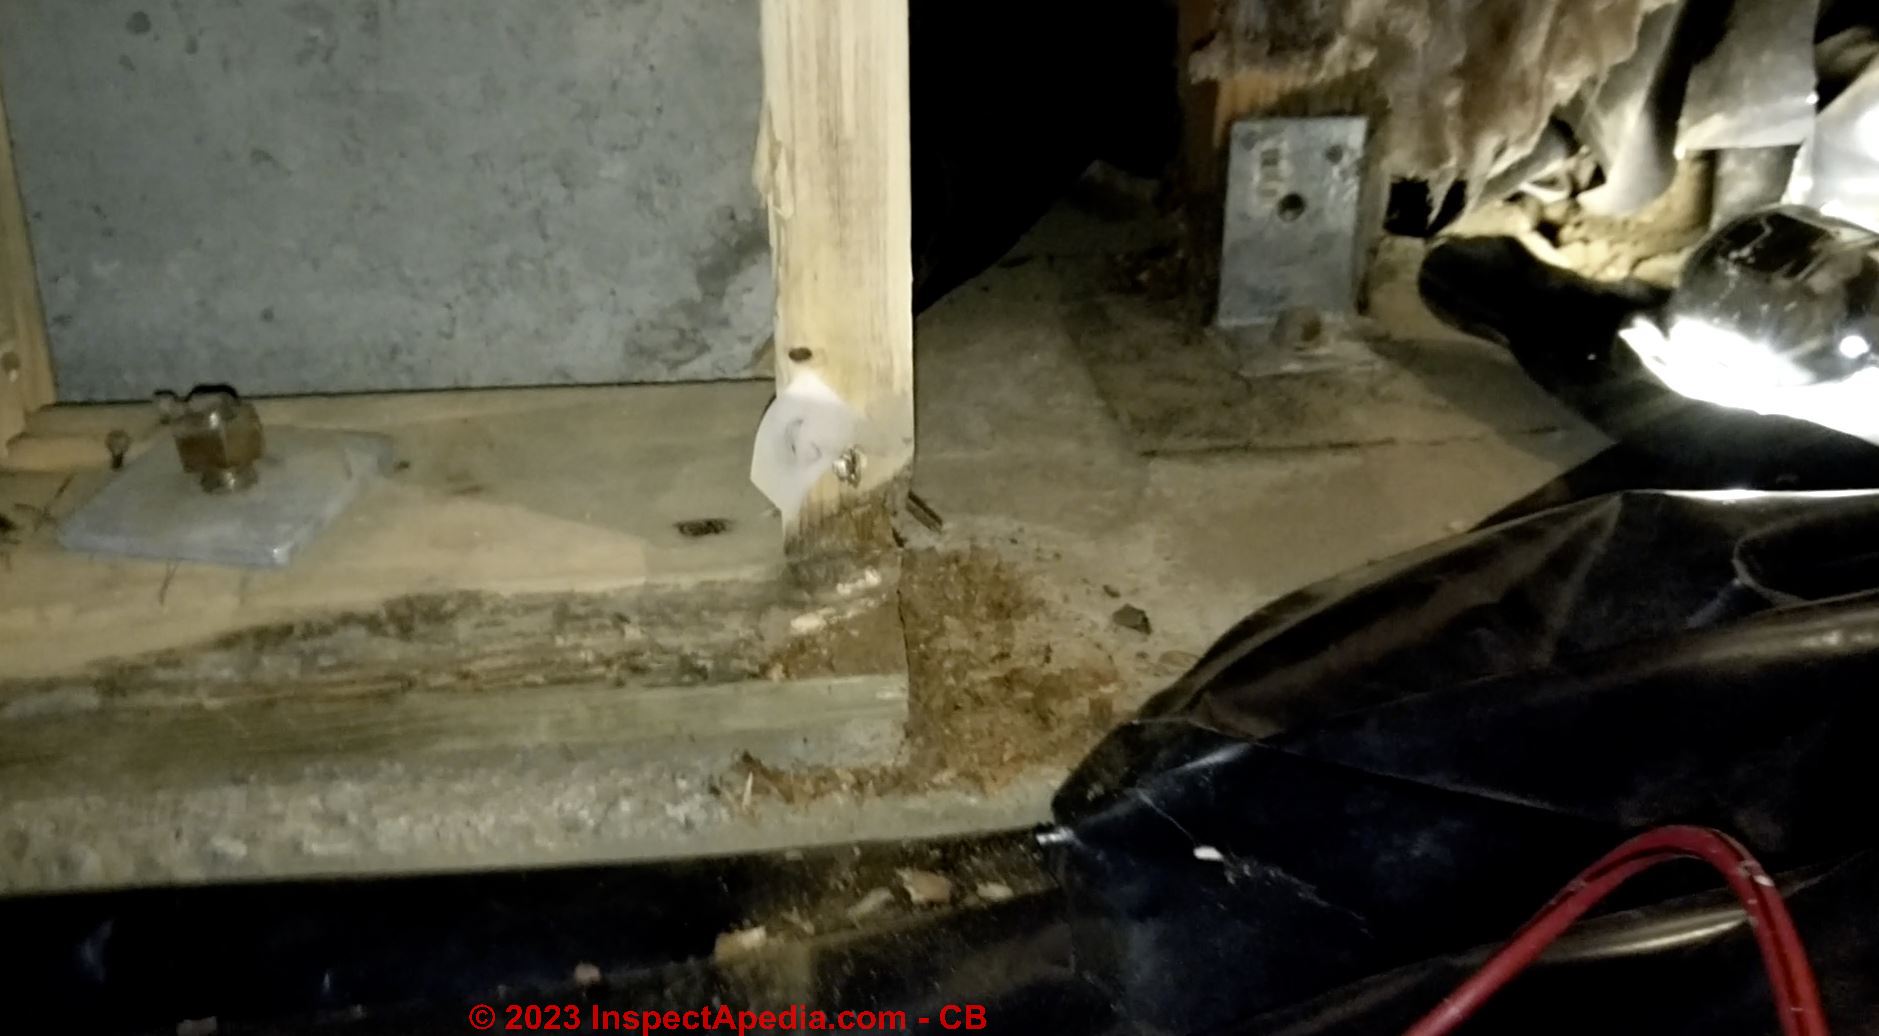
In one corner of the crawlspace, it appeared that a crib wall was built directly on dirt!
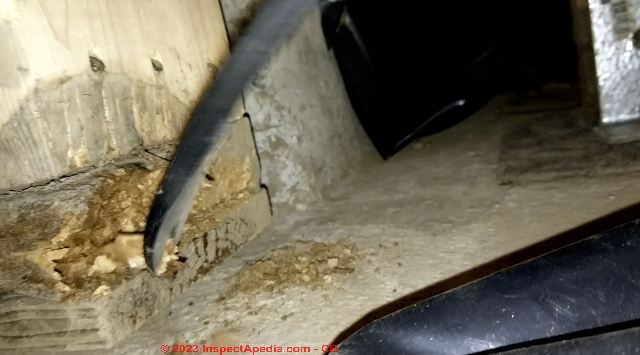
It turned out that there was just some water during construction that had apparently caused some mud to flow over and bury a crib wall and a couple posts.
The builder replaced the rotten lumber. I have a short video clip where I'm prying at this rotten lumber with a pry bar. It's amazing how crumbly it can become... again, after just 1 year of being submerged in dirt in the crawlspace.
The builder agreed to dig it out. This was just 1 year after construction, and it's allegedly UC4A lumber.
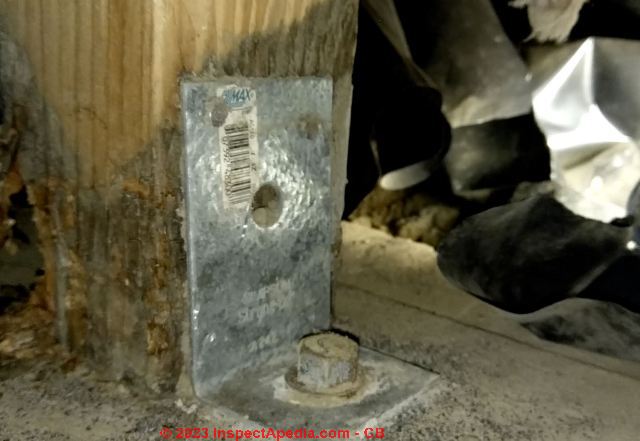
The builder also tightened up that earthquake bolt. Sloppy!
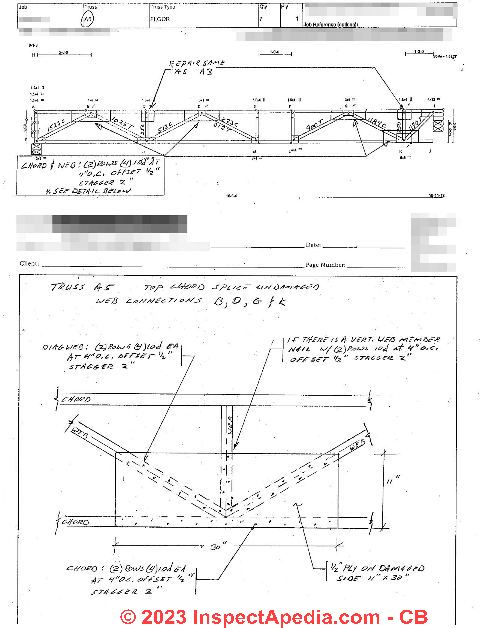
Sketch-Plans for Truss Repair Work
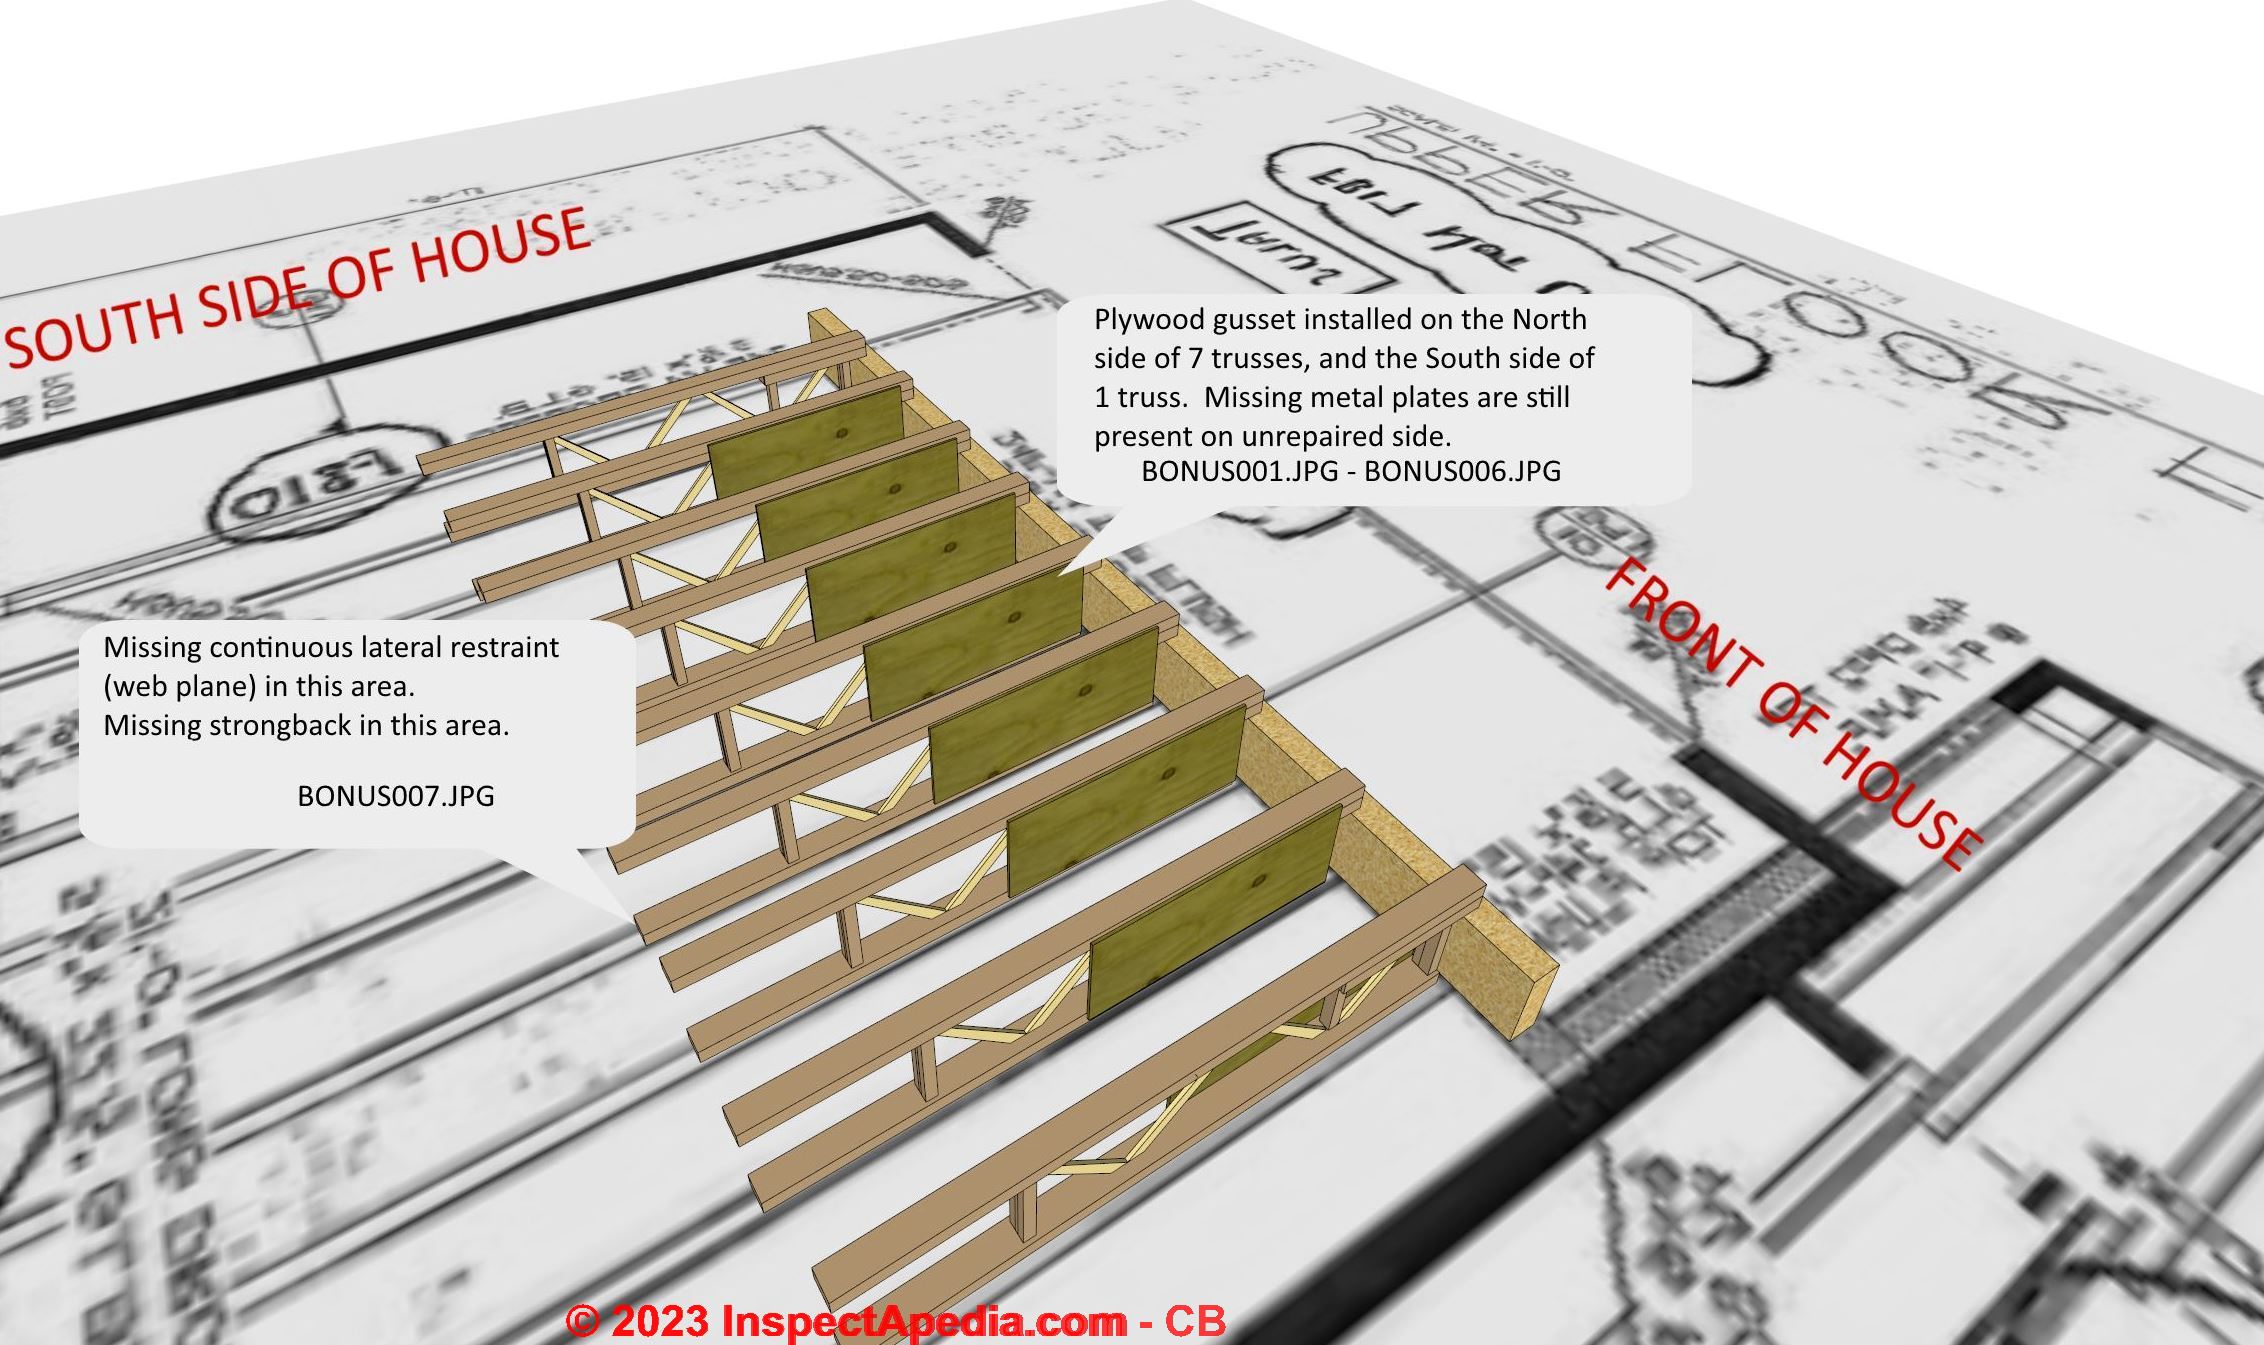
At a certain point, the project was getting too complex, so I created a sketchup document to track what work had been done, and what needed to be done.
The builder provided me with blueprints (and I used those as a background image in sketchup in order to align components). However, the blueprints the builder provided was a mirror image of our actual floor plan.

So I had to mirror the blueprint, which is why the text is backwards in the background of the images shown in this section.
Repairs Specified by Engineer
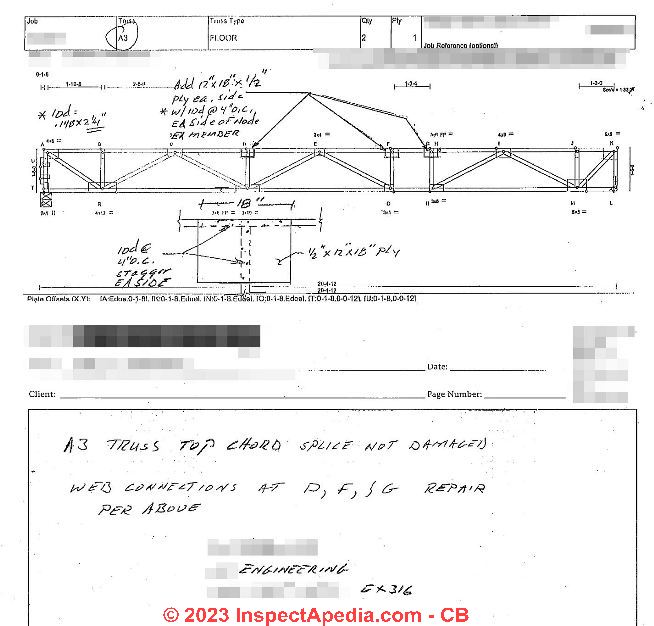
Illustrations above & below: examples of one of many individual truss or other building repair specifications. [Click to enlarge any image]
We have reviewed the photographs that you provided and compared them with the truss design documents.
The location for each photograph is somewhat vague, however in most cases we believe that we have the truss type identified.
In a few places we are not sure which node of the truss is being shown. Below is list of the issues and our proposed repairs.
[Minor editing for clarity performed by InspectApedia - Ed.]
- Attachment of trusses to bearing:
all floor trusses must be attached to bearing with (20 16d nails. - Minimum floor truss bearing length:
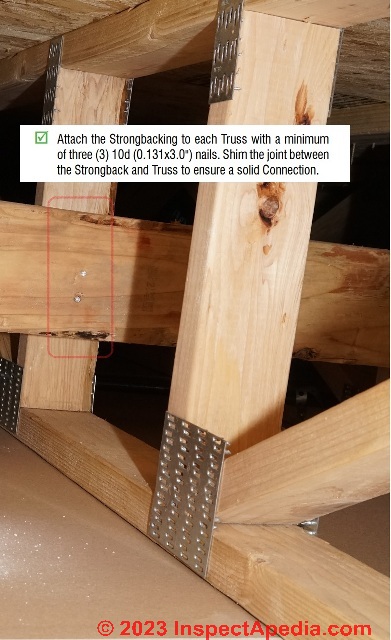
the minimum bearing length for all floor trusses is 1 1/2". - Continuous bracing: [Strongbacks - Ed.]
provide a continuous brace of 2x6's with (3) 10d nails at the vertical web member of each truss at 10' on center.
Splice with (6) 10d nails each side of the splice. - At the split vertical element of the jack truss
shown in the photo0graph: drive $10 x 3" [construction] screws from the plywood [external sheathing - Ed.] side across the split. - Non-bearing wall blocking:
non-bearing walls parallel to the trusses and landing on the sheathing between the trusses should be blocked per the attachment detail #1. - Floor trusses overhanging bearing:
Repair per attachment detail #2. - Floor trusses with loose gang nail plates:
Shore the trusses from below with a padded beam lifted to the level position;
use a 1/2" steel plate the same size as the gang plate and drive or press the existing MT20 gang nail plate tight against the wood members per attached detail #3. - Floor trusses with damaged gang nail plates:
Shore the trusses from below as stated above [at #7]; drive or press the plate in place as described above;
add 1/2" plywood to each side per detail #3.
Nailing and plywood requirements are specific to each location. - Notched top chord of gable end roof truss:
The locations shown in the photographs are acceptable as built. - Missing gable end roof truss:
Where this occurs, frame the gable end with 2x4s and connect with LTP5s. - Unattached GWB:
Attach all drywall appropriately to the bottom of the trusses and beams. - More information needed:
Photographs illustrate that a number of trusses had plywood attached to one side;
Please provide additional photographs of these trusses; if the end of the original truss is still intact, shore the trusses as described above. ;
Reset the gang nail plates as described above as necessary and add an equal size sheet of 1/2" plywood to the opposite side and nail with 10d nails at 4" on center to all members of both sides, similar to detail #2.
Please contact [the engineer] if there are any questions pertaining to our specification.
Every repair needed its own engineering document. Shown here are a couple of samples of those.
...
Continue reading at NEW HOME INSPECTIONS, or select a topic from the closely-related articles below, or see the complete ARTICLE INDEX.
Or see these
Recommended Articles
- BUILDING DEFECTS LISTS - home
- DISPUTE RESOLUTION on ROOF JOB PROBLEMS
- FRAMING DAMAGE, INSPECTION, REPAIR - home
- HOME & BUILDING INSPECTION - home
- HOME BUYERS GUIDE to SEPTIC SYSTEMS
- HOME INSPECTION SCOPE of COVERAGE
- NEW HOME INSPECTIONS
- ROOF STRUCTURE DEFECTS LIST
- STRUCTURAL INSPECTIONS & DEFECTS - home
- TRUSSES, FLOOR & ROOF
- WOOD STRUCTURE ASSESSMENT - home
Suggested citation for this web page
NEW HOME / SPEC HOME DEFECTS & REPAIRS at InspectApedia.com - online encyclopedia of building & environmental inspection, testing, diagnosis, repair, & problem prevention advice.
Or see this
INDEX to RELATED ARTICLES: ARTICLE INDEX to BUILDING STRUCTURES
Or use the SEARCH BOX found below to Ask a Question or Search InspectApedia
Ask a Question or Search InspectApedia
Try the search box just below, or if you prefer, post a question or comment in the Comments box below and we will respond promptly.
Search the InspectApedia website
Note: appearance of your Comment below may be delayed: if your comment contains an image, photograph, web link, or text that looks to the software as if it might be a web link, your posting will appear after it has been approved by a moderator. Apologies for the delay.
Only one image can be added per comment but you can post as many comments, and therefore images, as you like.
You will not receive a notification when a response to your question has been posted.
Please bookmark this page to make it easy for you to check back for our response.
IF above you see "Comment Form is loading comments..." then COMMENT BOX - countable.ca / bawkbox.com IS NOT WORKING.
In any case you are welcome to send an email directly to us at InspectApedia.com at editor@inspectApedia.com
We'll reply to you directly. Please help us help you by noting, in your email, the URL of the InspectApedia page where you wanted to comment.
Citations & References
In addition to any citations in the article above, a full list is available on request.
- In addition to citations & references found in this article, see the research citations given at the end of the related articles found at our suggested
CONTINUE READING or RECOMMENDED ARTICLES.
- Carson, Dunlop & Associates Ltd., 120 Carlton Street Suite 407, Toronto ON M5A 4K2. Tel: (416) 964-9415 1-800-268-7070 Email: info@carsondunlop.com. Alan Carson is a past president of ASHI, the American Society of Home Inspectors.
Thanks to Alan Carson and Bob Dunlop, for permission for InspectAPedia to use text excerpts from The HOME REFERENCE BOOK - the Encyclopedia of Homes and to use illustrations from The ILLUSTRATED HOME .
Carson Dunlop Associates provides extensive home inspection education and report writing material. In gratitude we provide links to tsome Carson Dunlop Associates products and services.
 |
HOME | ABOUT | ASK a QUESTION | CONTACT | CONTENT USE POLICY | DESCRIPTION | POLICIES | PRIVACY | |
| © 2026 - 1985 Publisher InspectApedia.com - Daniel Friedman | |||||||||