
InspectAPedia® FREE Encyclopedia of Building & Environmental Construction, Diagnosis, Maintenance & Repair |
Question? Just ask us! InspectAPedia
|
 Rooftop Plumbing Vent Repair
How to fix a snow or ice damaged or broken plumbing vent from the rooftop

- POST a QUESTION or COMMENT about how to repair a damaged rooftop plumbing vent
This article describes detailed procedures for repairing a broken-off plumbing vent stack from the roof top.
This plumbing vent repair procedure avoids having to cut open a cathedral ceiling or remove the roof covering outside and results in a leak-proof and sound repair to the plumbing vent system.
The article describes repairs to plumbing vent damage caused by snow and ice sliding down a roof where snow guards should have been installed.
InspectAPedia tolerates no conflicts of interest. We have no relationship with advertisers, products, or services discussed at this website.
- Daniel Friedman, Publisher/Editor/Author - See WHO ARE WE?
Plumbing Vent Repair Procedures: from on the roof
Damage to a plumbing vent stack on your roof could result in an undetected water leak into the roof cavity and extensive damage requiring costly repair.
The ability to address this plumbing vent damage from the roof rather than from below can reduce the time and cost involved. By adding snow guards as part of the repair, you are providing protection against a similar problem in the future.
Article Contents
- PLUMBING VENT DAMAGE FROM MISSING SNOW GUARDS
- WHY DO YOU CARE: LEAKS INTO THE ROOF CAVITY
- EMERGENCY TEMPORARY PLUMBING VENT REPAIRS
- MAKE AN ADAPTER TO REPAIR A BROKEN-OFF STACK
- FINAL GLUING PROBLEMS UP ON THE ROOF
- COMPLETED ROOFTOP REPAIR - WITH SNOWGUARDS
Plumbing vent damage from missing snow guards
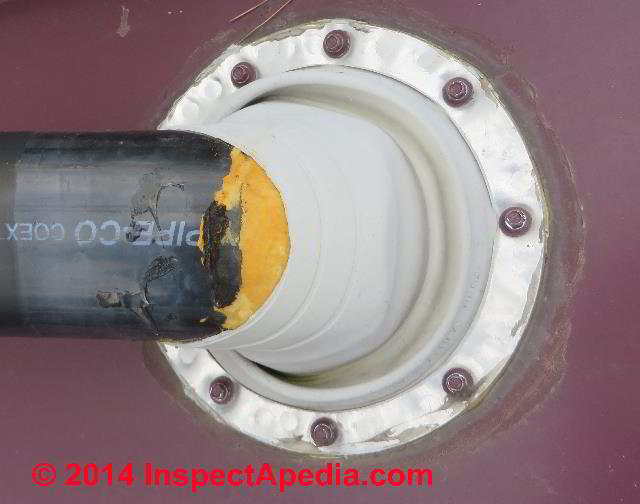
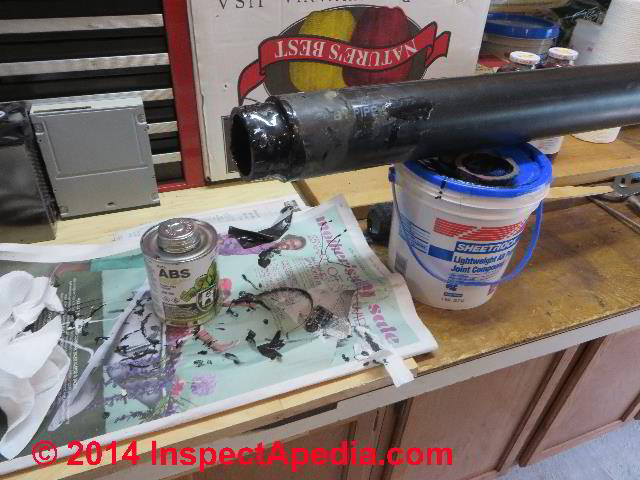
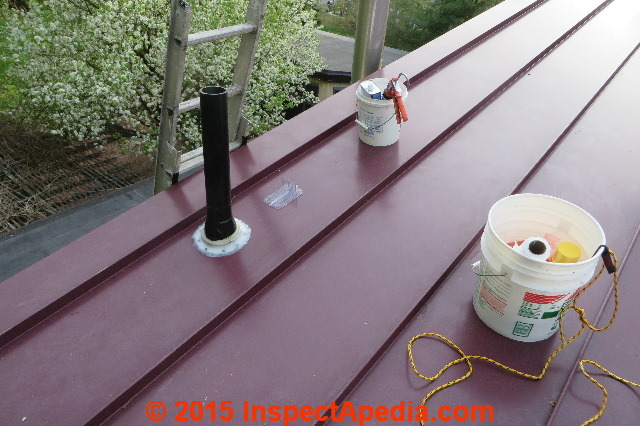
In our page top photo, notice the orange arrow pointing to that yellowish colored stuff at the broken end of the vent?
That's foam insulation, and the break is the only leak point that has ever occurred in this otherwise reliable roof installation.
This standing seam metal roof is installed over a cathedral ceiling packed with an open-celled foam insulation product. That's not a design that tolerates water in the roof structure very well.
In our experience, while any roof leak risks costly damage, some of the worst building damage from roof leaks occurs in foam insulated unvented roof designs and/or roofs with a poly vapor barrier between ceiling drywall and the underside of rafters.
In those designs, a leak can remain undetected for long periods of time as water is contained inside the roof structure without showing up in the ceiling below.
At SNOW GUARD FAILURES we used this broken plumbing vent to illustrate how sliding snow bent over this large ABS plumbing bent and broke it right off inside the roof cavity.
Our photo just above shows an emergency repair at this broken plumbing vent. We detail this emergency plumbing vent repair below on this page.
...
Why you should care about a broken off plumbing vent: leaks into the roof cavity
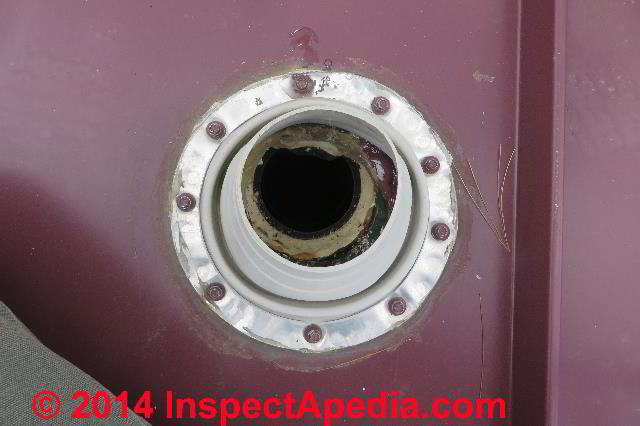
In our next close-up photo below, you'll see that even with the plumbing vent stack broken and bent over nearly touching the roof surface, the rubber boot installed in the photos above managed to avoid a flood of melting snow into the roof cavity.
The next photo (below) shows the broken off ABS stub inside the roof cavity.
The foam insulation was found to be a bit wet around the vent and was left to dry. Had this defect gone long unnoticed, rainwater leaking into the roof structure would have eventually risked a costly mold catastrophe.
In addition to rain water that could soak the roof cavity through the open plumbing vent boot flashing, moisture carried upwards by the building plumbing vent system could condense under the metal roof deck, soaking the foam insulation and ultimately leading to a costly rot or mold contamination issue.
 The plumbing vent stack above-roof portion, a 3-inch vertical segment of heavy ABS pipe, had been glued into an ABS elbow inside the roof cavity.
The sliding snow and ice snapped off the ABS just above the outer lip of that elbow, leaving an inch of plastic pipe still glued in place inside the fitting.
Our photo just above shows this same plumbing vent at the time of original construction.
You can see that the vent was extended up through a standing seam metal roof - a durable installation but one that makes future access to repair a broken-off above-roof plumbing vent mast ... well, difficult to put it politely.
The question was, how are we going to make a proper repair with the least disruption to the building roof or finished interior?
Watch out: especially where the plumbing vent pipe is installed through a cathedral ceiling and metal roof surface there is no easy access into the roof cavity.
In an attic, you'd just cut off the elbow whose female end contained the remains of the ABS pipe, glue on a short extension and new elbow in the attic, and glue a new plumbing vent rooftop riser into the new elbow.
That's not so easy if you're working inside a cathedral ceiling.
We didn't want to cut out the ceiling inside - a process that would involve more than just drywall repairs: you'll also lose the spray-foamed insulation around the plumbing. Insulation, new drywall, new ceiling paint are involved in an inside-repair.
From the rooftop, cutting open the metal roof to obtain sufficient working space to hack off broken pipes, re-insulate, and glue in new vent piping would be worse!
...
Emergency temporary plumbing vent repairs
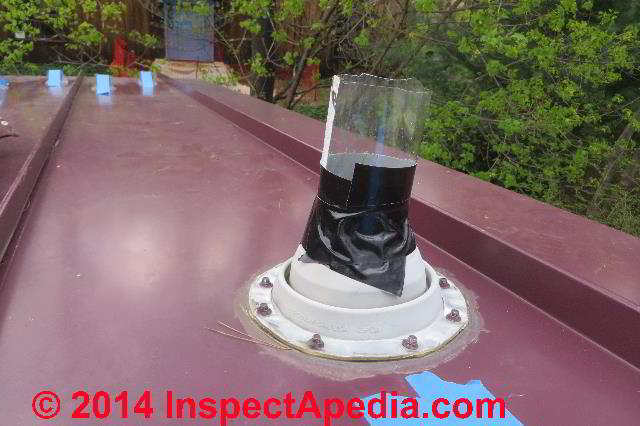
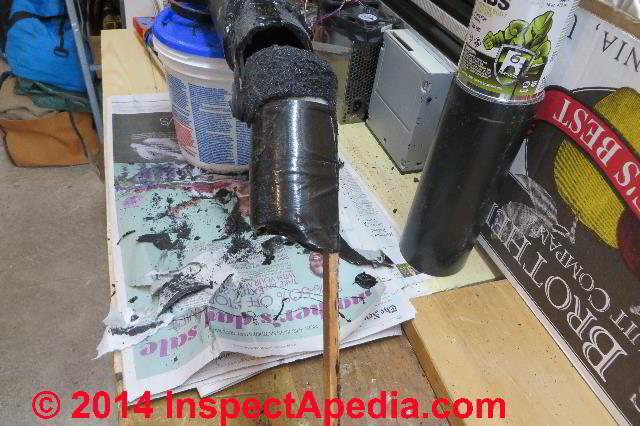
We jury-rigged a temporary plumbing vent out of soda bottles, mouth down, to direct any rainfall into the vent interior (below left), giving time to cut and prep and repair the broken plumbing vent.
By making sure that the cap-end of the plastic soda bottle was inserted mouth-down and a couple of inches inside the remaining plumbing vent pipe inside the ceiling cavity, we've basically made a sort of funnel that will assure that any heavy rains falling inside the makeshift plumbing vent will go where the water should go - back down the drain line, not into the ceiling cavity.
By pressing the quart-sized soda bottle snugly into the plumbing vent opening below the roof, we also assure that moisture venting upwards through the vent system exits above the roof top, not into the roof cavity.
I'm not claiming this is an IAPMO-approved design, it's a stopgap measure to keep water out of the structure.
But as rainy weather was expected, this gave us some breathing time to come up with a permanent repair to the broken vent stack.
...
Making an Adapter to Repair a Broken-off Plumbing Vent Stack
Quite possibly we could have also found an internal splice part (a double-male insert) for 3-inch ABS piping at a plumbing supplier.
For this installation we fabricated a smaller-diameter insert that would fit roughly inside the 3-inch I.D. of the original section of vertical 3-inch ABS above-roof vent stack piping.
In my workshop photo below, you'll see that by cutting apart a 6-inch length of 3" diameter ABS we made an insert (red arrow) that was glued to the interior of the ABS roof vent stack pipe (green arrow), leaving about a 3" long smaller diameter "stub" exposed for insertion into the interior diameter of the existing ABS vent elbow down inside the roof cavity.
Watch out: there was more to do in preparing this assembly for a successful repair.
Since nobody has hands small enough nor fingers long enough to reach up inside of the concentric ABS piping to apply our ABS adhesive reliably, we fabricated an adhesive swab using a stick and a mini paint roller (photo below).
When our inserted home-made inside-adapter for ABS piping (red arrow in the photo above ) had been glued and dried inside the 3" pipe (green arrow in the photo at above), and had been glued in place we then needed to test fit the protruding "female' end of the repair pipe section into a test section of 3" ABS pipe.
Below you can see that I've built-up the out-of-round sides of the home made adapter-insert (below) using ABS plastic pipe cement.
Below I'm test-fitting the male end into a scrap section of 3" I.D. ABS pipe - that's the same diameter into which our rooftop repair vent stack would have to insert.

Watch out: we're still not finished. It was easy enough to glue the home-made adapter into the interior of the new plumbing vent stack pipe.
But it was critical that the male end (above left) that was going to insert into the elbow down inside the roof cavity was round enough that it would be perfectly sealed both inside the receiving elbow and inside the vertical vent stack pipe riser.
The seal at both ends of this adapter is more important than you may think.
You might figure that if the upper end of the male adapter is glued nicely into the vertical vent pipe then any rain falling down into the pipe will indeed be directed properly to the interior of the receiving elbow and remaining vent piping in the building.
 That's correct.
But we also do not want rising steam and moist air to escape out of the receiving elbow into the roof cavity. In other words, our glue joint has to be perfectly sealed in both directions. Otherwise we'll be sending moisture into the cathedral ceiling cavity.
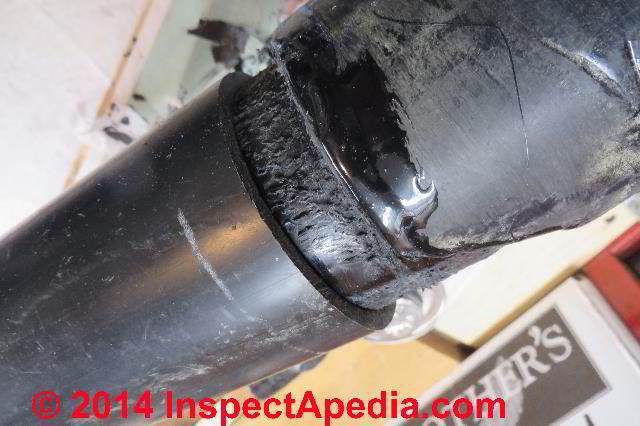
The solution to this problem was to hold the test fit pipes (photo above right) up to a light source.
In our photo of the interior of this vent pipe just above, the orange arrows point to daylight seen between the male adapter and the interior of the female or receiving test section of vent stack pipe.
If my ABS pipe cement was not sufficient to completely fill these irregular spaces, then those orange arrows would mark precisely where moist air rising inside the building vent piping would escape into the roof cavity.
In sum, I needed to build-out the home made adapter with ABS cement until it was so close to perfectly round that I was confident that it would be glued in place with a complete seal.
We added ABS cement on the outside of the male adapter and let it dry, then test fitted it again until there was no daylight.
A light sanding then prepared the male adapter end of the vent stack for insertion into the elbow up inside the roof cavity.
We used the following ABS cement product for this repair:
- Hercules, HCC Holdings, Inc., an Oatey Affiliate, 4700 W. 160th St., Cleveland OH 44`35, Tel: 800-321-9532 Website: wwwlherchem.com "Black ABS Medium Body Fast Set Plastic Pipe Cement, Low VOC" Part No. 60515.
...
Solving the ABS Vent Pipe Final Gluing Problems Up on the Roof
 On the roof there was another problem: how the heck do you blob ABS cement around the interior of the receiving elbow in the roof cavity, the protruding male end of our vent stack assembly, and insert the assembly down through the rubber vent flashing boot that is designed to fit tightly around the exterior of the ABS vent stack pipe without having the rubber boot squeegee all of the ABS cement right back off of the pipe?
The solution was to roll back the upper edges of the rubber boot and tape them to the lower boot so that we had a larger diameter opening through which to first apply ABS cement to the interior of the receiving elbow and second to insert the ABS-cement-coated male end of the vent stack down into the elbow.
That worked. The repair assembly slid into place nicely.
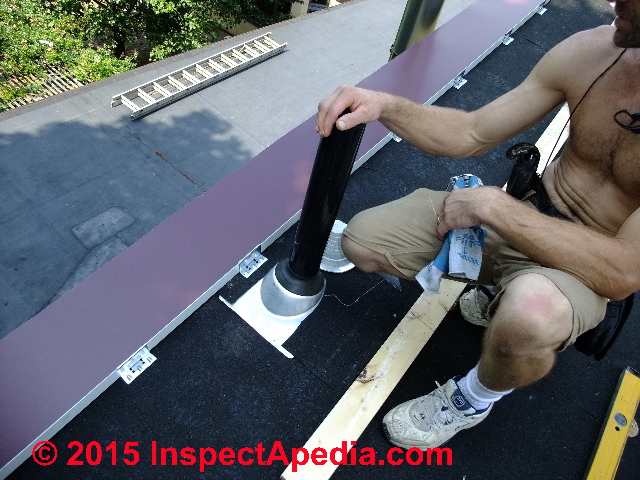
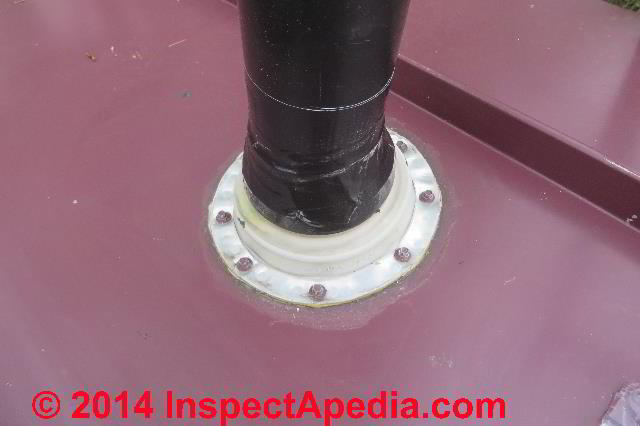
I finished by untaping the rolled-back rubber boot, rolling it up against the exterior of the vent stack and temporarily taping it in place to hold the vent pipe in perfectly vertical position while the plastic pipe cement set and dried.
Watch out: that black tape in my photo above is just a temporary hold to keep the pipe in place without moving while the ABS plastic pipe cement dries hard.
Later that tape can be carefully peeled away.
If you're in doubt about the quality of the seal of the rubber boot around the outer surface of the vent pipe, use a compatible adhesive sealant in that location.
Don't rely on duct tape or similar products that will eventually break down with sun exposure.
...
The Completed ABS Plumbing Vent Stack Rooftop Repair - Snowguard Protection Added

Above is the original plumbing vent stack as installed when the roof was new.
And below we show the completed plumbing vent stack repair, along with a portion of our snow-guard installation system that should prevent the snow and ice damage in future winters.
We glued-down an extra glue-on type snow guard just up-roof from the plumbing vent stack.
A single snow-fence or snow guard, especially one located down-slope from a plumbing vent may not be sufficient to protect the plumbing vent from damage when there is a heavy snow accumulation on the roof.
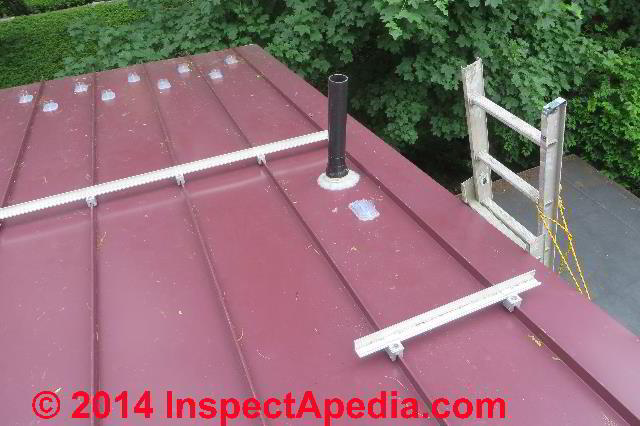 Steps to protect the plumbing vent from future snow damage began with a glue-on snow guard up-roof from the vent (photo at above right) and continued with more extensive clamp-on snow guards on the roof,
shown in our photograph at left and explained
at SNOW GUARD CLAMP ON INSTALLATION
and concluded with the double-row of glue-on snow guards near the roof eaves and visible in the upper left of our photograph shown at left.
The cause of the snow-damaged plumbing vent is discussed
Original installation details for this plumbing vent as photos and text are at the bottom of our article
on PLUMBING VENT DEFECTS & NOISES.
...
Continue reading at PLUMBING VENT DEFECTS & NOISES or select a topic from the closely-related articles below, or see the complete ARTICLE INDEX.
Or see these
Recommended Articles
Suggested citation for this web page
PLUMBING VENT REPAIR at InspectApedia.com - online encyclopedia of building & environmental inspection, testing, diagnosis, repair, & problem prevention advice.
Or see this
INDEX to RELATED ARTICLES: ARTICLE INDEX to PLUMBING SYSTEMS
Or use the SEARCH BOX found below to Ask a Question or Search InspectApedia
Ask a Question or Search InspectApedia
Try the search box just below, or if you prefer, post a question or comment in the Comments box below and we will respond promptly.
Search the InspectApedia website
Note: appearance of your Comment below may be delayed: if your comment contains an image, photograph, web link, or text that looks to the software as if it might be a web link, your posting will appear after it has been approved by a moderator. Apologies for the delay.
Only one image can be added per comment but you can post as many comments, and therefore images, as you like.
You will not receive a notification when a response to your question has been posted.
Please bookmark this page to make it easy for you to check back for our response.
IF above you see "Comment Form is loading comments..." then COMMENT BOX - countable.ca / bawkbox.com IS NOT WORKING.
In any case you are welcome to send an email directly to us at InspectApedia.com at editor@inspectApedia.com
We'll reply to you directly. Please help us help you by noting, in your email, the URL of the InspectApedia page where you wanted to comment.
Citations & References
In addition to any citations in the article above, a full list is available on request.
- Eric Galow, Galow Homes, Lagrangeville, NY. Mr. Galow can be reached by email: ericgalow@gmail.com or by telephone: 914-474-6613. Mr. Galow specializes in residential construction including both new homes and repairs, renovations, and additions.
- International Code Council, 500 New Jersey Avenue, NW, 6th Floor, Washington, DC 20001 Tel: 1-888-ICC-SAFE (422-7233); Fax: (202) 783-2348 International: (202) 370-1800, Email: webmaster@iccsafe.org, Website: www.iccsafe.org
- International Residential Code (IRC), for One and Two Family Dwellings, 2012 (First Printing)
Home Page: publicecodes.citation.com/icod/irc/index.htm
Citation Page:
publicecodes.citation.com/icod/irc/2012/icod_irc_2012_31_sec003.htm - International Mechanical Code (IMC), International Code Council [888] 422-7233, Op. Cit.
- International Plumbing Code (IPC) (see NPC below), Op. Cit.
- National Standard Plumbing Code, (NPC), 2009
obtained From: National Assoc. of Plumbing-Heating-Cooling Contractors in New Jersey at [800] 652-7422 or NAPHCC [800] 533-7694, [Cited by New Jersey State Department of Community Affairs]
state.nj.us/dca/divisions/codes/codreg/pdf_misc_codes/2006_nspc.pdf - New Jersey State Department of Community Affairs, Website: state.nj.us/dca/divisions/codes/codreg/
- In addition to citations & references found in this article, see the research citations given at the end of the related articles found at our suggested
CONTINUE READING or RECOMMENDED ARTICLES.
- Carson, Dunlop & Associates Ltd., 120 Carlton Street Suite 407, Toronto ON M5A 4K2. Tel: (416) 964-9415 1-800-268-7070 Email: info@carsondunlop.com. Alan Carson is a past president of ASHI, the American Society of Home Inspectors.
Thanks to Alan Carson and Bob Dunlop, for permission for InspectAPedia to use text excerpts from The HOME REFERENCE BOOK - the Encyclopedia of Homes and to use illustrations from The ILLUSTRATED HOME .
Carson Dunlop Associates provides extensive home inspection education and report writing material. In gratitude we provide links to tsome Carson Dunlop Associates products and services.
 | HOME | ABOUT | ASK a QUESTION | CONTACT | CONTENT USE POLICY | DESCRIPTION | POLICIES | PRIVACY | |
| © 2025 - 1985 Publisher InspectApedia.com - Daniel Friedman | |||||||||