 Hot Tub, Spa, Whirlpool Bath Use & Repair
User's Guide, Operation & Repair of Spas / Hot Tubs & Whirlpool Baths
- POST a QUESTION or COMMENT about how to troubleshoot & fix hot tubs, whirlpool bath tubs, spas, jacuzzis
Hot tub & spa or whirlpool bath operation, use, maintenance, troubleshooting & repair:
In these articles we describe the use, operation, maintenance as well as common problems, troubleshooting, & repair suggestions for hot tubs, spas, and whirlpool baths. We discuss hot tub leaks, broken hot tub or spa jets, hot tub or spa water temperature & heater repair, hot tub or spa pump diagnosis & repair, hot tub or spa filter maintenance, cleaning & repair, noisy air pumps at hot tubs, noisy water pumps at the hot tub or spa, and other hot tub, spa or whirlpool bath diagnosis & repair topics.
Page top photo, a Hawkeye Products hot tub or spa installed in Minnesota serving as an example of of repair & maintenance topics in this article. This spa was installed ca 1995 and is still in operation.
InspectAPedia tolerates no conflicts of interest. We have no relationship with advertisers, products, or services discussed at this website.
- Daniel Friedman, Publisher/Editor/Author - See WHO ARE WE?
Operating Procedures & Troubleshooting Tips for Whirlpools & Spas or Hot Tubs
Article Series Contents
- HOT TUB SPA WHIRLPOOL OPERATION & REPAIR
- SPA TURN ON PROCEDURE
- SPA CONTROLS & SWITCHES
- SPA / HOT TUB FILTER CLEANING - separate article
- SPA / HOT TUB FILTER REPLACEMENT - separate article
- SPA / HOT TUB PUMP OPERATION
- SPA, HOT TUB, SWIMMING POOL INSPECTION & CODES - separate article
- SPA HOT TUB WHIRLPOOL REPAIRS
- SPA / HOT TUB CHEMICALS & CHLORINATION
- SPA / HOT TUB DRAIN / WINTERIZING PROCEDURE
- SPA / HOT TUB / POOL MANUALS, PARTS, REPAIR, SUPPLIES
- SCALD PROTECTION
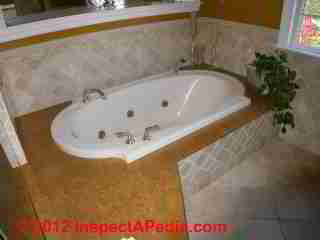
[Click to enlarge any image] Above: a contemporary jetted tub installation. It looks as if the installer didn't give easy access to the pump and plumbing for this tub.
10-Steps to Return a Spa or Hot Tub to Service
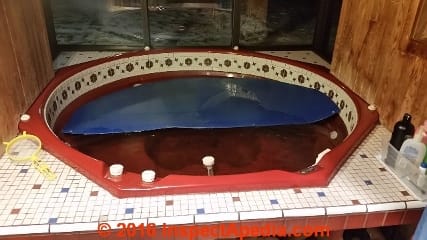
To return a long-disused hot tub or spa to active service you will need to complete several simple steps, but at each step it is critical to inspect the installation for safety, shock hazards, leaks, cleanliness, and proper operation.
- Clean the spa interior
- Open the access panels: remove the spa or hot tub access panels as needed to give access to all of the controls, valves, and hot tub / spa filter. .
Watch out: NSPI-4 Article V, Standard for Above Ground Pools includes safety warnings pertinent to in-home hot tubs and spas as well. Never position spa or hot tub equipment where it may enable young children to climb into the hot tub or spa. Never leave the hot tub or spa access panels open such that dangerous electrical connections, switches, chemicals, controls, etc. might be accessed by young children.
Watch out: GFCI (Ground fault circuit interrupter) protection should be provided on all hot tub, spa, and pool electrical circuits to reduce the chances of fatal electrical shock. - Inspect for exposed electrical connections, pneumatic control connections, evidence of leaks, damage
Watch out: exposed electrical splices or connections can kill someone. Being wet, naked, and standing on a wet floor is a good preparation for electrocuting yourself. Don't touch electrical parts. Consult a licensed electrician if repairs are needed. - Service the filter: Open, inspect, and clean the spa filter. The filter is filled with water and air is bled from it after the pump has been started.
See SPA FILTER CLEANING for details. - Fill the hot tub / spa with enough water to test the pump. Water needs to be above the highest pump intake opening. For the hot tub shown in this article that means water needs to be up into the tiled area near the top rim of the tub. We used a short garden hose connected to a nearby tap that provided both hot and cold water.
- Turn on the spa pump, bleed air from the system (usually at a thumbscrew at the top of the spa filter), and check for water leaks. Typically a spa pump is a centrifugal pump that will be self-priming.
See SPA CONTROLS & SWITCHES to find the main pump switch and the tub rim pneumatic switch needed to operate the pump
also
See SPA / HOT TUB PUMP OPERATION
Watch out: never operate a pump without water or you may permanently damage the pump impeller, bearings, motor, or other parts. Typical instructions require filling the spa and pump filter or strainer assembly with water before turning on the pump. - Repair leaks
See SPA HOT TUB WHIRLPOOL REPAIRS if needed - Turn on and test the spa heater.
Watch out: do not heat any spa to more than 104 F. Higher temperatures are dangerous, risk scalding burns, heat prostration, or other health hazards. Higher temperatures also may damage the hot tub / spa itself.
See SPA CONTROLS & SWITCHES to find the heater control
Also
See SCALD PROTECTION if you are not sure about hot water hazards and safe water temperatures - Repair equipment: Make any other necessary repairs to the pump, heater, filter or other components found by inspection and testing
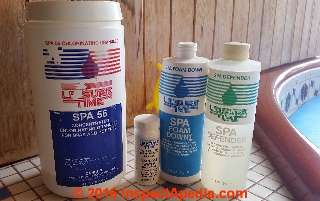
- Add chemical treatments: When the hot tub or spa is filled and operating, add the necessary chemicals to keep the water safe, avoiding bacterial growth, algae, and if necessary add an anti-foaming agent.
You will need a spa disinfectant, usually chlorine, and pool or spa test strips to be sure that you've used enough chlorine for the water to remain safe. Regular testing every 1-3 days is needed. This particular spa operates at a chlorine level of 1 to 1.5 ppm.
See SPA / HOT TUB CHEMICALS & CHLORINATION for details
Watch out: typical spa / hot tub instructions require that the spa pump and filter system be operated at least 2 hours / day even if you are not using the system. It is also necessary to monitor and maintain the proper chemical treatment of the spa water to avoid algae, bacterial and other hazards.
Watch out: keep all spa chemicals & treatments out of reach of children. Some of these can cause fatal poisoning or serious burns.
Watch out: remember to restore the access panels and to keep chemicals and hot tub access out of reach of children.
Spa or Hot Tub Controls & Switches
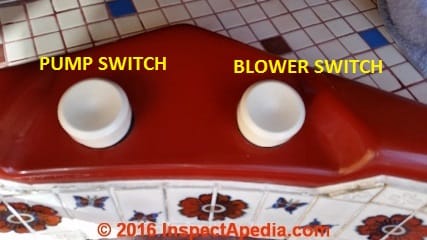
Above: these pneumatic controls on the spa or hot tub rim control turning the pump on-low, on-high, and OFF (left hand button), and turning the blower unit or bubbler pump on or off (right hand button).
Watch out: do not try these switches before the spa has been cleaned, filled, and inspected or you may ruin the pump.
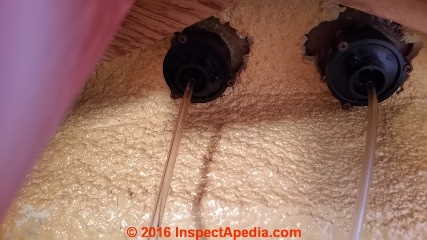
Below: air tubes connect these large white switches to electrical controls on the spa or hot tub controller.
Watch out: if these tubes become disconnected (as you rummage around below the hot tub) then the controls won't work. One end of the tube connects to the under-side of the switch (shown above) and the other end of each of the two tubes connects to a port on the spa controller / heater control.
These two tubing connections will be labeled "BLOWER SWITCH" and "PUMP SWITCH" on that device. We show it in a photograph later in this article.
Interior Spa / Hot Tub Controls & Switches: Pump, Heater, Blower behind the access panel
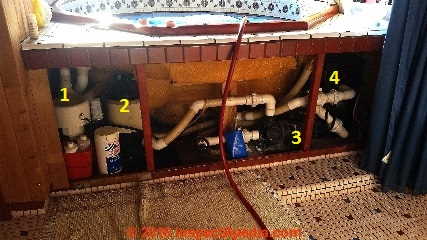
The remaining hot tub or spa controls, switches, filter, pump, and other components are usually located behind an access panel such as the one we removed from the front of the hot tub shown below.
[Click to enlarge any image]
Above, from left to right the key components below this hot tub include:
- The blower or bubbler pump.
Ick! The blower motor at this spa is so horribly noisy that we did not use it. Further inspection & repair are probably in order.
See SPA / HOT TUB BLOWER UNIT - The filter or strainer unit. This filter includes a drain at its bottom but it is not operative.
Watch out: do not try forcing a valve that seems stuck. You will cause a leak, break the valve, flood everything, and you'll be really really sorry.
See SPA FILTER CLEANING
and
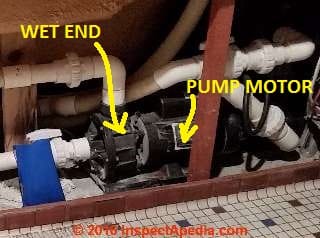
See SPA / HOT TUB FILTER LEAK REPAIR if needed - The pump motor.
Watch out: read our pump instructions below. Never run a pump dry or it will be ruined.
See SPA / HOT TUB PUMP OPERATION
Or
See SPA / HOT TUB PUMP REPAIR if needed - The heater and pump control module
Watch out: for safety, read the description below of the heater controls, thermal reset, and scald protection.
See SPA / HOT TUB HEATER REPAIR if needed
However it is possible that at your installation the pump, heater, blower unit or other controls are located in a separate location. Below we give closer views of key operating controls and parts of this hot tub or spa installation.
[Click to enlarge any image]
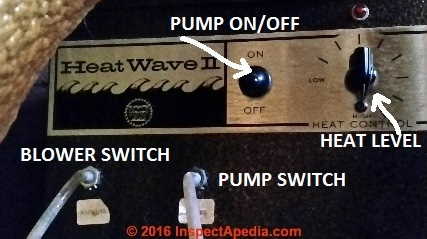
Above: a Heat Wave II electric heater for a spa or hot tub.
- The Pump ON/OFF switch is the main power switch for this system. Nothing will work when this switch is in the OFF position.
Watch out: Do not turn on the pump before preparing the hot tub / spa according to the manufacturer's directions or you may damage the unit.
See SPA / HOT TUB PUMP OPERATION
Watch out: missing from this hot tub installation is a separate, GFCI-protetected emergncy-off switch readily accessible to building occupants or tub users. - The Heat Level switch adjusts the temperature to which the heater will warm the spa / hot tub water. As shown the switch is set to its highest position.
- The "Blower Switch" and "Pump Switch" connections in the lower area of the photo are individually connected by plastic air tube to push-buttons located on the rim of the spa or hot tub (shown earlier in this article). By using pneumatic controls (air) to operate the actual electrical switch inside the Heater Control and Pump Control the risk of electric shock is reduced substantially.
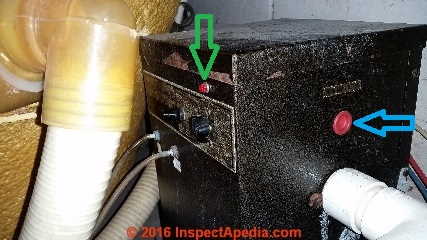
Below:
- Spa heater on light indicating that the spa heating elements are working (green arrow) and
- Spa heater thermal overload reset button / switch (blue arrow). If the spa heating elements are off try pressing the heater overload reset switch through the rubber button (that's to keep you from getting fried).
Watch out: do not keep pressing the reset-switch repeatedly. If the system keeps switching off, find and fix the problem. Otherwise the system maybe unsafe.
Watch out: GFCI (Ground fault circuit interrupter) protection should be provided on all hot tub, spa, and pool electrical circuits to reduce the chances of fatal electrical shock.
Spa / Hot Tub Pump Operation
The pump installed at this hot tub is a Hayward Power Flow II two-speed self-priming centrifugal pump.
To start the spa /hot tub pump
- Water level: The hot tub / spa should first be filled with water and the filter canister should also be filled.
- Valves: All of the suction and discharge pipe valves should be open (on the spa shown in this article these valves are left always open)
- Air bleeder: The air bleeder at the top of the filter canister should be open to allow discharge of air that will be first drawn into the system as the pump starts.
Watch out: after the pump has been turned on (below) and once air stops coming out of the bleeder opening and water is squirting all over the place it's time to hand-tighten this screw. - Now you can turn on the pump. For the hot tub / spa shown in this article the pump on-switch is shown in the photo below (located behind the hot tub / spa right-most access panel for the installation discussed in this article).
You will note that a heat level dial as well as pneumatic connections to remote blower and pump on/off/speed buttons on the hot tub rim are in the photo below.
This manual pump toggle-switch is also shown
at SPA CONTROLS & SWITCHES
Watch out: as you want to start the pump in HIGH SPEED mode, you may need to press the remote, pneumatically-operate button on the rim of the hot tub to place the pump into high speed mode. (Photo below).
Each time it is pressed, the white pneumatic pump control on the tub rim cycles through three state: OFF, ON-LOW, and ON HIGH. High speed will be obvious because the pump noise will increase and the visible flow of water exiting the jets in the tub will be stronger.
Watch out: when first turning on this pump to prime it (after hot tub / spa has been re-filled with water) start the priming cycle with the pump in HIGH SPEED mode. Never run a pump "dry" without water or it may be permanently damaged. Depending on the hot tub / spa / pool size, priming and removing air from the system piping may take as long a five minutes. Longer piping runs and higher pump lifts will require longer priming time.
But if you hear just a "hum" and the pump does not start pumping water out of the jets, TURN OFF the system right away to avoid damage or unsafe conditions.
Watch out: GFCI (Ground fault circuit interrupter) protection should be provided on all hot tub, spa, and pool electrical circuits to reduce the chances of fatal electrical shock.
Separately at SPA / HOT TUB LEAK REPAIR we discuss evidence of water leaks at this pump motor.
Separately at SPA / HOT TUB PUMP REPAIR we discuss repairing leaks or bad bearings or motor failures at the spa or hot tub circulating pump.
Spa / Hot Tub Inspection Checklist
This topic has been moved to a separate article now found
at SPA, HOT TUB, SWIMMING POOL INSPECTION & CODES
Clean the Spa or Hot Tub Filter Cartridge
Please see SPA / HOT TUB FILTER CLEANING for details
Watch out: failure to keep the spa / hot tub filter clean may result in reduced system water flow rate and operating pressure that in turn may prevent the spa / hot tub heater from operating.
Also see SPA / HOT TUB FILTER LEAK REPAIR
Replace the spa/hot tub filter cartridge
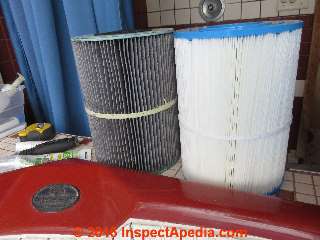
Replace the hot tub or spa filter cartridge if it looks black and slimy like the filter at left in our photograph below. Basically after cleaning your hot tub filter cartridge should be white.
See SPA / HOT TUB FILTER REPLACEMENT for details.
Spa / Hot Tub Troubleshooting & Leak Repairs
This topic has been moved to SPA HOT TUB WHIRLPOOL REPAIRS
Spa Blower Assembly
This topic has been moved to SPA / HOT TUB BLOWER UNIT
Spa / Hot Tub Filter Leak Repair - Using Epoxy to Repair Leaks at the Spa Filter Top
This topic has been moved to SPA / HOT TUB FILTER LEAK REPAIR
Spa Heater Troubleshooting & Repairs
This topic has been moved to SPA / HOT TUB HEATER REPAIR
Spa / Hot Tub Jet Repairs
This topic has been moved to SPA / HOT TUB JET CLOG REPAIR
Spa / Hot Tub Pump Troubleshooting & Repair
This topic has been moved to SPA / HOT TUB PUMP REPAIR
Find & Fix Other Leaks at the Hot Tub
This topic has been moved to SPA / HOT TUB, OTHER LEAKS
Hot Tub / Spa Water Chemistry Recommendations
Please see SPA / HOT TUB CHEMICALS & CHLORINATION where we illustrate and explain the typical chemicals and pool or spa water test strips needed to maintain a hot tub or spa.
Winterizing the Hot Tub or Spa
This topic has moved to SPA / HOT TUB DRAIN / WINTERIZING PROCEDURE
Where to Get Instructions for Specific-Brands of Jetted and Soaking Tubs
Moved to SPA, HOT TUB, SWIMMING POOL MANUALS, PARTS, REPAIR, SUPPLIES
...
Continue reading at SPA, HOT TUB, SWIMMING POOL INSPECTION & CODES, or if your spa or hot tub needs repair see SPA HOT TUB WHIRLPOOL REPAIRS or select a topic from the closely-related articles below, or see the complete ARTICLE INDEX.
Or see these
Recommended Articles
- HOT TUB SPA WHIRLPOOL OPERATION & REPAIR
- SPA TURN ON PROCEDURE
- SPA CONTROLS & SWITCHES
- SPA / HOT TUB BLOWER UNIT
- SPA / HOT TUB FILTER CLEANING
- SPA / HOT TUB FILTER LEAK REPAIR
- SPA / HOT TUB FILTER REPLACEMENT
- SPA / HOT TUB HEATER REPAIR
- SPA, HOT TUB, SWIMMING POOL INSPECTION & CODES
- SPAS, WHIRLPOOLS, INSTALLATION
- SPA / HOT TUB JET CLOG REPAIR
- SPA / HOT TUB LEAKS
- SPA / HOT TUB & POOL OZONE
- SPA / HOT TUB PUMP OPERATION
- SPA / HOT TUB PUMP REPAIR
- SPA JETTED TUBS NOISE
- SPA HOT TUB WHIRLPOOL REPAIRS
- SPA / HOT TUB CHEMICALS & CHLORINATION
- SPA / HOT TUB DRAIN / WINTERIZING PROCEDURE
- SPA / HOT TUB / POOL MANUALS, PARTS, REPAIR, SUPPLIES
- SCALD PROTECTION
Suggested citation for this web page
HOT TUB SPA WHIRLPOOL OPERATION & REPAIR at InspectApedia.com - online encyclopedia of building & environmental inspection, testing, diagnosis, repair, & problem prevention advice.
Or see this
INDEX to RELATED ARTICLES: ARTICLE INDEX to BATH & KITCHEN
Or use the SEARCH BOX found below to Ask a Question or Search InspectApedia
Ask a Question or Search InspectApedia
Try the search box just below, or if you prefer, post a question or comment in the Comments box below and we will respond promptly.
Search the InspectApedia website
Note: appearance of your Comment below may be delayed: if your comment contains an image, photograph, web link, or text that looks to the software as if it might be a web link, your posting will appear after it has been approved by a moderator. Apologies for the delay.
Only one image can be added per comment but you can post as many comments, and therefore images, as you like.
You will not receive a notification when a response to your question has been posted.
Please bookmark this page to make it easy for you to check back for our response.
IF above you see "Comment Form is loading comments..." then COMMENT BOX - countable.ca / bawkbox.com IS NOT WORKING.
In any case you are welcome to send an email directly to us at InspectApedia.com at editor@inspectApedia.com
We'll reply to you directly. Please help us help you by noting, in your email, the URL of the InspectApedia page where you wanted to comment.
Citations & References
In addition to any citations in the article above, a full list is available on request.
- Best Practices Guide to Residential Construction, by Steven Bliss. John Wiley & Sons, 2006. ISBN-10: 0471648361, ISBN-13: 978-0471648369, Hardcover: 320 pages, available from Amazon.com and also Wiley.com. See our book review of this publication.
- Best Practices Guide to Residential Construction, by Steven Bliss. John Wiley & Sons, 2006. ISBN-10: 0471648361, ISBN-13: 978-0471648369, Hardcover: 320 pages, available from Amazon.com and also Wiley.com. See our book review of this publication.
- In addition to citations & references found in this article, see the research citations given at the end of the related articles found at our suggested
CONTINUE READING or RECOMMENDED ARTICLES.
- Carson, Dunlop & Associates Ltd., 120 Carlton Street Suite 407, Toronto ON M5A 4K2. Tel: (416) 964-9415 1-800-268-7070 Email: info@carsondunlop.com. Alan Carson is a past president of ASHI, the American Society of Home Inspectors.
Thanks to Alan Carson and Bob Dunlop, for permission for InspectAPedia to use text excerpts from The HOME REFERENCE BOOK - the Encyclopedia of Homes and to use illustrations from The ILLUSTRATED HOME .
Carson Dunlop Associates provides extensive home inspection education and report writing material. In gratitude we provide links to tsome Carson Dunlop Associates products and services.


