 Heating Boiler Aquastat Immersion Well Grease
Thermal Conductive Paste Used with heating system aquastats
- POST a QUESTION or COMMENT about Aquastats controls used on Heating Boilers
Heating aquastat sensor probe immersion well thermal-conductive compound is used to assure good thermal contact between the sensor well (itself immersed in hot boiler water at a representative location) and the aquastat's temperature sensing probe.
This article series describes common operating problems with heating system aquastat controls and how these troubles are diagnosed and fixed.
InspectAPedia tolerates no conflicts of interest. We have no relationship with advertisers, products, or services discussed at this website.
- Daniel Friedman, Publisher/Editor/Author - See WHO ARE WE?
Heating Boiler Aquastat Probe Thermal Conducting Grease Use
Article Contents
- CONDUCTING GREASE IS NEEDED in the AQUASTAT PROBE WELL
- AQUASTAT SENSOR PROBE GREASE INSTALLATION DETAILS
- FREE UP A STUCK AQUASTAT SENSOR PROBE - when old hard grease makes changing a probe more difficult
...
Do we need that heat-conductive grease in the aquastat sensor probe well?
 To communicate the temperature of the water in the boiler to the controlling aquastat heat must flow from the boiler water to the surface of the sensor well - basically a steel tube mounted through an opening in the boiler body.
The water heats the sensor well steel.
Heat flows from the water through the steel of the sensor well to the surface of the aquastat's temperature sensing probe.
If this probe is not in very good thermal contact with the interior surface of the sensor well the aquastat may not always control the boiler on-off cycles properly.
Boiler aquastat manufacturers like Honeywell recommend two main installation details to assure good thermal contact between the aquastat temperature sensor and the sensor well into which it mounts:
- Temperature Sensing Probe contact:
When installing the probe, gently bend the cap tube to assure that the outer top, inner bottom and end of the sensor probe are in solid contact with the immersion well surfaces - Heat conductive compound:
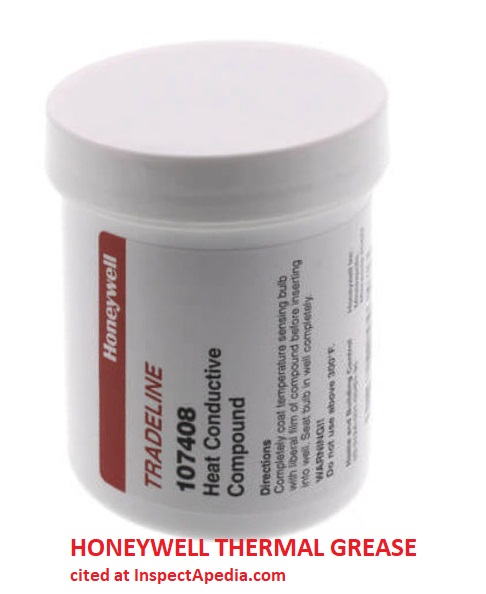
For immersion wells that are not a snug fit to the sensor probe, use a thermal-conductive compound such as Honeywell's Tradeline 107408 Heat Conductive Compound [grease] discussed here.
The thermal or heat-conductive compound or "grease" assures good thermal contact between the aquastat temperature sensing probe and the inner surface of the sensor well into which the probe is inserted.
Without this conductive compound in the boiler's aquastat temperature sensing probe well, even bending the aquastat sensor line to try to assure that it will have good thermal contact with the sensor well sides, that contact may vary over time, causing the sensor to flip the boiler on and off in too-short on-cycles.
The boiler aquastat may begin to misbehave, short cycling on and off or failing to turn on properly or turn off properly in response to boiler temperatures.
See BOILER SHORT CYCLING for more causes.
Watch out: if a boiler safety control such as an aquastat or limit control cannot sense the boiler temperature accurately the system is unsafe.
Illustration: Honeywell 107408, 120650, 197007 HEAT CONDUCTIVE COMPOUND [PDF] (1999) Honeywell Inc., 1985 Douglas Drive North, Minneapolis, MN 55422 USA, basic ingredients include Lithium complex grease (70%) and Aluminum paste (30%) in a stable compound. This product is specifically designed for installing aquastat sensor probes.
Watch out: be sure that the thermal-conductive compound you buy for installing a boiler aquastat probe is the correct product.
Sold by independent suppliers is also Accutemp AT0H-3412-2 Thermal Paste, type 120 Silicone Thermal Joint Compound, more information is at www.wakefield-vette.com described by the company as follows:
The 120 Series Silicone Oil-Based Thermal Joint Compound fills the minute air gap between mating surfaces with a grease-like material containing zinc oxide in a silicone oil carrier.
It possesses an excellent thermal resistance of only 0.05°C/W for a 0.001 in. film with an area of one square inch.
There is no measurable increase in case temperature of a mounted semiconductor on a heat sink after the 6-month stabilization period. - source: http://www.wakefield-vette.com/resource-center/downloads/brochures/thermal-management-accessories-wakefield.pdf retrieved 2019/05/14
Notice that nothing in the Accutemp silicone joint compound mentions its use on heating boilers! For an even greater snafu, note that Wakefield-Vette's thermal compounds include not only a range of thermal greases and but also thermal epoxies. If some fool uses thermal epoxy to mount the sensor probe on a boiler aquastat we're sunk.
Not All Tempeature Sensors Use Thermal Grease

Above: Immersion well details from the Hydrolevel's Ascent
Watch out: while thermal grease is required by traditional thermal sensors such as used on the Honeywell Aquastats described here, some boiler control manufacturers specifically tell us NOT to use thermal grease with their temperature sensors.
Most likely that's because some newer boiler temperature sensors use a close-fitting thermal probe well that does not require thermal grease for good contact and because using a thermal grease in those sensors can cause the sensor to become stuck - making its replacement difficult.
Really? Well yes, specifically if you are using the Hydrolevel Electro-Well - sensor combination you do not use thermal grease. However if you are using a traditional (and larger-diameter) temperature probe sensor well thermal grease may still be required.
Watch out: also, to note that if you are using a traditional or "standard" immersion well with these Hydrolevel controls, the control's"LWCO Active" light won't illuminate.
Examples of Boiler Controls that do NOT Use Thermal Grease
- HYDROLEVEL HydroStat 3250-EXT INSTALLATION & OPERATING MANUAL [PDF] (at Hydrolevel) - - local copy saved as Ascent-HydroStat-3250-EXT-Manual.pdf - when using the Hydrolevel Electro-Well illustrated above.
Watch out: regarding insertion of the tempeature sensor for this control: the company warns: NOTE: Do not use heat-conducting grease when using the company's Hydrolevel Electro-Well. - Hydrolevel HydroStat 3250 Plus INSTALLATION MANUAL [PDF] (at Hydrolevel) - local bacup saved as HydroStat-3200-Plus-Manual.pdf
Excerpts:
When installed on an Electro-Well™ (sold separately), the Low Water Cut-Off function is automatically activated. Heat transfer grease should not be used. NOTE: For proper operation, there must be 1/2" clearance between the copper well tube and any surface within the boiler.
NOTE: If installing an Electro-Well, pipe sealing compound should be used. Teflon tape is not recommended
What Transfers Heat from the Heating Boiler Immersion Well to the Aquastat Temperature Sensor Bulb?
 Our InspectApedia reader asked:
I am curious about aquastats using immersion wells. I have 2 of them and i find that in general they are more accurate than the strap on type. However I find that they are still not as accurate as i would like to see them.
The 2 that i have there is nothing inside the well itself to transfer heat from the well to the copper bulb inside the well it just sits there making loose contact with the sides in some spots.
It isn't even a semi snug fit they just dangle in there. Is there normally some sort of oil or heat sink compound that should fill the well for better heat transfer?
I can't help but think this would help increase accuracy. 6/1/2014 Heath M said:
Moderator's Answer: You need to use thermal grease when installing the sensor for an aquastat control ?
Thermal grease, on and around the temperature sensing probe in the immersion well on the boiler, is discussed on this page.
The bottom line answer is yes, the thermal or heat-conducting compound is necessary.
I know that some older service technicians omit this important step, griping that the thermal paste used to get so hard that they couldn't remove the old sensor. That's not a problem with the current thermal conductive grease, and if you run into an old thermal sensor well that's not usable it should be replaced anyway.
The use of the heat-conductive compound when installing the aquastat sensor is important because without it the ability of the sensor to accurately and consistently sense the temperature of the boiler's water will be reduced and its performance can also be intermittent. A result is erratic operation of the control.
So follow the manufacturer's instructions and use the heat conductive compound.
The excerpt below is from installation instructions for the L8184 Aquastat - which I think is what you meant. I don't know of an aquastat with model No. L8123. If you have one do attach a photo.
I am guessing you meant to type
Honeywell L8124 Aquastat Relay described in
AQUASTAT L8124 A-M INSTALLATION & OPERATION MANUAL [PDF] (2001)
Instructions:
1. Shut off the electric power and remove the old control.
Leave the old immersion well in place if it is suitable for
use with the L8124, either with or without an adapter. A
124904 Well Adapter can be ordered separately; see
form 68-0040, Immersion Wells and Compression
Fittings, for ordering information.
2. If the old well is unsuitable, drain the system, remove the old well, and install a new immersion well. Refill the system. Refer to form 68-0040, Wells and Fittings for Temperature Controllers, to order a new well. Make sure the well is tightly screwed in to prevent leakage.
NOTE: Do not attempt to tighten the well using the case as a handle.
3. Loosen, but do not remove, the immersion well clamp
screw.
4. If the immersion well fits the L8124 Immersion Well
Clamp, proceed as follows:
a. Partially fill the immersion well with heat-conductive
compound.
b. Insert the bulb into the well. The bulb must bottom in
the well.
c. Make sure the well fits into the hole in the case.
Properly position the clamp on the well flange; then
tighten the clamp screw.
d. Center the loop of excess capillary tubing in front of
the immersion well so it cannot touch any electrical
parts.
Source:
AQUASTAT L8124 A-M INSTALLATION & OPERATION MANUAL [PDF]
These immersion type controllers provide high limit, low
limit, and circulator control in forced hydronic heating
systems that include domestic hot water.
Also more details about your aquastat and the thermal heat conductive compound at
AQUASTAT SENSOR PROBE HEAT CONDUCTING COMPOUND
and
AQUASTAT SENSOR PROBE STUCK in the AQUASTAT WELL

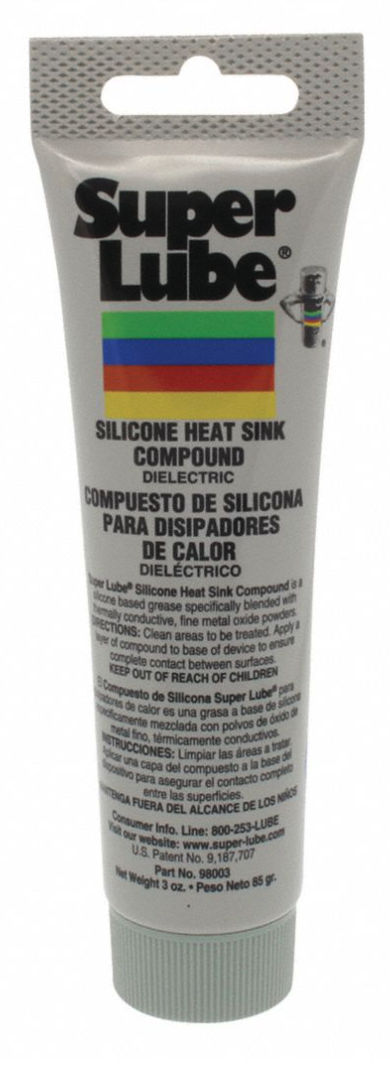
Thermal grease should be provided in the package with a new aquastat, but if yours is missing you can use a product widely-available such as this SUPER LUBE SILICONE HEAT SINK COMPOUND [PDF] shown below
...
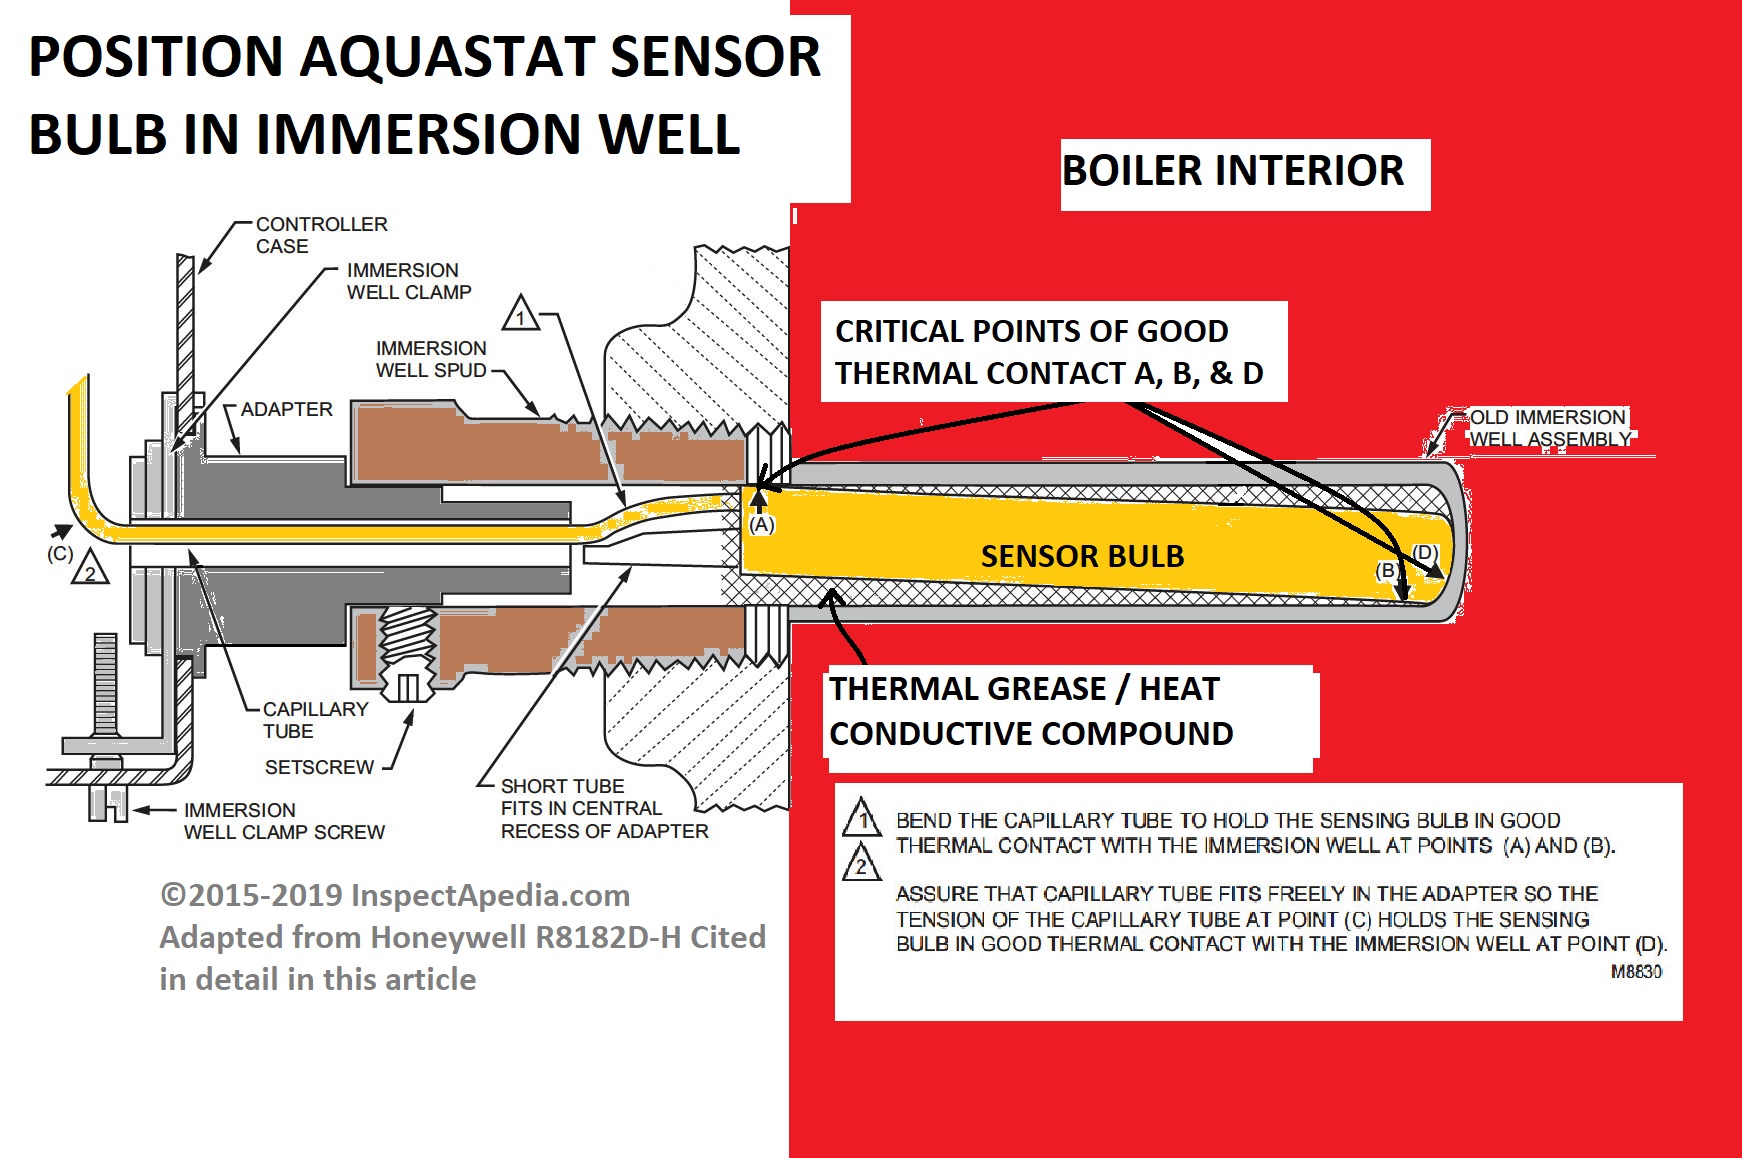
Aquastat Temperature Sensor Probe & Immersion Well Installation Details

Honeywell's R8182D-H AQUASTAT IO MANUAL [PDF] (2002) notes that included in the package for this control is a
Bag of heat-conductive compound for better heat transfer.
and includes these instructions:
IMPORTANT Be sure that the sensing bulb fits snugly inside the immersion well and that the sensing bulb rests against the bottom of the immersion well.
If the sensing bulb does not fit snugly inside the immersion well, use the heat-conductive compound as described below.
See Fig. 3. [see these figures, Adapted from Honeywell in 2015,Fig 3. revised 2019 /2025 - Ed.]
The following is excerpted from R8182 mounting instructions found in the Honeywell R78182-D-E-F-H-J AQUASTAT INSTALLATION MANUAL [PDF] (1995) - you 'll note that there is no mention of thermal conductive paste or grease in this older document.
3. Most boilers are equipped with a tapping that allows horizontal mounting of immersion well where average temperature boiler water circulates freely. If no tapping is provided, prepare one.
4. Install immersion well or compression fitting (ordered separately) by threading immersion well into tapped hole.
5. For R8182D,E,F models:
a. Loosen immersion well clamp screw on side of R8182 case.
b. Insert bulb into immersion well until it bottoms.
c. If necessary, bend capillary tube to hold bulb against bottom of immersion well.
[Notice the three required points of good thermal contact at the sensor top, bottom, and end in our illustration below - Ed.]NOTE: Do not make sharp bends in the tubing. A sharp bend can break the tubing and cause a loss of fill. In models with an adjustable tubing length, pull the extra tubing out of the controller case.
d. Fit controller case onto immersion well so that immersion well clamp slides over flange of immersion well.
e. Securely tighten immersion well clamp screw.
Position of the Probe With Thermal Conducting Grease in the Aquastat Immersion Well
Comparing older strap-on temperature sensors with modern Aquastat sensor probes
No question that strap-on units are less accurate and in my OPINION (Daniel Friedman) less reliable so less safe.
I too am troubled by that contact-constancy problem and suspect it explains why there are sometimes short on-cycles of the equipment.
Watch out: IF the sensor probe does not fit snugly in the aquastat senor probe well then use of a heat conductive grease is recommended. And in all cases Honeywell advises that the cap tube is gently bent (no sharp radius) so as to assure good contact at three points in the immersion well - shown in more detail here.
Even when the sensor probe fits snugly into the sensor well, so that heat conductive grease is not going to be used, to guard against a future jam-up from corrosion some techs will wipe a think coating of silicone or an non-corroding stable lubricant on the probe surface before inserting it into the well.
If we read the installation instructions we're told to use a thermal conductive paste inside the well, as illustrated at above left in our adaptation from the installation instructions for
the AQUASTAT L7224U UNIVERSAL Universal programmable aquastat.
The use of the manufacturer's recommended thermal-conductive paste would go a long way towards overcoming the contact constancy question that you raise.
In discussing this with heating boiler service techs who do not bother with the thermal paste when installing the aquastat, I heard their complaints about the paste (thermal-conductive grease) asserting that using the grease makes it difficult to remove the device in the future as the grease "cements" the sensor into the well.
This may have been true for some products in the past but currently (2014 & recent years prior to that year) the thermal grease is not acting like a glue.
The manufacturer knows what makes their control work properly. The thermal-grease assures reliable and continuous thermal contact between interior surface of the immersion well on the boiler and the temperature sensing tip of the aquastat's heat probe.
Without this grease, thermal movement and possibly even slight corrosion that occur between the surface of the probe and the side of the immersion well can cause the temperature sensor to behave erratically.
The temperature-conductive grease is needed and should be used.
Honeywell feels so strongly on this point that a packet of heat conductive grease is packaged with new aquastats. I've read that the formula for the conductive grease was amended to remove a drying agent, preventing the heat transfer grease from gluing the sensor into the sensor well.
Worse, once the aquastat control has been installed without the recommended grease, if the boiler is cycling erratically and you want to add the conductive grease, and if it's a close-mount aquastat whose sensor probe extends off the back of the aquastat directly into the temperature sensor well on the boiler, taking the aquastat back off to then add the conductive paste or grease is a fair amount of trouble that the tech certainly doesn't want to tackle.
Unless the senor well is snug around the sensor probe, get some heat conductive grease and use it, along with bending to get the proper thermal contact points, when installing the heating boiler aquastat sensor into the aquastat well.
Also see SPA / HOT TUB HEATER REPAIR
...
How to Free Upan Aquastat Temperature Sensor Probe Stuck in Old Thermal Grease
How do you get a aquastat out of the thermal grease if it's stuck?
I [DF] found when servicing some heating boilers that if I wanted to change the aquastat the old unit's thermal sensor bulb was literally "glued" into the boiler temperature sensor well by hardened thermal grease.
I've gotten stuck wires out of the thermal well by opening the well cap and probing into the well - it's basically a steel tube with a closed end - to loosen gunk around the probe - until I could remove the probe assembly.
Some service techs make a tapered "shim" or chisel out of a section of copper tubing or copper pipe of an appropriate OD size (such as 3/8 OD). That rounded tool, shaped and sized to be just smaller than half the diameter of the aquastat senor probe sensor well interior is then tapped into the well while being held against the well side.
A few taps in and you can (sometimes) free the probe and clean out the remaining dried out grease.
Really? Well not always: you may be able to use a thin steel shim to free-up a stuck aquastat sensor probe if it is stuck in an older, larger-diameter sensor well, but if the jammed sensor probe itself is quite close in size to the sensor probe well internal diameter, then there may not be much working room to use a tool to free-up the probe.
In that case you will probably have to drain the boiler and replace the aquastat well as well as the aquastat temperature sensing probe.
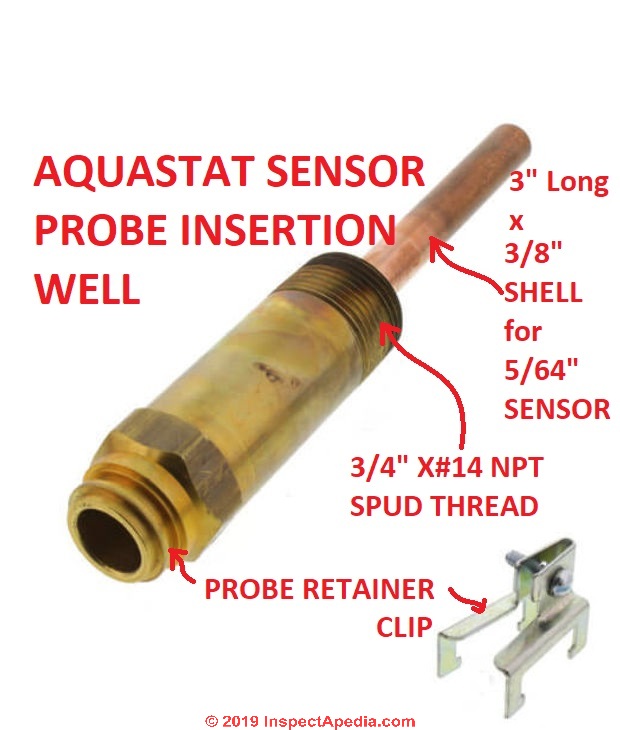
Above: a Honeywell® 3/4" spud diameter 3" long x 3/8" ID sensor probe well or aquastat well intended to receive an aquastat probe that is 5/64" in diameter. That's inserting a 5/64" OD sensor into a 24/64" OD sensor well ID, still leaving considerable wiggle room.
Watch out: doing that will perhaps ruin the thermal sensor end of the probe and you'll ned to replace that assembly.
Boiler and aquastat manufacturers learned about the glued-in aquastat probe problem quite some time ago and improved the thermal grease to stop the problem in newer installations.
Unfortunately some old-school heating techs had so much trouble with stuck-in probes in the old thermal grease that after trying solvents (dangerous on hot boiler) and resorting to chipping and hacking, and in a few cases resorting to boiler drain-down and replacement of the whole thermal well - after all that aggravation the techs just started leaving off the thermal grease entirely.
If you have to replace the thermal well - aka aquastat well or sensor probe well, the job is of course a longer and more-expensive one.
Watch out: Don't forget to check the sensor well tapping area for leaks after you've re-filled the boiler and returned it to operating temperature.
Contemporary aquastat wells are smaller in internal diameter (often 3/8" ID) than those found on some older boilers (sometimes 1/2" or 3/4" ID) and are typically 1/2" or 3/4" in nominal spud thread or tapping diameter and in varying lengths, comprised of brass, copper or stainless steel, also referred to as insertion wells or shells.
If you can absolutely not get the sensor probe out of the well it's possible that someone used expanding foam sealant or an adhesive or simply didn't use the proper thermal grease.
Today's thermal grease products may get thick and viscous but they won't leave the sensor probe glued into the sensor well.
That led to a different problem: at least for larger sensor immersion wells with smaller probes, you NEED that thermal grease to assure good contact between the aquastat's temperature probe and the side of the well into which the probe is inserted.
If you leave out the grease entirely there is poor and unreliable contact between probe and sensor well body.
Watch out: The result is an aquastat that does not respond properly to boiler temperature, turning on or off at the wrong temperature, or sometimes a bounce problem that causes very short cycling on and off at the burner - in turn that can lead to loss of heat or on an oil boiler even to a puffback explosion.
Post a photo or two of your aquastat probe (one per comment) and if I can see enough to make more suggestions I'll be glad to do so.
...
Aquastat Probe Failure Diagnostic Q&A
S8610U Aquastat will not shut off heat at temperature; it's set to 180 but it is blowing off at 240 - using S8610U Gas Control

On my gas boiler I changed the S8610f because of a bad ignition module with s8610u.
The boiler fires but will not shut off at the temperature it's set to: 180F but instead it keeps heating up until it is blows off at 240F.
Could this be a bad aquastat or is aomething changed on the new S8610u module?
I have had 2 hvac people hear and they can't figure out the problem as well - On 2018-03-04 by Brandon -
Diagnostic Suggestions by (mod) -
One of the first things to check is whether or not the sensor probe is in good contact in the sensor well in the boiler.
Also know that the manufacturer usually suggests using a thermal conductive Grease.
It's also possible that the sensor itself is actually bad.
I suggest watching the LED Status codes when you turn on your boiler, and compare them with Table 3. Green LED Status COdes for the S8610f control that we excerpt below.
Other readers: see this Resideo (Honeywell) S8610U Universal Intermittent Pilot Gas Ignition Control Instruction Manual [PDF] - Local copy saved as S8610U-Universal-Intermittent-Pilot-Gas-Ignition-Control.pdf
My bad heating system aquastat only runs after we give it a good smack
Thank you for a wonderful and informative website! We have an boiler for our radiator system in our home but it's not starting up unless we smack the cover of the aquastat repeatedly ..
And then it clicks a few times the burner flames eventually starts up - after a few smacks. If you can provide any insight to our problem, we'd greatly appreciate it. Thank you, J.D. 11/27/2013
Explanation by Moderator: smacking the aquastat - things to check: loose wires, buzzing, overheating, burning, damaged aquastat control
Nice question. Where is the aquastat mounted? On the boiler itself or remotely say, on or next to the oil burner?
I ask because part of diagnosing why smacking or tapping on an electrical control does something involves figuring out what you may be jiggling in the control when you rap, tap, or smack it.
I suspect a loose wire, loose connection, failing aquastat relay, or possibly a bad connection between the aquastat's temperature sensor and the sides of the well into which the sensor is inserted.
Of course there may be some other issue we haven't thought-of - something that would be immediately apparent to an astute heating service technician.
Start by turning power off (watch out for fatal electrocution hazards) and checking that all of the connections are tight.
Don't forget to check the thermostat wires too. Also listen for buzzing relays in the aquastat.
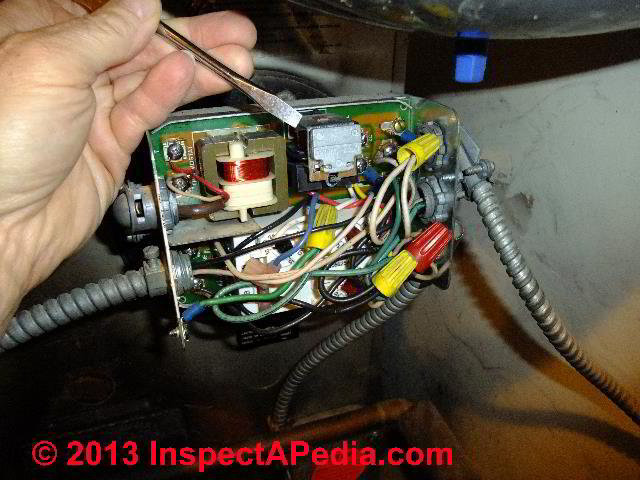
In the aquastat photo above left I'm pointing to a relay that may be buzzing if it's failing.
While the cover is off of the control, look with care for evidence of overheating or burning around any of the wire connectors or contacts.
Below we see overheating - burn marks around the lower-left power-connection screw.
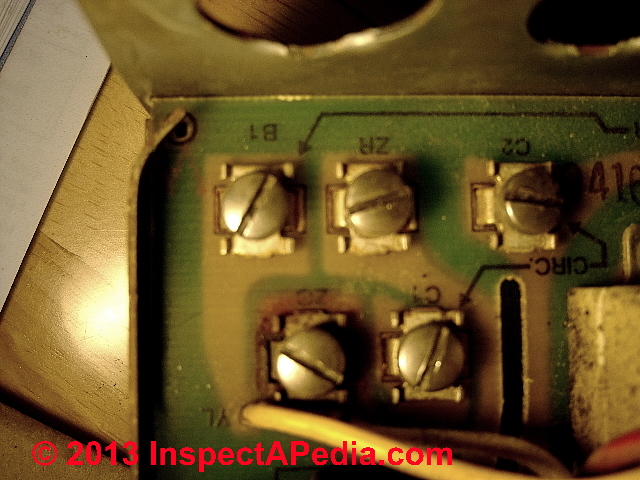
In my photo below right my pencil points to burn marks on the printed circuit board of a Honeywell L8124A aquastat on the reverse side of the overheated wire connection terminal shown above.
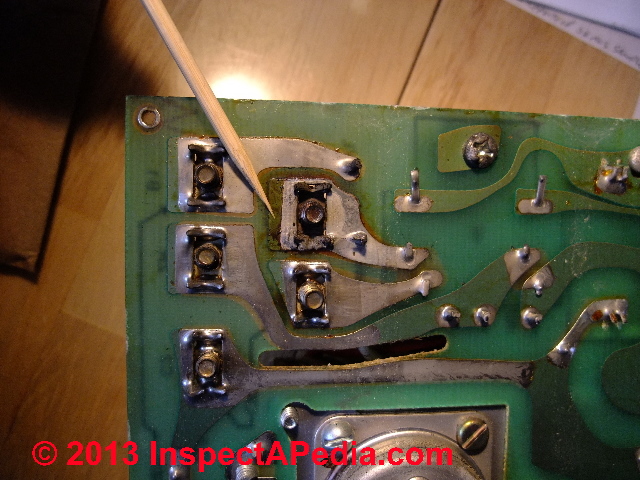
This aquastat was behaving erratically for a year or more before a sharp heating service tech from Bottini Oil (Poughkeepsie) spotted the damage.
We replaced the control.
Some contemporary aquastat wells are smaller in internal diameter (often 3/8" ID) than those found on some older boilers (sometimes 1/2" or 3/4" ID) and are typically 1/2" or 3/4" in nominal spud thread or tapping diameter and in varying lengths, comprised of brass, copper or stainless steel, also referred to as insertion wells or shells.
Burners won’t shut off at the temperature set on our aquastat
Burners won’t shut off at set aquastat temp. Only shuts off after overheating. Had a new pump and aquastat installed but the problem is still occurring. On 2019-02-16 8 by Paul -
by (mod) - Bad aquastat probe contact, missing thermal grease, or failed probe or bad control relay
Check that the aquastat's temperature sensor is properly installed in the sensor well and that you used the heat-conductive grease recommended by the manufacturer.
Check also for mis-wiring or a failed control relay.
Reader Comment: Oil Burner Short Cycling Traced to Poor Aquastat Temperature Sensor Contact: use the heat conductive grease
We have observed occasional short or sporadic oil burner (and some gas burner) "on" cycles that were hard to track down. Technicians even replaced aquastats on a test system we've been monitoring, only to have the problem continue.
Way back we traced the burner on cycle problem to poor contact of the aquastat's temperature sensor in the sensor well.
After assuring that the problem was not in the room thermostat, that there were no loose wires, that the aquastat relay was working normally and in fact that the whole aquastat was new, it was following the manufacturer's installation instructions to use a heat-conductive grease in the aquastat sensor well that fixed the problem.
...
...
Continue reading at AQUASTAT TROUBLESHOOTING or select a topic from the closely-related articles below, or see the complete ARTICLE INDEX.
Or see these AQUASTAT SETTING VS SENSOR PROBE FAILURE FAQS
Or see these
Recommended Articles
Suggested citation for this web page
AQUASTAT SENSOR PROBE HEAT CONDUCTING COMPOUND at InspectApedia.com - online encyclopedia of building & environmental inspection, testing, diagnosis, repair, & problem prevention advice.
Or see this
INDEX to RELATED ARTICLES: ARTICLE INDEX to HEATING BOILERS
Or use the SEARCH BOX found below to Ask a Question or Search InspectApedia
Ask a Question or Search InspectApedia
Share this article:Try the search box just below, or if you prefer, post a question or comment in the Comments box below and we will respond promptly.
Search the InspectApedia website
Note: appearance of your Comment below may be delayed: if your comment contains an image, photograph, web link, or text that looks to the software as if it might be a web link, your posting will appear after it has been approved by a moderator. Apologies for the delay.
Only one image can be added per comment but you can post as many comments, and therefore images, as you like.
You will not receive a notification when a response to your question has been posted.
Please bookmark this page to make it easy for you to check back for our response.
IF above you see "Comment Form is loading comments..." then COMMENT BOX - countable.ca / bawkbox.com IS NOT WORKING.
In any case you are welcome to send an email directly to us at InspectApedia.com at editor@inspectApedia.com
We'll reply to you directly. Please help us help you by noting, in your email, the URL of the InspectApedia page where you wanted to comment.
Citations & Reviewers
In addition to any citations in the article above, a full list is available on request.
- Thanks to Bottini Fuel service manager Ron Thomas for discussing aquastat functions, low limit controls, oil burner short cycling causes, and boiler maintenance, reliability, and service contracts 4/13/2010. Bottini Fuel is a residential and commercial heating oil distributor and oil heat service company in Wappingers Falls, NY and with offices in other New York locations. Bottini Fuel, 2785 W Main St, Wappingers Falls NY, 12590-1576 (845) 297-5580 more contact information for Bottini Fuel
- Thanks to reader powderfinger5 for careful reading of this text and suggesting clarifications - August 2011
- Thanks to reader Gary (Buddy Cat) for careful reading & editing - November 2012
- Honeywell Corporation, control installation guides for Honeywell aquastats and other heating and cooling controls: see http://customer.honeywell.com
- Honeywell L4008E Aquastat high limit,manual reset, aquastat controller instructions
- Honeywell L4006, Manual Reset Strap-On Aquastat (high limit control, 100 to 240 °F) [we consider strap on controls less accurate and reliable than immersion type sensor controls; these were commonly found on older heating boilers including the GE series downfired boilers]
- Honeywell L4026B Aquastat control instructions (contact Honeywell Corporation) Here is some basic description of the Honeywell L4026B control, also available at www.honeywell.com
- Our recommended books about building & mechanical systems design, inspection, problem diagnosis, and repair, and about indoor environment and IAQ testing, diagnosis, and cleanup are at the InspectAPedia Bookstore. Also see our Book Reviews - InspectAPedia.
- Principles of Steam Heating, Dan Holohan, technical editor of Fuel Oil and Oil Heat magazine, 389 Passaic Ave., Fairfield, NJ 07004 ($12.+1.25 postage/handling).
- "Residential Steam Heating Systems", Instructional Technologies Institute, Inc., 145 "D" Grassy Plain St., Bethel, CT 06801 800/227-1663 [home inspection training material] 1987
- "Residential Hydronic (circulating hot water) Heating Systems", Instructional Technologies Institute, Inc., 145 "D" Grassy Plain St., Bethel, CT 06801 800/227-1663 [home inspection training material] 1987
- Boilers, Boiler Conversions, James E. Brumbaugh, ISBN 0-672-23389-4 (v. 1) Volume II, Oil, Gas, and Coal Burners, Controls, Ducts, Piping, Valves, James E. Brumbaugh, ISBN 0-672-23390-7 (v. 2) Volume III, Radiant Heating, Water Heaters, Ventilation, Air Conditioning, Heat Pumps, Air Cleaners, James E. Brumbaugh, ISBN 0-672-23383-5 (v. 3) or ISBN 0-672-23380-0 (set) Special Sales Director, Macmillan Publishing Co., 866 Third Ave., New York, NY 10022. Macmillan Publishing Co., NY
- Installation Guide for Residential Hydronic Heating Systems
- In addition to citations & references found in this article, see the research citations given at the end of the related articles found at our suggested
CONTINUE READING or RECOMMENDED ARTICLES.
- Carson, Dunlop & Associates Ltd., 120 Carlton Street Suite 407, Toronto ON M5A 4K2. Tel: (416) 964-9415 1-800-268-7070 Email: info@carsondunlop.com. Alan Carson is a past president of ASHI, the American Society of Home Inspectors.
Thanks to Alan Carson and Bob Dunlop, for permission for InspectAPedia to use text excerpts from The HOME REFERENCE BOOK - the Encyclopedia of Homes and to use illustrations from The ILLUSTRATED HOME .
Carson Dunlop Associates provides extensive home inspection education and report writing material. In gratitude we provide links to tsome Carson Dunlop Associates products and services.
 |
HOME | ABOUT | ASK a QUESTION | CONTACT | CONTENT USE POLICY | DESCRIPTION | POLICIES | PRIVACY | |
| © 2026 - 1985 Publisher InspectApedia.com - Daniel Friedman | |||||||||