 Details for Installing Exterior Trim on buildings
Which building details cause rot & hidden damage at exterior trim on walls, doors, windows?
- POST a QUESTION or COMMENT about how to choose, install, maintain or repair exterior building trim
Exterior building trim installation guide, installation methods, and details to avoid trim damage, rot, or loss.
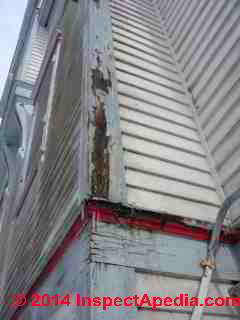
This article provides examples of exterior trim rot, delamination, or other damage traced to choice of materials, nailing methods, or omission of adequate flashing or sealant. Our page top photograph shows delaminating hardboard gable-end trim at the exterior of a building .
InspectAPedia tolerates no conflicts of interest. We have no relationship with advertisers, products, or services discussed at this website.
- Daniel Friedman, Publisher/Editor/Author - See WHO ARE WE?
Exterior Building Trim Installation Details to Avoid Rot & Other Trouble
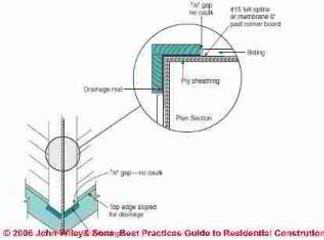 The first portion of this article series includes excerpts or adaptations from Best Practices Guide to Residential Construction (Steve Bliss, J Wiley & Sons) , by Steven Bliss, courtesy of Wiley & Sons.
[Click to enlarge any image]
The best exterior trim details are designed to keep water out but to provide easy drainage for any water that penetrates the exterior. This is particularly important when using trim materials that are vulnerable to decay or moisture damage, such as non decay-resistant softwoods or hardboard.
- Caulking trim joints with sealants (CAULKS & SEALANTS, EXTERIOR) is a double edged sword, since all caulk joints will eventually fail, and when they do, the remaining sealant will tend to keep the joint from drying.
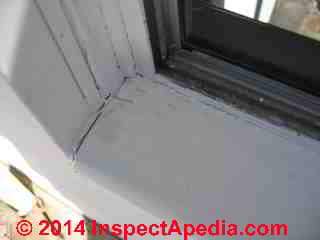
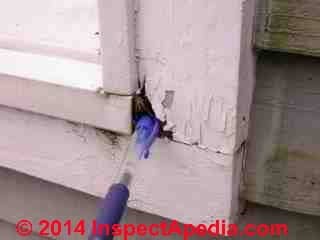
Our photo (below left) illustrates Steve Bliss's point: the gap that has opened at the window sill and trim provides a ready path for rain to enter the building wall cavity.
Regular inspection and repair / replacement of failing sealant as well as use of a good quality sealant are needed in spots like this to avoid more costly building damage from wall leaks at windows.
- Exterior building trim that is subject to frequent wettings
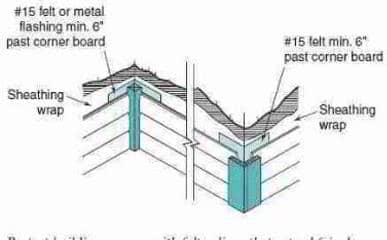
from the weather, such as corner boards, water tables, or wrapped porch posts or balusters, is a good candidate for rain-screen installation, where a ventilation and drainage space is left behind the trim (Figure 1-36). - Make sure to leave 1/8 to 1/4-inch free
at the bottom edge of the trim to drain to daylight. [Note: for vertical trim ends approaching a horizontal or sloped surface, leaving more space, 1" or 1 1/2" is better - Editor.]
To create the drainage space, either use shims (do not block the drainage path) or synthetic drainage materials, such as Benjamin Obdyke’s Home Slicker®. Foundation drainage materials can also work. If shims are used, add metal screening or drainage matting at top and bottom to block insect entry.
Regardless of the specific detail, the following principles will help create long-lasting exterior trim on any building:
- Wide roof overhangs,
8 inches minimum, at rake and eaves keeps water away from the side of the house, preserving siding and trim. - Avoid wide horizontal wood surfaces exposed to
water. S
lope for drainage or cap with metal flashing. Cut drip groove under edge to shed water. - Slope top edges
of exterior railings and horizontal trim boards, such as water tables, to shed water. - Avoid exposed end-grain facing upward
in vertical trim boards. Heavily prime all end grain and exposed edges. - Avoid exterior miter joints,
which tend to open and absorb water.
- Use Z- or drip-cap flashing at horizontal joints, such
as above windows or where corner boards meet the
water table. Leave 1/8-inch clear above the flashing, and
do not caulk the horizontal joint.
See also CAULKS & SEALANTS, EXTERIOR
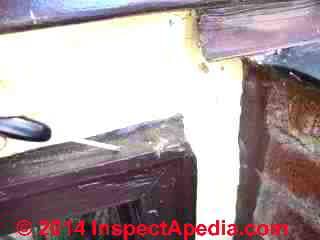
In the window trim photograph above my [DF] key points to rotted brickmold trim around an exterior window. The rot and leaks at this window were temporarily repaired using a wood filler, sealant, and paint, but it's the combination of rain splash in this location and omission of a Z-flashing over the horizontal window trim that accelerate the trim rot in this location.
At FLASHING SIDING DETAILS we emphasize that improper detailing of the ends of J-flashing on vinyl or aluminum sided buildings also leads to window trim rot and window leaks that often originate at the window head trim. - Avoid caulk joints.
Instead, flash well behind joints and leave a gap of 1/8 inch for ventilation. Where caulking must be used, apply a properly shaped caulk bead (see “Joint Design,” below).
- - Adapted with permission from Best Practices Guide to Residential Construction (Steve Bliss, J Wiley & Sons) .
Exterior Trim Damage Vulnerability Points
Horizontal hardboard trim
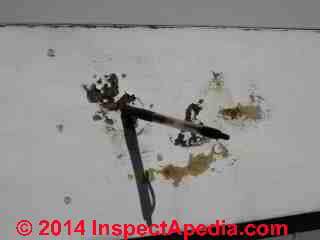
Our photo above illustrates soft, deteriorating wood fiber or hardboard exterior trim. In my [DF] experience, hardboard siding and trim don't fare well exposed to the exterior environment and are particularly vulnerable at cuts or surface penetrations.
The hardboard trim in my photo above was installed as the water table, a band of horizontal trim at the base of exterior siding around a building.\
You'll notice that where the nails penetrated the skin of this hardboard trim the deterioration was most rapid. The absence of zee-flashing between the siding bottom and the horizontal surface of the trim board's top also contribute to trim deterioration: water runs behind and along the trim surface.
My second photo (just above) shows the softening and beginning of deterioration where the hardboard siding nail penetrates its surface.
Vertical Trim Clearance from Roofs, Walks, or other Horizontal Surfaces
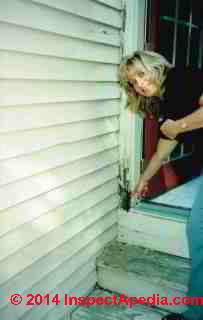
As our photographs illustrate just below, the exposed end grain of wood trim is particularly vulnerable to water absorption and subsequent rot as well as insect damage.
Above, the building exterior has been ignored so long that not only is there extensive rot to vertical and horizontal trim, we expected (and found) leaks into the walls and wall structure damage from rot and insects.
I [DF] like to see an inch or inch and a half of clearance between the end of vertical wood trim and the nearest horizontal surface. Where that large gap is not aesthetically acceptable, leaving 1/8" to 1/4" clearance may suffice if the wood ends were sealed and if proper flashing was used.
Where no clearance space is feasible, such as at vertical window trim abutting a window sill, it is important to seal the end and all other sides of the wood trim before nailing it in place, followed by painting or staining, followed by use of a compatible sealant (caulk) around the joint of wood trim to the horizontal surface.
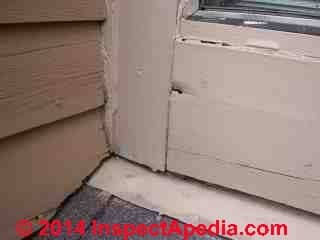
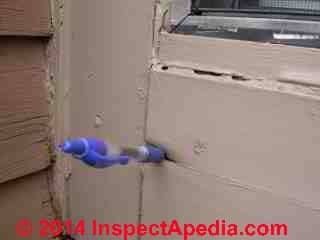
Abovce and below you can see significant rot at vertical wood trim along the side of a window at its sill abutment. Home inspectors know that if they were going to select one location to inspect around a window for trim damage, this would be a good one. In my OPINION, if my pen can penetrate the trim, it was badly damaged before I touched it - this is not "destructive" probing.
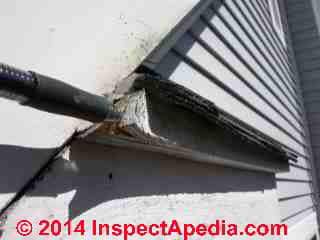
My second window trim rot photo (above right and probed at below left) shows that even if the vertical trim was given good clearance above a roof top or other horizontal surface, a horizontal abutting wood trim end grain will also pick up water and subsequently rot unless the connection is properly prepared with sealant and then kept caulked and painted.
Special Exterior Trim Installation Details for LVL, Fiber Cement, PVC, Plastic & Other Exterior Trim Products
Additional Exterior Trim Installation Materials Choices & Special Installation
Requirements are detailed
at TRIM, EXTERIOR CHOICES, INSTALLATION
where we discuss best construction practices in the choice, installation, painting, and maintenance of exterior trim on buildings.
We discuss solid wood trim, finger-jointed wood trim, hardboard trim, LVL trim, fiber cement building trim, polymer trim products, and cellular PVC building trim products and details.
Where to Buy Building Exterior Trim Products
Fiber-Cement Siding and Trim Suppliers
- Cemplank www.cemplank.com Cemplank fiber-cement siding and trim
- James Hardie www.jameshardie.com HardiePlank, Hardipanel, fiber-cement shingles
- Nichiha Wall Systems www.n-usa.com Fiber-cement lap siding and simulated shakes, brick, and stone
- Certainteed www.certainteed.com Fiber-cement lap, vertical, and shingle sidings, and soffits and trim
- GAF www.gaf.com Weatherside fiber-cement siding
Hardboard Trim
- ABTco www.abtco.com
- The Collins Companies www.collinswood.com
- Georgia-Pacific www.gp.com
- Masonite Corp. www.masonite.co
- Temple-Inland Forest Products www.templeinland.com
Polyurethane and PVC Trim Product Sources
- AZEK Trimboards www.azek.com, Vycom Corporation, 801 Core St., Moosicvk PA 18507, Tel: 570-346-8254 [illustrated above in this article]
- Cellular Polyvinyl Chloride (PVC) Trim
- Custom Decorative Mouldings (CDM) www.custom-moulding.com
- Edge Building Products www.permatrimboard.com
- Focal Point Architectural Products www.focalpointap.com
- Flex Trim www.flextrim.com Flexible polymer composite moldings
- Fypon www.fypon.com
- Gossen Corp. www.gossencorp.com
- Mid-America Building Products www.midamericabuilding.com
- Nu-Wood Decorative Millwork www.nu-wood.com
- Marley Moldings www.marleymoldings.com
- Outwater Plastics Industries, Inc. www.outwater.com
- Ras Industries www.rasindustries.com
- Resin Art www.resinart.com Duraflex flexible moldings
LVL Trim Product Sources
- Pacific Wood Laminates www.pwlonline.com
- Clear Lam (textured wood facing) and Socomi Lam (MDO facing)
...
Continue reading at FLASHING SIDING DETAILS or select a topic from the closely-related articles below, or see the complete ARTICLE INDEX.
Or see these
Recommended Articles
Suggested citation for this web page
EXTERIOR TRIM INSTALLATION DETAILS at InspectApedia.com - online encyclopedia of building & environmental inspection, testing, diagnosis, repair, & problem prevention advice.
Or see this
INDEX to RELATED ARTICLES: ARTICLE INDEX to EXTERIORS of BUILDINGS
Or use the SEARCH BOX found below to Ask a Question or Search InspectApedia
Ask a Question or Search InspectApedia
Questions & answers or comments about how to choose, install, maintain or repair exterior building trim.
Try the search box just below, or if you prefer, post a question or comment in the Comments box below and we will respond promptly.
Search the InspectApedia website
Note: appearance of your Comment below may be delayed: if your comment contains an image, photograph, web link, or text that looks to the software as if it might be a web link, your posting will appear after it has been approved by a moderator. Apologies for the delay.
Only one image can be added per comment but you can post as many comments, and therefore images, as you like.
You will not receive a notification when a response to your question has been posted.
Please bookmark this page to make it easy for you to check back for our response.
IF above you see "Comment Form is loading comments..." then COMMENT BOX - countable.ca / bawkbox.com IS NOT WORKING.
In any case you are welcome to send an email directly to us at InspectApedia.com at editor@inspectApedia.com
We'll reply to you directly. Please help us help you by noting, in your email, the URL of the InspectApedia page where you wanted to comment.
Citations & References
In addition to any citations in the article above, a full list is available on request.
- Webb, Craig, "What's In this Stuff? Composit and PVC Decking", Pro Sales Magazine, 6/10/2011, retrieved 8/10/14, original source: http://www.compositology.com/news/industry_news/pro-sales-what-is-composite/
- Azek Building Products, "Installation Guidelines for AZEK Trim and AZEK Moulding", Azek Building Products, 801 Corey Street,
Scranton, PA 18504, Tel: 877-ASK-AZEK (877-275-2935)
www.azek.com/pics/installation_document/AZEK-Trim-and-Moulding-Complete-Installation-Guidelines-2011.pdf - [1] "PVC trim holds paint well, resists rot, and looks just like wood", Jim Blahut, The Journal of Light Construction, September 2002. [copy on file].
- Allen, Edward and Joseph Iano. Fundamentals of Building Construction: Fourth Edition. Hoboken: John Wiley & Sons, 2004. pg. 91 [LVL lumber]
- APA - The Engineered Wood Association [Website: www.pacificwoodlaminates.com ], 7011 So. 19th St., PO Box 11700, Tacoma WA 98411-0700, Tel: 253-565-7265. APA provides an HDO/MDO Plywood Product Guide that offers details about these products., provides an HDO/MDO Plywood Product Guide that offers details about these products. Product support help desk: 253-620-7400. Email the APA at help@apawood.org. Web search 09/13/2010, original source: http://www.pacificwoodlaminates.com/img/PDFs/PlywoodGuide.pdf
- Azek Building Products, (Azek trim boards discussed in this article),
- Azek Technical Bulletin - Paint, November 2007, explains the use of Sherwin-Williams VinylSafe™ paints, Pittsburgh Paints - PPG Architectural Coatings, Duron Paints, ICI Paints, on AZEK trim products. web search 11/10/2010, original source:
http://www.azek.com/pics/reference_documents/AZEK-Trim-Paint-Bulletin.pdf - Georgia-Pacific Building Products, 133 Peachtree Street NE, Atlanta, GA 30303. Telephone: (404) 652-4000 , Wood Products: 800-284-5347. Gypsum Products: 800-255-6119. LVL lumber: GP-LAM, web search 09/14/2010, original source: http://www.gp.com/build/product.aspx?pid=1392
- Laminated Veneer Lumber, Overview of the Product, Manufacturing, Market, Department of Forest Products Marketing, wood-Based Panels Technology, Finland [PDF] web search 09/14/2010, original source: http://www.hochstrate.de/micha/finnland/reports/replvl.html
- Microllam Laminated Veneer Lumber (LVL) and/or Parallam Parallel Strand Lumber (PSL) MSDS Material Safety Data Sheet, courtesy of Weyerhaeuser Company, PO Box 9777, Federal Way, WA 98063-9777 Tel: 253-924-3865
- Ohawa, Ontario Wood Reference Handbook, p. 166, Canadian Wood Council, 1991
- Paul Galow [Website galowconsulting.com ] - technical consultant on networking, LAN design, applications support. Galow Consulting Services [Website galowconsulting.com ] , 914-204-1749, email: paulgalow@galowconsulting.com
- John Rudy, Advantage Home Inspections, Flemington N.J. 08822 home inspector, 908-806- 6364, Home, Radon & Termite Inspections, Central & Parts of North New Jersey, email: jonadvantage1@yahoo.com
- Malco® Products siding tools are available from that company, including the SideSwiper II SRT2 discussed at Malco's website. Websearch 09/07/2010 http://malcoproducts.com/product/roofing-siding-gutter/siding-vinyl/siding-tools-vinyl/sideswiper-ii. Malco also produces other vinyl siding repair tools such as aprons, awls, hole punches, saw blades, and tools for for fiber cement products including power-assisted cutters
- Mark Morsching, Everflashing, Tel: 800-550-1667, Email: everflashing@gmail.com. The Everflashing product comes in G-185 and Stainless Steel and is intended for use with treated lumber with copper in it. Everflashing produces a variety of specialty flashing products including flashings for use with decks at deck ledgers and deck perimeters.
- Parmetol, a wood preservativerecommended by the manufacturer was used as a fungicidal additive to paint on the Blue Poplar wood sculpture in Amsterdam, by artist Mari Shields [Website marishields.com ] [ - art conservation consult DJF-artist MS 2010]
- In addition to citations & references found in this article, see the research citations given at the end of the related articles found at our suggested
CONTINUE READING or RECOMMENDED ARTICLES.
- Carson, Dunlop & Associates Ltd., 120 Carlton Street Suite 407, Toronto ON M5A 4K2. Tel: (416) 964-9415 1-800-268-7070 Email: info@carsondunlop.com. Alan Carson is a past president of ASHI, the American Society of Home Inspectors.
Thanks to Alan Carson and Bob Dunlop, for permission for InspectAPedia to use text excerpts from The HOME REFERENCE BOOK - the Encyclopedia of Homes and to use illustrations from The ILLUSTRATED HOME .
Carson Dunlop Associates provides extensive home inspection education and report writing material. In gratitude we provide links to tsome Carson Dunlop Associates products and services.


