
 Damaged Exterior Electrical Box Repair
Fix Outdoor Electrical Box or Screw Mount in a Brick, Block, Concrete Wall
- POST a QUESTION or COMMENT about ways to replace an electrical outlet or switch mounting screw when threads are stripped on the screw or in the mounting box.
Q&A on how to repair an electrical box that is damaged, loose, or has stripped screw openings.
This article series describes how to repair the mounting screw or screw opening at an electrical box used to mount a receptacle, switch, or other device.
InspectAPedia tolerates no conflicts of interest. We have no relationship with advertisers, products, or services discussed at this website.
- Daniel Friedman, Publisher/Editor/Author - See WHO ARE WE?
Q&A on How to fix a damaged electrical box or mount or connecting screw tab
This Q&A were posted originally
at ELECTRICAL BOX SCREW REPAIR - you may also want to review that article.
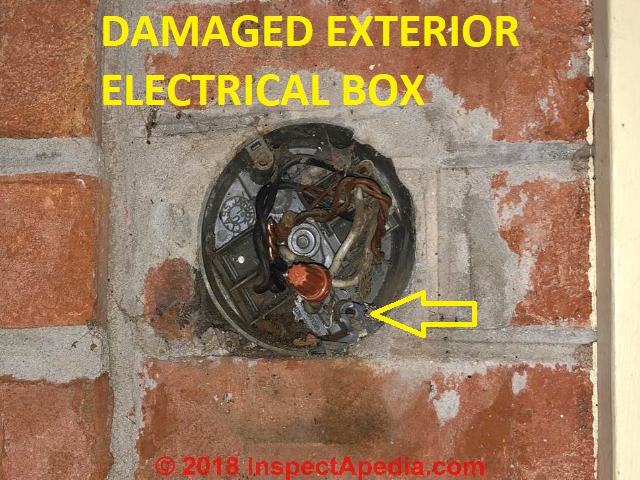
On 2018-11-08 by Steve - exterior brick veneer wall - porch light damaged during a storm
I have a porch light that was damaged during a storm - see photo at page top.
[Click to enlarge any image]
Fortunately the light was undamaged, but the junction box that's in the brick broke in half where the screw holes are.
To me, it looks as if I need to replace the junction box. My question is, "How"? The box has mortar all around it and obviously won't just pull out. Just not sure how to go about doing this myself. Any input would be appreciated.
On 2018-11-08 by (mod) - options for repairing a damaged electrical box in a brick, block, or concrete exterior wall
Steve I can't quite make out what is the situation in your exterior wall electrical box photo of damage.
Is the box itself broken or just the screw connector tab?
Is the box metal or plastic?
Tapcon® Screw Repair: Exterior Electrical Box Cover-Screw Tab is Stripped or Broken
 In your photo it looks to me as if the only damage is the lower box cover mounting screw tab or receiver - which looks cracked; perhaps a tree limb smashed your porch light and broke it away from the wall.
If just one of the screw tabs in the existing electrical box is broken you can easily repair the situation by using a Tapcon screw - saving hours of fooling around trying to replace the whole electrical box.
Here are the repair steps if you can use a Tapcon screw:
- Turn off electrical power to the circuit involved
- Move any electrical wires inside the box that are near the broken screw tab or connector (yellow arrow) - this step is important to avoid cutting, damaging or shorting the wires in the Step 4 below
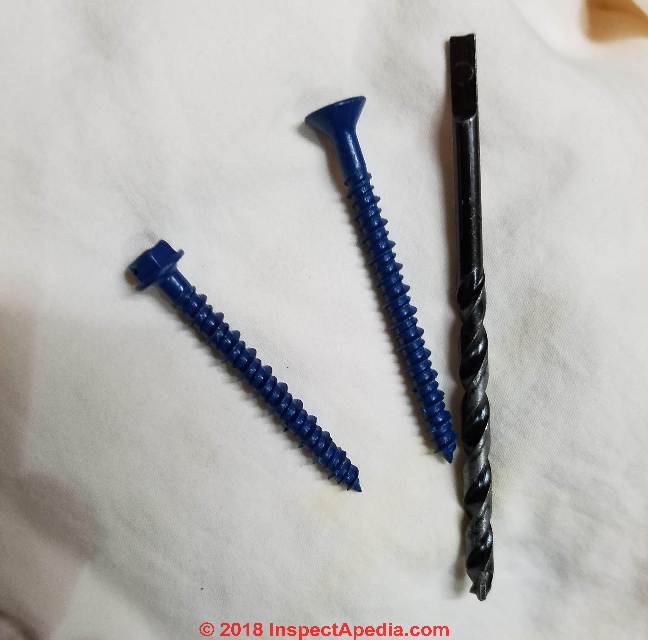
- Buy a couple of Tapcon screws and the appropriately-sized masonry bit from your local hardware store
- choose the smallest diameter tapcon you can obtain and in a length that will let the screw penetrate at least 3/4" into solid masonry behind the box
Watch out: use the standard or SDS drill bit provided by tapcon - these are special bits sized specifically to receive the Tapcon screw. Don't use an arbitrary masonry bit or your bit may be too large and the Tapcon screw won't be secure.
Tapcon drill bit size tips: If you can't find a Tapcon bit you can use a 5/32" masonry bit 3 1/2" long with a Tapcon 3/16" diameter screw in lengths from 1 1/4" to 2".
If you need a longer screw you'll need to go to the larger Tapcon screw. The larger screw uses a 3/16" masonry bit up to 7" long with Tapcon 1/4" diameter screws up to 4" in length.
- this assumes that your electrical box is in a solid masonry wall; if the box is in a brick veneer wall and there is nothing solid behind the box (for example a wall stud) then you'll need to use a repair clip such as I discuss below.
Tapcons are available at hardware stores, building suppliers, some electrical suppliers, and online. Tapcon is at https://www.tapcon.com/ - Drill out the Tapcon screw hole using an impact drill; You may first need to use a metal bit if the electrical box is metal, or a wood bit if the electrical box is plastic, to widen the opening in the box itself to pass the Tapcon screw,
Then you'll drill into the masonry behind the box using the Tapcon masonry bit - Use the Tapcon screw to re-mount the light fixture or light cover over the weatherproof box.
- Take care to use the appropriate gaskets or sealer so that the light fixture and its mount don't leak water into the electrical box.
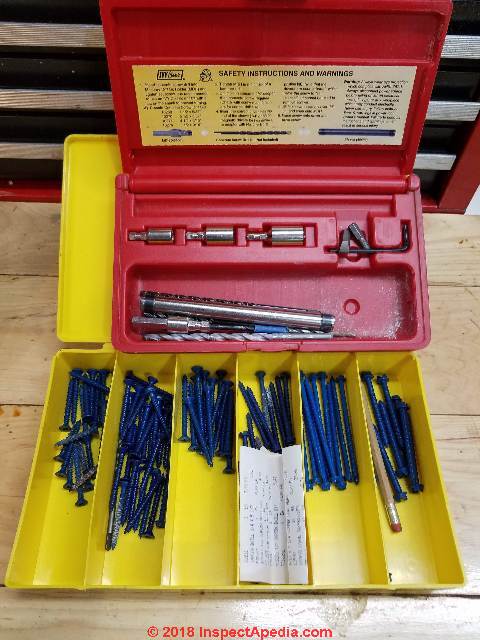
If you have a lot of Tapcon screw repairs I recommend buying the company's repair kit and an appropriate assortment of screws. Mine are shown below.
Watch out: While driving a Tapcon or any other repair screw into an existing electrical box, ytou don't want to pierce an electrical wire in the box - see ELECTRICAL PANEL COVER SCREWS for an example of what can go wrong.
Box Clip Repair: Alternative to Tapcons to fix an electrical box in a masonry veneer wall
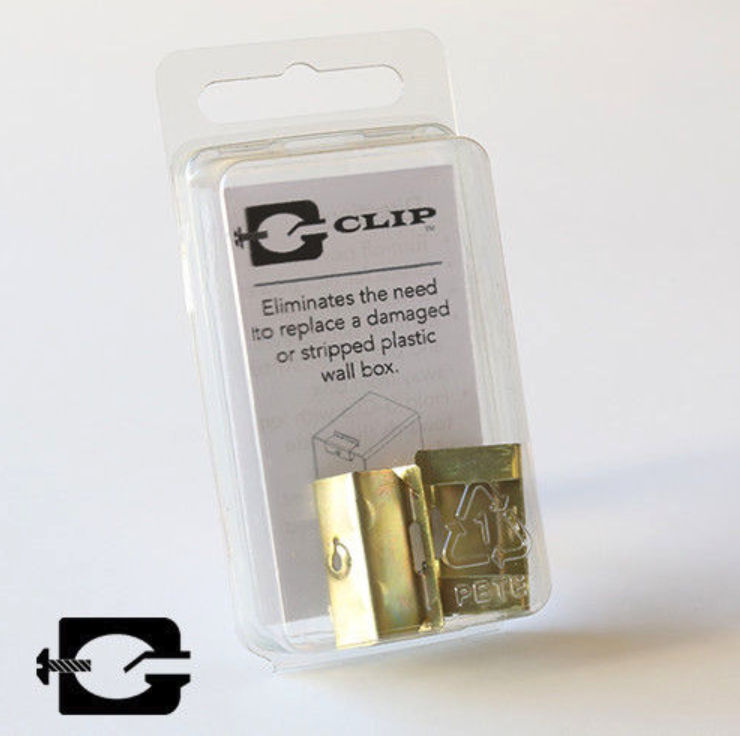
If the break is just the connector screw-tab, an alternative repair to using a Tapcon screw and one that you might need if the wall is a masonry veneer over wood frame is to use a repair clip like the several models (including the G-clip shown above).
If the break is just the connector screw-tab, I suspect it's possible to use a repair clip like the ones discussed in that article - simply chip out enough enough concrete at the box edge to insert the replacement repair clip, break off and remove the broken screw connector, then install the repair connector.
Simply chip out enough enough concrete at the box edge to insert the replacement repair clip, break off and remove the broken screw connector, then install the repair connector shown below and described in detail
at ELECTRICAL BOX SCREW REPAIR
Repair Procedure if the Exterior Electrical Box Must be Replaced Entirely
If the whole box is broken it may be possible to seal it against water entry using a fire-rated sealant.
In the worst case you'd indeed need to use a small cold chisel to remove the box after first straightening its entering wires. That's a larger job that I agree is best avoided if possible, but certainly do-able.
When facing a problem like this it's helpful to tell yourself that others have surely faced this problem before and that almost certainly there are specialty repair tools or parts for the job.
The electrical box mender screw clip is an example.
Watch out: work only with power off, and if you're not familiar with safe electrical wiring have the work done by a professional: a mistake can kill you or burn down the house.
 For a badly-damaged electrical box installed in an exterior masonry brick or block wall, the typical repair procedure used by many electricians involves the following steps:
- Turn off electrical power to the circuit
- Straighten wires taking care not to damage insulation, then
- Remove wire connectors inside the box, including the nuts on strain reliefs or clips if the box is steel
Watch out: you may need to protect the wire insulation from damage during removal of the old box by taking a moment to warp them with extra electrical tape that you'll remove later. - Chip out and break out the old, damaged electrical box,
Watch out: take care not to damage the wires in the process - Insert a new replacement box into the opening, enlarging the opening slightly if needed, bringing the existing wires into the box and re-installing any needed strain clip or strain clamp nuts inside the box if those were used previously.
- Seal the new box in place using fire resistant sealant or foam (photo above) and/or secure the box as needed using shims (and adhesive) or Tapcons.
Some electricians use construction adhesive. I prefer the foam for most circumstances. It's adhesive and fire-rated for use at electrical enclosures.
An expanding fire-rated foam can also help seal and secure an electrical box securely in a masonry opening. When I've used that foam I took care to remove foam that oozed into the box interior (otherwise the box interior is crowded and wires are immobilized)
Watch out: don't over-foam or you'll have a lot of cleanout to perform, as you can see in my photo below.
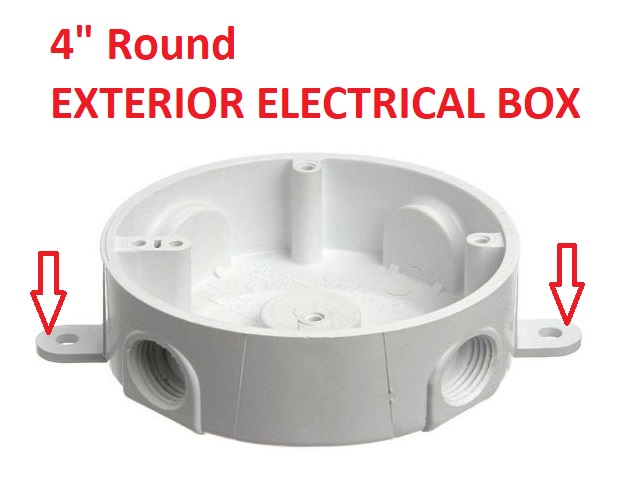
You want the weather-proof electrical box to actually be weatherproof if you're working in an exterior wall. So take care to buy the proper outdoor-use round electrical box to fit the existing opening.
A round 4" weatherproof exterior use electrical box like the one shown above can be used.
To insert that box flush into the wall so that its outer edge is just above the wall surface (so that its cover will also seal weather-tight) you'll need to break off the surface-mount ears (red arrows in the photo) and you will probably need to enlarge the hole in the wall slightly to get the wires into the box and the box into the wall.
Then you can mount this box into the masonry wall as I described previously.
...
Continue reading at METAL ELECTRICAL BOX SCREW REPAIR, METAL BOX MENDER or select a topic from the closely-related articles below, or see the complete ARTICLE INDEX.
Or see these
Recommended Articles
- ELECTRICAL BOX TYPES
- ELECTRICAL BOX GROUND WIRING
- ELECTRICAL JUNCTION BOX TYPES
- ELECTRICAL OUTLET, HOW TO ADD & WIRE
- PLASTIC ELECTRICAL BOX REPAIR - repair a broken plastic electrical box using an "old work" box: wiring, sealing, grounding.
Suggested citation for this web page
EXTERIOR ELECTRICAL BOX REPAIR at InspectApedia.com - online encyclopedia of building & environmental inspection, testing, diagnosis, repair, & problem prevention advice.
Or see this
INDEX to RELATED ARTICLES: ARTICLE INDEX to ELECTRICAL INSPECTION & TESTING
Or use the SEARCH BOX found below to Ask a Question or Search InspectApedia
Ask a Question or Search InspectApedia
Share this article:Questions & answers or comments about ways to replace an electrical outlet or switch mounting screw when threads are stripped on the screw or in the mounting box.
Try the search box just below, or if you prefer, post a question or comment in the Comments box below and we will respond promptly.
Search the InspectApedia website
Note: appearance of your Comment below may be delayed: if your comment contains an image, photograph, web link, or text that looks to the software as if it might be a web link, your posting will appear after it has been approved by a moderator. Apologies for the delay.
Only one image can be added per comment but you can post as many comments, and therefore images, as you like.
You will not receive a notification when a response to your question has been posted.
Please bookmark this page to make it easy for you to check back for our response.
IF above you see "Comment Form is loading comments..." then COMMENT BOX - countable.ca / bawkbox.com IS NOT WORKING.
In any case you are welcome to send an email directly to us at InspectApedia.com at editor@inspectApedia.com
We'll reply to you directly. Please help us help you by noting, in your email, the URL of the InspectApedia page where you wanted to comment.
Citations & References
In addition to any citations in the article above, a full list is available on request.
- [4] ...
- In addition to citations & references found in this article, see the research citations given at the end of the related articles found at our suggested
CONTINUE READING or RECOMMENDED ARTICLES.
- Carson, Dunlop & Associates Ltd., 120 Carlton Street Suite 407, Toronto ON M5A 4K2. Tel: (416) 964-9415 1-800-268-7070 Email: info@carsondunlop.com. Alan Carson is a past president of ASHI, the American Society of Home Inspectors.
Thanks to Alan Carson and Bob Dunlop, for permission for InspectAPedia to use text excerpts from The HOME REFERENCE BOOK - the Encyclopedia of Homes and to use illustrations from The ILLUSTRATED HOME .
Carson Dunlop Associates provides extensive home inspection education and report writing material. In gratitude we provide links to tsome Carson Dunlop Associates products and services.
 |
HOME | ABOUT | ASK a QUESTION | CONTACT | CONTENT USE POLICY | DESCRIPTION | POLICIES | PRIVACY | |
| © 2026 - 1985 Publisher InspectApedia.com - Daniel Friedman | |||||||||