
 Metal lectrical Box Repair using Metal Box Mender
Fix a stripped electrical outlet or switch box mounting screw opening in a metal electrical box
- POST a QUESTION or COMMENT about ways to replace an electrical outlet or switch mounting screw when threads are stripped on the screw or in the mounting box.
Repair the stripped screw opening at a metal electrical box using the Metal Box Mender:
This article describes using the Metal Box Mender, a U.K. electrical box repair product sold there and on eBay and used for repairing stripped screw holes at mounts for electrical switches, receptacles or electrical box covers.
This article series describes how to repair the mounting screw or screw opening at an electrical box used to mount a receptacle, switch, or other device. A stripped screw or screw opening at an electrical box is more than annoying, it's unsafe as the device will not be mounted safely and securely to the wall, ceiling or other location.
InspectAPedia tolerates no conflicts of interest. We have no relationship with advertisers, products, or services discussed at this website.
- Daniel Friedman, Publisher/Editor/Author - See WHO ARE WE?
Metal Box Mender Repairs for Stripped Screw Holes in Electrical Boxes

In the U.K. inventor David Sexton provides his invention, "Metal Box Mender" a kit that "mends threadbare screw holes in electrical metal boxes without replacing the box and without damaging surrounding area of the box."

This article describes the product and discusses details about its use including using the Mender to repair electrical boxes in the U.K., U.S. and other countries.
Article Contents
- METAL BOX MENDER: HOW IT WORKS
- METAL BOX MENDER INSTALLATION INSTRUCTIONS
- METAL BOX MENDER SIZES & SCREW CHOICES
- METAL ELECTRICAL BOX MENDER CAVEATS
- SCREWS TOO SHORT for SOME APPLICATIONS
- MENDER ROTATES DURING INSTALLATION?
- MENDER SCREW HEAD SIZE & SHAPE vs DEVICE OPENINGS
- MENDER HEIGHT & U.K. vs U.S. / CANADIAN ELECTRICAL BOXES
- MENDER USED UPSIDE DOWN on U.S. / CANADIAN ELECTRICAL BOXES?
- MENDER SPLITS IF IMPROPERLY INSTALLED
- MENDER PLASTIC vs ELECTRICAL GROUND PATH?
- METAL BOX MENDER SOURCES: WHERE TO BUY
Separately at ELECTRICAL BOX SCREW REPAIR - home - we discuss other methods for repairing not only a stripped screw opening on metal electrical boxes but also on plastic electrical boxes as well as repair methods for stripped electrical box or device screws themselves.
Watch out: repair attempts for stripped screw openings in any electrical box installed in a ceiling risks mechanical connections that may not be strong enough to carry the weight of suspended light fixtures or ceiling fans. Do not attempt such repairs; replace the damaged ceiling electrical box and be sure that the replacement is properly secured to the building structure.
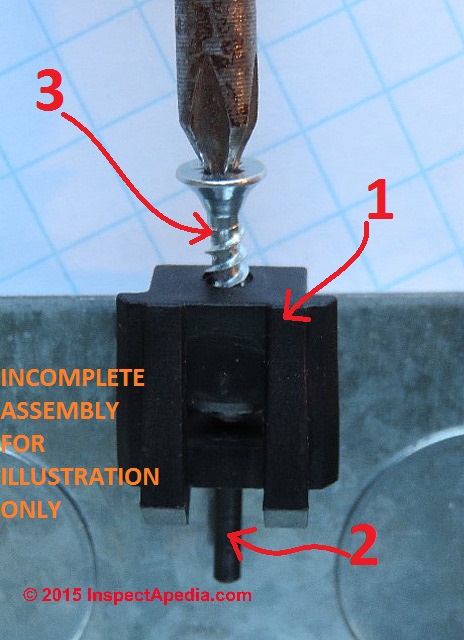
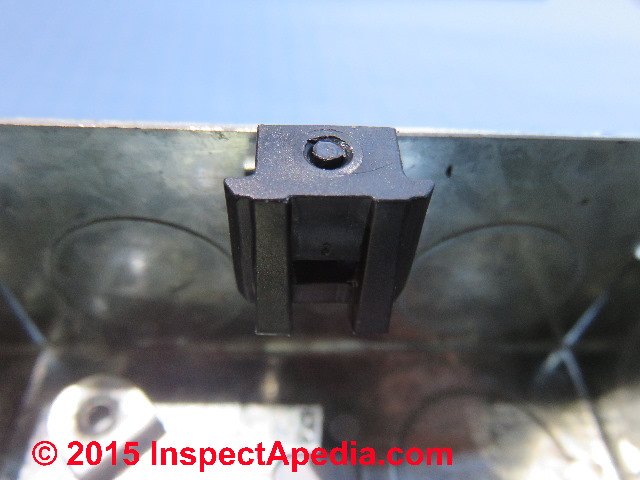
How the Metal Box Mender Works
The metal box mender repair for stripped screw holes in electrical boxes consists of three parts illustrated here.
The screw (3) passes through the upper portion of the metal box mender (1) then passes through the metal ear of the electrical box and into the screw-holding base of the metal box mender screw receiver. As the screw is tightened the little black plastic retainer pin (2) falls out into the electrical box.
Just to the right of the word "Assembly" in the photo you can see the light-coloured edge of the electrical box's original metal screw receiving tab.
- The Mender, a plastic screw receiver
that slips over the "ear" of the metal electrical box that would normally itself receive the screw that mounts an electrical box cover or an electrical device such as an electrical switch or receptacle ("outlet" or "wall plug" in common speech).
The black plastic screw receiver or Mender is the key part of this assembly and is sold in two sizes depending on the distance from the original screw hole to the interior surface of the electrical box wall. I will have more to say about the performance and apparent safety of this key part later. - A plastic pin
that is pushed through the metal box mender screw receiver and that is designed to hold the part in place until it is later secured with a screw.
The pin is about 10 mm x 2 mm and is pushed out of the screw receiver as the screw is turned in. I had some pin troubles that I will discuss below. You can just see the end of the retainer pin as the screw is pushing it out through the bottom of the Mender. - A wood screw
that is intended to be inserted through the box cover or electrical device (outlet or switch) and thence into the plastic screw receiver.
The wood screws intended for this repair are sold in two lengths (16mm and 20mm) and colors (silver or brass coloured) depending on the need. I will have more to say about these screws.
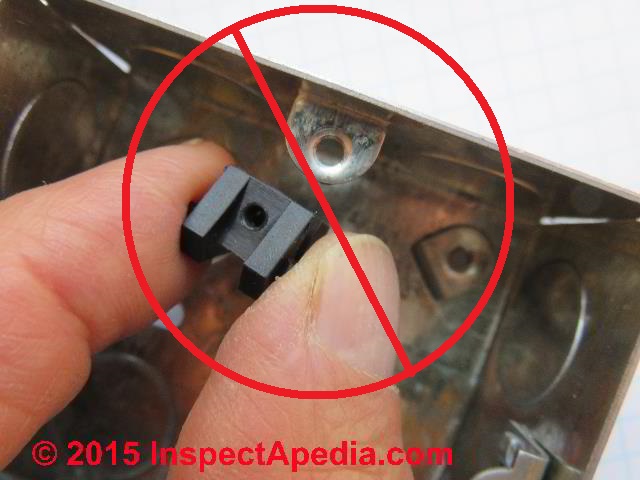
Watch out: in this illustration the parts are not being correctly used: for demonstration purposes I've left off the box cover or alternatively the electrical device such as an electrical receptacle or light switch that the screw would be holding in place.
Otherwise you'd not have been able to see how these parts go together.
But screwing down the bugle head screw as I'm doing here will damage the metal box mender causing that part to fail and resulting in a possible safety hazard: loose electrical wiring and components.
More about this problem is given later
at METAL ELECTRICAL BOX MENDER CAVEATS
On first reading about this product I was concerned about the the use of sharp-tipped "mender" screws that could, after passing through the polypropylene mender and pin assembly then puncture an electrical wire inside the electrical box. But Sexton's design now uses a metal wood screw with a flattened tip to reduce that hazard.
Dave was kind enough to send me some samples of the Metal Box Mender along with instructions and a little 35mm square metal electrical box listed for U.K. use.
I took a look at the Metal Box Mender, its instructions, parts and components and have documented what I saw in the photographs and comments given here. Currently this product is sold only in the U.K. and on eBay and it has not been tested nor listed for use in the U.S.
The metal box mender is indeed intended only for metal electrical boxes. It is not sized nor designed to repair plastic or PVC electrical boxes whose screw threads have been stripped. However intelligent selection of an over-sized screw and possibly a tiny bit of drilling can permit repair and continued use of plastic electrical boxes using methods described beginning
at ELECTRICAL BOX SCREW REPAIR.
Stripped Screw Metal Electrical Box: Metal Box Mender Instructions
The basic instructions for installing the metal box mender are both simple and confusing.
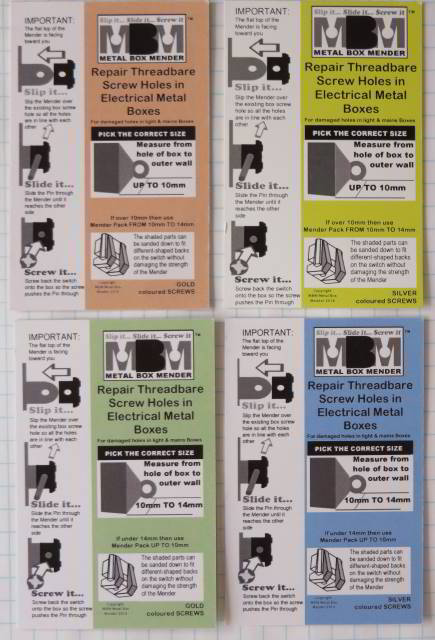
Simple because the actual installation procedure is easy, and confusing because the four different coloured cards pertain to four different product combinations among which you'll want to make the proper choice.
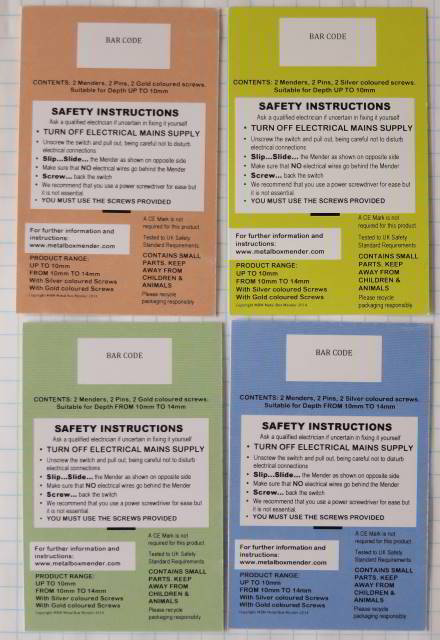
Below I've included but expanded on the manufacturer's original instructions that can be read on the illustrations given just above.
I found the company's website and printed instructions confusing, in part because I did not immediately understand that the product design involves five measurements, four instruction cards, two metal box mender sizes and two metal box mender screw sizes. If you wonder why there are four nearly-identical looking product cards in four different colors, that's the trouble.
Watch out: My expanded "Metal Box Mender installation instructions" listed below have not been approved by the manufacturer and are subject to technical review and corrections.
- Turn off electrical power at the electrical main switch.
Watch out: working on live electrical wiring risks fire or death by electrocution. In many jurisdictions electrical repairs may be performed only by a licensed electrician.
In the U.K. all electrical installation work must be carried out in accordance with the latest Building REgulations and IEE wiring Regulations BS7671. If you are not sure about these procedures you should contact a professional electrician in your city. - Unscrew the cover
over the electrical box, receptacle or switch. Then unscrew the switch or receptacle - by removing the two screws holding the switch (or electrical receptacle or "wall plug" or "outlet") in place and and pull the device out of the electrical box. Presumably it is one or both of these screws or screw openings in the electrical box that has become stripped and insecure. Inspect the screws for damage.
If the original screw itself is stripped then perhaps all that's needed for repair is to install a new screw of the proper size. If the screw-receiving metal "ear" inside the electrical box has been stripped, then (in the U.K.) you will use a repair device such as the Metal Box Mender, or alternatively the procedure beginning at ELECTRICAL BOX SCREW REPAIR might work for you.
Watch out: when pulling an electrical device (such as a light switch or electrical receptacle) out of the electrical box. Pulling and moving electrical wires about can cause twist-on connectors to fall off, splices to open, or wires to be cracked, cut or damaged. Any of these conditions will need to be noticed and repaired or your electrical system will be unsafe.
 ...
... 
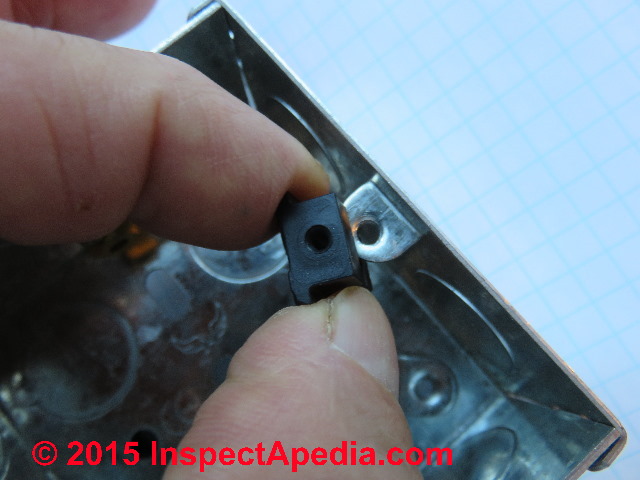
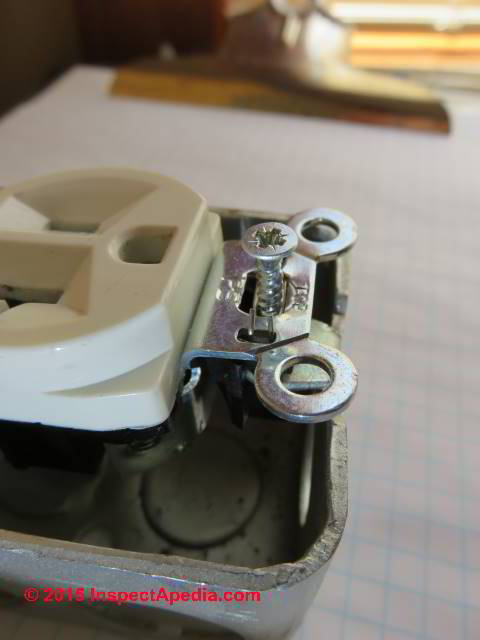
- Slip-slide the "Mender"
(that I'm calling the screw receiver) into place on the metal box "ear".
At above left you see the metal box mender slipped over the metal ear of the electrical box in the proper position, with its thicker and flat-surfaced face "up" or towards the exterior or upper edge of the box. We've also begun inserting the plastic pin that is designed to hold the Mender in place until the screw has passed through the Mender device.
For some readers including me, the installation instructions and illustrations may be a bit confusing on which side belongs "up" for this device.
Watch out: at above right you see the same device being held "upside down" with its thinner face and its two sloped ribs facing "up" - this is not the position recommended by the manufacturer.
Watch out: the manufacturer also warns that you should make sure that no electrical wires go behind the Mender inside the electrical box. The worry is that the point of a repair screw might puncture a wire causing a short circuit, fire or deadly electrical shock. I'll say more about this later.
 ...
... 
- Push the plastic pin into the screw opening
until its top end is flush with the top of the "Mender" as shown at above left. At above right we show the Mender installed incorrectly, "upside down" - don't do this.
The manufacturer's little cards omit this step but the pin is provided for a reason.
Without this little plastic pin, especially when working on vertically-mounted electrical boxes, during the process of installing a blind cover and possibly even during installation of an electrical switch or receptacle, the "Mender" may move out of place in the box, giving no end of aggravation and causing the repair screw to miss the plastic block into which it is supposed to connect.
I had trouble with this pin and found that it did not always work for me - more on this later.
Note: in my photo at above right I'm installing a U.S. sized electrical receptacle in a U.S. sized metal electrical box. This is not the same product as the U.K.-sized electrical junction box at above left.
- Screw back the switch, receptacle, or box cover
using the repair screw (silver or gold - two different lengths). The manufacturer emphasizes that "You must use the screws provided" - I'll explain why later and I describe some problems some users will have with these "must use" screws.
Watch out: if any electrical box repair method cannot provide a very secure mount or screw receiver for the screws that hold an electrical receptacle ("wall outlet" or "wall plug" or "wall socket") in place there is a risk that the whole receptacle may be pulled out of the wall when someone is simply trying to un-plug a power cord that has been plugged in to the receptacle.
The result would be unsafe, risking electrical shock, short circuit, or fire.
For this reason, when you are evaluating any approach to repairing an electrical box or stripped screw or stripped screw receiver you must be sure that the repair is of adequate strength to resist pulling on an electrical receptacle secured to that box.
Light switches and electrical box covers are not subjected to the same outwards force as is an electrical receptacle.
Table of Metal [Electrical] Box Mender Sizes & Parts
Metal Electrical Box Mender Product Sizes, Choices, Specs |
||||
| Distance H: screw hole to box wall | Screw Length | Screw Color | Instruction Card | "Mender" Screw Receiver Height |
| Up to 10 mm | 15mm | Silver | Yellow instruction card | 17mm (factory) |
| Up to 10 mm | ?? mm (sample not provided) | Gold | Tan instruction card | 17mm (factory) |
| 10-14 mm | 15 mm | Silver | Blue instruction card | 17mm (factory) |
| 10-14 mm | ?? mm (sample not provided) | Gold | Green instruction card | 17mm (factory) |
| ADJUST by SANDING? | ||||
I suspect that a product engineer will ultimately design a "one size fits all" solution that reduces product cost and price and simplifies the ordering and installation instructions.
Choose the Metal Box Mender Screw Receiver Size
The screw receiver, which is the main component of the metal box mender, is simply slipped over the stripped metal ear of the electrical box to be repaired. is 17mm in total height and consists of a thinner upper portion
Choose the Metal Box Mender Screw Length
When you add the additional thickness of a box cover or the steel mounting ears of an electrical receptacle of switch (about another 2 mm of metal ears or as much as 6mm if you are using a typical U.K. Crabtree brand plastic blank cover plate) to the 17mm screw receiver height, the total thickness that will receive the Mender's screws is 20mm or more: there is no chance that the silver screw (total length 15mm, screw reach about 11mm) will penetrate past the bottom of the plastic metal box mender.
Thus there is little chance that the pointed screw would puncture a live wire inside the electrical box - a source of unpleasant (unsafe) events. such as sparks, shorts, or more.
The upper screw in my photo above is the 16mm silver bugle headed wood screw provided by the Metal Box Mender manufacturer. As se noted above the company also provides a 20mm. The manufacturer explains:
The full original length of the small screw is 16mm. The Mender is 7mm + 3mm gap + 3mm + depth of switch 3mm = 16mm with trim of screw approx 2mm . The longer screw without trim = 20mm still giving the the same result if box is deeper within wall. - private email 4 Sep 2015
The lower OEM screw is a 22 mm (about 0.9") long typical machine-thread, blunt-tipped and longer screw provided with electrical switches and receptacles and was the OEM screw used to secure these devices to the electrical box metal ears or tabs before you or I, with our power screwdriver, stripped the screw, screw hole, or both.
Watch out: if the repair screw is too short for all of the thicknesses involved then it will not screw securely into the "Mender" and / or may strip its hole in the mender resulting in dangerously-loose electrical components.
This is exactly what happened when I used the short silver screw and the Crabtree #4001 blank cover plate atop the U.K.-sized electrical box with the Metal Box Mender. Turning the screw gently by hand I found it rotated endlessly and never got tight. It was too short for this application. The gold screw available from the manufacturer may have worked.
Watch out: if the repair screw is too long for all of the components being secured and if the screw has a sharp point (later screws I'm told will be blunt-ended) it can penetrate an electrical wire in the electrical box causing a dangerous short circuit or fire.
The manufacturer warned to keep wires from behind the "Mender" in the electrical box, but in the real world of electrical wiring one cannot be absolutely certain that a wire was not pushed back into this forbidden zone when the device (switch, receptacle, spliced wires) is/are pushed back into the electrical box.
Metal Electrical Box Mender Installation Slip-ups & SNAFUS to Avoid
Technical note: the Metal Box Mender features and properties discussed next include upside down installation, use on U.S. or Canadian metal electrical boxes, and other features not intended for this product. The U.K. manufacturer of the Metal Box Mender is considering producing a similar product intended for Canadian or U.S.- sized metal electrical boxes.
Short Mender Screws Mean Screws Strip or Do Not Tighten: warning about using a power screwdriver
Below is the Crabtree E40001 blank plate or "blind" electrical box cover installed on the metal U.K. electrical box provided for our inspection. Using the 15mm long silver bugle-headed wood screw provided by the manufacture I found that my screw stripped and spun in the Mender's screw receiver and I could not obtain a tight connection of the plastic blank plate to the electrical box. I suspect that a longer screw would have worked fine.
The silver Metal Box Mender screw provided by the manufacturer is about 15mm in length and is a bugle-headed wood-screw. OEM screws provided for U.S. & Canadian electrical devices such as electrical receptacles or switches are typically a machine-threaded screw of about 22mm in overall length.
Other screw lengths vary according to application. For example the OEM screw for securing a blind cover plate or receptacle or switch cover is typically about 13mm in length.
Watch out: although the manufacturer recommends, and many electricians like to use a power screwdriver to speed the installation of electrical devices, you may find it a bit easy to strip the screw holding portion of the Mender.
In fact that is how some metal electrical box screw-receiving ears got stripped in the first place.
For a one-off electrical repair such as the typical application of the Metal Box Mender described here, I recommend turning your screws by hand and I recommend that you avoid over-tightening.
Metal Box Mender Screw Receiver May Rotate, Twist, or Fail to Remain Aligned During Assembly: Use the Pin Luke!
I had some trouble keeping the Mender in place regardless of whether the plastic pin was inserted or not. However if I could hold it in place until the repair screw had begun to enter the screw receiver the repair continued successfully. This problem may be avoided if the Mender pin is properly placed: the device may rotate on the pin but it should not move enough to lose screw opening alignments.
The screw receiver on the U.S. and U.K. electrical boxes are a bit different in size. If you don't position the Mender properly you may have trouble inserting the pin through the Mender and through the hole in the screw receiver on the electrical box.
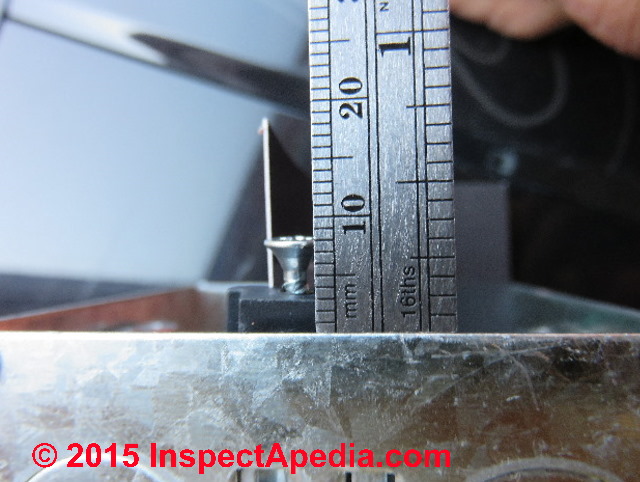
- On a typical U.K. electrical box (below left) you can see that the distance from the outer edge of the screw receiver to the center of the screw hole is about 3.5 mm.
- On a typical U.S. electrical box (below right) the distance from the outer edge of the screw receiver to the center of the screw hole is about 5.5 mm.
 ...
... 
Watch out: if you can't be bothered to follow the manufacturer's instructions about using that little plastic pin you may be bothered by the result. Even on a U.K. electrical box, if you omit the little plastic pin you may find that as you begin the turn in the mounting screw the Mender will move out of place (below right).
At below left I left out the plastic pin and found that the Mender moved out of place when I tried to turn a screw through it.
At below right: I had a bit of trouble pushing the pin through the original screw opening of this U.S. metal electrical box.
Watch out: the Mender in the two photos below was also being installed "upside down" and is not consistent with the manufacturer's instructions.
The reason for this "upside down" installation was a test of the device for use on North American metal electrical boxes - a topic we discuss below. The rotation shown here can occur in both proper and improper installations of the Mender.
 ...
... 
In fact I was able to position the Mender on the U.S. Box and to install the electrical receptacle without using the alignment pin but I had to hold the parts in position with some care that plastic pin was giving me a hard time.
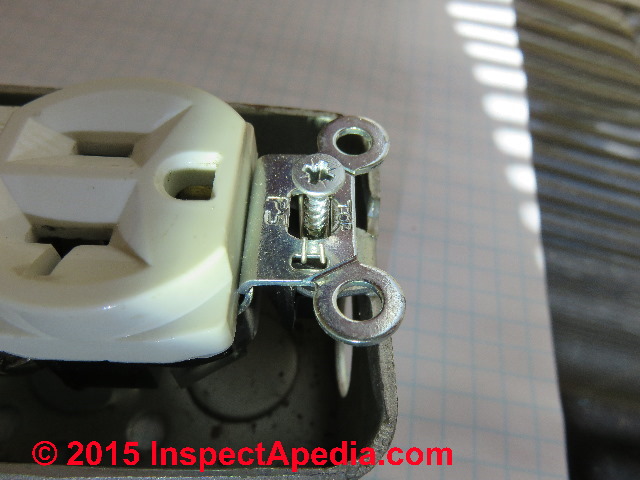
Metal Box Mender Screw Heads Too Small for U.S. Devices
Watch out: depending on the thickness of the metal tabs of the electrical switch or receptacle being secured using the Mender and depending on the width or diameter of the screw opening in the switch or receptacle tabs, the too-small bugle-headed wood screw provided by the manufacturer can pass right through the switch or receptacle tab.
You may notice the problem and you might add a tiny metal washer and start over again. But the screw may have already split the Mender's retention head as shown in my photos above.
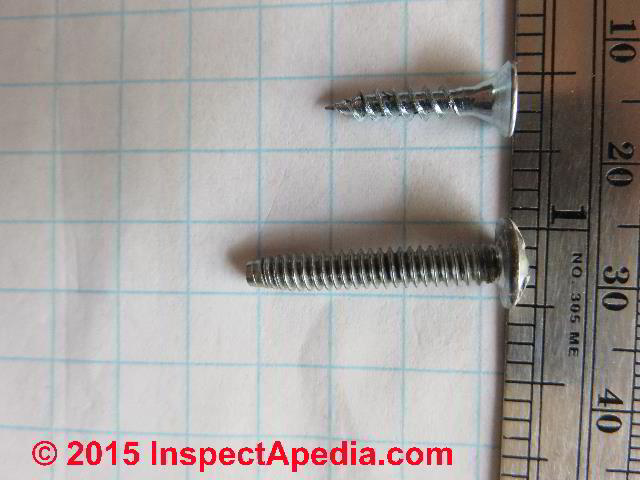
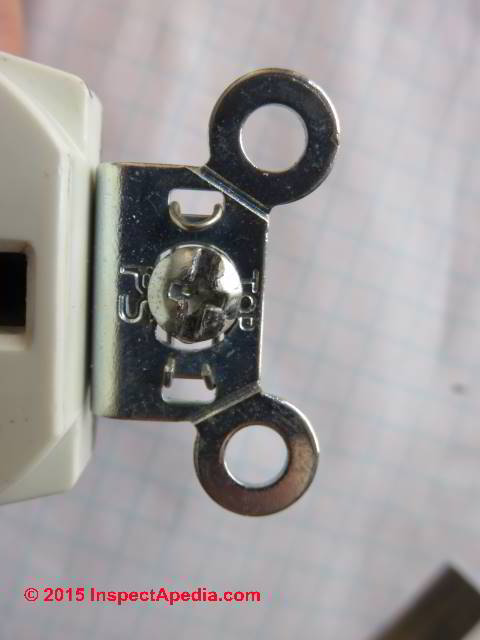
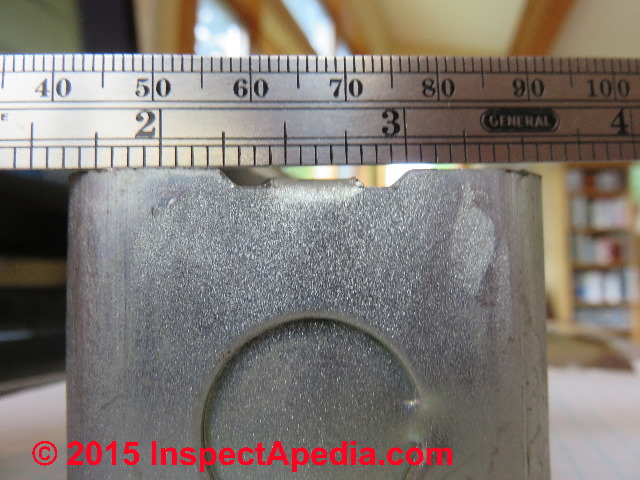
- OEM U.S. Screw head: 7-8 mm
The OEM electrical device screw head profile shape depends on application: a U.S. or Canadian OEM electrical device screw (above left) typically has a 7-8 mm diameter screw head with a flat under-side on OEM equipment mounting electrical switches and a receptacles.
The screw may have a sloped shoulder (similar to bugle headed screws) for shorter screws used to mount an electrical switch or receptacle plastic cover. (The ruler shown is divided in 16ths of an inch closest to the screw heads and in mm at the lower portion of the photo.) - Mender Screw Head: 6mm
The Metal Box Mender screw head (above right) about 6mm in diameter with a bugle head profile, wood screw threads (fine for soft plastic) and in my test versions a sharp point. The manufacturer informs me they will or have shifted to dull-point or rounded point screws for increased safety. - Receptacle Screw Opening: 6.5mm
The open width of the mounting screw opening of the electrical receptacle shown below is about 6.5mm.
A half to one millimeter or two may not seem important but when we combine the bugle-headed under-profile of the Mender repair screw with the smaller diameter, it's going to spread and go right through some electrical switch or receptacle screw openings, resulting in a loose and unsafe electrical device.
Below you can see my comparison of the sizes of typical screws used with and sold along with electrical receptacles and switches. At below left is the larger-headed machine threaded screw used in North America and inserted into the mounting ears of an electrical receptacle.
At below right is the smaller bugle-headed wood-screw provided by the Metal Box Mender manufacturer inserted into the same mounting ears. With tightening the widest (topmost) point of the 7mm wide head of the Mender's screw will push right through the 6.5mm wide opening in the electrical receptacle leaving the device poorly-secured.
 ...
... 
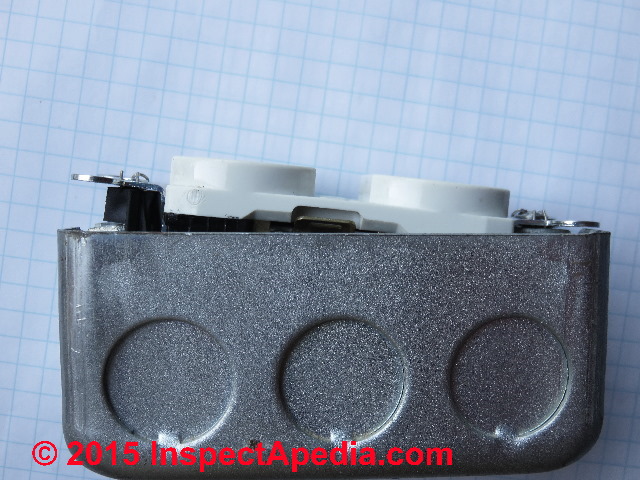
Using the Metal Box Mender - in current design (September 2015) - on U.S. electrical Boxes?
In its present design, the Metal Box Mender screw receiver is too tall for U.S. devices regardless of whether it is installed right-way up or upside down. The manufacturer is considering designing a revised Metal Box Mender intended for U.S. & Canadian-sized electrical boxes.
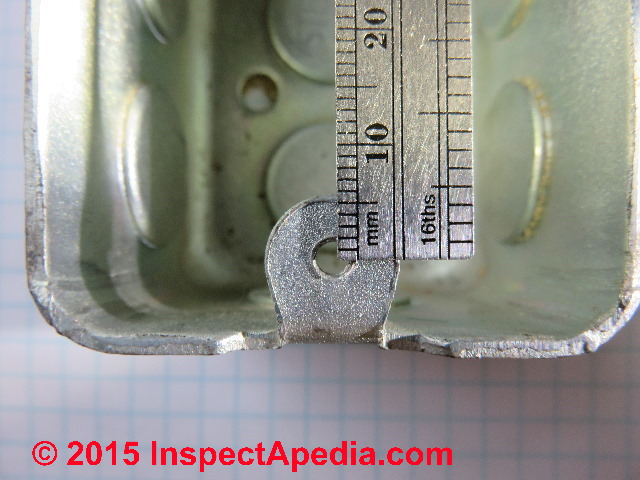
At below left is a U.K. steel electrical box. In these electrical boxes the metal tab that receives the retaining screw for an electrical switch or receptacle is itself about 4 mm below the upper or outermost edge of the box.
At below right you see that in its installed position the top of the plastic Mender is about 2-3 mm above the top edge of the metal box.
Note: The screw was used in this photo to hold the Mender device in place for our photo. In a proper installation the Metal Box Mender mounting screw must be passed first through the metal tabs or ears of the device mounting strap: an electrical switch or electrical receptacle as we show in the next image.
Tightening a bugle-head screw onto the Mender without first passing it through the metal strap of a switch or receptacle will damage or split the Mender rendering it unsafe.
 ...
... 
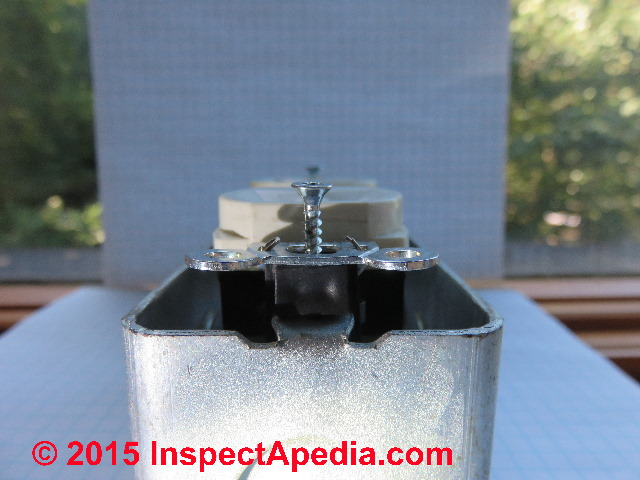
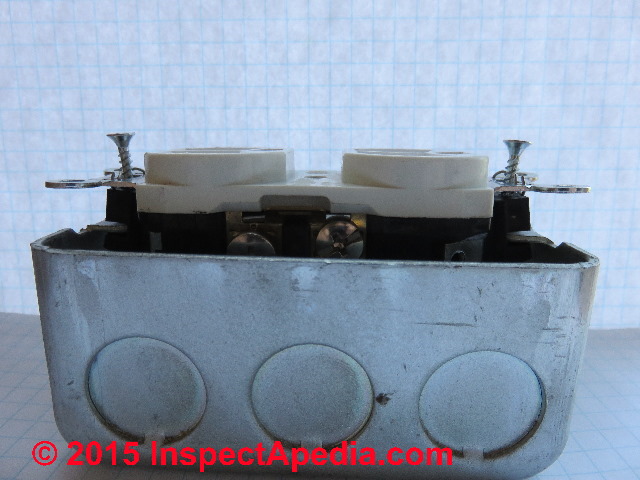
Below you see the position of an electrical receptacle (or switch) metal mounting strap when properly installed and tightened into position on the U.K. electrical box. It's about 2 mm above the box edge or uppermost surface.

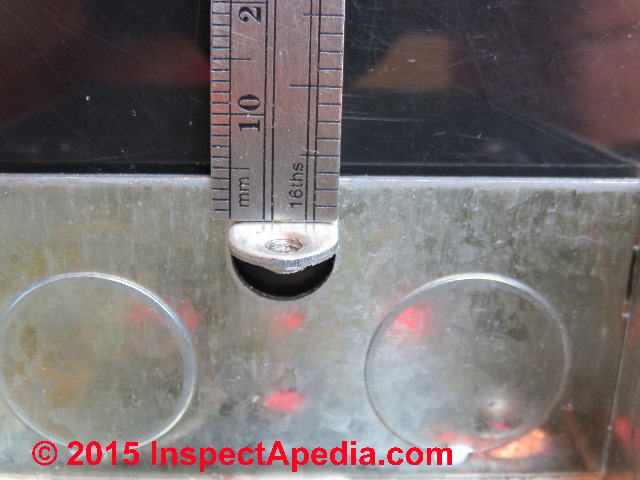
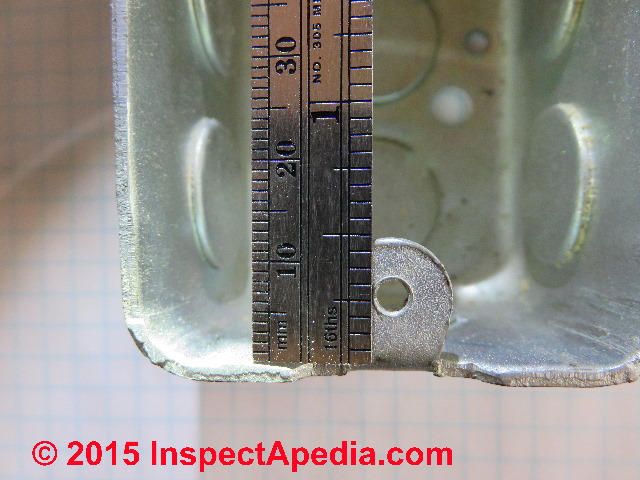
The position of the metal electrical box ear or tab that receives a device or box cover screw on U.S., Canadian and some other electrical boxes is nearly at the top edge of the electrical box and is on some boxes exactly flush with the box edge, depending on the electrical box brand and model, as you can see below.
The screw receiving tab on the U.S. / Canadian electrical boxes is anywhere from flush with to about 2mm below the face-edge of the box.
At below right you can see the dimensions of the screw tab and the location of its screw receiving opening.
 ...
... 
This means that trying to use the Metal Box Mender on a North American electrical box will leave the electrical switch, receptacle, or box cover sticking up considerably past the face of the box and in most cases projecting out past the wall surface to an unacceptable distance - shown at below left.
...
So we use two Menders, one at each device screw to avoid a tipped device (below left).
 ...
...
As you see below, on a typical U.S. metal electrical box the Mender repair will leave our switch or receptacle about 8 mm. above the face of the box.
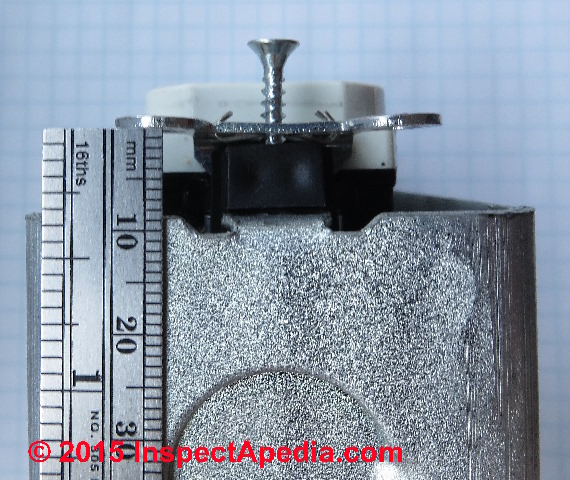
The receptacle or switch along with its cover are going to project out from the face of the wall by an extra 8mm or more (about 5 1/6") as well as leaving an open gap behind the cover plate exposing the electrical box interior: an unsafe condition.
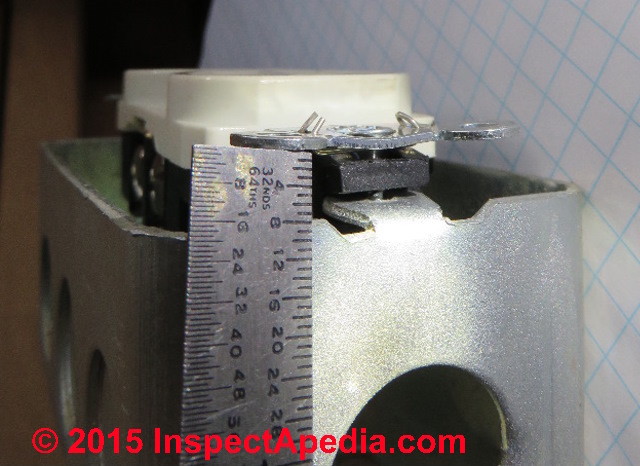
What about installing the Metal Box Mender Upside Down on a U.S. or Canadian Electrical Box for a better fit?
At below right I'm installing the Metal Box Mender upside down and not as recommended by the manufacturer on a typical U.S. electrical box. Why was I trying this? Because installed "right way up" will bring the electrical switch or receptacle face up out of the electrical box by 11-12 mm - making the whole assembly stick out of the wall surface and creating an unacceptable installation.
The plastic device still projects considerably above the upper edge of the box. If the box is recessed in the wall and you're not using a box extender to bring that box face forward then you might still be OK - or not.
The manufacturer advises that you can sand down the upper portion of the screw-receiving "Mender" if necessary.
You'll need to do this in cases where the metal ear into which the device or cover mounting screws turn or pass is "high" in the box - as we illustrate below. You will see that the distance from the upper surface of the metal electrical box screw-receiving "ear" on U.S. electrical boxes is much closer to the upper edge of the electrical box than on typical U.K. electrical boxes.
The receptacle mounting ears are sticking up 1/4" past the face of the electrical box (below). You'd have to sand off the entire face of the plastic Mender to bring the electrical receptacle back to its original mounting position.
This means that trying to use the Metal Box Mender on a U.S. or Canadian electrical box is going to give some trouble with the product's U.K. dimensions: if you don't sand the top of the Mender down to a quite thin dimension your wall plate or cover plate of the box is not going to sit flush and tight against the wall.
Rather the plate will separate from the wall by 4-5 mm or still nearly 1/4".
Watch out: when you sand or file down the plastic bottom of a of the "Mender" that you're also installing upside down to make your electrical parts fit properly on U.S. or Canadian metal electrical boxes you're reducing that overall 17mm screw receiver height to something less. In turn that means that the point of a longer screw may penetrate and pass out of the bottom of the "Mender" and thus it could damage an electrical wire causing a short or fire.
Watch out: You are also modifying an electrical component and using it not in accordance with the manufacturer's instructions. Even if a device has been tested and listed for use in electrical systems, modifying it or using it other than as intended violates both the manufacturer's instructions and fails to comply with the electrical codes in most jurisdictions.
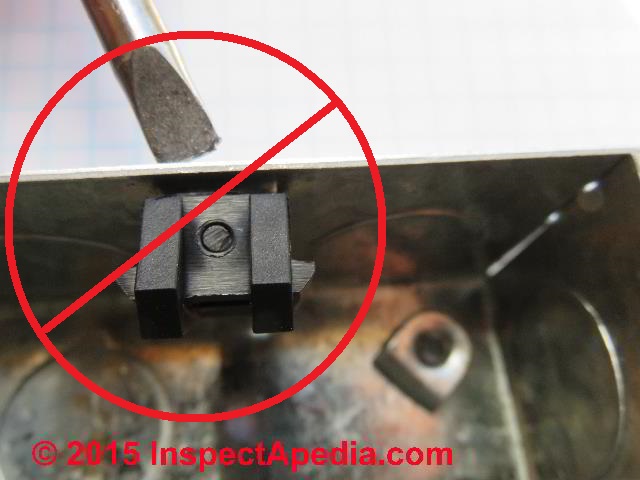
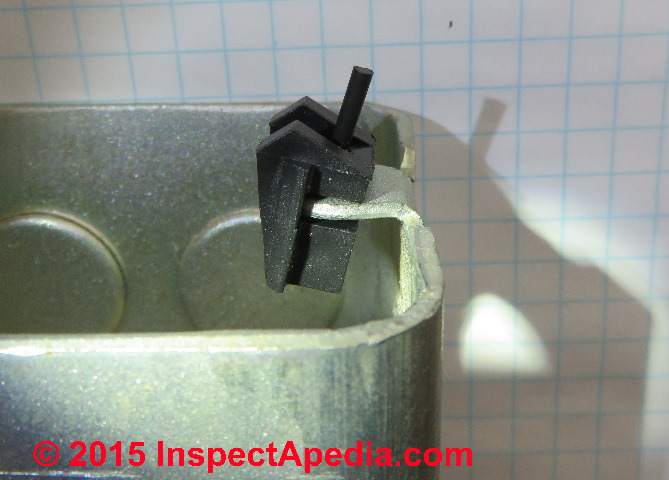
Splits in the Mender Screw Receiver if Installed Upside Down & Screw is Inserted Without Switch or Receptacle Strap
Earlier I explained that one of my illustration photos risked damage to the Mender by causing it to split. In my photo below I've backed the Mender screw out a bit but my green arrows point to faint markings that show where the bugle-head of the screw contacted the raised sizes of the top portion of the Mender, and my red arrow points to the spit developing in this part, rendering it damaged and possibly unsafe.
Note: the photo below does not illustrate a procedure recommended by the manufacturer because
- The Mender was installed upside down
- I've omitted the metal tabs of an electrical receptacle or switch or a blind box cover, any of which would, using U.K. devices, be expected to avoid the splitting problem described here. However as I explain below there could be a splitting problem when using this repair part with U.S. & Canadian-sized electrical components.
 ...
... 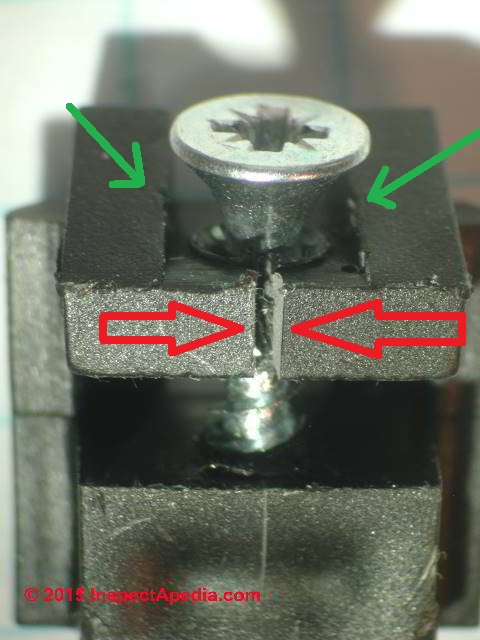
- At above right you can see the results of this fiasco: I've split the Mender plastic block. Don't do this.
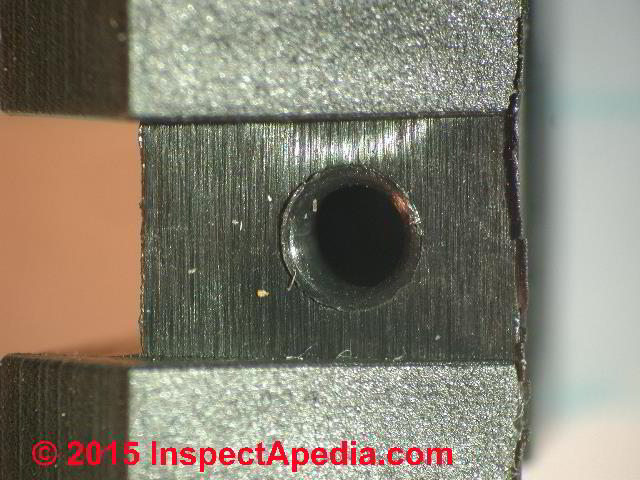
At below left is an un-damaged, intact Metal Box Mender screw receiver.
Below you can see three interesting details in a damaged Metal Box Mender screw receiver:
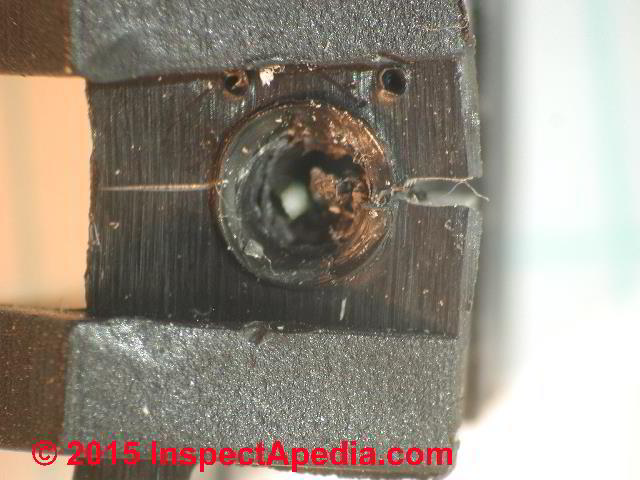
The two small holes in the upper photo show us where the tip of the sharp-pointed wood screw missed the proper screw opening and tried to penetrate the Mender block at the wrong location. Using a manual screwdriver I could feel this trouble and I could move the screw for another try.
If I'd been using a power screwdriver the screw would have entered the block at the wrong location (one of those two little holes) and I'm not sure how the device would perform.
The center screw opening shows a beveled edge - signs that the bugle portion of the bugle-headed wood screw entered and spread the screw receiver.
The split at the right center of the Mender shows that this device has "failed" or more fairly, I broke it. If you screw the bugle-headed wood screw fully into the Mender without the screw passing first through a box cover or switch or receptacle mounting tab the bugle-shaped screw head will pass into the Mender's plastic top segment causing it to split. The result is an insecure holding device that may be unsafe, risking electrical short or fire. I made this mistake. Don't do it.
Metal Box Mender Assembly vs. Grounding Path on Older Electrical Work
Proper electrical wiring in most countries requires a physical grounding conductor wire between a grounding terminal screw on the electrical receptacle or switch and the electrical circuit's grounding conductor wire, usually joined by a crimp-splice or sometimes by a twist-on connector.
However amateur electrical wiring too often omits this connecting wire and instead relies on the coincidental ground path between the metal strap or body of the electrical receptacle or switch, through its mounting tabs, through its mounting screw to the metal ear on the metal electrical box that in turn may be grounded to the circuit ground or may be grounded through the metal jacket of older BX armored cable.
Watch out: this is not a safe, reliable ground connector. However it may be the only one present on an older electrical circuit and it may have been "working" - somewhat. If you then repair a stripped metal electrical box mounting screw opening with a plastic Metal Box Mender and the Mender's wood screw, even that improper and rather iffy ground could be lost.
Metal Box Mender Contact Information & Sources: Where to Buy
U.K. readers who need to repair a stripped screw mounting hole on an electrical box should contact the Metal Box Mender inventor, David Sexton at the addresses given below.
- Metal Box Mender, 3 Wakering Road, Shoeburyness, Southend-on-Sea, Essex SS39SY UK, Tel: 074692 12318 Email: metalboxmender@outlook.com, Website: http://www.metalboxmender.com/
Quoting the company's website: "Repair the stripped thread screw hole in electrical metal boxes. The new "Mender" has been developed to be fitted in seconds without compromising the safety of the box."
Note: my understanding is that the MBM or Metal Box Mender, sold directly from the producer and also sold in Ebay (£2.88 postage paid (VAT included) for Single packs of 2 Menders), has not been tested nor listed for use in the United States nor Canada. For North American, Australian, New Zealand, Canadian or other applications, look for a product listing and approval that applies in your country.
Technical note on the illustrations in this article: the metal electrical boxes used in this article were selected to permit illustration of the electrical box screw repair parts and installation procedures. The boxes themselves may not be of adequate size in cubic inches and certainly do not include the hardware that would be needed to mount these boxes in a building wall.
...
Continue reading at ELECTRICAL OUTLET BOX SCREW REPAIR or select a topic from the closely-related articles below, or see the complete ARTICLE INDEX.
Or see these
Recommended Articles
- ELECTRICAL BOX TYPES
- ELECTRICAL BOX GROUND WIRING
- ELECTRICAL JUNCTION BOX TYPES
- ELECTRICAL OUTLET, HOW TO ADD & WIRE
- PLASTIC ELECTRICAL BOX REPAIR - repair a broken plastic electrical box using an "old work" box: wiring, sealing, grounding.
Suggested citation for this web page
METAL ELECTRICAL BOX SCREW REPAIR, METAL BOX MENDER at InspectApedia.com - online encyclopedia of building & environmental inspection, testing, diagnosis, repair, & problem prevention advice.
Or see this
INDEX to RELATED ARTICLES: ARTICLE INDEX to ELECTRICAL INSPECTION & TESTING
Or use the SEARCH BOX found below to Ask a Question or Search InspectApedia
Ask a Question or Search InspectApedia
Share this article:Questions & answers or comments about ways to replace an electrical outlet or switch mounting screw when threads are stripped on the screw or in the mounting box.
Try the search box just below, or if you prefer, post a question or comment in the Comments box below and we will respond promptly.
Search the InspectApedia website
Note: appearance of your Comment below may be delayed: if your comment contains an image, photograph, web link, or text that looks to the software as if it might be a web link, your posting will appear after it has been approved by a moderator. Apologies for the delay.
Only one image can be added per comment but you can post as many comments, and therefore images, as you like.
You will not receive a notification when a response to your question has been posted.
Please bookmark this page to make it easy for you to check back for our response.
IF above you see "Comment Form is loading comments..." then COMMENT BOX - countable.ca / bawkbox.com IS NOT WORKING.
In any case you are welcome to send an email directly to us at InspectApedia.com at editor@inspectApedia.com
We'll reply to you directly. Please help us help you by noting, in your email, the URL of the InspectApedia page where you wanted to comment.
Citations & References
In addition to any citations in the article above, a full list is available on request.
- [1] Larry E. Mears, "Support clips for supporting electrical fixtures in a junction box", Patent number: 4679882 Filing date: Sep 17, 1985 Issue date: Jul 14, 1987 - retrieved 3/4/2013
- [2] Pimentel, Demetrio (Atlanta, GA), patent application No. 10/058762, filed 01/30/2002 - Retrieved 3/4/2012
- In addition to citations & references found in this article, see the research citations given at the end of the related articles found at our suggested
CONTINUE READING or RECOMMENDED ARTICLES.
- Carson, Dunlop & Associates Ltd., 120 Carlton Street Suite 407, Toronto ON M5A 4K2. Tel: (416) 964-9415 1-800-268-7070 Email: info@carsondunlop.com. Alan Carson is a past president of ASHI, the American Society of Home Inspectors.
Thanks to Alan Carson and Bob Dunlop, for permission for InspectAPedia to use text excerpts from The HOME REFERENCE BOOK - the Encyclopedia of Homes and to use illustrations from The ILLUSTRATED HOME .
Carson Dunlop Associates provides extensive home inspection education and report writing material. In gratitude we provide links to tsome Carson Dunlop Associates products and services.
 |
HOME | ABOUT | ASK a QUESTION | CONTACT | CONTENT USE POLICY | DESCRIPTION | POLICIES | PRIVACY | |
| © 2026 - 1985 Publisher InspectApedia.com - Daniel Friedman | |||||||||