 Electrical Conduit Tools & Bending Guide
Bends, connectors, cuts, install electrical conduit
- POST a QUESTION or COMMENT about how to buy, bend, wire, & install electrical conduit in buildings
Electrical conduit installation tools, conduit bend types, & how to make conduit bends in EMT.
Here we describe tools used to bend, connect, cut, or install electrical conduit made of metal or non-metallic materials, and we describe each of the EMT or electrical conduit bend types: the 90° Stub-Up bend, the back to back or "U" bend in conduit, the saddle bend to run conduit around any obstacle, the offset conduit bend to zig zag around an obstacle, and the three point saddle bend to run conduit over a small obstacle.
To make a conduit bend successfully you'll need to add length, often referred to as the "shrinkage amount" to allow for the loss in a given length of conduit's effective length when you bend it.
This article series describes both metallic electrical conduit and plastic or non-metallic electrical conduit products, and answers basic questions about installing electrical conduit. Electrical conduit is metal or plastic rigid or flexible tubing used to route electrical wires in a building.
InspectAPedia tolerates no conflicts of interest. We have no relationship with advertisers, products, or services discussed at this website.
- Daniel Friedman, Publisher/Editor/Author - See WHO ARE WE?
What tools you need and the procedures for using conduit?
These electrical conduit tools, methods, tables, bending guides are used for EMT (Electrical Metallic Tubing), IMC (Intermediate Conduit), and also for Rigid Conduit, of steel or aluminum, but note that bending instructions may vary depnding on just what material is being formed.
Cutting, Bending and Threading Electrical Conduit
Electrical conduit is often used to hold and protect house wiring. In some localities electrical conduit is required by the local code.
Conduit protects building wiring from damage better than flexible steel (BX) cabling or plastic sheathing (Non metallic sheathed or NMC wire).
However, it electrical conduit is more difficult to install and it requires both some special tools and some special knowledge about permitted bending radii and similar details.
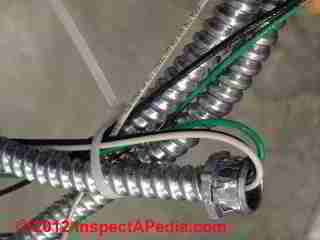
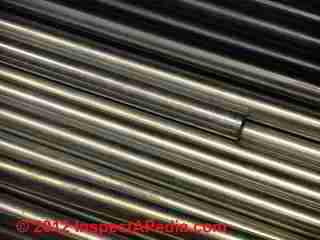
Instead of damaging rigid electrical conduit tubing (as in the photo above) make your bends using the proper tool, use elbows and fittings, buy pre-formed bends (shown at left in plastic conduit), or use flexible metal or plastic conduit (illustrated above ).
[Click to enlarge any image]
Tools for Cutting Electrical Conduit
Thin-wall metal conduit can be cut with a special electrical conduit cutter. To use the cutter, clamp it around the conduit. To cut the conduit, tighten the knurled nut in the handle.
As you tighten, force the cutter around the conduit. The sharp cutting blade cuts a groove that deepens with each revolution, making a smooth, quick cut. After cutting through the conduit, file off any burrs around the edge of the cut.
Watch out: after metal conduit is cut its cut ends must be reamed or chamfered so that the wire pulled through the conduit won't be damaged.
Tools for Bending Electrical Conduit
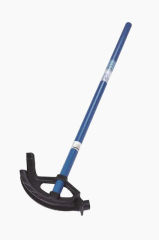
Thin-wall electrical conduit can be readily bent by using a special tool designed to make a smooth, even bend with little effort.
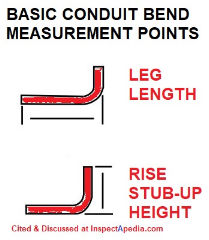
Below: a manual or hand-operated electrical conduit bender, this one from Ideal, widely sold at electrical suppliers. Our sketch shows the two most critical measurements when obtaining the leg length or stub-up height when bending conduit.
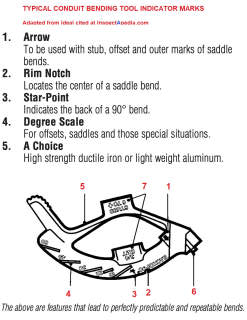
Details of the bend markings for this conduit bender are given below.
The more bends in a run of conduit, the more it is to “fish” the wires through.
Plan the conduit run carefully to avoid sharp bends and to make as few bends as possible.
Illustration above: Ideal Corporation's tubing bender marks used to make proper bends in EMT.
Never have more than four right angle bends between openings.
Follow the manufacturer’s instructions for the type of conduit bender you use.
How an electrical conduit bender works
Above: an electric-operated electrical conduit bender from Klein Tools.
- Screw a 30-inch length of threaded pipe into the bender head (sometimes called a an electricians “hickey.”)
- Insert the conduit into the bender through the hook at the top of the head. The hook marks where the bend will start.
- Put one foot on the conduit near the head and lever the pipe handle backward, checking the angle of the bend as you go.
Standard Bend Radius and Calculations for Electrical Conduit Bends
You'll find these and more details in the electric conduit bending guides cited in this article.
Standard Electrical Conduit Bend Data |
||
| Conduit Size | Required Bend Radius | Deduction for 90 Degree Bend |
| 1/2" | 4" | 5" |
| 3/4" | 4 1/2" | 6" |
| 1" | 5 3/4" | 8" |
| 1 1/4" | ||
Notes to the table above:
The Deduct numbers tell you how many straight-line linear inches will be occupied by the finished electrical conduit bend.
Types of Electrical or EMT Conduit Bends & How They Are Made
Conduit bending tools are provided for both ductable iron rigid conduit and EMT. You'll use a different conduit bending tool depending on the conduit material.
Here we illustrate the basic bends formed in metal conduit or that can be purchased pre-bent in EMT or plastic conduit. Details of exactly where and how to measure distances to get these bends exactly right for your job are in the conduit bending guides [PDFs as free downloads] provided later on this page.
90° Stub-Up Bend in EMT
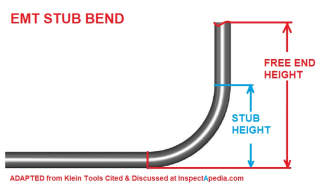
A stub bend forms a length of conduit into an L-shape or a 90° angle as shown below.
To make an L-bend that finishes with the desired free-end height that you want when the conduit has been bent to shape, you need to subtract the stub height that will be taken up by the actual 90° angle.
Klein and other conduit bending tool manufacturers provide a guide that shows, for a given conduit diameter, the stub-height that must be subtracted from the total desired free-end height (given below along with the company's contact information).
For example,
- For 1/2" EMT subtract 5" stub height
- For 3/4" EMT subtract 6" stub height
- for 1" EMT subtract 8" stub height
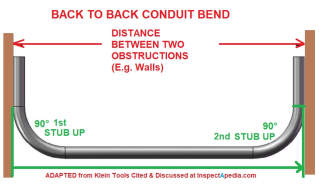
Back-to-Back or "U" Bends in Electrical Conduit
A pair of 90° Stub Bends is used to shape conduit between two obstacles, such as between two opposing walls or columns. This U-shaped conduit bend can be as short as two 90° stub bends joined together or of any greater length or distance as shown in our drawing, adapted from Klein, cited below.
To make a conduit U-bend you need to follow these steps: (see the instructions for your specific brand and model conduit bending tool)
- Measure the total distance between the two obstructions (the red line in our sketch).
- Make the first 90° stub-up bend at one end of the conduit
- Measure the distance from the back-end of the first stub-up bend to find where to place the conduit bender on the other (straight) end of the conduit (green lines in our sketch) and mark this as the second conduit bend index point.
- Place the bending tool on the conduit so that its index point (the "Star Point Symbol" if you're using the Klein conduit bending tool) is in line with the second-bend index point marked on the conduit
- Complete the second bend
Offset Bends in EMT Conduit
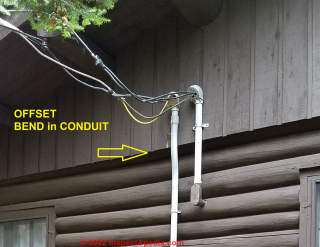
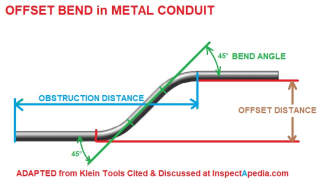
An offset bend allows conduit to shift up or down, or left or right, while continuing in the same original direction, such as to zig-zag around an obstruction.
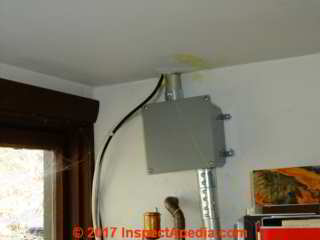
Above: we see a typical application of an offset bend in conduit: jogging around a change in wall thickness. This electrical conduit installation is on the exterior of a guest cabin on Bearskin Lake in northern Minnesota.
Our illustration of an offset bend shown below is adapted from Klein Tools, cited in detail further below.
Various offset bend angles may be used depending on the space needed to clear an obstacle or change elevation and the distance over which the change must be achieved. Bending angles include 10°, 22 1/2°, 30°, 45° and 60 °. You would prefer to avoid a pair of 90° bends as pulling wire may be made too difficult.
To make an offset bend the installer chooses the necessary angle to clear an obstacle over a given distance, measuring
- The distance to the obstacle
- The offset necessary to clear the obstacle
Conduit bending guides will give a constant multiplier for each bend angle. Use the constant multiplier to increase the total conduit length needed to clear the distances involved, thus allowing for the loss in effective length that occurs when you bend (thus shortening) the conduit's travel distance.
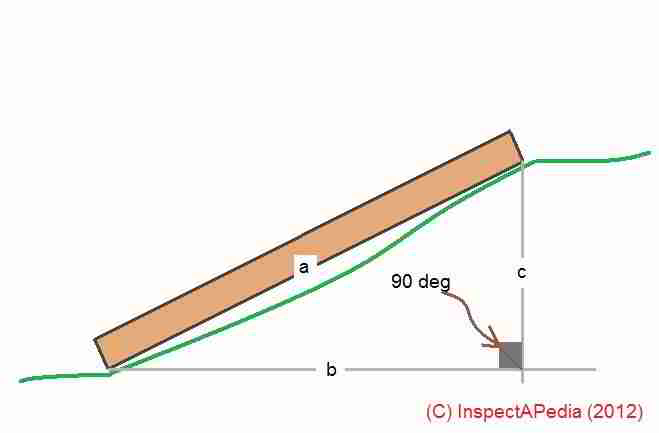
Above, from our framing article cited below, we illustrate the calculations you'd need to route conduit over a change in height or across a jog in a wall.
Using that same drawing for electrical conduit bends, angle ab is the bend to leave the floor and slope up, and angle ac is the necessary angle to continue again on the flat or horizontal.
The calculations of these angles always require using a "right triangle" with the 90 degree angle shown in the sketch.
Since every triangle will have three angles, and we know they'll add up to 180 degrees (a straight line), if we have any two angles we calculate the third.
Example: if angle ab is 30° and we know that the right angle is 90° (by definition), and since those two add up to 90°+30°=120° we can calculate
Angle ac = (180° - 120°) = 60°
See also FRAMING TRIANGLES & CALCULATIONS for help in using simple triangles to calculate the length and rise (or drop) in conduit as well as the necessary bends shown in the table above.
When your conduit needs to span a rise or fall across a surface such as a curb or step, use the table below to determine the degrees of bend necessary.
Electrical Conduit Offset Bend Multipliers |
|
| Bend Angle Degrees | Multiplier |
| 10° | 6.0 |
| 22° | 2.6 |
| 30° | 2.9 |
| 45° | 1.4 |
| 60° | 1.2 |
Notes to the table above:
Watch out: NEC 346.11 sets a limit of four quarter-bends between any two pull points. That's the same as a limit of 360° through four bends.
Three Point Saddle Bend in Electrical Conduit
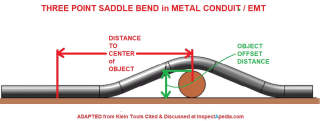
Illustrated below is the three-point "saddle bend" in EMT, used to clear a small object such as a pipe or cross-under conduit.
A three point saddle conduit bend is similar to the offset bend we described above. This conduit shape is useful to clear small obstacles such as a crossing pipe.
Like the saddle bend, you will need to add conduit length to accommodate the distance lost from the bend itself, depending on the bending angle you choose.
Detailed three point saddle bend shrinkage amount tables will be given in the instructions for your conduit bending tool, such as the Klein tool from which we adapted the image shown above.
Examples of conduit length shrinkage amounts, or the amount you need to add to the "distance to object" (red in our drawing) for every inch of height in the object offset distance (green in our drawing) include:
Three Point Saddle Bends Using 45 ° Center
- Use two 22.5° saddle bends to get a 45°center arch (as in our drawing above)
- For each inch of obstruction height add 3/16" length (shrink amount) and 2 1/2" distance away from the center of the obstruction
- Mark the conduit with the location of the center of the object, then measure and mark the distances away from the enter of the object to the two bending tool marking points
Three Point Saddle Bends using 60 ° Center
- Use two 30° saddle bends to get a 60° center arch
- For each inch of obstruction height add 1/4" length (shrink amount) and 2" distance away from the center of the obstruction
- Mark the conduit with the location of the center of the object, then measure and mark the distances away from the enter of the object to the two bending tool marking points
Watch out: Be sure to double check tables of shrinkage amounts (or length extensions) to allow for various bends and to see exactly where to place the bending tool according to the instructions for your specific electrical conduit or EMT bending tool's manufacturer and model.
Non-Metallic Conduit Bends
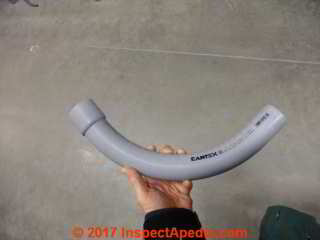
Sweeps and bends traversing 45 degrees and 90 degrees for non-metallic plastic conduit are sold pre-formed, such as the PVC 90-degree Bell-End elbow conduit example I'm holding in the photo above.
How to thread electrical wires through conduit
A fish tape is a thin, flexible metal tape with a hook on one end. The tape is usually packaged on some type of reel. The tape is used to pull wires through conduit or through openings in walls. For conduit use, the tape is inserted in one conduit opening and worked through to the next opening. The wires to be drawn through the conduit are bent around the hook on the fish tape.
If the run is long and has a few bends it is a good idea to wrap some electrical tape around the wires to hold them on the hook. The tape is then reeled in to draw the wires through the conduit. A slow, steady is less likely to kink the tape or jam the wires than is a series of sharp.
Electrical codes allow multiple electrical wires to be pulled through a single conduit, but limit the number of wires allowed in a conduit run depending on the number of wires and the wire diameter or gauge.
The more wires you pull, the more crowded the conduit, so buy larger conduit---perhaps 3/4 inch instead of 1/2 inch.
Conduit Connectors
ENT, LFNC, Plastic PVC Conduit connectors
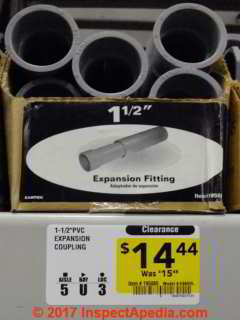
ENT conduit sections and fittings are joined by conduit solvent cement specifically formulated for use with PVC (polyvinyl chloride) plastic conduit ducts and fittings.
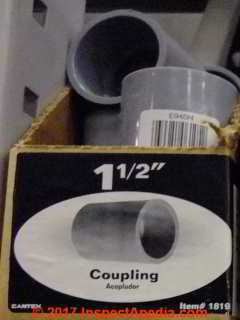
Below: ENT Coupling fittings and expansion couplings for PVC conduit.
...
EMT Connectors
[in process] Photos, comments, suggestions are invited. Use the page top or bottom CONTACT link. Contributors are cited & linked-to, or can remain anonymous (default). - Ed.
FMC Connectors
[In process]
IMC Connectors
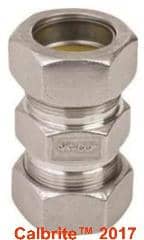
Non-threaded IMC is joined by compression fit type couplings like the stainless steel Calbrite™ IMC coupling shown here.
RMC connectors
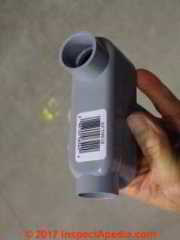
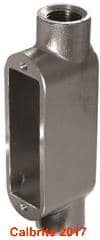
The stainless steel C Condulet shown below and used for snaking or connecting electrical wires inside of RMC is a Calbrite™ product - contact information is given below.
Stainless steel RMC is used where corrosive environments will exceed the limitations of aluminum, fiberglass, rigid steel, PVC, & PVC Coated conduit. (Calbrite 2017).
Electrical Conduit Tool & Equipment Suppliers
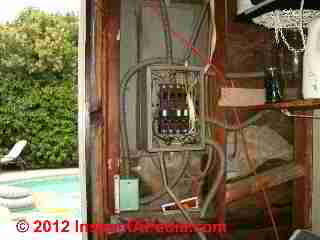 Watch Out: Do not attempt to work on your electrical wiring, switches, or outlets unless you are properly trained and equipped to do so. Electrical components in a building can easily cause an electrical shock, burn, or even death.
Even when a hot line switch is off, one terminal on the switch is still connected to the power source.
Before doing any work on the switch, the power source must be turned off by setting a circuit breaker to OFF or removing a fuse.
See SAFETY for ELECTRICAL INSPECTORS
and ELECTRICAL WIRING BOOKS & GUIDES
Electrical conduit for wiring has some advantages in protecting wires and also in running multiple wires to a location.
The proper selection of electrical conduit materials, fittings, and installation are important for safe electrical wiring.
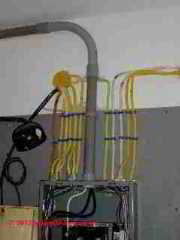
Our photo (above left, courtesy of Tim Hemm), shows an electrical conduit snafu along with an unsafe FPE Stab-Lok electrical sub panel. Both flexible electrical conduit and rigid conduit were used. Our arrow points to an improper "bend" made in the rigid metal electrical conduit. [3]
- Calbrite™ Corporation, 6451 Northwind Pkwy., Hobart, IN 46342 USA, Tel: 219-844-6800 Website: www.calbrite.com
- Carlon Corporation, "Rigid Nonmetallic Conduit - Schedule 40, Carlon Rigid Nonmetallic Conduit (RNC), Fittings & Accessories", Gross Automation 3680 N. 126th St. Brookfield, WI 53005 USA, Tel: 877-268-3700, Website: Carlonsales.com, Email: sales@grossautomation.com - retrieved 8 Sept 2015 original source: http://www.carlonsales.com/techinfo/brochures/conduit/Conduit_Schedule_40_and_80.pdf
- Gardner Bender, HOW TO BEND CONDUIT [PDF] Instructions for Gardner Bender's 960-series conduit bending tool, original source: Home Depot 2022/04/05
Simple two-page pamphlet includes instructions for all of the bends shown in the sketch just below.
- Gardner Bender CONDUIT BENDER CATALOG [PDF] Gardner, Tel: USA 800.624.4320 CANADA 905.564.5749 Web: www.gardnerbender.com
- Greenlee, BENDING TOOL CATALOG [PDF] Electric, mechanical, & hand bending tools for EMT, IMC, Rigid & Aluminum Conduit, Greenlee Corp., USA 800-435-0786, Canada: 866-384-8813, International: +1-815-397-7070, includes also bending charts & tables and tables of conduit sizes for EMT, IMC and Rigid Steel or Aluminum conduit .
- Ideal, BENDER GUIDE for Metal Conduit & Pipe [PDF] IDEAL INDUSTRIES, INC. Sycamore, IL 60178, U.S.A. 800-435-0705 Customer Assistance www.idealindustries.com Retrieved 2022/04/05, original source: Lowes, at http://pdf.lowes.com/howtoguides/783250740475_how.pdf
- Klein Tools, ELECTRICAL CONDUIT BENDING INSTRUCTIONS [PDF] Klein Tools, Inc 450 Bond Street PO Box 1418 Lincolnshire, IL 60069-1418 USA Customer Service: 800-553-4676 retrieved 2021/04/10, www.kleintools.com/sites/kleintools/files/instructions/Conduit%20Bender%20Guide.pdf
- Liquid-Tuff™ Liquid Tight FLex Metallic Conduit, Steel, PVC-jacketed Conduit, 3/8 in Through 1 1/4 in Trade Sizes are Square Lock Formed; Include an Integral Bonding Strip of Copper that is Enclosed Within the Convolutions Throughout their Entire Length, WEEE Compliant; UL-360; ANSI; CSA LL18858; UL E29278
- Mittler, GAIN FACTORS & DEVELOPED LENGTH for CONDUIT BENDS - in 1 degree increments from 1 to 90 degrees [PDF] (2004) Mittler bros. Machine & Tool, retrieved 2022/04/05 original source: https://www.mittlerbros.com/media/pdffile/GAIN-DL-OFFSET-CHARTS-for-Tube-Bending.pdf
These tables tive formulas and tables to find distance between bends, offset multipliers for degrees x offset height, and DL - developed length = 0.175 x degree of bend x radius. - Roth, W.-M. ULES OF BENDING, BENDING THE RULES: THE GEOMETRY OF ELECTRICAL CONDUIT BENDING IN COLLEGE AND WORKPLACE [PDF] (2012) Educational Studies in Mathematics. DOI: 10.1007/s10649-011-9376-4, retrieed 2022/04/05, original source: https://web.uvic.ca/~mroth/PREPRINTS/EDUC1193r2.pdf
Excerpts:
... empirical study of how electrician apprentices learn to bend electrical conduits in college and on the job. The requirements for doing well in the two locations are very different: exhibiting knowledge of trigonometry, on the one hand, and doing a good job that makes bending and subsequent pulling of wires practical.
Formal trigonometry is the reference in the classroom, whereas rules of practice are the main references on the job. In each case, the practices orient themselves to the Canadian codebook, which provides a description that the inspector uses as his/her reference ...
In our research, not a single electrician made reference to the textbook approach when bending electrical conduit tubing. The most common is the “multiplier method,” which is also described on the operating description that the toolmaker supplies (e.g., Greenlee Textron, 1998).
Electricians tend to know the multipliers for the most common angles used in the trade and these are also marked off on the bender (Figure 4, top). Thus, to the set of angles {10°, 22.5°, 30°, 45°, 60°} the corresponding set of multipliers is {5.76, 2.60, 2.00, 1.41, 1.15}. - U.S. Federal Regulations 49 CFR 195.212 - BENDING of PIPE [PDF]
Excerpt:
§ 195.212 Bending of pipe. (
a) Pipe must not have a wrinkle bend.
(b) Each field bend must comply with the following:
(1) A bend must not impair the serviceability of the pipe.
(2) Each bend must have a smooth contour and be free from buckling, cracks, or any other mechanical damage.
(3) On pipe containing a longitudinal weld, the longitudinal weld must be as near as practicable to the neutral axis of the bend unless—
(i) The bend is made with an internal bending mandrel; or
(ii) The pipe is 123⁄4 in (324 mm) or less nominal outside diameter or has a diameter to wall thickness ratio less than 70.
(c) Each circumferential weld which is located where the stress during bending causes a permanent deformation in the pipe must be nondestructively tested either before or after the bending process.
[Amdt. 195–22, 46 FR 38360, July 27, 1981, as amended by Amdt. 195–52, 59 FR 33396, June 28, 1994; Amdt. 195–63, 63 FR 37506, July 13, 1998] - RIGID CONDUIT INSTALLATION GUIDELINES [PDF], Royal Electrical Solutions, 56400 Mound Road - Shelby Twp., MI 48316 USA, Tel: 1.800.232.5690 Website: royalbuildingproducts.com
- Wheatland Tube, "CONDUIT TUBING, EMT, IMC, RMC" [PDF], Wheatland Tube, JMC Steel, includes 2011 National Electrical Code References. Wheatland Tube, 700 South Dock Street, Sharon, PA 16146 USA, Tel: 800.257.8182 Email: info@wheatland.com Website: wheatland.com
...
Reader Comments, Questions & Answers About The Article Above
Below you will find questions and answers previously posted on this page at its page bottom reader comment box.
Reader Q&A - also see RECOMMENDED ARTICLES & FAQs
On 2021-04-10 - by (mod) -
 @Fredy floees,
The electrical code does not prohibit specific tools but does require that the conduit bending tool be listed or "identified" as approved for bending conduit.
(2014) U.S. NEC 352.24 Bends — How Made.
Bends shall be so made that the conduit will not be damaged and the internal diameter of the conduit will not be effectively reduced. Field bends shall be made only with identified bending equipment.
Shown above on this page are both an electrical conduit bending tool from Ideal and an electric-operated conduit bender from Klein Tools.
Just comparing prices the hand operated mechanical bender sells for less than $100. U.S. while an electric bending tool may be $1,000 - $12,000.
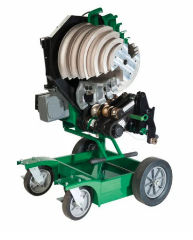
Below is an electrical conduit bender from Greenlee, the Greenlee 854DX One Shoe Solution EMT, IMC, and Rigid Electric Conduit Bender https://www.greenleestore.com/
In addition to the conduit bending instructions we already included in the article above, Klein Tools offers their own
ELECTRICAL CONDUIT BENDING INSTRUCTIONS [PDF] Klein Tools, Inc - cited above on this page
It seems to me that if you are working a large commercial electrical wiring job where there is a lot of conduit bending it's pefectly justified to buy or rent an electric conduit bender.
On 2021-04-10 by Fredy floees
Requirements for bending conduit by the NEC when to use hand tool benders and when you would use power tools.
On 2020-11-23 - by (mod) -
Anon: the metal conduit tubing bending tools I've seen held the tubing themselves during the bend.
EMT is often cut with a sawzall (foot on pipe on 2x4 scraps or a wood faced vise), with a band saw, with a Milwaukee or equivalent power tool designed for EMT cutting, or using a manual pipe cutter that also holds the tubing.
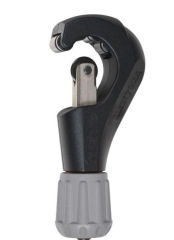
Conduit is also cut by using a scoring tool that's almost identical to a traditional copper pipe cutting tool - we'll show one below. The tech marks the cut line, adjusts the scoring wheel to the cut mark, and holds the tubing with her free hand.
On 2020-11-23 by Anonymous
use to hold conduit pipes when threading , cutting, and installing fittings
...
Continue reading at ELECTRICAL CONDUIT DEFECTS & DAMAGE or select a topic from the closely-related articles below, or see the complete ARTICLE INDEX.
Or see these
Recommended Articles
- ELECTRICAL CONDUIT, METALLIC
- EMT ELECTRICAL METALLIC CONDUIT - THIN WALLED METAL CONDUIT - rigid
- FRAMING TRIANGLES & CALCULATIONS
- FMC FLEXIBLE METAL ELECTRICAL CONDUIT - flexible
- IMC INTERMEDIATE METAL CONDUIT, THREADED & NON-THREADED - rigid
- LFMC LIQUID-TIGHT FLEXIBLE METAL CONDUIT & WHIPS - flexible, liquid tight, with wire
- RMC RIGID METAL CONDUIT - rigid
- ELECTRICAL CONDUIT, NON-METALLIC
- ELECTRICAL CONDUIT PULL BOXES
- ENT ELECTRICAL NONMETALLIC TUBING - rigid plastic conduit
- ENT & LFNC NON-METALLIC ELECTRICAL CONDUIT- flexible plastic & liquid-tight flexible plastic conduit
- FLEXIBLE LFNC PRE-WIRED WHIPS - flexible, liquid-tight, with wire
Suggested citation for this web page
ELECTRICAL CONDUIT BEND CONNECT TOOLS at InspectApedia.com - online encyclopedia of building & environmental inspection, testing, diagnosis, repair, & problem prevention advice.
Or see this
INDEX to RELATED ARTICLES: ARTICLE INDEX to ELECTRICAL INSPECTION & TESTING
Or use the SEARCH BOX found below to Ask a Question or Search InspectApedia
Ask a Question or Search InspectApedia
Try the search box just below, or if you prefer, post a question or comment in the Comments box below and we will respond promptly.
Search the InspectApedia website
Note: appearance of your Comment below may be delayed: if your comment contains an image, photograph, web link, or text that looks to the software as if it might be a web link, your posting will appear after it has been approved by a moderator. Apologies for the delay.
Only one image can be added per comment but you can post as many comments, and therefore images, as you like.
You will not receive a notification when a response to your question has been posted.
Please bookmark this page to make it easy for you to check back for our response.
IF above you see "Comment Form is loading comments..." then COMMENT BOX - countable.ca / bawkbox.com IS NOT WORKING.
In any case you are welcome to send an email directly to us at InspectApedia.com at editor@inspectApedia.com
We'll reply to you directly. Please help us help you by noting, in your email, the URL of the InspectApedia page where you wanted to comment.
Citations & References
In addition to any citations in the article above, a full list is available on request.
- [1] Elizabeth Sluder, Montross, VA, the original author of this article, is a public school teacher who writes basic educational articles about a variety of building, construction, and other topics. Her husband, a licensed electrician, consults for her writing on electrical topics. Her articles appearing at the InspectAPedia TM Website have been edited, illustrated, and on occasion content has been added by the website author. These articles are © 2010 InspectAPedia copyright-protected, all rights reserved.
- [3] Timothy Hemm has provided photographs of various electrical defects used at the InspectAPedia TM Website. Mr. Hemm is a professional electrical inspector in Yucala, CA.
- [4] NFPA - the National Fire Protection Association can be found online at www.nfpa.org
- [5] The 2008 NEC National Electrical Code (ISBN 978-0877657903) Online Access LINK (you'll need to sign in as a professional or as a visitor)
- [6] Thomas & Betts Corporation, Memphis TN, website: www.tnb.com.
- [7] Eric Galow, Galow Homes, Lagrangeville, NY. Mr. Galow can be reached by email: ericgalow@gmail.com or by telephone: 914-474-6613. Mr. Galow specializes in residential construction including both new homes and repairs, renovations, and additions.
- "Electrical System Inspection Basics," Richard C. Wolcott, ASHI 8th Annual Education Conference, Boston 1985.
- "Simplified Electrical Wiring," Sears, Roebuck and Co., 15705 (F5428) Rev. 4-77 1977 [Lots of sketches of older-type service panels.]
- "How to plan and install electric wiring for homes, farms, garages, shops," Montgomery Ward Co., 83-850.
- "Simplified Electrical Wiring," Sears, Roebuck and Co., 15705 (F5428) Rev. 4-77 1977 [Lots of sketches of older-type service panels.]
- "Home Wiring Inspection," Roswell W. Ard, Rodale's New Shelter, July/August, 1985 p. 35-40.
- "Evaluating Wiring in Older Minnesota Homes," Agricultural Extension Service, University of Minnesota, St. Paul, Minnesota 55108.
- "Electrical Systems," A Training Manual for Home Inspectors, Alfred L. Alk, American Society of Home Inspectors (ASHI), 1987, available from ASHI. [DF NOTE: I do NOT recommend this obsolete publication, though it was cited in the original Journal article as it contains unsafe inaccuracies]
- "Basic Housing Inspection," US DHEW, S352.75 U48, p.144, out of print, but is available in most state libraries.
- In addition to citations & references found in this article, see the research citations given at the end of the related articles found at our suggested
CONTINUE READING or RECOMMENDED ARTICLES.
- Carson, Dunlop & Associates Ltd., 120 Carlton Street Suite 407, Toronto ON M5A 4K2. Tel: (416) 964-9415 1-800-268-7070 Email: info@carsondunlop.com. Alan Carson is a past president of ASHI, the American Society of Home Inspectors.
Thanks to Alan Carson and Bob Dunlop, for permission for InspectAPedia to use text excerpts from The HOME REFERENCE BOOK - the Encyclopedia of Homes and to use illustrations from The ILLUSTRATED HOME .
Carson Dunlop Associates provides extensive home inspection education and report writing material. In gratitude we provide links to tsome Carson Dunlop Associates products and services.


