 Deck Post Installation
Procedure
Deck Post Installation
Procedure
Deck Design-Build Online Guide

- POST a QUESTION or COMMENT about deck post installation, size, spacing, construction & connections or connectors from post to pier or from post to supporting girder or deck framing.
How to install & connect deck posts: this article describes how to set the deck posts in place atop their piers, the use of temporary bracing, options for connections between the posts and piers and post tops and beams or girders that carry the deck.
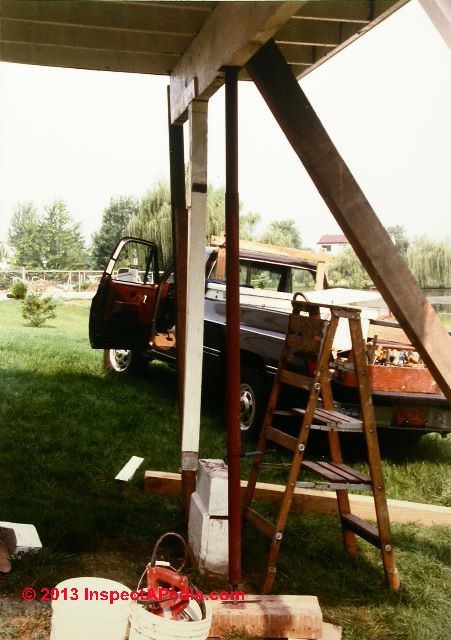
Our page top photo illustrates temporary bracing and support during replacement of unsafe deck posts.
In response from a realtor selling the home where this deck was installed, the author inspected and corrected this New York deck post installation, finding that this high deck was in danger of collapse.
You can see my wooden toolbox on the tailgate of my pickup truck: we rebuilt the post piers, connectors, and then we added appropriate cross-bracing to make this high deck a bit less dangerous.
InspectAPedia tolerates no conflicts of interest. We have no relationship with advertisers, products, or services discussed at this website.
- Daniel Friedman, Publisher/Editor/Author - See WHO ARE WE?
Deck Post Setting, Bracing, Cutting

A deck frame is composed primarily of three components: posts, beams, and joists.
This article will show you how to prepare and install each of these parts for a typical deck, as well as how to tackle more advanced techniques such as framing around the corner of your house and building openings in the deck.
A special feature highlights the process of building a deck at ground level, m Much of the framing will be out of sight once the deck is complete, which is another way of saying that it will be hard to fix any errors you make.
So while looks may not count for much when framing, quality certainly does. Take a little extra time to build a frame for your deck that will last.
We (DF) replaced the unsafe deck posts shown at page top with these 6x6 posts back in 1985.
We sank the treated-wood post bottoms 36" into the soil after placing concrete and stone in the bottom of the hole. That met New York's building code.
Today I'd have used above-ground concrete piers and post anchors at the post bottoms.
The cross bracing for the posts below this deck was not yet installed, and our photo doesn't show the structural framing connectors used to tie the posts to the girder.
Setting the Deck Posts
Posts are a prominent visual feature of many decks. With good planning, they can be transformed from merely functional components into decorative design features.
Posts give decks most of their elevation. If you are building a high deck, you will need long posts. If, however, you are building a very low deck, you may not need any posts at all.
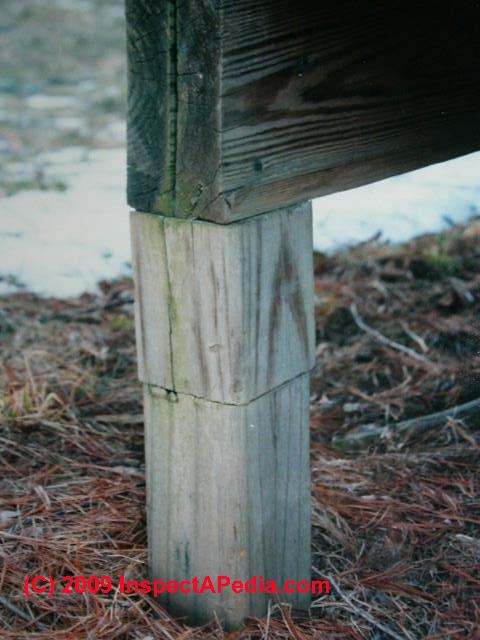 Watch out: Don't do what this contractor did. The "deck post" is comprised of a stack of 4x4" scrap with no actual structural connections. Gravity may seem to work to keep this deck in place - until my teen-aged cousin rams the deck with the lawn tractor.
Most decks are built with 4x4 posts, but 4 x 6s and 6 x 6s are often used as well, and even larger posts are sometimes required.
Some people think that 4 x 4s look too weak and skinny on a high deck, even when they are structurally sound.
Feel free to use larger posts than are required if you prefer a bulkier appearance. Post size is also related to how far the beam spans from one post to the next.
Posts must be plumb, well secured, and cut to the right length. They are rarely the same length on a deck, however, since piers are usually not perfectly level with each other.
So it is best to avoid cutting posts to their anticipated length before setting them in place.
To determine the length of each post, use one of two methods.
The first, which may be easiest with short posts, is to set the post in the post base, check it for plumb, and mark the desired post height using a level or a water level. Remove the post, cut it to length with a power miter saw, and then attach it to the post base.
The more typical approach is to put all the posts in position, brace them so that they are plumb, attach them to the post bases, and then mark and cut them in place.
If you are using pressure treated posts, it is best to place the uncut ends into the post bases.
But it is even more important that the bottom surface of every post be flat and square.
Use a small square to check the ends of each post.
If neither end is square, cut just enough off the bottom to make it square, then coat the cut surface with a water-repellent preservative before setting it in place.
Framing Options for Connecting Deck Posts to Beams
The most common means of joining posts to beams is to have the beam rest directly on top of the posts, to which it is secured by special connectors. This is also the strongest connection, and usually the easiest construction technique.
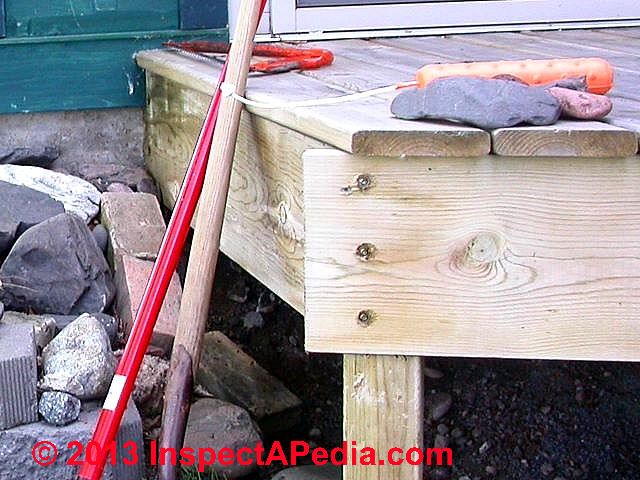
Our photo shows a tiny entry deck whose joists did not require a supporting beam. The front rim joist can be seen connected to the supporting post with three bolts.
Decks are sometimes built with posts that extend above the deck surface to serve double duty as railing posts. This requires that notches be cut carefully into the posts to fit the beam. This approach is feasible only when using posts that are at least 6x6.
Avoid building your deck with the beams bolted to the sides of extended posts, even though your building code may not explicitly bar this approach. It is not a recommended practice, since the entire connection relies on fasteners to support the load.
1. Set Up Temporary Bracing for Deck Posts During Construction
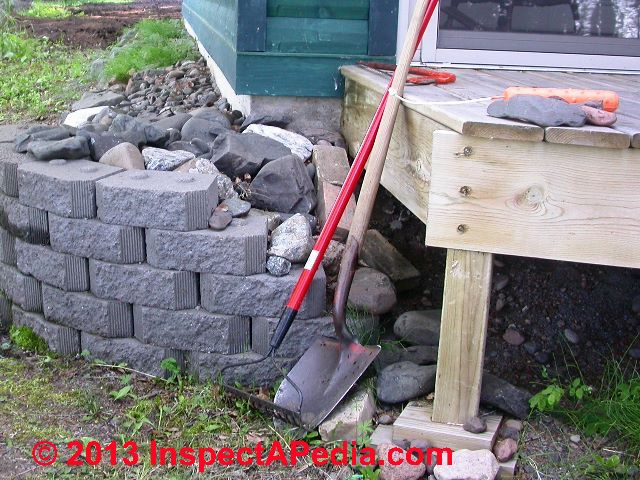
Our photo (left) illustrates what can happen if the deck contractor is a good finish carpenter but one who is not so sharp with deck construction.
His post was left floating atop a wood scrap that we later replaced with an excavated shallow block pier. The deck (as well as his cabin's slab floor) floats.
Real post piers and good connections between the post base and pier top are important for a durable structure.If you are using adjustable post bases, first attach the hardware to the anchor bolts. (Fixed one-piece bases will already be in place.) Set a post in each post base.
Drive one nail through the base and into the post just far enough to hold the post in place; you may have to remove and reposition the nail later.
Plumb the post by checking it on adjacent sides with a carpenter’s level. If you are working alone, it may be easier to attach a post level (inset) to the post to leave both hands free to continue working.
With the post plumb, attach temporary braces to two adjacent sides.
If you are using adjustable post bases, first attach the hardware to the anchor bolts. (Fixed one-piece bases will already be in place.) Set a post in each post base.
Drive one nail through the base and into the post just far enough to hold the post in place; you may have to remove and reposition the nail later. Plumb the post by checking it on adjacent sides with a carpenter’s level.
If you are working alone, it may be easier to attach a post level (inset) to the post to leave both hands free to continue working. With the post plumb, attach temporary braces to two adjacent sides.
Use 1 x 4s for braces, securing them with screws to stakes in the ground and with clamps to the posts
Details about permanent deck post bracing are below
Keep the Deck Posts in a Straight Line
 We hope you used your batterboards and string to get those piers exactly where you need them to carry the deck posts.
But if some piers are centered exactly in position, as long as the post bottom will be close to the pier center, you'll be able to get the post to its exact-desired position by using adjustable deck post base connectors that we describe below.
First let's be sure our piers and posts are lined up. If your batterboards are still set up, you can run a string line to help align the posts.
Since this string line relates to the sides of the posts, rather than their centers, reposition the string on each crosspiece by one-half the thickness of the post
If the batterboards have been removed, you could set a couple of them back in place quickly. Just be certain that the string line is perfectly parallel with the ledger, so that it’s the same distance from the ledger on both sides.
We used batter boards and string to lay out and keep our deck posts aligned for the SummerBlue Arts Camp stage decking in Two Harbors MN (photo above left).
These 6x6 treated wood posts were set in augur -drilled holes in the hard clay soil.
We wrapped each post with 6-mil poly to reduce the chances of frost lensing and heaving - a procedure that has worked well in this climate. More than sixteen years later we can report that the stage has not moved.
The original construction, installation and long term performance of this outdoor performing arts stage floor are described in a series of articles beginning
at BATTER BOARDS LAYOUT METHOD.
2. How to Attach the Deck Posts to the Piers using Adjustable Post Bases
With all the posts plumbed and aligned (see below), if you are using wood post bases, drive nails through the post bases into the posts. Use only the nails recommended by the manufacturer of the post bases you are using.
More often we use a steel post connector plate that is tied to the pier top - an "adjustable" post base.
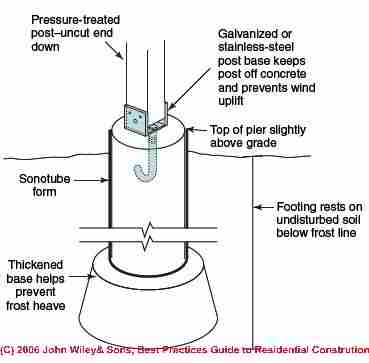
The adjustable deck post base is bolted to the top of the concrete pier. If you planned ahead, you inserted the anchor bolt into the pier top when you poured your concrete piers using a connector like the one below, also discussed further in
Step 6 of DECK / PORCH PIER INSTALLATION STEP by STEP PROCEDURE

If you forgot that step all is not lost.
Use a masonry drill bit of matching diameter and bolt-to-concrete mounting epoxy to install the anchor bolts for the post bases like this one from Simpson Strong-Tie.
 Base")
With the anchor holts in place, place the deck post connector atop the post and add washers and hex-nut as provided by the manufacturer. The adjustable base will permit movement of the post bottom anchor to exactly the right final position before you tighten its mounting bolt.
If you are using adjustable bases, be sure that the nuts on the anchor bolts are tightened snugly, but not so tightly that you strip the threads.
3. Find the Final Deck Post Height
The first step in determining post height is to mark each post at the spot that is level with the top of the ledger. Place a carpenter's level on the straightest 2x4 you can find.
Set one end of the 2 x 4 on top of the ledger, then adjust the other side along the post until it is level. Mark the post at the bottom of the 2 x 4. If the posts are too far from the ledger for this method, use a water level.
4. Mark the Cut Line on the Deck Posts

With the height of the top of the ledger now marked on each post, you need to determine where to cut the posts. Place a short piece of joist stock under the mark on one post, then mark the post again.
If the joists will attach on top of (rather than beside) the beam, set a piece of beam stock under this line, and again mark the bottom. This final line is the height at which you need to cut the post.
(Of course, you can also measure down the post with a tape measure rather than lumber, but using the latter is a bit more foolproof.)
You can repeat this process at each post, but it might be quicker to transfer the cut line from post to post using a 2 x 4 and a level.
Our photo shows an ASHI home office employee whom we took on a tour of unsafe building details. A good swift kick could have caused this poorly-connected post to dislocate, causing the entry platform to collapse.
5. Cut the Deck Post Tops to Final Height
Use a square to transfer the cut line to all four sides of each post. Set the blade of your circular saw to cut as deeply as possible. For a 4 x 4 post you will need to cut the post twice, on opposite sides.
For a 6 x 6 post, cut along the line on all four sides, then finish the cut with a reciprocating saw or handsaw.
Deck Post Cutting Tip: measure twice, cut once. With all of your post cut lines marked, use a string and your level, or a straight 2x4 and your level to double-check that all of the post tops will be cut to the same height. Better now than l later.
Our photo (above) taken during a field visit conducted for ASHI home inspector's association headquarters staff, shows how easily one might kick down an improperly supported and un-braced deck post. This entry deck and stair would have collapsed.
Deck Post Bracing Methods

Bracing is a way to stiffen and strengthen a deck’s substructure with diagonal boards. Bracing is required on some decks, so check your local building code for specific guidelines.
Even if it is not mandated, as a general rule it is wise to add bracing to decks with 4x4 posts more than 4 feet high and 6x6 posts more than 8 feet high.
Freestanding decks over 3 feet high also should be braced.
Post-To- Beam-Bracing
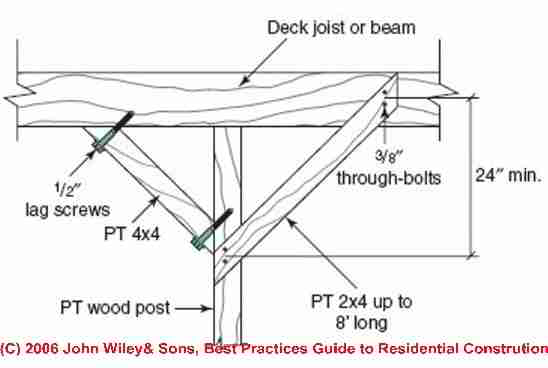
The most common type of bracing is called Y bracing. The simplest form of Y bracing, and the style that many codes demand, has one 2 X 4 on each side of the post and beam.
Carriage bolts are used to secure the connections. Cut the ends of the 2 x 4s plumb, as shown, so that water and dirt will not have a place to accumulate.
A single 2x4 brace can also be used on the sides of the deck to tie posts to joists, once the latter are installed.
Illustration used with permission from Best Practices Guide to Residential Construction (Steve Bliss, J Wiley & Sons) , by Steven Bliss,
Many people prefer the look of solid 4x4 braces, which can be used with solid beams. The ends must be cut at 45-degree angles, and lag screws secure the braces to the bottom of the beam and the side of the post.
For 6x6" posts we cut our braces out of 6x6's as well.
Post-to-Post Bracing
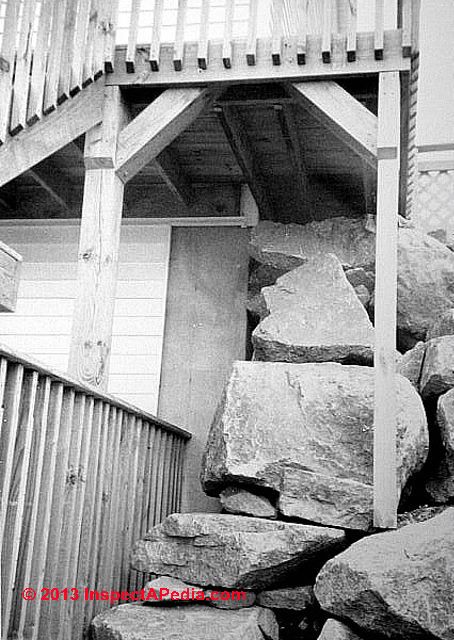 The scary tall multiple-level deck and stairway detailed at left left posts standing on sloping rock - something I (DF) found very scary.
You can see that the builder included a bit of 6x6" bracing between the posts and deck floor structure to add some stiffness and security.
The posts should have been anchored or tied to the rocks, cut to fit properly so that we're not just bearing on an edge of the post, and I'd have felt safer if the builder had made sure there was tie-back bracing between the post and the deck side joists back towards the building.
Post-to-post bracing is often necessary for decks with high posts (such as those built over a steep slope);
for decks with long spans between beams; or along the sides of decks where post- to-joist bracing is not feasible.
You can normally use 2 x 4s for braces up to 8 feet long.
Make longer braces from 2 x 6s. Use ½ inch carriage bolts at all connections. X-shaped bracing also requires blocking between the crossing braces. Local codes may stipulate the type of post-to-post bracing you can use.
If not, choose the style that looks best to you.
Continue reading at DECK BEAM CONSTRUCTION where we include notes on proper connection of the post top to the beams or structure that it supports.
...
Reader Comments, Questions & Answers About The Article Above
Below you will find questions and answers previously posted on this page at its page bottom reader comment box.
Reader Q&A - also see RECOMMENDED ARTICLES & FAQs
Having a post rest directly on a ground level concrete pad without any connection is not in violation?
 So, if I understand correctly, connectors are better but having a post rest directly on a ground level concrete pad without any connection is not in violation of the code (as far as you know--no legal liability here!).
Is this correct? Thanks again. - On 2020-05-01 by Anonymous -
Reply by (mod) - deck post must be connected to the pier
No, I'm not saying that at all.
A connection between post bottom and pier top is required.The connection may be made by any of several methods, not all of which are visible, and varying by local code official's opinion.
- a steel connector bolted into the pier and nailed or connected by structural screws to the post bottom, typically holding the bottom of the post a bit off of the top of the pier (for longer life0
- a steel pin or even re-bar set into the pier top and into a hole drilled up into the bottom of the post (not visible once constructed, no longer in general use)
- setting the treated wood post down into the concrete pier at the time of pouring the pier (not in general use, and IMO no longer recommended).Watch out: I can't see how far below ground level that concrete "pier" extends for your deck post: it may be insufficient. And I cannot see a structural connector between the post bottom and the top of the pier, though the photo hints that a bracket might be present. The top of the pier would best extend a few inches above ground level so that your post bottom is kept dry.
Are deck posts supposed to be secured to their concrete bases by code in New Jersey?
Are deck posts supposed to be secured to their concrete bases by code in New Jersey? My posts rest on the on-grade concrete bases but all of the photos I see online have them physically attached by metal pieces. Thanks.
Dan, photo attached. They threw a little dirt over the concrete but since a lot of it has washed away, you can see the base. As far as the codes, I checked and it said what the attaching pieces need to be made of but I didn't see where it said they were required by code. Thanks. - On 2020-05-01 by Ron -
Reply by (mod) - anchor the deck post to the pier
There are various options for attaching the post to the pier. Back in the day before the modern and Superior deck post and Pier connectors were widely marketed we used to set the post into the concrete. We also would sometimes set one or two pins in the concrete and pin up into the bottom of the post.
Of course if that method was used you can't see the connection. So when I was building decks and ramps the building inspector wanted to see the pier and pin before I set the post in place.
The deck pier bottom base connectors that are bolted to the top of the pier and the keep the very bottom of the post a bit off of direct contact with the concrete are a superior connection.You posted this question https://inspectapedia.com/Design/COPIES-of-BUILDING-CODES.php
Please check my reply there and dont hesitate to ask follow-up questions.
Deck surface post anchors meet code?
Does deck surface post anchors ( for a 28x8' PORCH for a double-wide manufactured-home (plywood surface) meet California code requirements? ThaNK YOU - On 2018-12-15 by MRR -
Reply - by (mod) -
I'm sorry but I don't exactly understand the question.
But I think you're talking about posts along a deck that support a guardrail, and how those posts must be secured to the deck sdtructure.
I suspect that the answer is going to be not whether or not post anchors are used but rather whether they are of sufficient strength to meet the strength requirements for guardrails.
How many deck posts do I need on a 33 ft. deck?
How many 4x4 deck posts do I need and equal spacing if my deck is 33 feet and 7 inches,no corner posts installed. - On 2015-05-27 by Dwayne -
Reply by (mod) -
Dwane the answer is ... it depends - on the dimensions or strength of the supporting girder that the posts are in turn going to support.
A ballpark rule of thumb is that your post are probably going to be 6 ft. apart but some girders might permit 8 ft. Also don't overdo the cantilever at the beam end or your deck will sag.
What's the beam size?
...
Continue reading at DECK BEAM CONSTRUCTION or select a topic from the closely-related articles below, or see the complete ARTICLE INDEX.
Or see these
Recommended Articles
- DECK & PORCH CONSTRUCTION - home
- DECK BEAM CONSTRUCTION
- DECK JOIST LAYOUT
- DECK PIER CONSTRUCTION
- DECK POST CONSTRUCTION
- FRAMING CONNECTORS & JOIST HANGERS
- PIER FOUNDATION PROBLEMS for a description of common structural pier types, inspection, defects
- RAILING POST CONNECTIONS for a description of connections for posts supporting guardrails or stair guards
Suggested citation for this web page
DECK POST CONSTRUCTION at InspectApedia.com - online encyclopedia of building & environmental inspection, testing, diagnosis, repair, & problem prevention advice.
Or see this
INDEX to RELATED ARTICLES: ARTICLE INDEX to BUILDING DECKS & PORCHES
Or use the SEARCH BOX found below to Ask a Question or Search InspectApedia
Or see
INDEX to RELATED ARTICLES: ARTICLE INDEX to BUILDING STRUCTURES
Or use the SEARCH BOX found below to Ask a Question or Search InspectApedia
Ask a Question or Search InspectApedia
Share this article:Try the search box just below, or if you prefer, post a question or comment in the Comments box below and we will respond promptly.
Search the InspectApedia website
Note: appearance of your Comment below may be delayed: if your comment contains an image, photograph, web link, or text that looks to the software as if it might be a web link, your posting will appear after it has been approved by a moderator. Apologies for the delay.
Only one image can be added per comment but you can post as many comments, and therefore images, as you like.
You will not receive a notification when a response to your question has been posted.
Please bookmark this page to make it easy for you to check back for our response.
IF above you see "Comment Form is loading comments..." then COMMENT BOX - countable.ca / bawkbox.com IS NOT WORKING.
In any case you are welcome to send an email directly to us at InspectApedia.com at editor@inspectApedia.com
We'll reply to you directly. Please help us help you by noting, in your email, the URL of the InspectApedia page where you wanted to comment.
Citations & References
In addition to any citations in the article above, a full list is available on request.
- [1] Steve Bliss's Building Advisor at buildingadvisor.com helps homeowners & contractors plan & complete successful building & remodeling projects: buying land, site work, building design, cost estimating, materials & components, & project management through complete construction. Email: info@buildingadvisor.com
Steven Bliss served as editorial director and co-publisher of The Journal of Light Construction for 16 years and previously as building technology editor for Progressive Builder and Solar Age magazines. He worked in the building trades as a carpenter and design/build contractor for more than ten years and holds a masters degree from the Harvard Graduate School of Education. Excerpts from his recent book, Best Practices Guide to Residential Construction, Wiley (November 18, 2005) ISBN-10: 0471648361, ISBN-13: 978-0471648369, appear throughout this website, with permission and courtesy of Wiley & Sons. Best Practices Guide is available from the publisher, J. Wiley & Sons, and also at Amazon.com - [2] Decks and Porches, the JLC Guide to, Best Practices for Outdoor Spaces, Steve Bliss (Editor), The Journal of Light Construction, Williston VT, 2010 ISBN 10: 1-928580-42-4, ISBN 13: 978-1-928580-42-3, available from Amazon.com
- [3] Prescriptive Residential Wood Deck Construction Guide, based on the 2009 International Residential Code, American Forest & Paper Association, Inc., provided by reader Mark Morsching from Everflashing.
- [2] Manual for the Inspection of Residential Wood Decks and Balconies, by Cheryl Anderson, Frank Woeste (Forest Products Society), & Joseph Loferski, October 2003, ISBN-13: 978-1892529343,
- In addition to citations & references found in this article, see the research citations given at the end of the related articles found at our suggested
CONTINUE READING or RECOMMENDED ARTICLES.
- Carson, Dunlop & Associates Ltd., 120 Carlton Street Suite 407, Toronto ON M5A 4K2. Tel: (416) 964-9415 1-800-268-7070 Email: info@carsondunlop.com. Alan Carson is a past president of ASHI, the American Society of Home Inspectors.
Thanks to Alan Carson and Bob Dunlop, for permission for InspectAPedia to use text excerpts from The HOME REFERENCE BOOK - the Encyclopedia of Homes and to use illustrations from The ILLUSTRATED HOME .
Carson Dunlop Associates provides extensive home inspection education and report writing material. In gratitude we provide links to tsome Carson Dunlop Associates products and services.
 |
HOME | ABOUT | ASK a QUESTION | CONTACT | CONTENT USE POLICY | DESCRIPTION | POLICIES | PRIVACY | |
| © 2026 - 1985 Publisher InspectApedia.com - Daniel Friedman | |||||||||