 Deck Joist Hanging Procedure
Deck Design-Build Online Guide
- POST a QUESTION or COMMENT about deck construction
How to install deck joists for design-build deck projects.
This article describes in detail how to set deck joists in place, how to square up the deck frame using a simple diagonal measurement, and how to keep the deck joist tops all in one level plane.
We continue with how the joists are connected to the outer girder and how to trim off the ends of joists to an exactly uniform length after they are all in place and fastened.
We also discuss handling recalcitrant crooked or annoying joists. . This article series describes critical safe-construction details for decks and porches, including avoiding deck or porch collapses and other hazards.
InspectAPedia tolerates no conflicts of interest. We have no relationship with advertisers, products, or services discussed at this website.
- Daniel Friedman, Publisher/Editor/Author - See WHO ARE WE?
Deck Joist Installation Steps - Putting the Joists in Place for your Deck

Attach the End Joists & Make Square the Joists, Ledger Board & Deck Beam
Begin your joist installation with the end joists, it is best to design your deck and ledger so that these joists cover the ends of the ledger. The joists should be attached on both sides.
[Click to enlarge any image]
Back at DECK JOIST LAYOUT we discussed marking the layout positions for the deck floor joists along the ledger board face and atop the outer girder.
On the outside, drill three pilot holes through the joist and into the ledger to prevent splitting, then fasten with 16d nails. Attach reinforcing angle brackets to the inside corners.
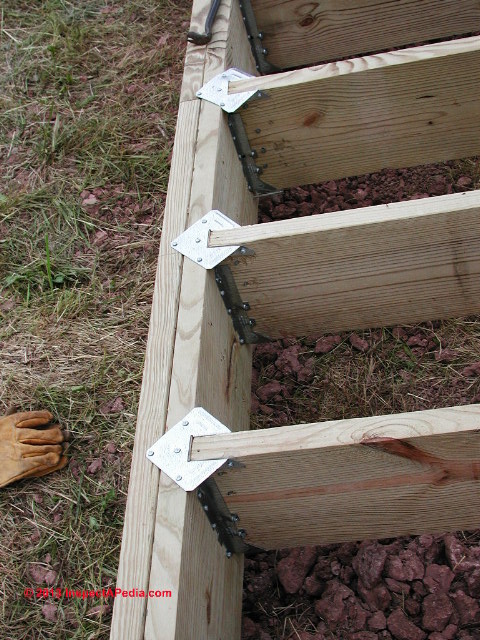
You can use angled brackets or half-joist-hanger brackets to make a good connection between the inner face of those end joists and the face of the girder.
...
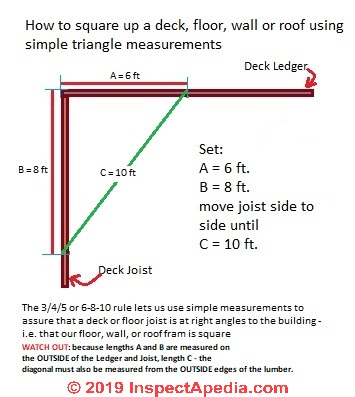
As we show in the sketch at left and as we will explain below, using the 6-8-10 rule can also help you square up the deck by making sure that the side joists are absolutely perpendicular to the building.
Square the Structure & Trim the Deck Beam Ends
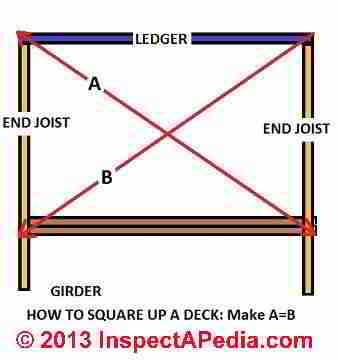
 Square up the end joists at the ledger and at the beam by measuring the diagonals. If a rectangle is square, the two diagonals will be identical in length.
[Click to enlarge any image]
The end of the beam should be flush with the outer edges of the joists. In my sketch you'll see the outer girder projects a little beyond the joist on the right end of the girder.
I like to leave the girder a bit long until the deck frame has been perfectly squared. That gives us some adjustment room; then we trim off any excess girder length using a handsaw.
If you need to cut the beam, use a square to mark the vertical cut line, then make the cut with a circular saw or reciprocating saw. Trim the bottom corner at an angle for a nicer look.
Useful details for making sure that your structure is plumb (vertical), level (flat), and square are found at
Attach Joists to the Ledger
Set the joist into the joist hanger. Use a framing square, try square, or speed square to ensure that the joists are perpendicular to the ledger.
If you nailed joist hangers to the girder previously, as some carpenters do, you'll just drop the ledger board end of the joist into the hanger - an easy and fast way to assemble the deck joists.
If you left one side of the joist hanger un-nailed you'll want to nail it now. Tap the joist hanger closed against the side of the joist and against the ledger board and then nail it.
Framing tip: you may find that not all of your joists are exactly the same depth. Some of your 2x10's may be 9 1/2" exactly while others may be 9 5/8" or 9 1/4".
This gets ugly when you are using joist hangers already nailed to the leger board because if we don't keep the top surfaces of the deck joists all in the same plane our deck surface may be wavy or poorly connected later.
See DECK JOIST LAYOUT for details.
Make sure that the tops of your deck joists are all installed flush with the top edge of the ledger board.
No matter how accurately you install joist hangers, you will still be faced with joists that are a bit larger or smaller than others. If you wind up with a joist that sits too high in its hanger, trim a bit off the bottom with a chisel.
Similarly, if a joist is too low, shim the bottom. When you are satisfied with the fit, drive nails through the joist hanger into the joist on both sides.
After you have installed a few joists, you can also use the laid-out rim joist to check for square.
You may have to make similar adjustments at the other end of bad joists where they rest atop the girder.
Attach the Deck Joists to the Girder or Beam
 With the joists attached to the ledger, it is time to attach them to the beam. You should do this only after you are sure the joists are square.
An easy way to check the alignment is to lay the rim joist on top of the joists, with the layout marks on the rim joist lined up with the joists. Building codes often permit you to fasten the joist to the beam with three 8d or l0d nails driven at an angle (that is, toe nailed).
For added strength, use seismic or hurricane ties or rafter ties.
Our SummerBlue Arts camp stage deck (at left) used an outer girder for the front edge of the stage to solve a framing problem when the lumber yard delivered framing lumber that was shorter than we had ordered.
We wanted a very-secure connection between the joists and the outer girder-framed deck.
The photo shows clips and joist hangers used to tie the girder to the joists and vice versa.
The original construction, installation and long term performance of this outdoor performing arts stage floor are described in a series of articles beginning
at BATTER BOARDS LAYOUT METHOD.
Keep the Deck Joists Straight
Joists should be perpendicular to the ledger and also parallel to each other.
One simple way to get each joist quickly squared up is to make an oversized framing square, which is really nothing more than a physical expression of the “3-4-5” principle.
Make the square out of 1 x4s, paying attention to the dimensions noted in the illustration. When you install a joist, set the 3-foot-long side against the ledger, and use the 4-foot-long edge to align the joist.
Lay Out the End Cuts on the Deck Joist Outer Ends
To cut the joists to length, first measure out from the ledger along each end joist and mark the desired length. Snap a chalk line between these marks across the tops of the joists.
Use a square and a pencil to transfer the chalk marks to the face of each joist. Note that even if you are not planning to cut the joists, it is still wise to snap a chalk line and see that the joists line up properly; if they do not, trim those that are too long.
Trim the Deck Joist Ends
Cut each joist to length with a circular saw. Cut carefully so that the ends are straight and plumb.
Attach the Rim Joist (Header Joist) at the Deck Outer Edge
 Aligning the top of the rim joist with the tops of the other joists can be tricky. To make the process easier, tack pieces of scrap lumber to the bottoms of a couple of joists to give the rim joist a place to rest while you work.
It will be easier to keep it properly aligned with the joists. Have a helper apply pressure to align the joists, then drive three 12d nails through the face of the rim joist and into each of the joist ends, working from one end to the other.
Our photo (left) of the Green Cabin project in Minnesota illustrates simple deck rim joist connections at a corner post; the rim joists are first nailed (16d common galvanized) to the corner post, then bolted for added security.
When choosing your nailing pattern remember not to jam a nail where you intend to drill or a structural lag or through bolt connection.
Framing tip: to avoid splitting the ends of the rim joist, drill pilot holes before driving the nails into the end joists. After nailing the rim joist to the end joists, attach angle brackets to the inside, as you did at the ledger.
Alternatively, to keep the face of the rim joist free of visible nail heads, you can attach the intermediary joists with joist hangers instead.
Handling Twisted or Difficult Deck Joists or Other Boards
When you cannot align a joist by hand, use a pipe clamp. In the photograph, the clamp is pulling a joist into vertical alignment, but you can also use a clamp to force the tops of joists into horizontal alignment or to pull a joist closer to the rim joist. In the latter case, attach one end of the clamp to a nail driven into the top of the joist and the other end to the face of the rim joist.
Overlap Long-Span Deck Joists at the Deck Girder or Beam
Larger decks typically require more than one beam, and this, in turn, generally means you will need to use two joists to span the distance from the ledger to the rim joist. The best way to handle this transition is to have the joists overlap each other at the middle beam, as shown at left.
Allow at least 12 inches of overlap, and secure the joists to each other with 16d nails. Note that this approach will result in the ledger and rim joist having different layouts. Rather than mirroring each other, the joists at the rim will be offset by 1 ½ inches from the joists at the ledger.
Use Blocking or Bridging Between Deck Joists
Some building codes require the use of blocking (also called bracing or bridging) between the joists. Bridging prevents longer-span joists from twisting and it stiffens the floor structure by transferring a portion of the load at any individual deck joist over to its two neighbors.
Blocking can strengthen floors that have deep joists with spans of 10 feet or more.
Check your building code for specific requirements. Blocking should be cut from joist stock. Snap a chalk line across the tops of joists, and then install blocking on alternating sides of the line.
Toenail the blocking with three 12d nails at each connection.
...
Continue reading at DECK FLOOR LAYOUT or select a topic from the closely-related articles below, or see the complete ARTICLE INDEX.
Or see these
Recommended Articles
- BATTER BOARDS LAYOUT METHOD - how to lay out a deck from scratch
- DECK & PORCH CONSTRUCTION - home
- DECK FLOOR INSTALLATION
- DECK JOIST LAYOUT - the prior article in this series.
Suggested citation for this web page
DECK JOIST INSTALLATION at InspectApedia.com - online encyclopedia of building & environmental inspection, testing, diagnosis, repair, & problem prevention advice.
Or see this
INDEX to RELATED ARTICLES: ARTICLE INDEX to BUILDING DECKS & PORCHES
Or use the SEARCH BOX found below to Ask a Question or Search InspectApedia
Or see
INDEX to RELATED ARTICLES: ARTICLE INDEX to BUILDING STRUCTURES
Or use the SEARCH BOX found below to Ask a Question or Search InspectApedia
Ask a Question or Search InspectApedia
Try the search box just below, or if you prefer, post a question or comment in the Comments box below and we will respond promptly.
Search the InspectApedia website
Note: appearance of your Comment below may be delayed: if your comment contains an image, photograph, web link, or text that looks to the software as if it might be a web link, your posting will appear after it has been approved by a moderator. Apologies for the delay.
Only one image can be added per comment but you can post as many comments, and therefore images, as you like.
You will not receive a notification when a response to your question has been posted.
Please bookmark this page to make it easy for you to check back for our response.
IF above you see "Comment Form is loading comments..." then COMMENT BOX - countable.ca / bawkbox.com IS NOT WORKING.
In any case you are welcome to send an email directly to us at InspectApedia.com at editor@inspectApedia.com
We'll reply to you directly. Please help us help you by noting, in your email, the URL of the InspectApedia page where you wanted to comment.
Citations & References
In addition to any citations in the article above, a full list is available on request.
- [1] Steve Bliss's Building Advisor at buildingadvisor.com helps homeowners & contractors plan & complete successful building & remodeling projects: buying land, site work, building design, cost estimating, materials & components, & project management through complete construction. Email: info@buildingadvisor.com
Steven Bliss served as editorial director and co-publisher of The Journal of Light Construction for 16 years and previously as building technology editor for Progressive Builder and Solar Age magazines. He worked in the building trades as a carpenter and design/build contractor for more than ten years and holds a masters degree from the Harvard Graduate School of Education. Excerpts from his recent book, Best Practices Guide to Residential Construction, Wiley (November 18, 2005) ISBN-10: 0471648361, ISBN-13: 978-0471648369, appear throughout this website, with permission and courtesy of Wiley & Sons. Best Practices Guide is available from the publisher, J. Wiley & Sons, and also at Amazon.com - [2] Decks and Porches, the JLC Guide to, Best Practices for Outdoor Spaces, Steve Bliss (Editor), The Journal of Light Construction, Williston VT, 2010 ISBN 10: 1-928580-42-4, ISBN 13: 978-1-928580-42-3, available from Amazon.com
- [3] Prescriptive Residential Wood Deck Construction Guide, based on the 2009 International Residential Code, American Forest & Paper Association, Inc., provided by reader Mark Morsching from Everflashing.
- [2] Manual for the Inspection of Residential Wood Decks and Balconies, by Cheryl Anderson, Frank Woeste (Forest Products Society), & Joseph Loferski, October 2003, ISBN-13: 978-1892529343,
- In addition to citations & references found in this article, see the research citations given at the end of the related articles found at our suggested
CONTINUE READING or RECOMMENDED ARTICLES.
- Carson, Dunlop & Associates Ltd., 120 Carlton Street Suite 407, Toronto ON M5A 4K2. Tel: (416) 964-9415 1-800-268-7070 Email: info@carsondunlop.com. Alan Carson is a past president of ASHI, the American Society of Home Inspectors.
Thanks to Alan Carson and Bob Dunlop, for permission for InspectAPedia to use text excerpts from The HOME REFERENCE BOOK - the Encyclopedia of Homes and to use illustrations from The ILLUSTRATED HOME .
Carson Dunlop Associates provides extensive home inspection education and report writing material. In gratitude we provide links to tsome Carson Dunlop Associates products and services.

