 Foundation Drains
Footing Drains Prevent Foundation Leaks & Water Entry
- POST a QUESTION or COMMENT about foundation drains, footing drains, and perimeter drains used to keep water out of buildings
Foundation drainage installation design specifications.
This article discusses building foundation drainage: footing drains, used to prevent foundation leaks and building water entry.
This article series discusses types of drainage system s, including foundation drains or "french drains" for preventing wet basements and crawl spaces.
InspectAPedia tolerates no conflicts of interest. We have no relationship with advertisers, products, or services discussed at this website.
- Daniel Friedman, Publisher/Editor/Author - See WHO ARE WE?
Foundation Drain Systems - Footing Drains
Our page top drawing of types of indoor foundation and basement drainage systems is provided courtesy of Carson Dunlop Associates, a Toronto home inspection, education & report writing tool company [ carsondunlop.com ].
[Click to enlarge any image]
Article Series Contents
- DRAIN DEFINITIONS: FOOTING, FRENCH, PERIMETER DRAIN
- FOOTING DRAIN INSTALLATION
- FOOTING DRAIN CLOGGING
- FOOTING DRAIN BACKFILL DETAILS
- FOOTING DRAINS HOLES DOWN
- OVERLOADED FOUNDATION DRAINS
Definitions of a Footing Drain, French Drain, & Perimeter Drain?
Properly, a footing drain or French drain is an outdoor drain around the building's foundation bottom while an perimeter drain is an indoor drain in a basement or crawlspace floor. Here are the details of these drain types and how to build them.
A footing drain,
that is an exterior foundation drainage system placed outside the foundation wall near the wall footing, at the level we show, covered with gravel, and if the footing drain going to do anything, it is piped to daylight or to a catch basin that is in turn pumped to daylight or to a storm drain.
Well plenty of people do call interior foundation drains or perimeter drains a "french drain". We don't.
A "French Drain"
is an outdoor buried drain line constructed to carry water away from the building, typically to a drywell or catch basin.
Our sketch shows how we remove water from roof runoff that pours down a downspout.
Details about French Drains are
at FRENCH DRAINS for DOWNSPOUTS
So what is the difference between a french drain, a footing drain, and a perimeter drain. A French drain is shown above, and a footing drain is shown in our two sketches below.
A perimeter drain is an indoor drain cut into the floor around the perimeter of a basement or crawl space to intercept and remove water from the building interior. We illustrate perimeter drains above.
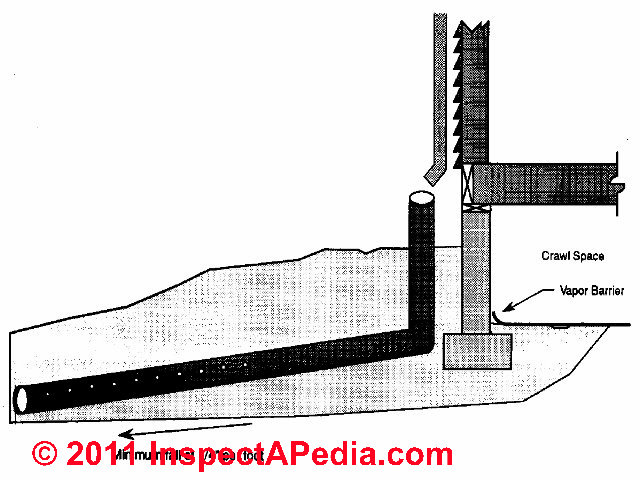
The drain shown in the sketch above is intended to describe an exterior foundation drainage system. This drain is placed outside the foundation wall in the location shown, is sloped to drain, and ideally drains downhill away from the building carrying water "to daylight".
Interior Trench & Drain
An interior trench and drain system is sometimes added inside a basement or crawl space that has a flooding problem. If you imagine the drain pipe shown above located on the interior of a foundation wall then it's an internal perimeter drain.
Details about interior perimeter drain systems are
Watch out: the sketch above shows what can be a common and serious mistake: connecting the roof drainage system or downspouts or leaders into the footing drain system.
The result is likely to overload the footing drain or even if it doesn't do so right away, eventually the footing drain clogs and the roof drainage ends up in the building basement or crawl space.
If you have this bad arrangement at your property you should consider a temporary above-ground extension to the downspout - don't leave it emptying into the foundation drain system.
Building Footing Drain Details
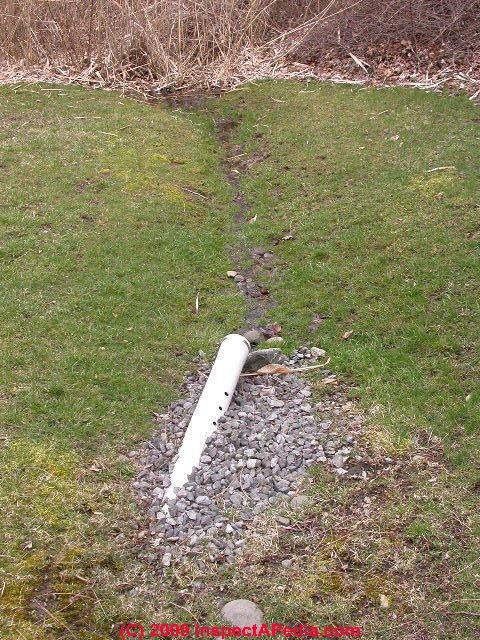
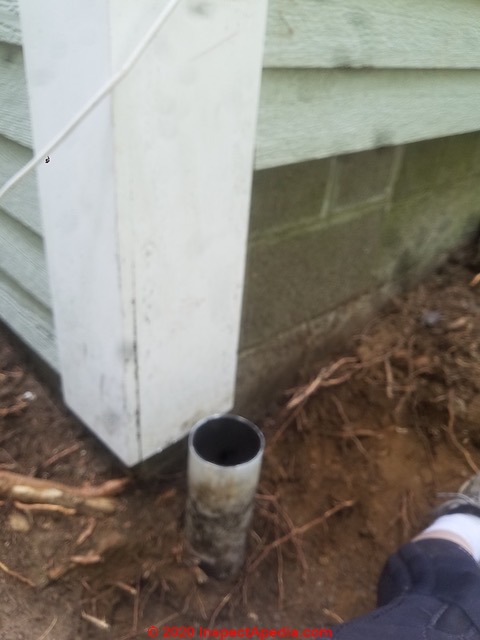
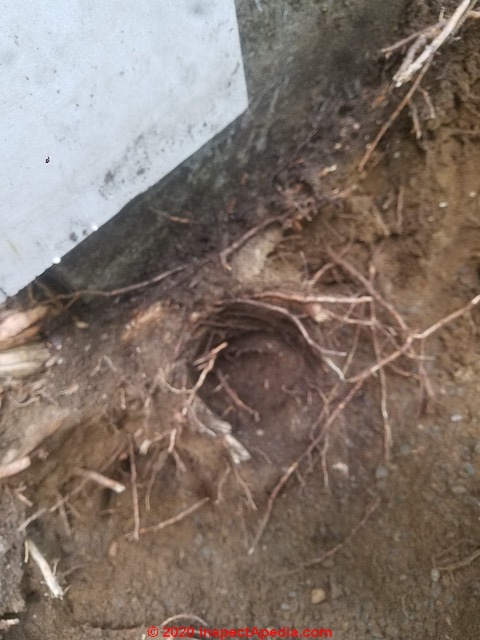
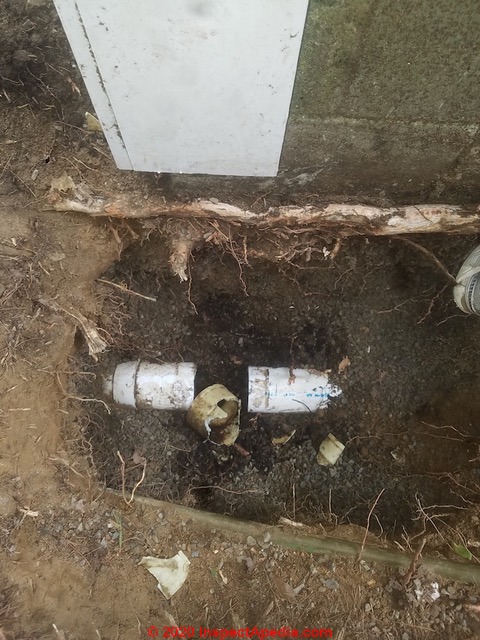
Find the end of the footing drain system that used to drain to daylight (see our photo below).
The foundation drain system may have become buried with mud or covered by backfill. Clear any blockage at the end of the footing drain extension, open and check the end for water flow in wet weather.
- Foundation drainage - drain tiles also called footing drains and by some folks "French drains" (which is not correct) water flows in the path of least resistance. Perforated 4-inch PVC or flexible ABS are the least costly and most foolproof foundation drainage conduits.
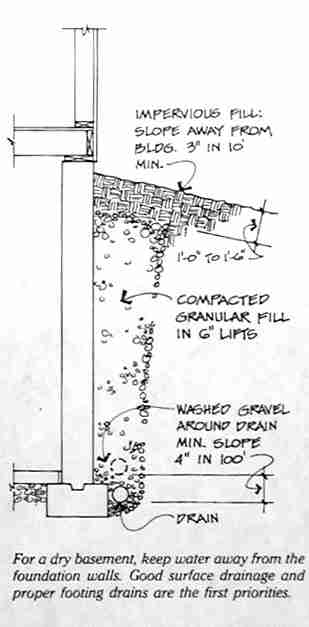
Foundation drains should pitch at least 4 inches in every 100 feet of length.
The top of the foundation drain, should be below the top of the finished basement or crawl space slab. From the low corner of the building, the foundation drain should continue to daylight or, if permitted by local codes, to a storm sewer, so that water will drain away from the building without relying on an electrical sump pump or other magic.
See FRENCH DRAINS for DOWNSPOUTS - Footing drain hole perforations face down:
if you use perforated footing drain tiles that include perforations only on one side, face the holes down. Water collects on the bottom. More details are
at FOOTING DRAINS HOLES DOWN - Footing drains to a drywell?
Some builders of homes on flat sites where drainage by gravity is not possible install a drywell to collect and store storm drainage from around a building.
Watch out: in areas of wet soils, in wet weather drywells are often not dry at all and may themselves fill-up with water from nearby soils, making this scheme simply not workable. - Footing drains to a sump pit?
One of our clients plagued with water entry at a flat site installed new foundation drains around her home, combined with an outdoor, frost-protected, duplexed, and battery backup sump pit system to pump foundation drainage to a nearby storm drain.
Without the battery backup detail, this system might not have worked: guess when electrical power (for the sump pump) is most likely to fail?
Clogged Footing Drains
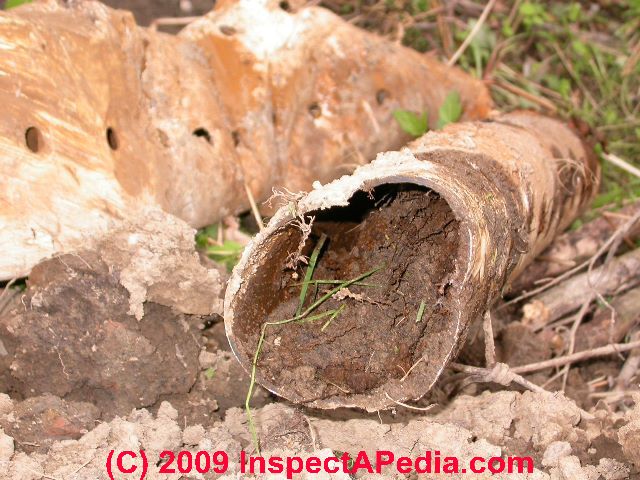
Even if foundation drainage was properly installed when a building was constructed, the system may no longer be working. Over time fine soil particles can enter and clog the foundation drainage system.
If you know that a foundation drain system was installed - perhaps you can find the end of it as we illustrate above - and if the building foundation is leaking water from low on the foundation walls, and if little or no water is coming out of the end of the footing drain in wet weather, it's a good bet that the drain system has clogged.
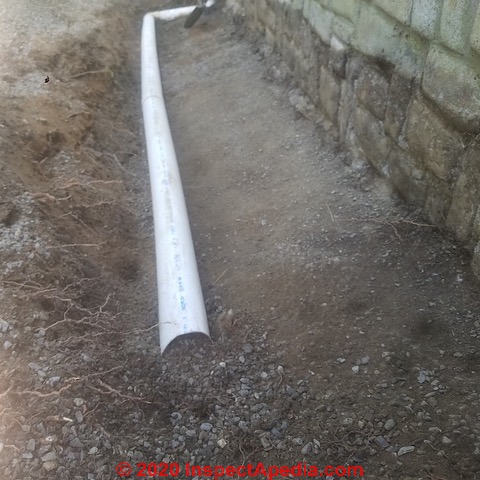
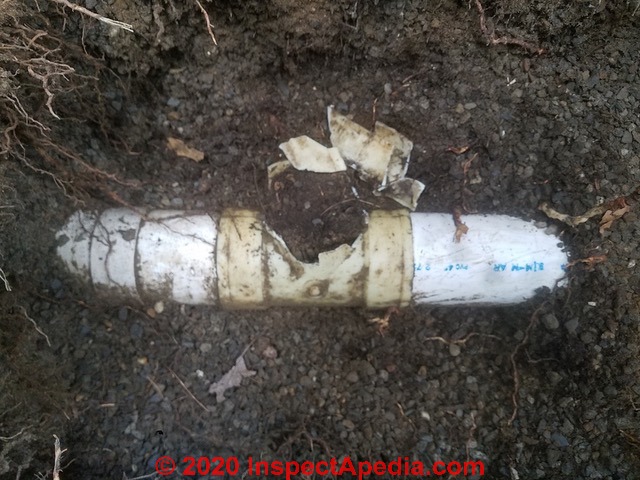
Our photo above shows the footing drain that was excavated and removed at the home of a client whose house suffered recurrent flooding. The old footing drain was totally impacted with mud.
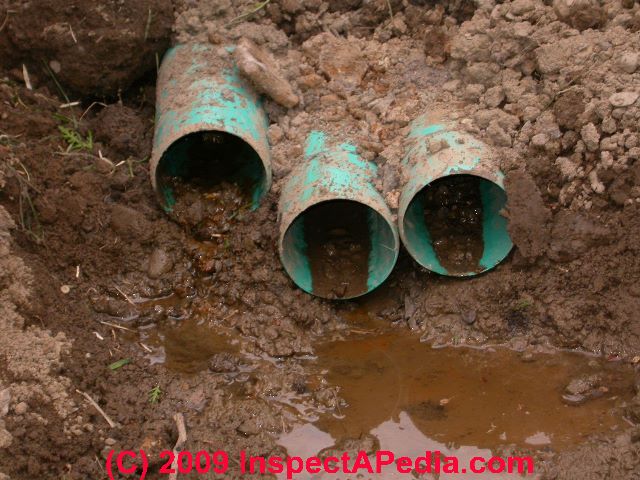
The photo below shows the ends of three new footing drains that were installed and carried to daylight. We remained a little nervous about just what the builder used for backfill - notice that silty mud coming out of the new drains? They may not have a long life.
- Find and un-clog the footing drains: excavate at a building corner, find the footing drains, cut open the drain to see how full it has become with silt, and have the drains cleaned using high pressure water or other methods.
- Reroute a non-working footing drain to a drywell if you can't get it to daylight
- Add missing foundation footing drain sections that were omitted, such as around a chimney or building addition
Foundation Drainage Backfill Details to Prevent Basement Water Leaks

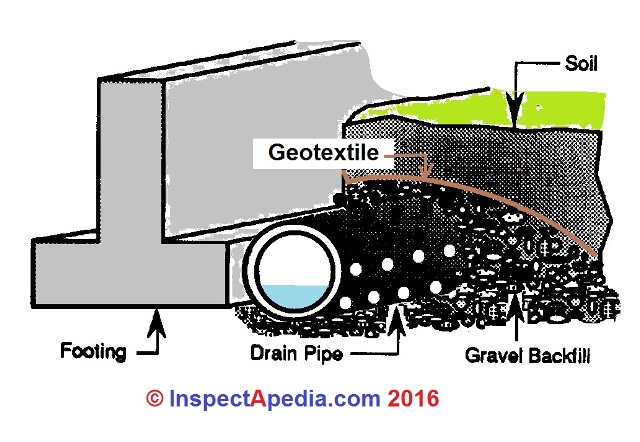
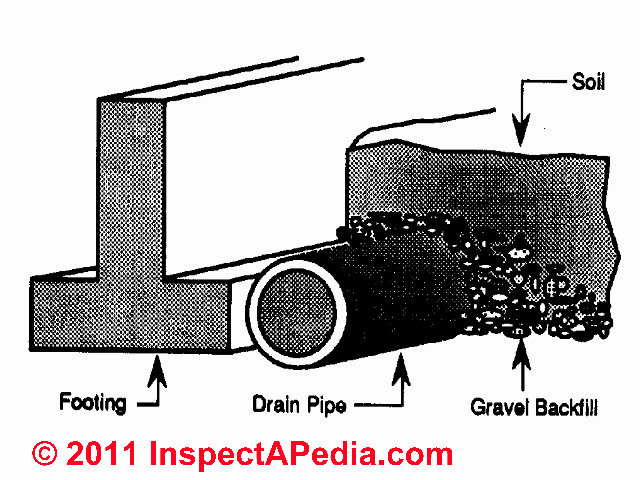
- Bury the footing drains in gravel, both under and above the drain tiles. Extend the gravel backfill at least two-thirds of the way to the top of finished grade.
Gravel helps water flow easily into the drain system instead of seeking a way into the building, and the removal of water outside the foundation wall also avoids foundation collapse later.
The gravel size needs to be larger than the holes in the drain tiles.
Our sketch (left) shows a less than optimum footing drain installation because the artist placed soil too close to the drain pipe. - Footing drain geotextile covers: some builders also install synthetic fabrics (geotextiles) over the footing drains before covering them to further slow the footing drain clogging by dirt and silt.
Other builders place a layer of 15-pound building felt on top of the drainage bed to slow soil clogging of the gravel itself as well as to protect the footing drains. - Clay foundation drain cap: the top foot of backfill over the footing drains should be a low-permeance clay cap to keep surface water (those spilling-over gutters) away from the foundation. If plantings are intended, add 4 to 6" of loam on top of the clay cap.
Foundation Drain Perforated Pipe Holes "Up" versus "Holes "Down"?
The foundation drain or "footing drain" I show in various illustrations above is a modification of the original page top drawing to illustrate water inside the drain pipe (blue) and the placement of the pipe with perforations "up".
There is some argument among builders about whether or not the footing drain should go "holes-up" or "holes down".
The "Up" position is thought to reduce the rate of soil clogging but has the disadvantage that water outside the foundation has to rise to the height of the holes to get into the drain.
This isn't a terrible problem for the common case that water is entering the footing drain by percolating down through soil from above.
Still in my OPINION "holes down" and well bedded in gravel under as well as around and above the footing drain pipe and with gravel covered by a geotextile is the optimum solution.
That means water finds its way into the footing drain system as soon as it reaches the level of the bottom of the footing drain pipe - sooner than if it has to rise several inches higher to get into the drain line.
That reduces water pressure under and around the foundation footing and reduces chances of water entry into the structure.
Incidentally though I show blue in the bottom of the footing drain in the sketches above, you should not normally see standing water in a footing drain. If you do the drain is
- Partly or fully clogged
- Not properly sloped down to daylight
- or is overloaded and inadequate to handle the volume of water entering the drain system - you might see this condition of you examine the footing drain interior during very wet weather and during heavy rain.
We discuss the orientation of perforated drain line holes - up, down, or in-between, in more detail and in a different application
at SEPTIC TRENCH LINE SPECIFICATIONS.
There where we are worried about sewage sludge clogging the drain system we put the perforated holes at 5 and 7 o-clock if we can, theorizing that we're deferring the clogging of the drain line exit holes by sewage sludge.
You could make the same argument about silt collecting inside the footing drains around a foundation.
But for foundation drains around a foundation, I'm more worried about intercepting water as soon as possible to keep it out of the building.
Overloaded Footing Drains
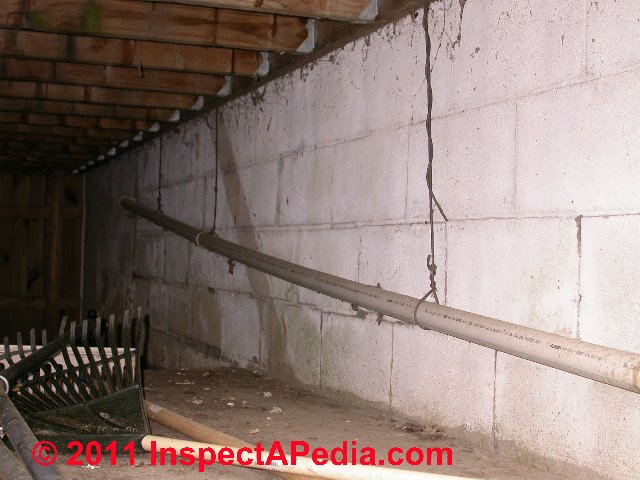
We explain at GUTTERS & DOWNSPOUTS that it's a bad idea to connect the roof drainage system to the building footing drains.
The added water volume may overload the drain system leading to foundation leaks.
And worse, when later in the life of the building the foundation drains clog, we suddenly begin directing 100% of the roof runoff into a lake of water trapped around the building foundation - virtually guaranteeing that the basement floods.
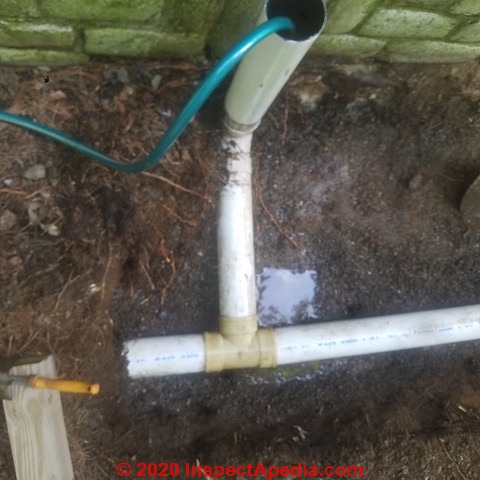
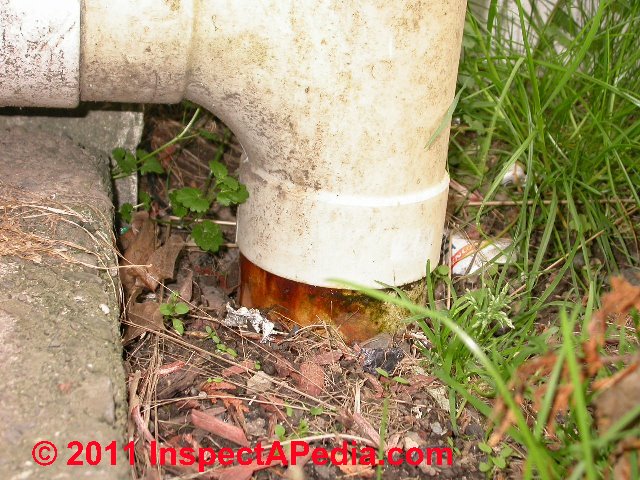
Our photos (below) show a home whose roof drainage system passed through the crawl space wall, across to the other end of the building, exited the crawl space to go back outside where it dove down into the building footing drain system. The result was a constant wet finished basement.
Notice in our second photo (below right) that a clue telling us the whole drainage system was clogged and backing up was that during rain water leaked out of the tee at the top of the vertical drain line that was connected to the footing drains.
At a recently constructed home we determined that the roof gutter system was connected to the foundation drains, and warned the buyer about the chances of basement flooding. The home was ten years old, and the basement, by every inside inspection indication, was "dry".
But two years later, following a period of heavy rain the client called to exclaim "Geez, our basement is full of water!" IT was like throwing a switch. The footing drain outlet clogged and the basement just filled right up.
Here we include solar energy, solar heating, solar hot water, and related building energy efficiency improvement articles reprinted/adapted/excerpted with permission from Solar Age Magazine - editor Steven Bliss.
...
Reader Comments, Questions & Answers About The Article Above
Below you will find questions and answers previously posted on this page at its page bottom reader comment box.
Reader Q&A - also see RECOMMENDED ARTICLES & FAQs
My foundation drain doesn't work, sump runs continuously
I connected my house foundation drainage to the farmer's field drainage system & my sump pump keeps running meaning it's not emptying through the field system.
When the foundation drain emptied into a drainage ditch the sump would fill to the level of the intake then flow to the ditch & the sump pump would never run. It was like that for about 9 yrs & worked no matter how hard it rained.
I was careful to maintain proper slope to the connecting point of the farm field system so do not know why it's not working.
The ditch is on my neighbour's property & it was getting filled with debris & I couldn't maintain it with the resultant consequence with my sump. Any advice? On 2020-12-01 by George
Reply by (mod) - two serious mistakes in your drain system
George,
it sounds as if the drainage ditch that you were relying on as two serious problems.The first is that it's on your neighbor's property which is not good you and might be objectionable to your neighbor. You don't normally have a legal right to use nor hsould you depend on a neighbor's drainage system
The second is that the ditch is being filled in which means that it's probably no longer accepting water.
You're going to need to find another drainage destination
Are foundation drain pipes white in contrast to gutter drain pipes that are light blue?
Are foundation drain pipes white in contrast to gutter drain pipes that are light blue? I am trying to figure out what a white drain pipe is connected to. It is not connected to any downspouts so I am assuming it is a foundation drain. On 2020-09-22
by Robin
Reply by (mod) -
Thanks for asking, Robin, but no; there's no color code that is specifically intended to distinguish between a foundation or footing drain and a downspout drain or extension.
When I've tested drain lines by putting water into them, such as running a hose into a gutter at the downspout to permit watching the end of that drain, when I do not see any outflow I don't necessarily assume that the non-flowing drain is a footing drain; instead, it could simply be a blocked downspout drain extension.
Watch out: we never want to connect a downspout drain into the footing drains - as some builders have done; the risk is overloading the footing drain and causing basement or crawl space water entry. When in doubt about the downspout destination, I might at least temporarily remove the connection to the buried drain line and extend the downspout away from the building above grade.
In particularly troublesome drain troubleshooting cases it's worth running an inspection camera through the drain line.
Reader field report: French Drain System Failures & Installation Errors: Diagnosis & Repair
Perhaps these two shots can help illustrate key “how not to” considerations for French drains.
[Click to enlarge any image]
The original house (1950) was built directly on ledge with a stone-and-cobblestone foundation. The upper ledge is gneiss which comes with a lot of natural layering and seepage, while the lower part sits on granite which is virtually impervious.
The grade is not consistent, so while the ledge slopes toward the house all the way down, the ledge dips lower in several places which naturally collect water at the foundation.
Some time in the 1990s the previous owners must have spent a bundle of money putting in new gutter drainage and a French drain. They built a 3-5 foot-wide concrete berm/swale shaped onto the ledge and then ran 10’ sections of perforated PVC 2 feet down the slope of the mini-swale (but not at the low-point?!) and covered everything with 20 yards or so of fine gravel.
The problems with this foundation drain system are:
(1a) The upper 20’ of perforated PVC sits as much as a foot above the lower counters of the swale/ledge, so that large amounts of water must pool before any of it can be carried away by the pipe.
(1b) The ledge is porous to begin with and the seam with the concrete is even less of a barrier, so the result of the pooled water is a 12 month, 24/7 wet basement, regardless of climate or season.
(2) The “new” downspout joins the perforated PVC at a T-joint where the ledge slopes down on both sides, so that any debris at all in the lower pipe backs downspout water into the upper section of the perforated PVC, ensuring that the pooled water is constantly replenished and the cellar never dries out.
(3) Furthermore, the lower 30+ feet of drainpipe - below the downspout - is (incorrectly) perforated as well, so that water gets released next to the house all the way downhill.
My plan is to dig out to the outer edge of the cement swale along its full 50+’ length and attempt to coat the seam with the ledge with hydraulic cement or similar, then lay sleeved, perforated PVC cut in lengths to lay as flat as possible to the low points of swale and ledge while stil angling downhill.
I’ll have to run a separate solid PVC line for the downspout, since the tree-roots and pine-needles pretty much guarantee a certain amount of crud in the pipe that could back up into any tied-in French drain. (I wish I could sleeve a solid pipe inside the perforated 4", but I don’t think it would have sufficient capacity.)
I’ll be happy to hear back if you notice anything notoriously wrong with my plan, but all I really need to do here is get you the photos for Inspectapedia's excellent "rogues gallery"...- Anonymous by private email 2091/08/20
Additional Comments:
1] more photos (below): I’ve dug out the bottom end and uncovered further misdeeds. It’s perforated PVC all the way down, and - as if that wasn’t enough - the perforated pipe then it makes a 90° turn and continues along the downhill side of the house.
I’m still not sure where or if it has an outlet, but there’s a suspicious persistent icy patch in the winter partway down the driveway...
The original PVC T-joint clearly degraded, but the super-wet lower corner was an obvious magnet for roots and they had infiltrated the system from all over.
[2] Plan B for the fix:
The two gutter downspouts will need new, solid lines to carry water away from the house.
Meanwhile, for the now-separated French drain, I’d still like to do some sealing at the seam of the trench (best sealant?) and then lay a 6-foot width of landscaping cloth along the bottom of the trench with 8-perf flexible pipe resting directly on it.
I’ll backfill with as much of the old (washed) gravel as will fit and fold the extra landscaping fabric over it before backfilling with mixed gravel and dirt. (I’ll haul off some of the excess, as it looks like the dirt will continue to build up at a rate of one inch every 2-3 years.)
As I’ve mentioned, however, the main drainage problem is not from surface water next to the house (which will be fully guttered), but from water and seepage following the surface of the ledge from uphill, so I’m not overly concerned with slow percolation from directly above.
I’ll need to cap off the top end of the remaining original drain where it continues past the downhill face of the house and run the “new” French drain drainage away from the house alongside the new downspout flow.
Moderator reply:
Thanks Anon - you're into an important project and a classic example of the difficulty of knowing what snafus someone buried before we came along.
It's in our publish-queue - I'll ask you to look at the material when it's ready.What seam are we sealing at "the trench" ?
If you're sealing concrete and it's clean and dry, there are some butyl caulks or sealants that adhere and endure well, though gooey and sticky to work with.
I've also used polyurethane sealants - SEAL CRACKS in CONCRETE, HOW TO
and POLYURETHANE FOAM INJECTION CRACK REPAIRS
Your photos illustrate a classic problem with foundation drain system failures: you can't see exactly what went wrong until the system is dug-up. You'd not even have been able to push a sewer line camera through these broken, clogged footing drains - nearly a guarantee of basement or crawl space water entry.
Reader follow-up:
Yeah… I had to re-think sealing that seam (between the concrete swale and the ledge).
Because the concrete was poured right onto clean ledge, there was nowhere to use expanding cement.
The tarry butyl route made sense but I wasn’t sure I would have enough time to clean (and dry) before the next rain (plus the mosquitos were awful, even if they couldn’t land for all the DEET I had on), so I just laid fabric along the low-point (all down the seam) with the flexible drain placed directly on top of that, then wrapped the fabric over to make a sleeve with as much clean gravel inside as would fit.
Backfilled with the old pea-gravel (probably 90% gravel, 10% dirt) and threw another sheet of fabric over that, then covered the top with the dregs of the gravel pile (probably 60/40 gravel/dirt).
I’d shoveled as much as I could of the first 8” of original dirt and roots to the side so I’ll move that somewhere else, since (a) there's not enough r-value to be gained by banking it against the foundation and (b) more dirt’s going to build up over the years anyway.
I still need to do something with the water at the low end of the French drain, so once the lower downspout’s in place there’ll be a new trench to carry both drains straight downhill side-by-side.
I haven’t been very consistent at documenting all the lessons-learned on this project, but at some point I’ll dig around for some other stuff that may amuse you.
Some of the best material was from the original house here that burned in 2016:
it had been a deluxe 1950 three-bedroom ranch that had a second floor added over the original footprint 5 years later - and at the same time they added a 6-foot bump-out to the first.
The only continuous vertical supports then were the new stairwell, a post in the living-room and the chase for the extended chimney. The last things keeping the 5-pitch roof from pancaking were the joists in the second-floor ceiling…built of lapped 2x3s.
As you can imagine, the demolition was remarkably easy and fast.
Can't I just patch a cove joint leak along my basement?
ps.... I know you probably shouldn't patch a cove joint but considering it is so small....only two feet or so.
should I patch a four or five foot length with some hydrolic cement in addition to the outside work? Just a thought?
I know the hydrostatic pressure will still exist but hopefully some of it will be reduced?
Have plenty of time with "stay at home" orders and don't want to use up all the economic stimulus money with major foundation expenses. ;)
Any thoughts? Thanks in advance.
I have a cove joint leak that extends about 2ft. long in the basement on the side of the house. It only leaks about once or twice a year and only after a really major rainfall. That foundation wall is about 10' deep and I do not wish to dig that deep to put in a footing drain. There are no downspouts close to it.
Can I simply dig about 3 feet deep along the foundation and put in some drain pipe to divert water away from the side wall to help relieve ground saturation and pressure? The grade is excellent with the back of the house being three stories and the front being two stories.
Not the perfect solution but is it a patchwork solution? What do you think? Could save thousands. Thanks. On 2020-04-27 by Bill
Reply by (mod) -
Bill
Maybe, but a worry is that digging part way down mat make the water entry worse by disturbing the soil. I would only try that if i thought the water source was at thst depth.Followup by Bill
Good point........how about just going below surface level? Obviously the water saturation comes from base but thinking of eliminating some extra water coming off the siding on that side of the house and potentially helping fight soil saturation.
I did put in french drains at both corner downspouts which reroutes water away from the foundation. They extend about 10 feet out.
Water still leaks under my foundation after installing a drain
To clarify the previous comments:
The footing ditch tapered from 2" below bottom of footer to 4.5" below bottom of footer at end of perforated pipe.
Over a 24 feet span dug done 2" below bottom of footer and at the point of 24 feet away dug down 4.5" below bottom of footer. Installed 24 feet of perforated pipe connecting to solid pipe to drain water away from 24 feet of foundation.
Still water is seeping under foundation? On 2020-03-13 by Robert Hodges -
Reply by by (mod) -
Robert
You might want to dig up and explore the footing drains at a couple of spots to be sure the drain is properly located, bedded in and covered by gravel; then look at the outlet of the footing drain system; if the diameter of water flowing out of the drain is close to the pipe diameter then the drain is overloaded;I have run into this at wet sites; we had to double the footing drain piping to handle the water volume.
Indoor drain is too high to remove water from my basement
To drain sitting water in a corner of my crawlspace , a contractor bore a hole thru the cinderblock and pushed thru a four inch french drain to the outside.
He sealed the hole with a foam product.
The water is supposed to drain out to the years and out a pop up.
It seems to me that the drain inside is up higher than the height of the standing water and will be useless.
Also will this cause deterioration of the foundation? should it be sealed with a masonry product? On 2019-08-31 by linda
Reply by by (mod) -
Linda
What's a "pop-up" and how does that handle drainage?
And yes, if the water outlet drain opening is above the level of water in the crawl area then water won't leave the crawl area through that opening except that portion of the water that rises above the bottom of the drain.
The hole through the block at the bottom of the foundation wall ought not harm the foundation structural properties.
I commend the contractor for trying to drain the crawl area by gravity, but this sounds like a faux drain. You might need a sump pump
Use the ARTICLE INDEX to see our articles on CRAWL SPACE DRYOUT and you'll see other steps that would be helpful.
Thanks for this page. Here's my footing drain repair plan. Is it adequate?
Thanks for building this page. I have a 1973 split foyer home about 46' W x 24' D. Around 1993 I added a 10'x20' rear deck and a 8'x10' front deck. About 10 years ago, I directed the downspouts through 4" PVC piping 100' to the garden in the backyard which is graded downhill away from the house.
About 5 years ago, I noticed water buildup under my rear deck which is built over the old patio space at the rear of the house on the lowest point near the home - there is a sliding patio door there. This spot, right in front of the door gathers rainwater in heavy rains, no matter the duration of the downpour.
Previuosly, this area would not accumulate water. I have a spot, near this area where the foundation drain is visible - it is the flexible black plastic pipe that appears to be about 6" -8". I'm not sure where the 'daylight' end is but will look around or simply follow the section I see until I find it unless you have a better way to locate it. I'm thinking my drain has broken down or become clogged over the years.
The front portion of the house hangs over about 2" so the upstairs dimensions are deeper than the downstairs.
Since I'm just trying to figure out the daylight, could there be multiple points of exit? I have a 2 car garage and driveway at the front of the house with a large drain directly in front of the garage which provide the lowest point for daylight for the front, and as I stated the back has the patio area, but further out in the yard is likely, but I don't remember ever seeing any place out there that water could be exiting from.
The front yard to the drainage ditch goes slightly up hill, so I'm guessing the builder did not attempt to drain there.
I'm guessing that I may need to replace sections or the drain entirely.
so I'm thinking if I need to replace it, I can excavate the old drain out, dig a little deeper, as you say, a few inches away from the footer noting the weight bearing at a 45 degree angle as you go down, add the geotextile, gravel, pipe, gravel, geotextile, being sure to slope it so there is no standing water at any point.
Then , when I backfill, I read to tamp the ground for every 6"" of depth as I fill it to minimize future settling and particulate carryover into the drain. Am I missing anything? I like your idea of a professional inspection and will definitely have someone assess it locally. On 2018-08-30 by al
Reply by by (mod) -
Foundation drains typically run to daylight, and depending on the shape of the site, there might be one corner or a pair of corners from which drains leave the building - or even more locations depending, again, on the building's footprint and on just how the site slopes away from the building.
And it's no surprise that between 1973 and recent years a foundation drain would clog. Unfortunately in my experience, even if you could get into the drain to try to clean the piping, soil will re-fill the line.
However before digging up the whole foundation drain system to replace it, I would concentrate on a very thorough, careful inspection of the roof drainage system and surface runoff details, as most of the time that's where a building's water problems originate.
My house has a footing drain that runs to daylight but appears to be running up hill! Should I worry?
My home has a footing drain that runs to daylight but appears to be running up hill! I never see any evidence of water running out of the drain... Should I be worried? On 2015-10-02
by Josh -
Reply by (mod) - yes worry
You may not yet have had water entry but if your foundation drains are not actually able to carry water away from the home, yes, later in the building's life a water entry problem is likely to occur, often leading to expensive damage. Better to fix it before that happens.
On 2014-09-03 by Dania Kustermans
Hi There,
I am looking for quote for reasonable foundation drains in my backyards.
please contact us at 905-319-2087.
Reply by (mod) -
Dania,
To protect reader confidence in our published material, InspectApedia does not sell services nor products.
Should french drains go below the footing on a house with a raised foundation with a crawl space
Should french drains go below the footing on a house with a raised foundation with a crawl space On 2011-11-10 by Greg
Reply by (mod) -
Greg, the sketches above show that experienced installers place the footing drains at the level of the bottom of the footing, on and covered by gravel and a soil filter. I may not understand your question. But if you mean that the level of the crawl space is below the footings, that sounds like a risky design - unsupported footings, and inviting water entry.
...
Continue reading at BASEMENT WATERPROOFING - topic home, or select a topic from the closely-related articles below, or see the complete ARTICLE INDEX.
Or see these
Recommended Articles
FOUNDATION DRAINAGE FAQs questions & answers about foundation drainage systems posted originally at the end of this page.
Or see
- BASEMENT WATERPROOFING - topic home
- GRADING, DRAINAGE & SITE WORK for a description of exterior surface grading and runoff control
Suggested citation for this web page
FOOTING & FOUNDATION DRAINS at InspectApedia.com - online encyclopedia of building & environmental inspection, testing, diagnosis, repair, & problem prevention advice.
Or see this
INDEX to RELATED ARTICLES: ARTICLE INDEX to BUILDING LEAKS & WATER ENTRY
Or use the SEARCH BOX found below to Ask a Question or Search InspectApedia
Ask a Question or Search InspectApedia
Questions & answers or comments about foundation drains, footing drains, and perimeter drains used to keep water out of buildings.
Try the search box just below, or if you prefer, post a question or comment in the Comments box below and we will respond promptly.
Search the InspectApedia website
Note: appearance of your Comment below may be delayed: if your comment contains an image, photograph, web link, or text that looks to the software as if it might be a web link, your posting will appear after it has been approved by a moderator. Apologies for the delay.
Only one image can be added per comment but you can post as many comments, and therefore images, as you like.
You will not receive a notification when a response to your question has been posted.
Please bookmark this page to make it easy for you to check back for our response.
IF above you see "Comment Form is loading comments..." then COMMENT BOX - countable.ca / bawkbox.com IS NOT WORKING.
In any case you are welcome to send an email directly to us at InspectApedia.com at editor@inspectApedia.com
We'll reply to you directly. Please help us help you by noting, in your email, the URL of the InspectApedia page where you wanted to comment.
Citations & References
In addition to any citations in the article above, a full list is available on request.
- [1] Scott Anderson, The Journal of Light Construction, December 2005 [1]. Mr. Anderson is owner of Tri-State Basement Systems in Berlin VT
- Steven Bliss served as editorial director and co-publisher of The Journal of Light Construction for 16 years and previously as building technology editor for Progressive Builder and Solar Age magazines. He worked in the building trades as a carpenter and design/build contractor for more than ten years and holds a masters degree from the Harvard Graduate School of Education.
Excerpts from his recent book, Best Practices Guide to Residential Construction, Wiley (November 18, 2005) ISBN-10: 0471648361, ISBN-13: 978-0471648369, appear throughout this website, with permission and courtesy of Wiley & Sons. Best Practices Guide is available from the publisher, J. Wiley & Sons, and also at Amazon.com.
Excerpts with updates and annotations expanding the original Best Practices Guide text can be found in the online review and book summary at BEST CONSTRUCTION PRACTICES GUIDE and also at DECK & PORCH CONSTRUCTION, at INDOOR AIR QUALITY IMPROVEMENT GUIDE, and in other articles found at InspectAPedia.com such as HOUSEWRAP AIR & VAPOR BARRIERS, SOUND CONTROL in buildings, and other topics. - Our recommended books about building & mechanical systems design, inspection, problem diagnosis, and repair, and about indoor environment and IAQ testing, diagnosis, and cleanup are at the InspectAPedia Bookstore. Also see our Book Reviews - InspectAPedia.
- In addition to citations & references found in this article, see the research citations given at the end of the related articles found at our suggested
CONTINUE READING or RECOMMENDED ARTICLES.
- Carson, Dunlop & Associates Ltd., 120 Carlton Street Suite 407, Toronto ON M5A 4K2. Tel: (416) 964-9415 1-800-268-7070 Email: info@carsondunlop.com. Alan Carson is a past president of ASHI, the American Society of Home Inspectors.
Thanks to Alan Carson and Bob Dunlop, for permission for InspectAPedia to use text excerpts from The HOME REFERENCE BOOK - the Encyclopedia of Homes and to use illustrations from The ILLUSTRATED HOME .
Carson Dunlop Associates provides extensive home inspection education and report writing material. In gratitude we provide links to tsome Carson Dunlop Associates products and services.


