 Adjust the Nest Cam Image Display
- POST a QUESTION or COMMENT about how to buy, install, debug, & make best use of a home security system using the Nest Cam®
![]() Nest Cam display adjustment:
Nest Cam display adjustment:
How to flip or rotate the Nest Cam display image. This article describes how to fix a Nest Cam display that is upside down or that is crooked when shown on your smartphone, tablet, or computer screen.
This article series describes the Nest Cam installation procedure and includes advice on settings that can get you out of trouble if your camera installation does not go smoothly.
To get the very best performance from your Nest Cam (or Dropcam) we give advice on camera location, use of lighting, and securing the cameras and their wiring.
InspectAPedia tolerates no conflicts of interest. We have no relationship with advertisers, products, or services discussed at this website.
- Daniel Friedman, Publisher/Editor/Author - See WHO ARE WE?
Adjusting the Nest Cam's View
 at NEST CAM DISPLAYS - WHAT CAN YOU SEE? we gave examples of placing the Nest Cam at the best height and location to monitor the more important areas of your field of view such as entry doors or windows.
Once the camera has been set-up and connected, you can move it without having to set it up again. I found it easiest to fine tune the camera's location by having my smartphone at hand, showing the view afforded by the Nest Cam I was adjusting. That can save repeated trips up and down the ladder.
But the nest cam has to additional view adjustment features that you may not have noticed.
- Flip the view in the software:
We mounted our nest-cams on horizontal surfaces such as a high bookshelf or onto vertical surfaces such as a wall. You can also hang a Nest Cam from an overhead surface - a ceiling or beam.
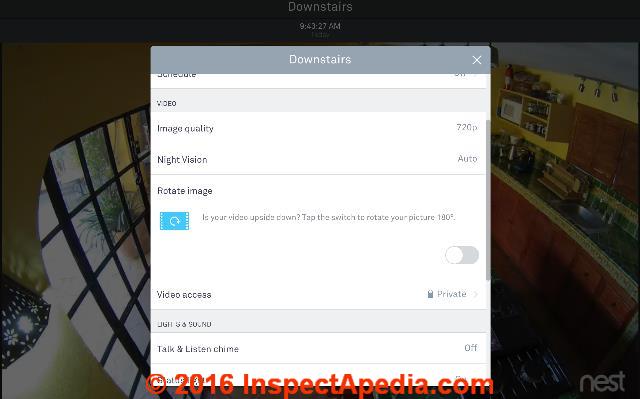
But in that position you may find that the scene on your smartphone or computer is now upside down. No problem.
Using the gear icon to access your camera's settings, you can select the "Rotate Image" feature to flip your picture 180 degrees. We performed this change for one of our wall-mounted cameras that hung the camera "down" from the wall mount.
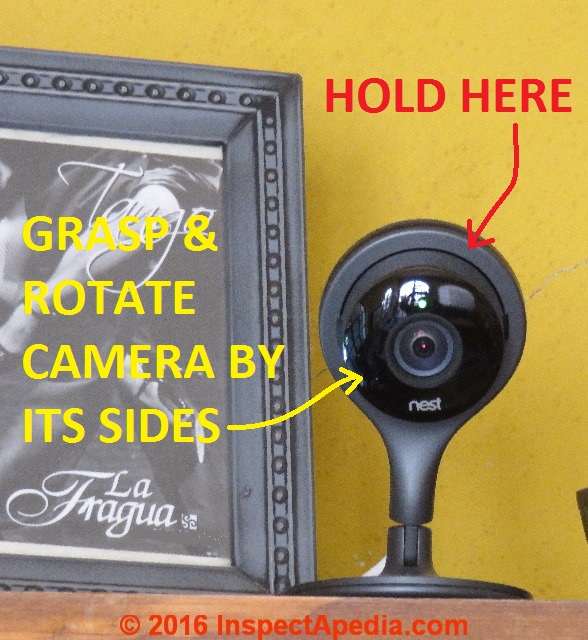
- Rotate the view by moving the camera in its mount.
Depending on just where you've placed the Nest Cam with respect to an area of view such as a room or peering through doorways, you may find that the view is disturbingly tilted.
You could move the camera to a different location such as the center of the room for a more "normal" view but perhaps that's not convenient (for example there's no power outlet). It's easy to fine-tune the angle of the viewing image.
Taking care not to bend the camera mount or damage its wiring connection, with one hand hold the outer rim of the camera mount, and with the other grasp the portion of the camera body that projects through that round rim and gently rotate it clockwise or counterclockwise.
Watch the image change on your smartphone or computer so that you can get the adjustment just right and so that you can be sure you're turning the camera in the proper direction.
If you find that you wanted to turn the camera 180 degrees you should use the software image rotation feature instead. Or you may need to use both of these features together to get your image properly adjusted to avoid nausea while watching your dog tear into the garbage in the kitchen.
At NEST CAM INFRA RED for DARK VIEWS we gave examples of two Nest Cam night vision problems to avoid:
- Don't place a bright light source too close to the camera, or move or re-aim the camera to avoid a fixed bright light source. Otherwise the bright light may interfere with the Nest Cam's own IR used for night vision, leaving large areas of the field of view un-lit.
- Don't place the camera where a large object is in the view foreground. Even if the object does not occupy much of the daytime field of view, at night when the Nest Cam's IR light source is in use, IR light reflected back to the camera will cause it to adjust (dim) such that more distant items in the field of view are totally in the dark.
Moving the Nest Cam to a different room is easy: just unplug it and re-plug it in the new location. As long as the camera is within Wi-fi range it will re-connect itself to your network. You will want to use the camera's Gear settings to change the camera's location name to the new room.
Avoid un-wanted detecting of animals by the security camera by selecting the appropriate system for their study area and target species and by careful placement and precise alignment of camera units in the field.
...
Continue reading at NEST CAM LIGHTING RECOMMENDATIONS or select a topic from the closely-related articles below, or see the complete ARTICLE INDEX.
Or see these
Recommended Articles
- BUILDING SAFETY HAZARDS GUIDE
- LIGHTING, EXTERIOR GUIDE - home
- NEST CAM INSTALLATION & USE - home
- NEST LEARNING THERMOSTATS
- SECURITY / MOTION SENSOR LIGHT INSTALL
- SECURITY SYSTEMS cameras, monitors for home security, intrusion, elder-safety, freeze or water damage monitoring
Suggested citation for this web page
NEST CAM VIEW ADJUSTMENT at InspectApedia.com - online encyclopedia of building & environmental inspection, testing, diagnosis, repair, & problem prevention advice.
Or see this
INDEX to RELATED ARTICLES: ARTICLE INDEX to BUILDING SAFETY
Or use the SEARCH BOX found below to Ask a Question or Search InspectApedia
Ask a Question or Search InspectApedia
Try the search box just below, or if you prefer, post a question or comment in the Comments box below and we will respond promptly.
Search the InspectApedia website
Note: appearance of your Comment below may be delayed: if your comment contains an image, photograph, web link, or text that looks to the software as if it might be a web link, your posting will appear after it has been approved by a moderator. Apologies for the delay.
Only one image can be added per comment but you can post as many comments, and therefore images, as you like.
You will not receive a notification when a response to your question has been posted.
Please bookmark this page to make it easy for you to check back for our response.
IF above you see "Comment Form is loading comments..." then COMMENT BOX - countable.ca / bawkbox.com IS NOT WORKING.
In any case you are welcome to send an email directly to us at InspectApedia.com at editor@inspectApedia.com
We'll reply to you directly. Please help us help you by noting, in your email, the URL of the InspectApedia page where you wanted to comment.
Citations & References
In addition to any citations in the article above, a full list is available on request.
- UL 1023, "Standard for Household Burglar-Alarm System Units" - http://ulstandards.ul.com/standard/?id=1023_6 - Excerpt:
Household burglar-alarm system units covered by these requirements consist of one or more unit assemblies of electrical components that are designed to detect the presence, movement, sound, or other activity of an intruder. Provisions are made for the connection of a power supply, remote control, and signal circuits by a prescribed method of wiring. These system units usually operate within the limits of Class 2 remote control and signal circuits as defined by Article 725 of the National Electrical Code, NFPA 70. - UL 985, "Standard for Household Fire Warning Systems"
- UL 641, "Standard for Installation and Classification of Residential Burglar Alarm Systems"
- UL 639, "Standard for Intrusion-Detection Units" - Excerpt:
An intrusion detector, as covered by these requirements, consists of one or more unit assemblies of electrical components that are designed to detect the presence, movement, sound or other activity of an intruder. Provision is made for connection to the assembly of power supply, remote control, and signal circuits by a prescribed method of wiring. - UL 603, "Standard for Power Supplies for Use with Burglar-Alarm Systems", - Excerpt:
These requirements do not cover power supplies for use at a central station. Such power supplies are covered by the Standard for Central-Station Alarm Services, UL 827. - Our recommended books about building & mechanical systems design, inspection, problem diagnosis, and repair, and about indoor environment and IAQ testing, diagnosis, and cleanup are at the InspectAPedia Bookstore. Also see our Book Reviews - InspectAPedia.
- In addition to citations & references found in this article, see the research citations given at the end of the related articles found at our suggested
CONTINUE READING or RECOMMENDED ARTICLES.
- Carson, Dunlop & Associates Ltd., 120 Carlton Street Suite 407, Toronto ON M5A 4K2. Tel: (416) 964-9415 1-800-268-7070 Email: info@carsondunlop.com. Alan Carson is a past president of ASHI, the American Society of Home Inspectors.
Thanks to Alan Carson and Bob Dunlop, for permission for InspectAPedia to use text excerpts from The HOME REFERENCE BOOK - the Encyclopedia of Homes and to use illustrations from The ILLUSTRATED HOME .
Carson Dunlop Associates provides extensive home inspection education and report writing material. In gratitude we provide links to tsome Carson Dunlop Associates products and services.

