 Exterior Lighting Installation, Inspection, Troubleshooting, Repair
How to install or repair outdoor light fixtures
- POST a QUESTION or COMMENT about exterior lighting installation, troubleshooting, repair, & electrical codes
This article describes exterior lighting for residential & light commercial properties.
We begin with a discussion of how to install recessed lights in an exterior soffit or roof overhang. We provide lighting installation suggestions about the type of light fixture to use, light fixture support, clearances, fire safety, moisture resistance, switch location, and electrical code citations for exterior lighting on buildings.
Comparison of low-voltage or 12-V recessed light fixtures with 120-V recessed lights, Comparison of bulb types for recessed lighting, Solutions for limited-installation-space problems in low-slope roof soffits, Solutions for aiming lights down when installed in an angled soffit that follows roof rafters, Wiring suggestions for outdoor soffit recessed lighting.
InspectAPedia tolerates no conflicts of interest. We have no relationship with advertisers, products, or services discussed at this website.
- Daniel Friedman, Publisher/Editor/Author - See WHO ARE WE?
Exterior Light Choices, Installation, Troubleshooting
 Article Series Contents
- LIGHTING, EXTERIOR GUIDE
- RECESSED SOFFIT LIGHT INSTALLATION OUTDOORS
- RECESSED SOFFIT LIGHT BULB & TRIM CHOICES
- SURFACE-MOUNT OUTDOOR LIGHT FIXTURE INSTALLATION
- REPAIR AUTOMATIC OUTDOOR LIGHT FIXTURE - separate article
- SECURITY / MOTION SENSOR LIGHT INSTALL - separate article
- LIGHTING, EXTERIOR FAQs - separate article
- UNSAFE OUTDOOR LIGHT FIXTURES - separate article
Also see our discussion of lighting requirements over stairs, at LIGHTING OVER STAIRS & AT EXITS and see LIGHTING, INTERIOR GUIDE for details about lighting fixtures, bulbs, and indoor requirements.
How to Install Recessed Lights in Roof Soffit Overhangs Outdoors
Reader Question:
I've used your website many times to find trusted advice on building and remodeling practices. I have a question that I can't seem to find an answer on at inspectapedia. I wonder if you might be able to answer. I want to know if it is acceptable to put recessed can lighting in exterior vinyl soffits.
I know it is fine in aluminum soffits, but I am concerned about the effects of the heat on the Vinyl soffits. In particular, can regular IC or non-IC 4" or 5" can lights be installed in the eves in Vinyl soffits? Thanks for your time and keep up the excellent work. - A. F.
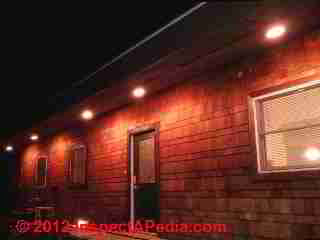
Photo (above) of recessed lighting installed in a roof soffit overhang, courtesy of Paul Galow.
Reply: how to install recessed lights in a vinyl soffit or roof overhang
Here are the installation considerations that you should keep in mind when buying & installing outdoor light fixtures for a roof overhang or soffit.
These points include addressing your worry about the effects of heat on vinyl roof soffits as well as other installation advice we found while researching the question.
Choice of recessed light fixtures for an outdoor roof soffit
While there are of course many surface-mount light fixtures that also work fine outdoors including at the roof eaves, you (and many people) want to install recessed fixtures, also referred to as "pot lights" or in some installations, downlights.
- Choose an IC recessed lighting fixture. IC fixtures are rated for installation in insulated ceilings. You won't be insulating your soffit outdoors, at least not normally, but using an IC fixture there means that issues about fire clearances are just about eliminated.
Technical notes about types of recessed light fixture housings- IC-rated refers to lighting fixture housings rated for installation in contact with insulation, typically rated for handling up to 100 watts.
- Spacing - Clearance for Non-IC-rated light fixtures: these housings may not be installed in contact with building insulation and typically require a 3-inch clearance between the fixture surfaces and the nearest insulation. In some building electrical code jurisdictions, Non-IC light fixtures are not allowed if insulation is present at all.
Non-IC-rated fixtures may be able to handle higher light wattages, but are currently more likely to be replaced with "IC Air-Tight light fixture housings. - Spacing - Clearances for IC-rated air-tight-rated lighting fixtures: these housings are IC-rated (as above) and are air-tight rated. These fixtures are specified by some energy-savings codes.
You may not need air-tight rated fixtures in an outdoor building soffit, but see our notes below about ice dam effects of warm or hot light fixtures in an outdoor roof overhang or soffit.
Because an air-tight light fixture housing will run hotter, the wattage in these fixtures and the trim selections may be limited - do not violate the manufacturer's instructions. Note that by choosing CF or LED lighting you should be able to increase the light output while keeping the fixture temperature down.
Details are at RECESSED LIGHT CLEARANCES - Thermal overload (overheating) protection: currently all UL-listed recessed lighting fixtures sold for installation in North America include a thermal sensor device that will turn the fixture off if its temperature exceeds its design temperature.
Thermal protection devices use either a thermal protection device that turns off the fixture if its temperature exceeds a specified limit (used in all IC and IC/Non-IC rated fixtures) or an insulation sensor that detects the presence of insulation fibers and will turn off the fixture if it detects insulation.
Insulation sensors are used in Non-IC lighting fixtures. Arcadian Lighting warns that if you install a Non-IC fixture in a building where insulation is nearby and the sensor detects insulation, the fixture may continue to shut down even if you remove the insulation (as its sensor is now contaminated). [16]
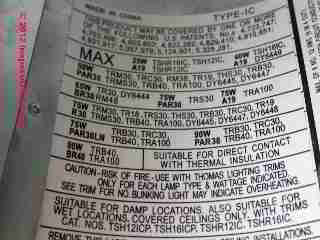
- Choose a recessed light fixture that is also UL listed for use in damp locations. In most jurisdictions your electrical code compliance inspector will insist on an IC, damp-location-rated fixture. (Check the label in our photo at left).
Watch out: "dry & damp location" recessed light housings may be installed in dry or damp locations only. The trims for most of these fixtures are not listed for wet locations. Special fixtures and trim are however, available for wet locations.[14] including Dekor's waterproof 12-V LED lighting fixtures[15].
Some if not many builders assert that the space under a roof overhang is "dry" but in fact the area is exposed to both dampness, and in event of high wind during rains, wind-blown rain that can actually cycle upwards against the soffit in some locations.
There are waterproof recessed light fixtures intended for use outdoors in lawns, decks, and walkways. You shouldn't need these and it would most likely be overkill. - You may need to use a 4-inch IC fixture rather than a 6-inch unit. Standing under the eaves and looking up at a soffit you may think there is plenty of space for the light fixture but if your roof is constructed with a fairly low slope, say 4 in 12, and depending on how far past the building walls your soffit extends, you may find it difficult to squeeze a 6-inch "can" or pot light into the space and still center it.
- Recessed lighting fixtures are sold in housing diameter opening sizes of 3", 4", 5" and 6". T
wo fixtures of different diameters will permit the same lighting output provided that they are rated to accept the same bulb and wattage. - 4-inch recessed light fixtures are the most common size used for 12-Volt systems.
- 6-inch recessed light fixtures are the most common size used for 120-volt recessed light systems
- 3-inch and 5-inch recessed light fixture sizes are design alternatives to the 6-inch system.
- If space is tight, you can opt for a standard 4-inch fixture instead of a 6-inch unit. If you have not already done so, remove one of the vinyl panels from your soffit to inspect the interior area for space, clearances, and also to see how the soffit was constructed. More on that next.
- Recessed lighting fixtures are sold in housing diameter opening sizes of 3", 4", 5" and 6". T
- Angled surface or adjustable-angle recessed light fixtures may be desirable if you are installing recessed lighting into a sloped soffit or ceiling rather than into horizontal soffits or ceilings.
Angled or adjustable-angle fixtures allow you to set the angle of the bulb in the housing to point at an angle different from the position of the fixture itself.
So in a sloped roof overhang whose soffits are affixed directly to the rafter under-sides, an adjustable-angle recessed light fixture allows you to still aim the fixture straight down if desired. An "eyeball" or "gimbal" recessed light fixture are examples of angle-adjustable recessed light fixture units.
Watch out: if your roof slope is very shallow or if the soffit follows the underside of roof rafters, the space for a recesed light fixture may be limited, even using IC-rated devices (and depending on rafter size).
For example in the roof soffit of a 1920's era low-slope roofed bungalow you may need to install a shallow housing IC-rated light fixture just to fit the unit into the space afforded by nominal 2x6 rafters (giving about 5 1/2" of vertical space).
If you opt for an eyeball type shallow recessed light fixture the "eyeball" project out below the soffit face, and even so you may not be able to point the light straight down. - Before buying your light fixtures to use in the soffits, I'd give some thought to the bulb type alternatives that we describe below. Also see details
at RECESSED LIGHT HOUSINGS GUIDE
Installing the Recessed Lights Under the Soffit
- If you haven't already done so, remove the soffit covering panels, intact. Usually we can do this by pulling out the L-channel or J-channel at the bottom of the fascia board, leaving the J or F channel on the building walls in place.
Support for recessed lights in an outdoor roof overhang
- Do not try to support a recessed light fixture by simply cutting a hole in the soffit covering and securing the light to it. You might get away with that approach if your building is an older one that was originally constructed with solid plywood
soffit coverings, but more likely you'll find that the vinyl (or aluminum) soffit covering is supported only by -channel. The light fixture needs to be secured to the building structure. - If the roof eaves are enclosed with a horizontal soffit cover, you may need to install a short, horizontal support that is secured to the building wall at one end and to the inner face of the fascia or the rafter tail-end at the outer end.
Your soffit light fixture will be in turn secured to this member. A 2x4 will most likely be adequate. - If the roof eaves are enclosed with a soffit that is secured to the underside of the rafters, you will have still less installation space (and a 4-inch box will surely be needed), but the installation is otherwise simple since you can secure the fixture to the side of a rafter.
- On the installation sheet for your pot lights you'll see and follow any clearance and support details given by the fixture manufacturer.
- Most recessed light fixtures allow for a range of adjusting of the can position, but I'd pay some attention to locating the face edge of the can just above where you expect the upper surface of the soffit covering to reach when you are reinstalling that material.
Wiring the recessed soffit lights
- No surprise, all of your electrical wiring must comply with local electrical codes, for which the National Electrical code is usually the starting model.
Check with your building department about the required permits and inspections. In many jurisdictions, electrical wiring must be done by a licensed electrician.
Even if your town permits do-it-yourself wiring, the results must meet the requirements of the electrical code. I'd hire a licensed professional. - GFCI's (ground fault circuit interrupter) protection is not required by the NEC for outdoor overhead lights.
We found a few electricians who recommended GFCI protection for the circuit, fearing that someone would stand on an aluminum ladder set on wet ground while messing with the fixture. - Choose your power source. Often for getting power to lights in a roof soffit, you can find an available circuit in the building attic, or in a nearby garage.
- Choose the switch location. Remember when planning wiring routing that you will want to locate a switch for these lights at a convenient spot indoors, preferably by an exit door.
- When planning your wiring and wire routing, now is a good time to make any final decisions on other electrical control options for your roof downlights, such as
- Light timers
- Light dimmers
- Motion sensors. We installed motion-sensing surface mount lights under an outdoor soffit that covered the approach to a building door - they have been much appreciated since.
Choosing Bulb Types for Outdoor Recessed Soffit Lights
- Decide on 120V or 12-V lighting: there are recessed lighting fixtures or "pot lights" that can accept just about all bulb types. First confirm that your wiring and installation is going to use 120V lighting fixtures.) There are low-voltage (12-V) outdoor lights that can also work in roof soffit installations.)
- 120V recessed lighting housing & fixtures will operate the entire circuit, switches, any timer or dimmer option, all on a 120V circuit.
No low-voltage transformer is used. 120-V systems are usually less costly than a 12-V low-voltage system, are less energy efficient if using incandescent or halogen bulbs. Incandescent or halogen bulbs, some up to 150 watts, can be installed provided that you accept a more limited trim choice (possibly allowing more air movement through the fixture). You can also install CFs or LED bulbs that are designed for installation in a 120V bulb socket. - 12V (low voltage) recessed lighting housings & fixtures use a low-voltage transformer to provide power to 12-V lighting fixtures that typically use LED or halogen bulbs.
Low-voltage recessed light fixtures are more economical to operate and generally involve lower temperatures - something that may be a consideration even in outdoor use if you have a snow and ice-dam concern for your roof edge.
Watch out: It must be remembered that a lower voltage signifies a higher current in amperes.
Therefore secondary fusing based a multiplier of 1.25% (NEC) must be used. The conductor on the secondary side of the [low voltage] transformer at 12-volts must be sized for the full load amperage. E.g. 50 watts / 12 volts = 4.16 amps. 4.16 Amps x 1.25 (125%) = 5.20 AMPS.
Use a 5-amp fuse, not a 4-amp fuse. - paraphrased from Lucifer Lighting low voltage lighting installation instructions. These instructions also describe the requirement for selecting an electrical wire (conductor) size based on the distance between the light fixture and the low voltage transformer. [14] Also
see LOW VOLTAGE BUILDING WIRING
- 120V recessed lighting housing & fixtures will operate the entire circuit, switches, any timer or dimmer option, all on a 120V circuit.
- Bulb choices for outdoor recessed lights in roof overhangs / soffits include
- LED bulbs are the least costly to operate, most costly to buy, and are cooler in operating temperature.
You might consider LEDs (or the much less costly CFs below) to keep the temperature coolest in your soffit lighting, not only out of respect for the vinyl soffit covering but in snow-climates, to minimize the effects of heating the roof overhang and contributing to ice damming up-roof from the lights.
Also, in our OPINION, because some roof eaves are high, making changing bulbs a risky ordeal, the prospect of installing very long-lived bulbs in these fixtures such as LEDs or the CFs below is appealing. - Compact fluorescent (CF) bulbs, typically in 9W to 42W ratings, are less costly to operate, less costly to buy than LEDs, cooler operating temperatures than the bulbs below.
We found conflicting reports, some saying these bulbs work fine outdoors (we use them here in New York at our place), and a few claims that these bulbs may not last well in very cold outdoor environments. This is probably the most economical choice with the most advantages. - Halogen bulbs and fixtures of course offer brightness, and these are often used in weatherproof outdoor floodlights or areas lights.
They may be a bit hot for your installation however. Halogen bulbs are energy efficient and deliver pure white light in both wide and spot beam patterns. Low-voltage halogen bulbs (or "lamps" in the lingo) are more energy efficient than standard lamps, providing more light per watt than incandescents. - Incandescent (conventional light bulbs), most costly to operate, shorter life, hotter temperatures, my last choice, but incandescents are often chosen for interior recessed lighting where a warm bright lighting color is desired.
Some new (and expensive) LED bulbs and color-corrected CF bulbs can also provide bright and warm interior lighting. Incandescent bulbs in a recessed light fixture use type "A" or type "R" (reflector) lamps, or PAR reflector lamps for accent lighting. - Metal halide bulbs are very high performance (very bright) lights used in special applications such as museums, building lobbies, showrooms. You wouldn't normally choose metal halide lamps for outdoor soffit lighting.
Details about bulb types for recessed light fixtures, and bulb properties can be read
at RECESSED & TRACK LIGHT BULB GUIDE - LED bulbs are the least costly to operate, most costly to buy, and are cooler in operating temperature.
Reinstall the Soffit Covering of Vinyl or Aluminum; Choose & Install Recessed Soffit Light Trim
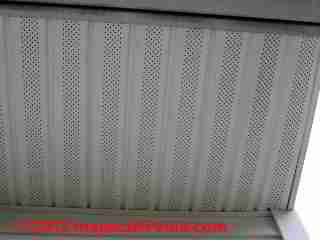
- Cutting the hole for recessed lighting fixtures: use the dimensions or template provided by the fixture manufacturer.
Watch out: the size of the fixture opening for recessed lighting may vary significantly depending on whether the installation during new construction (the fixture housing is installed before the ceiling or soffit cover is installed) or a retrofit installation. Retrofit openings tend to be larger.
For example, a typical retrofit installation hole template may specify a diameter of 162mm or 6.375", but your fixture may be different.[11] - Reinstall the soffit covering: If you managed to remove your soffit covering intact, then its' ready for reinstallation. You will want to measure twice and cut once to get your round openings properly centered below each light fixture. Cut the opening to clear the fixture by 1/4 to 1/2".
Do not allow the soffit covering material to contact the can surface, especially if you are using vinyl soffit covers. - Choose & install light fixture trim: we recommend choosing solid trim bezels for use around your soffit lights. We're not concerned about airflow as we would be with indoor recessed ceiling lights, but we like to discourage insects and small birds from making a home in the soffit or in the fixtures themselves.
For details about trim types used with recessed lighting also
see RECESSED LIGHT FIXTURE TRIM
Surface-Mount Outdoor Light Fixture Installations
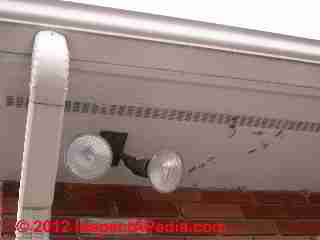
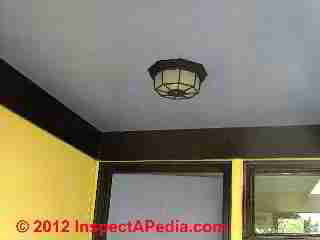
At below left our photo illustrates a surface-mounted outdoor light fixture installed beneath a building overhang.
This fixture, one of a pair along a walkway beneath the overhang, lights the passage to the building's front door.

By choosing a fixture that includes a motion sensor and day-night controls, the owners can leave this fixture switched "on" 24-hours a day. Settings on the light control for many outdoor lights permit the occupant to choose among
- Off during day, on at night
- Off during day, on at night only when motion is detected
- Off during day, on at night at dim level, on at bright level when motion is detected
- On during day at low-level, on at night at bright level when motion is detected
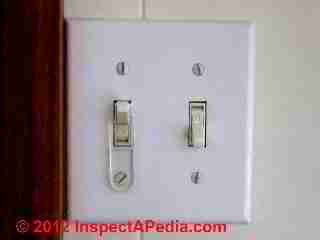
At the indoor light switch for such fixtures, we like to install a reminder that the switch should normally be left in the "on" position.
To prevent the switch from being flipped to the "off" position accidentally, we install the clear plastic switch block shown in our second photo, above right. It is still possible to turn the switch off, leaving the plastic switch-block in place but prying it away from the switch with your thumbnail, or better, by loosening its mounting screw.
Outdoor Light Fixture Inspection
Now found at UNSAFE OUTDOOR LIGHT FIXTURES are photographs & text discussing examples of outdoor "lighting" practices to avoid.
Diagnose & fix an outdoor "Dusk to Dawn" motion-sensor light fixture
Reader Question:
2016/04/03 Freezing Cold said:
Without warning, our outdoor dusk to dawn light stopped working Tried cleaning the fixture's sensor & changing floodlight bulbs, but that didn't help. Any ideas or suggestions? Or is this 3-year old fixture a goner? Thanks.
Our reply is now found at REPAIR AUTOMATIC OUTDOOR LIGHT FIXTURE where we detail the steps in diagnosing and fixing a light that's not working.
...
Continue reading at SECURITY / MOTION SENSOR LIGHT INSTALL or select a topic from the closely-related articles below, or see the complete ARTICLE INDEX.
Or see LIGHTING, EXTERIOR FAQs - Questions & answers posted originally on this page.
Or see these
Exterior Lighting Articles
- LIGHTING, EXTERIOR GUIDE - home
- LIGHTING, INTERIOR GUIDE - home
- LIGHTING OVER STAIRS & AT EXITS
- NEST CAM LIGHTING RECOMMENDATIONS
Suggested citation for this web page
LIGHTING, EXTERIOR GUIDE at InspectApedia.com - online encyclopedia of building & environmental inspection, testing, diagnosis, repair, & problem prevention advice.
Or see this
INDEX to RELATED ARTICLES: ARTICLE INDEX to BUILDING LIGHTING
Or use the SEARCH BOX found below to Ask a Question or Search InspectApedia
Ask a Question or Search InspectApedia
Try the search box just below, or if you prefer, post a question or comment in the Comments box below and we will respond promptly.
Search the InspectApedia website
Note: appearance of your Comment below may be delayed: if your comment contains an image, photograph, web link, or text that looks to the software as if it might be a web link, your posting will appear after it has been approved by a moderator. Apologies for the delay.
Only one image can be added per comment but you can post as many comments, and therefore images, as you like.
You will not receive a notification when a response to your question has been posted.
Please bookmark this page to make it easy for you to check back for our response.
IF above you see "Comment Form is loading comments..." then COMMENT BOX - countable.ca / bawkbox.com IS NOT WORKING.
In any case you are welcome to send an email directly to us at InspectApedia.com at editor@inspectApedia.com
We'll reply to you directly. Please help us help you by noting, in your email, the URL of the InspectApedia page where you wanted to comment.
Citations & References
In addition to any citations in the article above, a full list is available on request.
- [1] Codes & Standards pertaining to fire-rating enclosures:
- ASTM E119-05a
- UL 263 (also see Canadian CUL specifications)
- UBC 7-1
- NFPA 251
- ANSI A2.1
- IP66
- [2] Steven Bliss served as editorial director and co-publisher of The Journal of Light Construction for 16 years and previously as building technology editor for Progressive Builder and Solar Age magazines. He worked in the building trades as a carpenter and design/build contractor for more than ten years and holds a masters degree from the Harvard Graduate School of Education. Excerpts from his recent book, Best Practices Guide to Residential Construction, Wiley (November 18, 2005) ISBN-10: 0471648361, ISBN-13: 978-0471648369, appear throughout this website, with permission and courtesy of Wiley & Sons. Best Practices Guide is available from the publisher, J. Wiley & Sons, and also at Amazon.com .
- [3] Carson Dunlop provides home inspection education including the ASHI-adopted a Home Inspection Home Study Course, and publications such as the Home Reference Book, the Home Reference eBook, and report writing materials including the Horizon report writer, and home inspection services. Alan Carson is a past president of ASHI, the American Society of Home Inspectors.
- [4] Paul Galow [Website galowconsulting.com ] - technical consultant on networking, LAN design, applications support. Galow Consulting Services [Website galowconsulting.com ] , 914-204-1749, email: paulgalow@galowconsulting.com
- [5] New Jersey State Energy Code, N.J.A.C. 5:23-3.18, Recessed Lighting Fixtures (RLFs), Uniform Construction Code Communicator, Vol. 16, No. 1, Spring 2004, p. 8, Division of Codes and Standards, POB 802, Trenton NJ 08625-0802. Web site for free downloads of the energy
compliance tools REScheck, New Jersey edition and
COMcheck-EZ is www.energycodes.gov.
Quoting:
N.J.A.C. 5:23-3.18 adopts by reference the 1995 edition of the Council of American Building Officials’ Model Energy Code (CABO MEC/1995) as New Jersey’s Energy Subcode of the Uniform Construction Code. Sections 502.3.4 and 602.3.3 of CABO MEC/1995, both entitled “Recessed Lighting Fixtures,” contain requirements for RLFs in relation to the Energy Subcode. The following are the three options for the installation of RLFs when installed in the building envelope. Only one must be followed to meet the requirements of the Energy Subcode:
1. Type IC rated, manufactured with no penetrations between the inside of the recessed fixture and ceiling cavity, and sealed or gasketed to prevent air leakage into the unconditioned space; or
2. Type IC rated or non-IC rated, installed inside a sealed box constructed from a minimum ½-inch-thick gypsum wall board or constructed from preformed polymeric vapor barrier, or other air-tight assembly manufactured for this purpose, while maintaining required clearances of not less than ½ inch from combustible material and not less than three inches from insulation material; or
3. Type IC rated, in accordance with ASTM E 283- 91 (Standard Method of Test for Rate of Air Leakage Through Exterior Windows, Curtain Walls, and Doors), with no more than 2.0 cfm air movement from the conditioned space to the ceiling cavity. The lighting fixture shall be tested at 75 Pa or 1.57 lbs/ft2 pressure difference and shall be labeled.
Sections 502.3.4 and 602.3.3 of CABO MEC/1995 are the responsibility of the building subcode official, who inspects RLFs to ensure that they are either insulation cover rated (IC rated), or installed in a sealed box that has the insulation at least three inches from the light fixture. It is the building subcode official’s responsibility to ensure compliance, both in the inspection plan review and inspection plan review stages, because RLFs pose a potential fire hazard if installed incorrectly with insulation. These fixtures also act as chimneys, transferring heat loss and moisture through the building envelope into attic spaces if not installed properly. The heat loss resulting from improperly insulated RLFs can be significant.
NOTE: Electrical subcode officials are responsible for the wiring methods of RLFs. - [6] "Out of Sight, Out of Mind - the dangers and requirements of recessed light fixtures", Kellie K. Speed, Electrical Contractor, Feb. 2009, Quoting:
When installing recessed fixtures, carefully consider the location of the units. The presence of combustible materials surrounding the luminaire is very important, and recessed lights can act as chimneys for heat loss and moisture transfer into attic spaces. Many residential fires have resulted from improperly installed or modified recessed light fixtures, but they can be easily avoided. In older homes that may have existing recessed lighting fixtures, homeowners sometimes cover these fixtures with insulation. As a result, the insulation traps the heat created by the bulb and either melts the insulation on the electrical wiring or ignites combustible materials, which is, of course, a fire hazard. It is vital to ensure the area surrounding the recessed fixture is insulated properly. In addition to fire, the interior of a property could be compromised if air leakage occurs, resulting in moisture, condensation and mold. Sealing the building properly reduces air movement in and out of the building. Uncontrolled air movement will negatively impact the heating and cooling systems, resulting in higher initial and ongoing maintenance costs. There certainly is a lot to consider when installing recessed lighting. For help, consult the National Electrical Code (NEC). Article 410 Parts M and N offer special provisions for recessed luminaires installed in walls or ceilings. Most of these Code requirements are designed to protect combustible building materials from temperatures greater than 90°C (194°F). - [7] National Electrical Code, (NEC). Article 410 Parts M and N: provisions for recessed luminaires installed in walls or ceilings.
- [8] "E-Series LED Recessed Light, Installation instructions for E6-E26-30-WH, retrofit installation or new construction installation, American Lighting, www.americanlighting.com
- [9] "Information Bulletin - Recessed Light Fittings", ACE Insurance Limited, CU1-3, Shed 24, Princes Wharf, Auckland 1010, website: http://www.aceinsurance.co.nz/,
Ace reported a "near miss" inner city apartment complex fire traced to recessed light fittings. Quoting:
An investigation into the cause of a fault on an apartment complex’s fire alarm system revealed the cause as a slow smouldering fire involving the heat detector wiring. Further investigation indicated the probable cause of the fire to be due to a nearby recessed incandescent light fitting which had overheated. The insulation on the electric wiring at the point of connection to the light fitting had been burnt away and the burning had continued for several metres along the electrical wiring to the switch and another interconnected light fitting within the same room. Thermal insulation material (fibreglass batts) was present in the roof space around the recessed light fittings. The recessed light fittings had been installed in the room for more than 15 years without any previous issues. Repairs to the roof had been carried out some 5 years previously which required contractors to access the roof space directly above the room.
Australian/New Zealand Wiring Rules (AS/NZS 3000:2007 provides minimum clearance for recessed light fittings but emphasizes that The importance of following relevant codes and standards and the recessed light manufacturer's installation requirements cannot be over-emphasized.Dimension Incandescent lamp Halogen lamp Clearance - luminaire to building element above 50 mm 200 mm Side clearance - luminaire to structural member 100 mm 200 mm Clearance -luminaire to thermal insulation 50 mm 200 mm Clearance - luminaire to supply transformer 50 mm 50 m - [10] E.Z. Barrier, fire-rated: Fire-rated Recessed Light Enclosure, E.Z. Barrier, 901 N 3rd St, Ste 130 Minneapolis, MN 55401 Ph. 612.436.0606 Fax 612.436.0608 sales@ezbarrier.com, Website: www.ezbarrier.com Product literature describes one-hour rated enclosure for recessed lights that save time over a site built fire-rated recessed light enclosure complies with the fire resistance codes listed in citation [1] above.
- [11] "Liteline Recessed Lighting, Luminaire Encastre, 6-in. Remodel IC/non-IC housing, air tight, Installation Instructions", Liteline Corporation, info@lifeline.com, web: lifeline.com, Tel: 866-730-7704
- [12] "Wiring Methods Utilizing Suspended Ceilings (Revised", State of Oregon, Building Codes Division, code interpretation, 10/1/2002, Gary A. Wilson, Chief Electrical Inspector & Doug Alexander, Structural Code Specialist. This interpretation specifies that in light duty systems certain light fixtures (such as recessed fluorescent lighting), the ceiling system shall not be used for the support of the lighting fixtures. Intermediate-duty ceilings may be used for supporting recessed lighting fixtures provided certain support detail specifications are followed. Heavy duty ceiling systems require that the recessed light fixture be secured to specifications included in the interpretation. Web search 4/29/12, original source: http://www.etnews.org/docs/wiring_methods_suspended_ceilings.pdf
- [13] "Recessed Light (Non-Insulating), Installation Instructions, CANARM Lighting & Fans, Tel: 800-265-1833 (English) or 800-567-2513 (French) or 800-267-4427 (USA) describe a recessed light fixture retrofit through a drywall ceiling.
- [14] "Downlights, Recessed Downlight Housings - Installation", Lucifer Lighting Company, 414 Live Oak St., San Antonnio TX 78202, Tel: 210-227-7329, www.luciferlighting.com
- [15] "Outdoor Recessed Light Kit Installation Instructions, apply to downlights / stair lights", Dekor, 2655 Santa Fe Unit 4H, Denver CO 80223, 2011, Customer Support: 800-258-0344, Website: www.DE-Kor.com. This document describes installation for a 12V DC constant current 3A transformer with a waterproof design IP66-rated, UL and CUL approved, and LED lighting fixtures that are waterproof and can be submerged in water. cf: OUTDOORRecessedLight Install1.pdf
- [16] "Recessed Lighting Tips", Arcadian Lighting, website: www.arcadianlighting.com Tel: 888-228-8856. [No mailing address provided]
- In addition to citations & references found in this article, see the research citations given at the end of the related articles found at our suggested
CONTINUE READING or RECOMMENDED ARTICLES.
- Carson, Dunlop & Associates Ltd., 120 Carlton Street Suite 407, Toronto ON M5A 4K2. Tel: (416) 964-9415 1-800-268-7070 Email: info@carsondunlop.com. Alan Carson is a past president of ASHI, the American Society of Home Inspectors.
Thanks to Alan Carson and Bob Dunlop, for permission for InspectAPedia to use text excerpts from The HOME REFERENCE BOOK - the Encyclopedia of Homes and to use illustrations from The ILLUSTRATED HOME .
Carson Dunlop Associates provides extensive home inspection education and report writing material. In gratitude we provide links to tsome Carson Dunlop Associates products and services.


