
 Building the Chimney & Fireplace
Chapter 9 of How to Build Your Dream Home © 2020 InspectApedia.com

- POST a QUESTION or COMMENT about how to identify the architectural style of buildings and building components
How to build a chimney & fireplace.
This article series provides an updated version of Hubbard Cobb's Your Dream Home, illustrated by Sigman-Ward, first published by Wm. H. Wise & Co. New York, 1950.
From site selection and obtaining financing through each step in construction of a single family home the simple procedures and drawings in this book are still useful for anyone building or repairing a home or other small structure.
InspectAPedia tolerates no conflicts of interest. We have no relationship with advertisers, products, or services discussed at this website.
- Daniel Friedman, Publisher/Editor/Author - See WHO ARE WE?
How to Build a Masonry Chimney & Fireplace
 This is Chapter 9 of BUILD YOUR DREAM HOME at InspectApedia.com - online encyclopedia of building & environmental inspection, testing, diagnosis, repair, & problem prevention advice.
This web page is also available as THE CHIMNEY & FIREPLACE [eBook], or as a PDF image at THE CHIMNEY & FIREPLACE [PDF] original page images.
It is obvious that the method of constructing a fireplace and a chimney for both the fireplace and the furnace is going to differ considerably depending upon whether or not you have a basement in your house, whether. there is to be a second fireplace in the basement gameroom and where the furnace is to be located.
Let us start out with an explanation of how the work is done when there is a basement with the furnace in it and a fireplace in the living room only.
After directions for this situation have been given, we shall take up how to build two fireplaces, one in the basement and one in the living room, and how to handle the job in homes with basements and a furnace in the utility room and in basementless homes with wooden first floors or poured-concrete-slab first floors.
There are several important points that you must keep in mind about fireplace and chimney construction. In the first place, these structures must be built up from a solid and freestanding footing of their own. They should not be built up from the basement floor, as this slab is not thick enough to carry the load of fireplace or chimney. To eliminate any possibility of the chimney’s or fireplace’s sinking, the footings must be rather massive.
Directions for pouring the footings and their dimensions are given in the chapter on the foundation walls. The second point to remember is that the fireplace and the chimney must stay clear of all the house framework. The minimum clearance should be 2", and the space between the masonry and the woodwork must be filled with a fire-resistant insulation. There are other reasons than the possibility of fire for keeping the masonry and woodwork separate.
If any of the house framework is built into the masonry, the slight difference in expansion and contraction of the two materials plus the normal amount of settling that takes place is enough to damage the masonry work. The third point to remember is to keep the work level and plumb and to be sure that all mortar joints are thoroughly packed with good-grade mortar. Faulty mortar joints in the masonry are a fire hazard and a cause of leaks.
Watch out: building your own chimney and/or fireplace is a great example of the value of taking advantage of the requirements for permits and inspections where you live. By inviting the building inspector to check out your work at key junctures you reduce the chance of a dangerous house fire.
THE CHIMNEY BASE
Since the fireplace is located on the first floor, you will need a masonry base built up from the footing in the basement on which the fireplace and the chimney will rest. The back and two side walls of this masonry base should be at least 8" thick. The front wall can be 4" thick, as it does not have to support the same load as the other three walls. The mortar formula and the thickness of the mortar joints are the same as those given imder the section on working with bricks, if you are using bricks, or the section on working with masonry blocks, if you are using concrete chimney-blocks.
The opening left in the base will serve as an ash pit for the fireplace. A dump-door for ashes will be installed in the fireplace hearth, so that ashes in the fireplace can be easily removed, without fuss or mess. At the bottom of the ash pit you will need an ash-pit door, so that the ashes that have dropped down can be removed from time to time.
The first step in building the base is to drop four plumb lines from the opening that was framed for the fireplace in the first floor. These lines should extend 2" in from the framework on all four corners. The points where these four lines touch the concrete footing will indicate the outside measurements of the chimney base.
Before you can accurately lay out thedimensions of the base, you will have todecide what size of flue you are going to use for the furnace. This is necessary because the flue runs up through the base and you will need 3/4" of masonry on all sides of it.
The best way to find out what size of flue to use and exactly how high up in the base the opening for the stove pipe from the furnace should be is to consult the installation specification-sheet of the type of heating equipment you plan to have. This will give the recommended flue size and the height for the opening. For our present purpose, we have selected a 8%" x 13" flue for the furnace, and this will mean that the thickness of one of the walls of the chimney and fireplace base must be 21".
The Ash-Pit Door
Once vou have laid out the base, you can begin to build it up. Either common bricks or concrete chimney-blocks can be used for this work. A few inches above the basement finished-floor level, a cast-iron ash-pit clean-out door should be installed. It goes into the front wall of the base, so that you can remove the ashes in the pit. A door 10" x 12" is quite adequate.
These doors come as complete assemblies and can be purchased along with the other necessary equipment for the fireplace and chimney from lumber yards and masonry-supply houses. Put the door frame in place first and then build up around it. The frame should be securely mortared into the masonry so that you have a good tight fit between the walls and the metal door frame.
Flues
Now you can go ahead and build the base up until you reach the height where the flue for the furnace should begin. The furnace flue as well as the fireplace chimney flue should be lined with fire-clay flue-lining. It is possible, of course, not to use this special lining if it is not required by the building code, but this economy is not recommended. In the first place, if it is not used, the ’wall thickness must be at least 8" on all sides.
Also, since the inside of the flue will be rough, it will collect soot easily. Fire-clay flue-linings must always be used with gas heating equipment, because when gas burns, it produces a considerable amount of water vapor plus some acids that would cause the mortar in the flue-joints to disintegrate. The wall thickness of the flue-lining should be 5/8" thick. Flue-lining can be either round or rectangular. The round lining is the more efficient and is more easily cleaned, but more care is required in putting it up to be sure that it is properly mortared into the masonry.
The Clean-Out Door
The flue-tile lining should begin at least 8" below the point where the stove pipe from the furnace enters the flue. You will also need a clean-out door so that the soot from the furnace flue can be removed when necessary.
The top of this door should come almost flush with the bottom of the first section of flue-tile. Therefore, the clean-out door should be set in place first and the bricks or blocks built up around it on all sides. Now the first section of flue-tile can go into place.
The Stove-Pipe Opening
 Before it goes in, however, you will have to cut an opening in it so that the stove pipe may enter. The bottom of this opening should be 8" from the bottom of the flue-tile.
Fill a bag -with damp sand and stuff it down into the flue-tile at the point where the opening is to be cut; then tap a cold chisel very lightly with a hammer along the line where the cut is to be made. You can get special thimble sections of flue-tile that already contain the opening for the stove pipe. Before you cut the opening or get the special thimble section, check the size of the stove pipe you plan to use.
An 8" diameter is a standard size and the one we have chosen for our present purposes.
All flue-tile that must be cut should be cut before it is put into position.
[Click to Enlarge Any Image]
After the first section of flue-tile for the chimney flue has been put in place, build up around it with brick until you are just below the bottom of the opening. At this point, a thimble of fireclaj' should be installed so that the smoke pipe from the furnace can enter the flue.
The joint between the thimble and the flue-tile and the surrounding masonry must be tight at all points.
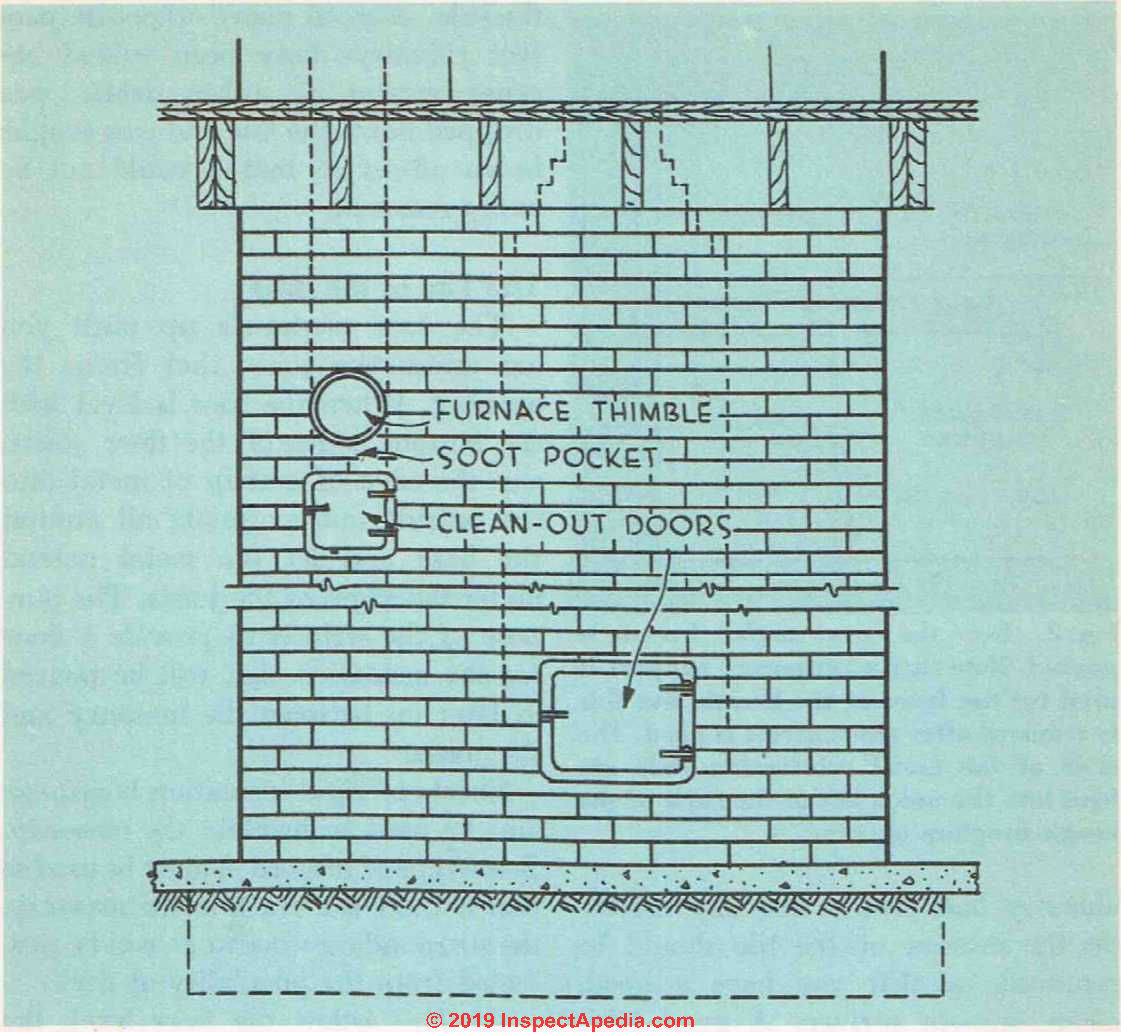
The opening for the smoke pipe in the flue must be at least 18" below the ceiling and it should be at least 6" away from any woodwork or combustible materials. It may be necessary to alter the location of the flue opening so that these requirements can be met. See Fig. 1.
The thimble should be set absolutely level, so that the metal stove pipe can enter it straight.
Do not try to lay a few courses of masonry and then slip the flue-tile into position. In the first place, your opening may be just a little too small and the work will have to be undone. What is more important is that you will not be able to fill all the spaces between the tile and the masonry with mortar.
The joints between sections of flue-tile should be mortared (using the same mortar formula as for the chimney base itself) and any mortar on the interior of the tile should be removed, so that you have a good, clean, smooth surface. A good trick to use in laying up the flue-tile is to All a bag with sawdust or shavings so that it just fits snugly into the tile.
Tie a long string to this bag and slip it up through each section of tile as it goes into place. As soon as one section of tile is in place and the masonry built up around it, pull the bag up a little so that it will smooth off the inside of the joint between the sections of flue-tile.
This bag will also help you to remove any mortar or even tools that you may drop down through the flue-tile. A good many otherwise perfect chimneys have been ruined because mortar or other debris was dropped down the flue and was caught in an off-set so that it could not be easily removed.
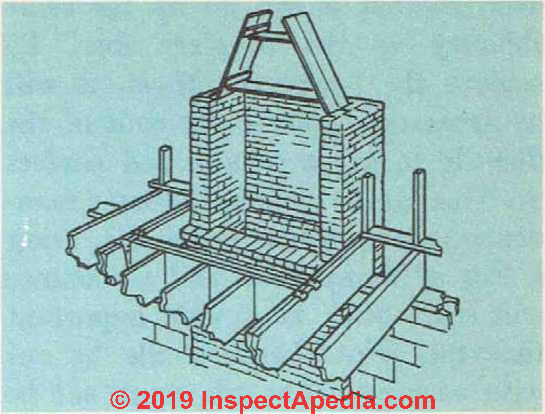
Fig. 1. Elevation of fireplace base.
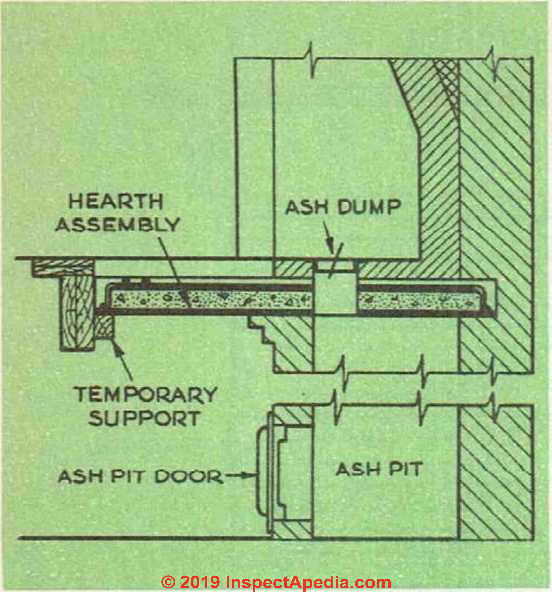
Fig. 2. How the concrete-slab hearth is poured. Note that a temporary support is used for the front of the hearth, but this is removed after the concrete is hard. The ends of the metal reinforcing rods are bent into the notch left in the back of the rough fireplace opening.
Build The Top of the Chimney Base
The base continues up until you are under the joists that frame the opening. When the base is level with the bottom edges of the floor joists, slip the edge of a strip of metal into the outside mortar joints all around the base and let the metal extend under the edges of the joists. The purpose of the strip is to provide a floor for the insulation that will be poured in later on between the masonrv and the joists.
Sheets of rigid insulation board can also be used to insulate the masonry. Some type of insulation must be used so that if there is a crack in the masonry, the surrounding woodwork will be protected from the possibility of fire.
At 7 1/2" below the floor level, the front wall of the base is widened out forward. The bricks in the front wall are brought forward 1". Two courses of bricks are laid thus, so that the front wall is about 6" thick at the top instead of 4".
When you reach a point 5 1/2" below the finished-floor level, level off the fore-wall or front wall of the base and notch out the rear wall 3 1/3" high and 1" deep. See Fig. 2. The purpose of the notch is to provide a hold for the hearth, which will be poured later on.
Fireplace Construction Details
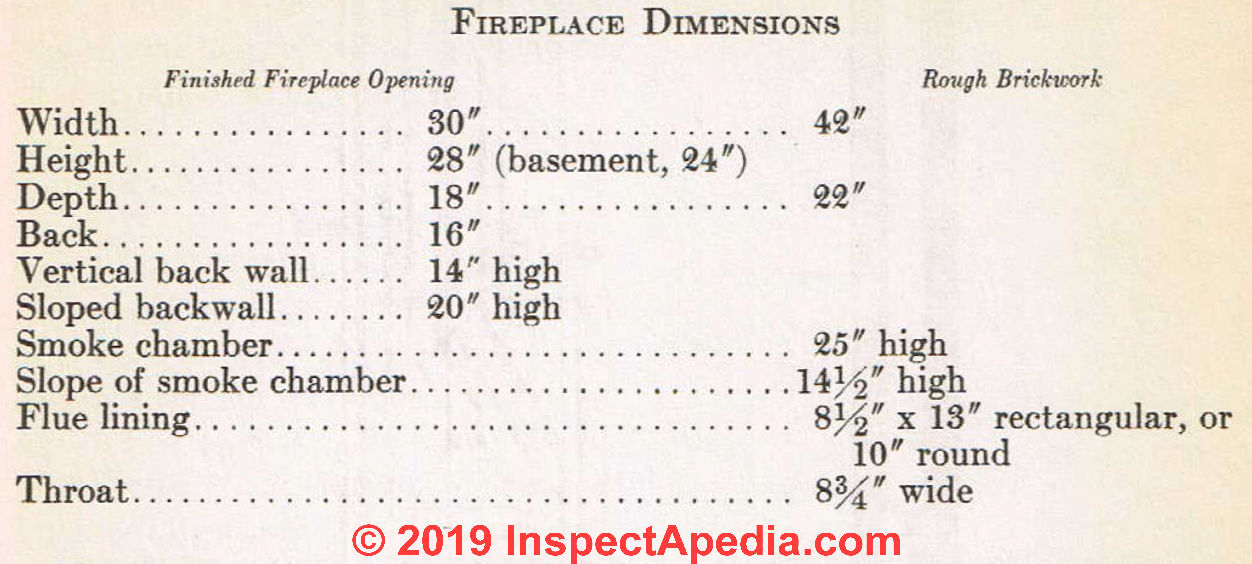
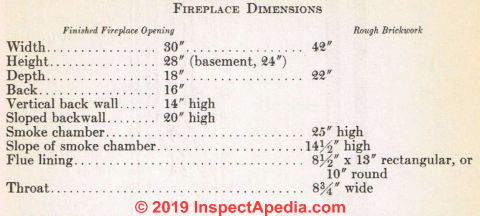 Fireplace Dimensions
Now we are ready to go ahead and build the rough fireplace. To save time at this point, the rough fireplace will be built and the chimney finished off and you can then go ahead w’ith other jobs and come back to finish off the fireplace later.
Before you start work on the fireplace, take a few minutes to study Fig. 3 in order to see exactly what must be done. You will notice that a well constructed fireplace is not square by any means. While the width of the fireplace opening that we are going to construct is 30" at the front, it is only 16" at the back.
The distance from the front of the fireplace to the back is 18". This will require that the two side walls of the fireplace gradually come together as they extend to the rear until they are 16" apart. The back wall of the fireplace, which is 18" from the front opening, is perfectly vertical for 14" and then it inclines forward for 20 vertical inches until it reaches the throat, which is 8 3/4" wide.
This, plus the nominal thickness of the finished front or breast of the fireplace, which is 4", means that in 20" the back wall has moved forward from 18" to 12 3/4". The result is a smoke shelf 9 1/4" wide. Of course, these are the dimensions for the finished fireplace. To make the rough opening, we have to use other dimensions, because the interior will be lined with firebricks later on.
For the purpose of building the rough opening, the width is 42" rather than 30" (the finished width).
The depth of the rough opening is 22", rather than 18" (the finished depth). At this time we do not have to worry about the height, because this will be taken care of later on when the finished brickwork and firebrick are added.
Build up the back and two side walls until you reach a height of 34". The rough opening should measure 42" x 22".
The walls should be at least 8" thick with at least 3 3/4" of masonry around the furnace flue-tile, which is running up through one of the side walls.
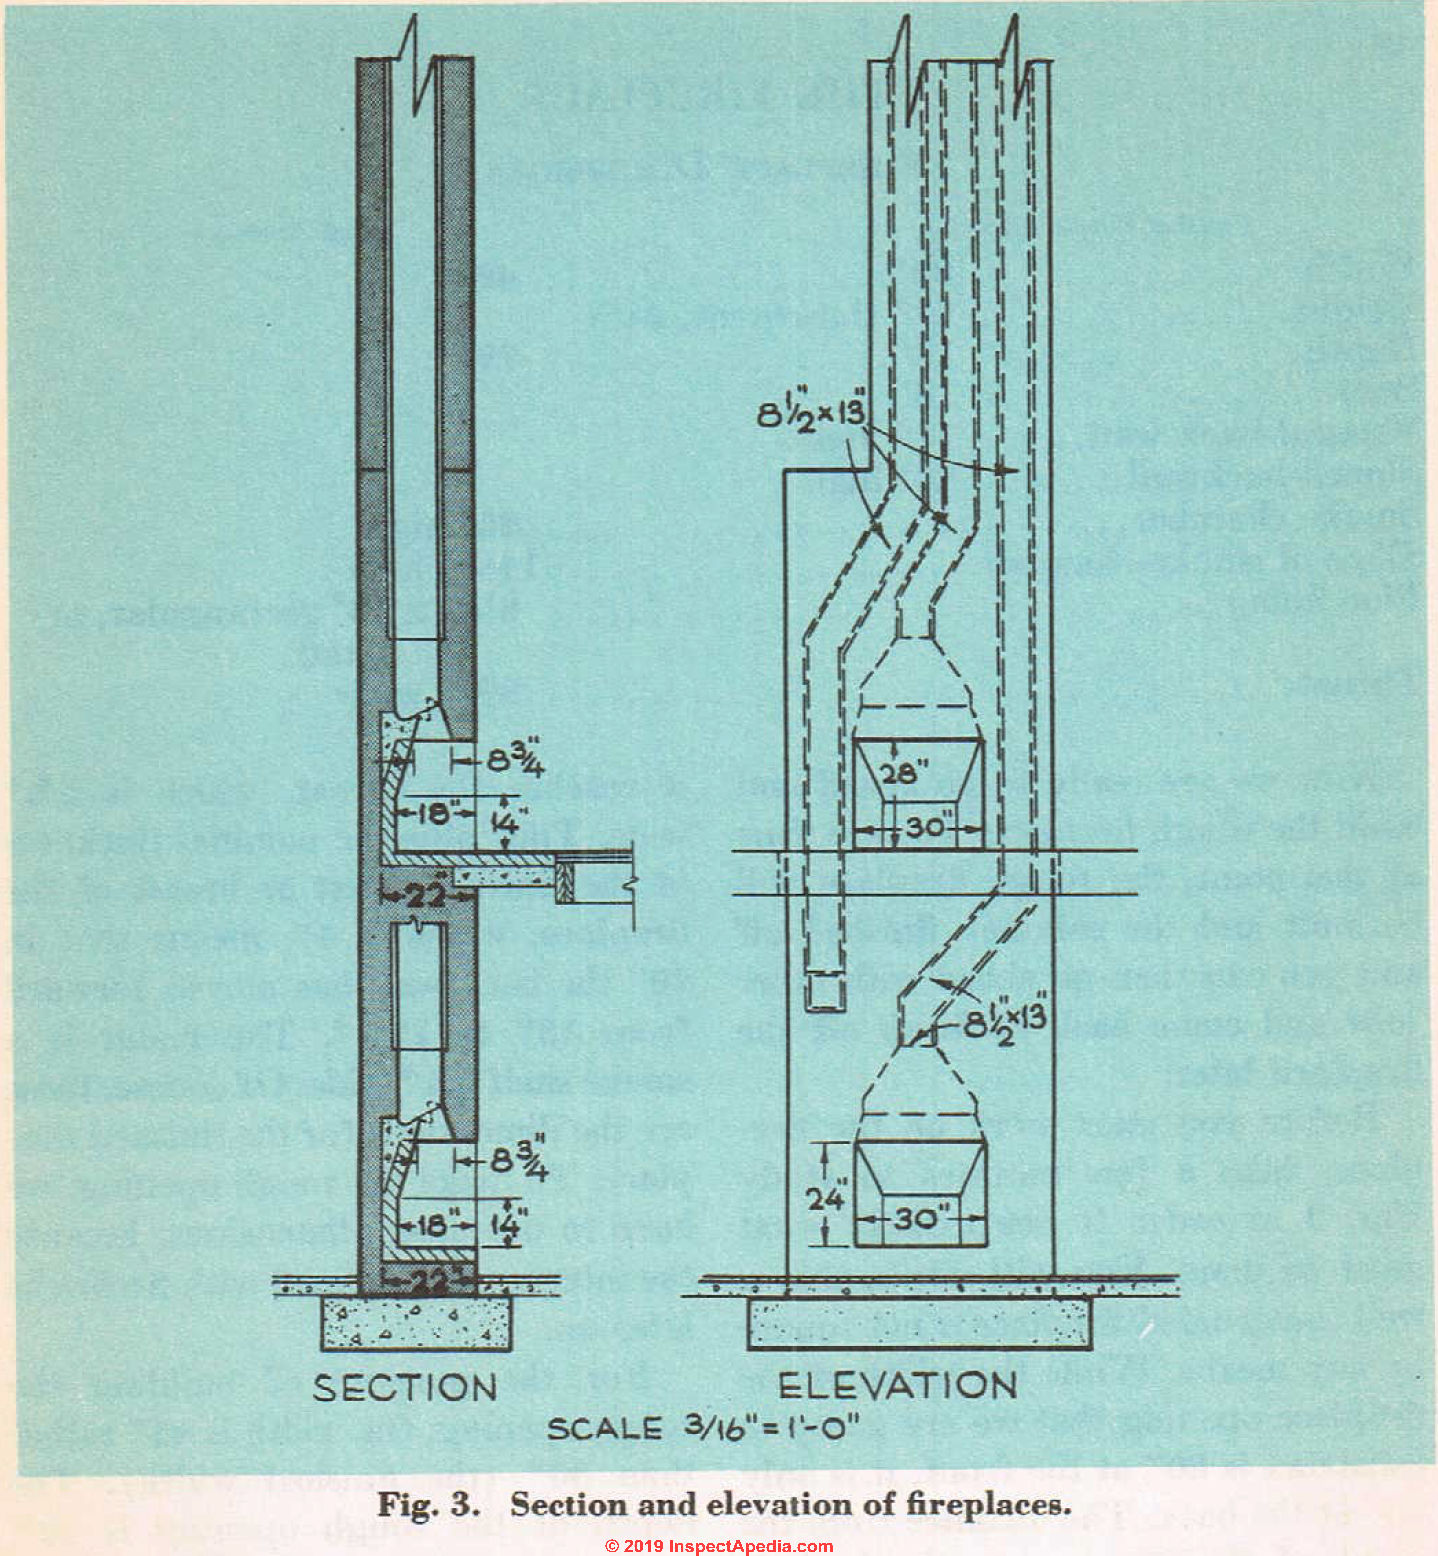
Fig. 3. Section and elevation of fireplaces.
The Smoke Chamber
at 34", the two side walls start to come together gradually, so that a smoke chamber will be formed. The height of this smoke chamber is 25" and the top should be the dimension of the chimney flue.
Fig. 4. Wood forms can be used to get the proper slope to the sidewalls to form the smoke chamber.
If you are using rectangular flue-tile, use one 8/4"x 13". If you use a round tile, the inside diameter should be 10". The best way to form the smoke chamber is to make a simple wood form as shown in Fig. 4.
The top opening of the form is equal to the size of the flue-tile that you are going to use. Set this form in place over the two side walls and then build up the side walls and the back. When you reach a height of 1414", put a piece of 3"x3%e" angle-iron 36" long between the two side walls, embedding it in the masonry.
The angle-iron supports the front of the chimney. Its distance away from the back wall of the fireplace should be the same distance as the width of the flue that you are using.
If rectangular flue-tile is used, this distance will be 8/4"; if round tile is used, it will be a little less than 10".
Now continue up until the total vertical height of the smoke chamber is 25". Level off the four walls so that the first section of flue-tile can be put in place.
Remove the forms that were used to get the proper pitch to the sidewalls and coat the masonry with a smooth covering of the cement mortar.
This, by the way, is the only spot in fireplace and chimney construction where mortar is preferred to brick or concrete chimney-blocks. Be sure that the two side walls have each the same amount of slope.
If one has more than the other, you will have difficulty in getting a good fire burning.
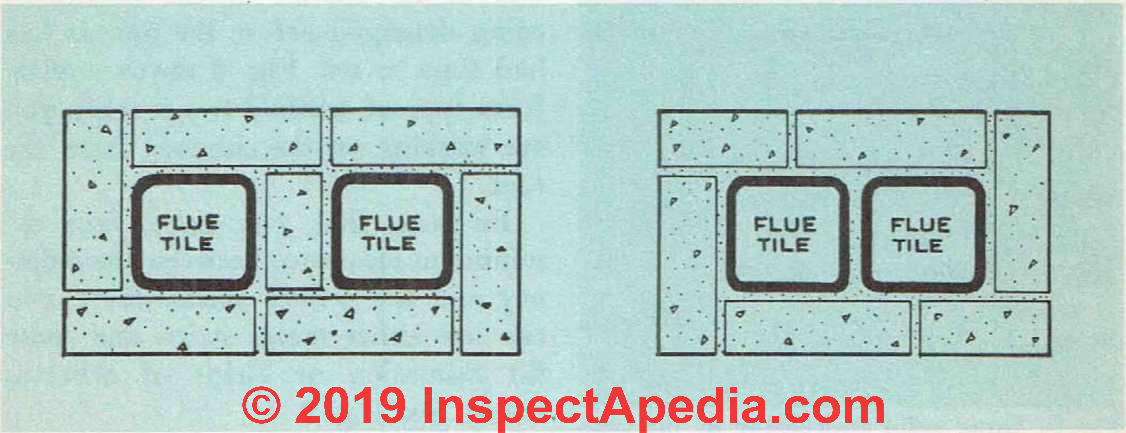
Fig. 5. Chimney made of masonry blocks flues. The same arrangements can be used with mortar and with block used between for a brick chimney.
Bringing the Furnace Flue Over
As the side walls come together to form the smoke chamber, it is also necessary to bring the furnace flue over, so that it can go up the same chimney as the fireplace flue. To achieve the necessarv off-set, it will be necessary to miter the ends of the flue-tile to get a smooth and perfect fit.
This can be done in the same manner as cutting a hole in the tile, using a bag of damp sand and a hammer and cold chisel. It is very important that the joints between tile be cut with accuracy. The tile must not be given an off-set of more than 30° from the vertical.
The furnace flue should be brought to within 4" of the fireplace flue, and this is the closest they should ever be. The joints between the furnace flue and chimnev flue should be staggered so that they are at least 7" apart. The space between the two flues may be filled either with mortar and brick or with mortar alone.
See Fig. 5.
Each of the four walls of the chimnev should be at least 4" thick.
THE CHIMNEY
From here on, it is just a matter of building the chimney up from the base that was made for it on the top of the fireplace. You will need a plumb line at all times to be sure that the chimney is going up perfectly straight and you will also want to be sure that all mortar joints and joints between sections of flue-tile are tight.
Take the time to rig a sand bag such as was described earlier in this section, because if you drop mortar down the furnace flue, there is a good chance of its collecting at the off-sets.
You are going to need some scaffolding as the work progresses, and it should be solid and should stand free and clear of the masonry, so that there will be no chance of the chimney’s being damaged before the mortar has had time to set. Fig. 6 shows a platform-type of scaffold to use when you are working on the chimney from the roof.
Be sure that you have your 2" minimum clearance between the chimney and the ceiling joists. Here you can use either metal strips and loose fill insulation or strips of asbestos board. See Fig. 7.
About 2' below the point where the chimney passes through the opening that was framed in the roof, increase the wall thickness of the chimney from 4" to 8". This is done by off-setting four courses of bricks so that each course extends about 2" bevond the wall surface. This is called corbeling. See Fig. 8. Although thickening the wall is not always essential, an 8" wall is better for exposure to the weather and will enable you to do a better flashing job than with a 4" wall. See Fig. 5.
The chimney should extend at least 2' above the highest point of the roof. At the point where the chimney passes through the roof, there must be a 2" clearance. See Fig. 9.
The joint between the chimney and the roof must be flashed with metal to make it watertight. See Fig. 10. A metal cricket in back of the chimney is also necessary, so that water running down the roof will not collect at this point. Fig. 11 shows the method of constructing a cricket with a wood base that is covered with copper.
Figs. 12 and 13 show detail of metal cricket. At this time, only the cap flashing is installed. The base flashing will be added wThen the roofing is installed. The cap flashing should be bent at a right angle so that it can be fastened right into the mortar joints. It should extend in about 1 1/2".
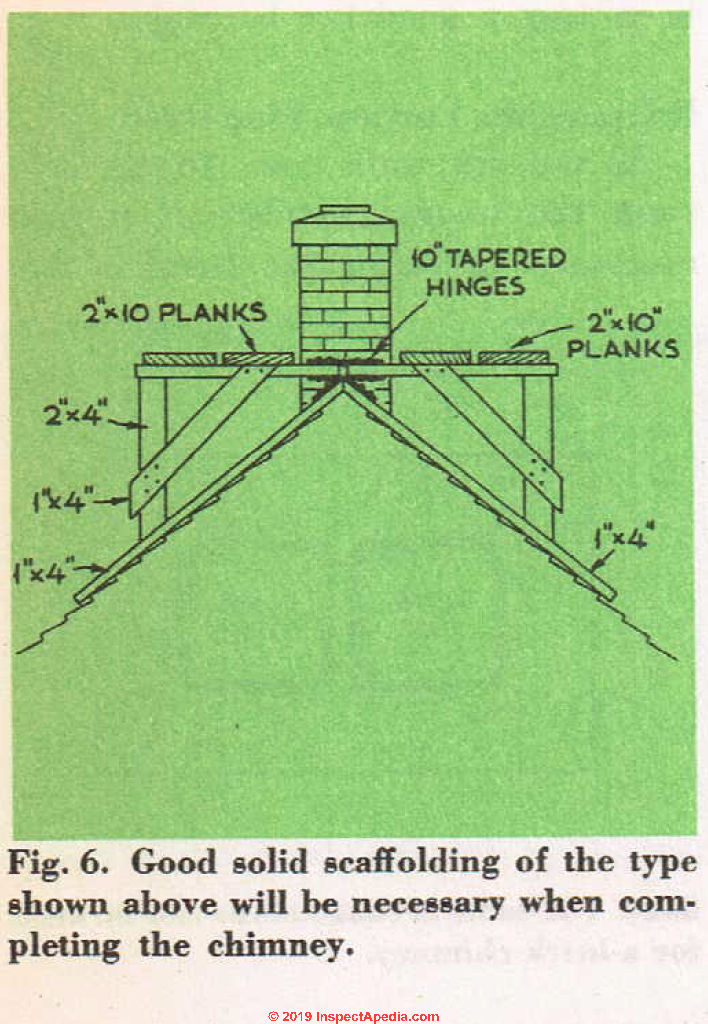
Figure 6: Scaffolding Used to Construct the Chimney at the Rooftop
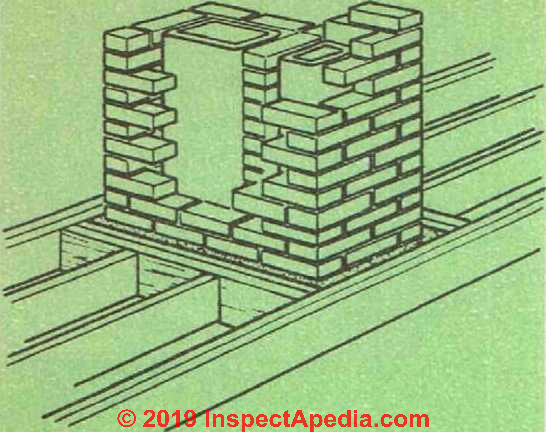
Fig. 7. Method of framing around opening in the floor or ceiling for the chimney. Double headers and double trimmers should be used. There should be a clearance of at least 2" between the framework and the masonry. This space is filled with insulation.
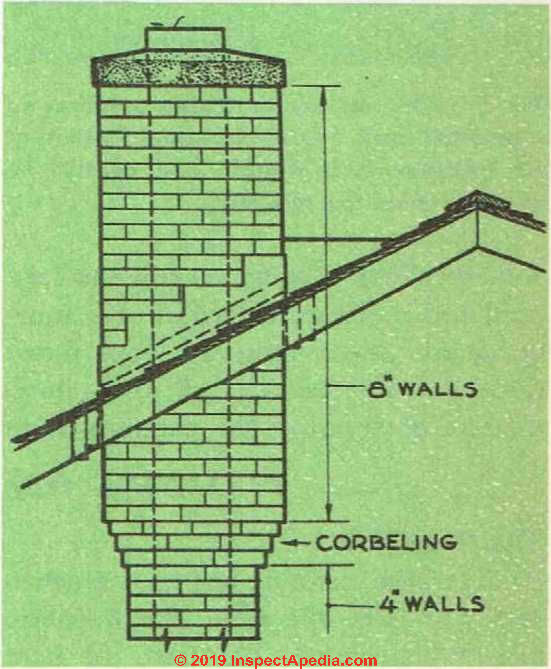
Fig. 8. Method of increasing the thickness of a chimney before it passes through the roof.
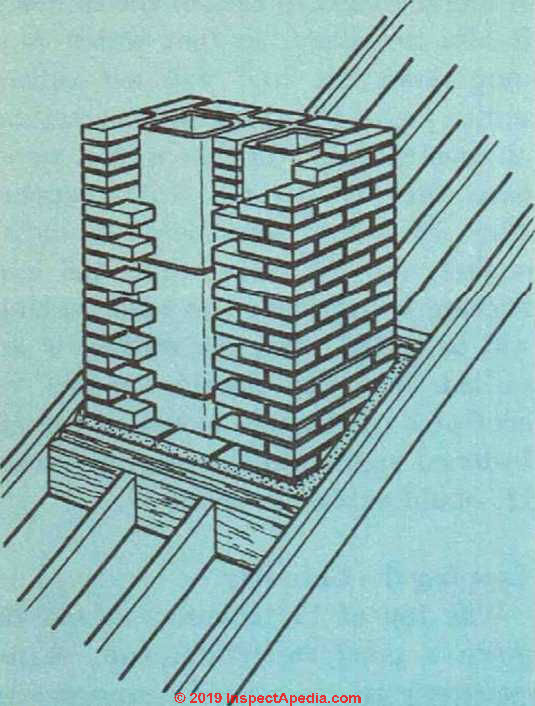
Fig. 9. Correct way to frame opening in a pitched roof for a chimney. Note that all framework is double and should be 2" away from the masonry.
Capping the Chimney
The top of the chimney should be given a good watertight cap; many chimneys leak because no cap has been used and moisture collects in the mortar joints and eventually seeps down through the masonry. A very good method of capping the chimney is to allow the tile to extend about 4" beyond the last course of bricks or blocks.
A wood form is then built around the top of the chimney brickwork, and a 3" cap of concrete is poured over the bricks. The surface of the cap should be given a slight downward slope so that water will drain off easily.
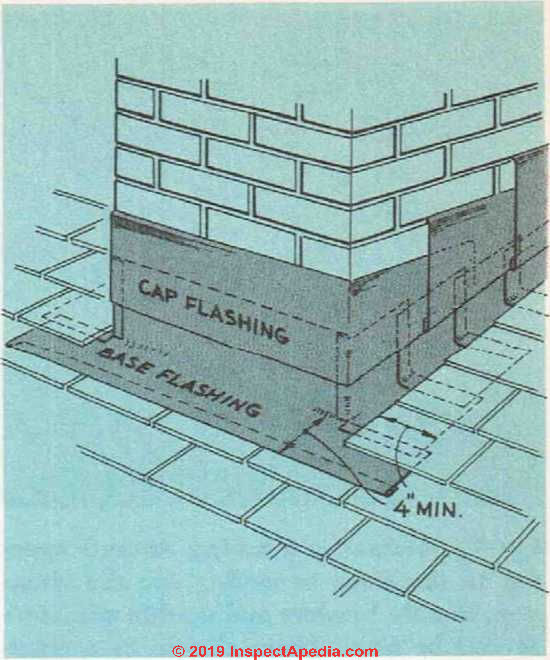
Fig. 10. Chimney base and cap flashing. The cap flashing extends into the mortar joints of the chimney. All flashing is overlapped 4" and the joint between the metal is made tight with roofing compound.
Finishing Off the Fireplace
Here we discuss construction of the fireplace hearth, combustion chamber, and a cricket at the chimney at the rooftop.
The Hearth
When the chimney has been finished and you have the time, the fireplace can be completed. The first job here is to pour the hearth. The finished hearth should be more or less level with the finished floor, so that it will be easy to sweep. The hearth should project at least 16" beyond the breast of the chimney and should be as long as the fireplace is wide plus 16". These, of course, are minimum requirements. The hearth must be made out of some type of fire-resistant material, such as brick or concrete, and it should be 4" thick.
The hearth must not be attached to the wood framework around the fireplace opening nor should it depend on any of the house framework for support. It must, in short, be supported entirely by the fireplace base.
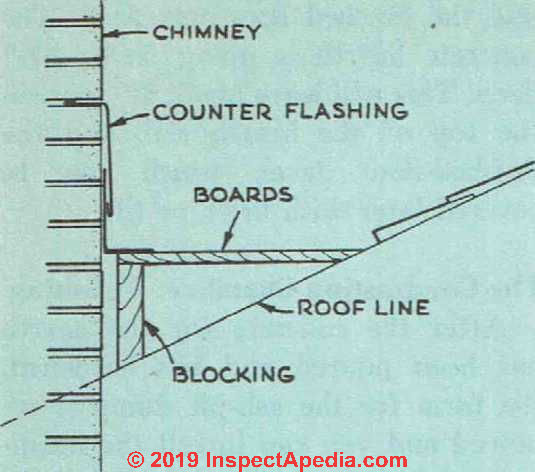
Fig. 11. Construction detail for the wood frame of a chimney cricket.
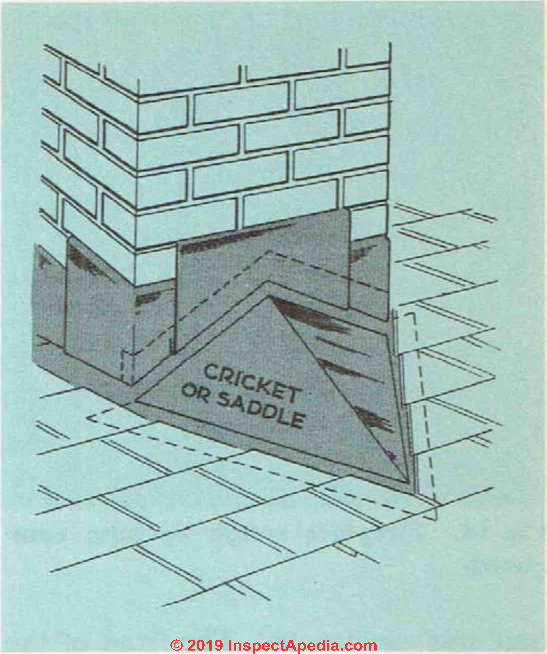
Fig. 12. How a metal cricket is installed in back of the chimney.

Fig. 13. Metal chimney cricket. The purpose of this device is to prevent snow and ice from collecting in hack of the chimney and causing the roof to leak at this point.
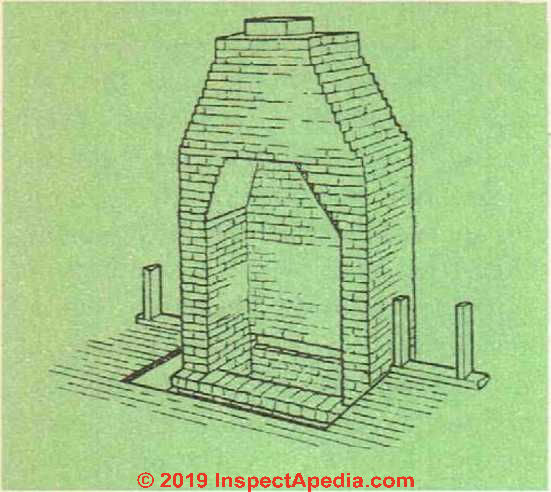
Fig. 14. Fireplace rough opening completed.
There are two methods employed in building a hearth so that it will meet all the necessary requirements.
One method, which has been in use for many years, is to build a supporting masonry arch under the hearth. This is a perfectly satisfactory arrangement except that building the arch is rather difficult and requires a good deal of time.
The other method of construction is to use a cantilevered concrete slab. This type of hearth is made out of reinforced concrete 3 1/2" thick. It is anchored to the rear wall of the fire place base by means of the recesses or notches that were made when the base was constructed.
The Combustion Chamber: Finishing
After the concrete for the hearth has been poured and has hardened, the form for the ash-pit dump is removed and you can install the finish-ing brick around the outside of the fireplace and the firebrick around the inside.
But before )rou get started, purchase the damper and the ash dump. The damper should be for a fireplace with a width of 30". Read the manufacturer’s instructions for installation carefully, because they may require slight modifications to the directions given here.
The combustion chamber of the fireplace is lined with firebrick rather than common or face-brick. See Fig. 14. It is the only material except metal that can withstand the high temperatures in this portion of the fireplace. Sometimes the firebricks are placed on edge to form a veneer 2" thick.
This is not the best type of construction to use because, unless special care is taken to install metal ties, the firebricks will eventually fall out of place. It is much better to set the bricks flat with the long side exposed.
This produces a good, thick, solid wall of firebrick that should last the lifetime of the fireplace. The firebricks should not be set up with ordinary cement mortar; they must be set in fire clay. See Figs. 3 and 15.
The firebrick and the face-brick can be installed at the same time. To be sure that you get the dimensions of the fireplace correct, draw a line across the hearth to show the proper angle that the side walls must follow'.
Now just to be on the safe side, let’s rim over the rough and finished dimensions of the fireplace opening. The present rough width at the opening is 42". This is to be decreased evenly on each side until it is 30". The rough depth is 22" and this must be reduced to 18".
Study Figs. 3 and 15, Avhich show the plan, elevation and section of the fireplace and w hich also give the necessary rough and finished dimensions. You will see from these pictures exactly how the back wall of the fireplace is brought forward to form the throat and the smoke shelf. Note that the fireplace damper is located 6" or so above the top of the fireplace opening rather than at the same height as the top.
Do not go ahead with the finishing off of the fireplace until you thoroughly understand these illustrations because while a slight error or so will not make too much difference, a serious one will spoil the chances of the fireplace’s ever operating properly.
Draw a rough, large-scale plan and have it handy while vou work.
Start out and lay the firebrick over the hearth, leaving the necessary size of opening for the ash dump. Now build up the side walls and the back walls. You will see that, as the side walls come towards each other, there is going to be an empty space between the firebrick and the rough opening. This space should be filled with mortar.
When the back wall of firebrick is 14" above the finished hearth, it should come forward. The inclined portion of the brick wall is going to extend upward for 20 vertical inches and thus it will form a throat opening of the correct size as well as forming the smoke shelf.
Since the throat must be 8 3/4" w'ide and the finished depth of the fireplace is 18", the width of the smoke shelf will be 9 1/4". It will save you a lot of time and w^ork at this point if you build a rough wooden form or guide to use in laying up the back-wall firebricks.
See Fig. 16.
Mortar and rubble can be used in back of the firebricks to form the smoke shelf, wiiich must be leveled off smoothly.
When the finished side walls are 28" high, a steel angle-iron 42" long is set across to support the top opening of the fireplace. The ends of this angle-iron also are embedded in mortar.
The top of the fireplace opening is 6" belowthe top of the smoke shelf. The damper can now be installed and this is fastened into the mortar joints of the breast wall of the fireplace. If the damper has a rotary control— that is, of the type that can be operated from the front of the fireplace— it must be installed at this time so that the finishing bricks on the front of chamber (this should be 14W' high); the fireplace can be put in around it. then install the finishing brick or tile Now finish the front of the smoke for the hearth.
The front of the hearth extends out beyond the front wall of the chimney base but due to the method of construction, it will not require any support other than the fireplace base. Forms for making this type of hearth are available from dealers in fireplace equipment. The form consists of sheets of steel that are overlapped to form a base on which the concrete can be poured.
The front edge of these sheets can be temporarily supported by nailing a strip of wood along one of the floor joists. Reinforcing rods are set over these sheets of steel and the end of each rod is bent so that it fits down into the notch at the back of the fireplace base. The rods are wired together with lighter-weight cross-rods.
The opening for the ash-pit dump in the hearth can be made by installing a wood form of the same size as the outside dimensions of the dump. The distance left be tween the top of the fireplace base and the finished floor was 5 1/2". The concrete hearth is going to be 3 1/2" deep. This will leave about 2" between the top of the hearth slab and the finished-floor level, which can be covered later with brick or tile.
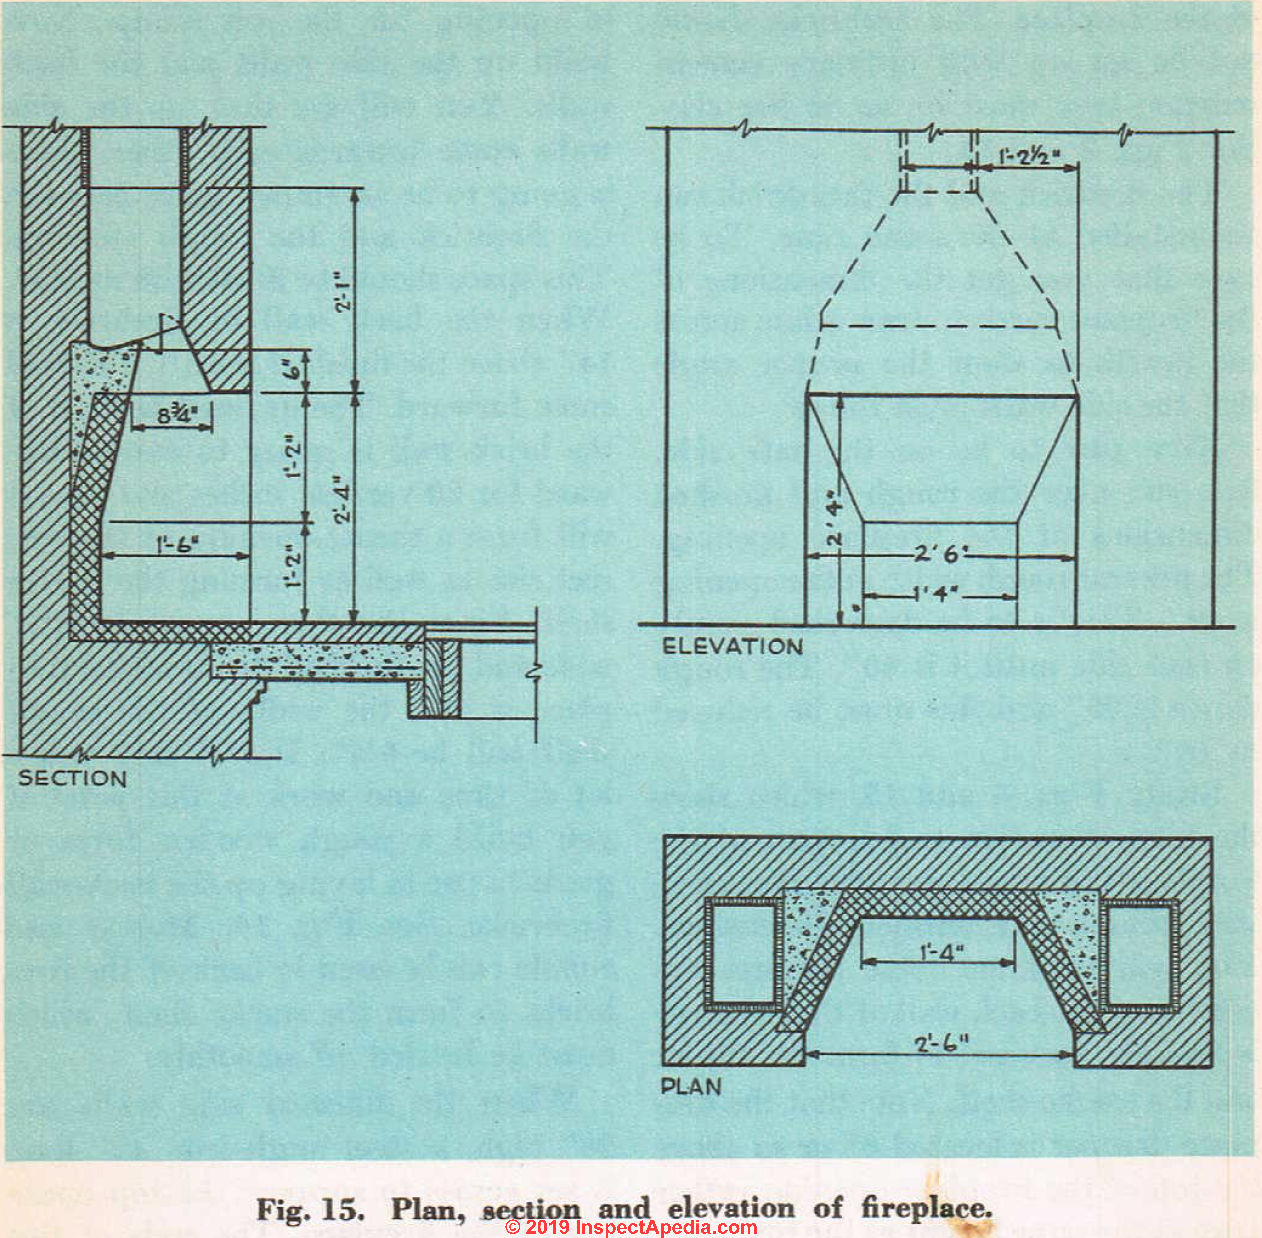
Fig. 15. Plan, section and elevation of fireplace.
Chimney & Fireplace Construction for Other Types of Homes
Second Fireplace in Basement
If you wish to have a fireplace in tne basement as well as one in the living room, you can build it in without much added expense for materials. The basement fireplace will serve as a base for the fireplace in the living room.
The dimensions for the basement fireplace and construction of the rough opening are the same as for the living room fireplace except that the height of the finished opening is 24" instead of 28" and that the outside walls of the basement fireplace are made square, so that when the construction reaches the first floor, there will be a base of sufficient size on which to build the upper fireplace.
The flue of the basement fireplace must be off-set so that it can run up through one side of the living-room fireplace and will clear the hearth. This off-set will have to start with the first piece of flue-tile, because no section of tile should be off-set more than 30 degrees.
If the furnace is to be located in the basement, a separate flue for it will have to be installed in one side of the basement-fireplace rough opening. It should be installed in the side opposite to the side that contains the off-set fireplace flue.
When the work has arrived at a point just under the level of the first floor, you should have a rectangular base-measuring 2' 1" x 5' 2", with the flue from the lower fireplace running up through one side, and the flue for the furnace running up through the other.
The living-room fireplace is now built up on this base, and the basement-fireplace flue and furnace flue continue up straight until the work has reached the point above the hearth of the living-room fireplace where the furnace and first-floor fireplace flues are off-set to bring them together with the basement fireplace flue.
The three flues then continue straight up in a common chimney.
You do not, by any means, have to complete the basement fireplace before the one in the living room. In fact, the best policy in most cases would be to leave the basement fireplace in the rough-opening stage until the living-room fireplace and chimney have been completed and construction work around the house has been finished.
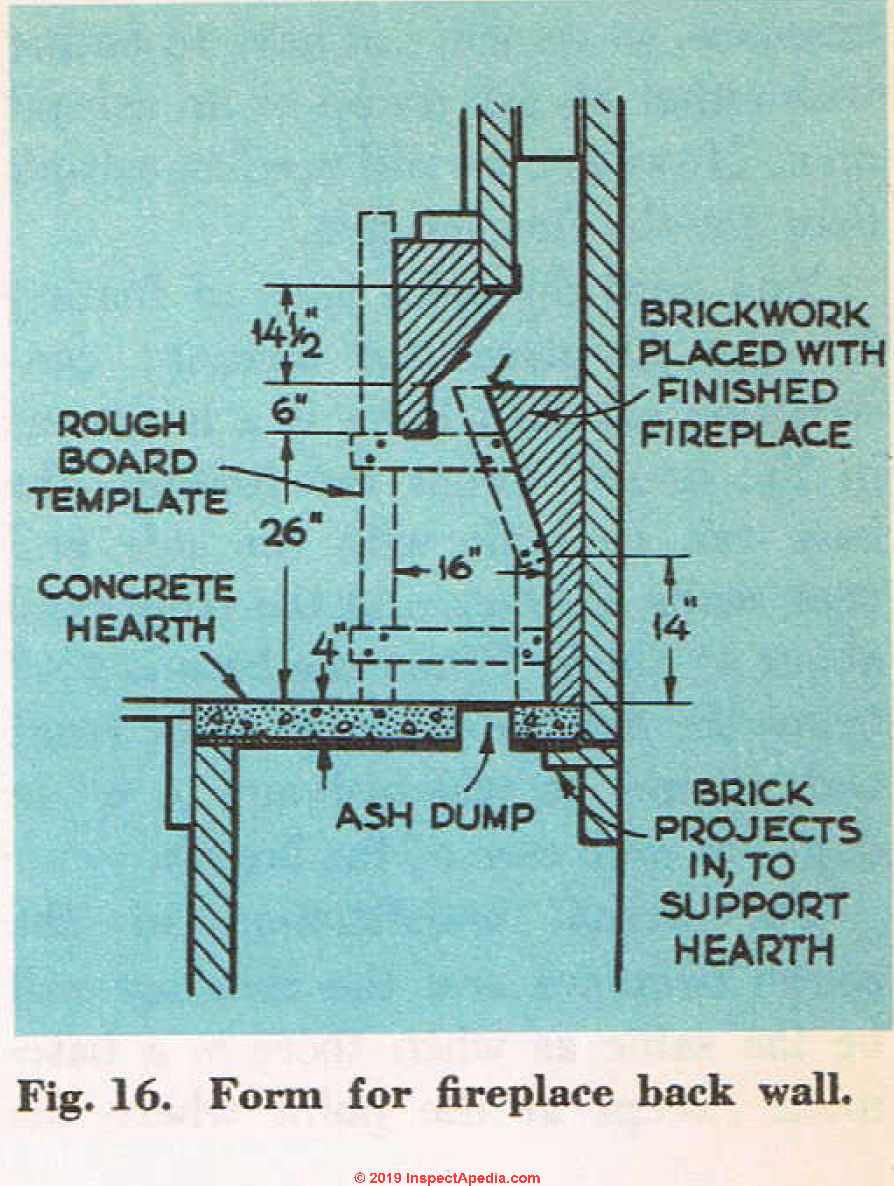
Fig. 16. Form for fireplace back wall.
If a house has no basement, but is set off the ground on concrete foundations, the method of building both the fireplace and the chimney is going to be slightly different.
In the first place, the furnace is going to have to be located in the utility room, and this will mean that instead of starting the furnace flue in the fireplace base, you will not start it until the fireplace is well underway.
Second, there will be no place to install an ash pit for thefireplace, so we will not have to bother with either an ash dump or an ash-pit door. However, we will need an ash-pit door for the furnace flue.
You need the same type of footing for this fireplace and chimney construction as when there is a basement in the house. From the footing, the base can be built with the side and back walls 8" thick and the front wall about 4" thick. When the base is 7%" below the finished-floor level, the front wall should be widened out to 6" in depth to take care of the hearth.
The actual construction of the rough fireplace and the chimney will be the same as when there is a basement except at the point where the furnace flue is brought in. The opening in the fire-clay flue must, of course, face into the utility room. The height at which the flue should start will depend on the type of heating equipment used. The main consideration is to allow enough width in the side wall so that vou will be able to have 4" of masonrv around this flue on all sides. There should be a soot pocket of flue-tile 8" below the opening in the tile, and you will want to have a furnace-flue clean-out door installed right under the pocket.
After the furnace flue-tile has been installed, the rest of the job can be done in exactly the same manner as previously described.
Fireplaces on Concrete Slab Floors
Fireplace and chimney construction in a concrete-slab-floor home is relatively simple compared to doing the same work when there is a basement to contend with.
First, a special footing is poured for the chimney and fireplace that is completely independent of the concrete floor of the house. Sufficient room is also left for the hearth, wdiich does not require the same heavy construction as the footings for the fireplace but should also not be a portion of the concrete floor.
The construction of the rough fireplace can begin right on the footing after you have leveled it off sufficiently so that the fireplace hearth will be about the same level as the finished floor of the house. From here on, the work goes in the same manner as when there is no basement, but a base is required.
The heating equipment must be located in the utility room, so you do not have to worry about the furnace flue until you have most of the rough fireplace put in. When the rough fireplace opening and the chimney have been completed, you can go back and pour the hearth right over a gravel or cinder bed.
The work of laying up the fire-clay around the combustion chamber and applying the finished brickwork is the same for this type of house as for the others.
Building a Chimney for the Heating System,
If you do not wish to build a fireplace, the only requirement will be a chimney from the basement or slab for the furnace.
The minimum wall thickness of a chimney is 4", but the over-all dimension of the chimney will depend on the size of flue-tile used. An 8 1/2" x 13" flue should be sufficient for most systems.
The footing for the chimney should be at least 12 " deep and should extend 6 " beyond the chimney on all sides. If you are building without a basement and the house is on masonry piers, it is important to have the footing extend well below the frost line.
The same care with regards to keeping the masonry away from the house woodwork applies to a chimney as to a fireplace and chimney. Keep the masonry at least 2 " away from all the house framework.
The chimney should have a cleanout door located below the entrance of the thimble. Flue-tile should extend at least 8 " below the thimble, and the door should be located directly under the last section of flue tile.
Testing the Chimney for Leaks
How to Smoke-Test a Chimney
Before the chimney is put into operation, it should be tested to be sure that it does not leak at any point. This test should be made for each flue. Build a small fire of wood and tar paper at the base of the flue or in the fireplace.
When the smoke begins to pour heavily from the top of the chimney, cover the top with a heavy wet blanket. Now inspect the entire chimney carefully to see if you can find any smoke escaping through the masonry. If you do find any leaks, the cause must be corrected before the chimney is safe.
Materials List for a Heating System Chimney
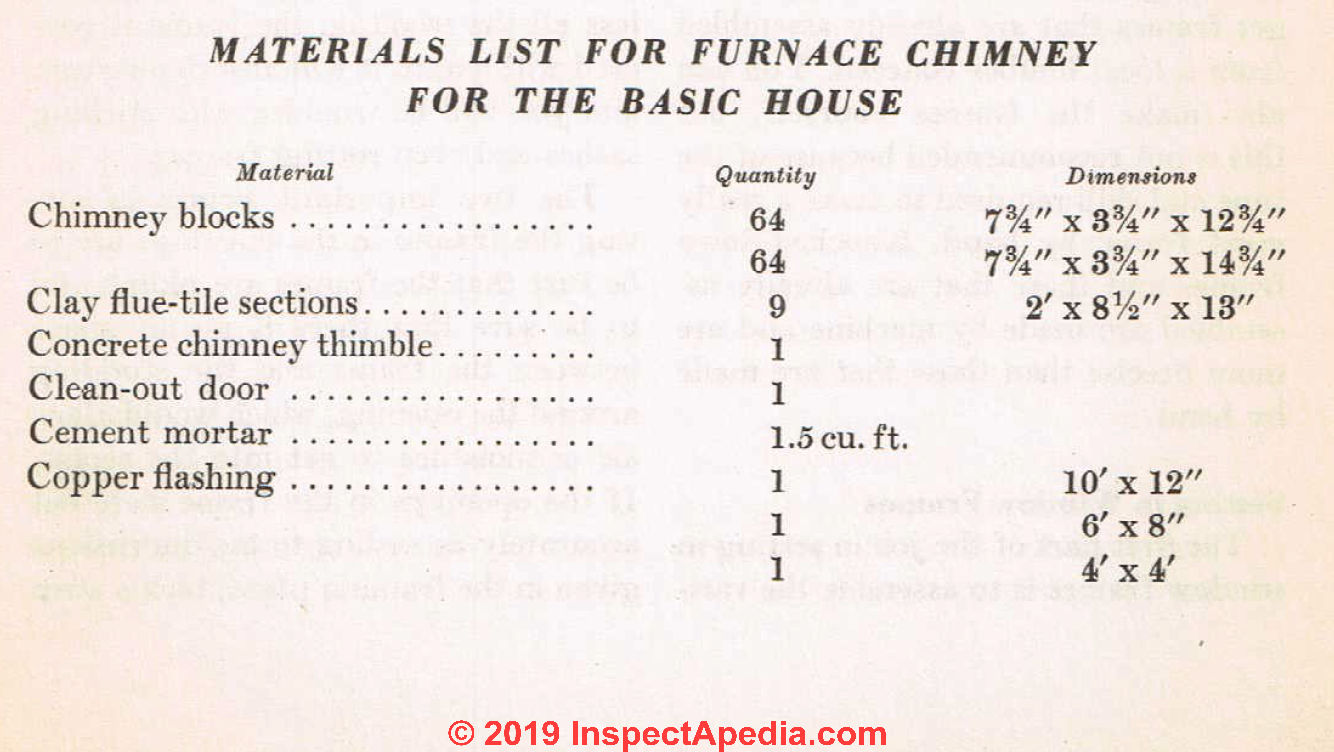
Table: Materials List for Building a Masonry Chimney
[Click to enlarge the table above]
...
Continue reading at WINDOW & DOOR FRAMES, INSIDE PARTITIONS, FLASHING INSTALLATION - next chapter in this book, or go to book contents at BUILD YOUR DREAM HOME, or select a topic from the closely-related articles below, or see the complete ARTICLE INDEX.
Or see these
Recommended Articles
- BUILD YOUR DREAM HOME
- CHIMNEY CODES & STANDARDS
- CHIMNEY CHASE CONSTRUCTION
- CHIMNEY CLEARANCE & CONDITION SAFETY
- CHIMNEY DRAFT & PERFORMANCE
- CHIMNEY FLUE SIZE SPECIFICATIONS
- CHIMNEY HEIGHT & CLEARANCE CODE
- CHIMNEY RAIN CAP / RAIN COVER INSPECTION
- CONSTRUCTION DICTIONARY
- GLOSSARY of BUILDING TERMS
Suggested citation for this web page
CHIMNEY & FIREPLACE CONSTRUCTION at InspectApedia.com - online encyclopedia of building & environmental inspection, testing, diagnosis, repair, & problem prevention advice.
Or see this
INDEX to RELATED ARTICLES: ARTICLE INDEX to BUILDING ARCHITECTURE
Or use the SEARCH BOX found below to Ask a Question or Search InspectApedia
Or see
INDEX to RELATED ARTICLES: ARTICLE INDEX to CHIMNEYS & FLUES
Or use the SEARCH BOX found below to Ask a Question or Search InspectApedia
Ask a Question or Search InspectApedia
Share this article:Questions & answers or comments about how to identify the architectural style of buildings and building components
Try the search box just below, or if you prefer, post a question or comment in the Comments box below and we will respond promptly.
Search the InspectApedia website
Note: appearance of your Comment below may be delayed: if your comment contains an image, photograph, web link, or text that looks to the software as if it might be a web link, your posting will appear after it has been approved by a moderator. Apologies for the delay.
Only one image can be added per comment but you can post as many comments, and therefore images, as you like.
You will not receive a notification when a response to your question has been posted.
Please bookmark this page to make it easy for you to check back for our response.
IF above you see "Comment Form is loading comments..." then COMMENT BOX - countable.ca / bawkbox.com IS NOT WORKING.
In any case you are welcome to send an email directly to us at InspectApedia.com at editor@inspectApedia.com
We'll reply to you directly. Please help us help you by noting, in your email, the URL of the InspectApedia page where you wanted to comment.
Citations & References
In addition to any citations in the article above, a full list is available on request.
- In addition to citations & references found in this article, see the research citations given at the end of the related articles found at our suggested
CONTINUE READING or RECOMMENDED ARTICLES.
- Carson, Dunlop & Associates Ltd., 120 Carlton Street Suite 407, Toronto ON M5A 4K2. Tel: (416) 964-9415 1-800-268-7070 Email: info@carsondunlop.com. Alan Carson is a past president of ASHI, the American Society of Home Inspectors.
Thanks to Alan Carson and Bob Dunlop, for permission for InspectAPedia to use text excerpts from The HOME REFERENCE BOOK - the Encyclopedia of Homes and to use illustrations from The ILLUSTRATED HOME .
Carson Dunlop Associates provides extensive home inspection education and report writing material. In gratitude we provide links to tsome Carson Dunlop Associates products and services.
 |
HOME | ABOUT | ASK a QUESTION | CONTACT | CONTENT USE POLICY | DESCRIPTION | POLICIES | PRIVACY | |
| © 2026 - 1985 Publisher InspectApedia.com - Daniel Friedman | |||||||||